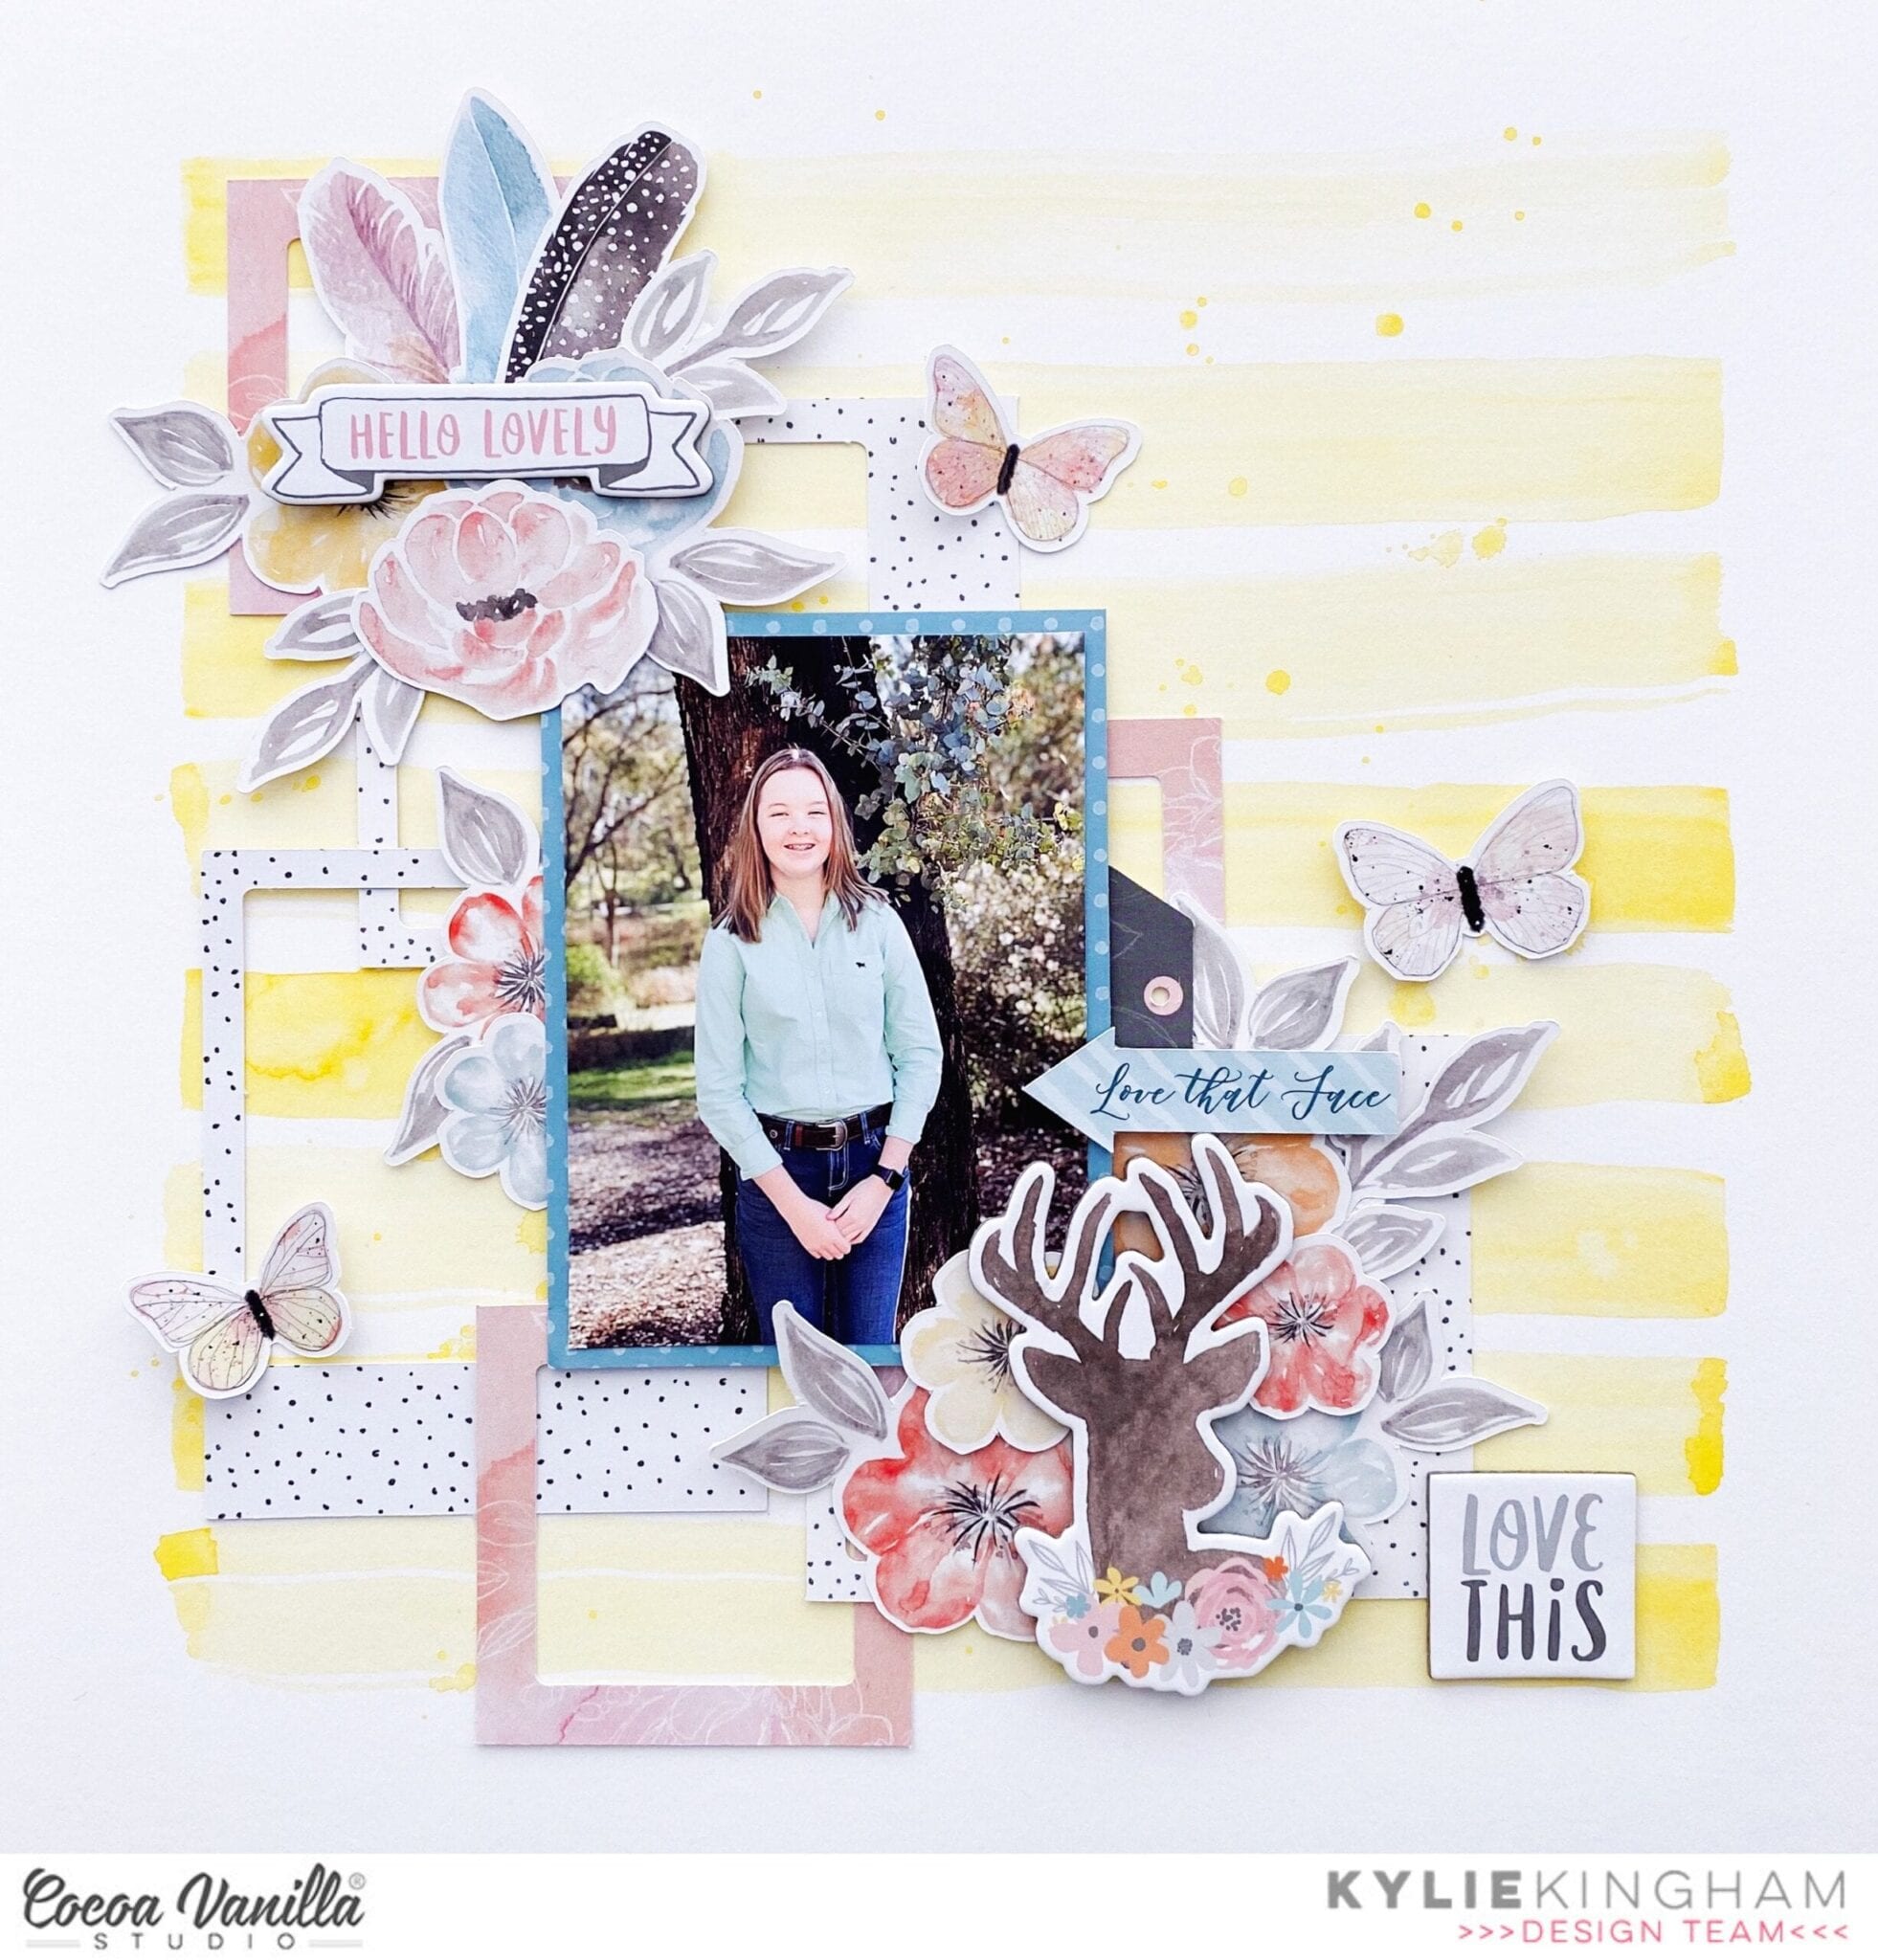
Hey there friends! It’s Kylie back with you today for ‘Throwback Thursday’, where I have created a layout featuring a past collection. It was and still is…. one of my favourite collections of all time- ‘More Than Words’. Just when I was thinking my stash was pretty well done, I was able to create yet another layout design!
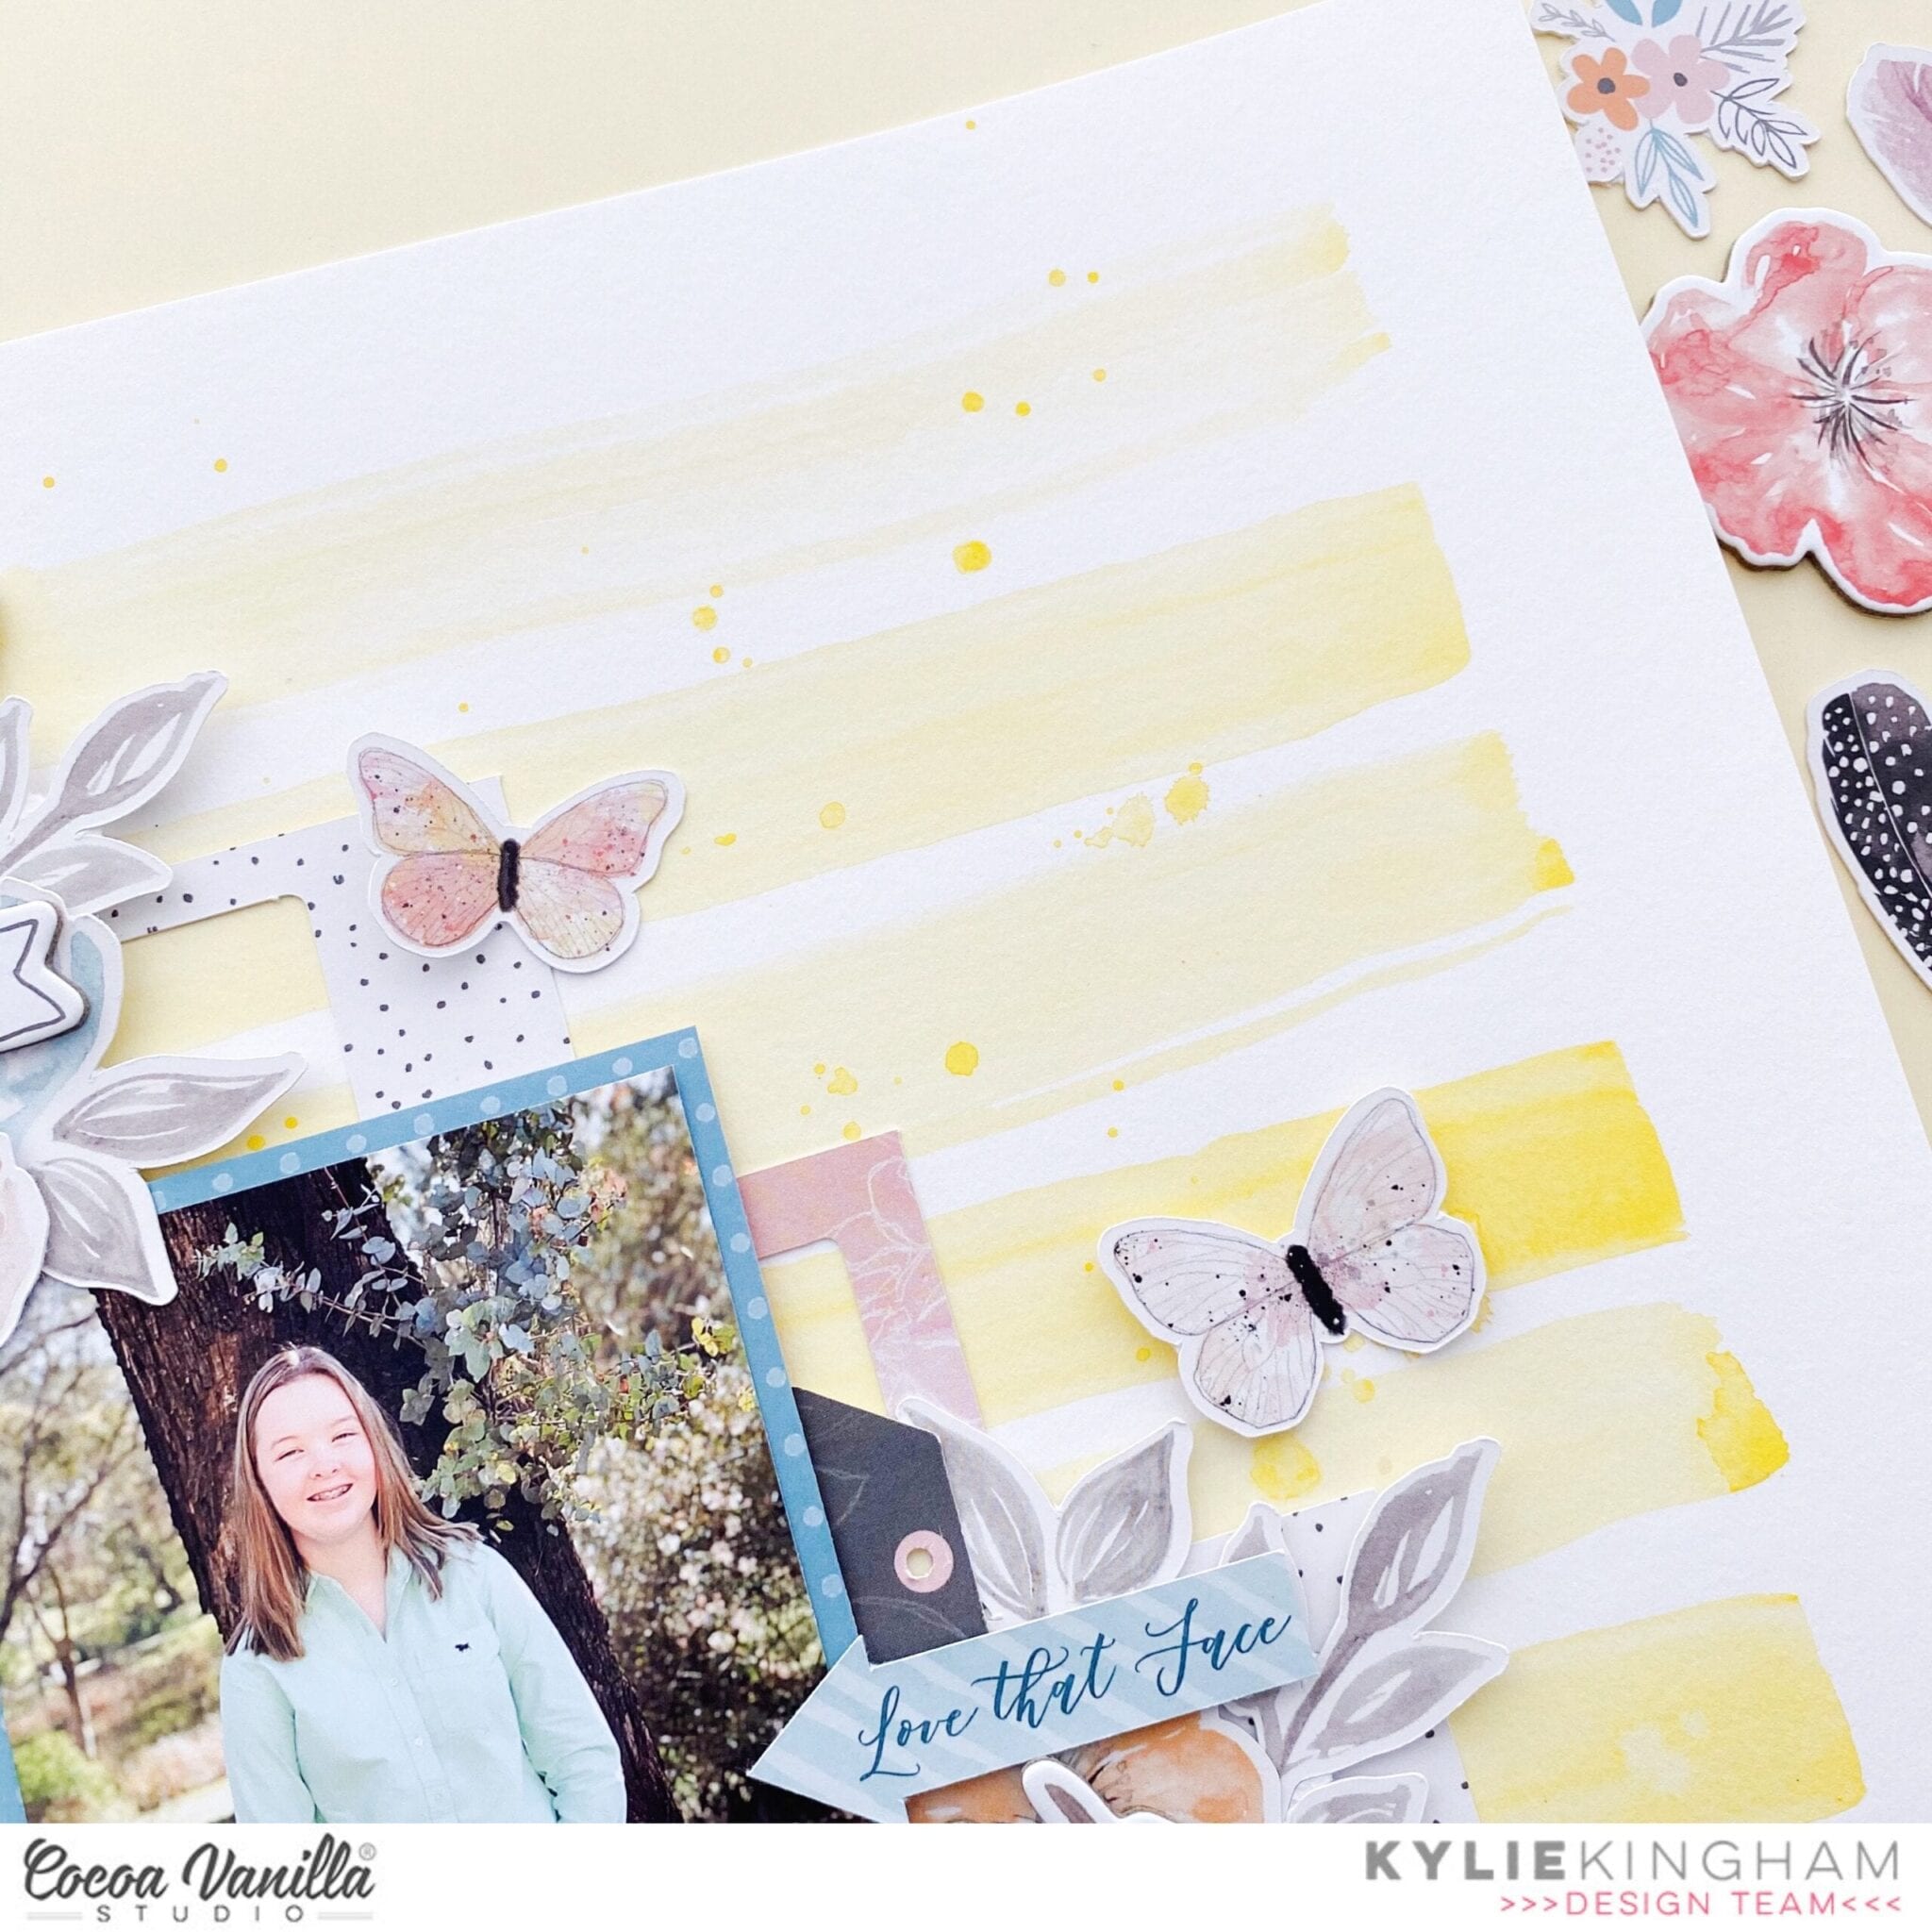
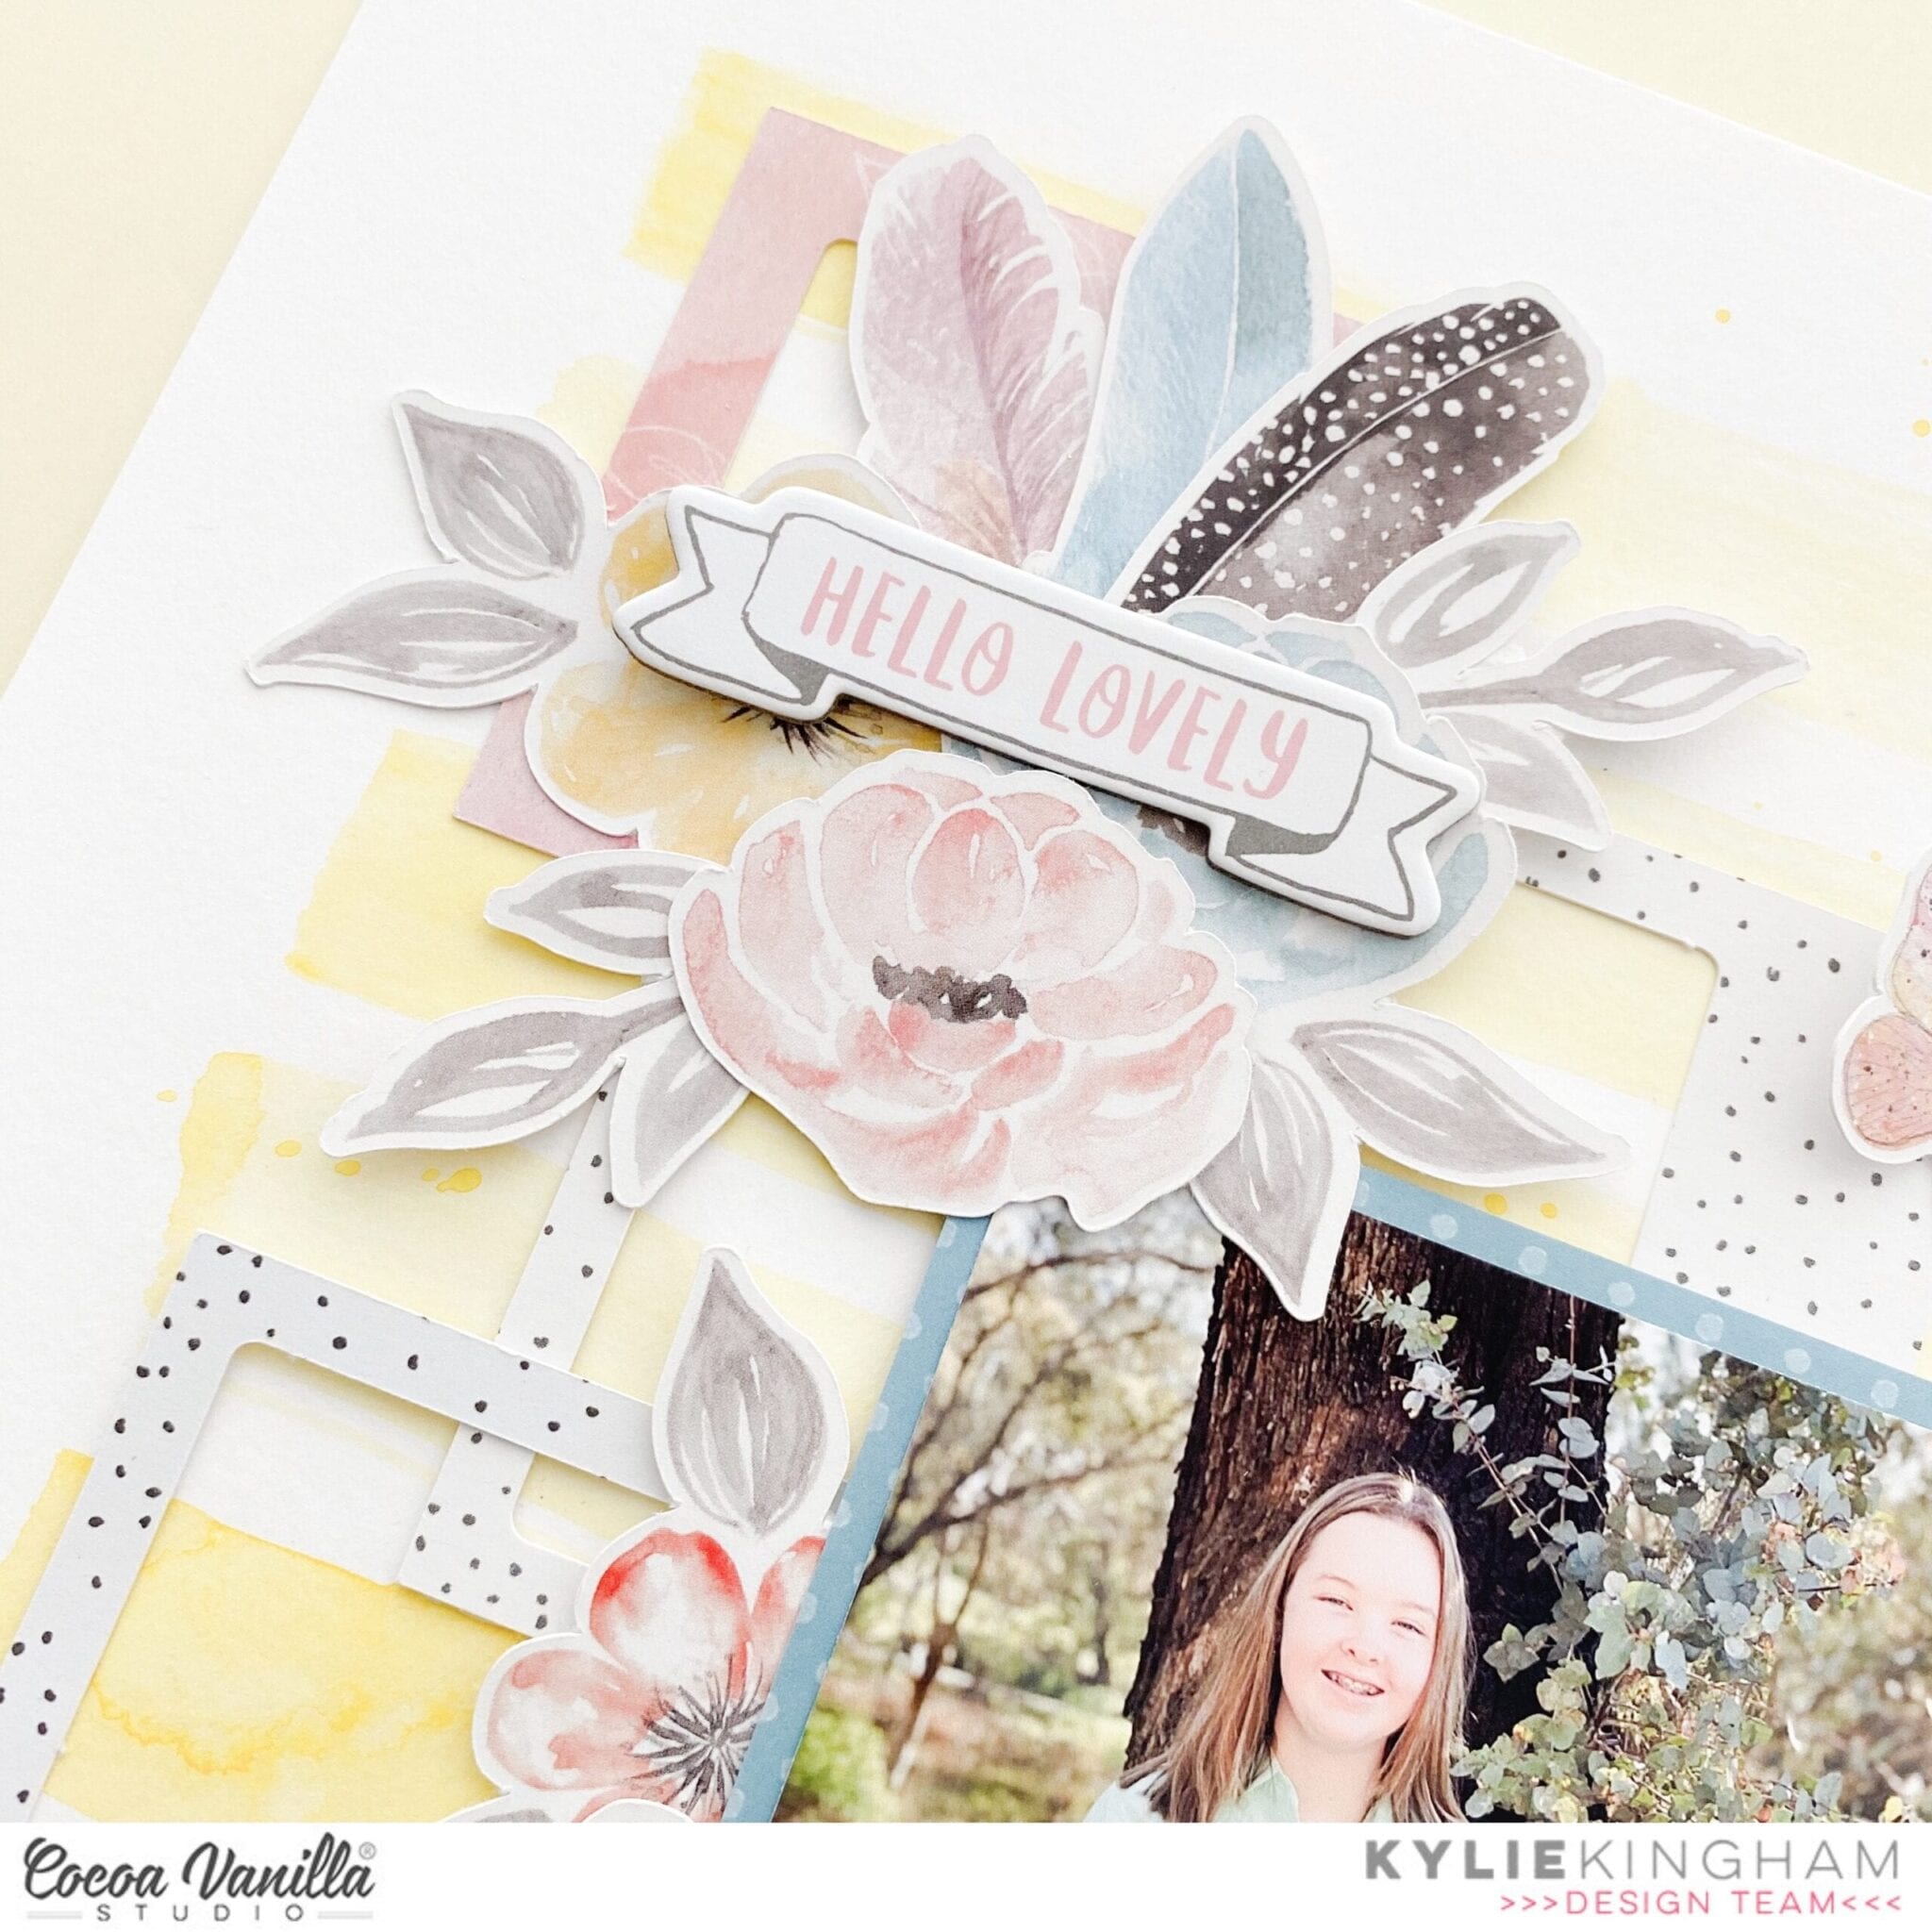
I selected a white piece of card stock for my background and added some simple watercolour stripes and splashes in yellow. Going through my pile of embellishments, I had noticed that I had quite a few of the ‘frame’ die cuts. Once my paint had dried I began layering the frames over and under each other for a fun background detail.
My photo was trimmed down to approximately 3″x 4″ and backed with some of the ‘COLLAGE’ paper before being adhered to the centre of my page with foam tape. Working on diagonals, I began layering elements from the chipboard stickers and die cut pack. Some were added with foam adhesive to give my page more dimension. I had been hoarding the gorgeous Deer chipboard sticker for so long because I love it so much. Now it is finally on a layout!
Sometimes when I complete a layout I am often left feeling it needs a little ‘extra’ something. That is how I felt with this design, so I added several Butterfly die cuts on various angles across my page to bring balance to my completed works.
Thanks so much for stopping by today. I hope my layout encourages you a little to dig into your own stash of supplies to have fun creating something special! Until next time,
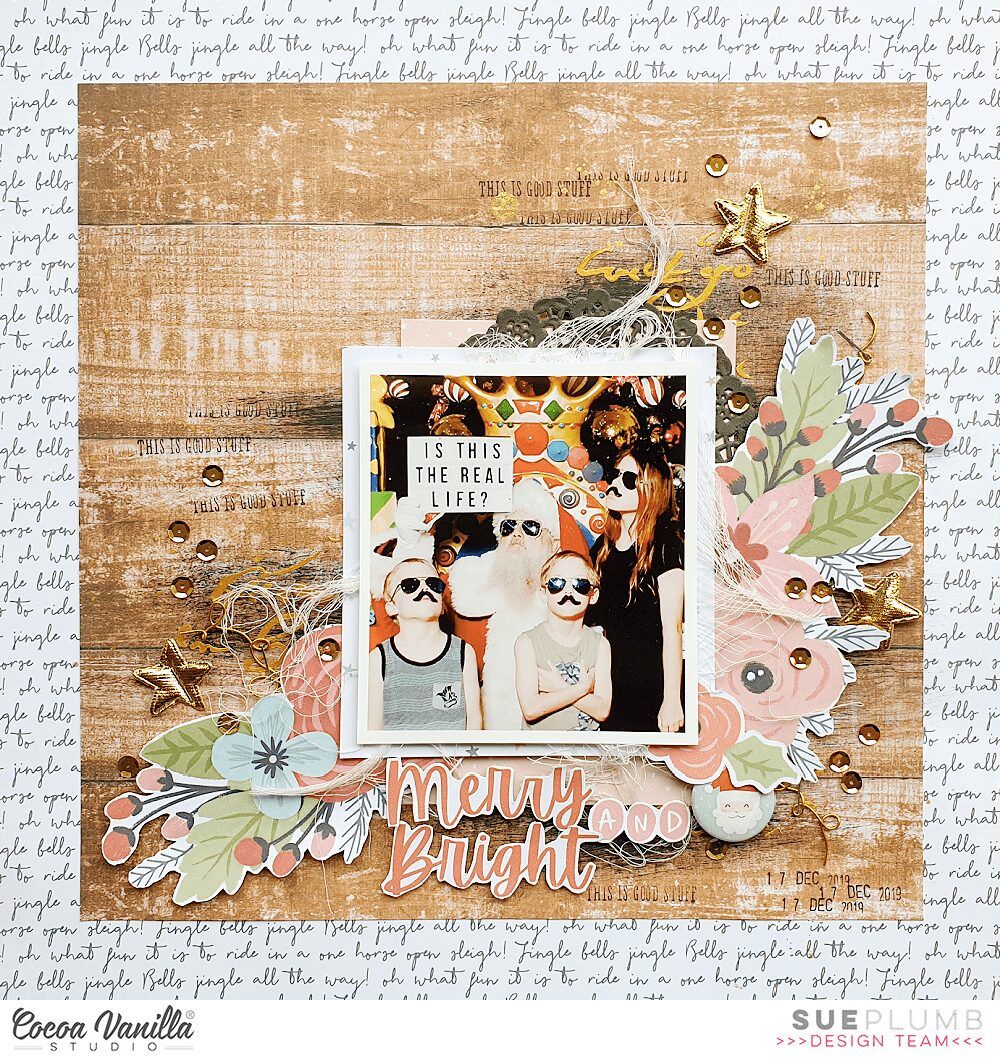
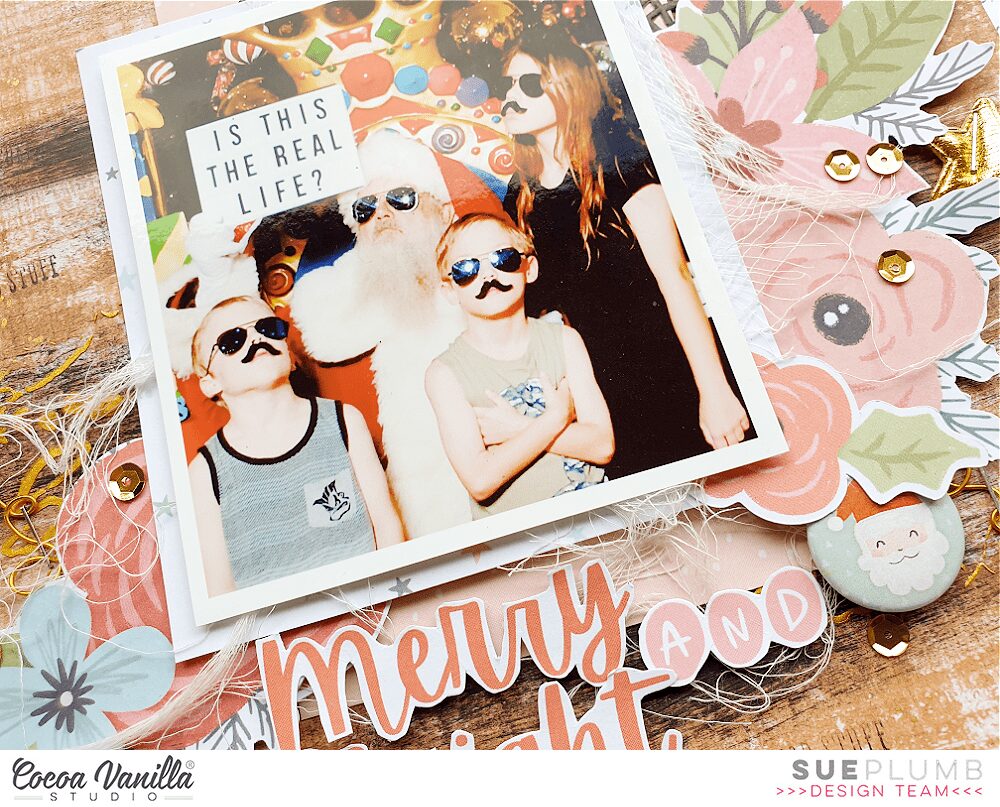
Hi everyone! Sue Plumb here to share my very first layout using the brand new ‘Merry & Bright’ collection. For this Christmas page, I couldn’t go past documenting one of my kids Santa photos from last year. Each year we try to do something a little out of the ordinary, as it not only makes it easier to get my kids to do it, but it also gives us something fun to look back on. (Not to mention giving Santa a good giggle as well.) Last year we decided to go with a Queen theme, as Bohemian Rhapsody is one of our favourite car sing-along songs.
Here is my layout…
As soon as I opened this collection, I was immediately drawn to the gorgeous wood grain print on the Season’s Greetings paper. (Zoe always has the best wood grains!) I decided to use it as the basis for my page, so I cut it down to measure 10×10″ and then mounted it onto the script pattern of the Oh What Fun paper to add a border.
I really wanted to make the background bit more “me” so I decided to add some mixed media as well. I brushed on some dark grey acrylic paint, then used a loose script stencil (which tied in beautifully with the script print paper) and some gold glaze to add texture.
Now it was time for some papery layers! I used pieces of some of the scaled down prints from the A5 Paper Stack to use as layers under my photo, adding in a dark grey paper doily (to tie in with the paint) and some frayed gauze for texture. I also added some cardboard to the back of my photo to help pop it up from the page.
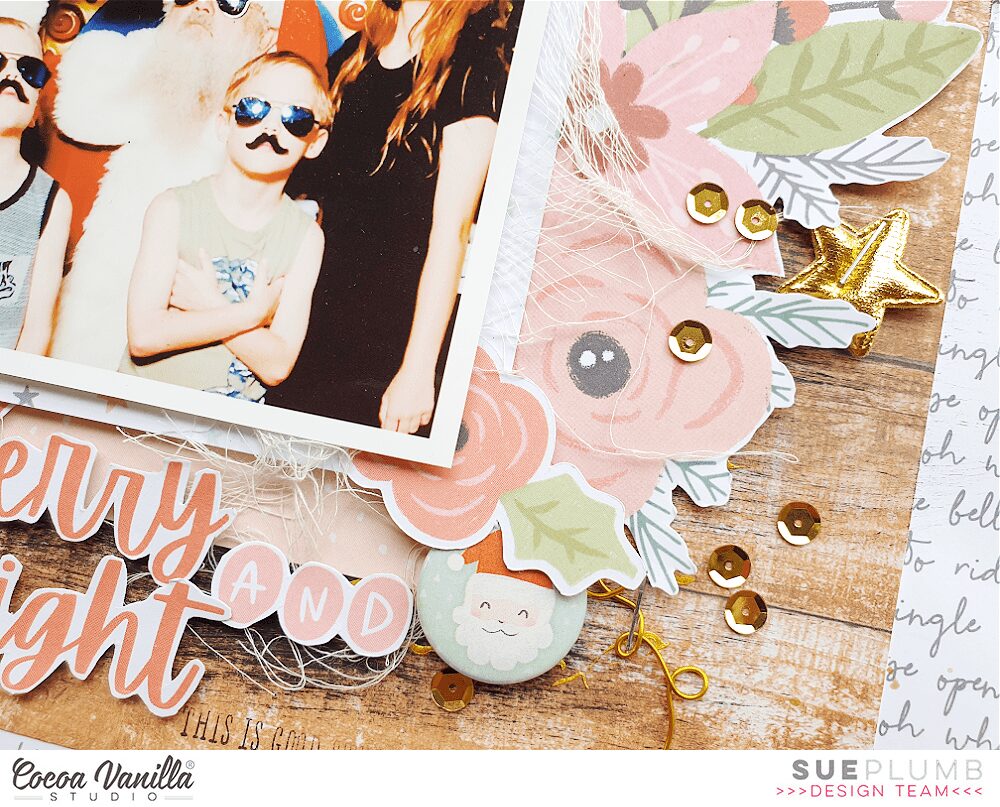
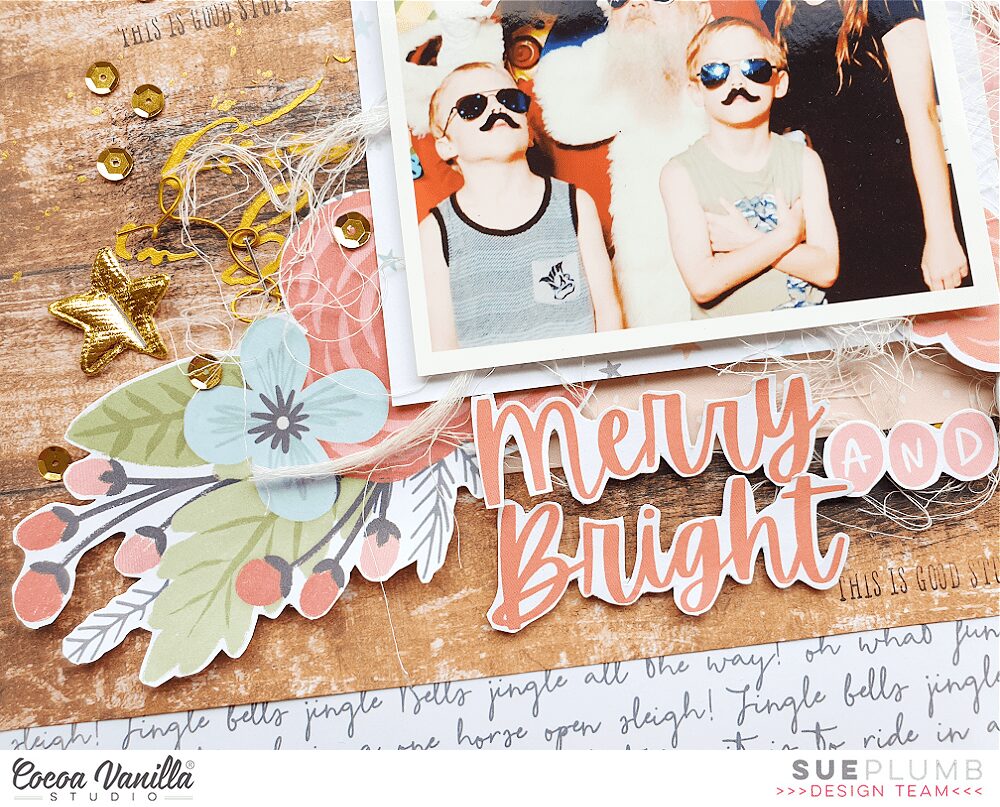
For my embellishments, I began with the gorgeous floral pattern of the Joy to the World paper because I couldn’t wait to fussy cut those flowers! I cut two large pieces which I tucked in under the bottom left and top right corners of the photo, to create a diagonal flow to help draw the viewer’s eye through the photo. I also added an extra flower from the Die Cut Ephemera pack.
Then it was time for some pretty little bits and pieces. I used three of the Puffy Gold Stars, which I attached using my stapler; and some small pieces of twisted gold wire, which I also stapled to the page.
For my title, I fussy cut the words merry and bright from one of the 3×4″ Pocket Cards and then adhered it below my photo using foam tape to pop it up from the page. I also tucked in the sweet little Santa Flair Button alongside my title.
To finish off, I stamped the date and a few phrases using a roller stamp from my stash; then added a touch more festive sparkle with some splatters of gold mist and a sprinkling of gold sequins.
I’ve already been busy creating more layouts with this collection and I can’t wait to share them with you soon. If you don’t have this collection yet, make sure you contact your favourite retailer to ask if they have it in stock.
Hi there lovely Cocoa Vanilla fans! Danni here with a fun layout using a mix of old and new Cocoa Vanilla Studio collections – Happiness and Daydream. I chose to marry these two collections because although they both have lots of pretty florals and butterflies, the colour palettes are quite different, with Daydream being beautifully soft and muted, and Happiness so bright and colourful. I really wanted to challenge myself to make the two collections work together, and I am really pleased with the result.
I have a photo of myself taken back in 2014 when I was in early pregnancy with my son; I had been suffering badly with morning sickness and this day was the first I felt well enough to get dressed up and go out, so I definitely wanted to celebrate that moment!
I started with the Sweet Serenity 12×12 patterned paper from Daydream, then took two pages from the Happiness 6×8 paper pad, layering them to make a large paper block in the centre of the layout to base my elements on. I also added a couple of strips of Over the Rainbow 12×12 patterned paper from Daydream because I love me some woodgrain!
I layered up some pieces from the Happiness Little Things 12×12 patterned paper behind my photo instead of matting it, and I also took one of the frames from the Happiness die cut ephemera to make a place for my journaling.
To jazz up my background a little I added some pink texture paste through a chevron-pattern stencil either side of my central paper block, elongating it to a more horizontal format. I went ahead and added a few tiny hearts with the same paste too, I just love little details like this.
For my title I chose the ‘Thankful’ die cut title from Happiness and layered it over my central paper block, overlapping my photo slightly. I chose to make two large embellishment clusters on this layout – I could have done a third but I wanted to keep most of my embellishments within that central paper block. I used a combination of accessory stickers from Happiness and die cut ephemera from Daydream to create my pretty floral clusters. I love the bright pops of pink from Happiness paired with the soft pinks and yellows from Daydream!
I decide to go all out with my clusters and added some die cutephemera hearts and sequins from Daydream, plus some tiny word phrases from the Happiness accessory stickers. To finish it all off I added a Daydream flair and two die cut butterflies, with some pearl drops as flight trails. I really love how soft and pretty this turned out with those bright pops of happy colour shining through. I also really love using that frame to give me lots of journaling space, definitely something I will be doing again in future!
I really hope you enjoyed joining me for this layout today. There is a process video on the Cocoa Vanilla Studio YouTube channel linked below if you would like to watch it come together. Happy scrapping!
Hi CVS friends! It’s Anna here with you again with a new layout. The focus of my layouts are usually my daughters, but for today’s project, I decided to use this picture of me and my sister. We both prefer to be behind the camera, but sometimes we have fun taking some selfies.
For my background, I made some mixed media on a watercolor sheet with pink and blue pigment powders. Then, I covered the top half of the page with two ripped papers. I used the B side of the Pretty Bits paper from the Unforgettable Collection and also the B side from the Daisy Days paper from the Daydream Collection.
I framed my photo with this wood polaroid frame from the Daydream Die Cut Ephemera pack and raised it with foam to make it stand out. I embellished it all around by creating clusters of flowers from the die cut pack too. I tried to give some dimension to the page raising some flowers with foam dots.
For my title, I used the word “hello” from the More than words collectionchipboard titles. I put it on top of the frame, and below it, I used an old foam alphabet that I had in my stash to spell the word sister. I completed the title with one of the stickers from the Daydream Accessory Stickers.
On the left side of the Hello, I glued a puffy fabric heart from the Daydream collection. I’m so in love with these hearts.
Finally, I cut a strip from the Garden Variety paper and use a scallop border punch. I lifted the edges and placed it on the top of my page to accentuate the romantic look of the page. I also scattered some hearts and butterflies die cuts.
I love how it turned out, so girly and romantic. I hope it gives you some inspiration. That’s a simple design to use when you’re stuck.
Thank you so much for stopping by today! See you very soon with another project!
Hello CVS friends, Today I have my take on Debra Beer’s layout that Sue and I chose to scrap lift. Here is Debra’s layout!
And here is my take using Daydream collection.
I created two scallop paper strips as the base of my layout, using Stepping Stones and Daisy Days papers (you can either use a hand punch or cut file to do this). I then did a little mixed media (probably as much as I will ever be comfortable in doing!). I used a soft pink and blue as my mixed media colours which coordinate perfectly with the Daydream collection.
I next added my photos, the photo on the left with foam tape to create a 3D effect and the other photo with double sided tape, but before I firmly press and attach I like the option of being able to add elements under the photo.
In keeping with Debra’s layout I added die cut ephemera florals under my photo, also adding a moth with foam tape. On the other side I again added another floral bunch and tucked one of the Puffy Hearts slightly behind my photo.
Instead of using wash tape I used a die cut, row of rainbows from the ephemera pack and finished off using a phrase sentiment from the Daydream Accessory Stickers, which is my title.
I finished off my layout adding a tab at the top of my left photo and instead of a doily I added a circular die cut instead. I also added some clear NUVO crystal drops on leaves, arches of rainbow and centre of photos to create light and shade. I added a light splatter of gold spray, just because I like gold really!!!
I hope I have done justice to Debra’s layout, Sue and I created quite different takes on this lift but that’s because every scrapper is unique I think!
Thank you for stopping by today and later in the month I look forward to sharing my first layout with the new Christmas collection Merry & Bright.
Hi there creative friends! Today I want to share a layout with you featuring the gorgeous Daydream collection and a photo of my little man at his 5th birthday party. I have been having a lot of fun scrapping girly photos with this collection, so I wanted to share the love and create some more masculine pages too. There are plenty of more boyish colours and patterns in this collection, so this page came together easily.
I started with the woodgrain side of Over the Rainbow 12×12 patterned paper because I just love a good wood pattern and I find it a very neutral pattern to work with. I added a border of Sun Shower 12×12 patterned paper to bring in some of the yellow that is in my photo.
To add some detail to my background I added some splatters with white ink, varying the size from delicate sprinkles to some larger drops. I also added a lighter sprinkling of lovely shiny gold mist for that metallic effect.
Next I found a geometric circles panel cutfile from Neat n Crafty Cutz that I had cut a while ago from white cardstock but had not managed to use – I love when I can get supplies that are just lying around to good use! I simply backed the entire cutfile with vellum, adding that lovely translucent quality while still being able to see the pattern of the paper behind.
I matted my photo with navy and blush pink papers from the 6×8 paper stack then layered it over the cutfile. I dug through the die cut titles to find the word “Happy” as the main part of my “Happy Birthday” title, using some small gold foam alphas from my stash to finish it off.
With the bones of my layout down, I added lots of pretty embellishments from the die cut ephemera and accessory stickers, building three clusters of embellishments in a triangle around my layout with my photo as the focus. I made sure to include a rainbow element and a more dimensional element in each cluster; I used a flair button, puffy heart and a foam-backed fussy-cut rainbow for those dimensional pieces.
As finishing touches, I added a handful of tiny word stickers from the accessory stickers, a sprinkling of the gorgeous sparkly sequins around each embellishment cluster and a hand-drawn border in white gel pen around outside edge of the woodgrain paper.
I really love how this turned out. I’m definitely a fan of flowers and rainbows on a boy page, and I think the masculine tones of woodgrain, yellow and navy really help to balance it all out. What do you think?There is a process video on the Cocoa Vanilla Studio YouTube channel linked below if you would like to watch this layout come together. Thanks so much for joining me today. Happy scrapping!
It’s Sue Plumb here to share my latest design team project with you. Today we are kicking off a new theme here on the blog simply called “1 paper, 3 ways”. Over the next few days three of our team members (myself included) will each share a layout that uses the same patterned paper as our page background. The purpose of this theme is to showcase different ways to use the same paper, and hopefully give you some inspiration to create a page of your own. The paper we were all tasked to use was the gorgeous mixed media style Sweet Serenity from the new ‘Daydream’ collection.
Here’s the layout I created, entitled “Together”…
For this page, I chose to document a recent photo of my daughter and I that was taken during a day at the beach. (And yes, it’s a selfie! I often find that if I don’t stop and take a selfie with my kids, I am rarely in any photos with them.)
So my layout began with the stunning Sweet Serenity paper, which I decided to add a little more subtle detail and texture to. I first used a criss-cross patterned stamp along with some grey ink to add some stamping; then used a scattered hearts stencil with modelling paste to add some small white hearts.
I then set it aside to dry while I began work on the papery portion of my page. First, I gathered some pieces of patterned paper to create a layered mat under my photo. The papers I used were All Aflutter; Up in the Clouds; and Happy Place and I used both vertical and horizontal pieces to help ground the photo to the page. I also added a grey paper doily from my stash.
Now it was time for some pretty embellishments! I have to admit, I am totally obsessed with the floral print Garden Variety paper from this collection. I love it so much I just want to fussy cut the flowers from it and stick them on every page I create. I cut a few pieces from it and tucked them in around my photo to help frame it.
My next goal was to extend out my embellishment clusters from the focal point to reach the two main mixed media areas on the page, as I didn’t want them to appear to be “floating” out on their own. I did this by using some cardstock leaves I had cut on my Silhouette with a cut file from Cut To You. This enabled me to ensure that all the stencilled areas on the page were connected to the focal point.
For my page title, I chose to use the word together from the Die Cut Titles pack, which I adhered along the bottom edge of my photo using some foam tape to pop it up a bit. On the top right corner of my photo I added the small happy days with you banner sticker from the Accessory Sticker sheet. To the right of my photo I added a sweet die cut rainbow from the Die Cut Ephemera pack, and then scattered a few hearts from the same pack.
I finished off my layout by adding a doodled pencil border, some soft grey ink splatters and a few stamped phrases.
Thanks so much for joining me today so I could share this with you. Stay tuned over the next couple of days to see what else the team has in store to inspire you using the Sweet Serenitypaper.
Hi there Cocoa Vanilla fans! Danni here, and today I am having some fun with the cut-apart elements in the Happy Place 12×12 patterned paper, which is part of the amazing new Daydream collection xx
Cut-apart sheets are one of my favourite products to work with, and as soon as this collection arrived on my doorstep I set to work with my scissors and cut this whole page up into it’s individual elements, ready for making a layout. I find it is much easier to get inspired when you already have all the pieces cut out and ready to use.
The sweet little woodgrain piece with the oval centre and flowers at the bottom was crying out to become a frame, so I carefully cut the oval from the centre, taking care to keep all the little flowers intact. A craft knife and cutting mat works best for this.
I chose this beautiful photo of my sweet baby girl to put behind the frame I created. The 3×4 inch size of these cut-apart elements makes them perfect to use with 3×4 photos, and this one fit perfectly. I arranged several of the other elements from Happy Place 12×12 patterned paper in a diagonal across my page – this is my favourite layout as it really helps to draw the eye across the page.
For my background I chose white mixed media weight cardstock and added a border using Stepping Stones 12×12 patterned paper for a pop of that beautiful rainbow stripe. I went ahead and added some soft mixed media to the background using some solid watercolour paints, making sure to place the colour where it could be seen peeking out from behind my cut-apart elements. Once this dried I placed all those elements back onto the page and adhered them down.
For embellishments I chose to keep things simple, adding a flair button, a puffy heart, a sunshine sticker from the accessory stickers and a sweet little die cut ephemera tab at the top of my photo. I pulled out a bunch of the teeny tiny heart die cut ephemera and accessory stickers, creating several clusters of these in varying colours around my diagonal design.
For finishing touches I added a few lines of journaling on a label at the bottom of the page, followed by three little clusters of white dimensional drops. This layout is quite simple and minimal, quick to make and looks so soft and pretty. I am so happy with how it turned out. I hope you were inspired to use your cut-apart patterned papers today! They are such a fun and easy way to make a layout that looks amazing.
There is a process video linked below if you would like to watch this layout come together. Thanks for joining me today, happy scrapping!
Hi everyone, it’s Sue Plumb here to share my latest design team project using the amazing ‘Daydream’ collection. If you haven’t had a chance to create with this range yet, then do yourself a favour and make sure you check with your favourite retailer to see if they have it in stock – it is so gorgeous!
For this page, I decided to document a photo that I took a few months ago when some of my family got together to celebrate my boys 8th birthday. I began with a sheet of white cardstock and used inks to add some subtle layered watercolour detail to the background.
Next, I layered some pieces of the Sun Shower; All Aflutter; Stepping Stones; and Up in the Clouds papers to form the mat for my photo. I then added some frayed gauze for texture and some scrap cardboard under my photo to pop it up from the page.
Once I had the photo in place it was time for some embellishments. I had the gorgeous floral print Garden Variety paper and my scissors at the ready to get cutting. I fussy cut several larger floral pieces and a few loose flowers, then tucked them in amongst the different paper layers around my photo. To give the flowers extra dimension, I bent up some of the petals and leaves, and used foam tape under some of the pieces.
To the left of my photo I added the flair button which read the good life from the Flair Button pack and a small blue heart from the Die Cut Ephemera pack directly onto the edge of my photo.
I couldn’t resist adding one of the adorable Puffy Hearts to my page, so I tucked a green one in amongst the flowers above my photo, which coordinated perfectly with where the green ink was on the background.
I created a small cluster in the top right corner of my photo using a few small stickers from the Accessory Sticker sheet, then added a butterfly from the Die Cut Ephemera pack nearby.
I chose the words family time from the Die Cut Titles pack for my page title and completed my title cluster with a die cut rainbow and heart.
As a finishing touch I scattered a few sequins around the page from the Sequins and Flowers pack and a little handwritten journalling.
I will be back again with another share in two weeks time. Until then, happy scrapping!
Hey everyone, its Raquel here with you today sharing some inspiration for this months Monthly Challenge that can be found in our Facebook ‘Cocoa Vanilla Studio Community’ – the winner randomly drawn will be able to score a $25 voucher to spend in the CVS store.
Here is the layout that I created inspired by the mood board –
I chose to draw inspiration from the colours, the nature and plant elements, adding butterflies to my page and also from the painted striped image at the bottom of the inspiration board.
Here is the process video for this layout:
The subject of my layout is my home town of Geelong. This photo was taken pre-covid when the waterfront was very much hustle bustle even on a weekday. I think this pandemic has brought me to reflect on the good times and things that I have in my life, our little town is one of those things.
The Happiness collection has soo many gorgeous floral elements and embellishments. As you can see from my process video the embellishing of this page came together so nicely and just worked. The cut file I have used on this page is another one from the Cut to You store, however this one was one of the Newsletter freebie files. I backed the file with vellum as I really wanted to showcase the beautiful florals on this layout.
Can you see something different for me on this page? Yep I had a little play with some distress inks and water to create that rainbow wash background. I fully committed to the design, though I must admit, I thought I would not like the result and would end up putting the background in the bin. Much to my surprise, that wasn’t the case and I like how it turned out.
The title Happy Times was found in the ephemera pack. I had played with the die cut titles pack in the collection, and really love the way the one titled ‘beautiful’ looked on the page, however, I ended up choosing the less bold and smaller in size ‘Happy Times’.
To frame my photo I used the light pink cross paper from the 6×8 paper pad. This pink shade has to be one of my favourite papers in the collection.I have used it multiple times and I was surprised that I had some left to mat my photo.
I created embellishment clusters to the left and right of the photo and also a small cluster to the bottom left of the page to balance out the heaviness on that top right side, this small cluster also served as a good place to pop my journaling. I have used mainly the florals in the ephemera pack to embellish this layout, though I did also use some of the Accessory stickers (words, hearts) and some fussy cut butterflies.
The journaling on this page, as always is typewritten and reflects my love of our town.
I love the opportunities that layering various elements gives, allowing me to add dimension, detail and depth by using foam adhesives to varying parts of the clusters. This image below gives you the chance to see some of the layering and detail that is on this page.
I hope that you have been inspired by my layout today. If you are not a member of our Facebook community be sure to join and take part in this challenge. I would love to see what you create.


 I created two scallop paper strips as the base of my layout, using Stepping Stones and Daisy Days papers (you can either use a hand punch or cut file to do this). I then did a little mixed media (probably as much as I will ever be comfortable in doing!). I used a soft pink and blue as my mixed media colours which coordinate perfectly with the Daydream collection.


