SO Sweet | Storyteller Collection | Michelle Stokes
HI All, its Michelle back here today with a new layout share featuring out BRAND NEW Storyteller Collection. Such a stunningly beautiful collection full of feminine patterns and oh so many sweet florals. And, if you know me well enough, you would absolutely be right in thinking that I jumped straight into the fussy cutting of ALL the florals before I even started the layout.

I thought it was time that this sweet little furry face made another appearance on the blog. Firstly because she’s just so stinkin cute, but also due to the lack of decent photos I’m getting from a certain 11 year old in my household haha.
To create the layout I grabbed the SPRING FLING and OH MY HEART papers and cut giant triangles (from the reverse side patterns) to overlap the majority of the bottom of the white cardstock background, adding machine stitching down the lightly distressed edges. I chose these two designs as they complimented each other well, and worked perfectly as a base for the giant clusters of fussy cut florals to stand out

I used the green pattern paper from the A5 paper stack to create layers under the black and white photo. Rather than using 1 full piece, I cut them into different sized shapes and layered randomly together before adhering to the layout using pieces of foam sheet for a little extra dimension.

I created a long line of floral clusters sprouting out from either end of the photo stack in a diagonal line using fussy cut pieces from both the 12×12 and A5 version of the SPRING FLING paper

I also added some fussy cut butterflies (FLY AWAY) , puffy stickers, accessory stickers and ephemera pieces to create added interest within the clusters.

I added more florals, ephemera, puffy and accessory stickers to fill up the open white space at the top of the layout
And lastly the title, using the awesome foam title stickers. So many title combinations to be made from one very versatile set, definitely an item to add to cart if you are purchasing this collection.

Here’s a closer look at all the pretty florals under the photo. You can see I’ve also added the usual sprinkle of gold ink to finish it all off.

And one final look at the whole layout

Well thats all from me today, thanks so much for stopping by. I hope you’ve enjoyed seeing the first creation I’ve made using our BRAND NEW Collection – Storyteller. Cant wait to see what you all create with it too
Until next time, Happy Scrapping!
Michelle x
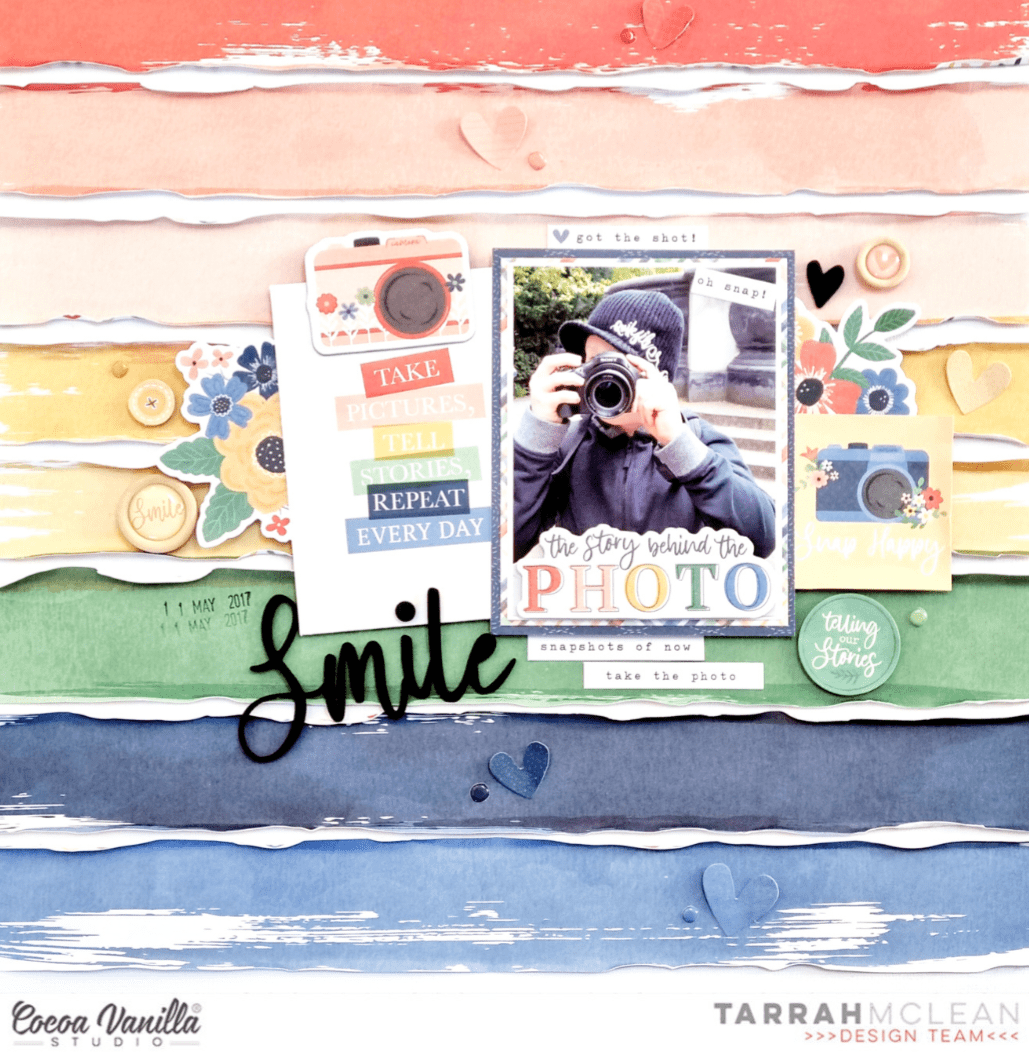
 I placed my photo slightly to the right of the page using craft foam to add dimension. I layered some papers from the A5 paper stack underneath the photo and distressed the edges slightly to add some texture and to help make the photo pop! I searched through the pocket cards and found the perfect one to suit the photo of my son as photographer! I used craft foam to adhere the pocket card to the left of the photo. When I am placing elements on my page and I am not 100% certain about their position, I will mostly always only use a very small amount of adhesive in case I need to reposition anything or add an extra layer underneath. Once I am happy with where everything ends up on my layout, I add extra adhesive for reinforcement.
 Now I have the main focus of the layout sorted out, next I added a title. I went through the gorgeous black Foam Titles and chose the word ‘Smile’. I placed this word at the bottom of the pocket card to help tie the photo, pocket card and title together. At either end of the photo and pocket card, I tucked in some pretty flower ephemera pieces, I also added the little piece that says ‘Snap Happy’ to the right of my photo.
 On top of my photo, I adhered the ephemera piece that says, ‘The Story Behind the Photo’ and also a small phrase sticker from the Accessory Sticker sheet in the top right corner. I also added some more of the phrase stickers above the photo and below the photo, these are great additions to a page to help tell a story! Above the pocket card, I added the camera die-cut using craft foam. From this point, I decided to add my embellishments in a tone on tone look…I took some of the super cute heart die-cuts, enamel hearts and wood epoxy buttons and placed them on their corresponding colours.


