I am so happy to be here today with a brand new layout to share with you!
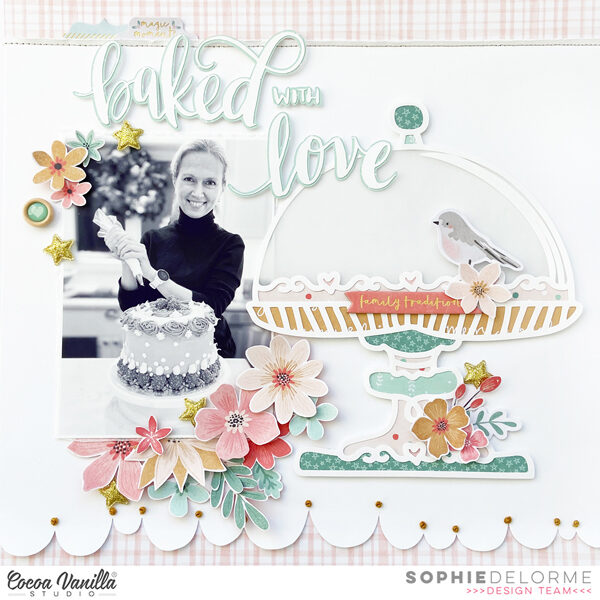
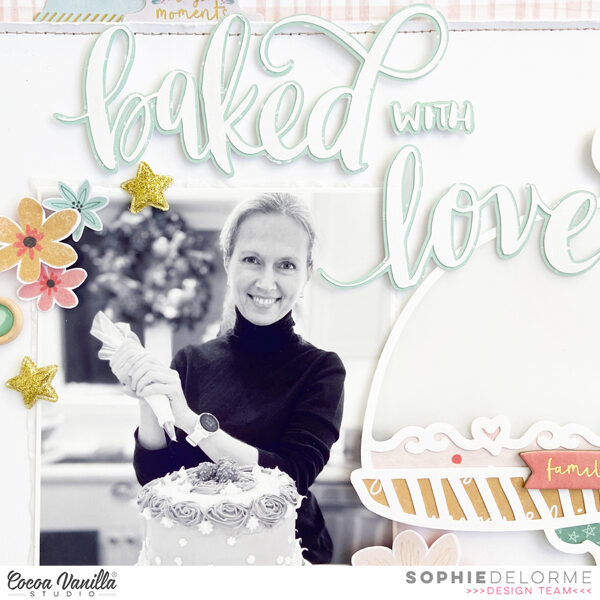
I used the Joyful collection for this page, paired with two cut files that I bought on the Silhouette Studio store. The cake stand is from Paige Evans and the title is from Jenny Highsmith.
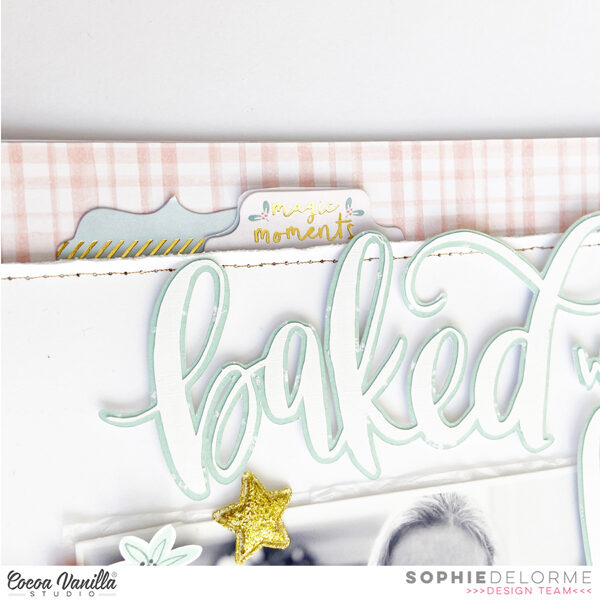
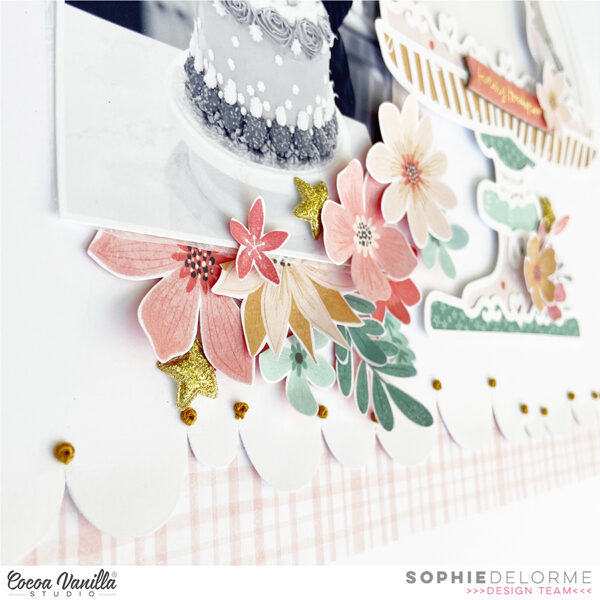
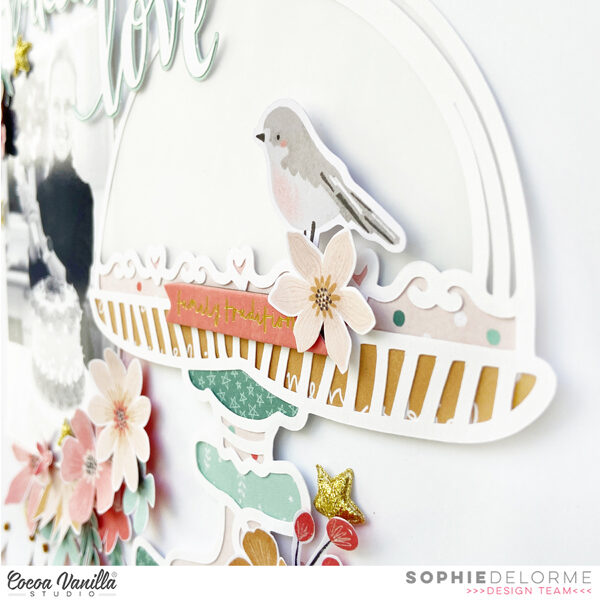
I hand draw an uneven scalloped border on white cardstock and cut it with scissors. I centered the cardstock on the Advent patterned paper and stitched some French knots on it.
I backed the cake stand with different patterned papers from the Joyful collection, and used velum paper for the glass bell.
I printed my photo in black and white as the cake that I backed didn’t match de colors of the collection at all! It’s a good way to use whatever photo you want for a page, and softens the overall look.
I fussy cut plenty of beautiful florals out of the ‘Tis The Season paper, added Wood Buttons, a few labels and beautiful gold stars to finish it up!
Here are some close-ups:
I love the result! This collection is one of my favorites from Cocoa Vanilla! It’s a Christmas collection, but as you can see here, you sure can use it for any other occasion!
I hope that this was inspiring to you!
Thank you for stopping by, and have a great crafty day!
Hello CVS fans and welcome to my first post for 2023!
Over the past few weeks I did a little Christmas scrapping and pulled out the ‘Merry and Bright’ collection which I still have a decent amount of in my stash. I love the pop of pink in this collection which doesn’t make it so ‘traditional.’ Here is a look at my page..
To start my page, I used this cut file from Paige Evans, and backed it with a bunch of the patterned papers, also using some gold glitter paper…..to me, gold screams Christmas and I love it! I think this cutfile was perfect for this photo of my twins and their elf.
Around my photo, I used some Ephemera pieces and tucked some florals in my cutfile… layers make my heart happy.
To add some separation between the cutfile and the star background paper, I added some distress oxide… I like the glow this provides to my page. I then added some of the word phrases from the Accessory sticker sheet under my photo.
I hope if you have this collection in your stash that you have been inspired to pull it out…or even the Joyful collection…another gorgeous collection.
Hope your 2023 is off to a good start..thanks for stopping by
Hey y’all! Laura Alberts back again with a fun layout of my son’s university tour! I thought the colors in these photos were perfect for Storyteller and they worked really well together. I chose a column design because I had two landscape 3×4 photos and 1 portrait 3×4 photo. I find splitting up the two formats a little easier to scrap. The left-hand column has 4 journaling cards stacked one right after another, 2 to back my photos and 2 for journaling spots.
A multi-layered strip down the center gives the two columns defined areas and gives me a place for a little extra embellishing in the middle. I especially love these wood buttons with the epoxy in the middle! Such a fun way to add more dimension and texture to the page. On top and bottom of that button are round puffy stickers, then a few Nuvo drops for interest. At the bottom of this page, I collaged stickers and ephemera to make an embellishment cluster.
On the right side of the page, I combined this fun journaling card and my portrait photo for a mini-layout within a layout! This half of a frame tucked behind my photo reminded me of some of the architecture at the university and also created a landing place to build my cluster of embellishments on top of too. All in all, I used five journaling cards on this layout.
I hope this layout gives you inspiration for using your journaling cards on a layout to create a grid or just to add a little extra color! Be sure to check out the process video below to see how “The Best Story” came together!
Welcome to the Cocoa Vanilla Studio blog and Happy New Year! So glad to see you here.
It’s Jo and today I show you my first scrapbook layout for Cocoa Vanilla Studio of 2023!!
One of my absolutely favorite collections is “No Limits” and I think this collection is perfect for a Happy New Year scrapbook layout.
I start with a white piece of cardstock and cut out one big star shape with my “Cricut Maker”I used a standard star shape cutfile from Cricut. I choose a wood colored patterned paper and place it behind the white cardstock with the cut out large star. I stitch the edges of the star with light blue sewing thread.
I cut out some more stars from different pattern papers and I stitch the edges with light blue sewing thread. I place the stars in different places on the layout. I cut patterned paper to
size and place it behind the black and white photo. I place the photo on top of the stars and slide some more labels between the layers.
I grab a pair of scissors and fussy cut a few extra stars from the patterned paper. As you can see, I also used some patterned paper from Legendary. So great to see that both collections combine perfectly with each other. For the small circles I used a reinforcer punch. Along with the stars, I decorate the layout.
The title “Hey hello Awsome 2023” on the right side of the photo consists of several die-cuts, word strip and a silver alphabet from Thickers. I find it a fun and playful effect to combine a title with different alphabets, die-cuts or word strips. My layout is done and for a festive look I splashed some more with blue distress ink “faded jeans” and white gesso. This adds just a little extra dimension to my layout and I love it.
I hope I was able to give you some great ideas and wish you lots of fun creating beautiful projects with this beautiful and colorful collection! I want to thank you for stopping by on the blog today!
Happy crafting and have fun!
It’s Tarrah back today to share a new scrapbook layout featuring the gorgeous Merry and Bright collection!
I just love creating Christmas layouts, what about you? I still have lots of the Merry and Bright collection and I also love to stash bust so I really enjoyed creating this layout!
I started by choosing my background paper – opting for the Star Bright paper. I then cut out a cut file from white cardstock. The cut file is from CUT to YOU and is called Stars Squared. Once the cut file was cut out, I struggled with the placement and design of my page so I cut up the cut file into separate pieces so I could place pieces of it where I wanted to. Do you ever do this? I do this a lot if I am struggling to like how a cut file looks on my page. There are no rules to say you have to use a cut file the way it was intended!
I backed all the stars of the cut file with papers from the Merry and Bright A5 paper stack, once it was all backed, I then placed foam adhesive to the underside of the cut file and adhered the cut file to the ‘Star Bright’ paper.
The photo I am documenting today was taken just this last Christmas of my 2 sons and my 2 beautiful nieces! My nieces were able to be here from England for this Christmas! It was wonderful to have them and it was the first Christmas we have had together with them! A very special memory to document. I layered one of the pocket cards and a cardstock frame from the ephemera pack under the photo and adhered it overlapping the cut file, in the centre of my layout. I also stapled a banner sticker from the accessory sticker sheet to the top left corner of the photo. My title is made up of a phrase sticker from the accessory sticker sheetoverlapping the word ‘Joy’ fussy cut out from the Season’s Greeting paper. It certainly was Christmas Morning Joy in our household!
To the left of the photo I also placed the Ho Ho Ho die-cut from the ephemera pack, a gorgeous flair button, a phrase sticker and a gold puffy star. In the top left I also placed that super cute Santa face die-cut from the ephemera pack and to balance that with the bottom right corner, I placed the sleigh, also from the ephemera pack.
To finish my layout, I added a few smaller embellishments like small die-cuts, stickers, another gold puffy star and completely finished the page with stamping the date stamp and sprinkling some gold Heidi shine. Once I had finished my layout, I then auditioned some papers to go behind the Star Bright one to act as a ‘frame’. I decided on the ‘B’ side of the ‘Joy to the World’ paper. I trimmed down the ‘Star Bright’ paper and adhered it to the ‘Joy to the World’ paper.
Thank you so much for stopping by the Cocoa Vanilla blog today! I hope you enjoyed reading about how I created my layout as much as I enjoyed creating it.
Do you have the Merry & Bright collection? I encourage you to pull it out and create some pretty things with it!
Happy New Year CVS friends! I am starting off the creative year with a layout welcoming 2023. I have used the beautiful Storyteller collection.
The camera and 2023 are cut files available from the Silhouette Design store. I have used the A5 paper pad for all the paper piecing of the cut files and Ditsy Daisy 12×12 paper for the side border strips.
I added some gold glitter cardstock to my camera and finished off by adding a wood epoxy button which creates the first word of my title.
I then created a floral cluster to the left of the camera, tucking some under the camera and foamed taped some over the top to create dimension. These blooms are from the Floral die cut ephemera.
To balance the top part of my page I added some die cuts and fussy cut butterflies to the right of the camera, again I added some with foam tape to add dimension.
So the 2023 stood out I used a dark outer and light floral for numbers, I added these with foam tape so they didn’t appear flat. I add a small cute butterfly wood epoxy button to finish the 2023 title off.
once I added my photo I used an Accessory Sticker phrase sentiment ‘turn the page’, perfect for the theme of my layout. I added some hearts from the foam title stickers which add a contrast.
A fun layout to kick off 2023 and an opportunity to scrap a photo of you!
Thank you for stopping by today and see you again later in the month.
Hi everyone, it’s Melissa here and I’m so happy to be back with you today with a Christmas themed layout. I’m using last years gorgeous Joyful collection. The cut file is from Confessions of A Paper Addict.
I knew that I wanted to use a patterned paper for my background, and chose Very Merry because I love the gold sprinkles. I painted the cut file with a sparkly powder activated with water. The powder is pink but has hidden colour in it, which is why there is a mix of pink tones. I actually love that it is uneven. I used a gold powder for the present.
I fussy cut several flowers from Tis’ The Season for embellishment. I bended up the edges of the petals for extra dimension and I love how they look scattered throughout my page. I used a couple of Accessory Stickers to help tell my story.
I backed the cut file present with papers from the A5 Paper Stack. They were perfect with their small repeating patterns.
I hope I’ve encouraged you to dig into an older Christmas collection to document your memories.
Are you already feeling the Christmas spirit? I absolutely am, I love all those pretty lights on the tree and streets, house decorations and trying out delicious recipes. How lovely for visiting the Cocoa Vanilla Blog today.
My challenge was a scrap-lifting of the amazing talented scrapbook designer Michelle Stokes.
I totally love her work! Curious?! please visit her IG (shelz626) for wonderful scrapbook inspiration.
I choose the beautiful and lovely “Always Sweet” layout from Michelle.
I really wanted to work with the beautiful Christmas collection “Joyful” This is truly the cutest scrapbook Christmas collection I know of.
I took a 12×12 white cardstock paper and choose four of my fave pocket page card designs. I cut four strips of patterned paper and place them along both sides of the layout. I choose white sewing thread and used my sewing machine to stitch both sides of the patterned paper strips.
I cut frames from the pocketpage cards and place the black and white photos behind them. I add white sewing thread to the edges of the frames. Behind the middle picture I place a tag with a pink bow made of embroidery thread. I place the four pocketpage cards playfully on my layout just as Michelle did on her layout.
I fussy cut several flowers from the patterned paper. I make both left and right of the layout a cluster of flowers, labels, stickers and die-cuts. In the center of the layout I make a banner of stickers. Then I make the title of the layout “Ho,Ho,Ho, Very Merry magic moments to you all” I use several elements for my title, stickers, gold title words, die-cut banner and a mini alphabet from the collection “These Days” Finally, I make splatters with gold acrylic paint for a magical touch.
I hope I’ve given you some festive Christmas ideas and I hope to see you next time on the blog and social with a new scrapbook project! Wishing you all a very Merry Christmas and a happy and healthy new year! Can’t wait to see your beautiful scrapbook inspiration on the Cocoa Vanilla FB group! Happy creating and I wish you a fun and crafty day friends!
Hey Scrappy Friends, it’s Michelle back here today with a new layout to share with you all. This one was really fun to create as I was given the task to scrap-lift a layout of fellow DT Member Josephine. I’ve used the Storyteller Collection and a little mixed media to pull it all together to document a little trip down memory lane
Josephine’s layout which you will see below, has a season vibe with loads of florals, circular pieces for the main feature of the layout, a splattering of mixed media with a mixed font title. I used all of those elements within my layout but changed up the central piece to be a hexagon shape and documented a photo from a different season. Just a couple of minor changes, just to make it look a little different, while also staying true to the original so that you know I’ve scrap-lifted it.
Here’s the layout I chose for my inspiration…
I think I did a pretty decent job at recreating my own version of the layout, using different shapes for the main feature, while also tying in all the same elements around the entire layout. Here’s a closer look..
I added machine stitching around the hexagons before layering them together with the photo, adding foam for dimension between the layers. Both papers used for the hexagons are in the A5 paper stack – the Woodgrain for the larger and the blue spotfor the smaller.
I used the florals in the Floral Ephemera pack for the giant clusters either side of the hexagons, with the addition of some tiny fussy cut florals and other ephemera pieces from the main ephemera pack
on the bottom cluster I used all the same elements as the other cluster while also incorporating a fussy cut butterfly and sticker banner from the Accessory sticker sheet. I used a range of adhesives in both clusters to give different pops of dimension.
To create the title I dipped into my super old stash of barley there alphabet stickers, my favourite white alphas and one of the very first sets ever made in the woodgrain colour for the bottom word. I sewed through all the stickers to ensure they stay put for years to come, but also to enable me to give the white ones a little pop off the page by folding them up
Here’s a closer peek above too at the poor attempt at mixed media that I added to the layout lol there was more, but it got covered up
And one final look at the entire layout. Let me know how you think I went in scrap lifting Josephine’s page in the comments
Well that all from me today, thanks so much for stopping by. Be sure to share all the layouts you scrap lift of ours with us in the Cocoa Vanilla Studio Community Group on Facebook. We love to see what’s inspired you to create!
It’s Kel here today, back sharing a page for you using the ‘No Limits’ collection, and you may be surprised to find I have created quite a mixed media back ground which isnt typically my thing….not because I dont like it, but because I worry that I will mess it up! So here is my version of mess .. but with control!
To start my page, I grabbed a 12 x 12 brick stencil and used 4 different shades of blue with my distress oxides through the stencil, working my way from lightest to darkest down my page. When that was done, I decided I wanted the bricks to look a bit more textural, so I added water with a paintbrush over the bricks (again, I was in control… LOL), and added a bit of stamping to some of the bricks as well! Next I cut all the bricks out leaving a small white border then popped them onto black cardstock to really make them pop! In this picture you can see the cool effect water has with oxide ink…
I also added some of the bricks onto foam so they looked more dimensional…
I backed my photos on a bunch of the patterned papers and distressed the edges to help lift my photo from the page. The main embellishments I used were stars.. some from the die cut pack, some chipboard, and some I fussy cut from the patterned paper.
For my title, I wanted to use the word die cuts as I love how bold they are, and I needed something that was going to stand out from the background….love them!
That’s it for me today, I hope you found some inspiration and enjoyed my share.


 One of my absolutely favorite collections is “No Limits” and I think this collection is perfect for a Happy New Year scrapbook layout.


 I cut frames from the pocketpage cards and place the black and white photos behind them. I add white sewing thread to the edges of the frames. Behind the middle picture I place a tag with a pink bow made of embroidery thread. I place the four pocketpage cards playfully on my layout just as Michelle did on her layout.


