Hi everyone, it’s Sue Plumb here to share my latest design team project with you. For today’s post I was tasked to create something inspired by the mood board for our current monthly challenge, which was designed for us by Michelle Stokes.
Here’s a look at the board…
The first thing that inspired me from the board was definitely the colours and the combination of different shades of pink, so I decided to create a layout of my daughter and go “full pink”. I had a sweet photo of her that I took in our garden last year, where she was looking very dreamy, so I printed it out in black and white to keep it neutral.
My secondary inspiration from the board was the image of the heart with all the tassels hanging from it. This immediately made me think of the Tassels and Bows pack from the ‘Unforgettable’ collection, and along with my dreamy looking daughter, led me to the idea to create a dreamcatcher style layout to showcase the tassels.
For my layout, I decided to start with a sheet of white wood grain patterned paper from the ‘Midnight’ collection. This gave me a nice, neutral background with a bit of a boho vibe. I added some colour to the top portion of my page with two different shades of pink ink using the packaging technique to achieve a soft, unstructured look.
Over the top of the ink I added the main part of my dreamcatcher. This was created using the die cut from the Large Die Cut and Backing kit from the ‘Midnight’ collection. I cut off the top third of the circle, then used a piercing tool to poke holes around the edge, which I threaded with some red and pink bakers twine.
Next, I cut some paper layers to mat my photo with. I used a hot pink paper from the ‘Unforgettable’ 6×8″ paper stack and a pink and white striped paper from the ‘Midnight’ 6×8″ paper pad. I also added a white paper lace doily and some frayed gauze to my stack before adding my photo on top.
With my photo in place it was time to pretty things up! I used lots of floral pieces from the ‘Unforgettable’ Die Cut Ephemera pack to frame around my photo. I also added some small die cut flowers around the edge of my dreamcatcher where each hole with the twine was.
Beneath the dreamcatcher, I added three tassels from the ‘Unforgettable’ Tassels and Bows pack, as well as three feathers from the ‘Unforgettable’ Die Cut Ephemera pack. I tied each tassel with the same twine I had threaded the dreamcatcher with. I tucked each of the pieces of twine under the title and then added a bow over the top.
I then added a few extra bits and pieces to my page – a flair button, the chipboard titlebeautiful, and some small phrase stickers – all from the ‘Midnight’ collection. From the ‘Unforgettable’ ephemera pack, I added some hearts and arrows (both inspired by the images in the board) and three die cut butterflies (because…butterflies!)
I was really happy with how this page turned out and I think it looks super pretty. I hope I have inspired you to play along with this month’s challenge too. You can find all the details and enter via the Cocoa Vanilla Studio Community group HERE.
If you would like to see exactly how this one came together you can watch my process video here:
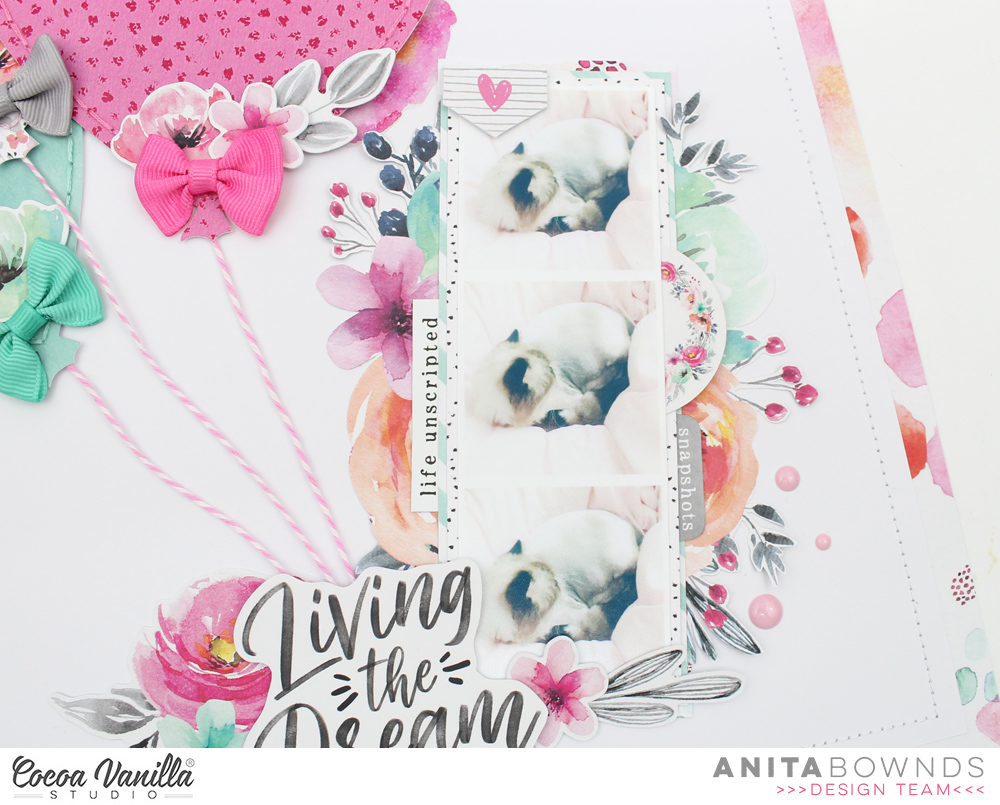
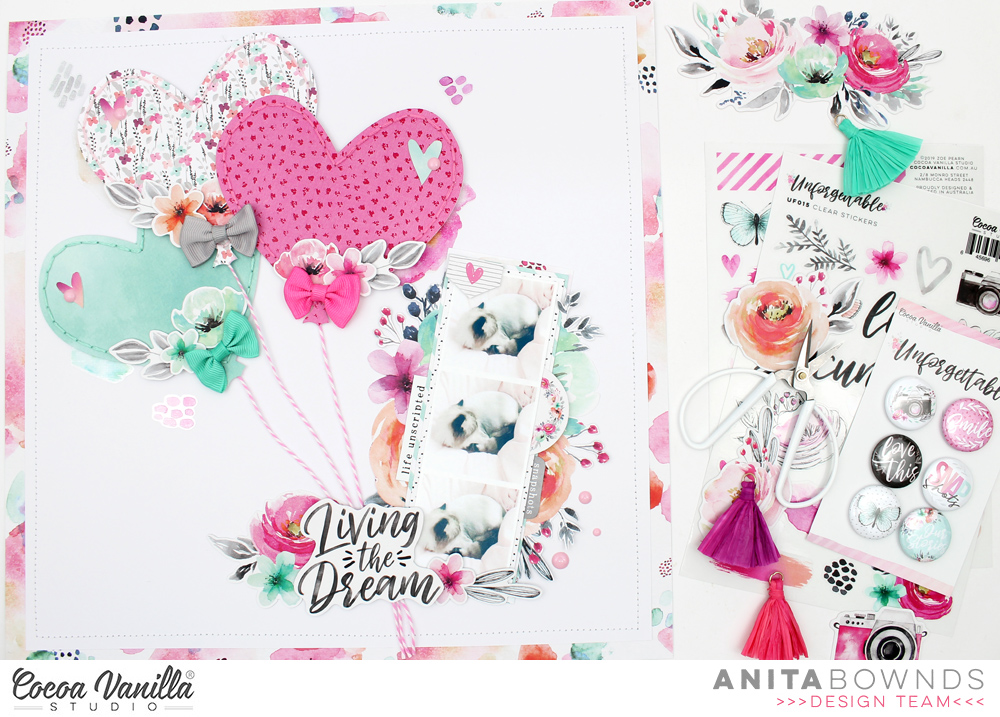
Hello CVS friends, today I have a layout to share using a mix of the older collections, Wild at Heart, Midnight , Unforgettable and Make a Wish collections.Instead of my go to white cardstock I used the beautiful and subtle grey white washed wood grain paper Artisan. I wanted a real pop of colour so used the bright pink paper Hooray. I have used a large scallop hand punch to create a border each side of the Wild at Heart Vellum sheet which is 4 x12 inches. I added machine stitching to each side of the pink border strips.I added my photo off centre with foam tape and finished off with a bow from Unforgettable collection.I have not matted my photo knowing I was going to be adding layered flowers which would draw the eye to the photo.
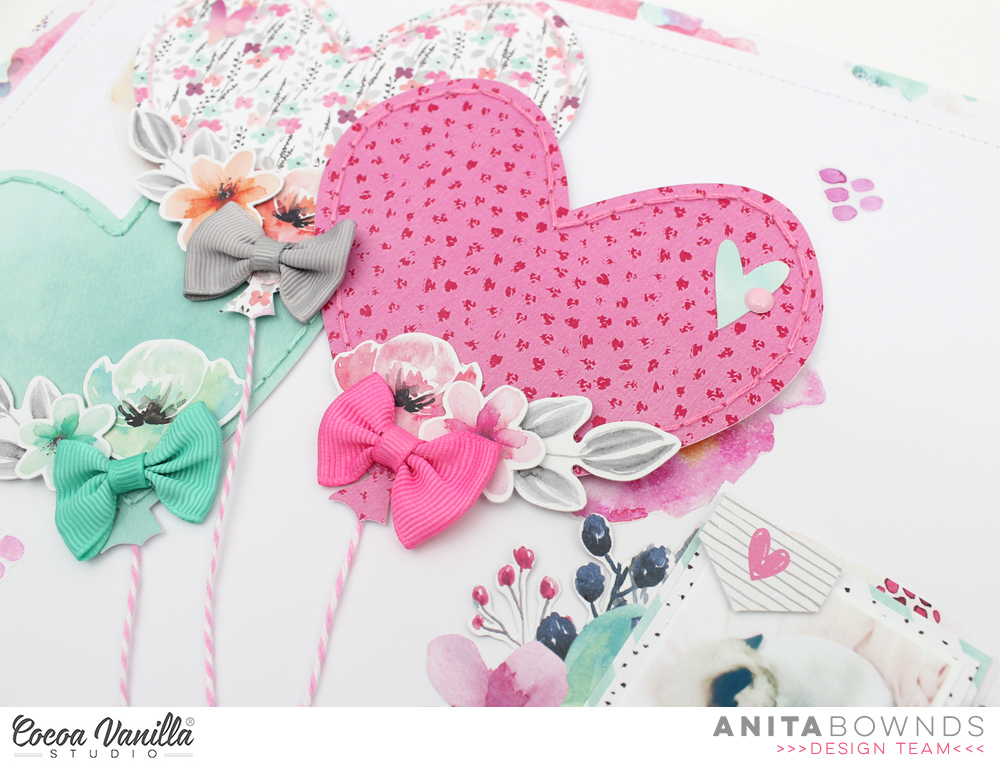
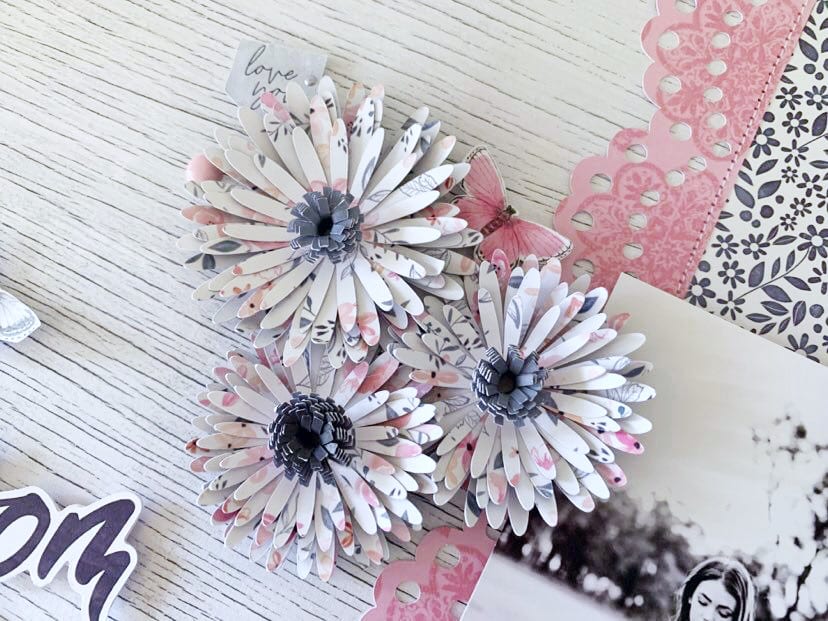
I have used two different cut files from the Silhouette Design store to create my layered flowers but for those who do not have a cutting machine use a hand punch, punching at least 3 and then layer with foam tape. If you want to recreate these centres, they are super easy! Cut a 12 inch strip at 1/2 an inch. fringe cut with a pair of scissors and then roll as you would any rolled flowers. Once the glue has dried then push outwards all the way around, then glue to the centre of your flowers. I have used Inky Depths paper from the Midnight collection to create my flowers.
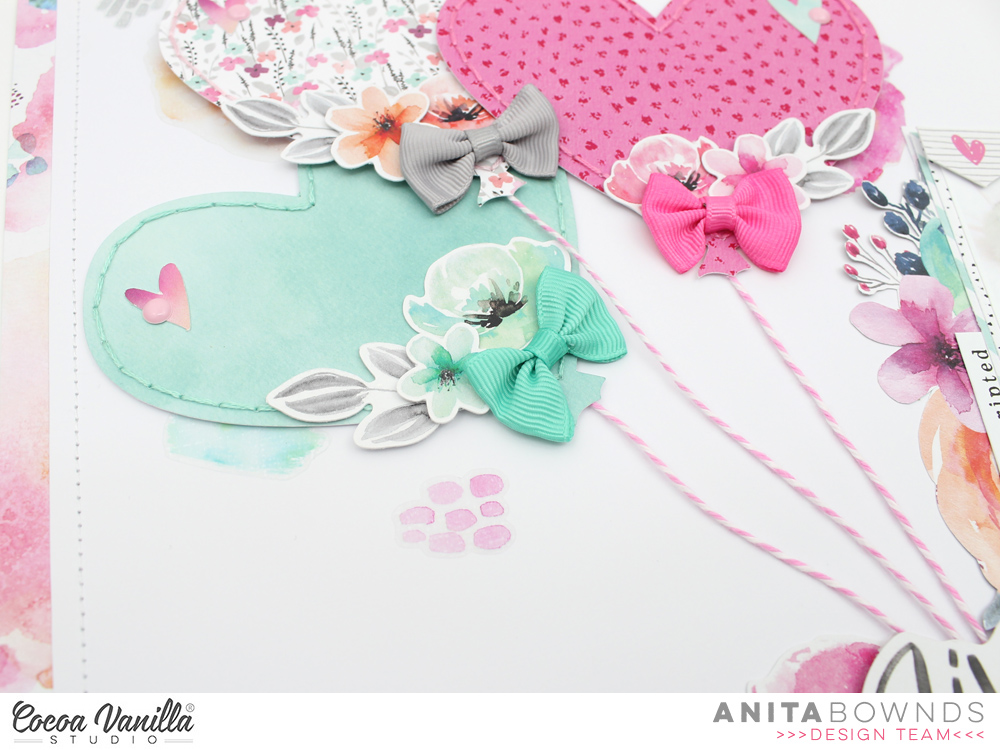
You will see that I then tucked in-between the flowers fussy cut butterflies, some die cut leaves and a sentiment from the accessory stickers.I then created my title using Happiness die cut titles. I added some more fussy cut butterflies around my title adding some Unforgettable enamel dots.I love using word and phrase sentiments from the Accessory Stickers sheets and you can see I added some more under my photo and under my large title.
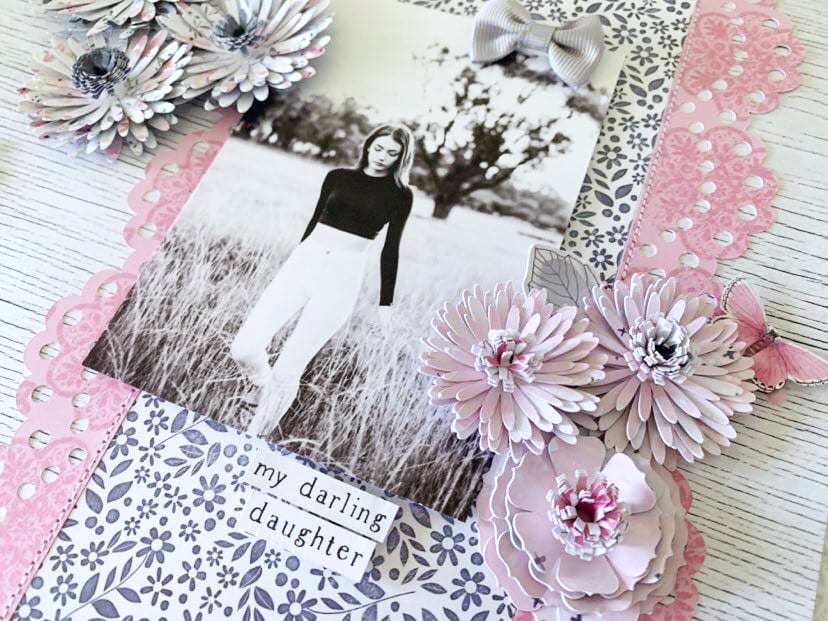
And there you have it, I love how this turned out! A great colour palette even though I have used several different collections. Don’t be put off because of the flowers on this layout, you can make. beautiful one’s too, time to blow the dust off those punches!
Thank you for stopping by today and feel free to leave any questions you may have on this layout in the comments. See you soon, stay safe and well!
Hey Creative friends, Gwen back on the blog today sharing AND I’m feeling adventurous! For my page today, I thought I’d ditch the comfort of my white cardstock background and go about using #allthepatternpapers because, why not with so many pretty designs all in one collection. Let’s use all the things! xo
For my page, I started with the ‘Pretty Bits‘ paper. I just love all of the patterns on this one and wanted to use them all, so I cut two strips, one 2 inches wide, the other, 1 inch wide with the plan to run them down the sides of my layout. This is where I would normally then go for a White Cardstock. Instead, I went hunting for a more neutral pattern paper and decided on the B side of ‘Storyteller‘ pattern paper. Of course, I was drawn to the white in this pattern paper, but I do love those sweet dots as well!
Next up, I went about backing my cut file. I wanted to use a bold title for this page so I’ve gone with a title cut file by CUT to YOU. I have then used the ‘6×8 paper stack‘ to back it. I love how the prints in the paper stack are smaller than the 12 x 12 pattern papers they are perfect for backing cut files. I’ve also used these papers to back my photo.
With my main elements sorted, it was time to assemble and lock in the page design. I’ve gone with the two strips down the left and right-hand sides of my page, with the 2 inch one on the right. From there, I’ve used this right edge as an anchor point to add my photo and the title underneath. I have raised these elements up on foam tape for extra interest and dimension and to help separate them from the background.
It was now time for pretty embellishments. I’ve started with the ‘Die Cut Ephemera‘ as this pack has so many stunning pieces in it. I love pulling them all out and just mixing and matching, playing around until I’m happy with everything. I’ve gone with one main floral element and then some pretty smaller florals and the butterflies.
I’ve then pulled the ‘Snapshots’ sticker from the ‘Accessory Stickers Sheet‘ these fun tabs are always the first to go off my sticker sheets, so fun to add to the top of a photo.
Next, some more dimension with a flair from the ‘Flair Buttons‘ pack and a bow from the ‘Tassles and Bows‘ pack. These are really fun elements to add to a page and they finish this one off so nicely.
Thanks for popping by today to see my latest project, I hope it inspires you to grab this collection and get making! As always, be sure to pop into the Cocoa Vanilla Studio and CUT to YOU Facebook groups to share your pages, I love seeing what you make.
Hi CVS friends! Well I still can’t quite believe that 2019 is almost over and Christmas is upon us! Today I am sharing my fav CVS 2019 layouts. My fav layouts are all about pretty, which Happiness and Unforgettable collections certainly are!
My first share is a layout created using Unforgettable and a fab heart cut file.I adore the clear stickers, especially the paint brush strokes, an easy way to create a mixed media look to your layout.
My second fav layout was created using Happiness collection documenting my love of coffee! This quote is right on point I think!!!!
Lastly a summer layout created using Happiness (again) and a stunning pineapple cut file as the feature piece. How stunning are the die cut florals layered on the pineapple!
And I had to include this sweet gift bag I created using Unforgettable, this colour combo is so beautiful and the tassel from the collection, love!
Thank you for stopping by today for my last blog post of 2019. I have loved sharing my projects with you and being a part of the CVS tribe. I wish you all a safe and blessed Christmas and a wonderful New Year, roll on 2020!
Hey all today I have some Christmas goodies to share. I love creating Christmas gift boxes and bags, because who doesn’t love pretty things! I have used the gorgeous Unforgettable collection for my Christmas trio.
I created a simple Christmas card using the 6×8 Unforgettable paper pad. I used Sprightly as my background paper measuring at 5×7 inches. I then chose three papers to create the Christmas trees, Story Teller, Glorious and Garland. I used a cut file for my tree’s but these could easily be cut by hand. I added some machine stitching to the curves of each tree piece to add definition. I added white glitter to the Garland (turquoise) pieces. My tree’s were then attached with foam tape to create dimension. I added gold glitter stars and tree trunks because although not a huge fan of bling, Christmas is a time you can add as much as you like right!!!! To finish off I added some tiny flowers from the ephemera die cut pack and a Merry Christmas sticker from my stash.
This Coffee Cup gift box is a cut file by Lori Whitlock, easy to assemble but oh so cute! I filled this one with Lindt Chocolates and it will be a gift for one of my boys teacher. I cut the cup part using the Natural Beauty paper as this provides a great contrast to use brighter coloured paper and embellishments. I cut the coffee cup lid in white cardstock.
I used the turquoise strip side of the Sprightly paper to add the coffee cup heat sleeve and then added one of the large floral bunches from the ephemera die cut pack with foam tape.
I added a paper star created using Unscripted paper finished off with a little bling. The Spiral Star is by Lori Whitlock.
To finish off I added one of the bows from the collection to break up the white of the lid. These are so easy to create and perfect for little Christmas treats.
And finally to finish off my Christmas trio I created another box, this is a Noodle Box from the Silhouette Design store. The outer box I used Sprightly paper and inside the box I used Glorious. I used the papers from the 6×8 inch paper pad to create the layered flower finished off with an Enamel Dot from the collection. I have filled this treat box with bath bombs.
You don’t need a Christmas collection to create Christmas cards or boxes, I love pink and turquoise as Christmas colours. Thank you for stopping by today and I hope you find a little time in the busy month of December to create.
Sue Plumb here to share a recent mixed media layout I created using the gorgeous ‘Unforgettable’ collection and a photo of my children that I took while I was shopping with them a few years ago.
I started this page by creating a mixed media background on some white cardstock. I used pink ink to create a watercolour style background, before adding some stamping and coloured texture paste through a stencil in a few spots on my page. I also added some blue watercolour splatters over the top for some extra interest.
Next, I fussy cut the wreath from the beautiful Garland paper, adding foam tape underneath the floral section to pop it up from the page, before sticking it down on top of my background. (You can see how I bent the edges up from the page to add extra dimension.)
I then added some pieces of paper cut from the B sides of the Gloriousand Sprightly papers as a mat for my photo, which I stuck down on top.
Alongside my photo, I added the quote “we don’t remember the days, we remember moments” from the scaled down version of the Story Teller paper from the 6×8″ Paper Stack to act as my page title. I was especially drawn to use this quote for this layout, as in the early days of having twins life seemed to pass by in such a blur. Going shopping with the kids and having two sitting in the trolley and one perched on the end like in the photo is something I will always remember though.
On top of the quote card I added the cute camera Flair Button and popped a couple of Enamel Dots nearby.
Now it was time to embellish my wreath. I used a variety of flowers from the Die Cut Ephemera pack, which I stuck down on top of the wreath using foam tape to provide further dimension. I also added 3 bows from the Tassels and Bows pack; and a few small phrase stickers from the Accessory Stickersheet.
I finished off my layout by adding more Enamel Dots; a die cut butterfly; and then a few hand-stitched crosses using embroidery thread.
That’s all from me today, I hope I have inspired you to create something pretty too. Until next time, happy scrapping!
Guest Designer Laura Alberts back again with a layout focused on the story aspect of the Unforgettable collection. I really loved this cut-apart piece with the phrase, “Every photo has a story” and made it the title of my project. This photo definitely has a story to tell, so it was perfect for this 9×12 sized layout. This photo of my impish daughter covered in paint is a pretty wild story, for sure! I include as many of these stories as possible in my albums because my kids love to read them. Imagine having such a wonderful collection of your childhood memories to enjoy as an adult!
The second cut-apart saying, “Life doesn’t have to be perfect to be beautiful” was such a fitting addition to this picture, I had to use it too! The top of the layout features the Natural Beauty paper that adds movement to the background, while the floral cluster softens the linear look.
My goal was to use flair, so two do appear on this layout, but I saw an opportunity to add tassels and took it! I absolutely love these tassels, such a lovely way to finish off a floral cluster.
I have greatly enjoyed my time as a guest designer for Cocoa Vanilla Studio and hope I have inspired you to create! If you would like to see how I created this layout, you can watch my process video on YouTube here: https://youtu.be/CZ-wV8oIfaQ
Thank you, Cocoa Vanilla Studio for the amazing opportunity to design for you!
Hey y’all! Guest Designer Laura Alberts back with a 9×12 layout using a patterned paper background!
I love this sweet cut file from my friend, Miranda Webber, and backed it with papers from the 6×8 paper pack. I tucked in tons of tiny flowers, clear heart stickers, and butterflies in a gentle cascade from top to bottom.
I wanted to keep the title small on this one so that it didn’t stand out too much on this already busy background, so I just focused on one phrase, “The best things in life are free,” which is certainly true and very applicable to this photo of my daughter enjoying her perch on our back patio. I loved her dreamy expression and decided to make this layout just as dreamy to match!
I hope you enjoy this layout and find inspiration! If you would like to see how I created this layout, you can watch my process video on YouTube here: https://youtu.be/-ocEnSkR_6U
Thank you, Cocoa Vanilla Studio for the amazing opportunity to design for you!
Hi crafty friends, Anita here with you today sharing a sweet layout using the beautiful unforgettable collection
The layout is all about my kitty Kushan who thinks Eve’s beanbag is one of his beds…I’m sure he probably thinks he’s on a big pink cloud. So Today I had to include the bows and tassels on my layout I decided on the bows As I had a idea of floating heart balloons in the air.
I started by selecting 3 pattern papers from the 6×8 paper pad and using a cut file from the silhouette design store and cut 3 heart balloons out then I hand stitched around each balloon using a matching colour thread then I added some twine to the back and double sided foam tape to pop it of the page then I layered them onto my trimmed white cardstock on a angle.
Then I matted my white on pattered paper sprightly and machine stitched around the border of the white cardstock then using more patterned paper from the 6×8 paper pad I matted my photo on 2 different papers .
Then I added fussy cut flowers from paper glorious on each side of my photo
Then I pulled the twine down straight to the bottom of my photo and adhered my title from the ephemera pieces then I added accessory stickers and ephemera around the photo
Then I use 3 of the bows from the bows and tassels to add on each of my balloons then tucking flowers from the ephemera pack around the bows to add a extra pop of colour and to finish of the layout I added clear stickers and enamel dots
Hi lovelies! It’s Danni here today sharing another guest designer layout with you. This time I was very keen to get playing with the freebie cutfiles that match the new Unforgettable collection.
I first cut a large section of the heart wreath cutfile on my Silhouette machine using white cardstock – I just love the way white pops on the gorgeous papers in the collection. I went ahead and backed some of the cutfile with different papers from the 6×8 paper stack, making sure to leave some open spaces to keep it light and airy.
For my background paper I chose Lacewing for that gorgeous peach floral B side, then I tore strips from Natural Beauty and Story Teller (my two favourite papers from this collection so far, I can’t stop using them!).
I layered the strips to the left side of the page and added a crepe paper ruffle underneath for extra texture. I made sure to curl the edges of the torn paper strips up a little, then slipped the cutfile under the edge of the ruffle, creating a half-wreath peeking out from beneath the layers. This created the perfect spot for my pics to go.
I added some layers behind my pics with the 6×8 paper stack and tissue paper, added a little dimensional foam and placed my photos overlapping each other slightly. I then embellished my photos using some ephemera, a flair button, tiny word stickers and one of the adorable bow embellies.
At the top right of my page I created a small cluster with a label sticker for the date. I also added some floral embellishments peeking out from between the paper layers to the left of the page.
My title fits perfectly in the space between, with the foam title words again making the most perfect addition to the page. I can’t get enough of these gorgeous script titles! For finishing touches I sprinkled some enamel dots around the page in groups of three, splattered some white ink and added my journaling inside the circle of the wreath cutfile using a white gel pen.
I love how perfectly this layout represents my photos of my husband and I enjoying the sunshine in the garden, and how perfectly the colours match the peachy coral dress I wore.
I hope you like this layout as much as I do! Thank you so much for joining me today. Happy scrapping!