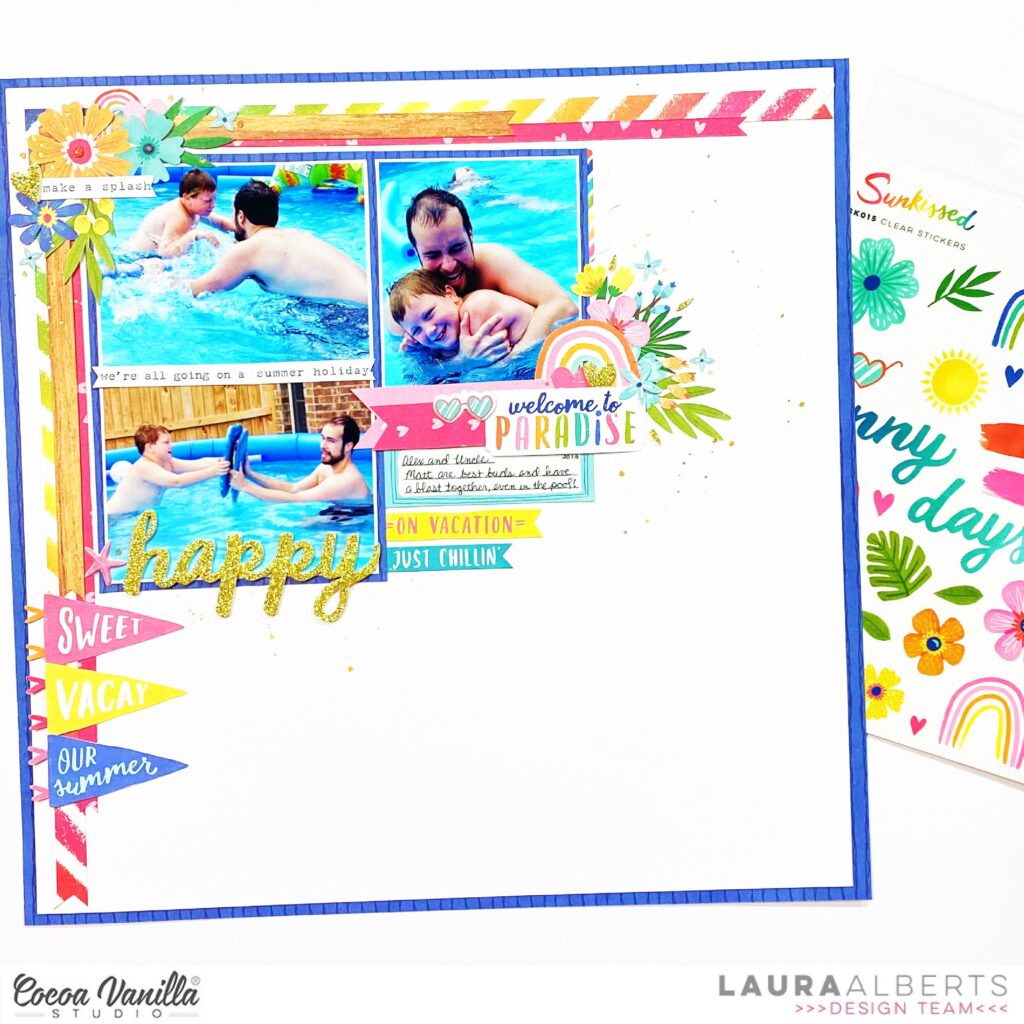
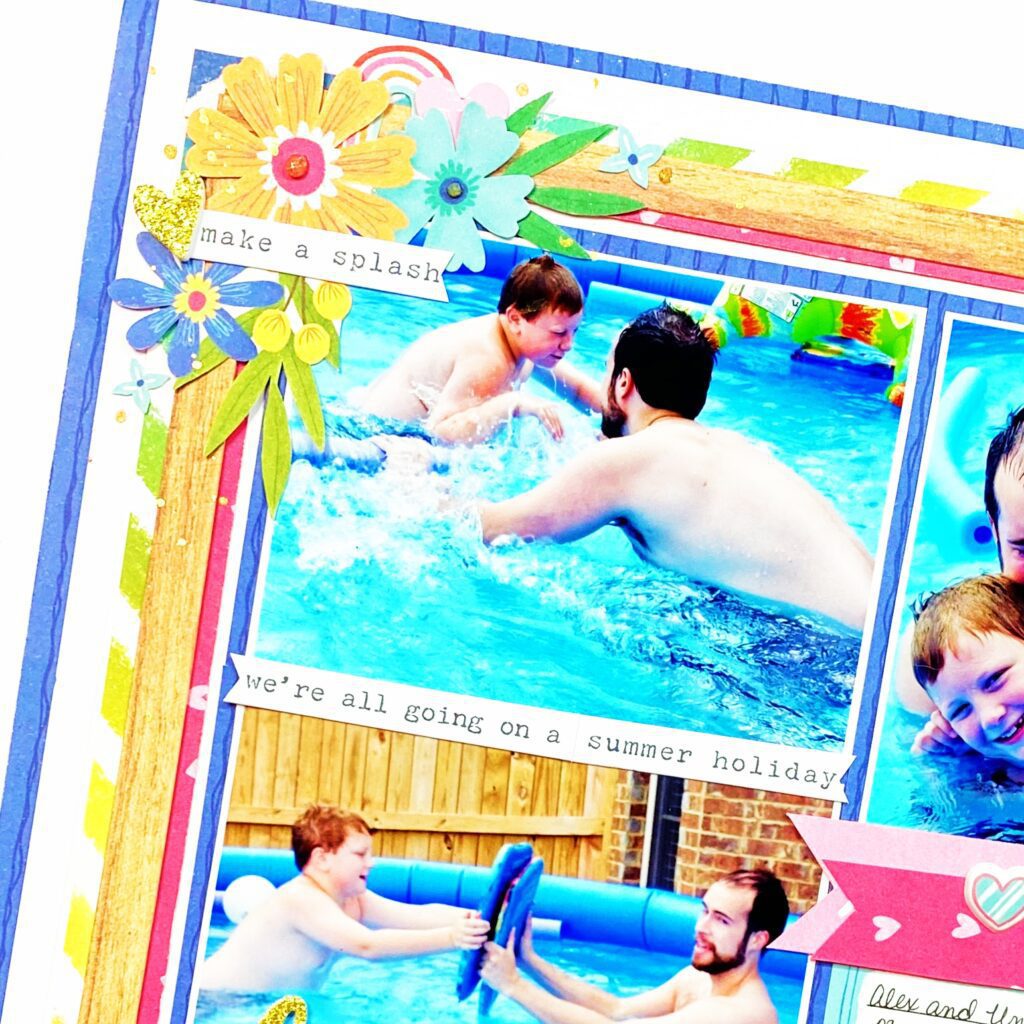
Hey y’all! Laura Alberts back again with a fun summer layout using the gorgeous Sunkissed collection! I love multiple photo layouts, so this month’s multiple photo focus was definitely my jam! I think these three 3×4 inch photos that beautifully illustrate my oldest son’s friendship with my brother. Love how the vibrant colors in Sunkissed perfectly capture the playful mood of these photos! Using a rainbow strip from the Fun in the Sun paper, along with some fussy cut flags, I created a fun L-design in the top left corner of this layout, which created a lovely border for my grid of photos.
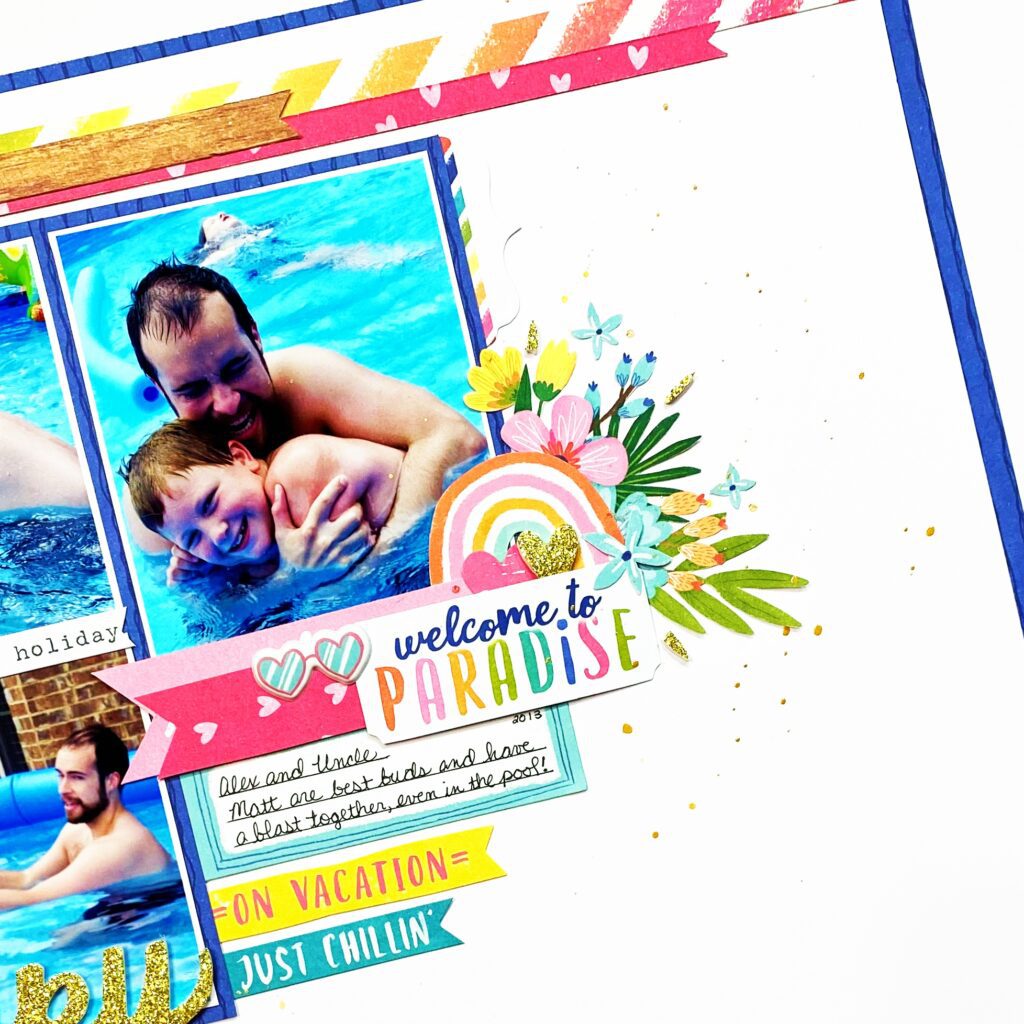
I particularly love this large cluster on the right where I layered a fussy cut floral cluster from the Growing Wild paper behind a rainbow and ticket from the ephemera pack. It’s such a fun corner cluster that accents the main focal image perfectly. The labels in this collection are so perfect for tucking a little bit of journaling anywhere on the layout too!
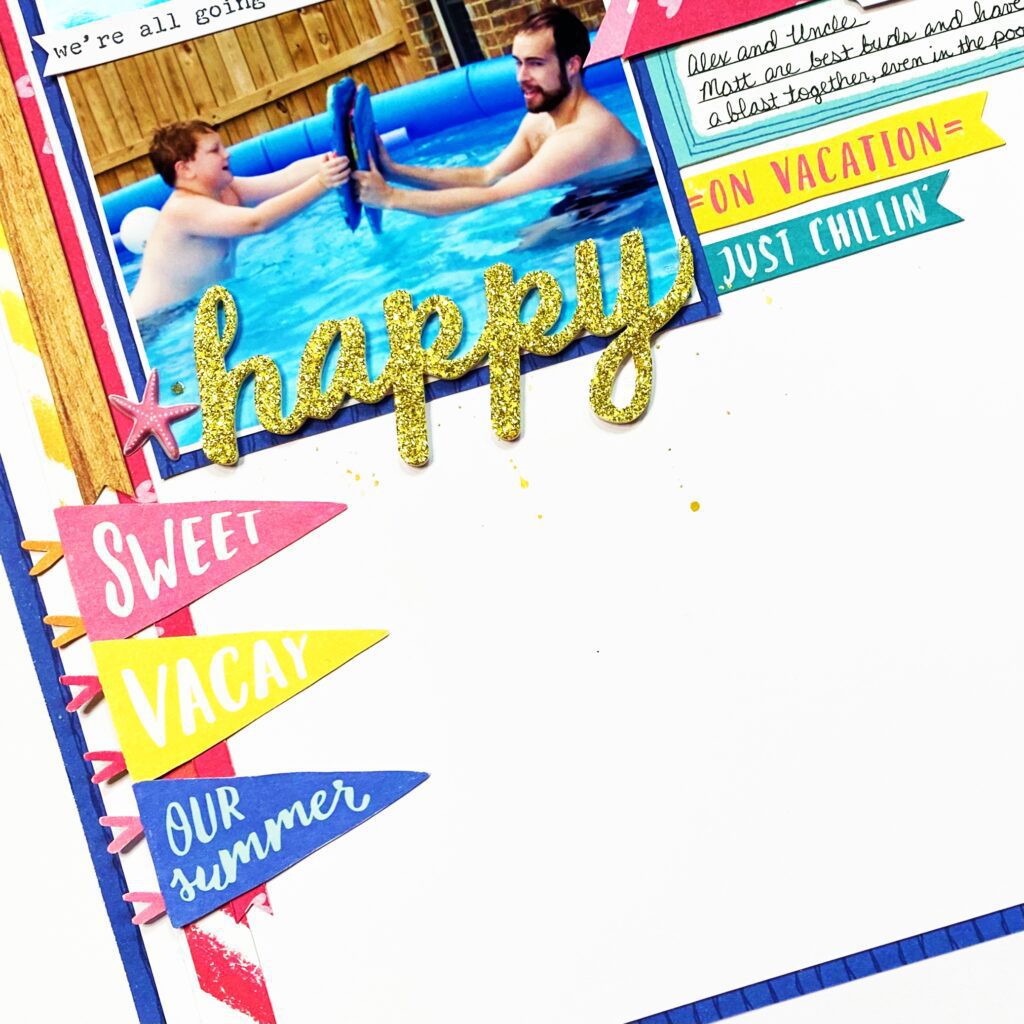
As a finishing touch, I dug into the glitter foam titles for this ‘happy’ and then added hearts to my other two clusters to tie in the beautiful gold tone around the page. The little starfish seemed like a lovely accompaniment in front of it! A little bit of splatter and Nuvo around my clusters finished this one off! Such a fun layout.
I hope this layout inspires you to try a multiple photo layout, as well as look at the cut apart papers as opportunities for extra embellishments! If you’d like to see how Welcome to Paradise came together, be sure to watch the process video below.
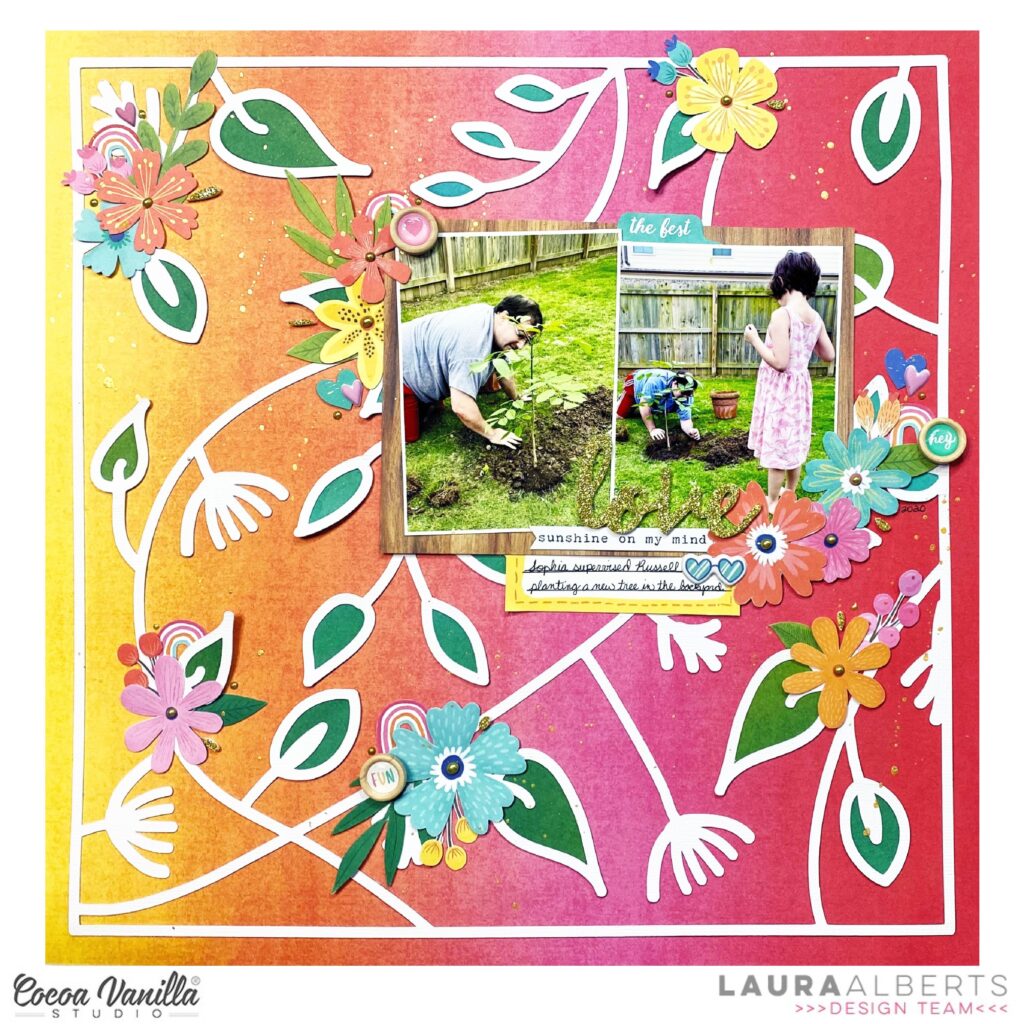
Hello Friends! Welcome on Throwback Thursday kind of a post. This time I get a pleasure to rediscover one of the older Cocoa Vanilla collections. You know I love them all and I love coming back to them, combining bits and pieces and pattern papers. This time however I focused on one line only and I pulled out “Sunkissed”. It was hidden for the period of winter but it’s time for the big comeback of vivid colors and summer motifs! I pulled out two most expensive photos in my mamarazzi career and scrapbook them with little mixed media vibe. If you wonder why they are the most expensive, let me only tell you that I was convinced my new smartphone is waterproof… It wasn’t. At least I got those photos, right? :D
I started with sheet of watercolor paper as my background. I knew I wanted to use water so I had to be sure to use the proper base paper. Next step was to apply some clear gel medium through stencil with circles in different sizes. They are going to mimic the air bubbles in water. Gel medium is transparent and shiny when it’s dry and it’s also color resistant. Just make sure you dried it well before moving to next step.
I picked three Distress Oxide inks in “Mermaid lagoon”, “Broken china” and “Peacock feathers” colors and tap them all over the background and sprayed everything with clear water. Colors mixed with water well and started floating on the surface. I dried the background with the heat gun removing excess of water with paper towel. When everything was dry, I took a blending brush and applied some ink through the stencil in random spots. The background was done!
I was ready to start building my composition. My pictures didn’t have any white outline so I back them with some pattern papers to make them pop from the background. I used “Bright side” and “Sunny days” for this purpose. Idea for this page was to create an underwater scene so I kept it very monochromatic, in all shades of blue. I also cut out circles in various sizes using the same pattern papers adding few scraps from A5 Paper Stack.
Few bits and pieces from Ephemera Pack serve as an embellishments scattered around the photos. I also added my beloved Wooden Buttons and Puffy Stickers here and there. They are the best finishing elements. I was almost done with my page, when I noticed I also got some transparent stickers left so I added few of them in the background using mostly blue ones. They work best on light backgrounds, like the one I have in my page.
And that’s it! Simple, right? My favorite type of layout. That is all for today. Thank you so much for stopping by and I we will see each other in two weeks! I already created fun page with “No limits” collection for you!
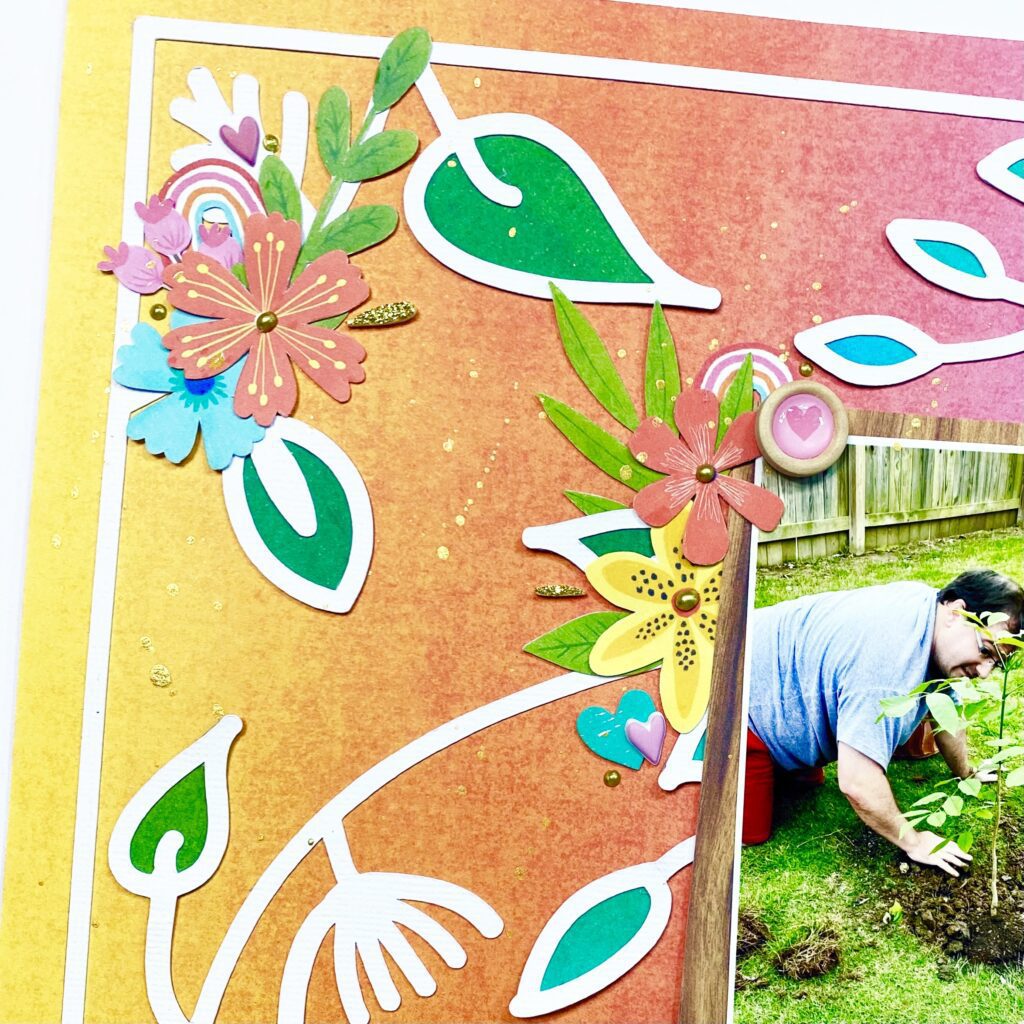
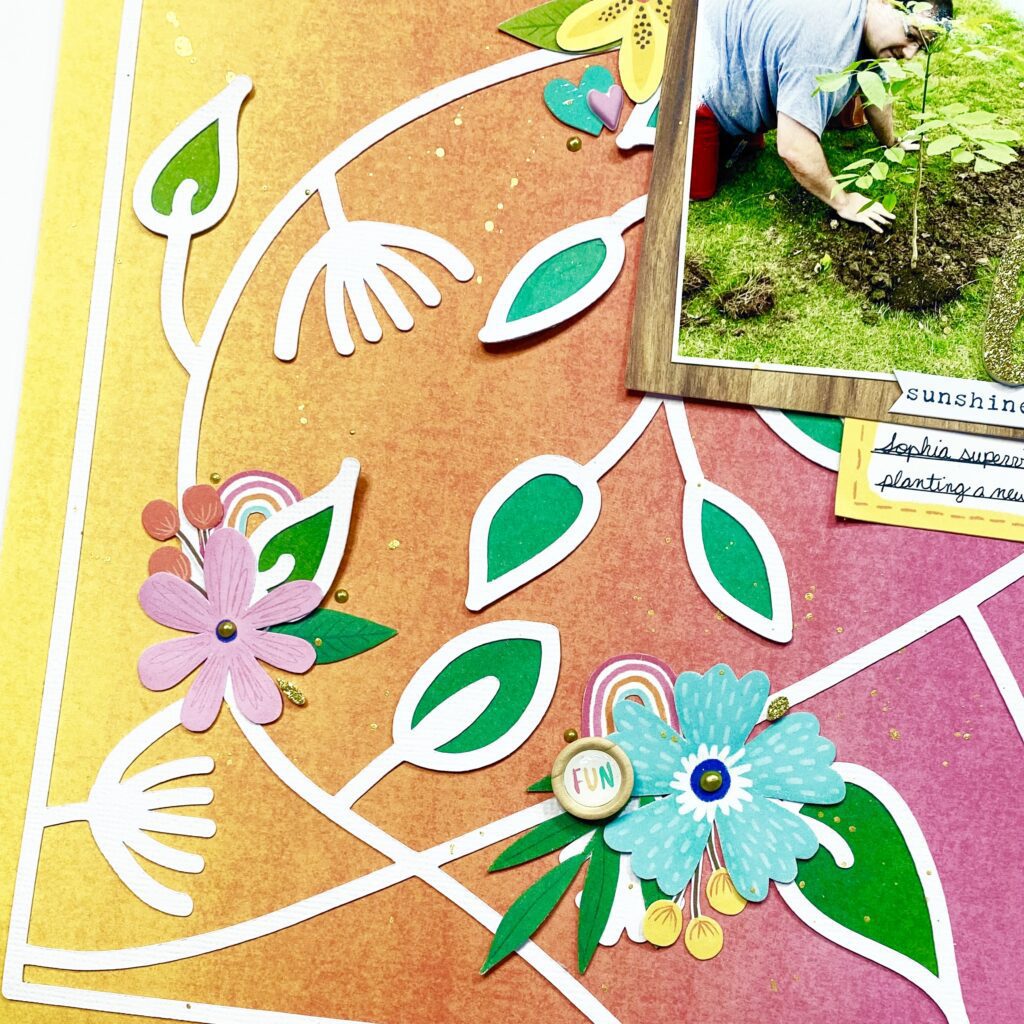
Hey y’all! Laura Alberts here with a bold background for this layout using the gorgeous Sunkissed collection and a fabulous cut file from Liz Longest Designs. Just like I prepare all of the new collections, I fussy cut a full page of these absolutely stunning florals from the Growing Wild patterned paper. Using the beautiful greens from the Good Vibrations patterned paper to back this cut file, I added a bit more color to this already bright and lovely background. Layering those fussy cut florals on top of the these cut file leaves was such a fun and easy way to tone down the vibrancy of the background.
I created several embellishment clusters on this background with a special surprise hidden inside, rainbows! While normally, rainbows aren’t the first icon I think to include in my floral clusters, on this page, it felt perfect! These sweet little rainbows blended in perfectly with the colour scheme! I fussy cut these rainbows from the Fun In The Sun cut apart sheet and just added them in with my ephemera. I even added little flourishes left over on the glitter titles around the clusters for a special detail.
My favourite part is adding these tiny details though! I created tiny clusters with ephemera hearts and puffy heart stickers as well as adding wood epoxy buttons to some of the my larger floral clusters. These scattering bits give so much interest to my clusters and a bit of texture too. I love when my layouts have more than paper elements on them, so these additions really stand out!
I hope that my bold and beautiful layout inspires you to reach for these colourful patterned papers and use them in a new way. If you’d like to see how this layout came together, watch the process video below!
Hey Hey! It’s Michelle back here today with a fun new layout share as part of our fortnightly Throwback Thursday feature. This week I dipped into my Sunkissed stash to brighten up the place, and because I was having so much fun creating my last layout for the Scraplift theme, I fell down that rabbit hole again too!
I lifted a layout of mine from quite a few years back that incorporates a beautiful heart cut file from CUT to YOU, a bunch of florals and a mixed font title. I kept all the same similar elements and just switched up the collection to show off the bright and beautiful colours within the Sunkissed Collection.
I chose to document a sweet moment of Leila and our super sweet little pup Daisy, both focused on smashing buttons while playing something on the Switch. It’s not often these days that you can find Daisy alert, awake and happy to sit still for a photo as she’s either VERY lively, or snuggled up next to someone fast asleep.
I backed the photo using the darker blue print from the ‘Bright Side‘ paper, theres a pretty pink version of the same print in the A5 paper stack too that I’ve used to back a section of the awesome heart cut file from CUT toYOU. On that note, a majority of patterns used to back the cut file can be found in the A5 paper stack. The cut file was cut out on white cardstock and once filled with pretty papers, adhered to the layout using foam tape to give a slight hint of dimension.
Under the photo I created the first of 2 large floral clusters, most of which are made using fussy cut flowers from the ‘Growing Wild‘ papers in both the 12×12 and A5 paper sizes. I added some ephemera pieces, a woodbutton and some accessory sticker words to finish this one off
and then up in the top right corner of the layout I added the second major cluster using the same decorative elements to compliment the first cluster. Both clusters use a mix of adhesives to create different layers of dimension within the floral goodness.. Most used would be my trusty double sided foam tape and some sticky dots.
I went back in time to find these alpha stickers in my stash as I was after something not quite as bright as the white I usually add to layouts. These are a pretty grey(ish) colour with little white polka dots all over, perfect for this kind of layout as they don’t blend in with the cut file, and don’t stand out too much to take away the focus from the photo and cut file. Released way back when, with the Free Spirit Collection. Now thats a throwback item for sure! The gold heart and ‘these’ word are the very last remnants in my pack of the awesome gold glitter words from the Sunkissed Collection. My most favourite word sticker pack by far!
Oh and I cant forget to mention the very awesome background pattern paper I used for this layout, Summer Lights, reminds me of a delicious Mocktail/ Juice creation that I enjoyed many years ago. Gives off bright summer sunset vibes too.
Well friends, thats all from me today. Thanks so much for stopping by and taking a quick journey back to enjoy the beautiful Sunkissed Collection. It truly is one of my most favourite collections of all time. I just love the bright happy colours in this collection, they make me want to make ALL the happy scrappy things!
Hello CVS crafty friends! Have you ever scrap lifted yourself? I have done it in the past when I am in a mojo rut, it’s a great way to get your creating going again, or perhaps its just a layout that you designed and loved so why not, do it again! Today I am sharing a layout created using These Days collection, which is a scrap lift of a layout I created using Sunkisssed collection.
Here is the original layout:
And here is my second take! I love the fact that no two layouts ever look the same when you scrap lift, they still look original. I chose a family theme for this layout. So my patterned papers stood out I used the Pretty Posies paper using the wood grain side. I gave a light splatter of white paint. I then used Take Flight, Home Grown and Family Ties papers to create my horizontal torn strips.
I chose a butterfly cut file for this layout to replace the origami heart. I cut it three time and only glued the centre to give it a 3D effect. I used Neighbourhood and The Good Life papers. I then added my 6×4 inch landscape photo matting it and adding with foam tape to add dimension.
My next step was to add flowers and florals like I did in my original layout. I used the Floral Ephemera pack and added to each side of my photo. I layered some on top of each other so they didn’t appear ‘flat’. I created an embellishment cluster to the right of my photo using the Die Cut Ephemera, Puffy Stickers and Wood Epoxy Buttons.
I created my title using phrases from the die cut pack and finished off with another wood epoxy button.
Lastly I added word stickers from the Accessory Stickers to create a sub title around the wing of the butterfly.
I love how my scrap lift layout turned out, I hope it inspires you to give it a try too!
Thank you for stopping by today and see you again later in the month!
It’s Tarrah back with you and today I am sharing a new Summer themed layout featuring the gorgeous Sunkissed collection! I have had this awesome photo of my Mum in the pool printed for ages and I took it especially to use with this collection! I am finally getting around to documenting it!
I started by choosing some background patterned papers – I chose the sunset ombre paper for my main background and trimmed down the ‘B’ side of the Sunny Days paper. I adhered this piece to the centre of the sunset ombre paper and bent up the edges to create some texture. Next I chose one of the really colourful 3′ x 4′ cards from the journaling cards pack to add lots of colour and layered it under my photo. I placed my photo and arranged them it how I liked it, making sure to leave enough room for the cut file title at the bottom.
Next I cut out the Best Ever card from the Fun in the Sun paper (again I love the different colours in it) and placed it to the left of my photo. From plain white cardstock, I cut out the ‘Hello Sunshine’ title from the Free Summer cut files. I added foam tape underneath the cut file once it was cut out and adhered it to the bottom half of the Sunny Days paper. I overlapped some of the cut file on the photo and also on the Best Ever card. I love the shadows that are created on the page by adding foam tape under the cut file title.
Tip: If you want to break up the plain look of a cut file without getting messy with paint, add some small repetitive embellishments like the cute heart puffy stickers to add some small detail and colour without taking away from the cut file itself.
I couldnt go past adding some gorgeous florals from the FloralEphemerapack I mean look at all those gorgeous colours! I tucked some into both the left and the right of the cut file title. I further embellished my page with clear stickers, more ephemera, accessory stickers, wood epoxy buttonsand puffy stickers. Lastly I sprinkled some white mist on my layout and stamped the date stamp.
Thanks so much for stopping by the Cocoa Vanilla blog today! I hope you enjoyed my layout as much as I enjoyed creating it!?
Make sure to get yourself the AMAZING Sunkissed collection and get creating with it!
Hi everyone, happy new year! If you are anything like me (4 weeks deep into school holidays), you are having trouble remembering what day it is and are tired of hearing “muuuuuum” for the five hundred and twentieth time today. (Hang in there, we’re past the half way mark!) Fortunately, I do know today is Thursday, because it is actually “Throwback Thursday” and my turn to bring you some fresh inspiration using an older collection. I didn’t go too far back though, because today I am sharing a layout featuring the beautiful ‘Sunkissed’ collection which is still available in the Cocoa Vanilla Studio online store.
For this layout, I wanted to create a mixed media page and decided to use some of my stash of acrylic paint. I love using paint because it is quick, easy, economical, and available in a great range of colours. And even those of you who are not “mixed media people” will usually have access to paint if you want try a technique like this yourself. (I didn’t use any fancy paints – cheap student grade acrylics will do the job!)
The photos I documented on this page are of my two boys taken on the day of their colour run at school. This was not long after they had crossed the finish line and they were both so proud of how wet and coloured they were. (And no, I didn’t bother trying to wash the clothes, they were destined for the bin anyway.) It was the colours of the paint on their clothes that inspired my colour choices for this layout.
As I mentioned above, I used acrylic paint for my mixed media background on this page. I used three different colours which I applied with a small brayer. (This method is great if you are short on time as the thin application means it dries super fast!) I then mounted my painted cardstock on top of the beautiful Good Vibrations striped paper, which created a fun page border.
Next, I added my rainbow arches, which had been fussy cut from a piece of the Bright Side paper left over from a previous project. I cut only the pink, orange and yellow arches (or what I had of them anyway) and stuck them onto my background.
I then created a layered mat for my photos to sit on using a piece of the heart print Feelin’ Fine paper, topped with a piece of the smaller scale cloud print paper from the A5 Paper Stack and finally a scrap of the Summer Lights paper. I also added a small yellow paper doily and some frayed gauze for texture before adding my photos on top.
The next step was to add my title, which I ran along the horizontal strip in my paper stack. To the left of my photos I used some alphabet stickers I had left over from the Love Always collection for the word colour and then to the right, I used the word fun from the Glitter Foam Title Stickers. Look at that gorgeous golden sparkle!
With all the main components in place, it was time to add a few fun embellishments. I chose a number of pieces from the Die Cut Ephemera pack including a flag, umbrella, and a watermelon slice. These were chosen purely based on their colour, but I love that they add a touch of whimsy to the page. I also added several stickers from the Puffy Stickers pack.
I finished off with some phrases from the Accessory Sticker sheet and some tiny black ink splatters. I love how fun and colourful this layout turned out!
If you would like to see exactly how it came together, you can watch my process video here:
Thanks for stopping by so I could share this with you, I hope you are feeling inspired to bust out some of your older Cocoa Vanilla stash now too! Until next time, happy scrapping!
Gwen on the blog today bringing you some fun Summer themed inspiration. My layout today features the beautiful bright ‘Sunkissed’ collection and I’m documenting a photo of my daughter on the beach at a recent family holiday. I was really keen to use the deep blue of the ‘Bright Side‘ pattern paper as my background for this one to draw out the blue in the ocean in my photo. I’ve teamed it with some of the pretty florals in the collection for a super fun bright and happy page.
To begin the layout, I’ve created a frame for my background using the ‘Sunny Days‘ pattern paper to layer onto of the ‘Bright Side‘ paper. I’ve also added a stitched border for extra detail.
Next, I’ve backed a cut file from CUT to YOU using the two ombre style pattern papers in the collection ‘Summer Lights‘ and ‘Good Vibrations’. I’ve used the floral ‘Growing Wild‘ paper in the rainbow section of the cut file as well as the pink exclusive pattern paper that is in the A5 paper stack. I’ve gone with the more subtle prints here because my background has stripes and I’m teaming it with the florals.
I’ve also used the ‘Good Vibrations’ pattern paper to create a photo mat and then raised my photo on foam for dimension. I’ve centred the back cut file on the page and now it’s time to add the pretty embellishments.
Starting with some fussy cut florals from the ‘Growing Wild‘ pattern paper, I’ve layered these both under and on top of the cut file. I’ve mixed these with die cut florals from the ‘Die Cut Ephemera Pack‘ for added layers and to build out the embellishment clusters. I also pulled out the fun thongs die cut to add to my page.
Next up, I’ve added in some elements from the ‘Accessory Sticker Sheet‘ including the round element at the top of the page that says ‘Fun in the Sun’. I’ve also included in my floral clusters some of the ‘Wooden Epoxy Buttons‘ and a cute pair of sunglasses from the ‘Puffy Sticker Sheet‘.
The tile for my page has come from the ‘Glitter Foam Title Stickers‘ I’ve combined the word ‘Summer’ and ‘Love’. As I’ve applied them to my page, I have bent them slightly to allow them to follow along the line of the rainbow. I’ve also added a couple of the sweet heart elements from this sheet to my clusters for an added little pop of sparkle. These were really easy to position and I love the dimension this adds to the page.
I finished up the page by adding in a few small fussy cut florals from the ‘Growing Wild’ pattern paper.
I’ve also made a YouTube process video for today’s page which you can watch here.
Hello Hello! It’s Michelle back here today with a new layout to share, and a slightly different subject to scrapbook than the usual continuous layout shares of Leila. The past few days my fellow DT Members have been sharing some really awesome ways to add journalling to their layouts in a creative way, and today its my turn to share. I’ve used a mix of our more recent collections These Days and Sunkissed, plus one paper from the BoysRule collection.
As you can see, a new addition to our family is on its way. This one is of the furry kind and she’s oh so cute! We’ve named her Daisy and cant wait to welcome her into our home. I wanted to document the first time we met this sweet little pup, and I think this layout was a perfect way to do so.
To begin the layout I found an awesome 3D cut file design on Etsy and cut it out using the Happy Go Lucky paper from the Boys Rulecollection. The perfect shade of textured black to use for a 3D style cut file. Each individual piece is adhered together using foam tape to give it the dimensional 3D look. I added a couple of fussy cut flowers in place of a collar from the Home Grown paper (TheseDays Collection)
Now we can’t have a cute puppy on a page without a sweet little dog house can we?
Using the woodgrain pattern side of the PrettyPosies paper I’ve constructed a dog house using a concertina fold for the main structure. This gives it a more dimensional look, similar to what a real dog house might look like. I added a rainbow pattern dog bed (Family Ties paper), some flowers (Home Grown Paper) out the front and a name plate using a label tag from the Good Life paper along with some puffy alphabet stickers.
Heres some close ups of that sweet puppy face. She’s grown and changed a lot since these photos were taken, and I cant wait to document the next visit.
I printed the photos at around 2x3inch size and adhered them to the layout using some foam. Underneath these I’ve added the sweet heart paper from the back of the Good Life paper and sewn around the edges for a little extra detail. Tucked into this cluster are more mini flowers growing out of the “grass” (Family Ties paper) a cute puffy gold glitter heart, accessory sticker and cut apart ticket from the Good Life paper. Theres also a mini Butterly (Take Flight A5 paper) to match the 2 above the dog house and a strip of hearts which is another cut apart piece from the Good Life Paper.
In regards to journalling, I’ve kept it pretty simple. It’s not often that I add journalling to my layouts these days and when I do its not very substantial. So I thought I would share a way to get creative, when you don’t have a lot to write.
I’ve used one of the frames from the Wall of Fame paper to create a thought bubble, hovering over the dog in amongst the clouds to add a couple sentences about our time with her the other week. These are all adhered using foam tape to give them all a little dimension in the top corner. The clouds and sun can be found in the Sunkissed Collection Ephemera pack.
Lastly I added a sprinkling of gold ink around the layout and a couple of hand drawn bubble dots to connect the thought bubble to the sweet little dog.
Well thats all from me today. I hope you’ve enjoyed seeing my take on creative journalling. Be sure to check back in tomorrow to see what the next DT member has in store for you.
Hi everyone, I’m back with another Summer Layout using the beautiful Sunkissed collection!! I’ve been making my way through scrapbooking my Summer beach holiday photos from earlier in the year and Sunkissed has been perfect for all of these happy memories. For this layout I decided to document a photo of my teenaged son, because I’m very aware that probably 90 percent of my layouts are girly! I hope that those of you that love boy layouts enjoy seeing this page!
The cut file is a free one from Paige Evans, and it was perfect for my title because I could make it work for a boy themed layout. I used a large piece of Just Chillin’ for the cloud background, and positioned the horizon line of the sun along the line of the paper.
I backed the cut file with Sunny Days, Summer Lights, and Fun in the Sun. The gold glitter paper that I used to back the ampersand is from my stash.
I used art crayons to add some interest behind the words of the cut file in matching colours. It’s very subtle, but definitely adds some interest. I kept my embellishment very simple, and tried to avoid girly icons and flowers (although I did use one Puffy Sticker flower).