Hello Hello! It’s Michelle back here with a new layout share featuring the beautiful Storyteller Collection. I went with a grid style layout, one that I’ve shared as part of a yearly documenting project I started a few years back for Leila.
I really enjoy re-creating this layout every year with the updated list of all the things Leila is loving, and seeing which photo and paper collection fits the feel of her current personality. Take the lack of pink from the past couple of years due to Leila’s hatred of the colour for a patch of time. Thankfully it’s making a comeback and is equally represented within the collection used this year.
Here’s a look back at all the older layouts, only 6 years of favourites documented so far, all with Cocoa Vanilla Studio Collections. I think I need to find the lists I made in years prior so that I can make a layout for all the years I missed prior to this.
I used all the same design elements on this layout as I have in the past, just switching up the direction that I placed the embellishments.
I’ve used squares of pattern paper from both the 12×12 and A5 paper stack designs and machine stitched for some added texture to create the base for the background then layered the list and photo over the top.
A photo taken from a recent day trip when Leila ‘met’ some life size versions of Lego Mario and Luigi. She’s still an avid lover of all things Luigi, even if he has been relegated to 2nd in line after all her beloved baby dolls. He does still come everywhere with her.
I added fussy cut florals from both sizes of the Spring Fling paper into the white spaces diagonally top and bottom of the layout.
There’s also a couple of ephemera pieces in both clusters, and a mix of different adhesives to achieve different heights of dimension.
I created the title of the layout at the top of the list using the Foam Title Stickers from the collection, along with handwritten text, then embellished with a wood button, ephemera and fussy cut florals. The list has been adhered to the woodgrain paper to create a clipboard of sorts.
Here’s a closer look at all Leila’s current favourites, there’s probably way more I could have added now that I look back on it.
In 3 of the 4 solid colour squares, I added strips of words from the 12×12 cut apart sheetStory Time, plus co-ordinating puffy stickers
Lastly I added the usual gold splatters a few extra puffy stickers within the floral clusters and then called it done.
Here’s a final look at the full layout…
Well that’s all from me today, thank you so much for stopping by. I hope you’ve enjoyed seeing this years updated ‘favourites’ layout, its certainly one that easy to replicate for your own documenting. Be sure to share in the Cocoa Vanilla Studio Community Group on Facebook if you do.
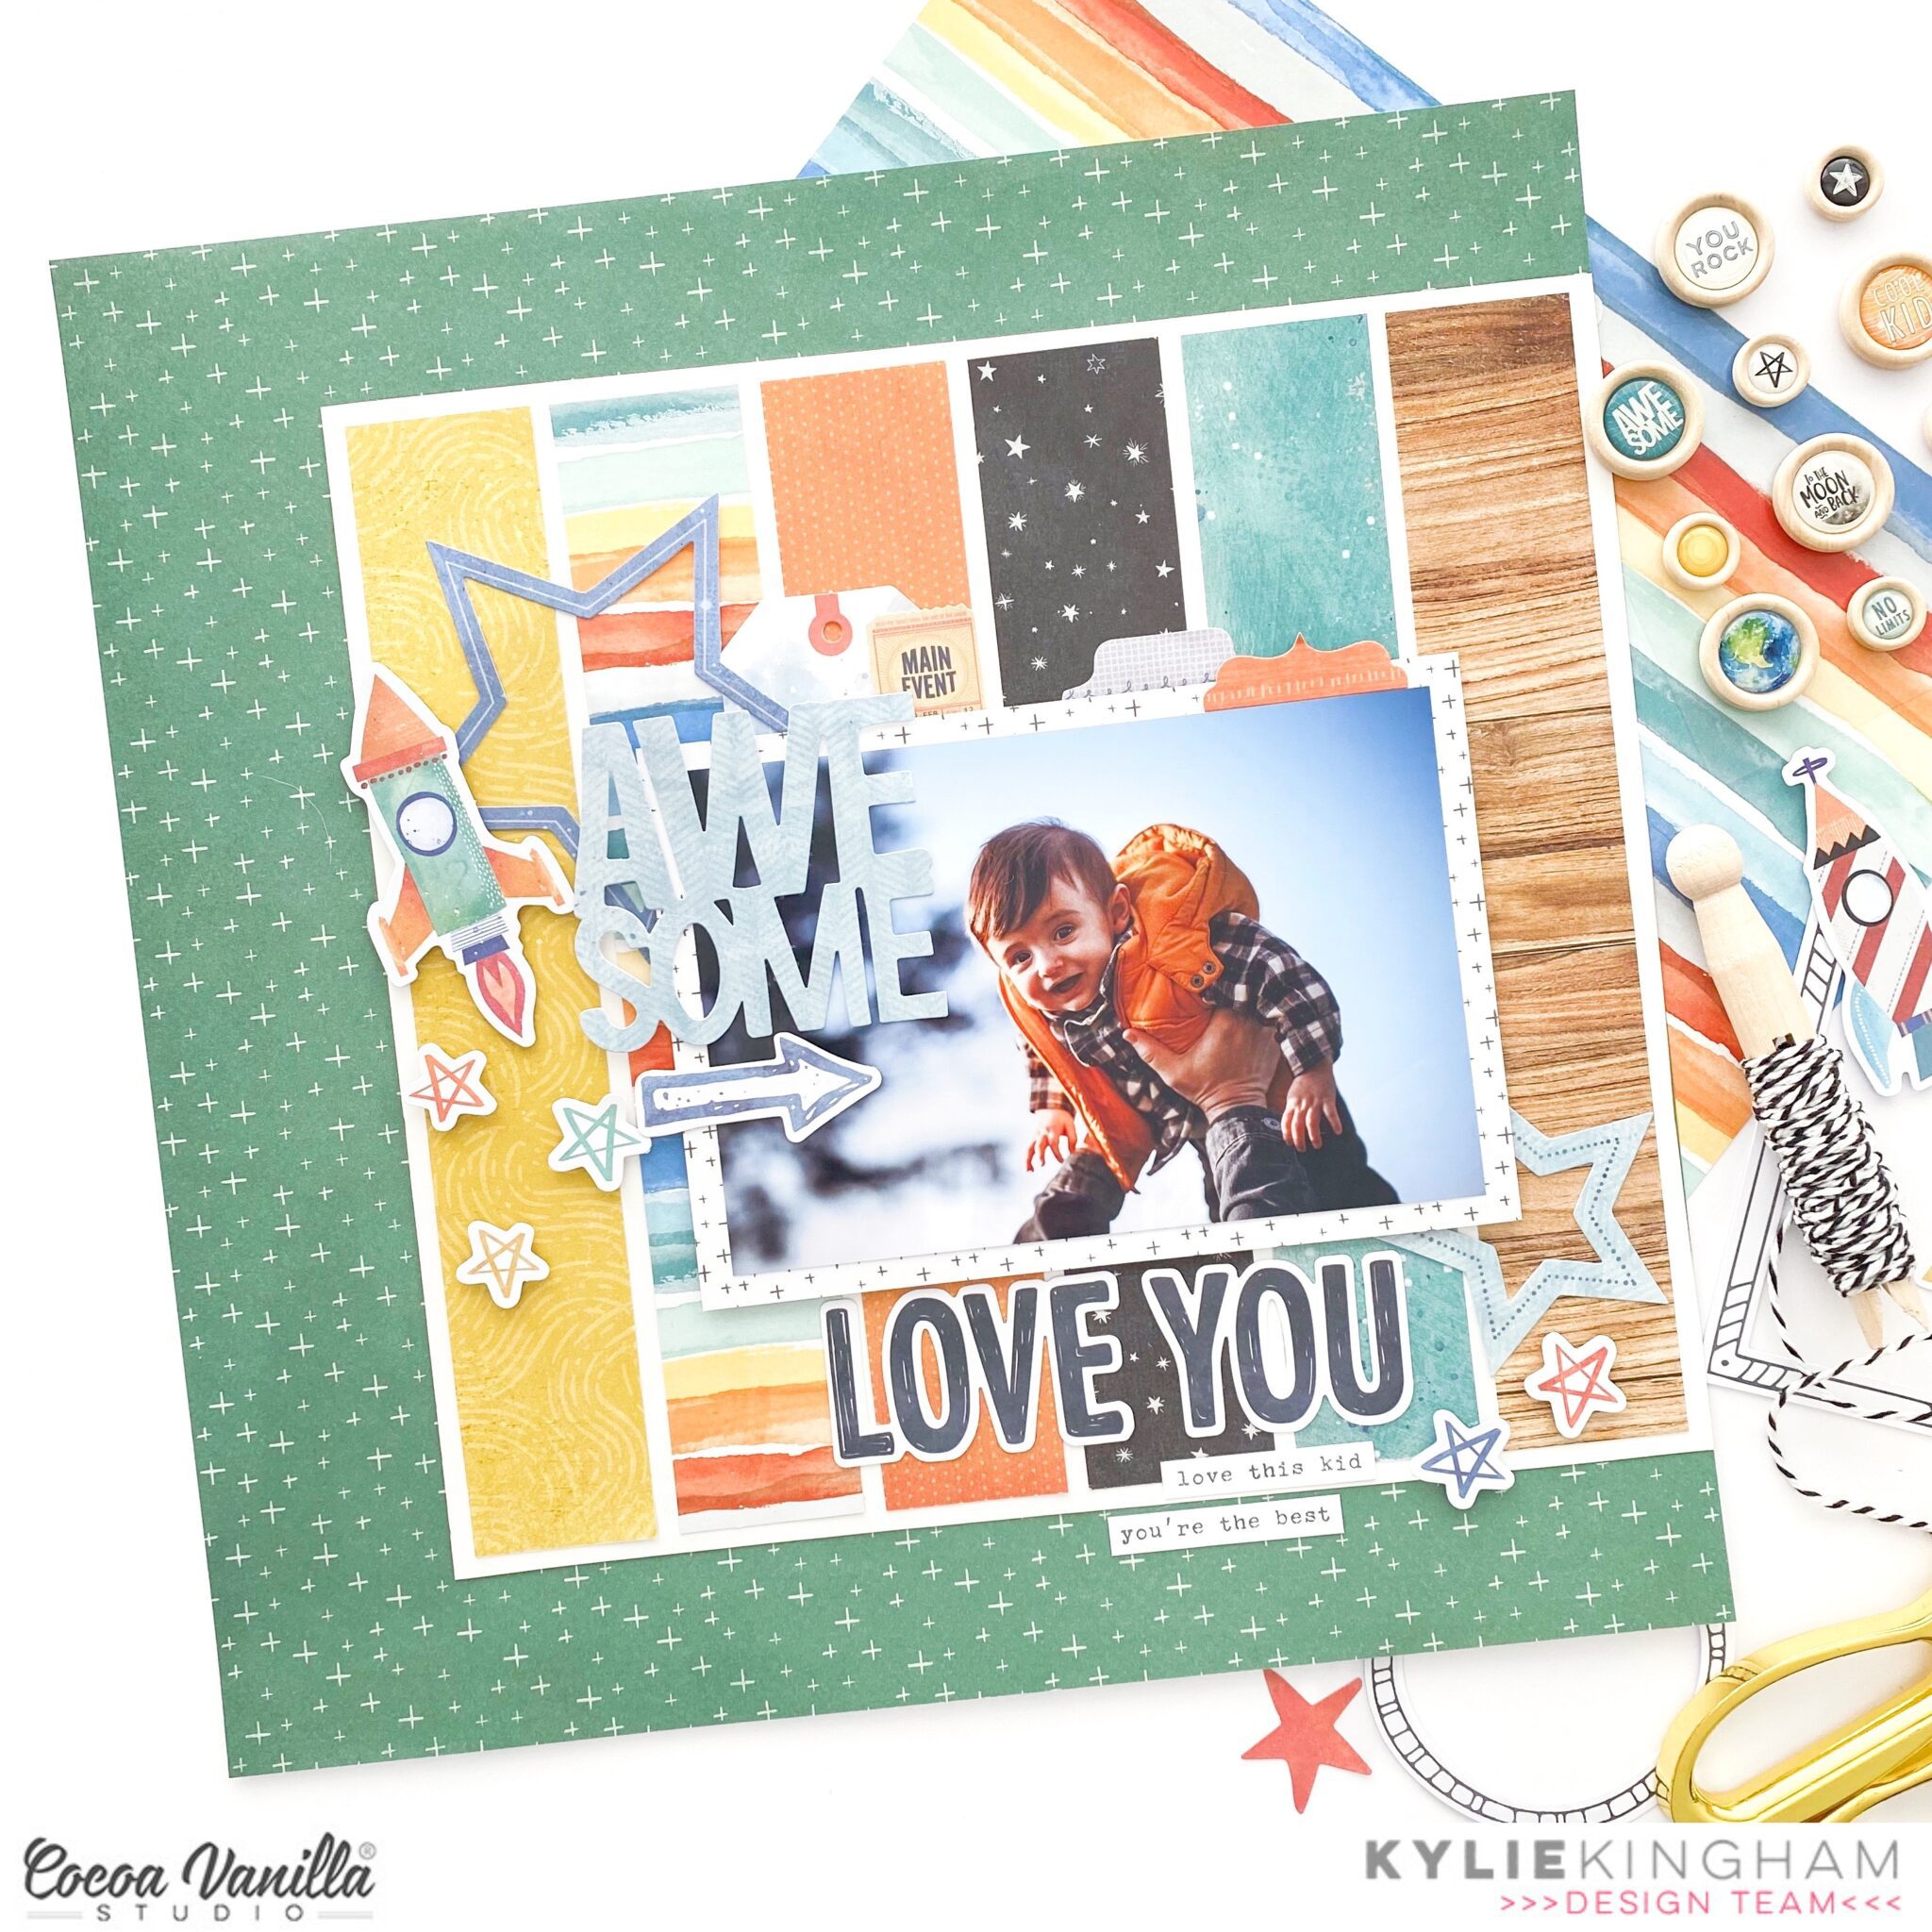
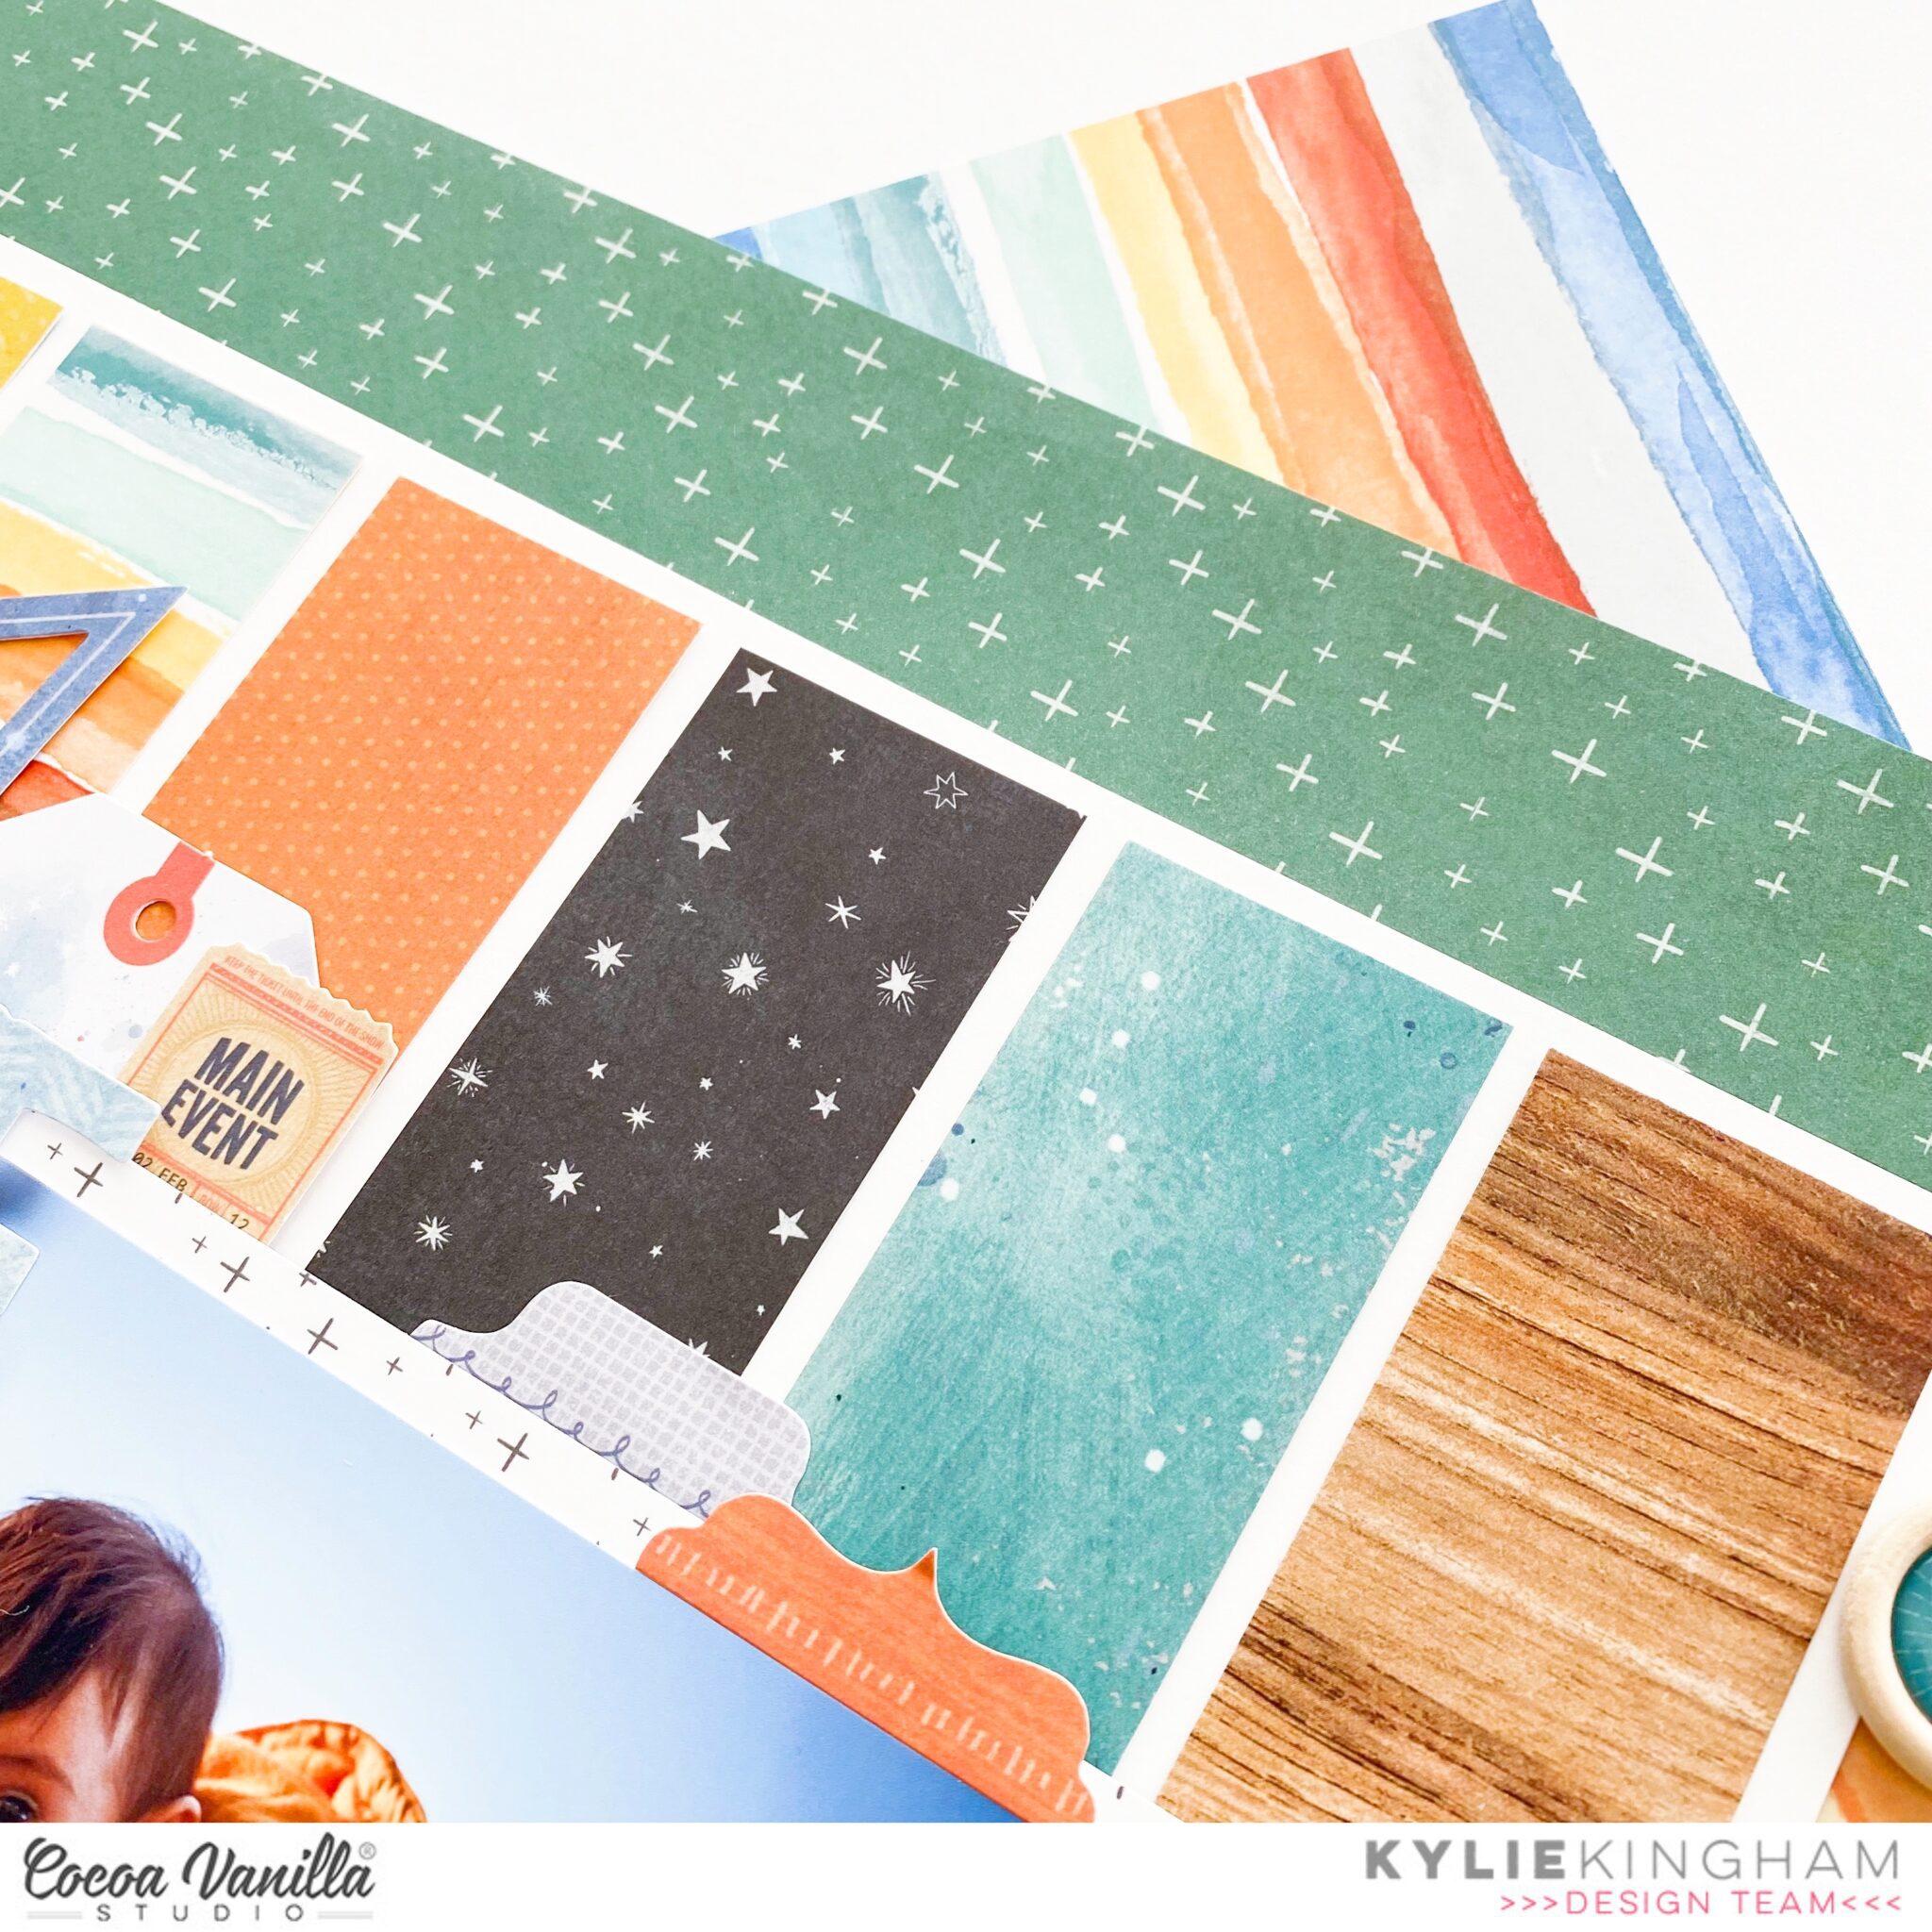
Hello there CV fans! It’s Kylie with you again today with a very colourful layout to share featuring the new ‘No Limits’ collection. I am always experimenting with ways to incorporate lots of different papers into my page designs. (Perhaps that comes from my inability to choose just one favourite paper!) I decided to create a background feature with ‘panel’ strips of paper for the layout I am sharing with you today.
I chose the ‘NEBULA’ paper as my background and I cut down a white sheet of cardstock to measure 10″x 9.5″. Next I trimmed several strips of various papers to measure 1.5″x 9″. I then laid every strip across the white panel, making sure to adjust the position of each so that they were all evenly space. I wanted to have a nice even edge of white showing around each piece. When I was happy with how it looked I adhered everything down with double sided tape. Once complete I adhere the whole piece to the background paper, lined up neatly next to the right side edge.
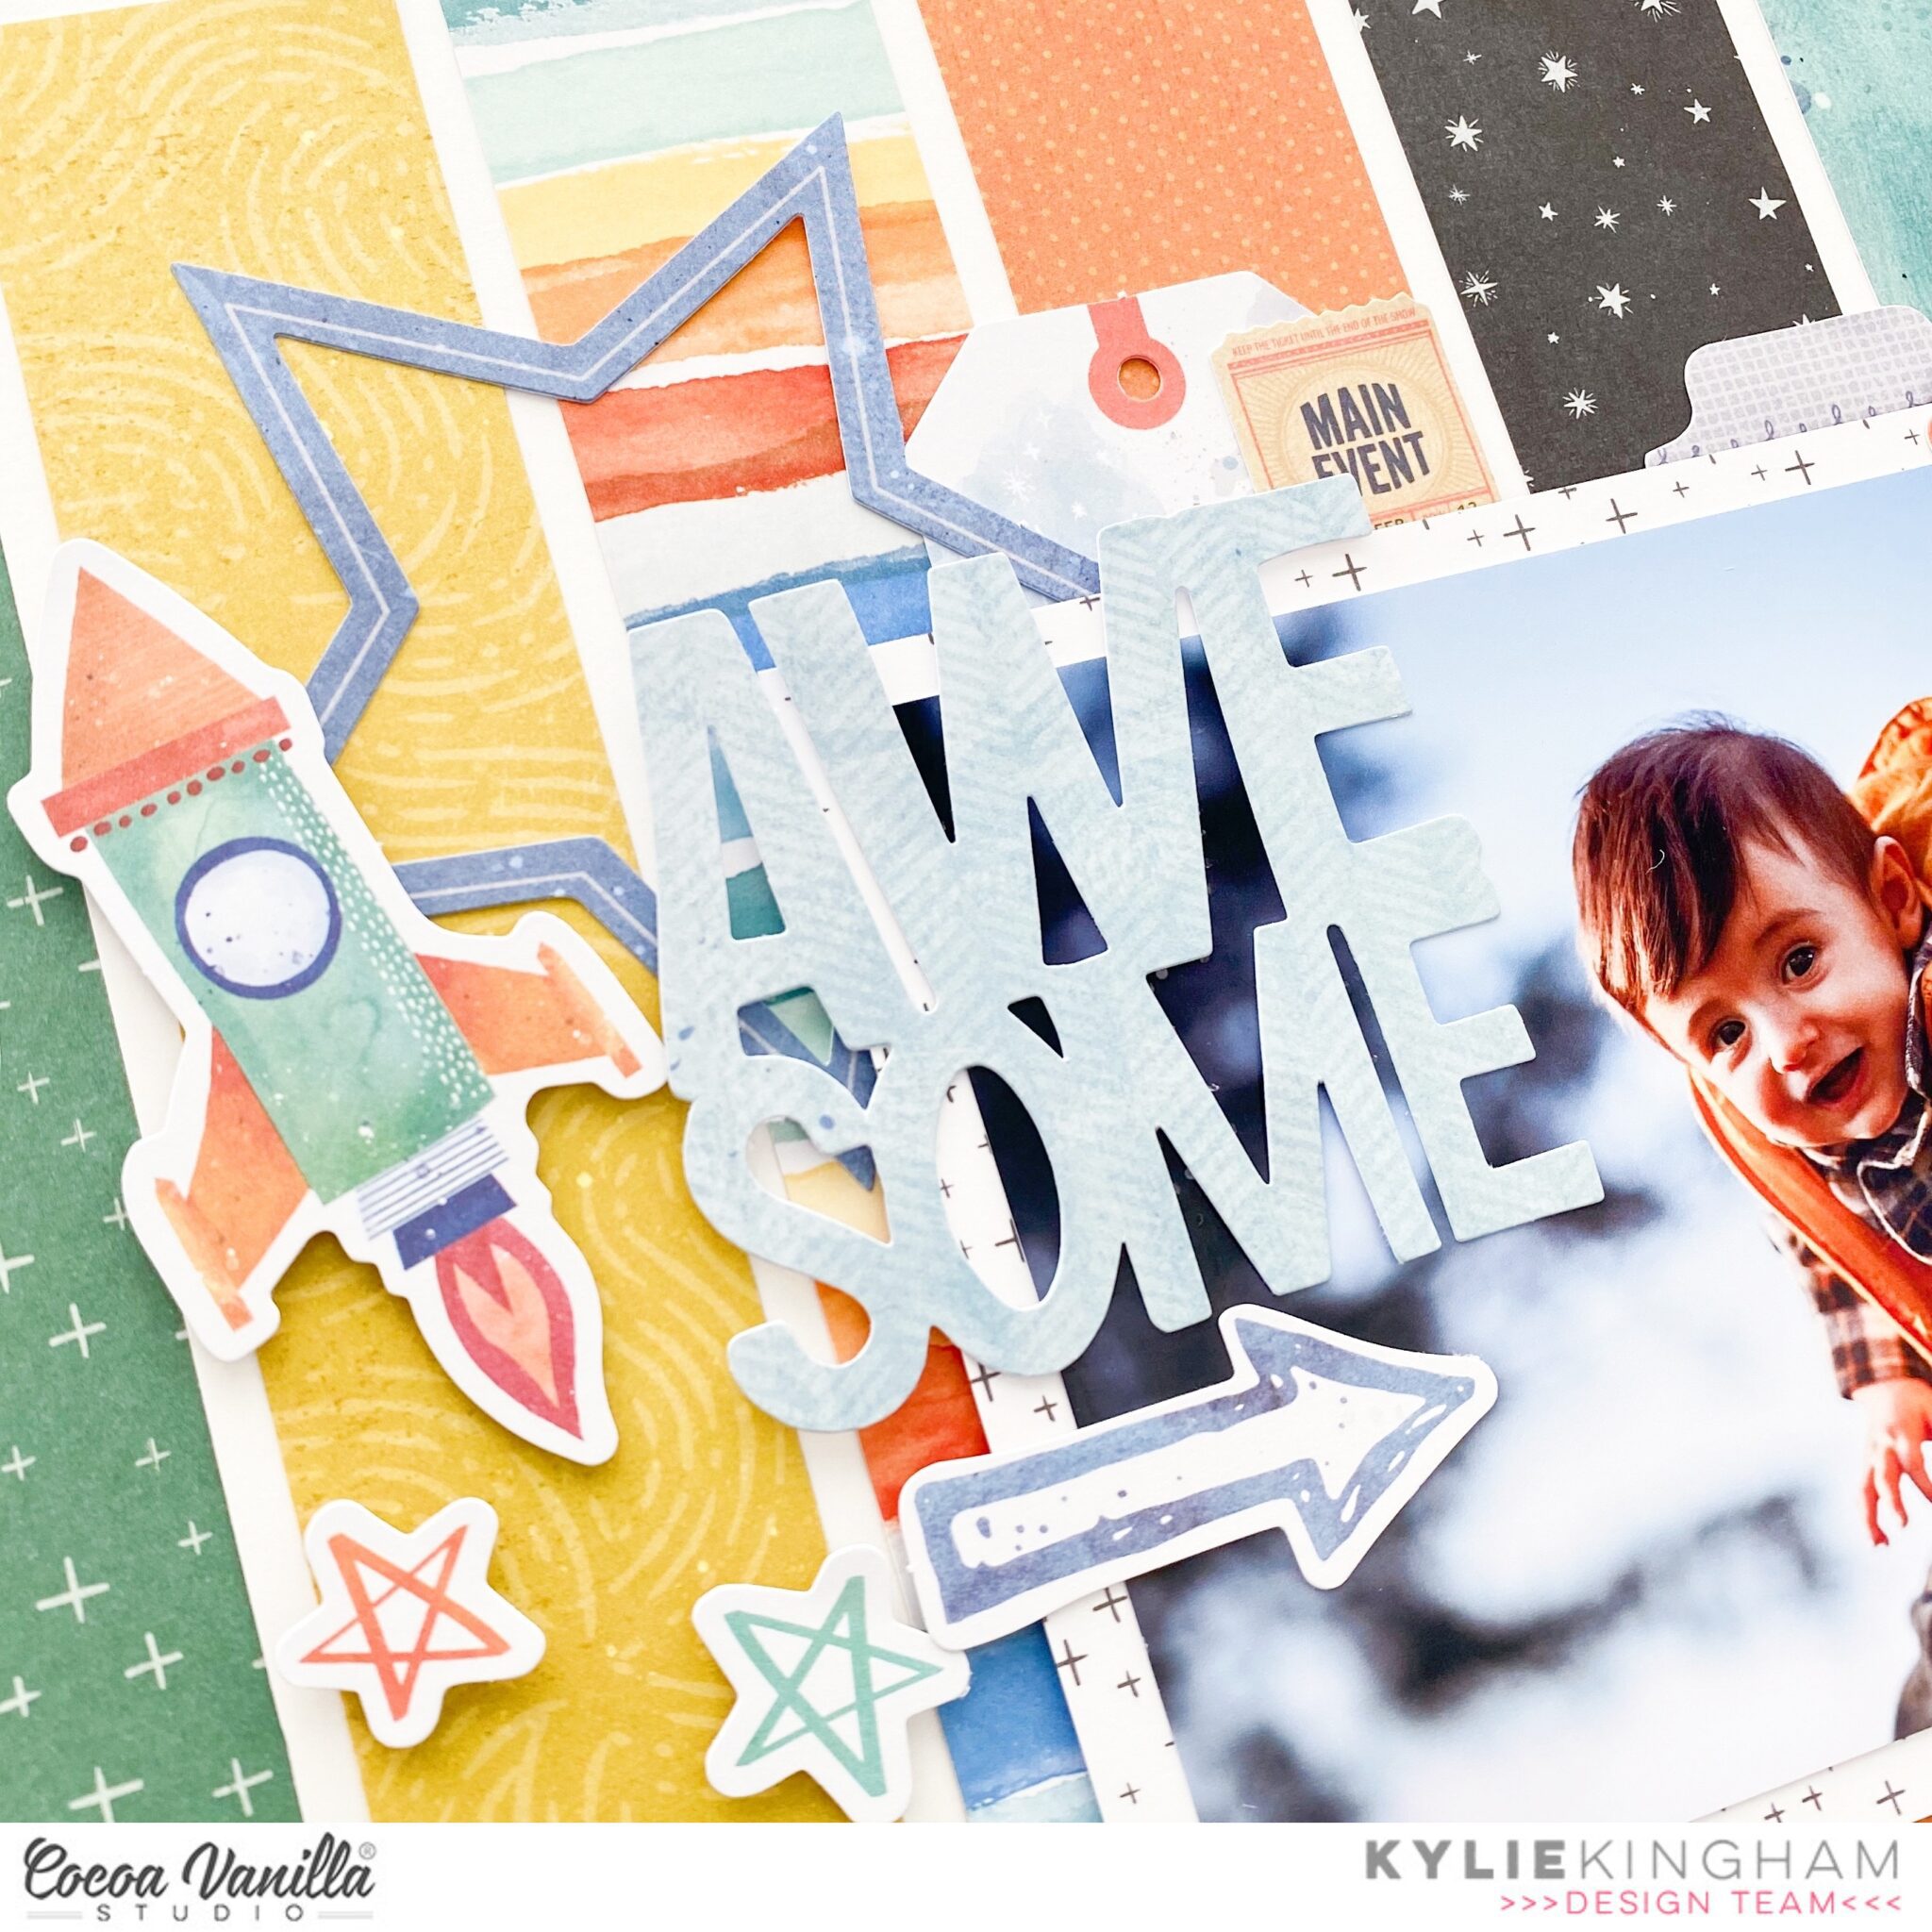
As some of you may know from my previous paper adventures, I love working with BIG titles. I wanted to include two big titles in my page design so first created a mat for my photo. Since my photo was 6″x 4″ I trimmed my photo mat to measure 6.25″x 4.25″ which gave a lovely neat border. I adhered the photo to my page with foam adhesives squares and adhered my first title over my photo from the ephemera pack. To create layers and dimension I tucked some more of the ephemera pieces behind the photo and added a few with more foam adhesive squares. (I think the rocket ships in this collection are some of my favourite decorative pieces!)
To keep my page balanced I added the second title to the base of the photo using the title die cut pack. I also added some of the typed phrases from the sticker sheet below it. To finish my page I added just a few more stars from the ephemera pack.
Thanks friends for stopping by the blog today. I hope my layout has given you a little inspiration to perhaps try something new with your own scrapbooking.
Hey Everyone! It’s Michelle back here today with a brand new layout share using the awesome NEW collection No Limits. Loving the switch up on colour palette and patterns for this collection, especially those stars. Another fantastic collection thats brilliant for scrapping all things kid related, with a more masculine feel, but still just as good for scrapping the not so girly little ladies in our lives.
I jumped straight into some messy creating for this layout, blue inks watered down and smooshed onto some white cardstock to give a watercolour effect. I already had a rough idea of layout design from something I had previously created, so I added the splotches into areas where I thought they would peek out through the layers. And yes, its another scraplift of myself haha. I cant help it, it’s so much fun to recreate past layouts. You should absolutely try it when you’re stuck for inspiration!
The photos I chose to use are from this years first day of school, hard to believe Leila is now such a big kid in Grade Five. Luigi also made an appearance, like he does most days when she’s off to school.
The layout is full of circular elements both hand cut and ephemera/ sticker pieces plus a tonne of stars. I even went to the trouble of editing the photos into circles before printing them out in black and white. I hand cut around the edge of each photo and then adhered them to some of the awesome blue “Stardust” pattern paper from the A5 paper stack.
I played around with different combinations of pattern papers from the A5 paper stack to create the 3 main clusters on the page. I kept it pretty neutral to compliment rather than compete against each other . This helped when it was time to add all the extra pops of colour with fussy cut stars and ephemera pieces. I used a couple border punches to add the other pops of pattern paper to break up all the blue, white and neutral colours.
I added journalling to the main photo cluster using some notepad paper I had on hand, it was the perfect blue lined paper that co-ordinated so well with the colours of the stars. I cut this in a circular shape like the pattern papers using the plastic ring from inside a roll of foam tape. It was the perfect size for tracing out.
At the bottom of the layout I added a bunch of ephemera pieces, more fussy cut stars from the Nebula paper and some pretty cool word stickers from the accessory sticker sheet. Then there was just enough room to squeeze in a quick white alpha sticker title to finish it all off..
Heres a closer look below at all the layers I created with all those circles and stars.
Well friends, thats all from me today. Thanks so much for stopping by! I hope you’ve enjoyed seeing my first creation with our BRAND new Collection – No Limits. I cant wait to jump back into the box and get creating with it again soon.
Hey Hey! It’s Michelle here with a new layout share inspired by the May Monthly Challenge Board. This board for May – Slice of Summer – designed by Gwen, is full of bright rainbow colours with a fruity kick. I could have gone in so many directions for this layout, but in the end this is where I ended up….
Inspired by the rainbow paint, circular fruit bowl and the bright rainbow colours of the glassware from one amazing Mood Board! I’ve used the awesome Sunkissed Collection for its bright colours and summery floral patterns.
I started with the Summer Sun cut file from CUT to YOU (designed by Gwen) and cut only the outer piece of the design on white cardstock. I added vellum to the rays as I new I would be layering the cut file piece over some form of ink splatters.
Using the inner circle as a rough guide in the middle of a fresh piece of white cardstock, I added splatters of bright inks in rainbow circular order using the plastic packaging technique and sprinkled splatters using the straw out of the spray bottle. This was so fun to create, and a shame that I covered so much of it up with all those florals!
Once the background was dry and the cut file was stuck down I added the photo. A black and white snap from the last Cocoa Vanilla Studio Creative Escape Retreat in 2019 when all was right in the world and we could travel carefree. I layered the photo with pieces of pattern paper from the A5 paper stack ( Feelin’ FIne and the blue version of that awesome Leopard print pattern from Growing Wild). I tucked in a tag from the Fun in the Sun paper and sticker from the Accessory Stickers sheet.
To the left of the photo I created one massive floral cluster using my beloved fussy cut florals from the Growing Wild paper and a banner from the Fun in the Sun paper. I layered these with different forms of adhesive tapes to give the flowers dimension. I also added a wood button and puffy heart to finish of the mix
Above the photo I created a second cluster using similar florals and items to the other cluster. I do this on all my layouts to give them a cohesive look
Lastly I added a title using the awesome GOLD Glitter words and a sticker from the accessory sheet and then finished it off with spatters of gold ink.
Well friends, that’s all from me today. Thanks so much for stopping by! Be sure to get your entries into the album in our CVS Community Facebook Group. We love seeing how you all interpret the boards each month and the Sunkissed collection is perfect for this board!
Hello Cocoa Vanilla friends, its Michelle back here today with my newest layout share for 2021! I chose the beautiful Daydream collection for this creation, documenting a sweet photo of fellow DT member Raquel and I from a couple years back. We’ve been friends since we started primary school and now our kids are great friends too.
I really wanted to use the wreath paper – Daisy Days – from the collection, and had a hankering for some fussy cutting… as much as I say I hate fussy cutting, it really is therapeutic and fun to do when sitting in front of the TV.
I used the wreath pieces as the base of the circular design and layered extra florals into areas to create large ‘clusters’. I used different types of adhesive to create multiple layers within the cluster, most used are foam tape and glue dots.
I’ve backed the photo using the smaller designs of Sweet Serenity and Sunshower from the A5 paper stack and tucked in a word tab from the ephemera pack. To the left of the photo I’ve added a flair button and butterfly from the ephemera pack and created larger floral clusters above and below this area that curve around the photo.
In the top group of florals I’ve used a mix of florals from the Garden Variety paper as well as the floral wreath piece, some smaller fussy cut tiny florals and a sticker.
In the larger grouping I’ve used florals from both the 12×12 and A5 size Garden Variety paper, a small rainbow from Up in the Clouds and a banner word from the ephemera pack.
And over on the right I’ve used both small and large florals again plus a sticker to complete the floral group, then added the title above to fill some of the open white space. I’ve used a die cut title word and stickers from past collections to create the mixed font title.
Lastly I added the usual splattering of gold ink and felt it was complete. One sweet photo of 2 friends who’ve known each other almost their entire life documented. A friendship that I cherish and am so thankful for. Don’t know what I would do without her.
Well friends that is all from me today. Thank you so much for stopping by!
Hello Hello, it’s Michelle here today and boy do I have a project share with you all this week. I suggest you sit down with a cuppa and have a read as theres a lot to share in this little post. If you cant tell by the title or sneak peek I’ve started an album to document last years December Memories using the magical new collection – Merry & Bright.
This collection is the perfect mix of Christmas and signature Cocoa Vanilla Studio designs. Full of beautiful colours, patterns and pretty florals which are all perfect for documenting an Aussie Christmas as theres not a snowflake insight. I’ve used the BRAND NEW Pocket Cards for this project as they make creating albums like these so fast. Pick a card and pop it in, pair it with a photo and call it done! You can jazz it up with a little ephemera, cut files, vellum and glitter. Don’t forget there’s also an A5 paper stack, 2 cut apart papers (Count Down & Oh What Fun), and some super cute gold puffy hearts that are all perfect for creating one magical album full of December Memories..
I’ve got half the album to share in this post today so apologies now for the photo overload. I’ll try not to write too much as there’s A LOT to get through
Lets begin…
The Album size I’ve used is 6x8inch and I’ve used a mix of different configurations in pocket pages. I kept the front opening page quite simple using a full A5 sheet in the Star Bright pattern, ‘Christmas’ and ‘Oh what fun’ tags are from the Oh What Fun cut apart paper, holly leaves from the ephemera pack, sticker from the Accessory sticker sheet and the numbers are from an ancient CCV collection.
Flipping over to the first pocket page – I’ve used another full A5 pattern paper Jingle All The Way with a piece of note paper sewn on to document the month ahead, then added some florals from the ephemera pack to the corner of the paper. You will see throughout the pockets of the albums I’ve used the Countdown paper to document most of the days, the numbers all cut down to just over 2inch square. For the right hand side I added the number to a pocket card using my tiny attacher
Heading over to the next page, sharing more of December 1 memories as a couple of things happened that day – our house elf arrived and I went out for dinner with my work colleagues. I created a ‘privacy shaker’ pocket to hide their faces using a flip flap pocket. Inside I’ve added the large floral cluster from the ephemera pack to some vellum and a tonne of glitter then used my sewing machine to stitch the edge closed. The ‘eat drink + be merry sticker is adhered to the outside along with the ephemera tag.
The shaker pocket turned out so cute.
Page 3… Still documenting the rest of December 1st haha How stinkin cute are those little gingerbread houses! Our house Elf Twinkle didn’t seem to get up to too much mischief last year, hoping she’s on her best behaviour if she makes it back into the country this year.
I used another flip flap to add an extra layer of embellishments to this corner of the page. Those gold hearts are so soft and not bulky at all, its hard not to use them all in one go!
Over the page and I’ve used the smaller frame from the ephemera kit to frame a smaller photo and documented a not so fun trip to the doctors. Between these 2 pages I’ve added a vellum insert using the 3 ornament pieces from the ephemera pack
I sewed these to the vellum and added some stickers
Theres a larger frame in the ephemera pack too, I’ve used it on this side to document an early Christmas present I gave to myself and am still yet to use. Whoops.
Some pockets I left plain with just photos and cards. Not everything needs a bunch of words to document, the photo is enough. The other side of the page however needed some words. I used a label from the cut apart paper for one and a journalling card from the pocket cards pack for the other. This pack is FULL of different designs, quote cards, filler design cards and journalling cards. Each card has a design on both sides so every design in the pack can be used once or twice if you need.
December is a big month for everyone, even bigger for those of us who have a birthday to throw into the mix. Leila’s falls in the second week of December and last year we were lucky to be able to throw a party for her and some friends and cousins. So much fun.
I created another flip pocket with the journalling on top and photos underneath
The kids had so much fun. Faces blurred for privacy
Of course the birthday girl and her cake needed a special insert! I love adding inserts to pocket page albums to create a focal interest and break up all the smaller pockets. I created this one using a star cut file from CUT to YOU and adhered the photos back to front, either side of the cut file, and then the entire piece sewn into the pocket page to stop it from moving or falling out
The cute photo on the reverse is from the following day with more cake to celebrate with family at home
On the right side of the page are more photos documenting the family celebration, the day prior to her actual birthday.
Over page and more photos to document our Elf, a couple more filler pocket cards, a label from the cut apart paper Oh What Fun, fussy cut florals from the A5 version of Joy to the World
On the right I used a smaller pocket page made up of 2x2inch squares. I created a couple of mini shaker pockets using ephemera, stickers and a gold puffy heart sewn in using my machine after sprinkling each with glitter. I added a couple of photos of Leila to document her last night of being 8 and filled the rest with pattern papers
Over page again and Its an entire spread dedicated to her actual birthday. Photos of present opening, more pattern paper to fill in the blanks. Photos of our house Elf and the spectacle she set up overnight. We never know what mess we might come out to on Leilas birthday, but theres always a basket full of presents for Leila all Christmas themed. Our elf does this in place of a December 1st basket.
And were onto the last of the pages I’ve created for this album. Our tree finally came out of its box so I could finally use the cute ‘Oh Christmas tree’ card
and one last flip flap pocket just because!
Phew, did you get through that ok? I hope you enjoyed seeing the first half of last years December memories. I like to keep things pretty simple within my pocket pages branching out with a little shaker page or insert to add a little extra fun. Everything within the album is either adhered using a tape runner, tiny attacher or sewing machine to save on bulk as theres a lot more to add so I need to save space as best I can.
Well thats all from me today. Thank you so so SO much for stopping by and reading through all of that! I aim to get this album complete and ready to share in a future post so keep an eye out next month. For now be sure to share with us the Christmas Creations that you’re making. We love to see what you all create. And if you haven’t already RUN to one of the many Scrapbooking Stores that are carrying this collection and buy it all before it sells out ! You won’t regret it.
Hello Hello! It’s Michelle here today to share with you a new layout that I created with our BRAND NEW collection – Daydream. I’d give ALL the heart eye emojis for this collection, it is so beautiful! I spent an entire night on the couch fussy cutting and loving over all the sweet floral clusters from the Garden Variety paper. So so pretty!
For this layout I felt the need to recreate an older layout of mine using circular elements grouped with florals, stickers and a little machine stitching. I started by choosing a couple different pattern papers Daisy Days, Sweet Serenity, All Aflutter and cut multiple circles from each one. I fussy cut the outer ring off 1 of each colour circle to create a smaller circle and an open circle, then arranged them in clusters within a triangular design on some white cardstock.
I slightly distressed the edges of each circle before adhering with double sided tape and machine stitched through the ones that overlapped the edge of the layout. I also stitched through a little on the open circles.
Before adding anymore to the layout I added in the photos, a couple of Leila from a few years back being as sweet and crazy as she can be. I adhered the photos to some of the yellow pattern paper Sun Shower and added one of the sticker tabs to the top left photo.
Next up I added in the title using cardstock title pieces from this collection along with some older white alpha stickers and some handwriting. I’ve adhered the cardstock pieces using foam tape to pop them up off the page and then machine stitched through the stickers to ensure they stay put on that layout in years to come, which also adds a little extra detail to the layout.
I then added the pretty floral clusters that were fussy cut from the Garden Variety paper to the groups of circles. In this cluster I also added a sweet flair button, ephemera heart & mini flower plus an accessory sticker strip.
In the cluster above the photo I used a mix of fussy cut florals with ephemera florals layered using different forms of adhesive. The ‘You are my sunshine’ element is from the accessory sticker sheet and one of the first embellishments I knew I wanted to mix into this layout.
Lastly the bottom cluster made using another mix of ephemera and fussy cut florals, sticker strip and heart. I added my usual splattering of gold ink all of the layout and called it complete.
Well friends thats all from me today. Thank you so much for stopping by to see the first layout I’ve created using our NEW Daydream Collection. You can find the details for this collection in the reveal post HERE. Hopefully it arrives at your favourite scrappy store real soon so that you can all get your craft on and create up a storm!
Hey friends its Michelle back here today with a new layout share featuring the awesome Legendary Collection. I was so inspired by our recent Stars and Stripes theme that I couldn’t help but use that as the base for this layout. Stars are the perfect embellishment for scrapping a layout of Leila’s ‘Star of the Week’ photo from last year.
I chose a fun new cut-file design from CUT to YOU that features 3 different star designs and resized them to create different focus points for the layout. I cut all 3 designs out on white cardstock and backed the larger design using a mix of different patterns and colours to compliment the stars within the collection. Papers used – ALL STAR, EPIC TALES, EXPLORER, OFF BEAT, TOTAL LEGEND and WILD ONE.
I adhered the star to the left side of the layout using foam sheeting to raise it off the background paper (OUTDOORS TYPE) and added the super cute photo of Leila to the left backed with a piece of BRAVE HEART and a sticker tab from the Accessory Sticker sheet.
I created the title using a cardstock title piece and alpha stickers from previous collections. LOVE LOVE LOVE those white alphas! There’s a sprinkling of stars, both fussy cut and ephemera, on top of the big star also.
I kept the other 2 star designs open and adhered half of each design to the edges of the layout, creating open clusters and tying all the elements of the layout together. In the top cluster I added the ‘Hey You’ banner sticker from the sticker sheet and a mix of fussy cut and ephemera stars.
In the bottom cluster I added pieces from the ephemera pack, fussy cut and ephemera stars plus a word sticker from the Accessory Sticker sheet. Lastly a splattering of gold colour shine to finish it off.
Well friends that’s all from me today. Thanks so much for stopping by.
Hi Friends its Michelle here today with a new layout share for our ongoing ‘Throwback Thursday’ Theme. I dove back into my stash of Midnight collection and added a couple of cute photos of Leila from a family outing a little while ago.
I love the colour palette of this collection and its soft floral patterns, especially that tiny floral pattern paper I’ve used to the left of the layout. I based my layout on one that I’ve made in the past, and one that I’ve been wanting to recreate again.
I started with 4 different pattern papers – INKY DEPTHS, SHINE BRIGHT and INSPIRED and cut triangles from each piece to create the background for the layout. I’ve machine stitched around each triangle after adhering each piece to the cardstock backing.
I backed the photos I’ve used with some of the pretty ombré SHINE BRIGHT paper and added a doily from my stash. Something I haven’t added to layouts for quite some time.
To the right of the photos I created a cluster of mixed embellishments, bringing together ephemera and stickers layered with different adhesives for pops of dimension.
There’s a couple of similar elements tucked into the left of the photos also.
Under the photos I added a title using words from the Die Cut Titles pack with a sprinkling of glitter enamel dots from the Wild at Heart collection to the right.
Lastly I created a mini cluster at the top left of the layout which helps to bring all the embellishments elements together and balance the visual triangle I created on top of the triangular pattern paper background.
Well friends that’s all from me today. Thank you so much for stopping by. I hope you’ve enjoyed this instalment of Throwback Thursday – our fortnightly walk down memory lane.
It’s Raquel here with you today sharing with you a layout for our ‘sewing’ theme here on the CVS blog. One of my go to techniques on my layouts are to add machine sewing to my pages, so for todays layout I decided to give myself a little creative challenge and hand stitch instead. Hand stitching is something I do not particularly enjoy doing, but I always LOVE the finished outcome.
Here is the layout that I created to share with you today:
For todays layout I used the beautiful Happiness collection. It has to be hands down one of my favourite CVS collections. I have used the Happiness Large Die Cut heart as the main focal piece of this layout. I used the backing patterned piece as it came and simply cut away the pink pattern away from the outline so I just had the heart. I then adhered the heard to my layout using foam sheets to give it some dimension.
To embellish this page I have used mainly the floral ephemera from the die cut pack – aren’t they just stunning. I would love a whole pack of just the flowers!! I used a combination of foam and liquid adhesive to embellish my page. The photos are a series of selfies that my daughter and I took together. She is just the cutest and loves a good selfie. I printed these 4 to a page and slightly smaller on my Canon Selphy. I normally edit my photos is an app like Pic Tap Go or Pic Collage first before I print anything out. I then adhered the photos to white paper and matted the whole strip on the Expressive paper.
The tiny word stickers in the 6×12 accessory sticker sheet are a great way to add that special touch to an embellishment cluster. Here I have used the words ‘you are beautiful’ to finish that group of embellishments.
My title for this layout is using the Die cut titles pack in the collection. I adhered these words using a foam adhesive and I love how they popped off the page, especially because the navy is such a contrast to the brights. The heart near the ‘my happiness label’ is a clear sticker that I have stuck onto some white cardstock. I will do this when I want the clear sticker to be a feature that stands out.
Of course, as I mentioned earlier, the theme of todays post was sewing. So yep, I brought out my needle and a hot pink embroidery thread and got to work. To ensure my stitched border was nice and straight I added a light grey lead line using a ruler. I then used a piercing tool to pierce the holes, trying to keep them a similar distance apart. It did take a while I admit, and hats off to all those who hand stitch regularly on pages, it is not something I would do a lot – but I do love how it turned out.
Thanks so much for stopping by the blog today. I know we are all living in some crazy times right now, so I really appreciate you taking the time to check out this post. Sending love to all.