Hi everyone! Sue Plumb here to share my latest design team project with you. This weekend we are doing “Scraplift Saturday and Sunday”, so myself and Rachel (tomorrow) will both be sharing a scraplift of a recent layout from our Facebook Community group. The layout we are lifting was this beautiful entry into our October “Spring Vibes” monthly challenge by Debra Beer…
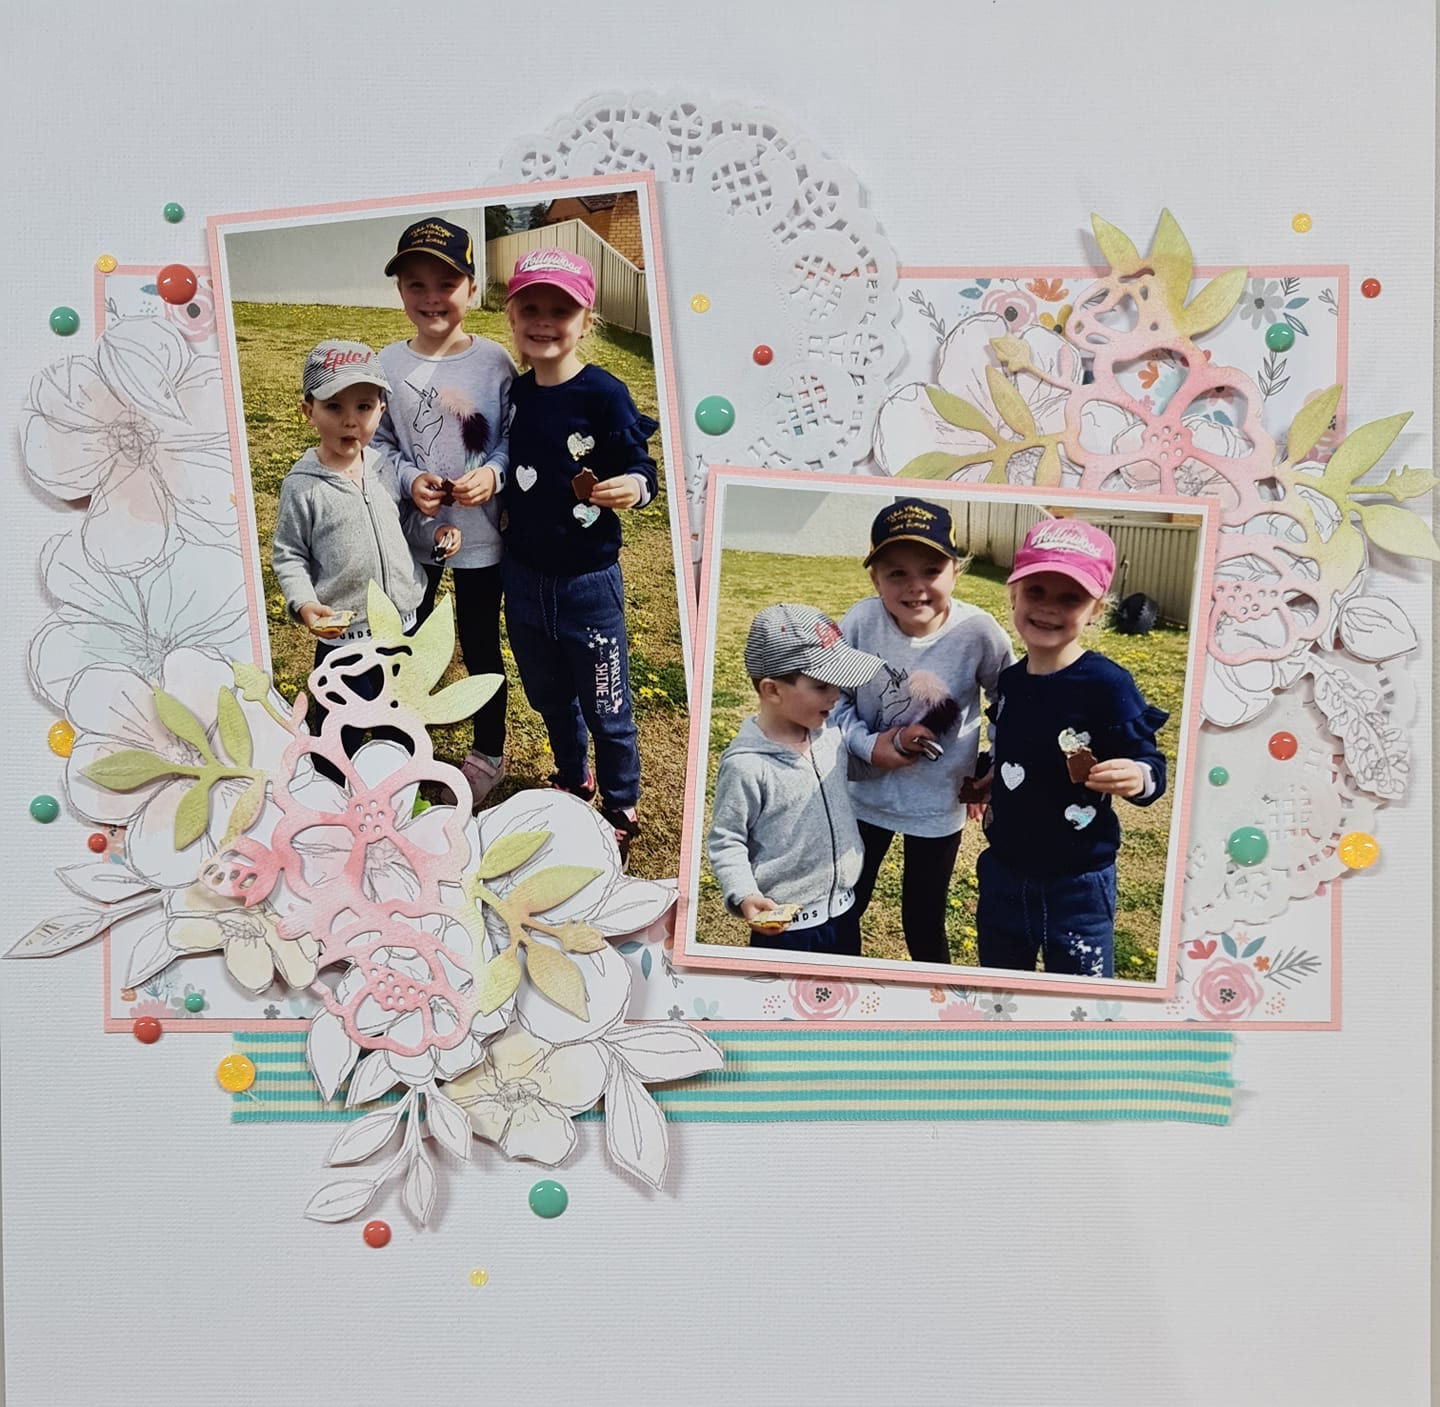
Scraplifting is when you take a design from someone else and use it as the basis for your own page. This could range from copying the design in its entirety using the exact same materials; to simply using the page as inspiration and treating the bones of the page like a sketch. Both Rachel and I have scraplifted the same layout to demonstrate how one page can inspire people in different ways.
Here is my take on Debra’s page using the ‘Daydream’ collection…
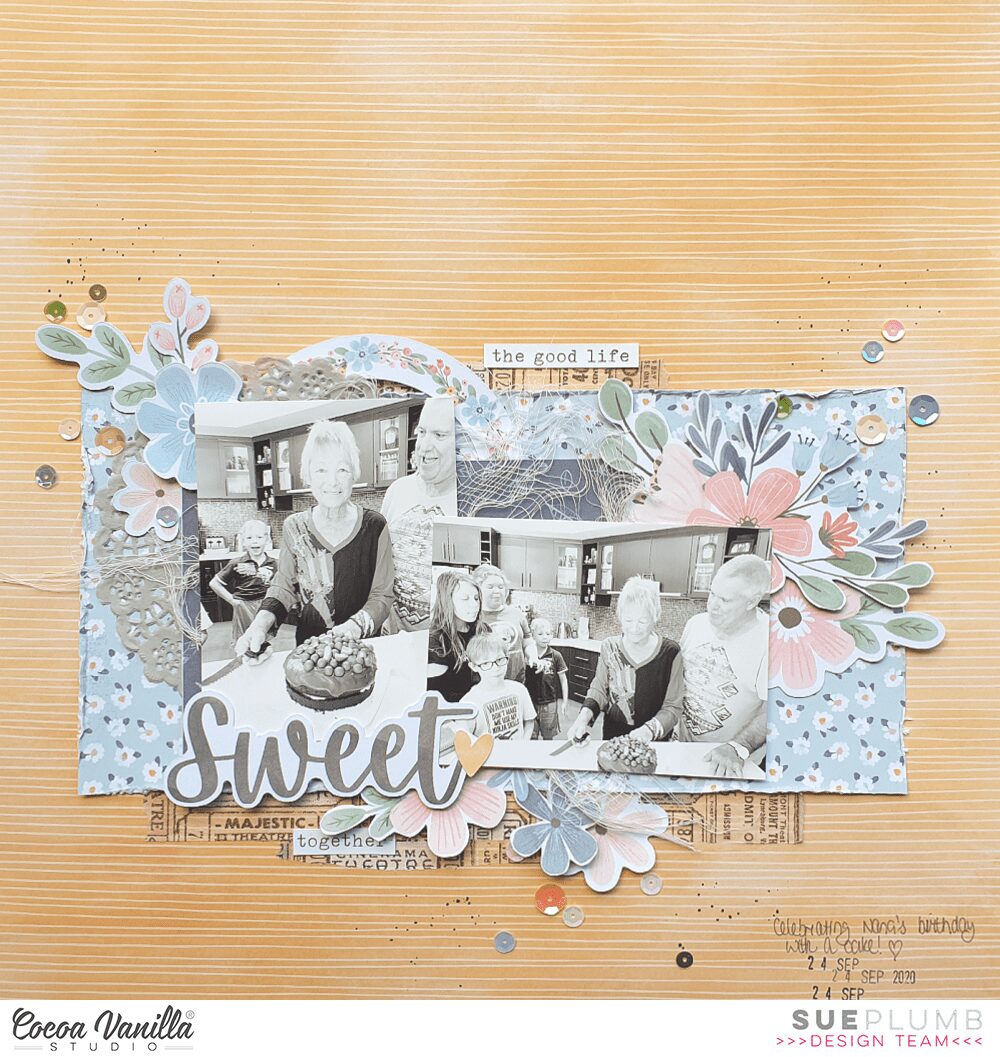
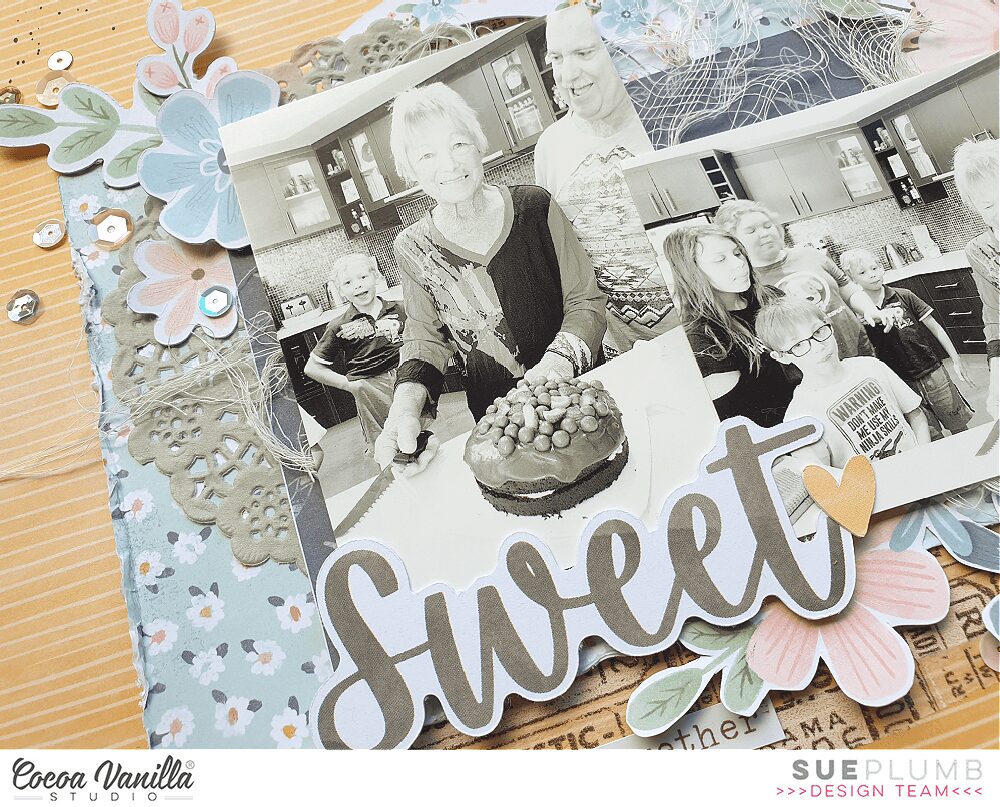
The first thing I decided when it came to creating my page, was that rather than a white cardstock background, I chose to use the Sun Shower patterned paper instead. I topped this with a piece of the Daisy Days paper to form the focal point of my page. I added extra texture to the paper by distressing the edges; and stuck some torn strips of washi tape under the top and bottom edges of it – just like Debra had also used washi tape on her page. I also added some frayed gauze for more texture.
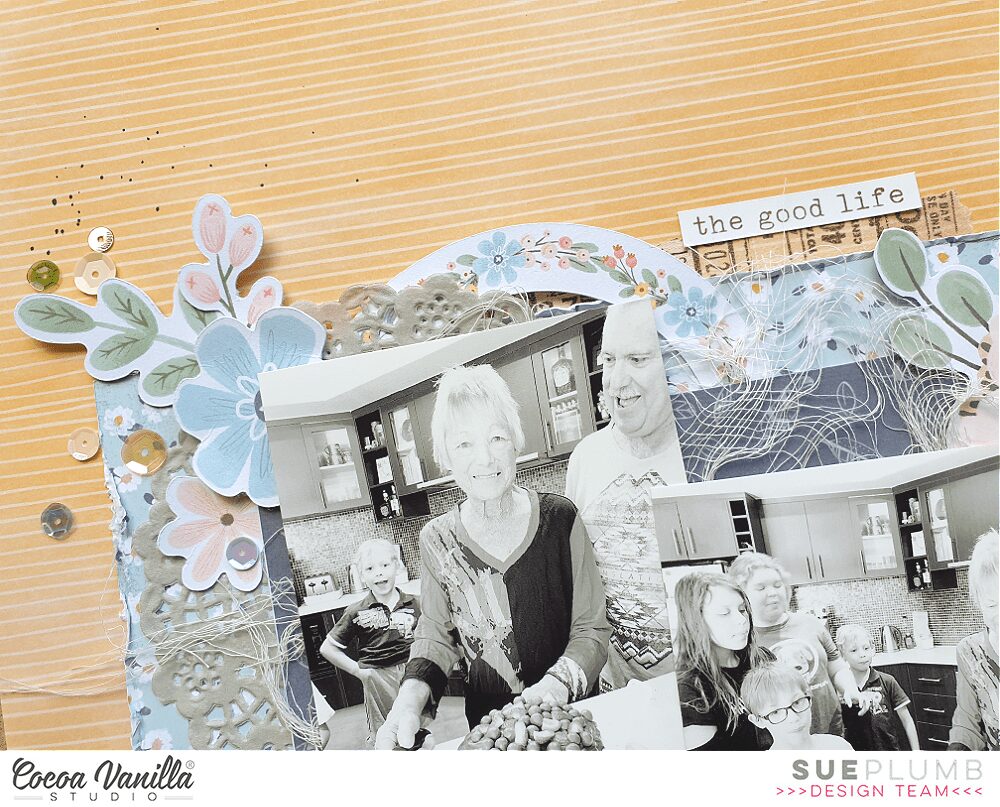
On top of the Daisy Dayspaper, I added a small piece of the navy Up in the Clouds paper to help separate my photos a little from the busy floral print. For my photos, I also chose to go with both a portrait and landscape shot, just as the original page had. These photos were taken recently while my family were celebrating my mum’s birthday. I also added a paper doily, but changed the position of it slightly to tuck under the left top corner of my photo and I also tucked in a circular floral frame from the Die Cut Ephemera pack.
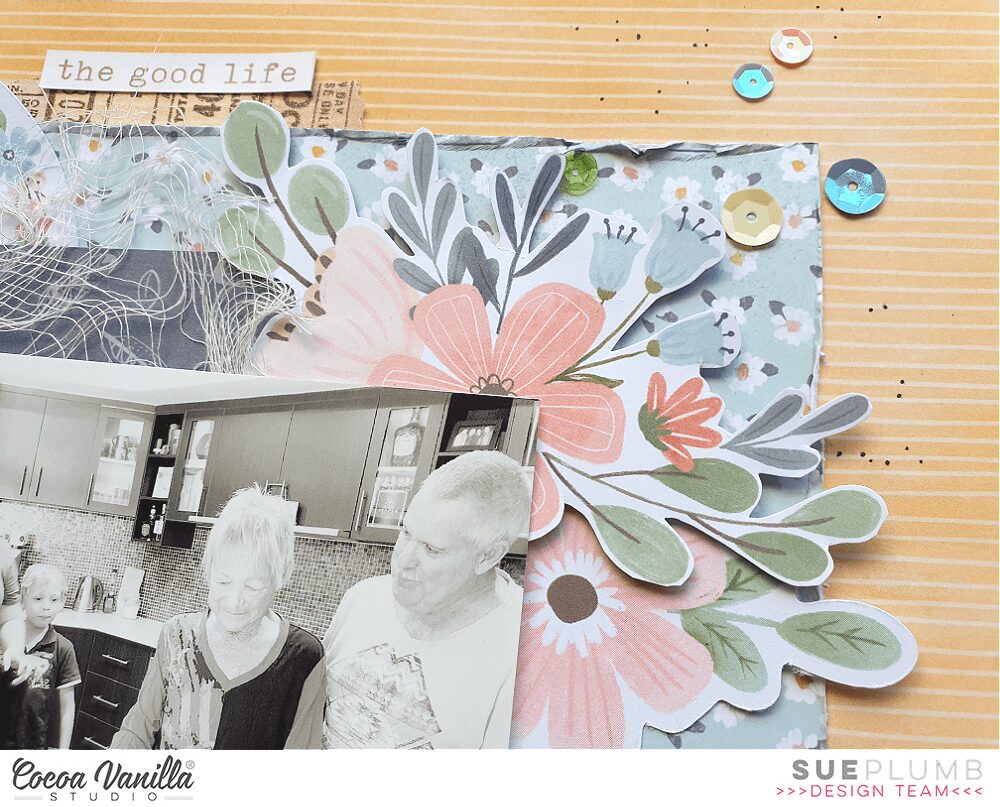
Just like Debra’s original page, I wanted to embellish my layout using clusters of flowers. I fussy cut several pieces from the Garden Variety paper and combined them with some ephemera pieces to create three clusters to frame around my photos. I also added a couple of small phrase stickers to my page from the Accessory Sticker sheet.
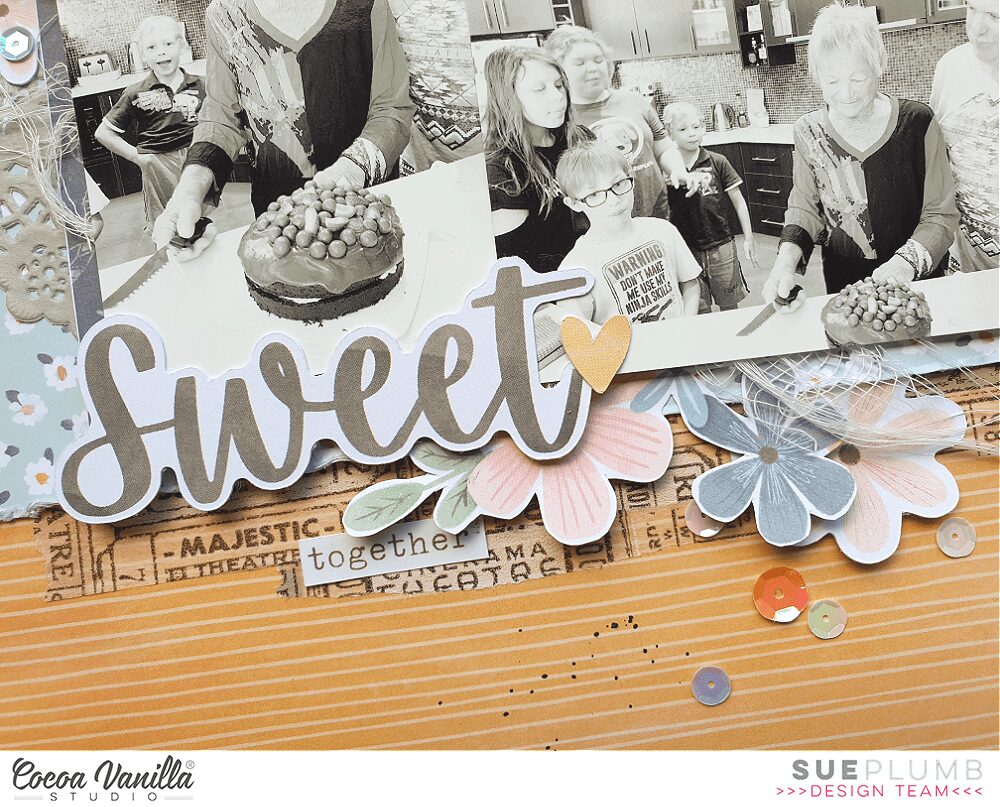
I finished off by adding a Die Cut Title word along the bottom edge of my photo, then added some scattered sequins from the Sequins and Flowers pack instead of the enamel dots Debra had used. A few tiny splatters of black ink, my journalling, a stamped date and I was done!
Thanks so much to Debra for her inspiration – I really love how this page turned out! If you ever find yourself stuck for ideas, take a quick scroll through our Facebook Community group and see all the gorgeous pages shared by our members there – you might find something to scraplift too.
Please note: if you are going to copy the work of someone else, it is common courtesy to credit the original designer when sharing your page. A small mention of who inspired you is often enough to make someone else’s day!
Be sure to pop back tomorrow to see what Rachel created too.
Sophie with you today with a sweet layout to share ! I used the Daydream collection and still can’t get enough of it..!
I started with the gorgeous woodgrain « Over The Rainbow » patterned paper for my background.
I used a stencil and applied textured paste with a palette knife directly on the background, behind where I planned to put my photo.I love the subtle effect it adds to the page.
I used a beautiful heart shaped wreath cut file from Just Nick Studio and cut it in white with my cutting machine. I backed the tiny flowers and leaves with different patterned papers from the 8×6 Daydream paper stack.
I added adhesive foam behind the cut file before adhering it to my page.
I backed my photo with tissue paper, adhesive foam and a piece of the « All Aflutter » patterned paper. I also added beautiful floral embellishments from the Die Cut Ephemera around the wreath.
I did a little cluster on the top right of the layout with a scalloped piece of the « Happy Place » patterned paper, an ephemera and a beautiful Flair. I also did a zig zag stitch with yellow thread on the scalloped border.
My title comes from a fussy cut « DayDream » word out of one packaging cardstock, and an accessory Sticker.
I added a few word stickers for my journaling as the finishing touch.
It is a very simple layout but I really love the end-result.
Here are more close-ups:
I hope that you felt inspired by my page today, and by that beautiful collection.
Hi there creative friends! Today I want to share a layout with you featuring the gorgeous Daydream collection and a photo of my little man at his 5th birthday party. I have been having a lot of fun scrapping girly photos with this collection, so I wanted to share the love and create some more masculine pages too. There are plenty of more boyish colours and patterns in this collection, so this page came together easily.
I started with the woodgrain side of Over the Rainbow 12×12 patterned paper because I just love a good wood pattern and I find it a very neutral pattern to work with. I added a border of Sun Shower 12×12 patterned paper to bring in some of the yellow that is in my photo.
To add some detail to my background I added some splatters with white ink, varying the size from delicate sprinkles to some larger drops. I also added a lighter sprinkling of lovely shiny gold mist for that metallic effect.
Next I found a geometric circles panel cutfile from Neat n Crafty Cutz that I had cut a while ago from white cardstock but had not managed to use – I love when I can get supplies that are just lying around to good use! I simply backed the entire cutfile with vellum, adding that lovely translucent quality while still being able to see the pattern of the paper behind.
I matted my photo with navy and blush pink papers from the 6×8 paper stack then layered it over the cutfile. I dug through the die cut titles to find the word “Happy” as the main part of my “Happy Birthday” title, using some small gold foam alphas from my stash to finish it off.
With the bones of my layout down, I added lots of pretty embellishments from the die cut ephemera and accessory stickers, building three clusters of embellishments in a triangle around my layout with my photo as the focus. I made sure to include a rainbow element and a more dimensional element in each cluster; I used a flair button, puffy heart and a foam-backed fussy-cut rainbow for those dimensional pieces.
As finishing touches, I added a handful of tiny word stickers from the accessory stickers, a sprinkling of the gorgeous sparkly sequins around each embellishment cluster and a hand-drawn border in white gel pen around outside edge of the woodgrain paper.
I really love how this turned out. I’m definitely a fan of flowers and rainbows on a boy page, and I think the masculine tones of woodgrain, yellow and navy really help to balance it all out. What do you think?There is a process video on the Cocoa Vanilla Studio YouTube channel linked below if you would like to watch this layout come together. Thanks so much for joining me today. Happy scrapping!
Hey y’all! Laura Alberts here today to share a darling 9×12 layout with you today that will truly pull at your heartstrings. My little girl doesn’t fall asleep in my arms anymore, but I surely cherish the many times that she did! This layout features a color and black and white version of this photo to really emphasize the moment. The soft colors of the Daydream collection were perfect for this layout! I used the Sun Shower patterned paper as a background and then used the leftover pieces to make an arrow behind each of the photos. This detail draws your eye from left to right, then right to left through the photos.
On either side of my photos I layered clusters of fussy cut florals, puffy hearts, rosettes, and rainbows. By using a variety of embellishment sizes, the clusters are dynamic and the layers create depth. Also, I add tiny details around each clusters with small hearts, Nuvo Drops, and gold ink splatter to finish them off. I loved the idea of these pillow-like puffy hearts on such a sweet, sleepy layout.
I love these titles included in the Daydream collection, they make it so easy to add a title! This tiny cluster in front of the title helped to tie it in with the other two clusters. I even used the collection title from the manufacturing strip and tucked it into one of the clusters because it perfectly matched these photos.
I hope the varied clusters on this layout inspires you to look at your embellishments a little differently! It’s fun to see how you can change things up. If you’d like to see the Sweet layout come together, I have the entire process in the video below!
Hello Cocoa Vanilla Studio maniacs. It’s Anna here with my brand new layout made with beautiful “Daydream” collection. I know that this line already won hearts of many of you but who can blame it? All the amazing flowers, very versatile feel and the rainbows are the ingredients of the perfect collection. Colors in “Daydream” are a little bit worn out and muted, with a pinch of wooden patterns so I thought they will match perfectly to the craft cardstock. I used it as a background for my page documenting our little, family trip fo the zoo from few weeks back.
I combined pretty floral pattern called “Garden variety” with raw color of craft cardstock adding some tearing in between to make the transition more smooth. My compostion runs from one corner to another diagonally with photo on one end and title on the second one. I framed the picture with one of the polarid frames from Ephemera pack. I also added some flowers, butterflies and tags to embellish it.
Little fabric heart from Puffy hearts pack is such a cute detail and adds great texture to the whole project. Sequins can be a perfect replacement for all the enamel dots and can be used as a finishing touch to every project. I used the ones from Sequins and flowers pack from “Daydream” collection so I was sure they will match the papers perfectly.
When it comes to my title I could use the ready words from Title die cuts but I wanted to have something lighter and more colorful. I chose the Happy days phrase from Emphemera pack and cut it into the single letters. I arranged the title once again skipping “s” in the word “days”. Thanks to that the title got less solid and more airy. I added pretty flair button as a finishing touch here.
This kind of page can be finished within half an hour, without complicated and sometimes scarry mixed media and big die cuts from electronic die cutting machines. Just simple, old fashioned layering. That is all for today my sweet Friends. Thank you so much for stopping by and see you in November.
Hello Hello! It’s Michelle back here today with another layout share using the wonderful Daydream Collection. I’ve been itching to use the awesome rainbow paper – Over the Rainbow – since it was shared with us on release day. It’s a paper that’s been used and shared over and over again because its just so darn sweet! Here’s a closer look at what I made..
I started by hand stitching every second heart on the outer arch of the rainbow, one of which was different to the others but I ended up covering most of it with the floral cluster. I cut each individual arch off the original pattern paper, lightly distressed the edges, bent the sides up slightly and adhered each piece to a sheet of white cardstock.
Next I added the photo of my sweet little family using the woodgrain frame from the Ephemera kit. I added some foam tape to the edges of the back of the frame before adhering to the photo so it wasn’t sitting flat on top then adhered the whole piece to the layout using more foam for a little dimension.
I worked on the floral cluster after that using a fussy cut piece from the Garden Variety paper along with some extra florals found in the Ephemera pack and some sweet tiny butterflies from the 6×8 version of All Aflutter
I used cardstock title pieces plus a sticker to create the title, adding a puffy heart to the right
Then finished off the layout by creating a mini cluster of florals, hearts and butterflies with a banner and sequins in the bottom left corner. A little ‘pot of gold’ if you can call it that.
And here’s a final look at the full layout..
Well that’s all from me today, Thanks so much for stopping by. I hope you’ve enjoyed seeing my take on this well loved pattern paper – Over the Rainbow. Be sure to share your creations using it too by tagging us on Instagram or sharing within the CVS Facebook group.
Hello happy scrappie friends! It’s Kylie back with you today with another layout featuring the ‘Daydream’ collection. I wanted to create yet another soft and feminine layout for my daughter with a focus on…You guessed it- flowers! I’ve also incorporated a ‘lacey’ Butterfly cut file which was designed by Paige Evans.
I’ve used the ‘GARDEN VARIETY’ paper as my background, which isn’t the first time I’ve used this paper, I just can’t help it! It’s my most favourite shade of blue! I’ve added a 1.5″ torn strip of the reverse side of this paper to the lower edge and distressed the edges a little more. I then cut into the top edge 1.5″ down and folded it back, securing it with some small staples. A piece of the ‘SUN STRIP’ paper was added in behind for contrast.
Once the cut file design had been cut out I chose to back it with a solid piece of the ‘STEPPING STONES’ paper. The soft and delicate ‘washed’ effect of this paper design stood out really nicely on the darker background. The Butterfly was then adhered to my background on an angle and with using foam tape, so that it sat up off the background page.
My photo was printed to smaller scale so that it fitted neatly over the Butterfly. Once it was in place I began layering some of the lovely floral die cuts surrounding it.
Using some of the die cut titles, I create a large title for my page. It was added to the opposite side of my photo with more layered, floral die cuts for balance.To complete my page I added some of the typed phrase stickers below my photo.
Thanks so much for stopping by the blog today. I hope my page has given you a little inspiration for your own creating.
Welcome back to the Cocoa Vanilla blog! It’s Tarrah here with you to share a new design team layout for a ‘1 paper, 3 ways’ feature focusing on the beautiful ‘Sweet Serenity’ paper from the stunning new Daydream collection as the background.
I chose a pretty cut file design from CUT to YOU, cut it out from white cardstock and then backed all the spaces behind the cut file using a mix of the gorgeous patterned papers from the 6′ x 8′ paper stack. For the circle space in the camera design, I added my photo which is a selfie taken in my car some time ago! The large circle die-cut piece in the ephemera pack fitted perfectly around the photo here. Once the spaces were all backed, I added craft foam underneath the cut file and adhered it to the ‘Sweet Serenity’ paper. As the page is all about cameras and selfies, I decided to trim 2 small strips from the ‘Stepping Stones’ paper and adhered them vertically to both outer edges of the ‘Sweet Serenity’ paper to replicate a filmstrip look.
You can see the shadows in the detail photos that are created by adhering the cut file up on foam tape onto the page, I love how this looks. On the left of the cut file, you can see I created a small cluster of embellishments with a few die-cuts and a flair button. This helps to balance the large camera feature in the top right corner a little. I also added more florals and a few other die-cuts around the page to decorate.
Design tip: If you look closely at the design of my layout, you will see that I have incorporated the all important visual triangle on my layout. I knew that I wanted to back the small circle on the camera with the darker blue paper and I also included the same paper in the ‘Me’ of the cut file title. As that was just 2 places, I needed to add a third piece of the darker blue somewhere, the dark blue moth sticker from the Accessory sticker sheet was the perfect addition placed just above the ‘e’ in ‘Selfie’. Having a visual triangle on your layout draws the readers/viewers eyes around the page.
Thank you so much for stopping by the Cocoa Vanilla Studio blog today, I hope you enjoyed my layout today and that you were inspired in some way. The Daydream collection should be in the Cocoa Vanilla Studio online store really soon, so keep an eye for it!
It’s Sue Plumb here to share my latest design team project with you. Today we are kicking off a new theme here on the blog simply called “1 paper, 3 ways”. Over the next few days three of our team members (myself included) will each share a layout that uses the same patterned paper as our page background. The purpose of this theme is to showcase different ways to use the same paper, and hopefully give you some inspiration to create a page of your own. The paper we were all tasked to use was the gorgeous mixed media style Sweet Serenity from the new ‘Daydream’ collection.
Here’s the layout I created, entitled “Together”…
For this page, I chose to document a recent photo of my daughter and I that was taken during a day at the beach. (And yes, it’s a selfie! I often find that if I don’t stop and take a selfie with my kids, I am rarely in any photos with them.)
So my layout began with the stunning Sweet Serenity paper, which I decided to add a little more subtle detail and texture to. I first used a criss-cross patterned stamp along with some grey ink to add some stamping; then used a scattered hearts stencil with modelling paste to add some small white hearts.
I then set it aside to dry while I began work on the papery portion of my page. First, I gathered some pieces of patterned paper to create a layered mat under my photo. The papers I used were All Aflutter; Up in the Clouds; and Happy Place and I used both vertical and horizontal pieces to help ground the photo to the page. I also added a grey paper doily from my stash.
Now it was time for some pretty embellishments! I have to admit, I am totally obsessed with the floral print Garden Variety paper from this collection. I love it so much I just want to fussy cut the flowers from it and stick them on every page I create. I cut a few pieces from it and tucked them in around my photo to help frame it.
My next goal was to extend out my embellishment clusters from the focal point to reach the two main mixed media areas on the page, as I didn’t want them to appear to be “floating” out on their own. I did this by using some cardstock leaves I had cut on my Silhouette with a cut file from Cut To You. This enabled me to ensure that all the stencilled areas on the page were connected to the focal point.
For my page title, I chose to use the word together from the Die Cut Titles pack, which I adhered along the bottom edge of my photo using some foam tape to pop it up a bit. On the top right corner of my photo I added the small happy days with you banner sticker from the Accessory Sticker sheet. To the right of my photo I added a sweet die cut rainbow from the Die Cut Ephemera pack, and then scattered a few hearts from the same pack.
I finished off my layout by adding a doodled pencil border, some soft grey ink splatters and a few stamped phrases.
Thanks so much for joining me today so I could share this with you. Stay tuned over the next couple of days to see what else the team has in store to inspire you using the Sweet Serenitypaper.
Hi Creative friends, Gwen back on the blog today with a new share and today’s layout is featuring the stunning ‘Daydream’ collection. For today, I decided to have a play with the cut apart pattern paper in the collection called ‘Happy Place’. It’s fun to see just how many elements I can get out of one sheet of pattern paper!
To begin my page, I’ve created a background with the ‘Serenity’ pattern paper as my border and a plain white cardstock from my stash. I’ve then used the centre of the ‘Serenity’ paper to cut out some simple banner strips. I’ve done this with a cut file from CUT to YOU but you could also do this with a border punch or even just fussy cut out the design freehand with your scissors.
Next, I’ve cut the striped piece and the heart row from the ‘Happy Place’ pattern paper. I’ve layered these two pieces with the banner pieces to create my background. I’ve added them randomly, working bottom to top along the centre line of the page, adding stitching to the top of each banner piece as I go.
I’ve then also added in three of the smaller banner pieces from the cut apart sheet and added stitching to those too. These are normally used as journaling spots, but I’m using them here just as parts of my layers.
I’ve then positioned my photo. I think this design works particularly well with photos that are landscape as the banner pieces in the background draw the eye across the page. I have used foam tape for this as well, just for added dimension.
I’ve used the cut apart sheet again for the text element ‘Beautiful’ which is positioned above my photo. I’ve also fussy cut out three of the cute rainbows and added those above and below my photo running along the same lines as the banner pieces.
I’ve also added in here some stickers from the ‘Accessory Sticker Sheet’ as well as fussy cut out floral elements from the ‘Garden Variety’ pattern paper and butterflies from the ‘All a Flutter’ pattern paper.
Here you can see a close up of the stitched details. To finish the page off, I’ve added a few typed sentiments from the ‘Accessory Sticker sheet’ and a Flair button.
I’ve also created a YouTube process video for this layout which you can watch below – I hope it inspires you to get creating with this beautiful collection.