Hello Paperlovers,
Welcome to my new post on the Cocoa Vanilla blog today! It’s Josefine here with a new scrapbook layout. For this layout, I chose a winter layout that I created with the amazing Joyful Collection and was inspired by the Cocoa Vanilla Moodboard.
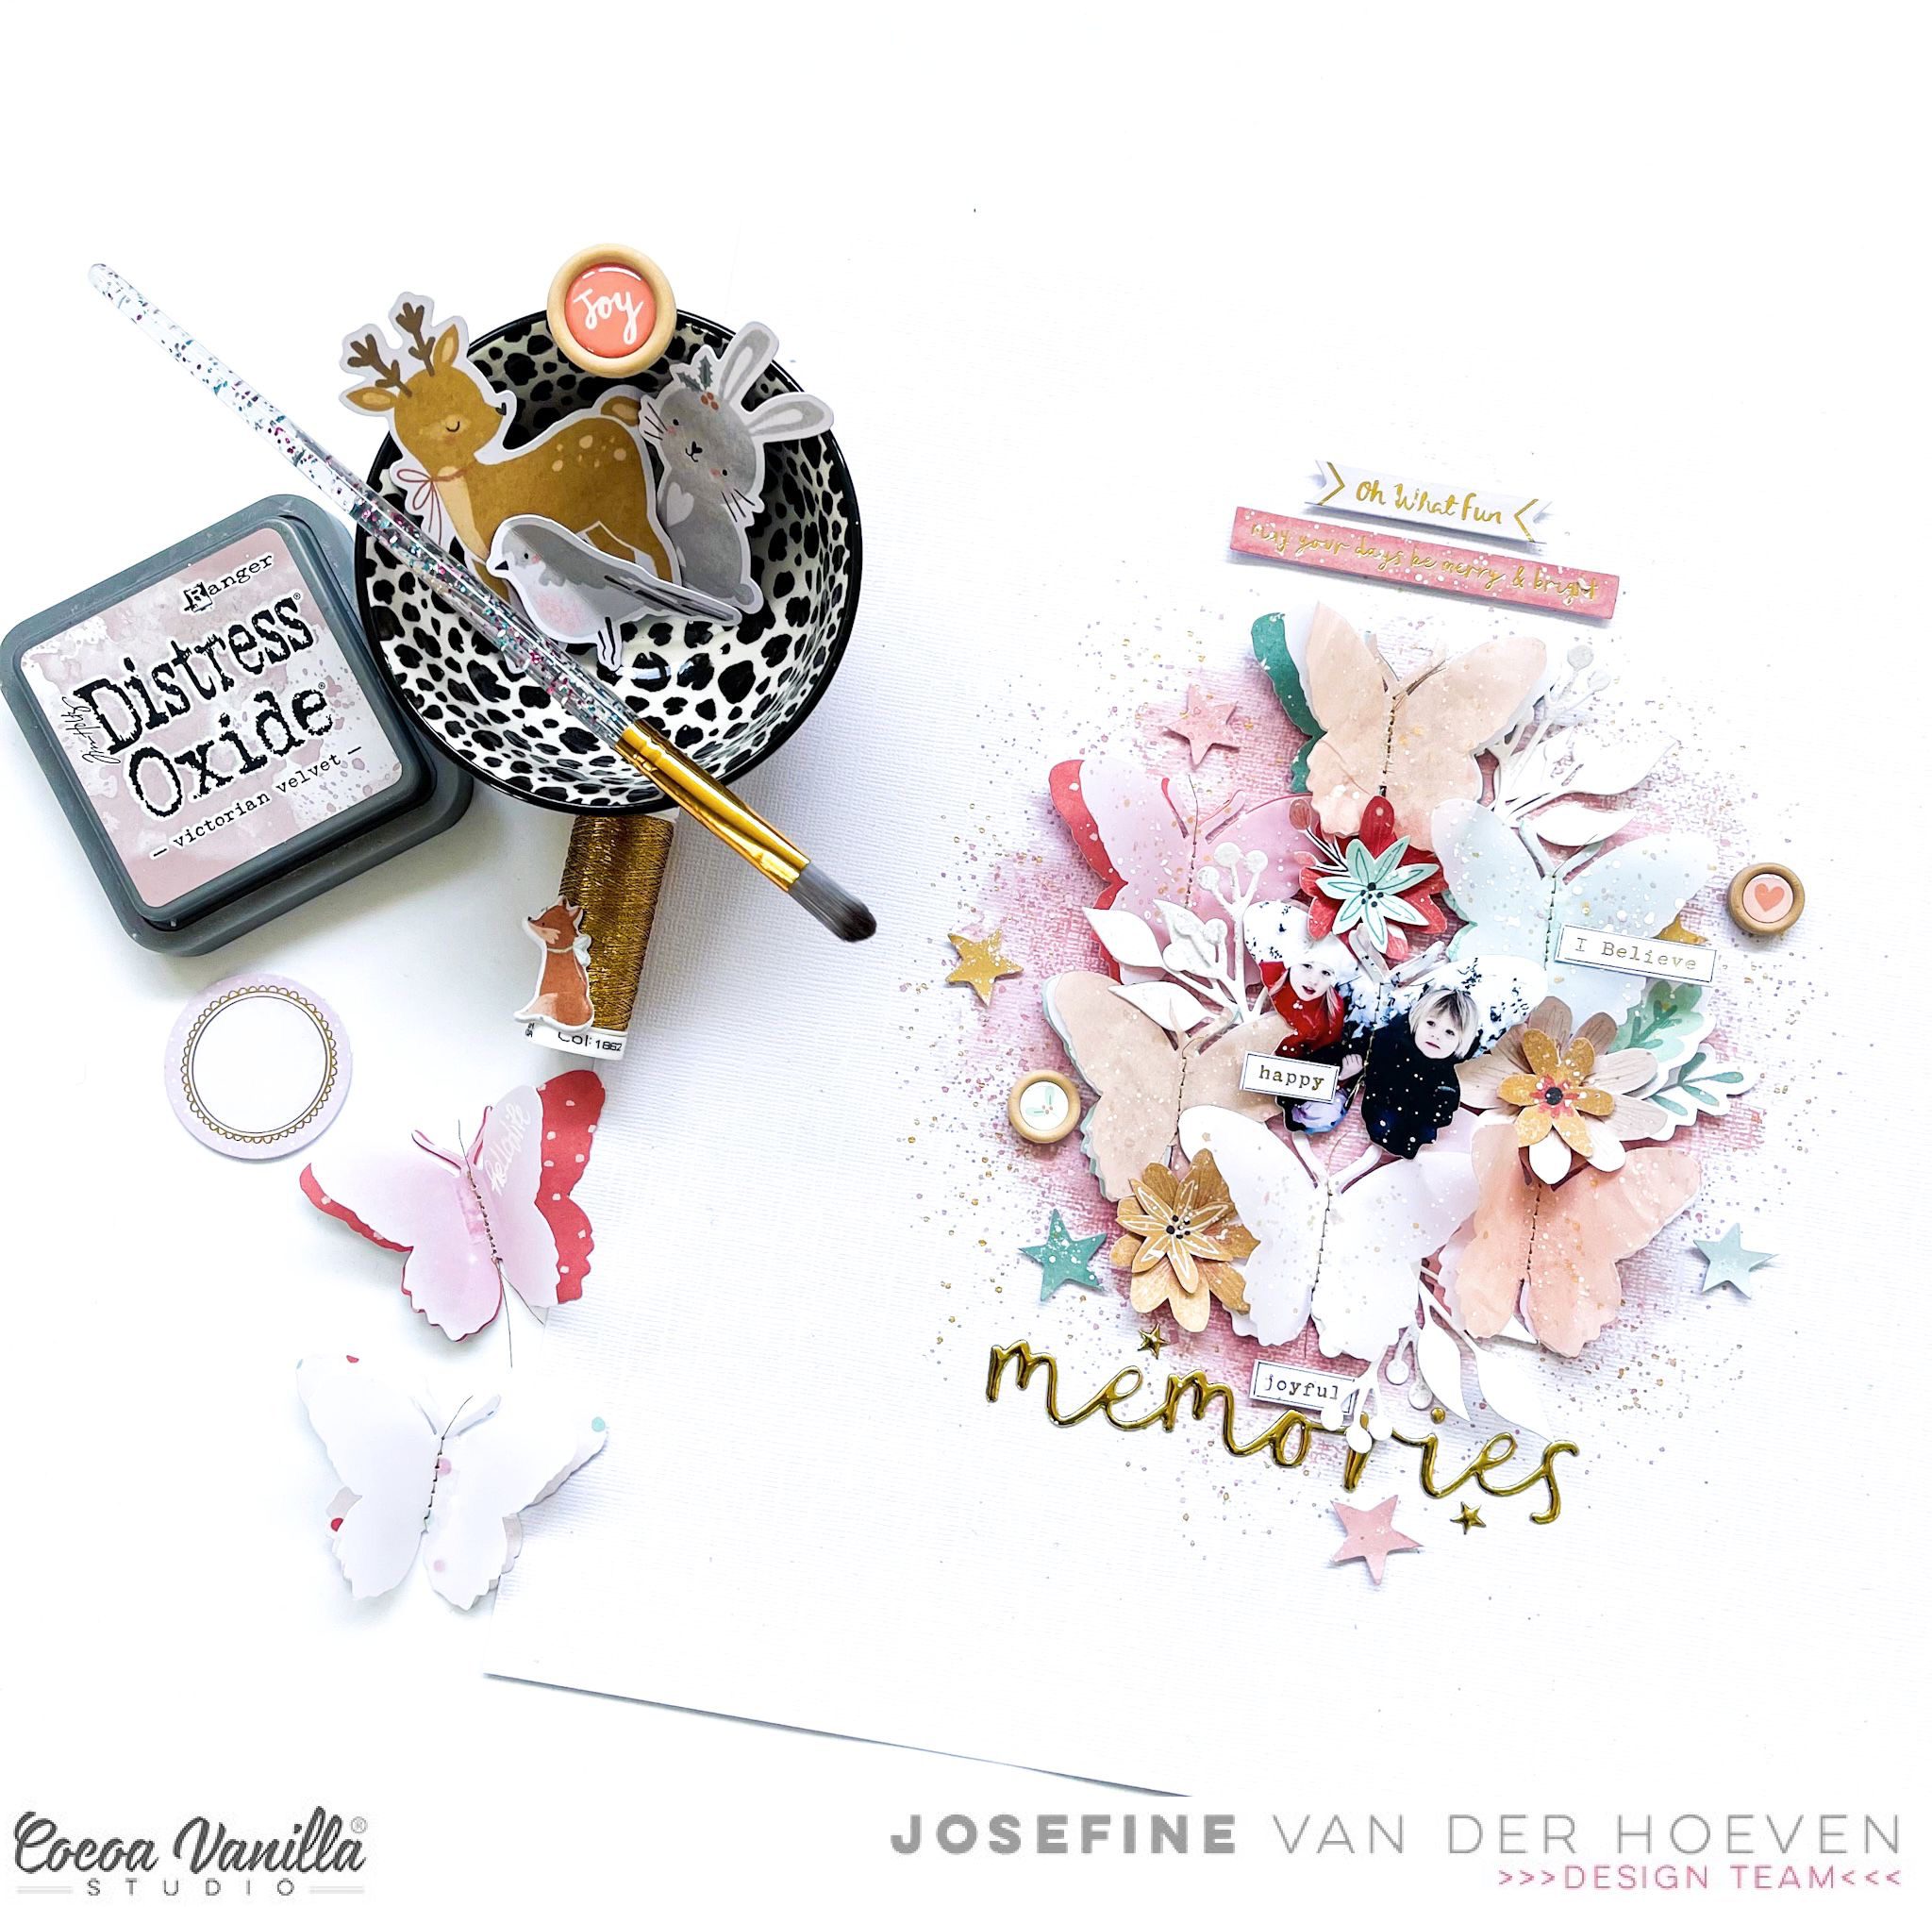
One of the things that inspired me was the winter photos and the light blue color of course I added some extra colors to my design. With the velum and white gesso splatters, I tried to capture the winter vibe.
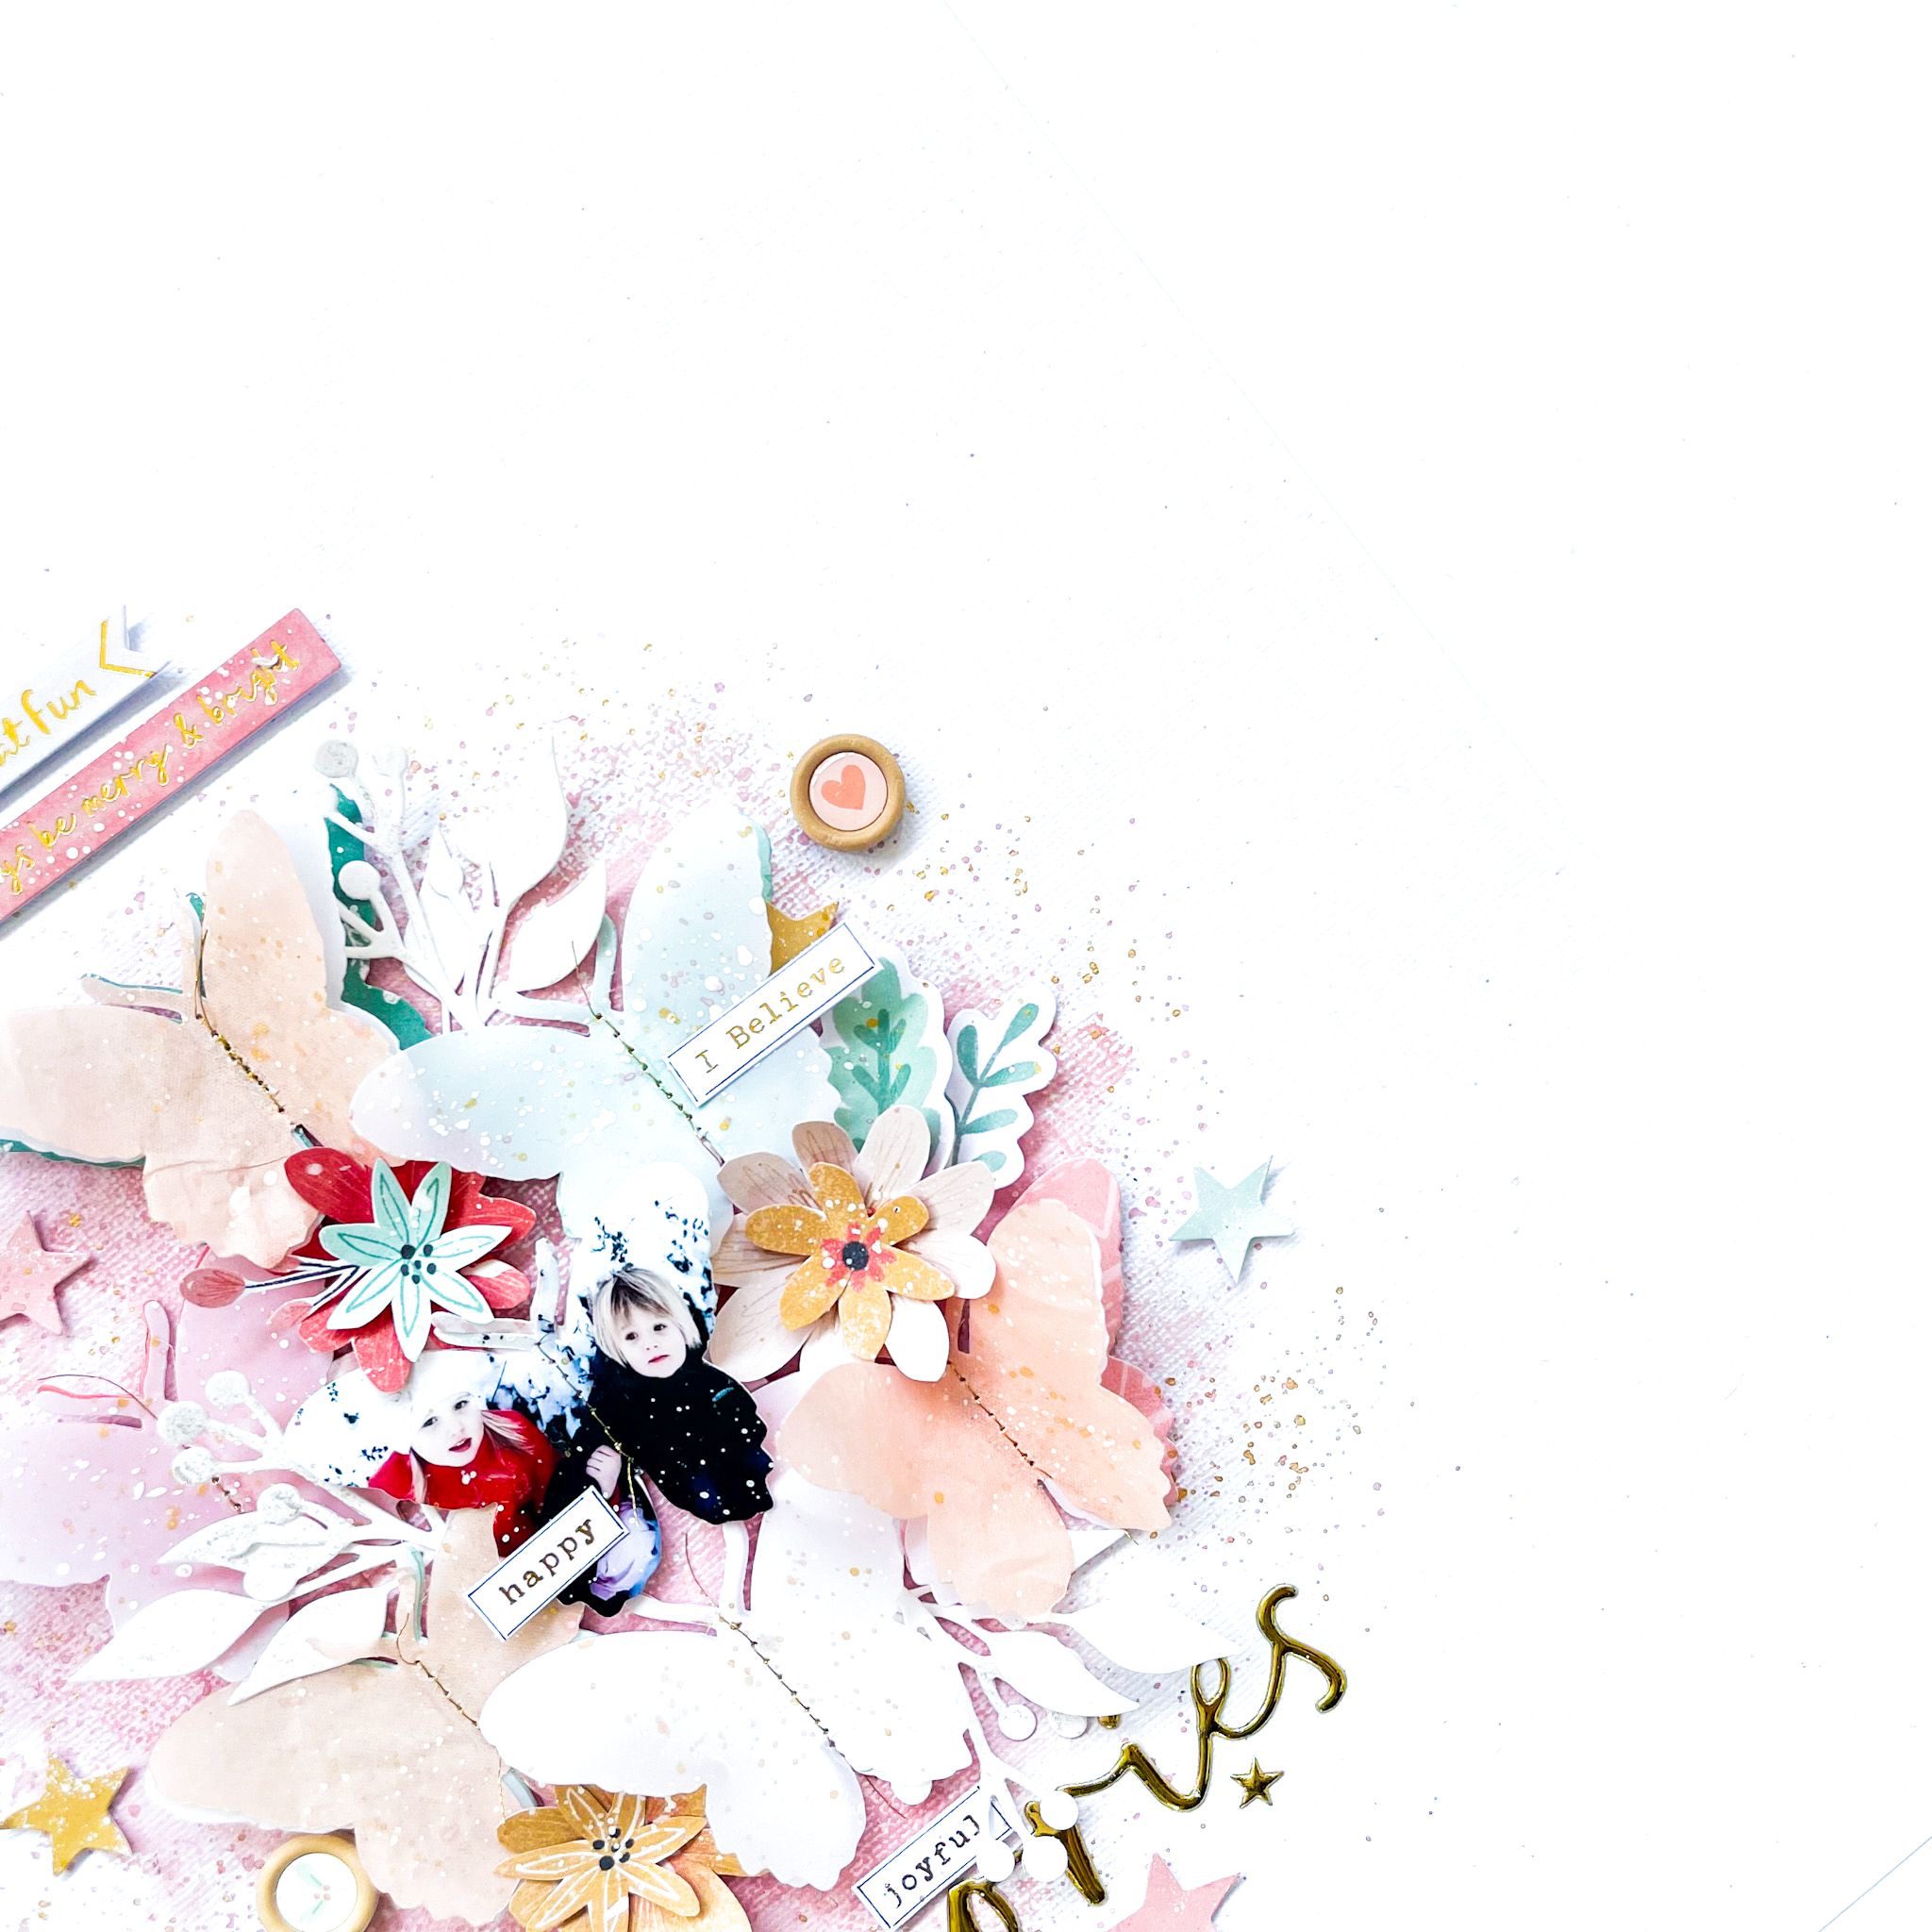
I start with a mixed media background that I created with the distress oxide ink. I chose the color “Victorian Velvet” I applied the ink with a stamp to my white cardstock background by stamping several times. This is how I created a stain of ink in the center of my layout. I punched out several butterflies from the design paper, vellum and light pink tissue paper.
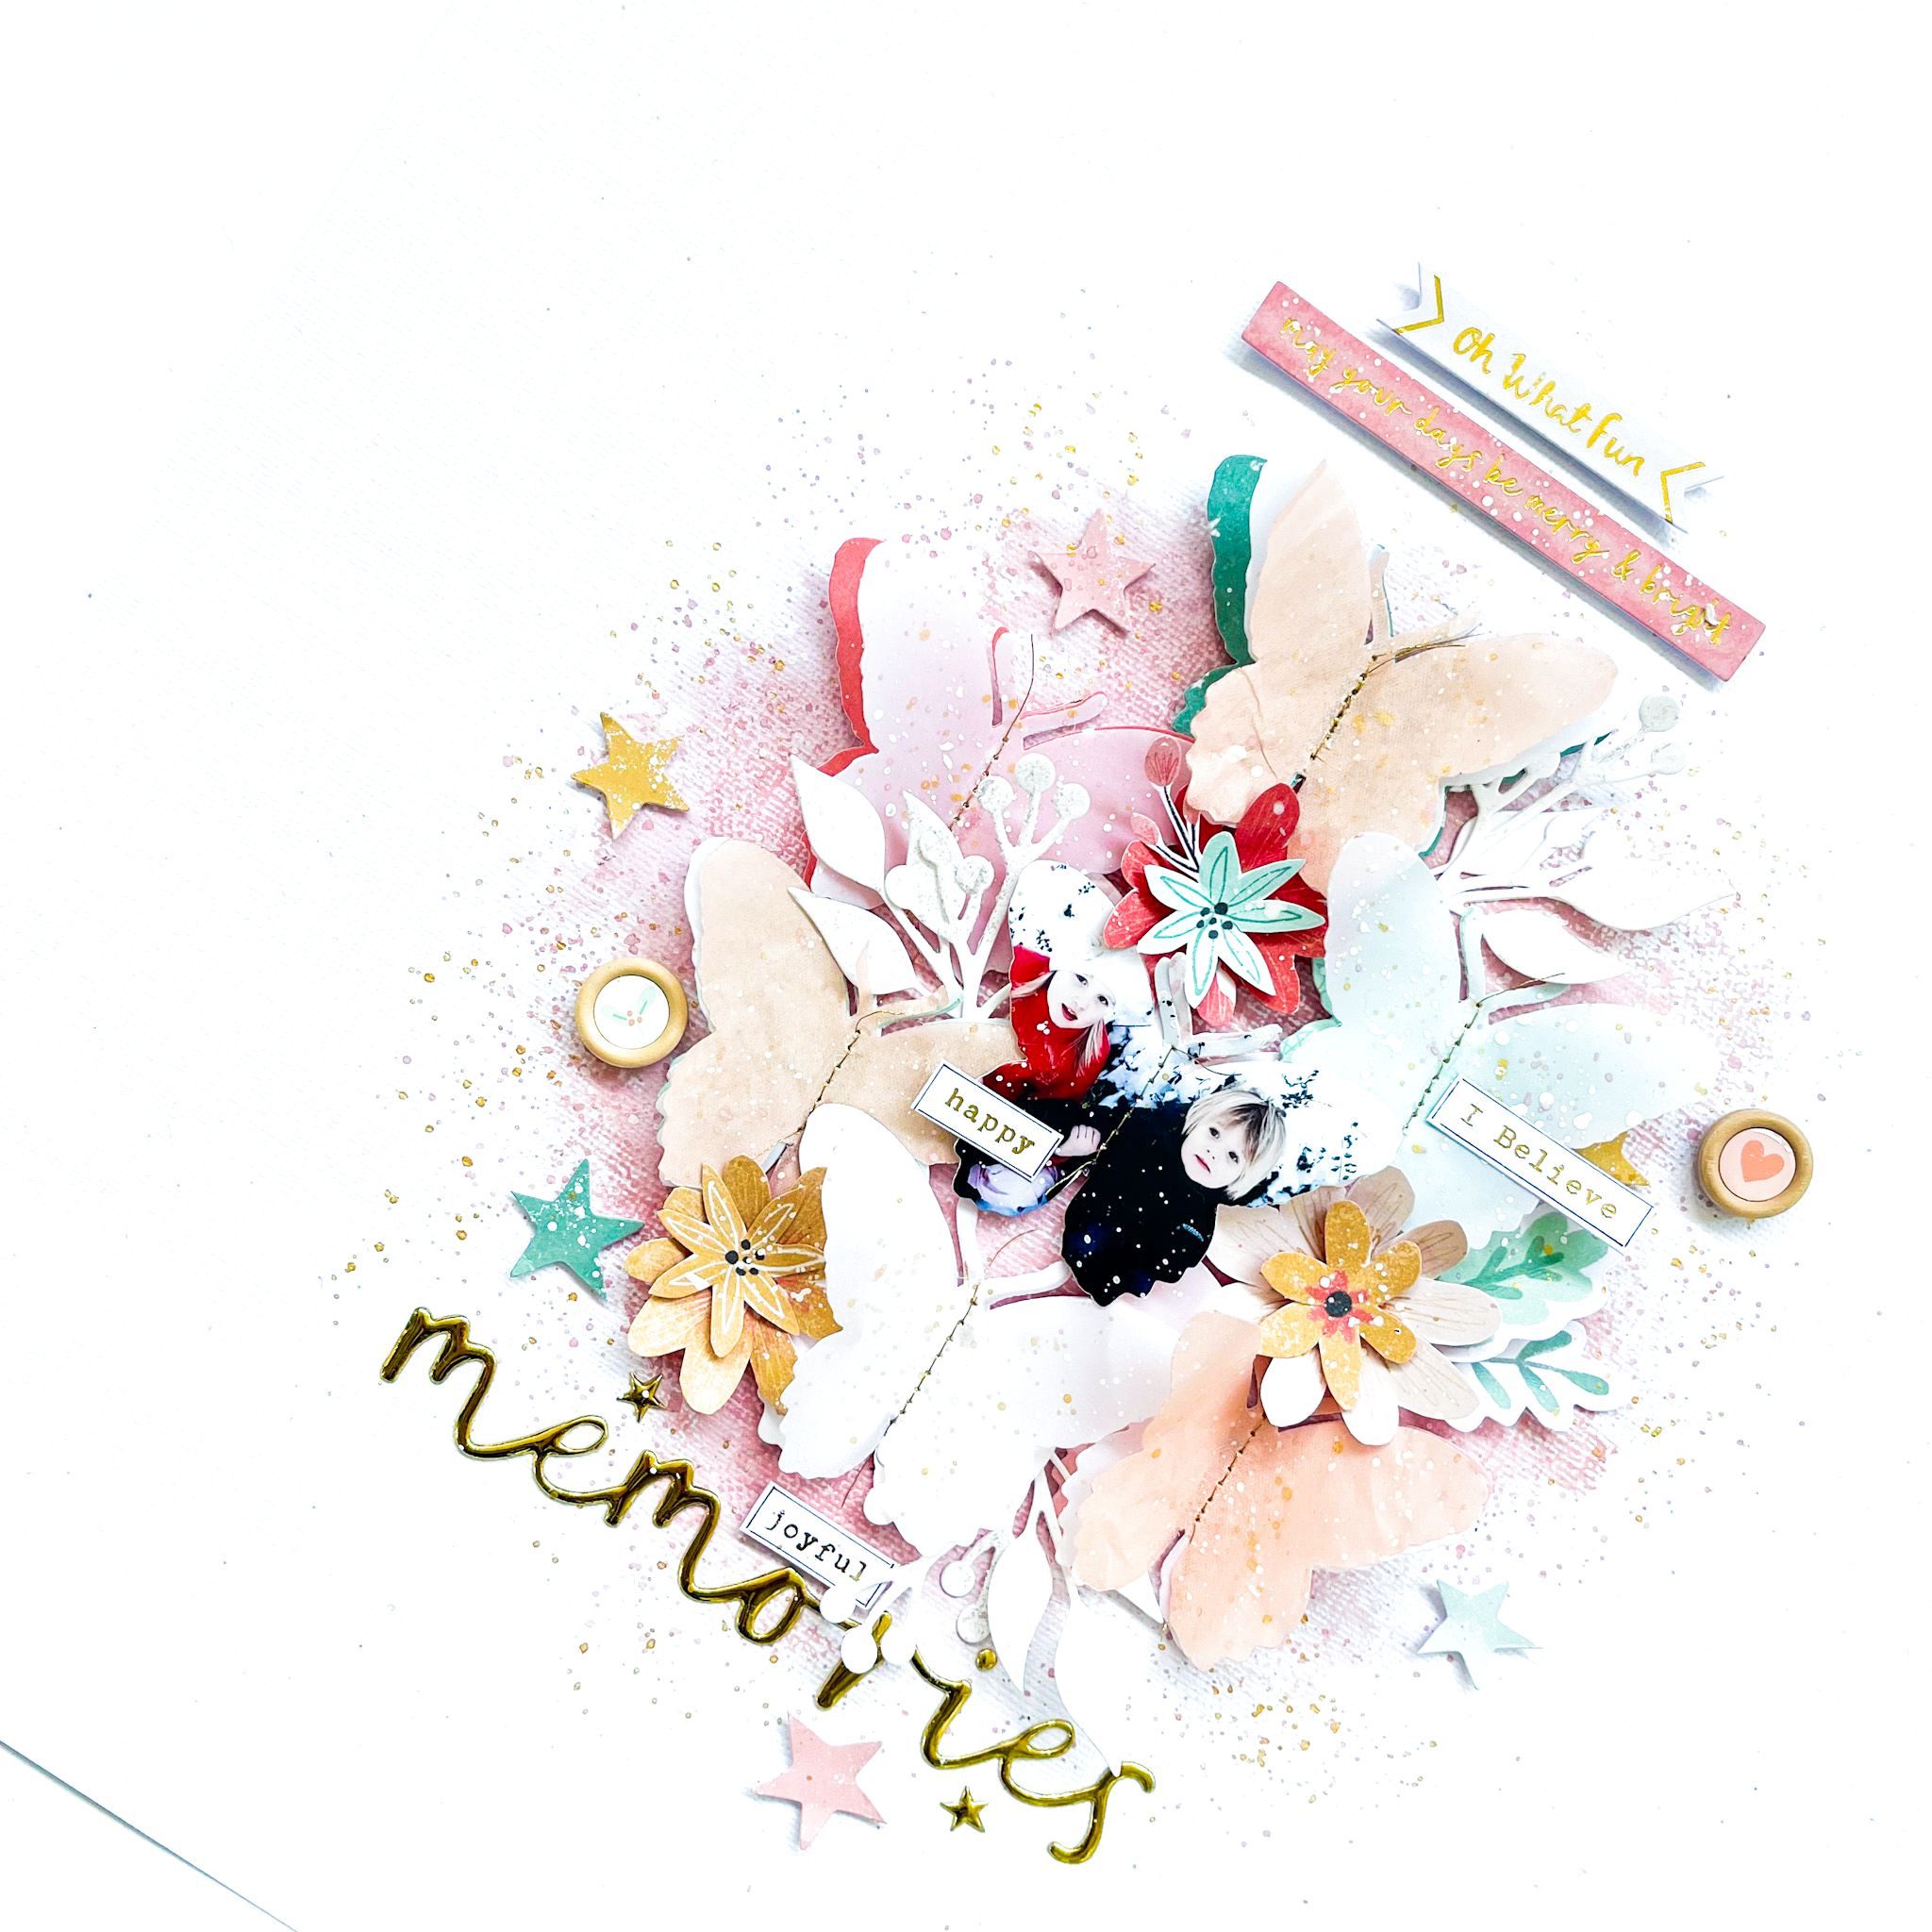
I used gold sewing thread and stitched the butterflies together. I also punched out a photo in a butterfly shape. I placed the butterflies in the center of the mixed media background and start decorating using die-cuts, flowers, stars, stickers and wooden buttons.
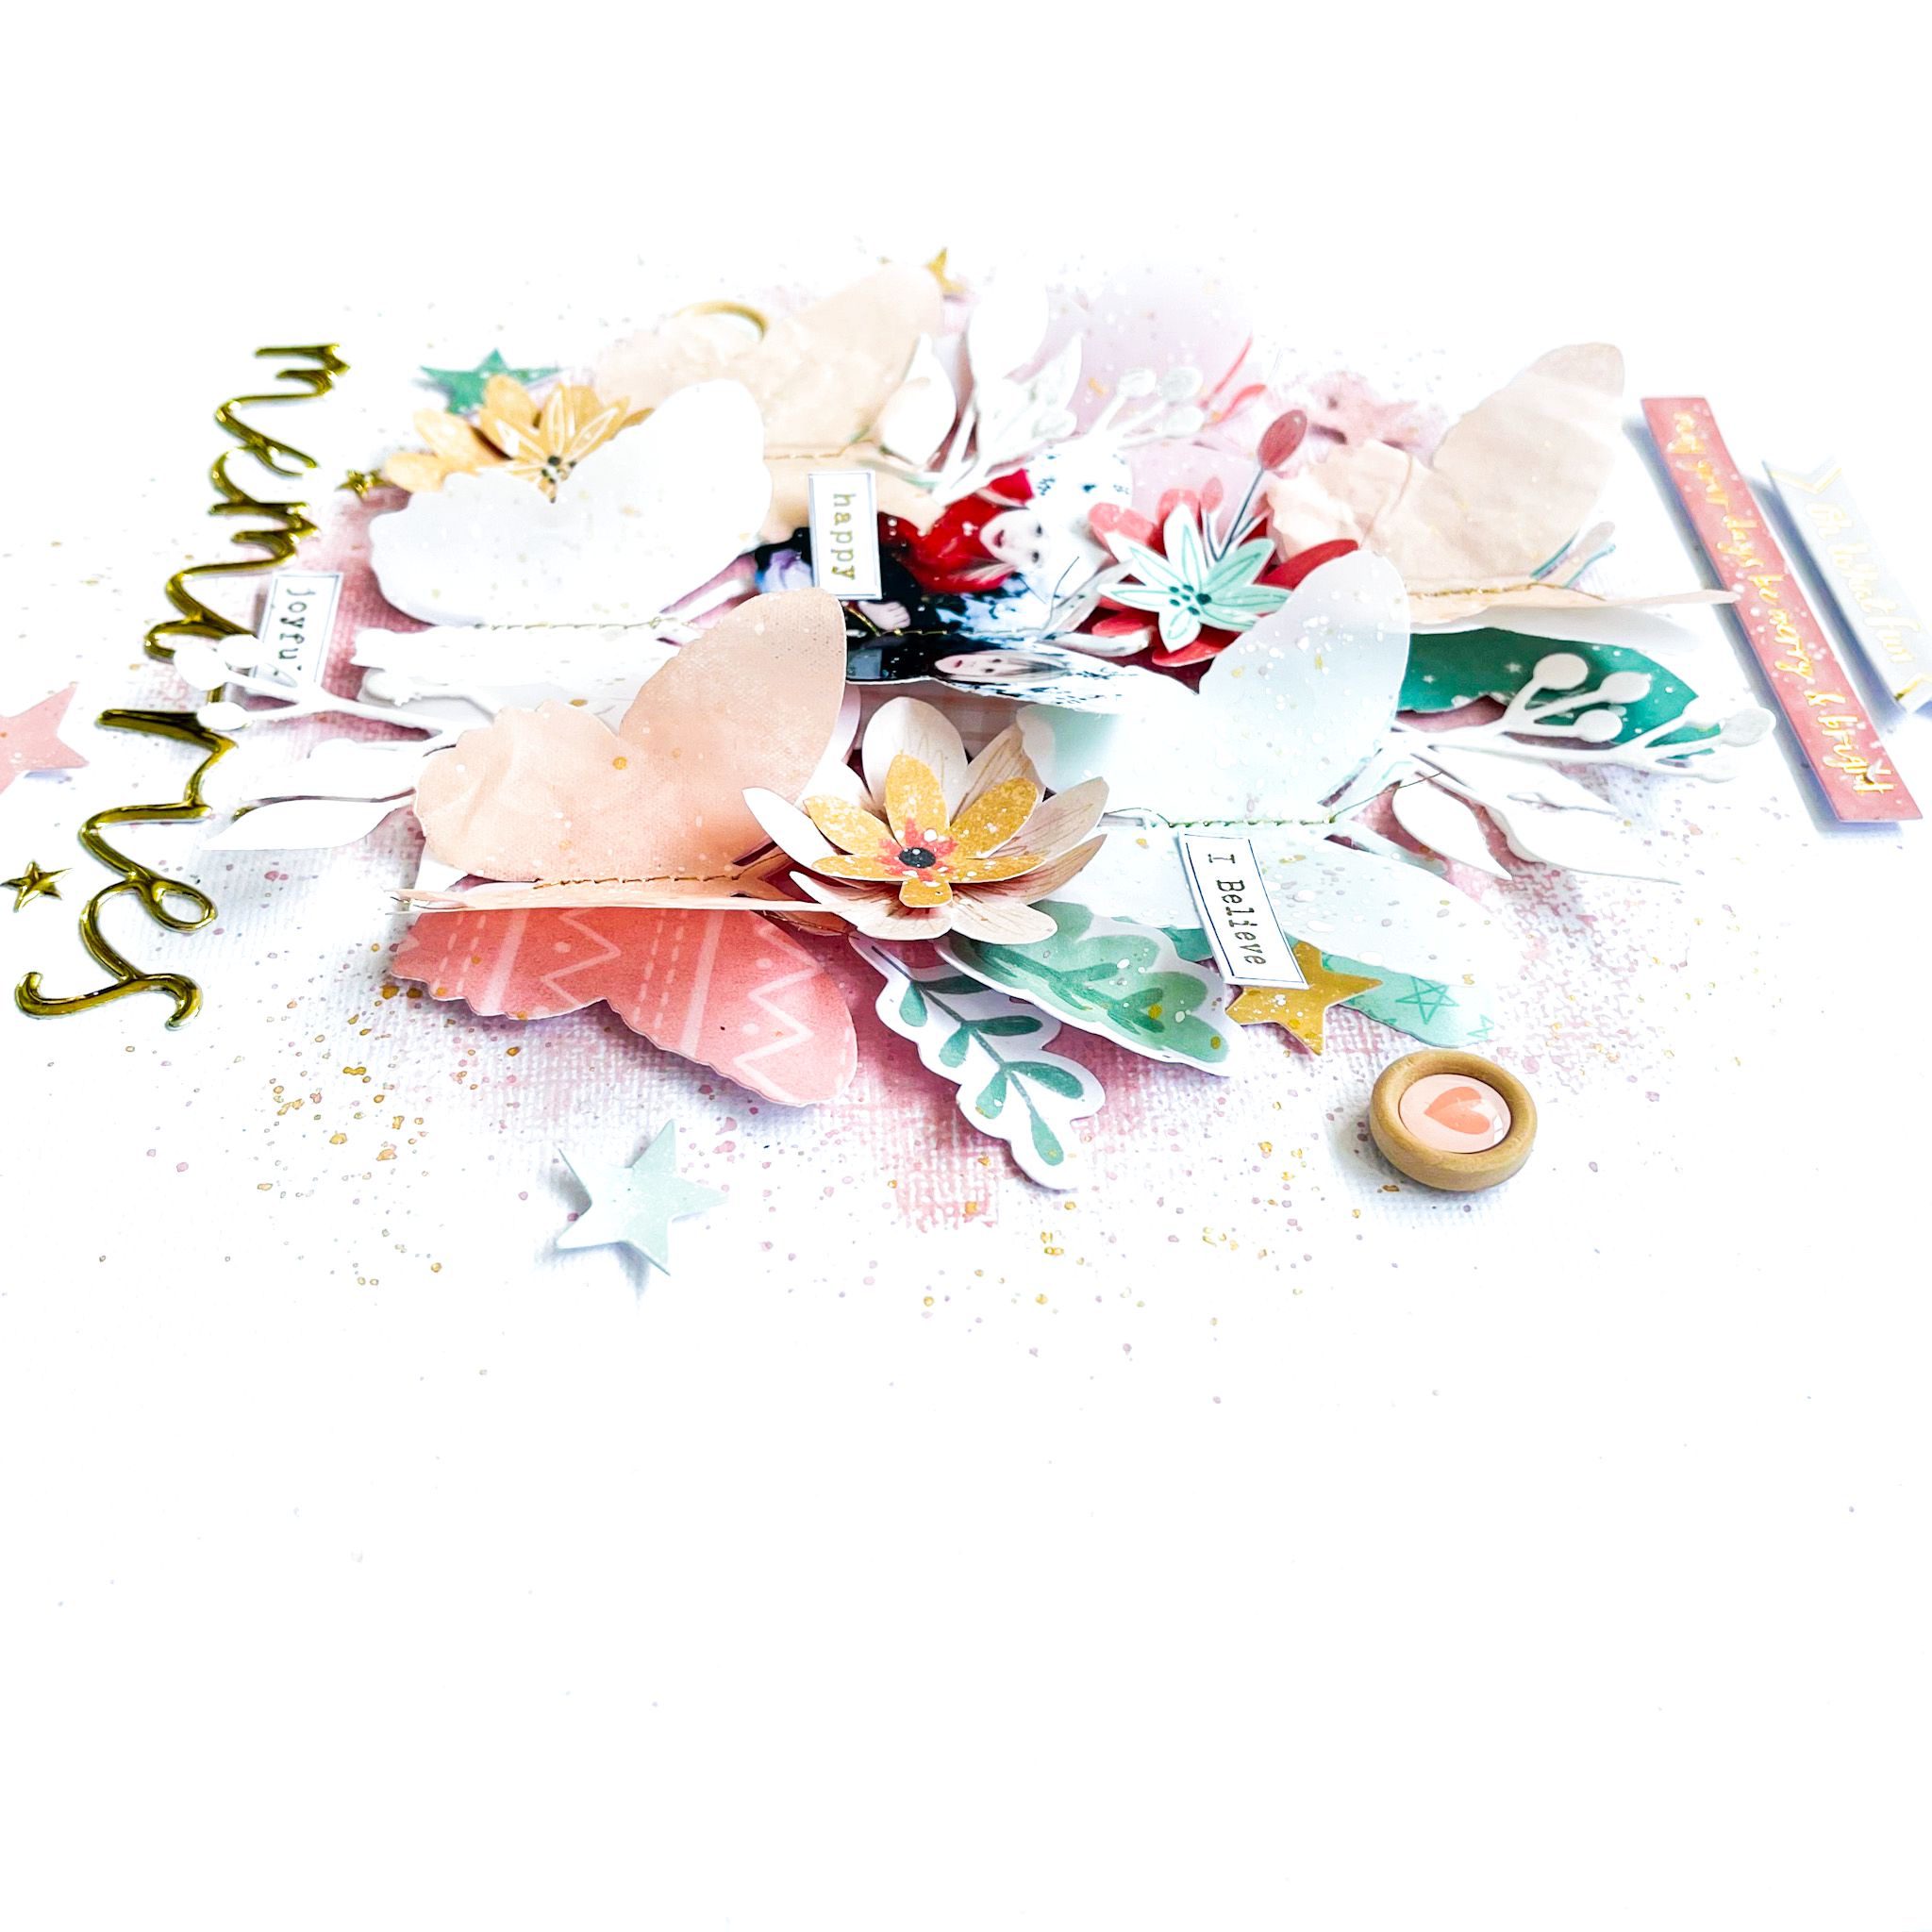
I placed die-cuts, flowers and stickers between the butterflies. I loved how that turned out. Look the gorgeous word strips on my layout and the gold title Memories under the butterflies. I splashed white gesso and gold acrylic paint splatters on top of the butterflies and embellishments.I punched some white twigs out of white cardstock and gave them a winter look with the Nuvo glacier. WoW, such a cool effect! I really love the shimmers. Curious to see more details and exactly how I made the layout! Just hop over to the Cocoa Vanilla Youtube channel for the process video! https://youtu.be/lkJee7SFoG8
I want to thank you for visiting the blog today and hope I was able to inspire you with this layout! I wish you a very happy and creative day today and enjoy watching the process video.
XoXo, Jo
It’s Tarrah back with you and yes I am still creating Christmas layouts!! I just can’t get enough! The stunning Joyful collection makes it so super easy to create pretty Christmas pages! I documented a Snapchat selfie photo taken on Christmas Day.
I chose the Holly Days paper as my main background paper and trimmed it down so that I could back it with the woodgrain side of the Pretty Posies paper from the These Days collection. I like how the woodgrain paper helps to make the fox die-cut pop and the flowers in similar colours on the page. I machine stitched a border around the edge so that the 2 papers attached to each other.
I cut out a pretty cut file from CUT to YOU and used the A5 paper to back all of the open spaces. On the bow of the cut file, I added red and then added 2 different greens to the leaf parts of the cut file. I adhered it down using regular adhesive, I love how the wreath on the Holly Days paper peeks through and adds a layer and some extra detail between the cut file and paper.
I layered one of the cards from the Pocket cards pack under my photo and adhered the photo down using craft foam over to the right of the layout. For my title, I chose the Believe word from the Gold Puffy title stickers and placed it below my photo. I fussy cut out some of the Poinsettia flowers from the smaller paper in the A5 paper stack and adhered some around the page. In the centre of the bow at the top, I placed the round Making Spirits Bright chipboard sticker. A few of the smaller embellishments I added were wood epoxy buttons, Accessory stickers and some more die-cuts. I also added a few of the small stars from the Gold Puffy Title stickers. Lastly I stamped the date stamp and my layout was complete.
Thanks so much for stopping by the Cocoa Vanilla blog today! I absolutely love how my layout turned out and I hope you were inspired in some way?
I centered them in a horizontal line on a white cardstock and added a gold machine stitch on the Advent paper. I distressed and curled up the edges of each paper.
I used a black and white photo of our sweet dog Fiona in front of our Christmas tree. I mounted it on adhesive foam and added tissue paper behind it.
I used two pocket cards from the Joyful collection Pocket Cards pack on each side of the photo, printed my journaling on velum and added it to the right card.
My title comes from the Joyful Chipboard stickers. I stamped the word “my” with an alphabet stamp set from my stash.
I created two big floral clusters that are from the Joyful Die Cut Ephemera pack and some fussy cut out of the gorgeous Tis The Season patterned paper. I also created leaves with a leaf punch from my stash.
I added a gold ribbon bow and a few white leaves that are from a JustNick Studio cut file.
Finally, I added a few Joyful Puffy Stars, a Wood Button from the same collection and numerous gold crystals from my stash.
Here are more close-ups:
Although Joyful is a Christmas collection, It is so versatile and easy to use for other kind of projects !
I hope this was inspiring for you ! Thank you for stopping by, and happy crafting !
Hi everyone, happy new year! If you are anything like me (4 weeks deep into school holidays), you are having trouble remembering what day it is and are tired of hearing “muuuuuum” for the five hundred and twentieth time today. (Hang in there, we’re past the half way mark!) Fortunately, I do know today is Thursday, because it is actually “Throwback Thursday” and my turn to bring you some fresh inspiration using an older collection. I didn’t go too far back though, because today I am sharing a layout featuring the beautiful ‘Sunkissed’ collection which is still available in the Cocoa Vanilla Studio online store.
For this layout, I wanted to create a mixed media page and decided to use some of my stash of acrylic paint. I love using paint because it is quick, easy, economical, and available in a great range of colours. And even those of you who are not “mixed media people” will usually have access to paint if you want try a technique like this yourself. (I didn’t use any fancy paints – cheap student grade acrylics will do the job!)
The photos I documented on this page are of my two boys taken on the day of their colour run at school. This was not long after they had crossed the finish line and they were both so proud of how wet and coloured they were. (And no, I didn’t bother trying to wash the clothes, they were destined for the bin anyway.) It was the colours of the paint on their clothes that inspired my colour choices for this layout.
As I mentioned above, I used acrylic paint for my mixed media background on this page. I used three different colours which I applied with a small brayer. (This method is great if you are short on time as the thin application means it dries super fast!) I then mounted my painted cardstock on top of the beautiful Good Vibrations striped paper, which created a fun page border.
Next, I added my rainbow arches, which had been fussy cut from a piece of the Bright Side paper left over from a previous project. I cut only the pink, orange and yellow arches (or what I had of them anyway) and stuck them onto my background.
I then created a layered mat for my photos to sit on using a piece of the heart print Feelin’ Fine paper, topped with a piece of the smaller scale cloud print paper from the A5 Paper Stack and finally a scrap of the Summer Lights paper. I also added a small yellow paper doily and some frayed gauze for texture before adding my photos on top.
The next step was to add my title, which I ran along the horizontal strip in my paper stack. To the left of my photos I used some alphabet stickers I had left over from the Love Always collection for the word colour and then to the right, I used the word fun from the Glitter Foam Title Stickers. Look at that gorgeous golden sparkle!
With all the main components in place, it was time to add a few fun embellishments. I chose a number of pieces from the Die Cut Ephemera pack including a flag, umbrella, and a watermelon slice. These were chosen purely based on their colour, but I love that they add a touch of whimsy to the page. I also added several stickers from the Puffy Stickers pack.
I finished off with some phrases from the Accessory Sticker sheet and some tiny black ink splatters. I love how fun and colourful this layout turned out!
If you would like to see exactly how it came together, you can watch my process video here:
Thanks for stopping by so I could share this with you, I hope you are feeling inspired to bust out some of your older Cocoa Vanilla stash now too! Until next time, happy scrapping!
Hello and Happy New Year to all our Cocoa Vanilla Studio friends! It’s Danni here, ready to get started with a brand new year of creative fun. I have lots of photos left over from my holiday celebrations to scrap, so today I am sharing another festive layout using our Joyful collection.
We have several Christmas traditions that have developed over the years with my little family, and one of my favourites is going out for dinner on Christmas Eve for South/East Asian food in our old neighbourhood. The photo I have chosen was from Christmas Eve 2019 where my son learned to use chopsticks for the first time – he did so well!
To begin the page I took a sheet of white cardstock and cut a Christmas tree background cutfile by COAPA Cutfiles using my digital cutting machine. Instead of using the outline cutfile, I took all the negative pieces and adhered them on top of Making Spirits Bright 12×12 patterned paper. This way the patterned paper peeks through all the gaps in the cutfile and creates a different texture than usual. I left some of the white pieces out so a few of the trees were a solid green for interest.
I wanted a fun bold title, and I noticed one of the double-sided 3×4 cards said ‘Christmas Eve’ which was perfect. I carefully fussy cut the letters from the card, then outlined them in black pen to make them stand out. I wanted a pop of red to prevent the green title blending into the green background, so I used the A5 paper stack to add some red paper behind my title and fussy cut around the outside to create a border. I finished off the title with a beautiful piece from the puffy gold title stickers.
I matted my two photos using the A5 paper stack and layered them slightly overlapping each other. Using the die cut ephemera I created three embellishment clusters – one either side of my photos and another at the bottom of the page. I used a cute animal embellishment in each of the clusters because I thought they looked as if they were frolicking through a forest of Christmas trees! I filled out the clusters with small foliage pieces, flags, a tree and a smattering of stars.
I adore the puffy stickers in this collection so I couldn’t resist adding a few puffy stars to each cluster. I used a sticker from the accessory stickers to add a few lines of journaling below my photo, then added a tiny puffy star to this as well. To add some extra details I added a bunch of messy splatters using distress oxide inks in green, pale pink and golden mustard.
I hope you enjoyed joining me for this layout today. Happy scrapping!
Hey y’all! Laura Alberts here with a sweet Christmas layout using the gorgeous new Joyful collection. I fussy cut this stunning wreath from the Holly Days patterned paper and backed it onto the Feeling Festive paper. I love the way these little dots give the appearance of confetti bursting around the wreath! In addition to giving this wreath a 3D look by backing it on a different patterned paper, this fussy cut background brings the attention straight in to the photos.
For my title, I used the gold puffy words from the Joyful collection to add a simple ‘Together’ to the top of the wreath and drew my journaling lines underneath. This filled in the open white space above my photos and gave it a purpose. To add details to the wreath itself, I added gold Nuvo drops in the centers and white Nuvo drops around the outside. These tiny gold stars from the puffy words sheet were the perfect scattering bits to finish off this page!
Along the bottom of my photos, I added a swag of florals that I fussy cut from the Tis the Season patterned paper. This covered the connection between the photos and the bottom of the wreath and helped them blend more seamlessly together. My favourite part though was adding these puffy gold fabric stars around the wreath. These are such a beautiful touch to this collection!
If you’d like to see how ‘Together’ was created, be sure to check out the process video below! I hope you will give fussy cutting a try and see how you can elevate your scrapping with your scissors!
Hello everyone. It’s Anna here with my last page in 2021! Staying in christmas mood I scrapbooked fresh from the oven photo of my girls under the christmas tree. I took it on Christmas Eve, that is the most celebrated day of christmas in Poland. We eat special supper that day and Star is bringing gifts to everyone, who was nice. If you thought it’s time to hide your christmas papers and collections until next year, hold your horses!!! Use them to make few pages with new photos and all the memories, that are still fresh in your head. Write everything down to read it next year. I don’t like adding journaling to my pages, where it’s visible so I usually write few words on the back of the layout. “Joyful” collection is just perfect for all the christmas photos – so cute, fresh and modern.
This layout was inspired by all the gifts under the chtistmas tree. I looked at them and thought it would be fun to mimic boxes on page and add photo as a gift tag. I went through the “Joyful” pattern papers and choose two that look like a wrapping paper: “Advent” and “Feeling festive“. I also added strips of red “Tis the season” as a ribbon with a dimensional bow. Smaller gift is decorated with strips of mint paper from A5 paper stack. My background paper is a little more busy. I decided to use “Making spirits bright” with super fun stars.
I printed my photo vertically and trimmed it to the size of rectangle, cutting of two corners with my tag corner punch. You can also use dies to cut this shape or just scissors. Next step was to make a hole and add circle of pattern paper as a decorative element. My photo tag was ready. Just make sure, that you picked the right photo that can be trimmed down to this quite narrow shape. You don’t want to cut off piece of head or whole arm of the person on the picture.
I decorated the photo and area around it using golden phrase stickers, chipboard stickers and few elements from ephemera pack. I didn’t want to overdo it so it still looks like a gift wrapping. Tag seems like hanging loose but I glued it down to the background so it won’t be destroyed while storing in the pile later.
I also added smaller tag to the other gift, this time without any photo on it. They are both decorated with bows that I made with strips of paper. You can use proper die if you have one but I was just too lazy to reach for it. I trimmed my bows with the scissors without measuring anything, trying to keepmthem simple. You can replace the paper with actual ribbon and make real bows with it. They will be harder to destroy while storing the layout.
I finished my page adding few stars fussy cut from “Making spirits bright” paper mixing them with gold glitter puffy stars. Thay are so cute and can be used whole year round, not only for christmas projects. This page came together pretty quickly thanks to my inspiration, found under the christmas tree. I had a vision in my head and just went with it.
You can easily recreate this page as a birthday one too! Just change patters and embellishments. You can add more gifts and more photos as a tags if you shrink them.
That is all for today and for this year. Thank you for stopping by and see you in 2022!
Hello Paperlovers, Welcome to the Cocoa Vanilla blog today! It’s Josefine here….Have you had a nice Christmas and enjoyed the family moments together. Today I have a new Christmas themed layout for you. I think the Joyful collection is really a great Christmas collection. The soft but also some brighter colors make this collection beautiful.
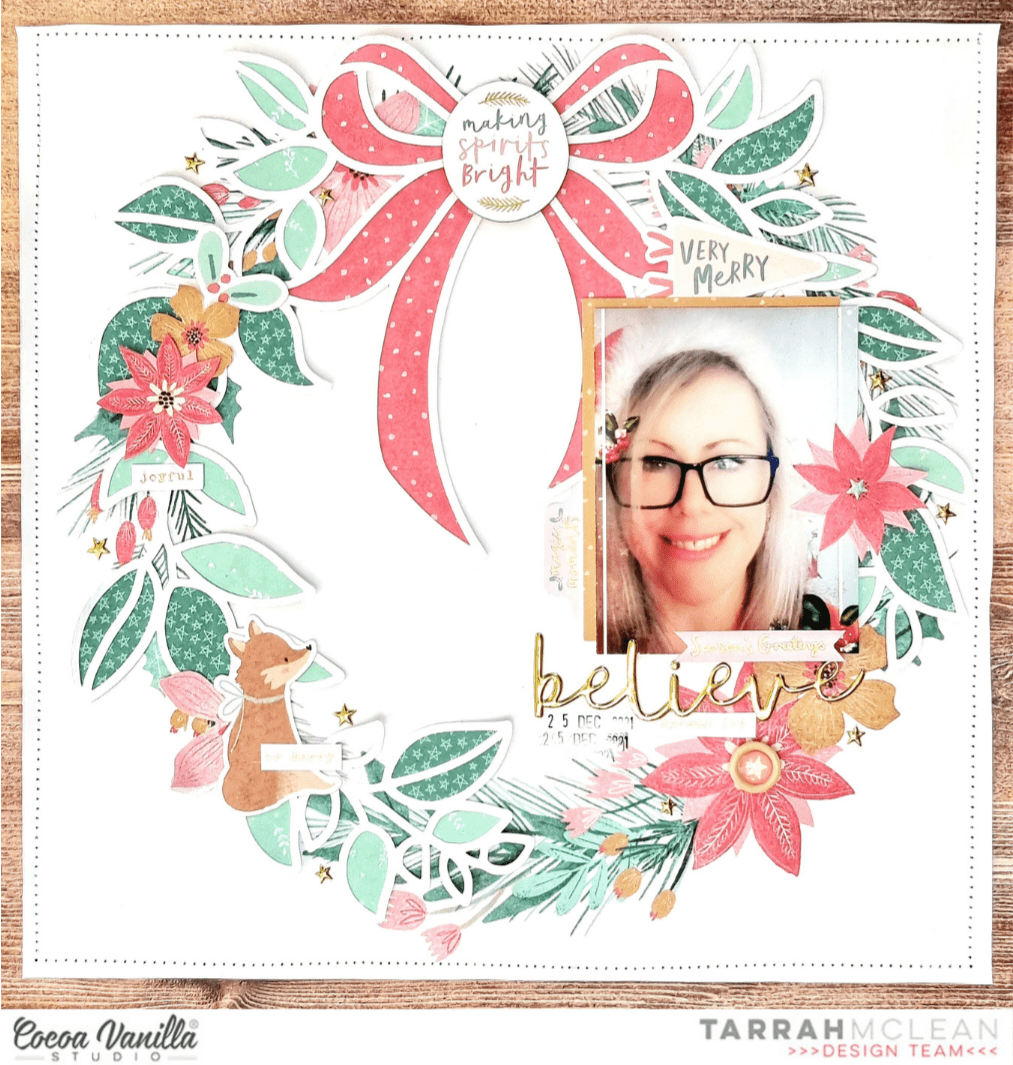
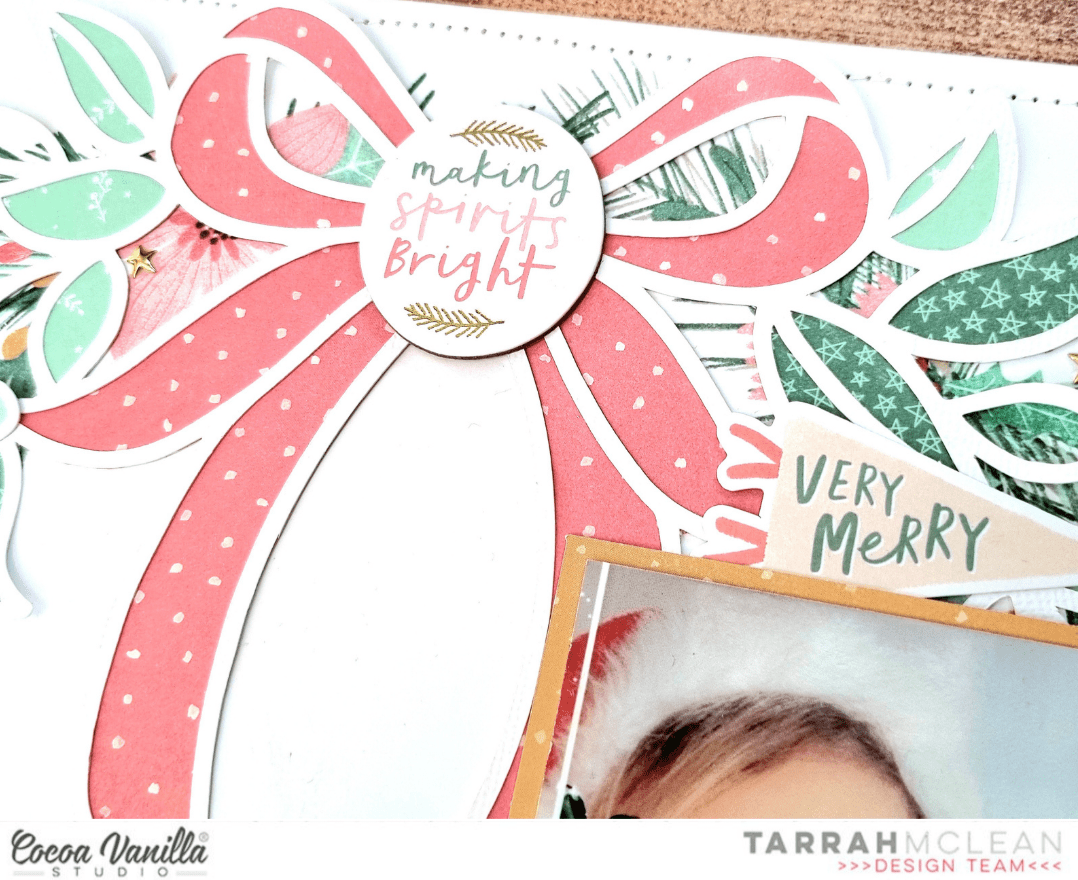
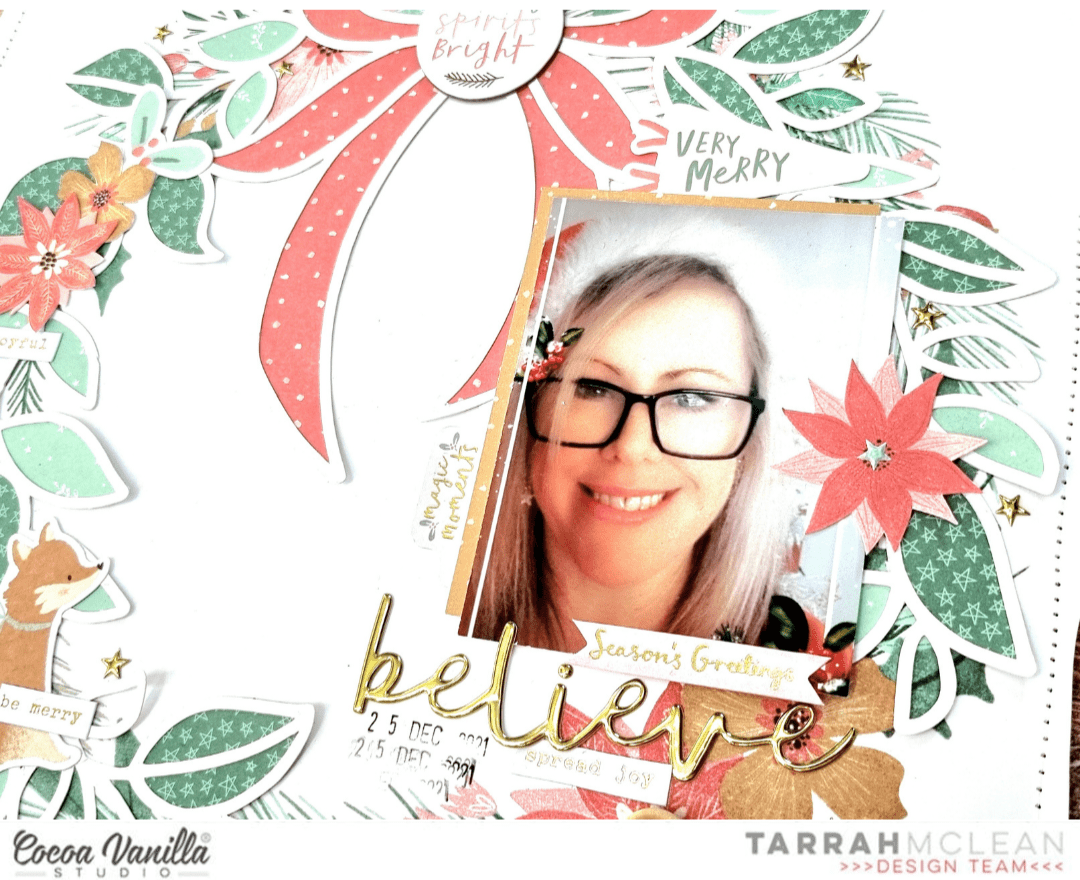
I used the beautiful designer paper with the Christmas wreath for this layout. Love, love, love the beautiful wreath design and also so easy to use with all the great embellishments. I cut the center and glued a design paper behind it with golden dots.
I made two rosettes from the beautiful design papers. I punched out several leaves and stitched them with gold thread. I put everything in a wreath on the design paper and used adhesive tape and 3D foam. This way I create different layers. I cut different flowers from the design paper and put them between the leaves. I used die-cuts, stars, chipboard figures and puffy stickers to decorate my layout.
I cut the photo of my daughter during the holidays into a circle and placed it on top of the chipboard frame. Have you spotted the sweet little deer, what a cutie. I punched some white branches from white cardstock and placed them in between all the gorgeous embellishments.
For the title, I used the gold chipboard words Christmas and Joy. Perfect for this Christmas layout. I splash with white acrylic paint for a snow effect. I fold three 3D Christmas baubles by using 1 inch punch and placed them between the leaves and flowers. I am happy with the result of this layout. Simple, easy but with a cool Christmas result. I hope I was able to inspire you during the holidays. I want to thank you for visiting the blog today and hope to see you here again next time with a new project! I wish you happy days and see you soon!
XoXo, Jo
Hello friends! It’s Kylie back with you today and I have another layout to share featuring the new ‘Joyful’ collection. I wanted to create a layout for the festive season based on lots of colour and dimension on the page. Since the papers of the ‘Joyful’ collection have the most beautiful colour palette I knew I could achieve this quite easily.
Using a ruler I began tearing strips of paper from many of the different designs. They were all torn at different widths and lengths and once I had a good selection I began layering them over the FEELING FESTIVE paper which would be my background page. I made sure to use the longer and wider pieces through the centre of the page, moving out to the shorter and more narrow. Once I was happy with the placement of each strip I used my fingers to fold and distress the edges a little further.
My photo was trimmed to measure 4.75″x 3.75″ and was adhered to a photo mat I cut from paper to measure 5″x4″. Once I had adhered it into place over the background I was able to embellish with some of the gorgeous die cuts. I created a title using the chipboard stickers placed over the lower portion of my photo.
This type of layout was really quick to create and would be a great way to use up a lot of left over strips pf paper. It would also be a great option for a double page layout.
Thanks for stopping by today. Wishing you and your families a wonderful festive season.
It’s Tarrah back with you today, I hope you are not going to crazy in this busy time of year and that you are getting some time to relax and enjoy your family or perhaps some crafting time?
I am very excited to be sharing a new layout with you featuring the gorgeous Joyful collection.
I decided to create a layout with some clusters built up at the top and bottom of my page, the bottom cluster includes the photo of my beautiful nieces dressed in their Christmas jumpers (they live in England) to go to school recently. They are so adorable and this photo had perfect colours to match with the Joyful collection. I placed my title, made up of the gold title puffy stickers, in the centre of the page to balance out the top and bottom clusters.
On the right of my photo, I just had to add the super cute bear die-cut from the Ephemera pack! He is just gorgeous and it suits the page so well, looking as though he is cuddling up next to the girls. Under the photo, I layered the oval frame die-cut and placed one of the small puffy stickers at the top of the photo. To the left of the photo I added the tag die-cut and the super cute rabbit die-cut too. At the top I added some more tags with twine through the holes.
Some of the smaller embellishments I added were some of the gorgeous wood epoxy buttons and some of the chipboard icons. I also popped up some of the star die-cuts with foam tape and scattered these down the page to tie in the top and bottom clusters together. Lastly I stamped the date stamp and sprinkled some gold mist around my page.
Thanks for stopping by the Cocoa Vanilla blog today! I hope you enjoyed my layout as much as I enjoyed creating it?!
Check out the Cocoa Vanilla store if you would like to purchase the gorgeous Joyful collection!
Happy creating and wishing you all a very Merry Christmas from my family to yours.