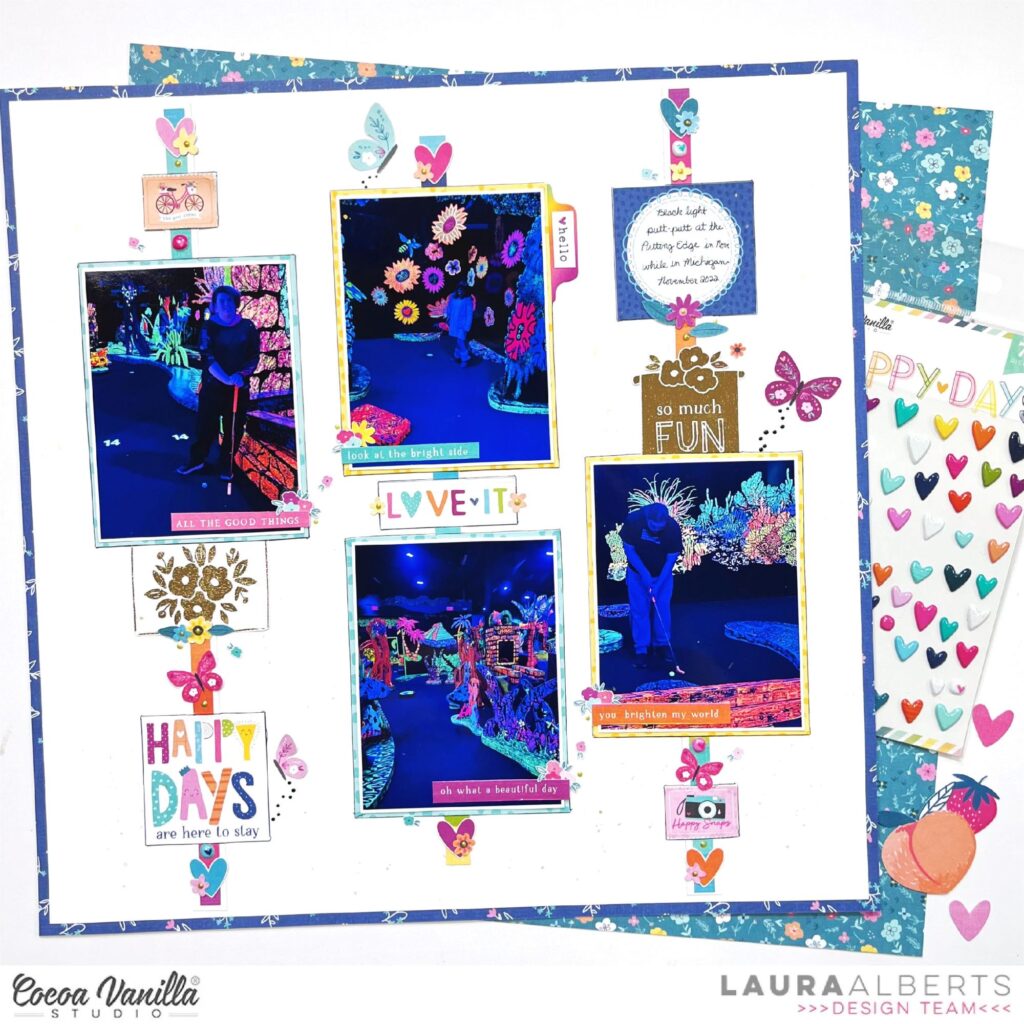
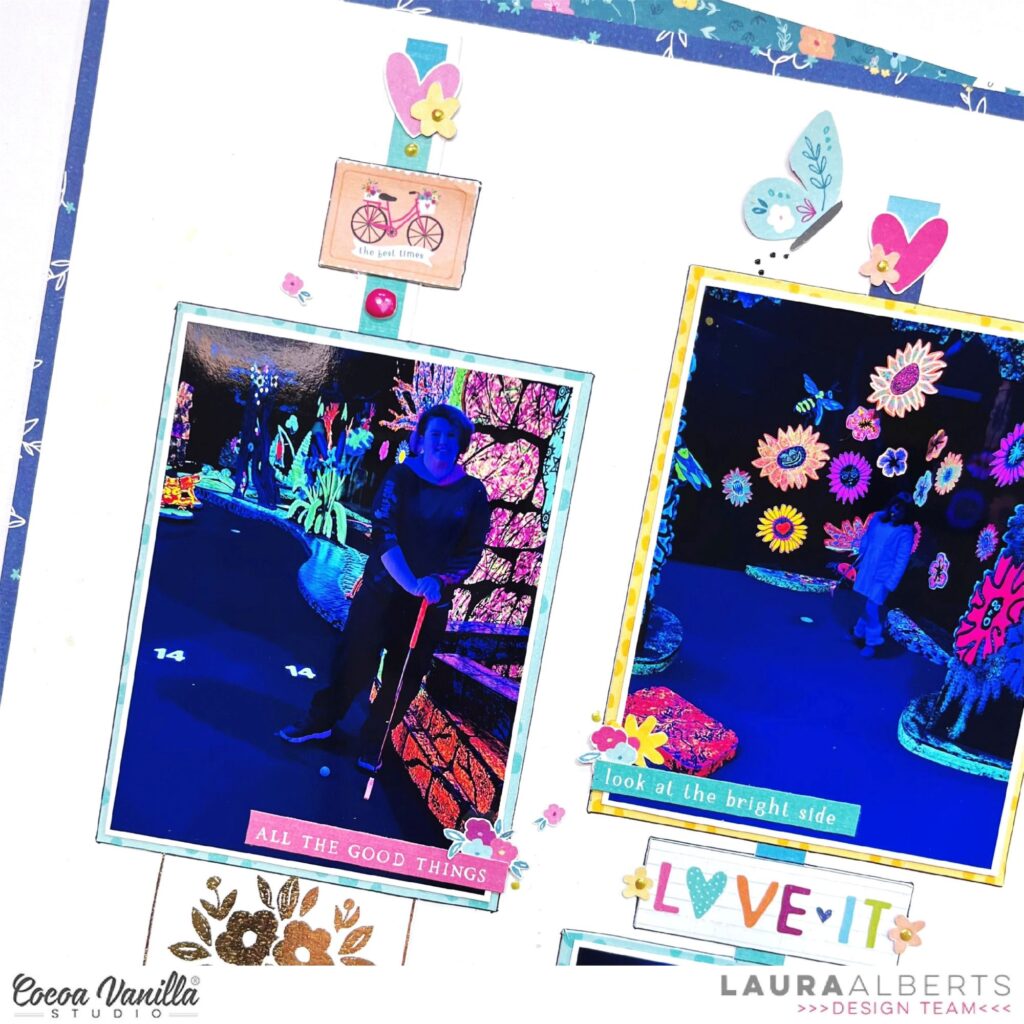
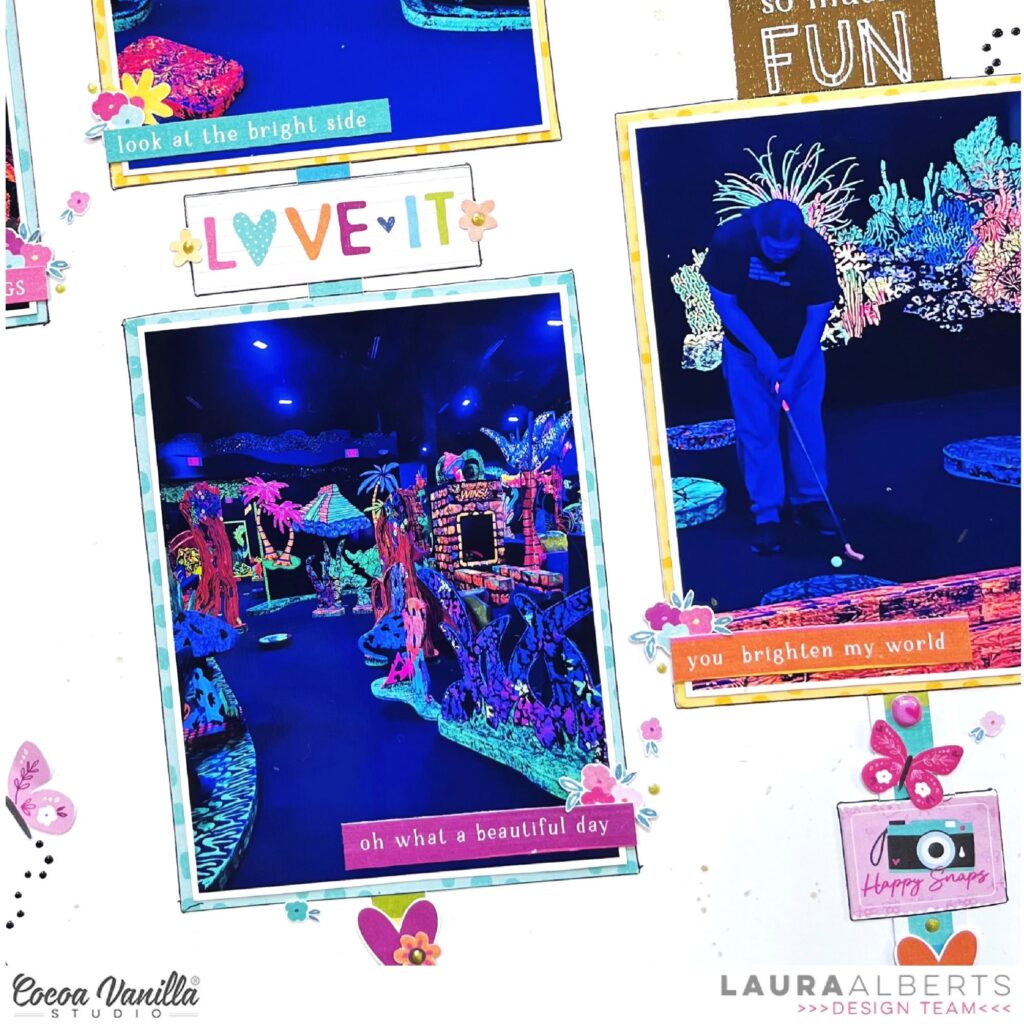
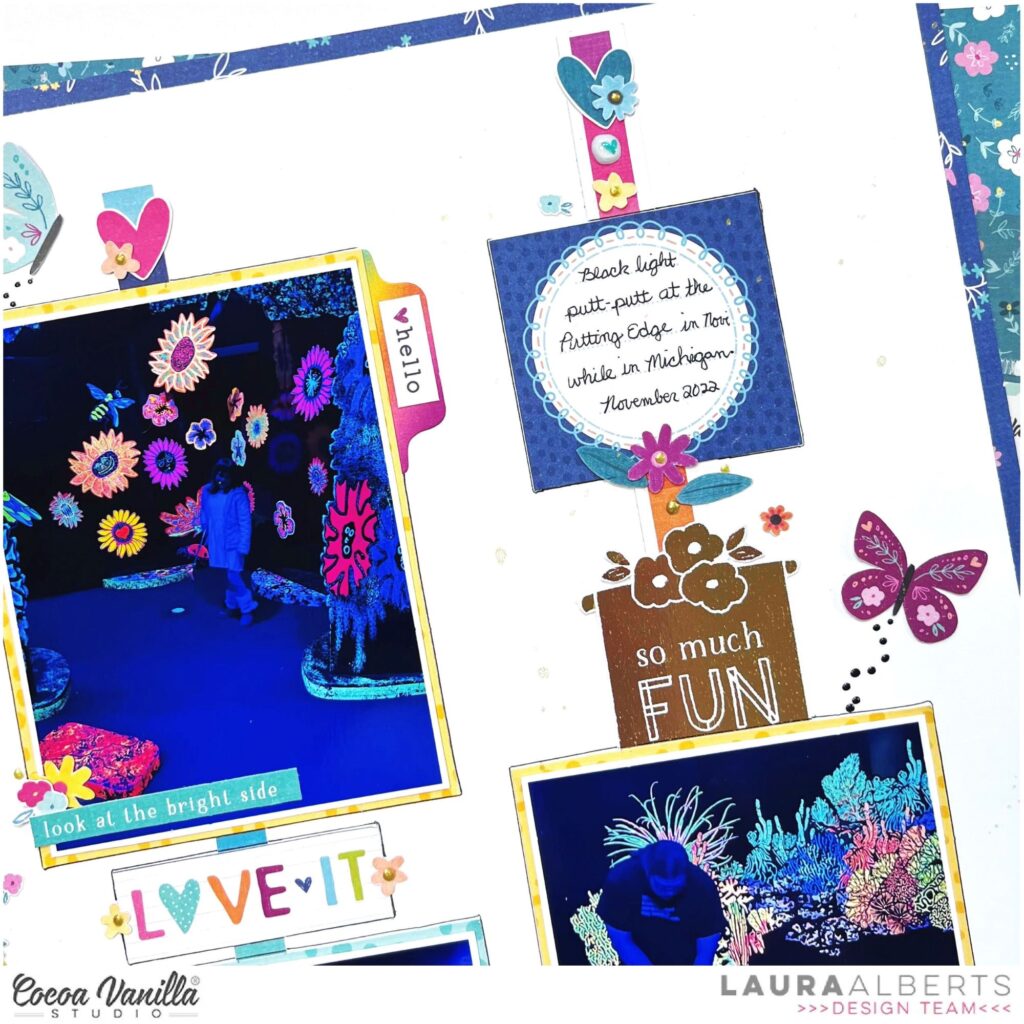
Hey y’all! Laura Alberts back again with a fun column design using the new Happy Days collection from Cocoa Vanilla Studio! Using the manufacturing strips to create these fun, super slim columns allowed me to add four 3×4 inch photos on this page.
On each of the columns, I added a ton of cut-apart pieces from both the 12×12 and A5 paper stack versions. Plus, a couple of cute gold foiled accents from the specialty paper. Finishing it off with hearts, florals, and butterflies that are fussy cut from the patterned papers in Happy Days for whimsy and fun!
The little dots of Nuvo and puffy stickers that I added on at the end really help this layout pop! I love how much the tiny details can make such a bit difference. These butterfly trails give the columns a softer look overall.
I hope this layout inspires you to dive into your cut-apart sheets and have a play with the column design! If you’d like to see how this layout came together, check out the process video below:
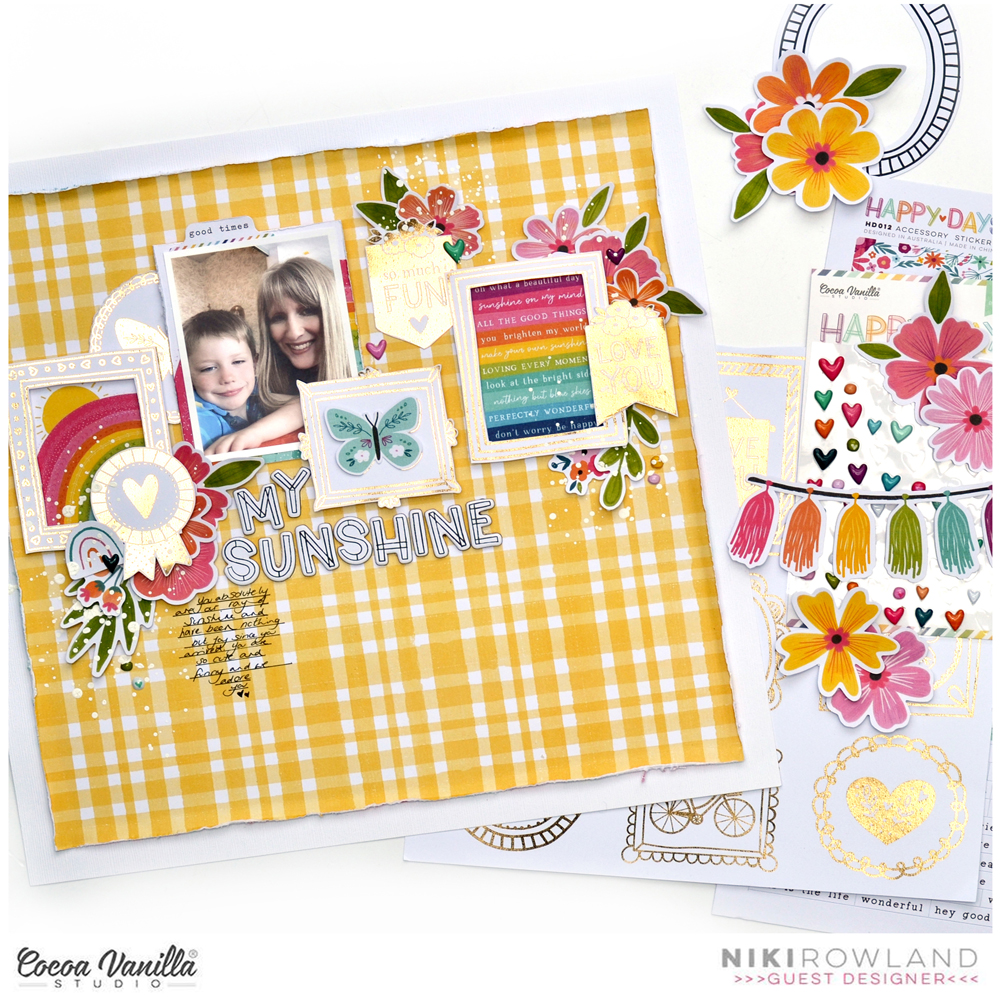
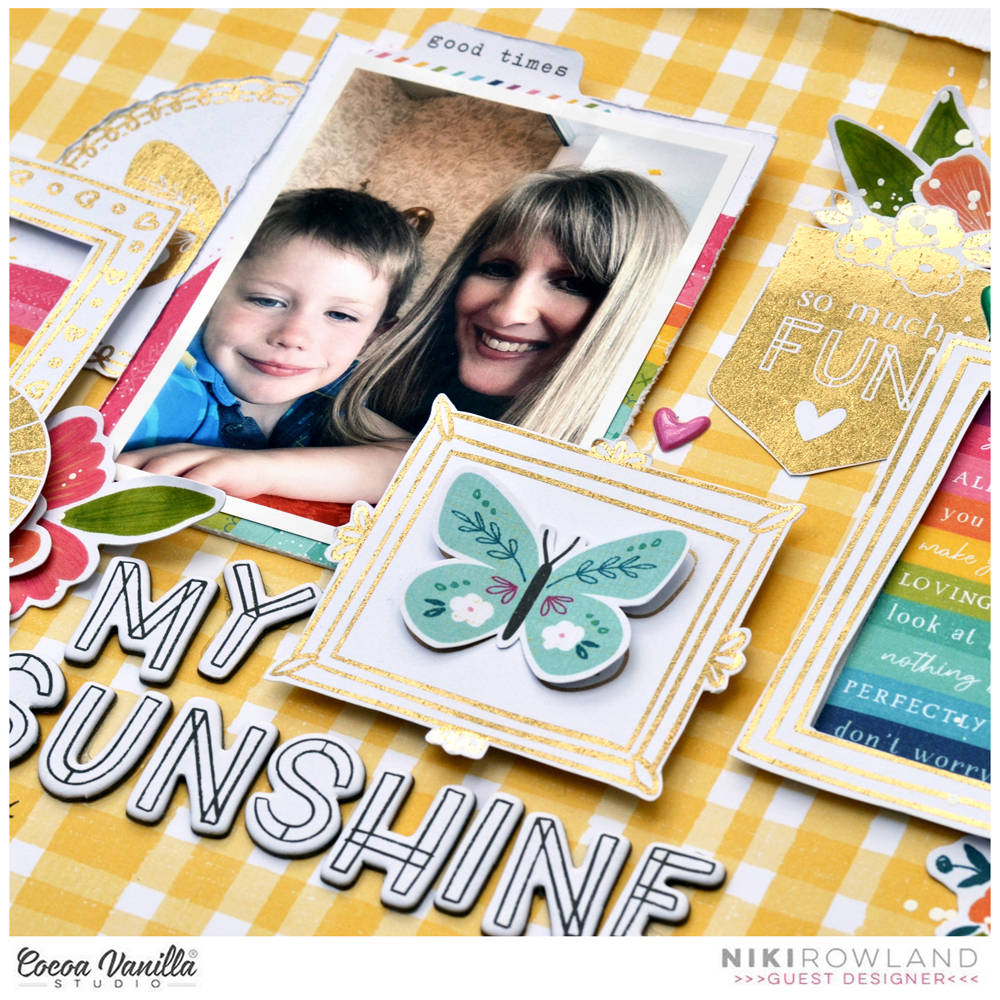
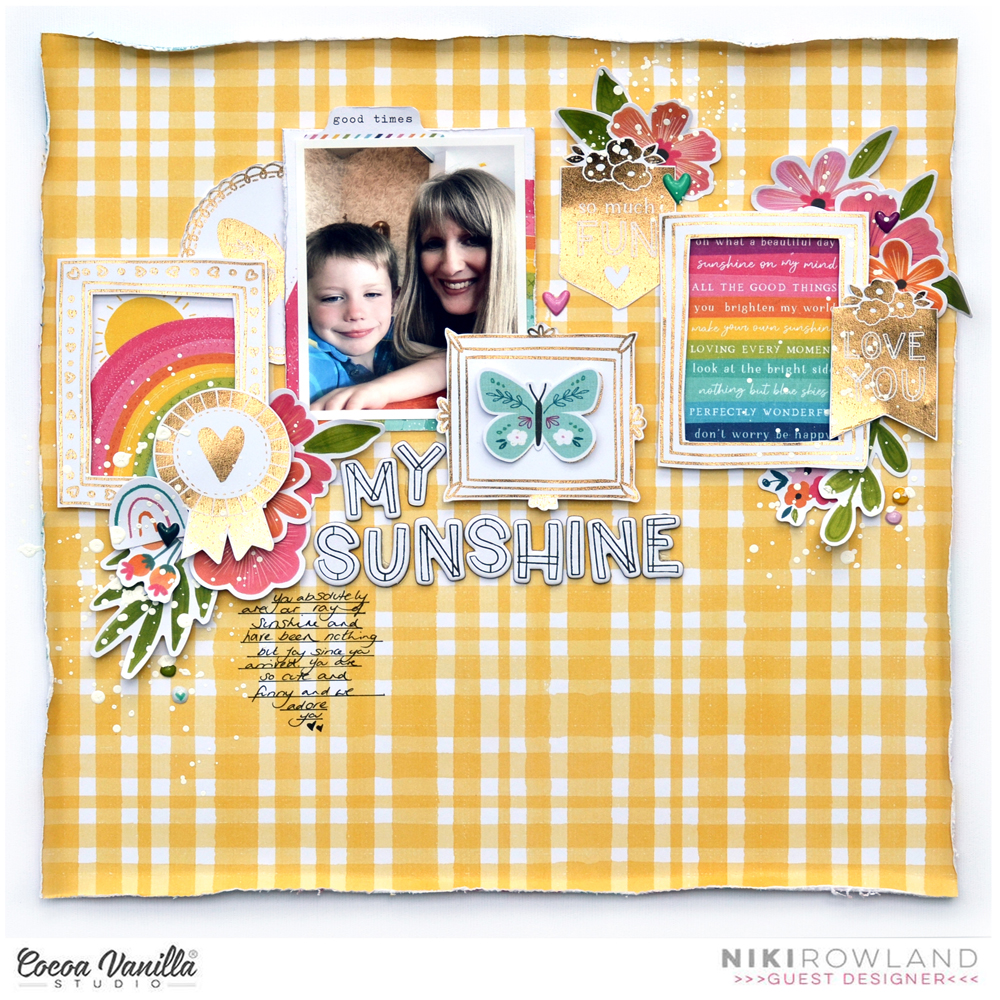
Hello again everyone! This is Niki (@nikiclairecreates) and I’m so excited to be back sharing my third layout as a Guest Designer today using Happy Days!
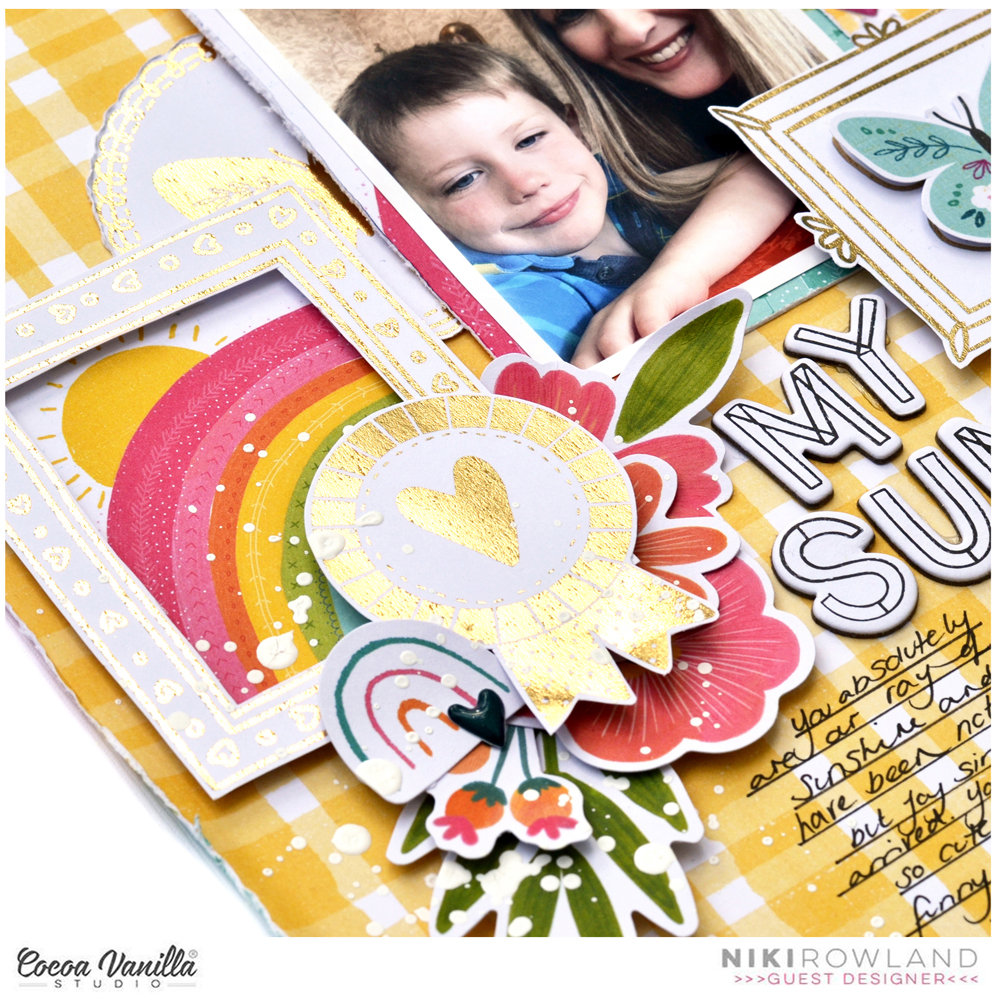
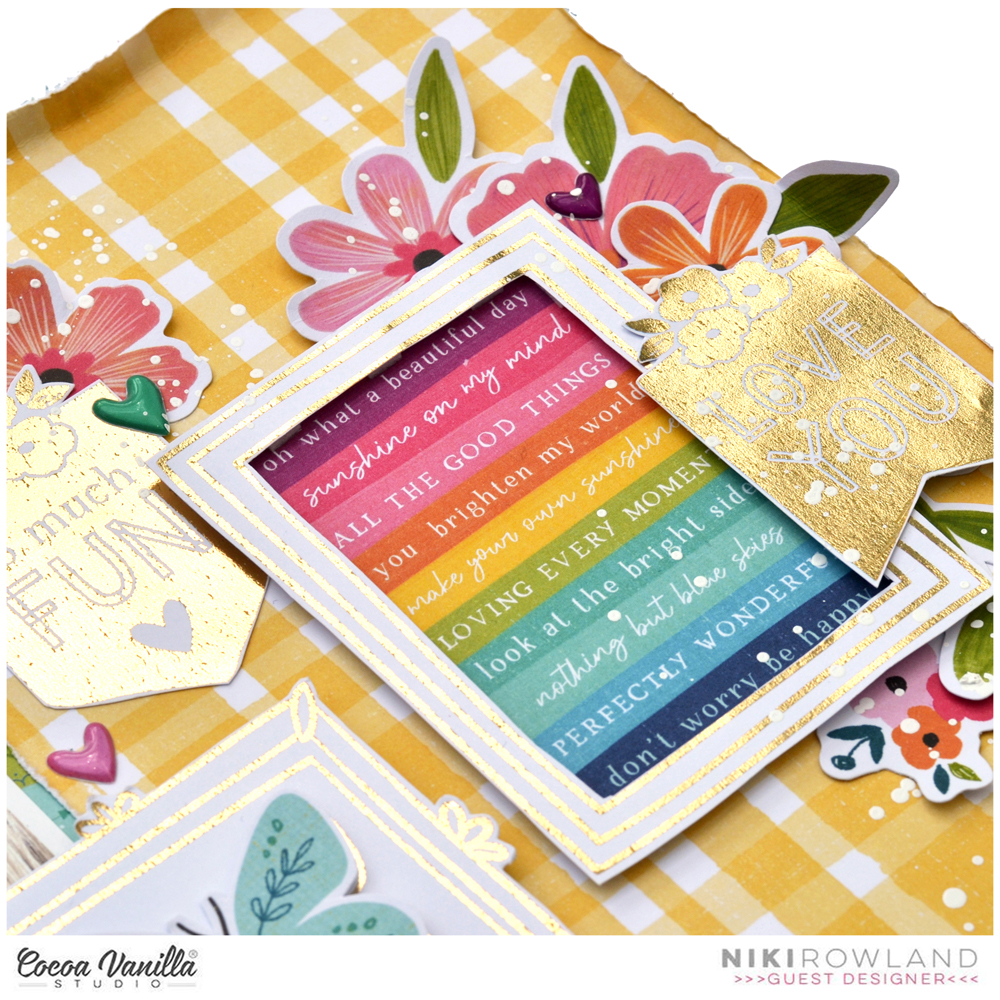
For this layout I wanted to feature the Specialty paper which consists of beautiful foiled gold frames on white card. Inside all the frames are also gold foiled icons – all TOTALLY perfect for fussy cutting! I cut out a few of the frames and cut the middles out too. I then added two of the tiny journaling cards from the A5 Paper Stack inside the frames. They were the perfect size. They needed mounting onto a piece of scrap card first so that the frame had something to stick to (as they were exactly perfect for the apertures). I raised he frames on foam pads. The two cards I chose were the two rainbow ones – these look gorgeous inside the gold foiled frames.
I chose to use the yellow check side of the Feel Good paper for my background. I trimmed this down a bit, distressed the edges and added it to a sheet of white card. I then arranged my frames and my photo onto the yellow background.
I embellished the frames with Floral Ephemera and with the gold foiled icons fussy cut from within the frames – these are amazing as extra embellishments! I added some other little bits of Die Cut Ephemera to my clusters and added some small Puffy Heart Stickers too.
I added a title using ‘my sunshine’ from the Chipboard Title Stickers – I love this font! And the white letters stood out beautifully against my yellow background.
I finished off by handwriting my journaling and splattering my embellishment clusters with white paint! Here is the link to the process video I made for this layout: https://youtu.be/sb-V5KniUa8
I hope you have enjoyed seeing this layout, I loved making it!
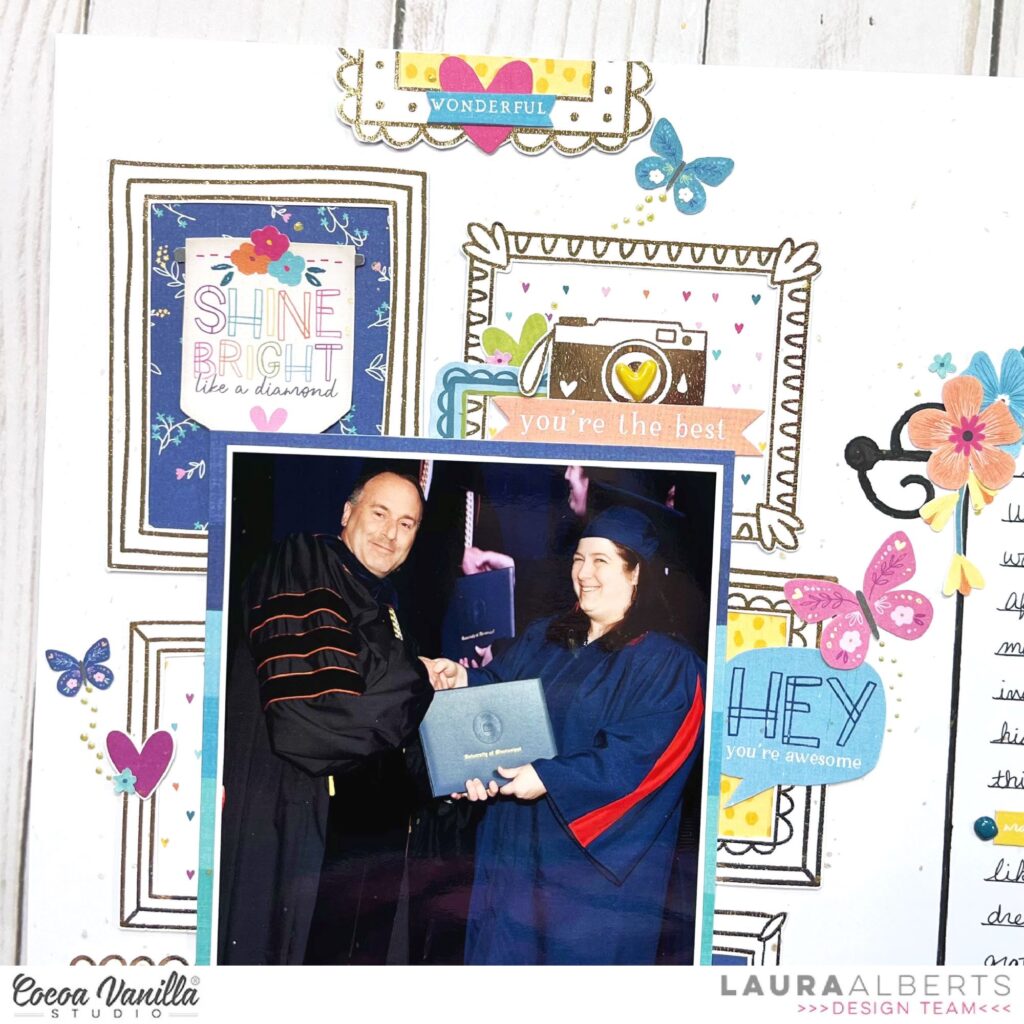
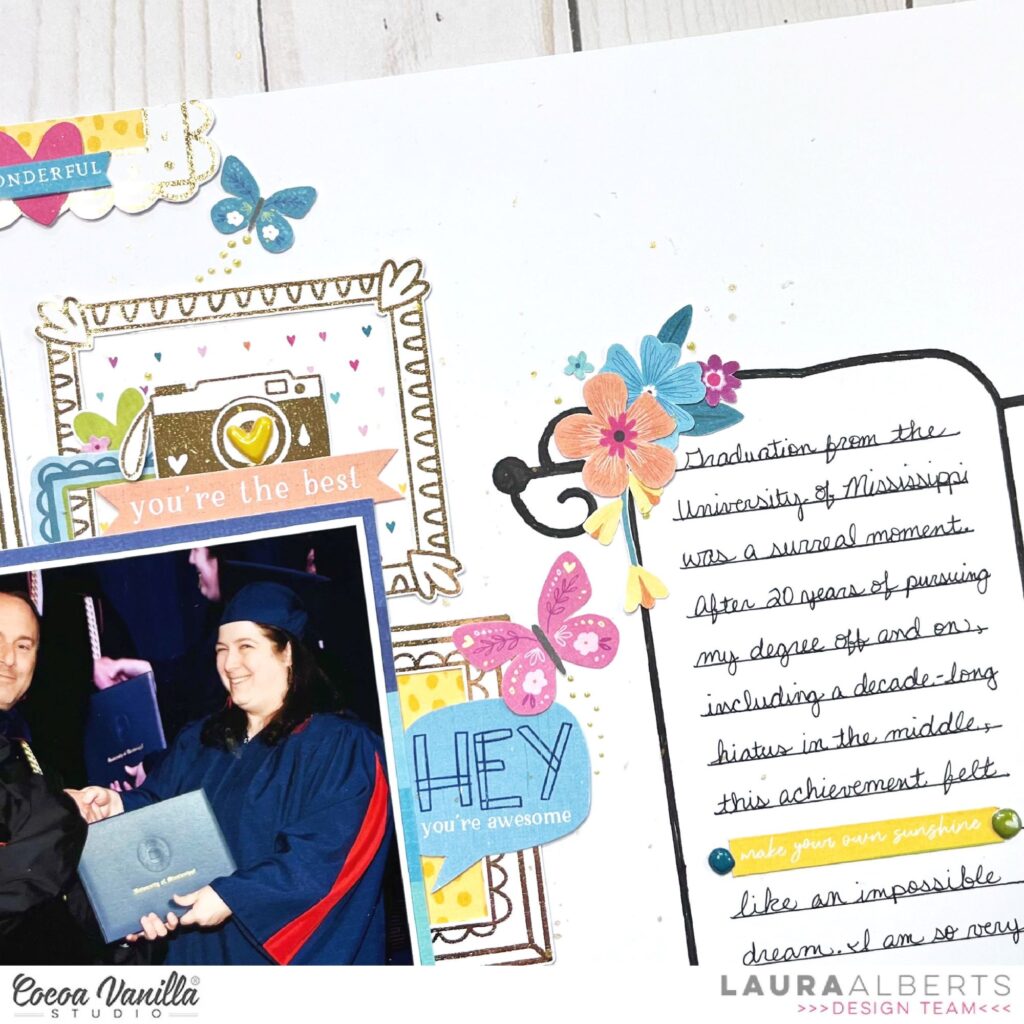
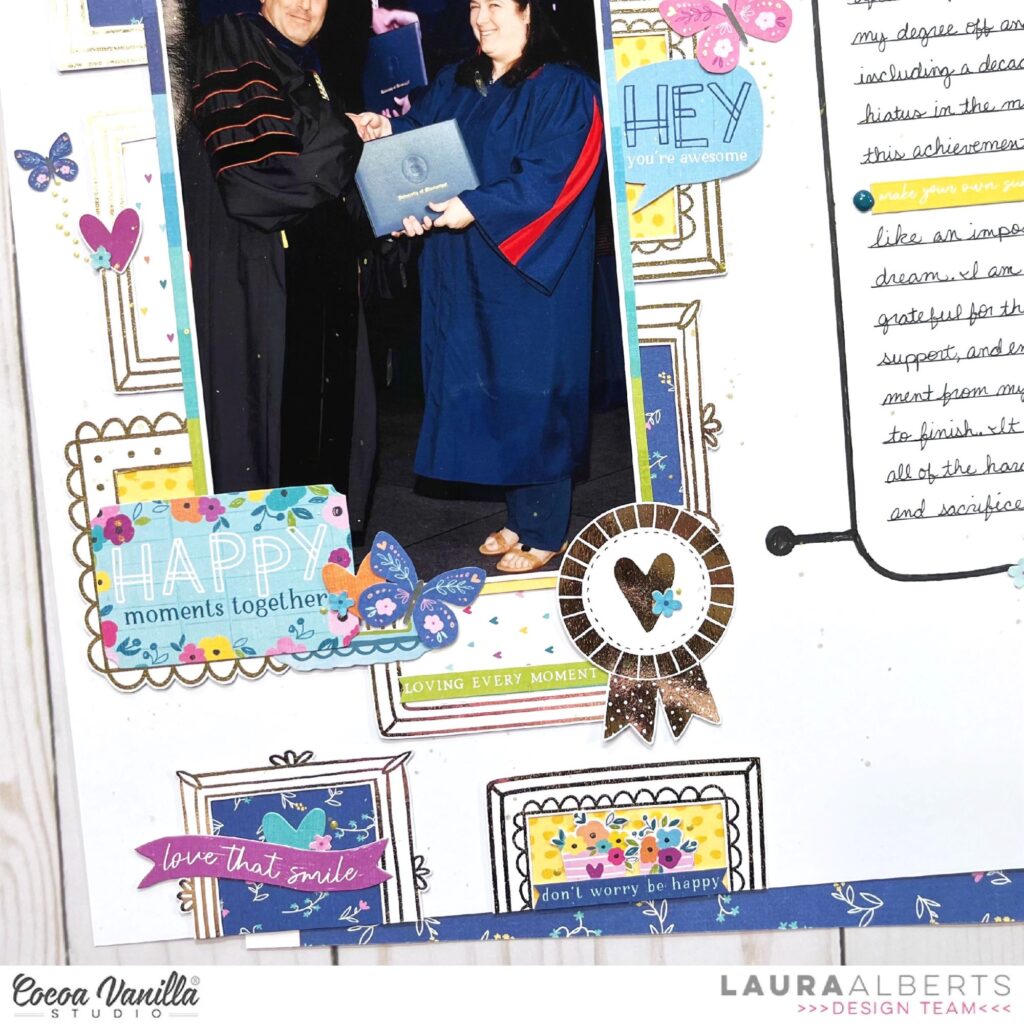
Hey y’all! Laura here with a fun graduation layout! When I finished my degree last month, it was a proud accomplishment and I couldn’t wait to scrap it! With a dark and mostly neutral color scheme, this photo needed the bright, celebratory colors of Happy Days to make this it pop. I started by fussy cutting out the frames from the specialty paper and backing them with patterned paper from the A5 paper stack.
I then matted my photo on the gorgeous Sunshine Lollipops patterned paper to help it stand out and tie together the main colors I chose from Happy Days to incorporate into my layout. Then, the fun part! I added clusters of fussy cut icons and ephemera pieces to create clusters in and around my frames. Puffy stickers and Nuvo drops added the detailing to finish them off.
For my journaling, I used a journaling stencil to create this lovely scroll design to hold a large block of journaling that imitates the feel of a diploma with it’s elaborate design. Such a fun addition and a great way to include a large block of journaling in a way that doesn’t detract from the photo!
I hope this layout inspires you to have a play with your frames from the Happy Days collection as well as to try some creative journaling techniques! To see how “Happy Moments Together” was created, check out the process video below:
Welcome to the Cocoa Vanilla Studio blog. It’s Josefine here with a new scrapbook layout created with the amazing ‘Happy Days’ collection. In this blog post, I wanted to highlight the die-cuts ephemera. I chose a white cardstock background so that my heart die-cut frame gets all the attention it deserves.
First, I used my Cricut electric cutting machine to cut out a large heart in the center of the layout. I enlarged a black and white photo of my husband and me in Paris and adhered it behind the heart using double-sided adhesive tape. Now, let the decorating begin…
I love all the ephemera die-cuts and matching them by color, pattern, and theme. First, I select which die-cuts I want to use, and then I arrange them in a heart shape around the photo. Once everything is in place, I use 3D foam to secure the ephemera die-cuts. I’m super happy with the result, and the colored die-cut ephemera stand out beautifully against the black and white photo. It creates a explosion of color around the photo.
The small puffy hearts are so adorable that I give them a special place around the frame. For the title, I use the gorgeous colored mini alphabet and choose the title ‘Good Times,’ which is fitting because I thoroughly enjoyed our trip together. I also select a few word strips, add a thin black line to the edge using my fineliner, and place them on top of the die-cuts.
I hope I’ve inspired you with this layout and look forward to seeing you again on the blog for new inspiration! Have a wonderful and creative day!
Hey Crafty friends it’s Michelle here today. I’ve created a layout using the wonderful Happy Days Collection for part of my annual scrapbooking series documenting my daughters current loves.. To keep a cohesive look to this project I make all the pages in the same design, just switching out the collections to suit the feelings of that year. Leila allowed the use of pink for this years layout, which is a big thing compared to the previous years.. Lets take a look
The bonus of creating one of these layouts each year is that it comes together so fast. The design of the layout is already pre-decided, I just need to select the papers, cut them to size, machine stitch around the edges and adhere to the layout. This years layout features pretty papers from the A5 paper stack as the smaller scale print works well when combined together with multiple patterns. Each square is cut to roughly 3 3/4 inch and set around the edges of the layout with white space in the opposite diagonal corners.
I added a 3×5 size photo to another A5 pattern paper and adhered to the middle right side of the layout, overlapping some of the background pattern papers. I added the list of favourites to the left of the photo using a piece of notepaper adhered to some pattern paper to create a ‘clipboard’. I used ephemera pieces to create the title and my own handwriting to write the list of loves
I add minimal embellishments to these layouts as I really want the list of faves to stand out with each one I create. For this layout I made 2 main embellishment clusters in the top and bottom corners, diagonally across from each other. Both contain fussy cut florals from the LUSH BLOOMS paper, ephemera pieces, butterflies from the FLUTTERBY paper, punched mini flowers and some mini puffy stickers.
Theres also a couple of punched flowers in the same pattern paper as the bottom left corner, just for a little hidden dimension
Heres a final look at the entire layout, plus a link to last years post that shares all the previous years layouts can be found HERE ..
I really enjoy creating these pages each year, and look forward to seeing them evolve each and every year. Theres a couple of years that I want to go back and create pages for that were before the times I started this project so I hope to share those with you all one day in the future. Do you document your kids favourite things each year? Please share in the Community group if you do, we all love to see different ideas on how people document these kinds of things, and It really is fun to look back on
Well thats all from me today, thank you so much for stopping by!
Hi everyone! This is Niki (@nikiclairecreates) and I’m delighted to be back Guest Designing with my second layout and process video using Happy Days. I am obsessed with those gorgeous words on the Definitive paper and have spent some time fussy cutting a lot of them out. I wanted to make a feature out of them on this layout.
I chose the purple side of Flutterby paper as my background, which I paired with the pink strawberry side of Lush Blooms paper. I trimmed these both down and distressed the edges, then stuck them together offset slightly. I then positioned these onto a sheet of white card.
I mounted my photo onto a darker patterned paper and added that to my layout together with a gold fussy cut frame from the Specialty Foiled paper. I then arranged all the fussy cut words around the photo, cascading down from top to bottom. I raised them all on foam pads to give them some dimension.
I then added some of the Floral Ephemera to the bottom corner of my photo, and another cluster in the top right corner. I chose mostly pinks and purple flowers but also added a few yellow ones. Purple and yellow are opposite each other on the colour wheel, so are therefore ‘contrasting colours’. Contrasting colours work best when there is a lot of one colour with a small amount of the contrasting colours and this is exactly what I did with the yellow – just a couple of small pops of it in amongst all the beautiful purple.
I added another tiny cluster in the bottom right corner of the layout using some of the Die Cut Ephemera. I added some butterflies and handwrote my journaling under all the words. I also embellished the words with lots of Puffy Heart Stickers.
I finished off with a few splatters of white paint over the top of the embellishment clusters! I absolutely love how this turned out, I adore purple as a colour so love how this looks as a background! Here is the link to my process video for this layout if you would like to watch along: https://youtu.be/2ygAZcQKt0c
Thanks so much for joining me today and happy scrapping!
Hey everyone and welcome back for another share from me combining the new ‘Happy Days’collection mixed with the older ‘Sunkissed’ collection. These two lines combine beautifully, so if you have them both, have a go and mxing them together! Here is my page…
My jumping off point was the rainbow paper from Happy Days called ‘Sunshine Lollipops’. I cut two 2 inch strips and adhered them down to each side of my page. To add some interest I also tore some of the ‘Feel Good‘ paper and had it popping out from underneath.
I have 2 photos on my page which I double matted using papers from the A5 paper stack from the Sunkissed collection.
Next, I worked on my title. I used a cutfile from Peartree Cutfiles. Instead of backing it with patterned papers I decided to use my distress oxides in matching colours to create an ombre effect.. I love how this turned out. Backing the cutfile onto some black cardstock really makes the title pop off the page. I also added some blue oxide behind my title.
Once I decided where I wanted my photos to go, the white cardstock needed some colour so I used a stencil to add some yellow suns to my page.
All of my embellishments come from the Sunkissed collection.
Next to the left photo I added a palm tree and flip flops from the ephemera packand a starfish puffy sticker. On the bottom right there is a pineapple and flower puffy sticker.
Above my photos I have used a cloud, rainbow and word tab from the ephemera packand a sticker from the Accessory Sticker Sheet.
To finish my page, I have added some heart puffy stickers and some of the word phrases from the Accessory Sticker Sheet.
I hope you have enjoyed my page today, and have found some inspiration!
Hey y’all! Laura Alberts back again with some bright and colorful handmade cards featuring the Happy Days collection. I absolutely adore the puffy alphas in this collection and find it super easy to pair them with ephemera pieces for fun mix-and-match designs and sentiments. For the first two cards, I used papers from the A5 paper stack and frames from the ephemera pack as the base for the design, then built up from there.
For this first card, I started with a purple background and added a frame backed with striped patterned paper. The butterflies were fussy cut from the Happy Days specialty paper and one of the patterned papers in the A5 paper stack. My sentiment is simple and makes this card a versatile option for a number of events. The tiny Nuvo drops behind the butterflies creates a whimsical trail.
On the second card, I layered the frame from the ephemera pack directly onto the background and created a wreath of florals around the edge. The ephemera ribbon banner that says “the best” was a great option for my focal image on this card. I used the puffy alphas to add to the sentiment so it says “You are the best.” A clever option for a card that could be used for multiple occasions!
For the last card, I fussy cut out the banner of ribbons from the ephemera pack and layered tiny florals on top. Above the banner, I added an ephemera sentiment “happy” as well as a puffy alphas to create a simple, but effective birthday card! I especially liked dotting tiny fussy cut florals all around the sentiment on this one.
I hope these sweet cards inspire you to have a go with the puffy alphas in the Happy Days collection!
Mandy here today to share a new layout showcasing the fabulous new Happy Days collection. This week our design team are sharing projects that feature the Puffy Alpha Stickers. My favourite way to use these sweet little alphas is to combine them with a larger alpha to create a longer title. This is exactly what I did on this page that documents a selfie of my hubby and I.
I started this layout off by trimming down a sheet of white cardstock and matting it on the gorgeous magenta Flutterby paper. I added a doodled border around the white cardstock to add some further definition and interest. Next I cut two triangles, one larger than the other, out of the beautiful yellow Feel Good paper, and adhered these on each side of the page. I matted my photo with a paper from the A5 Paper Stack and adhered that over the larger triangle on the left hand side of the page.
I love all of the different colour combinations that can be used from this one collection, and for this layout I decided to focus on the teal, magenta and yellow. I chose flowers in these three colours from the Floral Ephemera pack to create my floral clusters. To create interest and dimension I love to layer some flowers under the photo and others on top. I added one cluster to the top right hand corner of the photo, and another to the bottom left.
I created a third cluster in the bottom right hand corner of the page, over lapping the smaller yellow triangle. Again I created dimension within the cluster by adhering some elements with foam tape.
As I said, I love to combine the Mini Puffy Alpha Stickers with words from the Chipboard Titles. By using the mini puffy alphas, it enables me to create a longer title that also doubles as my journalling. These sweet little alphas are so fun and colourful and add so much interest to the page!
I finished the layout off with some cute banners in the top right hand corner of the page, a couple of little phrase stickers from the Accessory Sticker Sheet, and of course a sprinkling of hearts from the Die Cut Ephemera and the Puffy Sticker Pack.
I hope that you enjoyed taking a look at my layout and seeing how I used the Mini Puffy Alpha Stickers on my page. Thanks so much for stopping by.
Hello everyone. It’s Anna here with another project made with new “Happy days” collection. June is a busy period in our family’s life as it’s the last month of school year. Final exams are already over and now it’s time for a lot of good bye’s as my older daughter is finishing the elementary school and is moving to the highschool and my younger daughter is finishing the first step of elementary school and will be changing teachers. I will need a big bunch of cards to thank all of the teachers for taking such a great care of my kids. That’s why I decided to combine my DT duties and my mom duties and make a THANK YOU cards for teachers.
This week we are also focusing on PUFFY ALPHAS so I decided to show you how easily you can customize your cards with them! All four cards I made are the same size, but each looks a little bit different. I used variety of pattern papers from A5 PAPER STACK for my backgrounds. This way I didn’t have to cut into whole 12*12 sheets to only get a small piece.
Two of my cards have little shakers made with frames from EPHEMERA PACK. This is the fastest way to make a shaker! Just add a piece of acetate behind the frame, then pieces of foam adhesive to create a shaker, fill it with sequins and glue to the background.
Those two cards are more personal, with the names of teachers added. It was so easy to do with those tiny PUFFY ALPHA STICKERS! I decorated the frames with some flowers from FLORAL EPHEMERA PACK and some cut out from LUSH BLOOMS 12*12 PAPER. I also added colorful butterflies fussy cut from FLUTTERBY 12*12 PAPER. They create such a lovely, colorful mix. As you can see I didn’t add any school related items to my cards. Who said teacher’s appreciation cards need to have them? Mine are simply cheerful and colorful.
This card utilise another elements from EPHEMERA PACK – little oval frame, that became a focal point of my composition. I added a title on top of it, this time it’s simple THANK YOU, and surrounded it with some florals and butteflies. My final step was to add few cute PUFFY HEARTS.
Last card features fruits instead of flowers. Once again I reached for my scissors and fussy cut some lemons, peaches and oranges from one of the A5 PAPER STACK patterns. I arranged them in a frame around the background and added title in the middle. Another cute card was ready in just few minutes!
Here are few close-ups for the titles, showcasing PUFFY ALPHAS.
Four cards are done. I just need like ten more. But it’s good to have a good start. That is all for today. I hope you like my ideas for colorful and easy to make cards showcasing all the colors of beautiful “Happy days” collection!
Thank you so much for spending your time with me and see you at the end of June!

 I hope this layout inspires you to have a play with your frames from the Happy Days collection as well as to try some creative journaling techniques! To see how “Happy Moments Together” was created, check out the process video below:


 I started this layout off by trimming down a sheet of white cardstock and matting it on the gorgeous magenta Flutterby paper. I added a doodled border around the white cardstock to add some further definition and interest. Next I cut two triangles, one larger than the other, out of the beautiful yellow Feel Good paper, and adhered these on each side of the page. I matted my photo with a paper from the A5 Paper Stack and adhered that over the larger triangle on the left hand side of the page.


 I finished the layout off with some cute banners in the top right hand corner of the page, a couple of little phrase stickers from the Accessory Sticker Sheet, and of course a sprinkling of hearts from the Die Cut Ephemera and the Puffy Sticker Pack.


