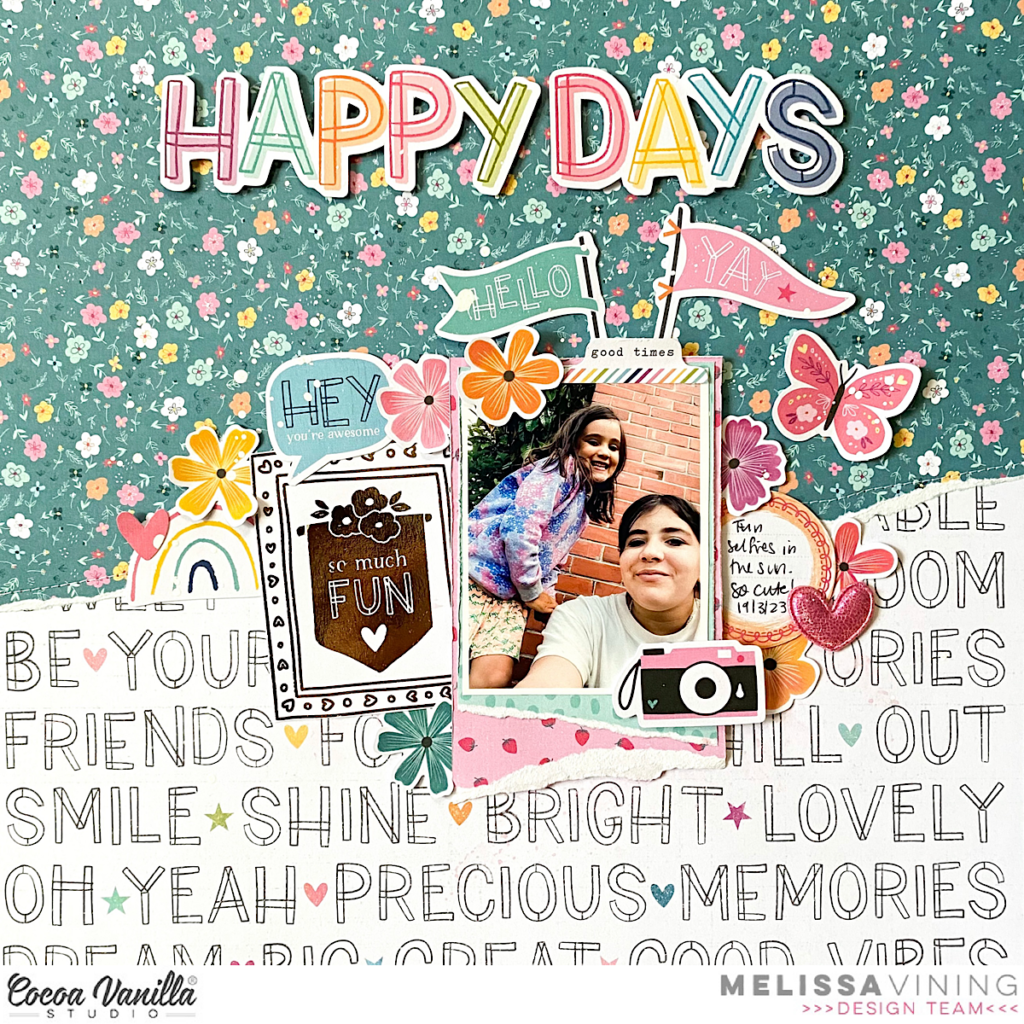
Hi everyone, it’s Melissa here and I’m so excited to be back sharing the first layout that I’ve created with the brand new Happy Days collection!! This collection arrived last week, in perfect timing for my layout today! Yay!! I don’t know about you but I always struggle with a new collection because I don’t want to cut into anything. I decided to create my ‘go-to’ design which is to feature a large piece of beautiful patterned paper, or in this instance two!
I just had to feature ‘Definitive’ and ‘Little Blossom’. Both sides of all the papers are stunning, and I’d highly recommend purchasing at least two pieces of all the papers! I tore the edge of Little Blossom and glued it onto Definitive. I machine stitched the edge for texture.
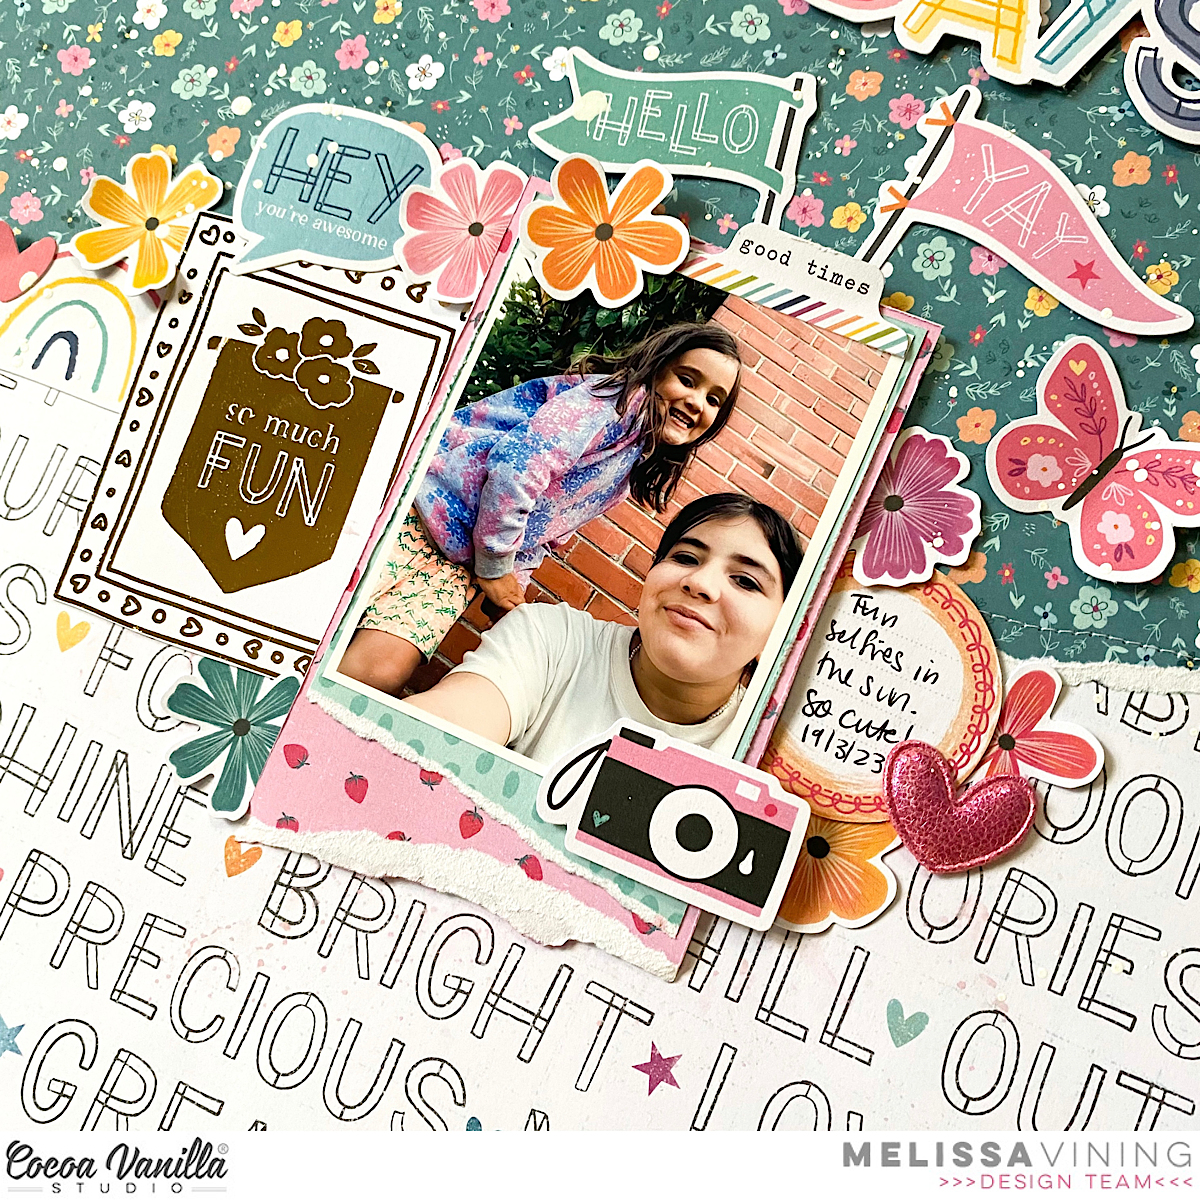
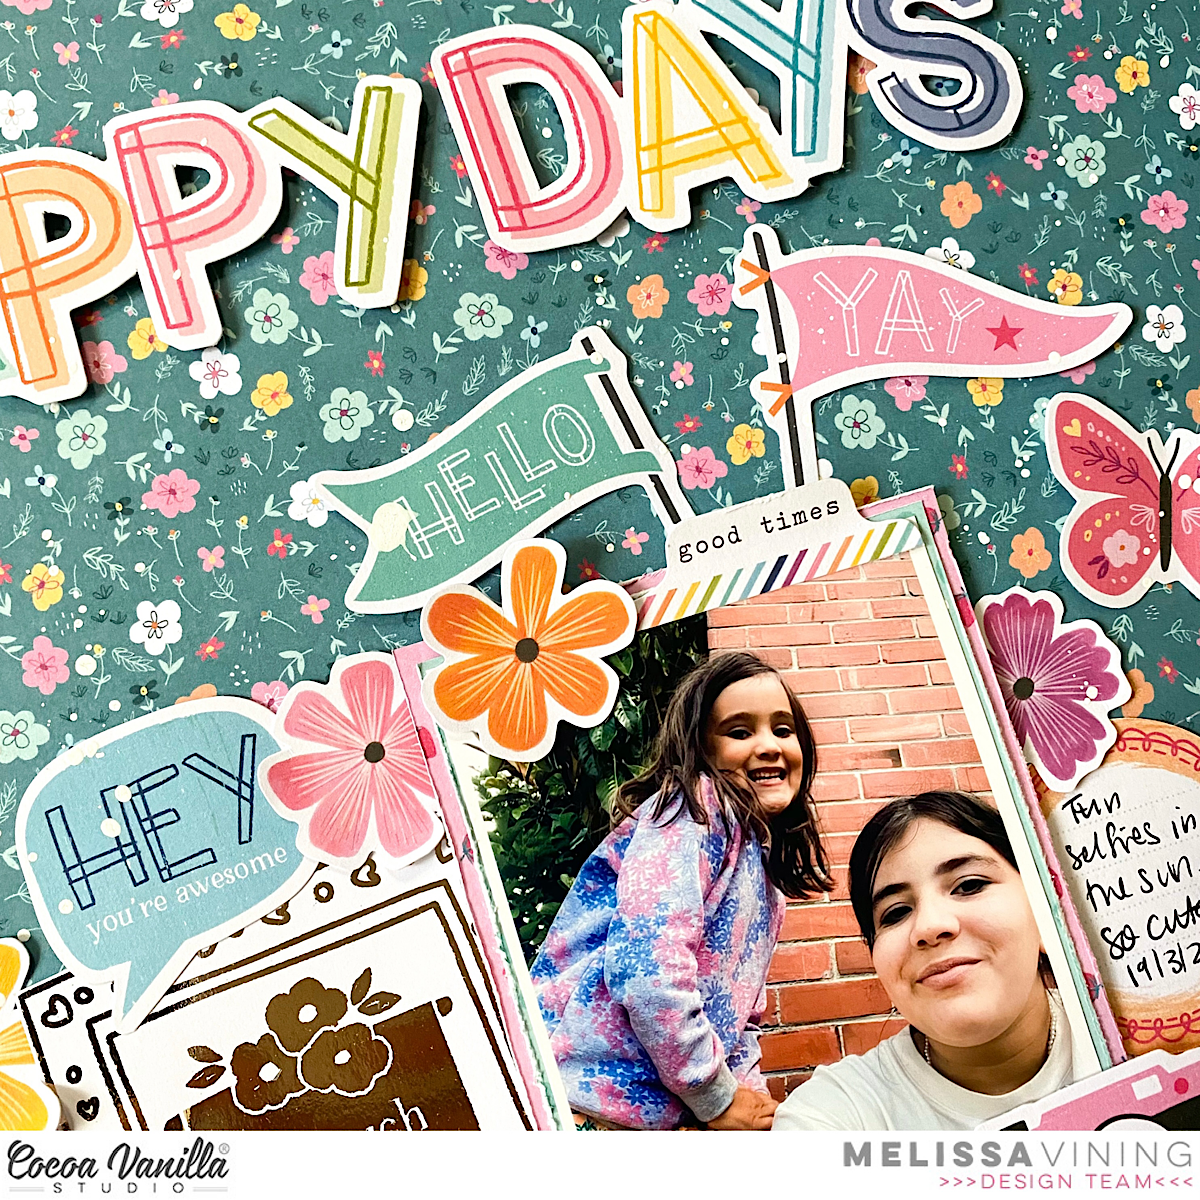
The photo is a cute selfie of two of my daughters that my oldest daughter took and I discovered on my phone. Love it when that happens! For my title I just had to use the name of the collection from the ‘Die Cut Titles’! So perfect!
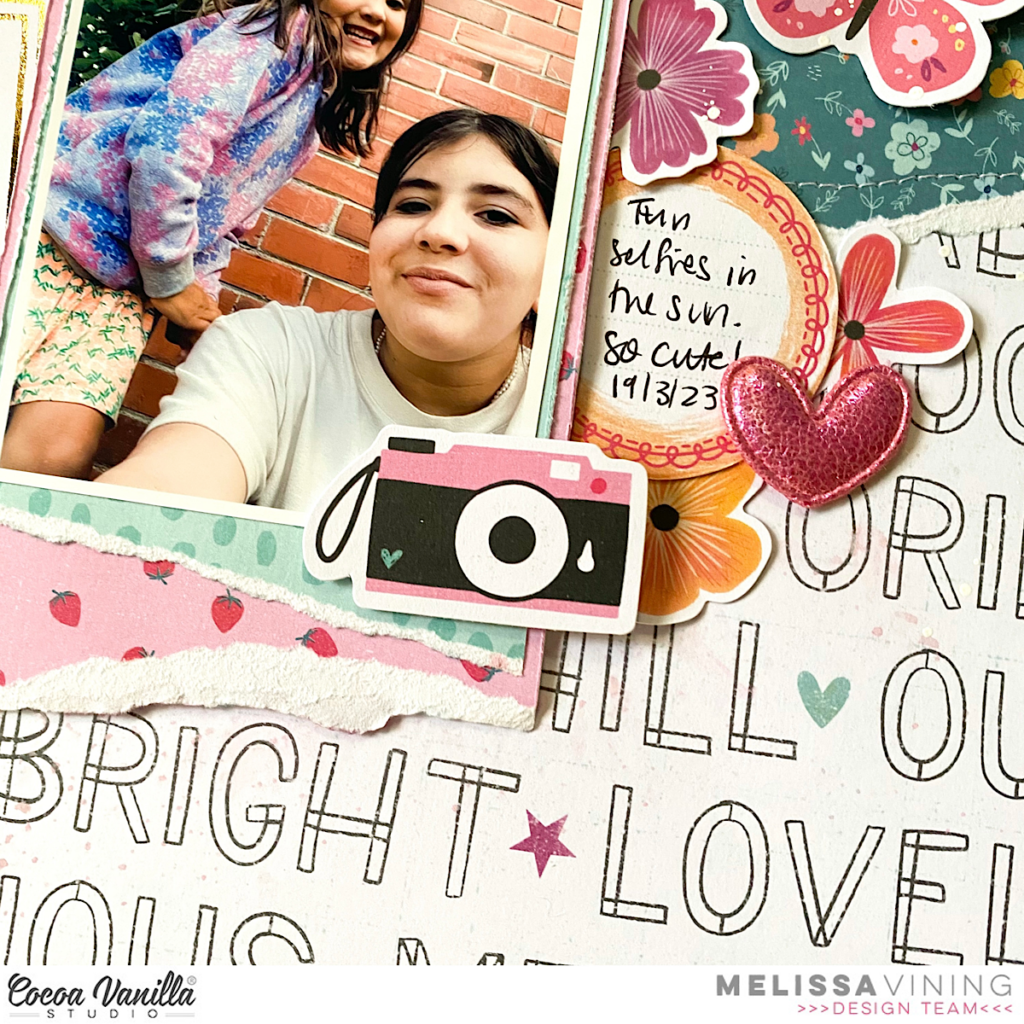
I cut apart one of the gorgeous images from the ‘Specialty Paper’, and I just love the gold foiling. I tucked it slightly under my photo and then embellished around with ‘Die Cut Floral Ephemera’, ‘Die Cut Ephemera’, and one of the stunning ‘Puffy Hearts’.
You can watch my process video below.
I hope you enjoyed my first layout created with this stunning collection using my go-to design!
Cocoa Vanilla Studio has just released a new collection called Happy Days, and I’m absolutely in love with the beautiful embellishments, colors and designs! This collection is perfect for creating scrapbook layouts that are filled with fun, bright colors and playful patterns.
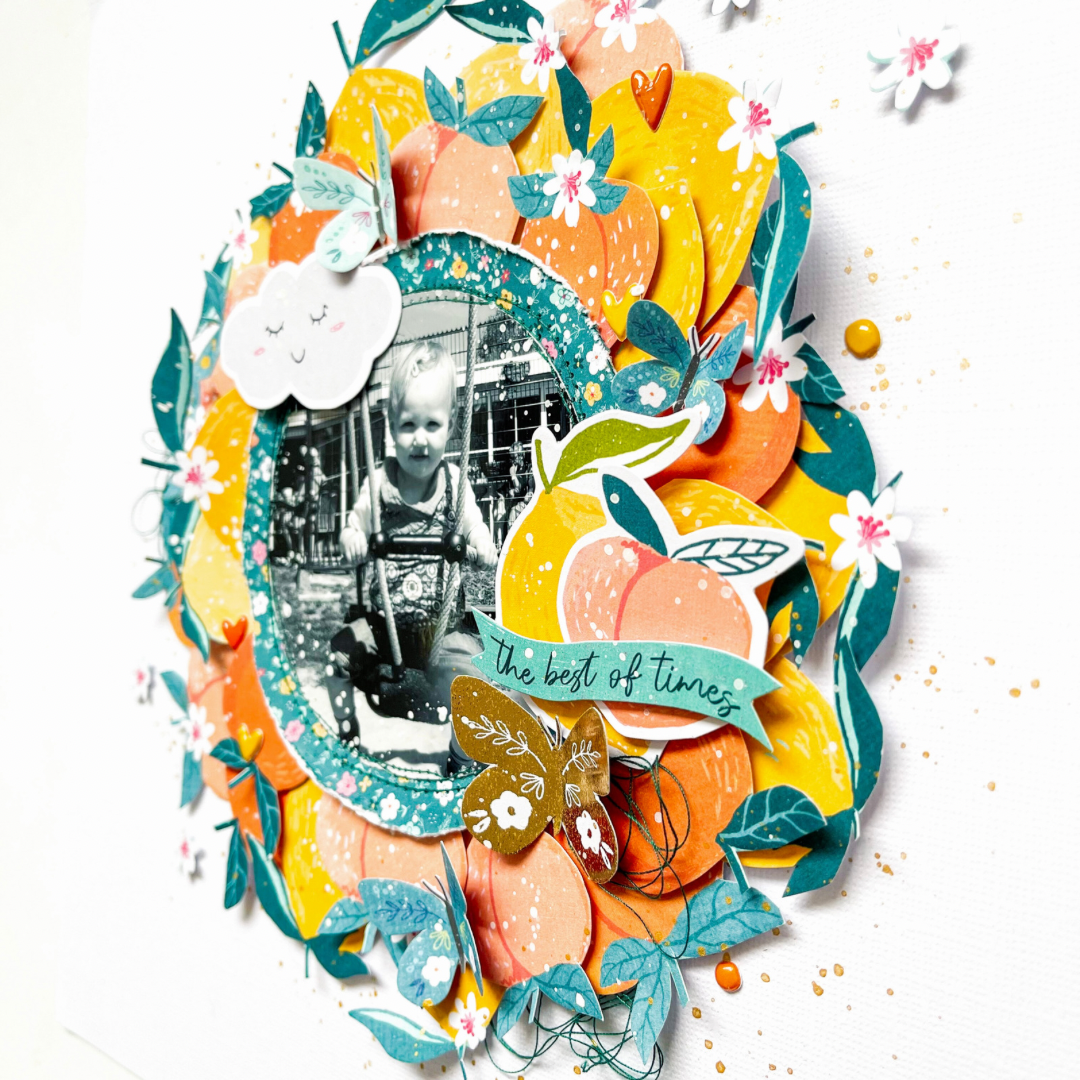
One of my favorite layouts to create using the Happy Days collection is a page that highlights the good things in life. Start by selecting a colorful patterned paper to fussy cut and create a round and colorful background on a white piece of cardstock with all these cute little peaches and lemons. Then, choose several coordinating patterned papers to layer underneath your photo.
Next, it’s time to add some embellishments to your page. The Happy Days collection includes a variety of stickers, die cuts, and chipboard accents that are perfect for adding pops of color and dimension to your layout. Choose a few of your favorite embellishments and scatter them around your page, being sure to balance out the colors and textures. For the title of this page I used a little banner with the quote “The best of Times”
I placed a view little puffy hearts randomly on the page and cut a gold foil butterfly from the special gold foil paper. I cut more butterflies from the pattern paper and placed them on the page as well. Between the peaches and lemon I put some green sewing thread. I love how that looks. Finally, I splatter some with white gesso and gold acrylic paint.
Overall, I highly recommend trying out this fun and beautiful scrapbook collection designed by Cocoa Vanilla Studio calls “Happy Days” With its bright colors and cheerful patterns, this collection is sure to bring a smile to your face and help you create memories that will last a lifetime!I would love if I was able to inspire you with this fun and happy layout and can’t wait to make more scrapbook projects with this awesome collection.
I hope to see you next time on the Cocoa Vanilla Studio blog with a new Scrapbook layout. Wish you a lovely and crafty day friends.
XoXo, Jo
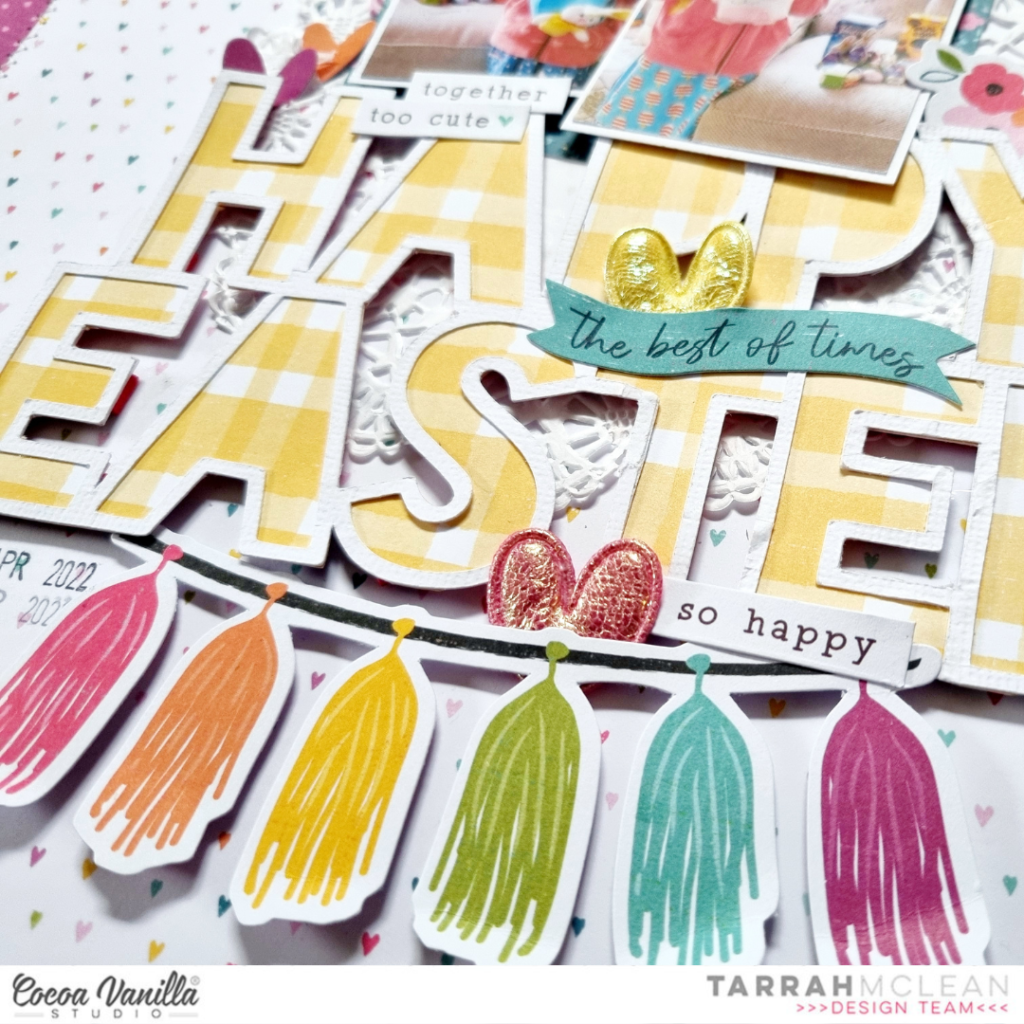
It’s Tarrah back with you today, I am very excited to be sharing my first layout featuring the gorgeous new Happy Days collection!
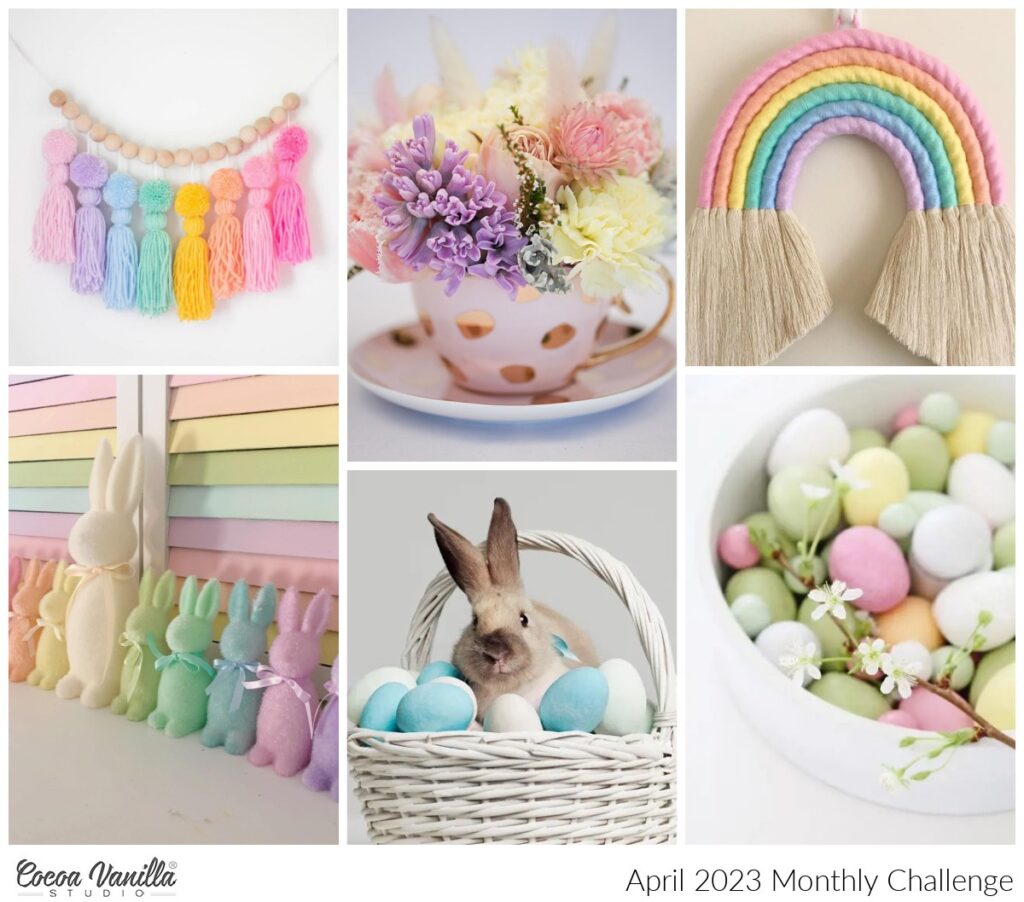
I was tasked with using the gorgeous April mood board as my inspiration for my project this week, the Happy Days collection has so many elements in it that match perfectly with the mood board!
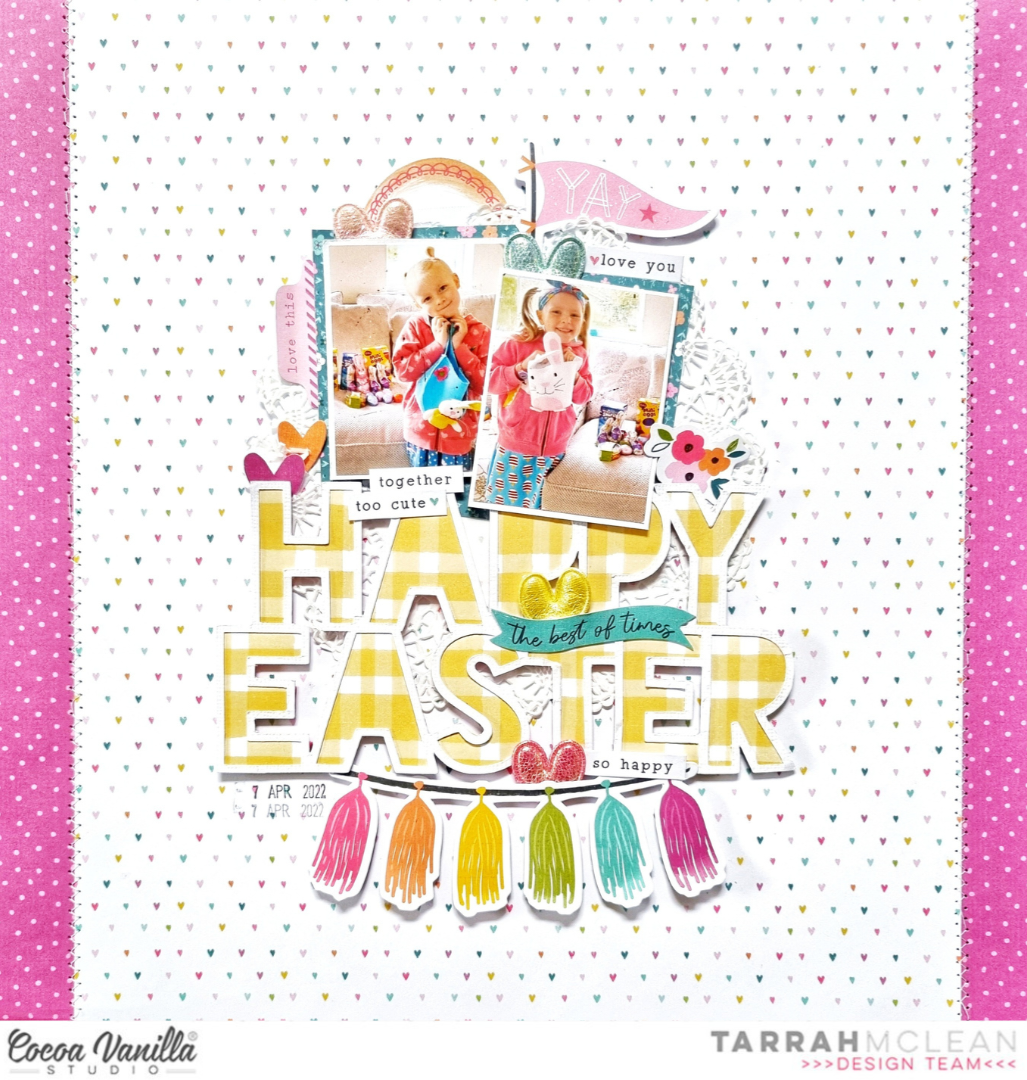
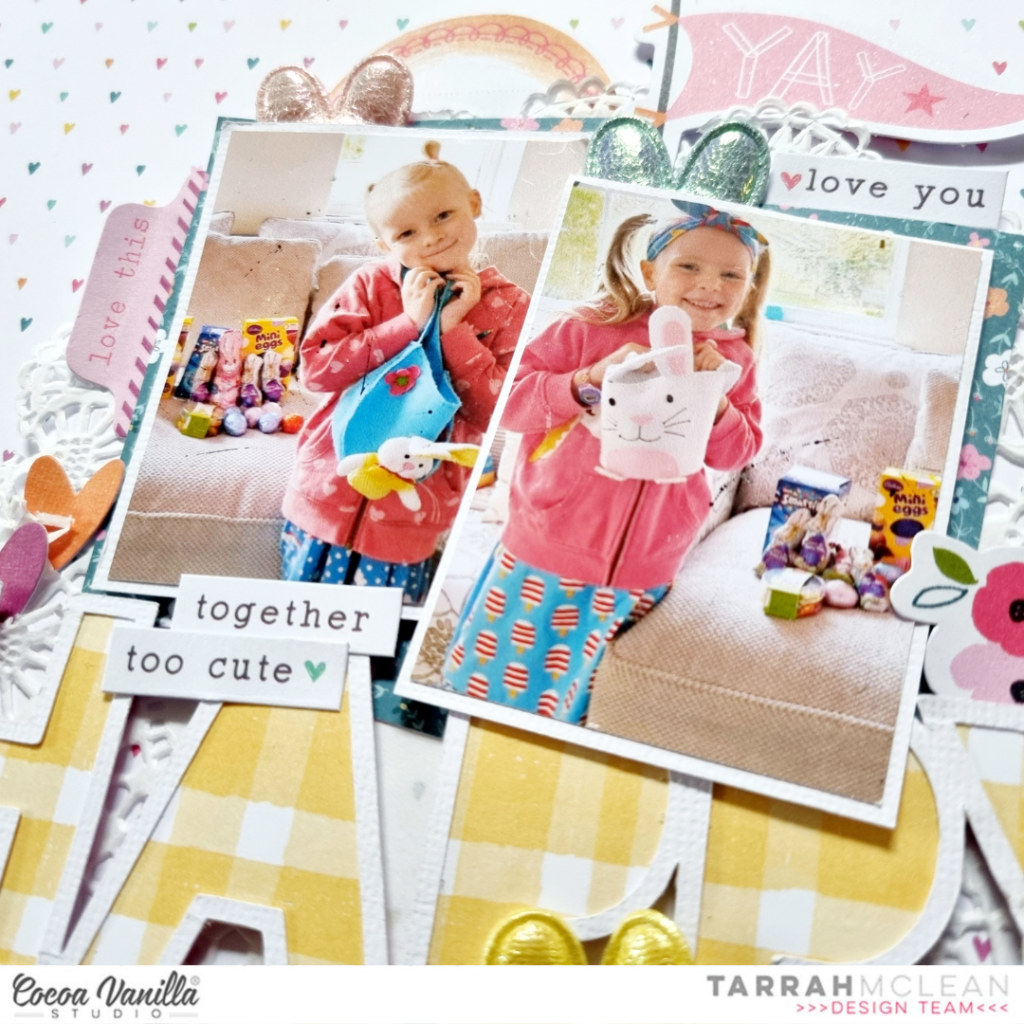
I am documenting 2 photos of my nieces from Easter last year, I love their sweet faces so much!
As the mood board is mostly Easter themed, I chose an Easter title cut file from CUT to YOU and backed it with one of the large 12′ x 12′ papers. I love the yellow plaid patterned paper!
You can see from the mood board image below that I was inspired by many things from the mood board! The Happy Days ephemera pack has the gorgeous tassel banner included in it, I knew I was definitely going to add that to this layout! It is perfect!
I absolutely love this mood board! There are so many things you can inspired from this board!
I placed a large white paper doily down on the heart background patterned paper and then adhered the cut file down using craft foam, leaving some room for my photos above the title. I did trim down the heart patterned paper and adhered it to the pink/purple spotted paper. I then machine stitched a zig zag border down the edges where the papers meet. I love the texture that the machine stitching adds to a layout!
I layered one of the papers from the A5 paper stack underneath my photos to help lift them a little bit. I added craft foam underneath the photos as well and also added craft foam under the tassel banner and adhered this at the bottom of the title. Now that I am happy with the placement of the largest elements on my layout, its time to embellish and tell some of the story!
Do you ever look at embellishments and think about how you can use them for something they aren’t originally intended for?
I do this a lot! When I saw the fabric puffy hearts in the Happy Days collection, I just knew I had to add them to this page to mimic bunny ears! Really hoping that you picked out the bunny ears before I pointed them out to you hehe! Aren’t they the cutest?! I added 4 of these in the end, tucking them in enough so that they peek out of the tops of what they are adhered behind.
By using craft foam underneath some of the larger elements on my page, it creates some shadows and dimension to my page which I love! You can see in the photo above the shadows created under the tassel banner. I didn’t add too many embellishments to this layout as sometimes less is more when it comes to embellishing. I did add a few die-cuts from the ephemera pack like the Yay banner, the small flower to the right of my photos and the round journal spot above the photos. I also added the phrase across the cut file, to help break up all that yellow! I also added the cute Love This tab to the left of my photos as well.
Lastly I helped tell the story of my layout by adding the small phrase and word stickers from the Accessory sticker sheet. One of my signature things I do on almost all of my layouts is to stamp the date stamp, the date is of when the photo was taken. Another thing I like to do is, and you don’t see this but I like to sign the back of my layouts and I write the date that I created it as well. I have doing this for years now! Do you have something you like to include on all of your projects? Please share with us!
Thank you so much for stopping by the Cocoa Vanilla Studio blog today! I hope you enjoyed reading how I created my layout as much as I enjoyed creating it!
Make sure you get your hands on the gorgeous NEW Happy Days collection from your local scrapbook store or favourite online store!
Today I have a layout to share using the beautiful These Days collection. I am a little sad as this is the last of it but on a positive note I have the new Happy Days collection to start creating with (happy dance).
As I only had the butterfly 12×12 paper left I decided to use it as my base paper but adding a white scalloped square to the middle with a blue colour wash to add contrast. Using a cut file I cut 5 butterflies to layer them for dimension. I used my sewing machine to add stitching down the centre.
I next added my 3×4 inch photo of me hanging out in Paris as you do lol! Which I matted and used foam tape to add. My photo is where I added a larger embellishment cluster. I cafe die cut reminded me of Paris so it had to be added to my cluster, I added a tree die cut behind it and then used phrase sentiments from the accessory sticker sheet to journal.
On the opposite side I created a floral cluster and finished off my adding a die cut tab at the top of my photo and a puffy heart sticker on the tree.
I added of the wood epoxy buttons on the butterfly wing. I then used the puffy stickers alphas to add Paris to the other butterfly wing. This layout is simple and quick to put together but the butterfly paper, mixed media background and layered butterfly cut file give it lots of visual impact.
There are some These Days product left in the CVS shop.
Thank you for stopping by and I look forward to sharing my first layout using Happy Days!
Just taking a quick break from packing orders of our new ‘Happy Days’ collection to announce the winners of our recent giveaway. As you already know, this collection is dedicated to my dear sister Kellie, who passed away shortly after Christmas. Thank you to everyone for your messages of condolence that you included in your comments about the collection. Please know that I read every single one of them and I could certainly feel the love from you all – thank you!
Now let’s announce some winners!
Our first lucky winner who will receive the ENTIRE ‘Happy Days’ collection is…
Congratulations Jenny Dutton!
And our runner-up, who will receive a collection kit is…
Congratulations Shelby Teeter!
Congratulations to both ladies, we hope you enjoy your ‘Happy Days’ goodies! (Keep an eye on your email Inbox – Sue will be in touch to organise your prizes shortly.)
To everyone who entered – thank you so much for your support for this collection. ‘Happy Days’ is already shipping to our amazing retailers all over the world, so please keep a look out for it at your favourite scrappy store.
I cut two strips of the “Take Flight” polka dot paper and placed them on the top and bottom part of a 12×12 thick white cardstock. I added some stitching with yellow thread and white embroidery floss.
I used a precious photo of me and my son Gabriel. I mounted it on tissue paper and foam adhesive, and centered it on the page.
I fussy cut three frames out of the “Wall of Fame” paper that I placed around the photo, and decorated them with Die Cut Ephemeras, stickers and fussy cut flowers.
I created my title with a mix of alpha dies from my stash and some Foam Title Stickers from the collection.
I placed a few phrases from the Accessory Stickers sheet, and scattered a few butterflies as the finishing touch.
Here are more close-ups:
I am so happy with the result and hope you like it too!
Hi y’all! Diving into one of my favorite collections today! I absolutely love the bold red and navy in the No Limits collection, so it is one I automatically reach for to scrap photos of my sons. For this photo of my son in his new snarky t-shirt, it was perfect!
I focused primarily on using up a ton of paper scraps on this one! The small stripes of color on the branding strips and 1/4 to 1/3 inch strips leftover from previous layouts were layered together to create a fun, colorful background on the Spark patterned paper.
To extend my photo cluster, I tucked in two cut apart pieces from the A5 paper stack to the right side of the photo. To give the photo more presence on the page, I added a frame from the ephemera pack that I cut in half and wedged in on either side of the photo cluster. Then, I finished it with a light embellishing of stars, cut apart phrases, and a chipboard title for a finishing touch!
I hope this layout inspires you to try and use up those tiny paper scraps and branding strips floating around your stash! If you’d like to see how “You’re Epic” came together, check out the process video below!
Hello everyone! It’s Anna here with something a little bit different than usual! I know you love all the layouts (and I love them too), but sometimes you are not in the mood for memory scrapbooking. Sometimes you just want to have some fun, use up some embellishments and make something useful. This was exactly my motivation to make this notebook, that can be used as a diary. I am impatiently waiting for the brand new “Happy days” collection to arrive to my doorstep. In the meantime, I still have plenty of other gorgeous lines to play with so I chose “Storyteller” to make my notebook. You can still find plenty of elements from this line in CVS Shop!
As I mentioned, I made this notebook from scratch. If you would like to make something similar, you would need a binding machine like Cinch. I own this tool for years and it still serves me well. I use it to make not only notebooks but also mini albums.
If you would like to make something similar and you have a proper tool, you need to start with choosing your size. I was using A5 sized inserts so my cover needed to be a little big wider and taller. Depending if you wish to add some dividers or tabs, the cover can be a bit wider or shorter – it’s the big advantage of making your own notebook from scratch. I chose “Dits daisy” pattern papers for my front and back covers. I simply cut out pieces of cardboard to the needed size and wrapped them with paper.
I also cut smaller rectangles for the insides of both covers using pretty paper with florals. Now you are ready to punch holes in the covers. You can adjust how many you want, how long the wire should be – it’s all up to you.
From A5 Paper Stack Pack I chose few sheets to add them between the pages of the notebook. They can be used as a dividers or just some decorative pages, to add something extra to your notebook. I gathered them along the regular sheets and made holes too. With covers and inserts prepared I was ready to bind everything together with 1 inch wire.
After everything was connected, i could start embellishing pages and covers. I started with the dividers, adding some stickers from 6*12 Stickers Sheet and Ephemera Pieces. I challenged myself to use up the whole sheet of stickers and I managed to do so! Mission of making room for new collection completed! :)
I tried to keep the decorations as flat as possible so the notebook wouldn’t turn out too bulky. It will not close nicely if you add to many dimensional elements inside. However, I added Foam Title Sticker on the first divider and on the notebook cover.
I also added a big pocket on the back cover to hide some extra journaling cards to add to the pages later. You can also keep there some memorabilia! Pocket is decorated with Floral Ephemera. I also added a wreath of flowers on the front cover.
How do you like my idea of handmade notebook? You can use it by yourself or give away as a gift! And you can easily make one with collection leftovers so use up all the bits and pieces!
That is all for today. I will be back in two weeks with another inspiration. Maybe even made with brand new line! Fingers crossed for the fast shipping. “Happy days” is totally my jam and I can’t wait to dive into those yummy colors.
Hi everyone, Its Melissa here and I’m back with a new layout. Its Thursday which means Throwback time! Yay!! What I love the most about Throwback Thursday is going through my stash of gorgeous Cocoa Vanilla Studio and deciding which collection to create with! For this layout I decided to use the beautiful Daydream collection to document a family photo from Mother’s Day 2021.
This collection has gorgeous florals, and for this layout I decided to feature ‘Daisy Days’. A great way to feature a patterned paper is to tear it, and place it on a white background. This enables breathing space against a busy paper, and the use of mixed media helps integrate the two paper and cardstock. I used a distress oxide ink and the packaging technique to create some interest.
I used lots of ‘Die Cut Ephemera’ florals for my embellishing, some ‘Accessory Stickers’ and also a couple of fussy cut moths from ‘All Aflutter’. I bent up the edges of the flowers for interest and dimension. I was also very happy to get one of the ‘Flair Buttons’ onto the page!
For my titles I used one of the ‘Die Cut Ephemera’, and a word from the ‘Die Cut Titles’. I love that combining the two made for a very easy title!!
I hope you enjoyed seeing a layout created with Daydream, and I hope I’ve inspired you to dig into your Cocoa Vanilla Studio stash. If you’re like me you may want to hoard pretty supplies, but there is nothing like using up products and documenting memories!
It’s Tarrah back with you today, I hope you are enjoying Easter celebrations with loved ones! I was given the theme of Easter for my project this week and have created a scrapbook layout featuring the gorgeous Happiness collection! The Happiness collection is so beautiful and perfect for my Easter themed layout documenting a sweet photo of my niece from last Easter!
I chose the gorgeous woodgrain paper from the Happiness collection for my background and trimmed down a piece of white cardstock to measure 11′ x 11′ adhering this on top of the woodgrain paper. I then machine stitched a border around the edge to add some texture and interest. Next I cut out a pretty floral Easter egg cut file from CUT to YOU from white cardstock also. I did attempt to machine stitch the very fine egg outline of the cut file, however it did not go that well with how thin this piece was. I took the A5 paper stack and chose some pretty papers from it to back the flowers and leaves in the cut file with. This was the most time consuming part of this layout but I LOVE how it looks. Once the flowers and leaves were all backed, I added craft foam to the underneath and adhered it in the centre of the white cardstock background. The thin outline of the egg, I did adhere this flat to the background as any sort of foam adhesive would have been visible.
I wanted to add a little bit of mixed media ( I know! Shock!) but not too much so I took a fine paintbrush and dipped it into my Tumbled Glass distress Oxide ink and painted around the outline of the egg shape on the right. I also added some water and the ink on some plastic packaging and did some small mist drops around the edge in 3 colours: Tumbled Glass, Spun Sugar and Worn Lipstick. I love how the subtle misting and painting looks to define the cut file a bit more. One thing I love about cut files is, that they often help with the design of your page, with this one in particular, my photo placement was obviously going to be to the right of the florals. I adhered my photo to the die-cut frame, tucked in the frame from the Accessory Sticker sheet, added some twine through the hole in the top and then added craft foam underneath the frame to adhere it to my page. I stapled a banner sticker to the top right corner, added the phrase banner at the top and also added my title to the bottom of the frame.
To the left on top of the flowers in the cut file, I added more flowers from the floral ephemera pack, I just LOVE how bright and gorgeous those flowers look! I also added another flower on the right hand side, tucking it in under the frame. I also fussy cut some butterflies out of the ‘B’ side of the woodgrain paper and adhered those on the right as well. I bent up the wings to give the sense of movement and dimension on the layout. I added a heart from the clear sticker sheet here as well. Like with all of my layouts, I like to get the largest elements laid on my pages first and then embellish with smaller things like die-cuts and stickers etc.
My title is made up of the alphabet stickers from the Life is Beautiful collection. At the top of the photo, I tucked in the ‘Fun’ ticket die-cut from the ephemera pack and stamped the date stamp of when the photo was taken. I also added some of the word and phrase stickers from the Accessory sticker sheet around the page to help tell the story of my photo.
Thanks so much for stopping by the Cocoa Vanilla blog today! I hope you enjoyed reading about how I created my layout as much as I enjoyed creating it!

 I placed a view little puffy hearts randomly on the page and cut a gold foil butterfly from the special gold foil paper. I cut more butterflies from the pattern paper and placed them on the page as well. Between the peaches and lemon I put some green sewing thread. I love how that looks. Finally, I splatter some with white gesso and gold acrylic paint.


 Congratulations Jenny Dutton!


