I am sharing a layout created with the colorful Happiness collection !
I played with some Lindy’s Stamp Gang magical powders and shakers and a lot of water on a thick white cardstock for a colorful mixed media background. I let it dry completely.
I went for a vertical design today, and my starting point was the little pink frame that comes in the Die Cut Ephemera pack.
I created several frames and squares that I placed together under and around my photo. I machine stitched on a few of them.
I printed my photo in color as it is quite neutral. I added tissue paper and adhesive foam behind it.
I printed my journaling directly on a rectangle cut out of a paper from the 6×8 Paper Pad.
I used the Happiness Die Cut Titles for my title and subtitles.
Finally, I embellished the page with a few beautiful Die Cuts. I fussy cut the blue butterfly out of the “Little Things” patterned paper. I added a Flair Button, a few Clear Sticker hearts and some sequins from my stash.
Here are more close-ups:
I love the end-result and hope you do too !
Thank you for stopping by, and I will see you again soon !
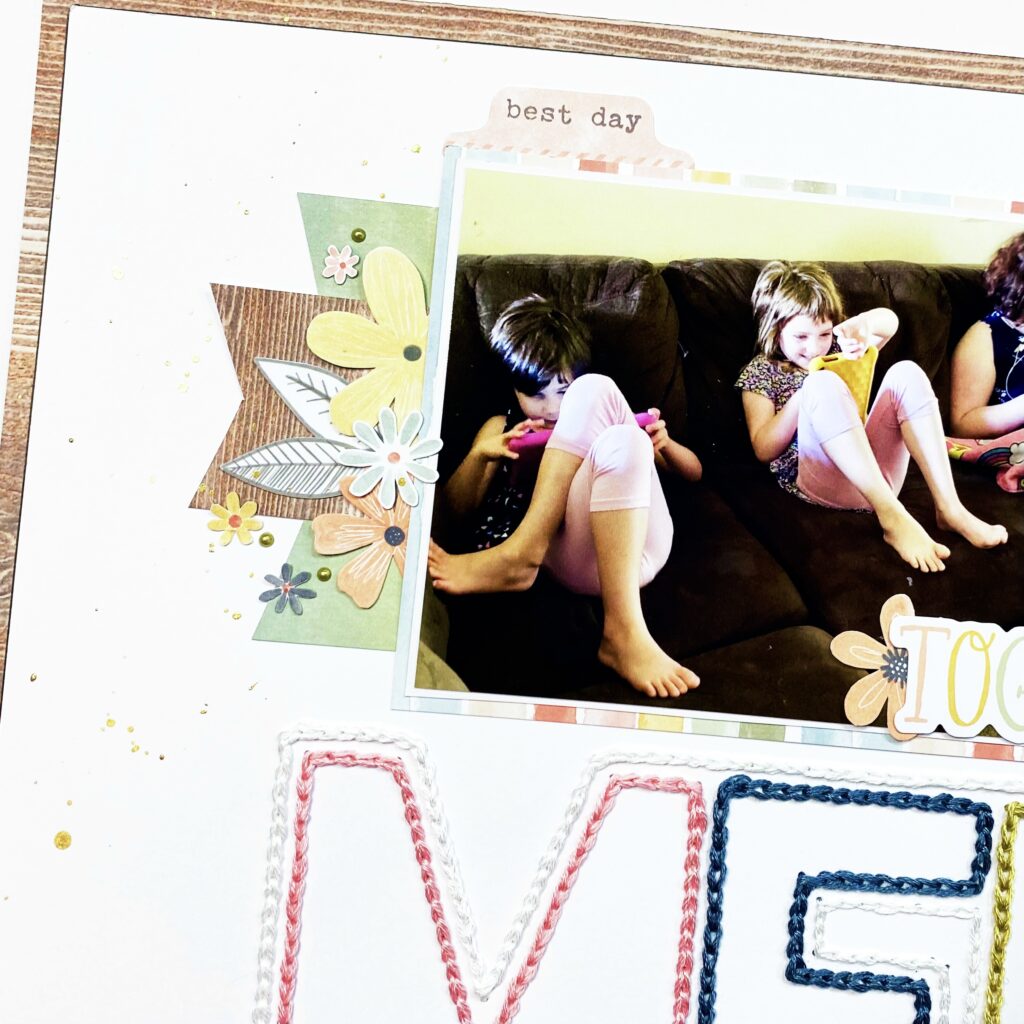
Hey y’all! Laura Alberts back again with a hand-stitched layout featuring the stunning These Days collection! For this beautiful title, I used a stitching cut file from Paige Evans. Instead of using an electronic cutting machine, however, I printed out the image and used a paper piercer to poke the holes by hand. Then, using a variety of coordinating colored floss, I chain-stitched the title. While three days of stitching was certainly a time commitment, I think the end results were worth it!
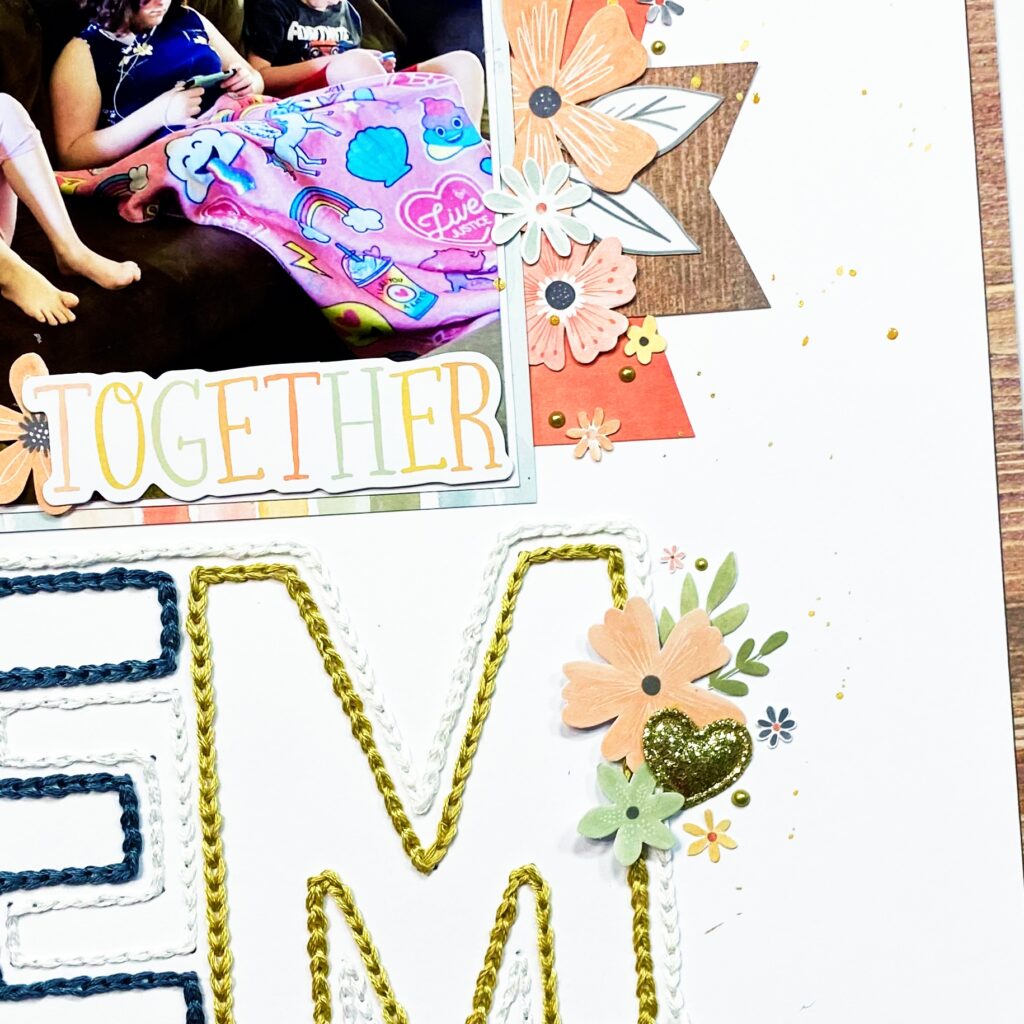
I backed the entire layout with a stunning wood grain paper called Pretty Posies and then reached into the A5 paper stack for these beautiful banners and mat behind my photo. The florals I’ve clustered on either side of the photo are fussy cut from the Home Grown patterned paper as well as the floral ephemera pack. Even those tiny little scattered florals are fussy cut! I do enjoy prepping new collections by fussy cutting all the florals first!
On opposite sides of my stitched title I added florals from the ephemera pack that I fussy cut the white border off of, with little fabric hearts for a bit of added texture. That is the name of the game with this layout! Stitching is a brilliant way to add texture and dimension to a layout without adding a lot of bulk to your albums! I finished off the layout with gold Nuvo drops around the clusters for extra detail and a bit of gold ink splatter. My favourite part was adding my journaling to the ‘O’, such a fun and unexpected place for journaling!
If you’d like to see how ‘Memories’ was created, be sure to check out the process video below! I hope you will give hand-stitching a try and see how you can elevate your scrapping with added texture!
Hi Cocoa Vanilla Studio friends! Danni here with a fun mixed media layout featuring the absolutely beautiful Joyful collection, because I still can’t get enough of it! I have a couple of sweet photos of my little girl to document, so I decided to keep everything bright and add lots of texture using machine stitching.
I started the layout with a white cardstock base and added a border with the soft pink gingham side of Advent 12×12 patterned paper. I added a line of machine stitching around the edge to add extra security and added detail. This gave me an idea to add a quilt-inspired design to the page – I’ll explain more about that later.
I have been eyeing off the gorgeous double sided 3×4 cards for a while, and this is one of my favourite ways to use a bunch of them on a layout. I overlapped my two 3×4 photos slightly, then chose four of the cards to build a large cluster to go in the centre of the page. I distressed all the edges of the cards then layered them around and behind my photos at different heights and widths to create variety. I adhered all these together then set them aside while I worked on my background.
I wanted to add some mixed media to the plain white background, so I took some distress oxide ink pads and diluted the colour using water and some white acrylic ink. White acrylic ink is great because it mutes bright colours while also making inks more opaque. My colours ended up still being brighter than I wanted, but I’m totally ok with that. I used the packaging technique to add messy splotches of the ink to the white cardstock.
Once the paper was completely dry, I went in with my sewing machine and added lots of cross hatching lines of stitching in a quilted-style pattern. I made sure to add the stitching where it would be visible around my central cluster. Because my photo and card cluster was already adhered together, I could just go ahead and glue it down to the centre of the page in one piece. I ended loving the quilted stitching effect peeking out from behind everything!
I finished off the ‘All I want for Christmas’ card with some small phrase stickers from the accessory stickers – I just love that shiny gold typeface font. I also took a couple of flag accessory stickers and layered them below the lower 3×4 card, plus a tab accessory sticker at the top. I embellished lightly with some chipboard sticker holly leaves either side of my photo, and some shiny chipboard sticker stars cascading down my layout.
Finally I added some puffy sticker holly leaves layered with the chipboard sticker ones, then some tiny puffy sticker stars. I love how this one turned out, I hope you did too. There is a process video linked below on the Cocoa Vanilla YouTube channel if you would like to watch this layout come together. Happy scrapping!
Hello scrappy Friends. It’s Anna here with my newest page. I still haven’t finished scrapbooking christmas photos so the bag with “Joyful” collection is still on my desk. I had this one, fun photo of my puppy spending time under the christmas tree that I wanted to use on the project. It was such a funny moment, when he found a perfect spot for the nap there, when all the presents were handled and christmas was done and dusted. All I could think of while looking at him was a Mariah Carey’s song “All I want for christmas is you”. He was like a self wrapped gift :) It have me an idea of a layout title.
I gathered all solid patterns from “Joyful” line, going through both 12*12 sheets and A5 paper stack. I decided to use “Deck the halls“, “Feeling festive“, “Making spirits bright” and “Tis the season” plus few small papers fromt the stack. Next step was to hand cut the letters for the title. I haven’t sketched anything so each letter if different. I tried to keep them around 5 cm tall. If you want to recreate my idea and you don’t feel confident enough to cut them by your own, you can reach for bigger alpha dies or digital die cutting machine. My desk is a total mess right now, swamped with few projects in progress so I didn’t have room for the Cameo to put up.
I tried few pattern papers for my background but they were mixing with the patterns I used for letters so I decided to use sheet of kraft cardstock instead. I arranged the letters and the photo and glued everything down. I only applied glue in the middle of each letter to be able to tuck something behind them if needed.
Next step was to decorate everything with ephemera pieces and stickers. I went through ephemera pack, chipboard stickers and puffy stickers to choose matching elements. I found a tall gift and I replaced one of the I letters with it! Am I brilliant or what? :D I also fussy cut some starts from “Making spirits bright” and added them to composition. You all know how I love papers with elements that can be easily cut out!
Here you can see my precious gift from up close. Isn’t he the cutest? My final step was to add few wooden buttons and golden splatters. To my surprise, this page came together really fast. Cutting the letters took me less than half an hour and placing all the elements another half making it an one hour page. I had a lot of fun with the big title and I will for sure revisit this idea for some other topic. It’s also a perfect opportunity to use up smaller paper scraps or make a page when you run our of full 12*12 papers and have only leftovers.
That’s all for today. Are you still creating christmas themed projects like me, or after the December is done, you no longer find it enjoyable? Let me know in the comments. Thank you so much for stopping by and see you in two weeks.
Hello Paperlovers,
Welcome to my new post on the Cocoa Vanilla blog today! It’s Josefine here with a new scrapbook layout. For this layout, I chose a winter layout that I created with the amazing Joyful Collection and was inspired by the Cocoa Vanilla Moodboard.
One of the things that inspired me was the winter photos and the light blue color of course I added some extra colors to my design. With the velum and white gesso splatters, I tried to capture the winter vibe.
I start with a mixed media background that I created with the distress oxide ink. I chose the color “Victorian Velvet” I applied the ink with a stamp to my white cardstock background by stamping several times. This is how I created a stain of ink in the center of my layout. I punched out several butterflies from the design paper, vellum and light pink tissue paper.
I used gold sewing thread and stitched the butterflies together. I also punched out a photo in a butterfly shape. I placed the butterflies in the center of the mixed media background and start decorating using die-cuts, flowers, stars, stickers and wooden buttons.I placed die-cuts, flowers and stickers between the butterflies. I loved how that turned out. Look the gorgeous word strips on my layout and the gold title Memories under the butterflies. I splashed white gesso and gold acrylic paint splatters on top of the butterflies and embellishments.I punched some white twigs out of white cardstock and gave them a winter look with the Nuvo glacier. WoW, such a cool effect! I really love the shimmers. Curious to see more details and exactly how I made the layout! Just hop over to the Cocoa Vanilla Youtube channel for the process video! https://youtu.be/lkJee7SFoG8
I want to thank you for visiting the blog today and hope I was able to inspire you with this layout! I wish you a very happy and creative day today and enjoy watching the process video.
XoXo, Jo
I centered them in a horizontal line on a white cardstock and added a gold machine stitch on the Advent paper. I distressed and curled up the edges of each paper.
I used a black and white photo of our sweet dog Fiona in front of our Christmas tree. I mounted it on adhesive foam and added tissue paper behind it.
I used two pocket cards from the Joyful collection Pocket Cards pack on each side of the photo, printed my journaling on velum and added it to the right card.
My title comes from the Joyful Chipboard stickers. I stamped the word “my” with an alphabet stamp set from my stash.
I created two big floral clusters that are from the Joyful Die Cut Ephemera pack and some fussy cut out of the gorgeous Tis The Season patterned paper. I also created leaves with a leaf punch from my stash.
I added a gold ribbon bow and a few white leaves that are from a JustNick Studio cut file.
Finally, I added a few Joyful Puffy Stars, a Wood Button from the same collection and numerous gold crystals from my stash.
Here are more close-ups:
Although Joyful is a Christmas collection, It is so versatile and easy to use for other kind of projects !
I hope this was inspiring for you ! Thank you for stopping by, and happy crafting !
Hello and Happy New Year to all our Cocoa Vanilla Studio friends! It’s Danni here, ready to get started with a brand new year of creative fun. I have lots of photos left over from my holiday celebrations to scrap, so today I am sharing another festive layout using our Joyful collection.
We have several Christmas traditions that have developed over the years with my little family, and one of my favourites is going out for dinner on Christmas Eve for South/East Asian food in our old neighbourhood. The photo I have chosen was from Christmas Eve 2019 where my son learned to use chopsticks for the first time – he did so well!
To begin the page I took a sheet of white cardstock and cut a Christmas tree background cutfile by COAPA Cutfiles using my digital cutting machine. Instead of using the outline cutfile, I took all the negative pieces and adhered them on top of Making Spirits Bright 12×12 patterned paper. This way the patterned paper peeks through all the gaps in the cutfile and creates a different texture than usual. I left some of the white pieces out so a few of the trees were a solid green for interest.
I wanted a fun bold title, and I noticed one of the double-sided 3×4 cards said ‘Christmas Eve’ which was perfect. I carefully fussy cut the letters from the card, then outlined them in black pen to make them stand out. I wanted a pop of red to prevent the green title blending into the green background, so I used the A5 paper stack to add some red paper behind my title and fussy cut around the outside to create a border. I finished off the title with a beautiful piece from the puffy gold title stickers.
I matted my two photos using the A5 paper stack and layered them slightly overlapping each other. Using the die cut ephemera I created three embellishment clusters – one either side of my photos and another at the bottom of the page. I used a cute animal embellishment in each of the clusters because I thought they looked as if they were frolicking through a forest of Christmas trees! I filled out the clusters with small foliage pieces, flags, a tree and a smattering of stars.
I adore the puffy stickers in this collection so I couldn’t resist adding a few puffy stars to each cluster. I used a sticker from the accessory stickers to add a few lines of journaling below my photo, then added a tiny puffy star to this as well. To add some extra details I added a bunch of messy splatters using distress oxide inks in green, pale pink and golden mustard.
I hope you enjoyed joining me for this layout today. Happy scrapping!
Hey y’all! Laura Alberts here with a sweet Christmas layout using the gorgeous new Joyful collection. I fussy cut this stunning wreath from the Holly Days patterned paper and backed it onto the Feeling Festive paper. I love the way these little dots give the appearance of confetti bursting around the wreath! In addition to giving this wreath a 3D look by backing it on a different patterned paper, this fussy cut background brings the attention straight in to the photos.
For my title, I used the gold puffy words from the Joyful collection to add a simple ‘Together’ to the top of the wreath and drew my journaling lines underneath. This filled in the open white space above my photos and gave it a purpose. To add details to the wreath itself, I added gold Nuvo drops in the centers and white Nuvo drops around the outside. These tiny gold stars from the puffy words sheet were the perfect scattering bits to finish off this page!
Along the bottom of my photos, I added a swag of florals that I fussy cut from the Tis the Season patterned paper. This covered the connection between the photos and the bottom of the wreath and helped them blend more seamlessly together. My favourite part though was adding these puffy gold fabric stars around the wreath. These are such a beautiful touch to this collection!
If you’d like to see how ‘Together’ was created, be sure to check out the process video below! I hope you will give fussy cutting a try and see how you can elevate your scrapping with your scissors!
Hello everyone. It’s Anna here with my last page in 2021! Staying in christmas mood I scrapbooked fresh from the oven photo of my girls under the christmas tree. I took it on Christmas Eve, that is the most celebrated day of christmas in Poland. We eat special supper that day and Star is bringing gifts to everyone, who was nice. If you thought it’s time to hide your christmas papers and collections until next year, hold your horses!!! Use them to make few pages with new photos and all the memories, that are still fresh in your head. Write everything down to read it next year. I don’t like adding journaling to my pages, where it’s visible so I usually write few words on the back of the layout. “Joyful” collection is just perfect for all the christmas photos – so cute, fresh and modern.
This layout was inspired by all the gifts under the chtistmas tree. I looked at them and thought it would be fun to mimic boxes on page and add photo as a gift tag. I went through the “Joyful” pattern papers and choose two that look like a wrapping paper: “Advent” and “Feeling festive“. I also added strips of red “Tis the season” as a ribbon with a dimensional bow. Smaller gift is decorated with strips of mint paper from A5 paper stack. My background paper is a little more busy. I decided to use “Making spirits bright” with super fun stars.
I printed my photo vertically and trimmed it to the size of rectangle, cutting of two corners with my tag corner punch. You can also use dies to cut this shape or just scissors. Next step was to make a hole and add circle of pattern paper as a decorative element. My photo tag was ready. Just make sure, that you picked the right photo that can be trimmed down to this quite narrow shape. You don’t want to cut off piece of head or whole arm of the person on the picture.
I decorated the photo and area around it using golden phrase stickers, chipboard stickers and few elements from ephemera pack. I didn’t want to overdo it so it still looks like a gift wrapping. Tag seems like hanging loose but I glued it down to the background so it won’t be destroyed while storing in the pile later.
I also added smaller tag to the other gift, this time without any photo on it. They are both decorated with bows that I made with strips of paper. You can use proper die if you have one but I was just too lazy to reach for it. I trimmed my bows with the scissors without measuring anything, trying to keepmthem simple. You can replace the paper with actual ribbon and make real bows with it. They will be harder to destroy while storing the layout.
I finished my page adding few stars fussy cut from “Making spirits bright” paper mixing them with gold glitter puffy stars. Thay are so cute and can be used whole year round, not only for christmas projects. This page came together pretty quickly thanks to my inspiration, found under the christmas tree. I had a vision in my head and just went with it.
You can easily recreate this page as a birthday one too! Just change patters and embellishments. You can add more gifts and more photos as a tags if you shrink them.
That is all for today and for this year. Thank you for stopping by and see you in 2022!
Hello friends! It’s Kylie back with you today and I have another layout to share featuring the new ‘Joyful’ collection. I wanted to create a layout for the festive season based on lots of colour and dimension on the page. Since the papers of the ‘Joyful’ collection have the most beautiful colour palette I knew I could achieve this quite easily.
Using a ruler I began tearing strips of paper from many of the different designs. They were all torn at different widths and lengths and once I had a good selection I began layering them over the FEELING FESTIVE paper which would be my background page. I made sure to use the longer and wider pieces through the centre of the page, moving out to the shorter and more narrow. Once I was happy with the placement of each strip I used my fingers to fold and distress the edges a little further.
My photo was trimmed to measure 4.75″x 3.75″ and was adhered to a photo mat I cut from paper to measure 5″x4″. Once I had adhered it into place over the background I was able to embellish with some of the gorgeous die cuts. I created a title using the chipboard stickers placed over the lower portion of my photo.
This type of layout was really quick to create and would be a great way to use up a lot of left over strips pf paper. It would also be a great option for a double page layout.
Thanks for stopping by today. Wishing you and your families a wonderful festive season.


 I placed die-cuts, flowers and stickers between the butterflies. I loved how that turned out. Look the gorgeous word strips on my layout and the gold title Memories under the butterflies. I splashed white gesso and gold acrylic paint splatters on top of the butterflies and embellishments.I punched some white twigs out of white cardstock and gave them a winter look with the Nuvo glacier. WoW, such a cool effect! I really love the shimmers. Curious to see more details and exactly how I made the layout! Just hop over to the Cocoa Vanilla Youtube channel for the process video!


