Today I have another layout made with the gorgeous ‘Storyteller’ collection.
For my layout today I wanted to incorporate alot of the patterned papers as a base for my background.
I started with the ‘Oh my Heart’ paper as a base for my page. While this paper is gorgeous, I needed to add something with it to tone down the busyness that would then allow my pictures shine. I decided the subtle yellow paper ‘Little Love’ would be a great addition so decided to add it on an angle …this really add an interesting format to my page.
i have used two pictures of my hubby and I today, both set at a slight angle. I used a small strip of the navy patterned paper from the ‘A5 paper stack’ to ground my photos to the page.
I decided i wanted my title to sit directly under my photo on the left and I used some of the black ‘Foam title stickers’ for this…..LOVE!
I really want to make a focus of the florals on my page so I used a mixture of the florals from the ‘Floral Ephemera’ pack and some fussy cut ones from the ‘Spring Fling’ paper. I put these to the top left and bottom right of my photos and had a few flowing down around my title.
To finish of the bottom of my page I added some of the ‘chipboard pieces’ ….butterflies and hearts for the win! Not to mention some of the ‘puffy stickers’…these hearts are perfect, I could add them to anything! To add some interest above my photos, I used a few of the stickers from the ‘Accessory Sticker Sheet’….perfect sentiments!
I hope you enjoyed todays share and you are enjoying the new Storyteller collection as much as I am!
Hello Friends,
Lina here today on the blog with a Throwback Thursday layout for you. I used the latest boy themed collection, No Limits, for my layout and I have no doubts that I made the correct decision with this one. It’s full of bright colours with fun accents and decor pieces such as lightning bolts, arrows and stars. I mean, it was an obvious choice for me!
For my layout, I decided I wanted to incorporate a grid of some sort. I wasn’t sure how I’d accomplish this right off the hop but after looking at my photos and noticing that I had printed off duplicates of this photo of my darling nephew, one in black and white and one in colour, I thought using the photos and pocket cards was the way to go. The background paper I used is called Stardust and it’s the most perfect aqua tone with splatters and distressing.
I matted my photos and two Pockets Cards with papers from the collection including Latitude, Nebula, and Big Bang. The pops of colours make my rainbow heart happy ☺️
For a pop of darker blue, I used two additional Pocket Cards to matte the original cards. I just adore how the inky blues subtly pop out from behind the cards, it just makes them leap off the page. I arranged both my photos and my Pocket Cards in a grid style and went to work on embellishing my layout.
I used the Die Cut Ephemera, Accessory Stickers, along with the Chipboard Stickers to add pops of embellishments around the page. I also used the Chipboard Stickers for my title, pulling “You’re Awesome” from the sheet. I adhered it down using hot glue on the edges and securing it down. I enjoy the loose and playful placement of the title as it adds a bit of whimsy in my opinion.
I continued to embellish the page with Puffy Stickers, tucking them in and around the layout. I felt the layout needed a bit more expression and sentiment and so I used some of the small phrases from the Accessory Sheet to add some much needed micro titles. This is how I personally convey sentiment on layouts as I almost never journal on them. If I want to document something specific, I do so on the back of the layout.
Lastly, as per my style, I finished off my layout with a good splattering of gold paint spray. I feel like it just pulls everything together and rounds out the layout nicely.
I hope you enjoyed my layout and wish you the best day!
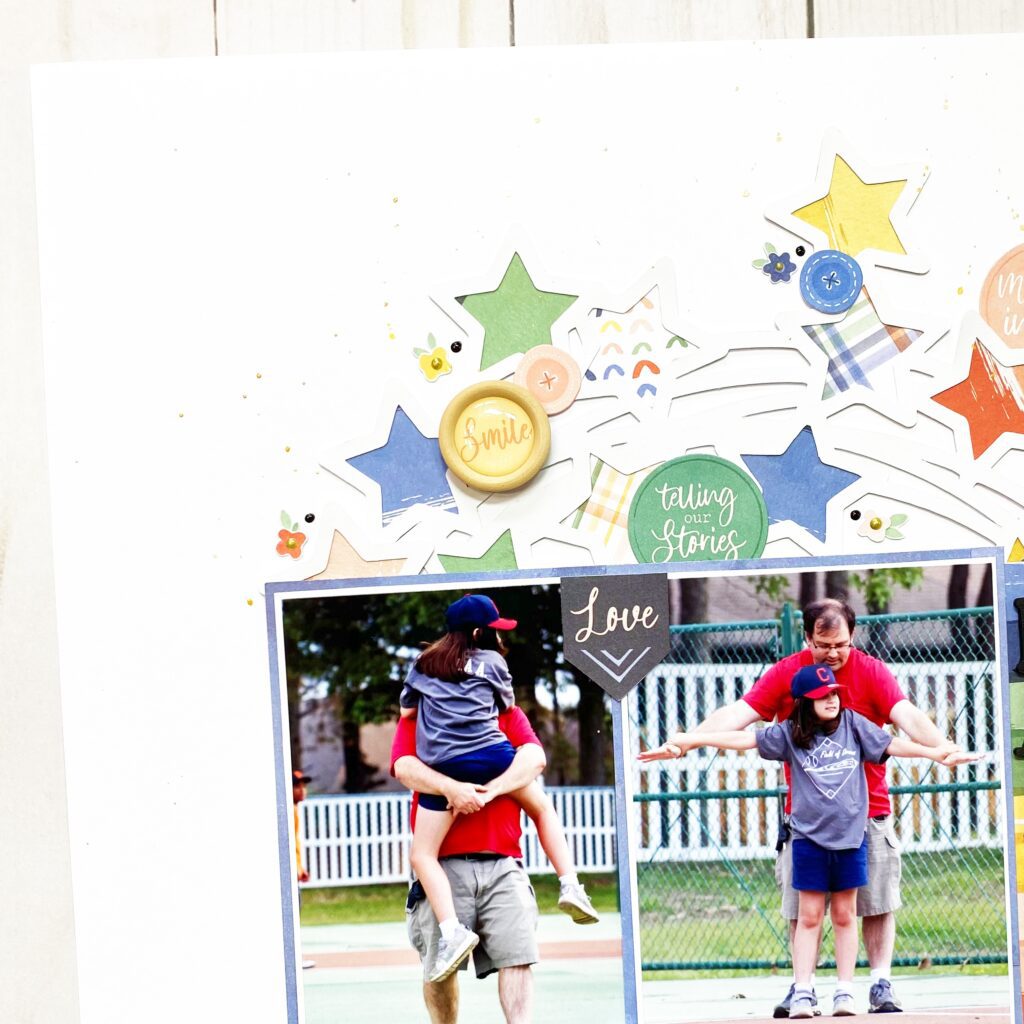
Hey y’all! Laura Alberts back again with another t-ball layout featuring my daughter and my husband. The colors in her uniform were just perfect for the Storyteller collection and I loved the idea of taking a very different spin on my last layout. In this one, I still used a small section of that Paige Taylor Evans star wreath cut file, but this time layered it in the background at the top of the page. Backing it with papers from the A5 paper stack for a splash of fun colors, this cut file really pops!
To give the appearance of dimension, I layered icon ephemera buttons on top and larger circle pieces underneath of the the cut file. These darling little flowers that I fussy cut from the Fly Away patterned paper are the perfect details to add around my clusters. With epoxy wood buttons for a decidedly non-paper addition, the clusters have texture too!
Adding in a cut apart piece and word phrases to match those details on the first half of this spread, I squeezed in so many words that truly capture the feeling of this moment. I kept my title small on this one, using the foam word “Happy” to keep it simple. Finishing it off with a frame to house my journaling and a camera from the icon ephemera, this layout is complete!
I hope this layout inspires you to scrap a wide variety of photos with this beautiful collection! If you’d like to see how “Happy” came together, check out the process video below.
Hello crafty Friend. It’a Anna here and today I have something different than a layout for you! I know it’s been a while but I also love making albums. Sure, layouts are faster and easier, but albums have this extra cute factor and can hold much more photos and stories. And what collection can be better for saving stories than a “Storyteller”? This brand new CVS line is just fantastic and so versatile. You can scrapbook any photo with it – both feminine and masculine, thanks to the big range of colors and motiffs. I didn’t have any specific ones in mind so I made a generic album, than can be filled any time in the future. It can also become a great gift for someone, who loves documenting their live.
Album itself is rather small but it can hold about 30 3*4 photos, thanks to the pockets and extra cards. I made the album base from scratch with three pieces of cardboard and some extra fabric to reinforce the cover. I think jeans pattern and color matches the papers perfectly. I combined it with paper with hearts called “Oh my heart”. You may notice the pattern is upside down, which wasn’t intended… I realized my error after the pages inside were finished and there was no easy fix for this. So I tried to cover the hearts with the flowers as much as I could hoping they will be distracting enough so hearts won’t be that visible.
Both front and back covers are decorated with ephemera pieces, floral ephemera pieces and chipboard stickers. There are so many great embellishments to choose from the “Storyteller” line! Black foam title stickers are just a cherry on top. I added them both on covers and inside the album as a contrasting piece and decorative element!
There is also one more product that I used in big quantities here – pocket cards! I am not a project lifer so I was sure I won’t use up those cards for my PL spreads. I decided to use as many as i could for my album. They serve as a filler for five pockers in the pages but they can be also found tucked into the pages. You can use them either as a base for extra photos or for some journaling.
For smaller projects, like my mini album, 6*8 paper stack can be more convinient to use than 12*12 papers.It also gives you a bigger choice for patterns as they are a bit different than the ones in 12*12 sheets. I used a lot of the pages for my album mixing them with dark navy cardstock as a page base.
On this page above I used doodly frames from ephemera pack as a pockets to slip photos into. All I needed to do is to add strips of foam on three sides of the frame and glue it down to the page.
Another page in my album got a little, long pocket that I filled with tags and squares cut out from 12*12 paper called “Story time”. This is such a mighty paper – you can cut it into pieces and add them into your epehemera pack for even more elements!
Two of my album pages got this little strip of paper that holds some loose pieces of papers and some 3*4 cards. You can add extra photos on them or a journaling. You can also add even more of them or remove them completely – whatever floats your boat!
When my album was done I went back and embellished each page with some small elements like puffy sticker hearts and dots or little, black foam hearts from Titles pack. This made the whole album more cohesive. This project took me few hours to finish, longer than a layout for sure, but it was time well spent and I love the final result. I hope you like it too and my alum will inspire you to make your own mini books with “Storyteller” line.
Thank you so much for stopping by and see you in August!
It’s Tarrah back with you and today I am sharing a new scrapbook layout featuring the stunning NEW Storyteller collection!
For this week I was given the brief of focusing on the wood epoxy buttons in the Storyteller collection! How can you go past these cute embellishments? These are great little additions to any project, providing beautiful dimension and texture!
I recently went away on a little weekend getaway and there was a lovely fireplace inside the cabin we stayed in, I took a couple of selfies in front of the fire as it was so cozy!
I chose the ‘B’ side of the beautiful Spring Fling paper for my background, trimming it down slightly and adhering it a piece of plain white cardstock, I printed my photo in black and white and distressed the edges of the photo, I then pulled out one of the pocket cards and layered it under my photo. I popped the photo up from the pocket card using craft foam, I love the dimension this creates on my layout. On the photo, I stapled a banner sticker from the accessory sticker sheet and to the right of the photo I also adhered a tab from the ephemera pack.
For my main design element I decided on a circle design, and since the gorgeous wood epoxy buttons are the feature, it allowed me to add lots to the centres of the circles!
I took my circle punches and the A5 paper stack and punched out a few circles from the papers in different sizes, I then layered them together to create 5 layered circles……I distressed the edges of all of the circles and added craft foam in between each layer to add dimension and texture.
I then took a wood epoxy button and added one to the centre of each of the layered circles I created. Once the layered circles were completed, I arranged them on my page how I liked them. I adhered them down, leaving some space at the bottom at the bottom to add a title and some more embellishments. I adhered the gorgeous rainbow banner from the ephemera pack below my photo and popped up the circle die-cut on the right of the photo. On the left of the photo, I just had to add the circle sticker from the accessory sticker sheetthat says. ‘But First, Let Me Take a Selfie. I added pop dots to the left edge of this piece and placed it overlapping the photo slightly.
I chose the title ‘So Happy’ from the awesome foam title stickers from the collection and placed the title below my photo and also took some phrase stickers from the accessory stickers and added these below the title and above my photo too. To balance out the other side of the page, I adhered the shorter rainbow banner die-cut from the ephemera pack. I also adhered the camera chipboard piece using craft foam to add dimension and adhered another of the wood epoxy buttons in the centre of the camera.
To help fill in some of the spaces between the circles, I bought in some of the smaller embellishments. I added some of the button die-cuts, some puffy stickers, accessory stickers, foam black hearts and even more wood epoxy buttons too. I added two of the black foam hearts to create the all important visual triangle on my page, strategically placing the hearts in places to draw your eye around the layout. Lastly I sprinkled some white mist and stamped the date stamp.
Thank you so much for stopping by the Cocoa Vanilla blogtoday! I had so much fun creating this layout and focusing on the super cute wood epoxy buttons! I hope you enjoyed reading how I created it. Make sure to ask your retail store for the gorgeous Storyteller collection…you absolutely NEED this in your life!
It’s Sophie on the blog today for Throwback Thursday!
I used the Legendary collection for this page!
I wanted to document a little fishing trip that my son had a few weeks ago. I had the idea to use cute fish cut files from Just Nick Studio to help me with my theme.
I started with a thick white 8,5×11” cardstock and used many mixed media products to create beautiful shades of blue to mimic the sea. I backed the fish cut files with different patterned papers from the Legendary collection, mounted them on foam adhesive and placed them on my blue mixed media background.
I machine stitched around the edges of the 8,5×11 cardstock and backed it with a green cardstock before adhering it to the beautiful “Wild One” rainbow paper.
I added a few layers of papers and tissue paper behind my photo and placed it on the right side of the layout.
My title comes from the Legendary Die Cut Titles, mixed with some letters stamped with an alphabet stamp from my stash.
I decorated the page with a few embellishments from the Legendary Die Cut Ephemera pack, a flair button, plenty of white acrylic splatters and some sequins from my stash.
Here are more close-ups:
I adore this masculine yet very colorful page! I hope you do too!
Today I am sharing my second page using the new ‘Storyteller’collection and these colours are my jam! I find them so easy to use and the whole collection can be used to cover so many different subjects…the choices are endless!
For my page today I started with wanting to make a statement background that featured many of the patterned papers, so out came the A5 paper stack. I chose a few different patterns and decided that I really wanted to bring in more of the red so I pulled a piece of red cardstock from my stash to add into the mix and went crazy cutting out 1 inch squares.
I decided to make a big star with the squares so I used a piece of cardstock to cut a star then stuck down all of the squares onto the star, trimming off all of the excess paper. I then decided to add some more texture to my page by adding some hand stitching to some of the squares…love me some texture!
Next I wanted to add some paper layers behind my photo so I HAD to use the woodgrain paper that matches so well with the hat my little boy is wearing in the photo….and I also added a paper doily to give some separation between my star and my photo.
Now that the base of my page was done, it was time to get some embellishments down, and of course I needed some of the gorgeous florals, so I used a mix of the florals from the floral ephemera pack and some that I had cut out from the ‘Spring Fling’ paper. I positioned them to the top left and bottom right of my page to draw the eye down through my photo.
Next, to complete these clusters, I added some of the butterflies from the ephemera pack and some of the gorgeous ‘wooden buttons’ ….LOVE!
Now, I just need to add my title so the words ‘So Sweet’ from the foam title stickerswere just too perfect not to use… so I placed it below my picture and my page was complete!
I hope I bought you some inspiration today, and you are having as much fun with Storyteller as I am.
Hello crafty friends,
Lina here today on the blog and I am sharing my latest layout. This creation features the ever beautiful, Bohemian Dream with it’s rich hues of purples, blues and pinks. One of my all time favourite collections to work with because of all it’s whimsical additions such as butterflies, feathers and florals.
This layout all began with first choosing the photo and in this case I used this sweet photo of my eldest daughter holding a bouquet of wild daisies she picked herself. In this photo, she is wearing a light purple shirt and I wanted to play off of that. Bohemian Dream was the obvious choice for me. Then after knowing what photo I was going to use, I opened up my Silhouette Studio and created this cut file with some simple fonts from my computer. I welded the two fonts and then outlined them. The lining is plain white cardstock and I used the paper Dreamer, a glorious purple ombre, to cut the internal title for layering. I popped the title up on dimensional foam.
Next, I used two photos, one in black and white and one in colour, layering the colour on top. I matted both photos and tucked some patterned papers in and behind both photos using the 6×6 paper pad. Both the photos and the cut file are layered on the wonderful background paper called Abstract. It’s another purple ombre with a cool mandala-ish pattern.
For the embellishing, I used florals from the Die Cut Ephemera package and created a visual triangle, making three separate clusters. I also used a woodgrain chipboard frame from the Chipboard Stickers and tucked it in behind the florals and on top of the photos. I just love the look of the negative space of the frame. I also used some small type phrases from the Accessory Stickers to add some additional sentiments.
Lastly, I added pieces from the Vellum Accents package, both some foliage and butterflies. For the butterflies, I used the black and white ones and added a drop of glue to only the centers and folded up the wings so that they looked like they were in flight. This layout came together pretty quickly for me thanks to the use of a large cut file and double photos.
I hope you enjoyed this layout today and will join me back again soon. Have a great day!
Hey y’all! Laura Alberts back again with a fun baseball layout using the gorgeous new Storyteller collection. This beautiful Spring Fling patterned paper with a mixed media vibe was perfect for these sweet photos of my youngest at her t-ball game. Using a star wreath cut file from Paige Taylor Evans, I backed it with paper from the A5 paper stack. The title in the center of the wreath is from the Foam Title Stickers.
These word phrases are fussy cut from the cut apart sheet in the A5 paper stack. Loved layering these up on my photos in place of journaling! The sweet little buttons are from the icon ephemera pack and the expoxy wood buttons layered over them perfectly! Loved all the layering with this layout.
One of my favourite details on this layout are the tiny little flowers that I fussy cut from the gorgeous Fly Away patterned paper. These little details add such a lovely touch of whimsy to the layout and softens the overall effect of a largely geometric design. Finishing it off with black Nuvo drops and gold ink spray splatter.
I hope this layout inspires you to try layering your embellishments over the edges of your photos. It’s such a fun technique! To see how ‘Make Me Smile’ came together, check out the process video below:
Hi Cocoa Vanilla Studio fans! Danni here with another layout using the gorgeous new Storyteller collection. Are you enjoying this beautiful new stack of goodies as much as I am? This collection is so easy to work with and so versatile, I am having so much fun with it!
I was rummaging around in my craft room this week (trying to clean but actually making more mess, who can relate?) and found a cutfile in drawer that I had cut ages ago but never gotten around to using. It is meant to be a Christmas cutfile I think, but it immediately made me think of a recent hike my family took in the mountains. I found some photos and decided the tree theme would work perfectly for a layout.
I started with the woodgrain side of Cross It Off 12×12 patterned paper as a background. I love a woodgrain paper at the best of times, and this light toned wood texture is perfect for a hiking layout. I added the cutfile on top of the patterned paper, deciding not to back it with papers because I like the clean look of the white on the woodgrain. I used small dots of glue at the trunk of each tree to ensure the tops and edges lifted up from the page to add dimension.
Next I matted my two 3x4inch photos with the double sided 3×4 cards. I love the patterns on these so much, and they are the perfect size to mat photos with. I also cut the ‘Love this life’ heart shape from one of the journal cards before using it as a mat, saving waste. I then added a strip of yellow to the photo mat using the A5 paper stack patterned papers. Once my photo mat was done I started to think about a title. I have been so excited to use the stunning foam title stickers so I chose ‘together’ and added it just below my photos. The script font of these is absolutely beautiful! I also took the heart shaped piece I cut from the double sided 3×4 cards earlier, and tucked it behind my photos at the top.
Next came the embellishments! I took two of the hearts from the chipboard stickers and added them around the larger heart, followed by a chipboard banner at the bottom of the photos. I like how this bridges the gap between my photos and main title. I stamped the date on a label from the accessory stickers and tucked it into the side of my photo mat. I also took an accessory sticker tiny word phrase and added it to the opposite side for balance.
I reached for the die cut ephemera next and was absolutely spoiled for choice! I chose two of the large flower clusters and added them to either side of my photo mat. I also chose two of the sweet little pink butterflies and added them to the flowers, bending the wings up for dimension. I wanted to bring in a couple more pops of the beautiful red colour, so I added a few puffy sticker hearts around the florals as well.
Finally, I added lots of splatters around my layout using a white acrylic ink and a gold shimmer mist. I love how white and gold look against woodgrain; very neutral colours but they added such a pretty detail. I hope you enjoyed joining me for this layout, I had so much fun making it. Happy scrapping!