Anna here with you today with a new layout featuring the awesome “Legendary” collection. With this page, I really went out of my comfort zone: no pink and no flowers!!
I started googling a mountain shape and with my Silhouette Cameo, I traced it and cut it. Then, I used it as a stencil with my distress inks in white cardstock. I love how this background turned out!
I also created the title with my Silhouette Cameo, using both sides of the Outdoors Type paper in two different fonts, and I raised the word “mountains” with foam dots. I stacked a flair button with the same pattern next to it (and could be used as a subtitle).
From the Die Cut Ephemera pack, I choose two that had mountains and placed them on both sides of my picture. The picture was matted with the B side of the Wild One paper and the whole page with the Outdoors Type paper too. I also made a machine stitching all around it.
It’s Tarrah McLean back with you today to share a new layout featuring the awesome Legendary collection!
I have chosen to scrap a 8.5′ x 11′ size layout today, I have been on a bit of a kick with this size of late and the photo that I am documenting is of my 2 sons on a recent bush walk where they found a cave.
I trimmed a piece of plain white cardstock to 8.5′ x 11′ and then trimmed the Offbeat paper with the blue stars showing down to 8′ x 10.5′. I machine stitched the paper to the white cardstock and bent up the edges to create a textured look. I then trimmed a piece of the One Way paper, turned it over to show the orange side and cut a banner edge into the bottom. I love how this paper looks as a contrast on the blue star background paper.
I added craft foam underneath the orange paper and the other layers to create shadows and dimension, I adhered these all in the top left corner with my photo. I then added some of the awesome accessory stickers, clear stickers and die-cuts to embellish this main design element on my page.
For the bottom right cluster I had to add that gorgeous bear die-cut, he is popped up off the page with craft foam, I overlapped the Explore piece also and tucked in a few clear stickers here. The stars are clear stickers adhered to white cardstock and then fussy cut out with a foam dot placed under each of them. My title is made of those awesome cardstock die-cut titles with that super cool font!
Lastly I placed some enamel dots and stamped the date stamp to finish my page.
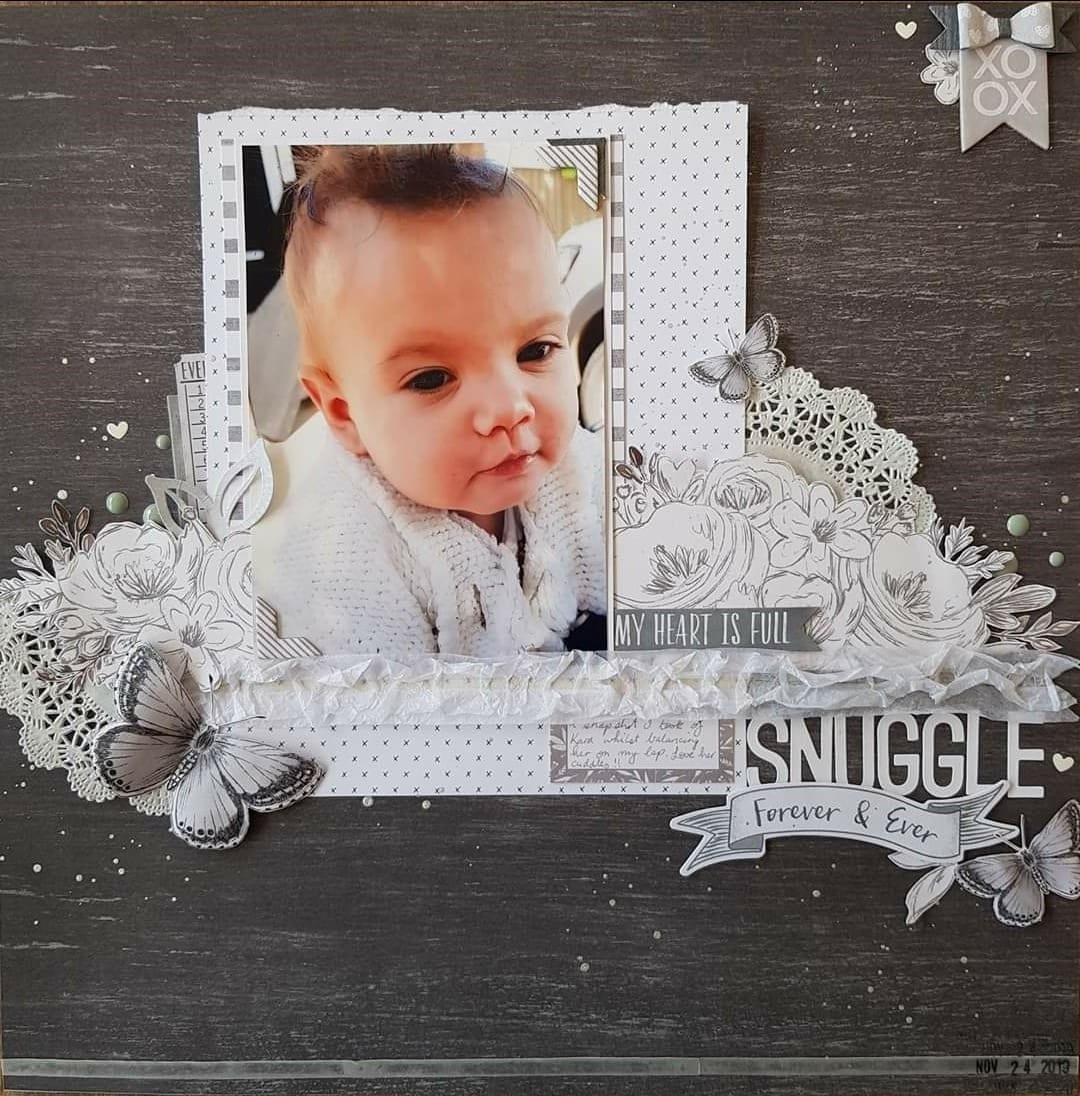
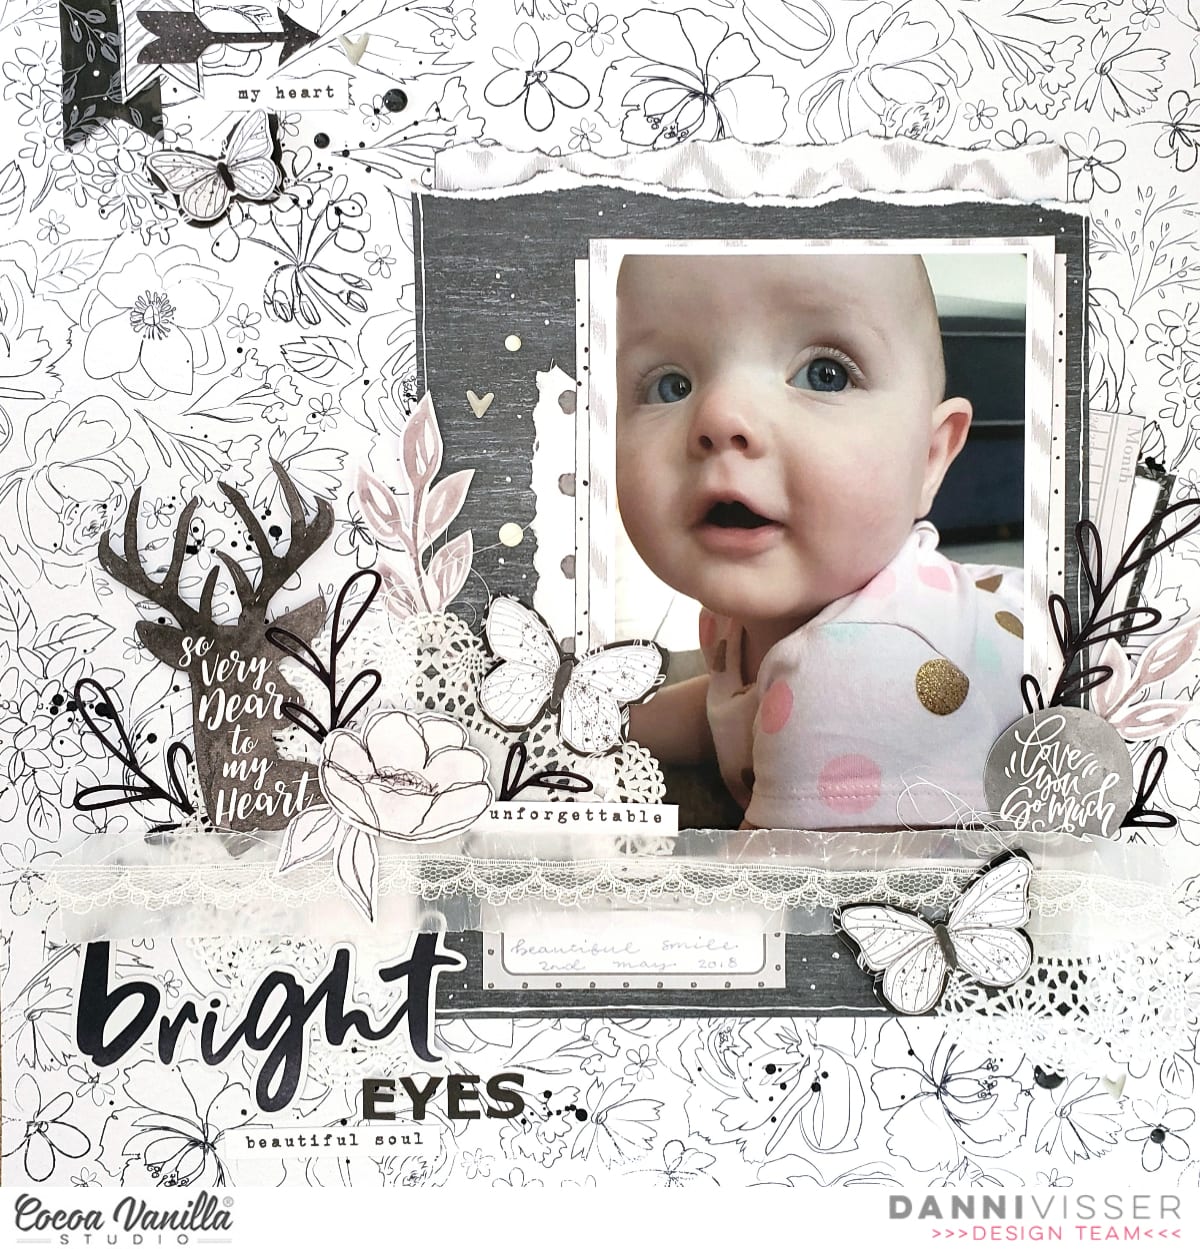
Hi there! Danni here with a scraplift of Michelle Robertson’s gorgeous black and white layout for the International Scrapbooking Day monochromatic challenge. As soon as I saw this stunning layout, I knew I had to have a go at creating my own version!
I first went through all my Cocoa Vanilla collections and pulled out all the black and white elements I thought could work for this. I decided to flip Michelle’s layout horizontally to work better with my photo, and I reversed the order of the light/dark elements on the page by choosing a lighter background (Sophisticated floral 12×12 paper from Midnight collection) and a darker main photo mat (Happy Go Lucky paper from Boys Rule collection). I added some soft layers with various monochrome papers from More Than Words collection as well.
I watered down some black acrylic paint and made lots of black paint splatters on my background paper before adding down my main photo mat. To echo the tissue paper strip on Michelle’s layout, I cut a strip of vellum, ruffled it up, added a strip of lace trim and ran it through my sewing machine with white thread. I kept the thread tails long for added texture.
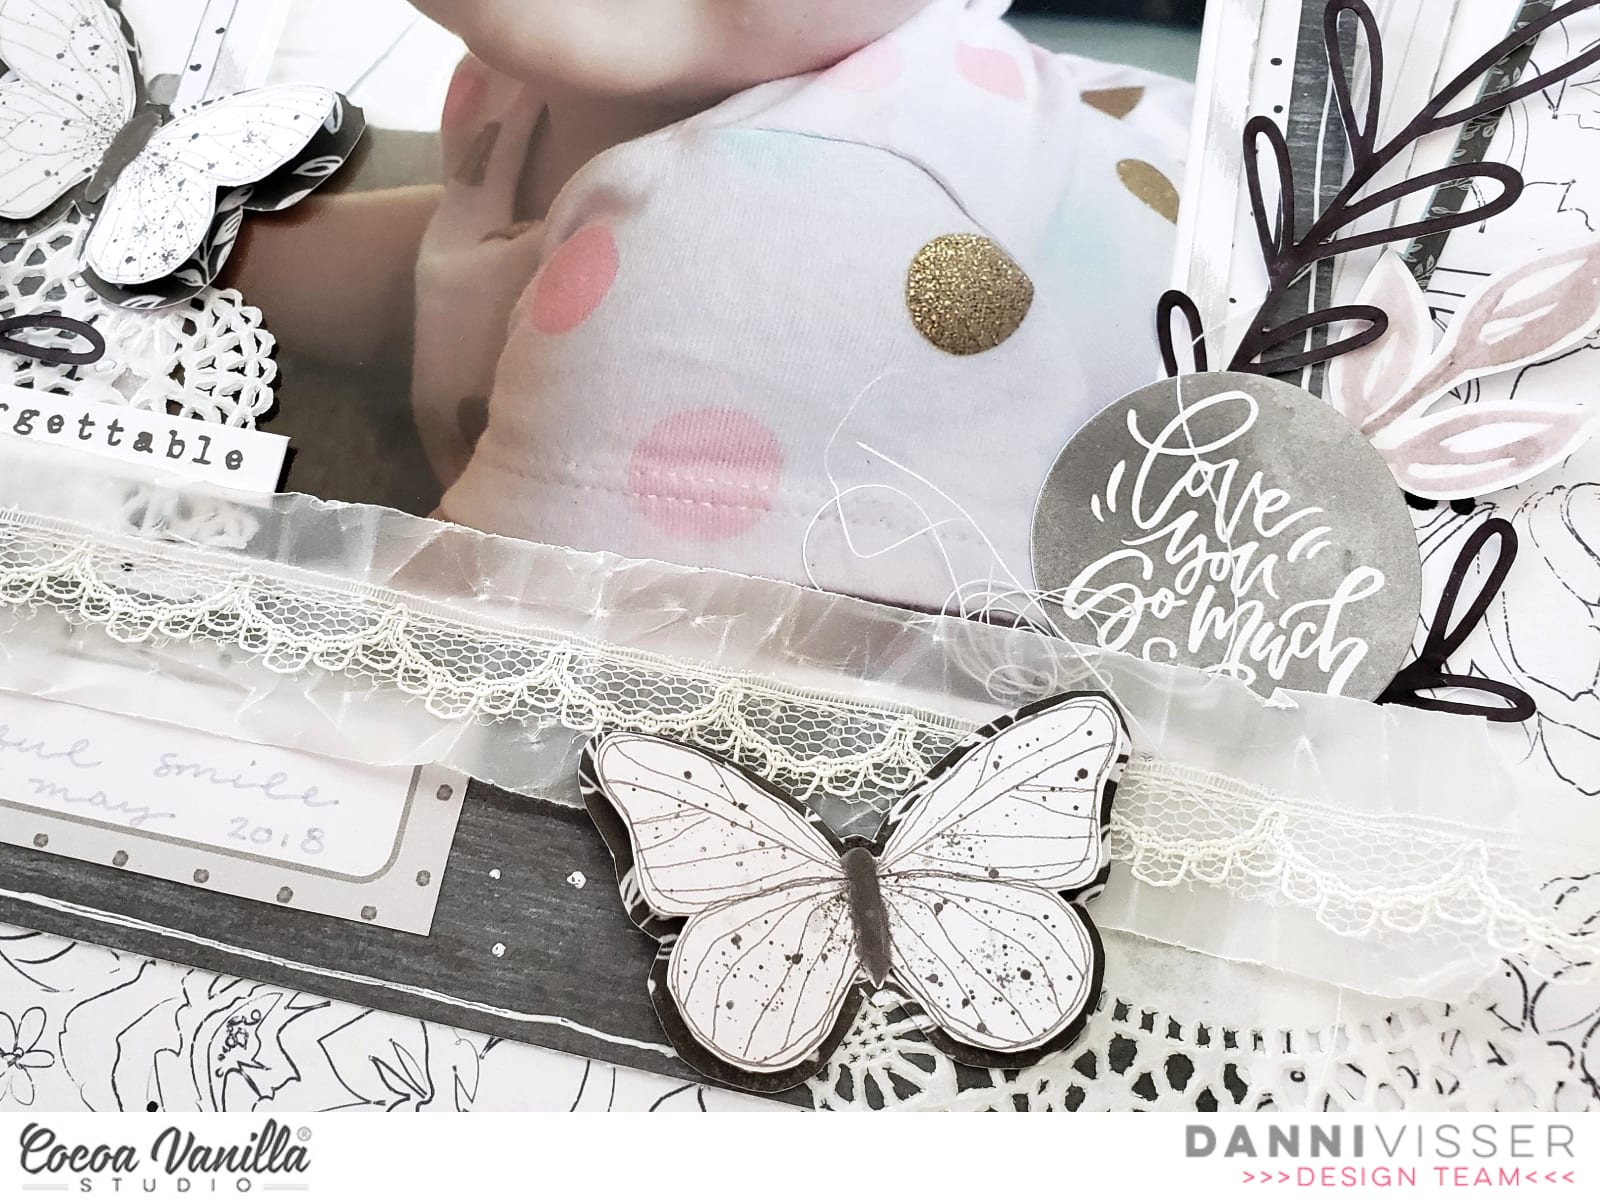
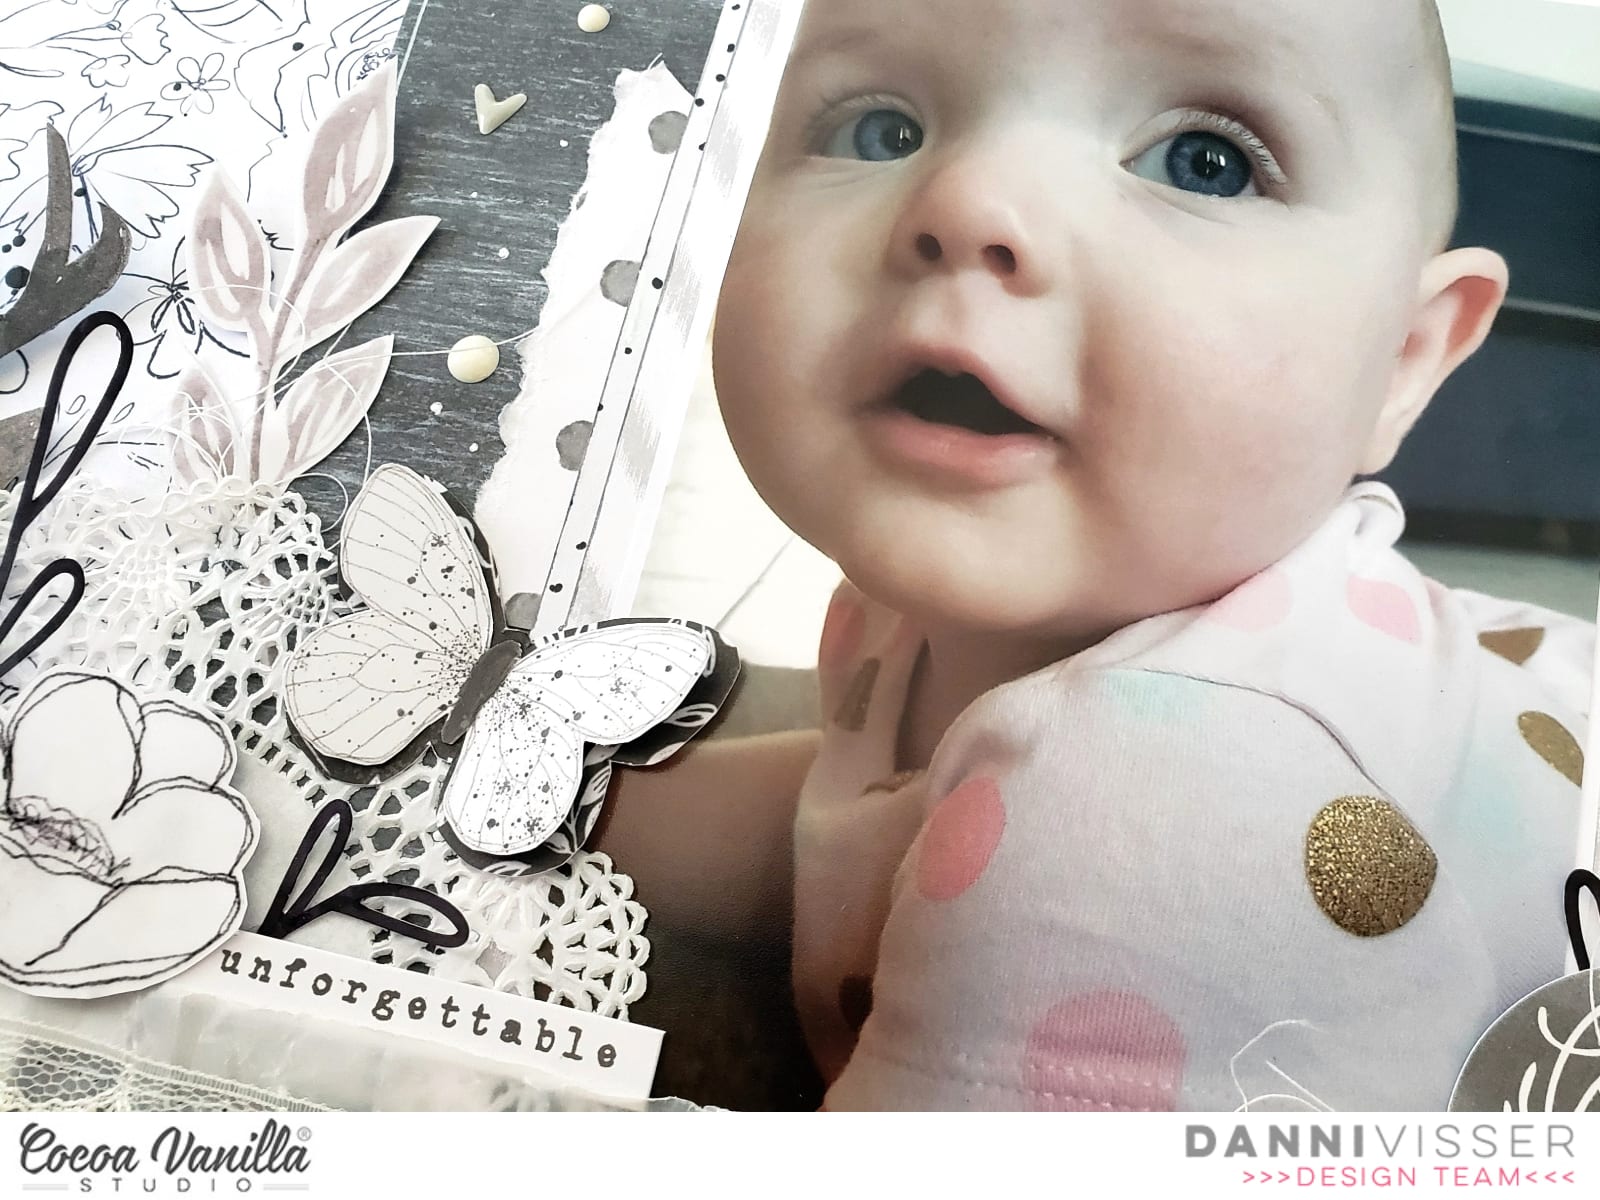
Next I took some fussy cut butterflies from More Than Words and added a layer of darker paper beneath with some foam squares to create layered butterfly embellishments. I also included some leaf die cuts, fussy cut elements, vellum ephemera and stickers from More Than Words and Unforgettable to create a cluster either side of my photo and at the top left of the page. I included a doily and some messy thread for more soft textural elements.
To help some of the elements stand out I used a white gel pen and a grey felt tip pen to outline and ink the edges of the paper layers. For a title I used the die cut titles from Midnight and some dark grey alpha stickers from my stash. To finish off I added a sprinkling of enamel dots from More Than Words and Unforgettable, choosing the grey and white tones.
Although this is a scraplift, I think they ended up looking quite different! I’m really pleased with the result and so happy I gave this a try. Have you had a go at scraplifting someone recently? It’s a great way to get outside your comfort zone. There is a process video for this layout linked below if you would like to see how I added all the little details.
Hello Hello! It’s Michelle here today with a new layout share as part of our current ‘Scrap-lift the followers’ theme. This was such a fun theme to play along with, but narrowing down the choices on who to lift was a tough one! All our followers had such amazing layouts created for the interNational Scrapbooking Day/Weekend, but I finally narrowed it down to one. Here’s what I created using the Happiness collection
The layout I chose was one of a few that had caught my eye from the time it was loaded into the ISD Challenge group. The triangular elements were something that I really wanted to try on a layout and what better time than a scrap-lift!
This super sweet creation was made by Belinda Griffin for Gwen’s Grab 5 challenge using some of her favourite CVS papers.
I drew inspiration from multiple elements on Belinda’s layout including using 2 cute kids in a photo. I wanted to step back in time and scrap a photo of Leila and my cute little nephew from a couple years ago along with a fun title based on a catchphrase their Grandad tells them every time he sees them – ‘You’re the best’
I used recreated the triangle shapes top and bottom of the layout using most of my favourite colours and patterns from the Happiness collection and sewed them all down randomly and roughed up other edges. The papers used are SPRINKLES, GOOD VIBES, FRAME OF MIND and MEADOW.
I adhered the photo to a piece of BRIGHT & BEAUTIFUL and adhered it left of centre to leave space for the title that I’ve made using DIE CUT TITLES and some handwriting.
I fussy cut some of the floral clusters from the SO FRESH wreath paper, one of my most used papers recently, and adhered them diagonally across from each other using foam tape for a little pop of dimension.
I also added a couple of butterflies, mini hearts and phrases from the ACCESSORY STICKER SHEET to finish it all off.
Lastly I added a sprinkling of gold ink and called it done. I really enjoyed this Scrap-lift theme, and hope you like what I’ve made based on Belinda’s layout. Be sure to check in each day to see what the rest of the team has created based on our wonderful followers inspiration.
That’s all from me today, thanks so much for stopping by.
Hey CVS friends today I have a fab boy layout to share using my fav paper from the Legendary collection, Wild One !
I have used a cut file from the Silhouette Design Store (Happy Rainbow). Once I had cut the rainbow I them added machine stitching to each rainbow piece (you could hand stitch this too), I loving adding texture to my layouts and sewing on your layout is a great way to do that.
I then used the reverse of the Wild One paper (yellow and left over after cutting the rainbow) and cut the Happy off set. I cut the actual letters in white cardstock. This is added under the rainbow which I attached with foam tape to create dimension.
I added phrase sentiments from the Accessory Sticker sheet that tied in with my theme and photo. I also added these with foam tape to add even more dimension. I LOVE the Clear Stickers especially the mixed media elements (It saves so much time and mess lol) and I have added a contrasting green and orange paint brush stroke clear sticker under the yellow title.
I next added my photo matting it on Off Beat paper (blue star side) and added with foam tape. I then tucked under Die Cut Ephemera elements. How cute is the geometric bear! I added some more clear stickers and Enamel Dots.
I finished off with a light splatter of black paint on the white cardstock. I love how this turned out and such a sweet photo of my boy and his pup documented!
Thank you for stopping by, if you have any questions about this layout please leave them in the comments and I will get back to you. Have a wonderful week!
I hope you are all keeping well. Gwen back with you on the blog today with a new share. For this page, I’ve dug deep into my stash to my all-time favourite collection ‘Bohemian Dream‘. I just love the blue tones in this collection and the moment I took this series of photos of Miss 12, I just knew it would be the perfect collection to work with to scrapbook it!
First things first, I stitched around the edge of my photo and added two photo mats. The first mat is purple card stock from my stash and the second mat is the ‘Wild and Free‘ paper. I’ve added foam between the layers for dimension.
Next up, I went about choosing my background paper. I used the same purple cardstock for the outside border of my layout and then ‘Gypsy Heart‘ pattern for the background. It’s bold, but I just love it! I then pulled out the “Intersecting Heart Row’ cut file from CUT to YOU, cut it three times and colour blocked the backing of each row. It looks like I’ve used different pattern papers here but I’ve simply chosen different sections of the ‘Dreamer‘ paper from the deep purple through to the light pink. *TIP – Choose ombre pattern papers in collections; you get multiple colour options for the price of one :)
Once the files were backed, I centred them onto my layout. Next, I wanted to lock in the position of my title and photo. For this, I’ve used the Chipboard Titles from the collection and the word ‘Beautiful’. As this is quite long, I’ve positioned it toward the left of the layout and the photo positioned towards the right. I think this balances the page out really nicely.
With my three main elements locked in, it was time to embellish. In my usual style, I’ve started with the bigger elements first. I had these Charm Creations fabric X and O and have added them to the left of my photo. I found this sweet sentiment ‘Fine and Dandy’ from the ‘Ephemera Pack‘ and have added that on top of these elements.
I’ve also used two of the flower elements from the ‘Ephemera Pack‘ one below my title and the other above my photo which creates three main cluster features around my page. The Ephemera pack in this collection has so many pretty watercolour flowers and lovely sentiments, it really is a must-have and still available in the Cocoa Vanilla shop.
Lastly, I pulled out the ‘Accessory Stickers’ from the collection including two fun tabs, one that says ‘Captured’ the other ‘Happy Snaps’ and added these around my photo. I’ve also added two die-cut butterflies, a flair button and some enamel dots to finish off the page.
This page is a little different for me, especially with that bolder background colour, but I just love it! I think the white in the cut file and the chipboard title really pop and it just sets the page off. Do you have some Bohemian Dream in your stash? If you do, I hope this page inspires you to revisit this stunning collection.
Hi there! Danni here, back with another fun layout using Legendary. You know we all LOVE stars over here at Cocoa Vanilla and I have been eyeing off the large star die cuts from the die cut ephemera for quite a while now. For this layout I decided to go sequin-happy and make some shaker embellishments!
I took four of the large star die cuts with the negative space in the centres to make my shakers, they were just absolutely perfect for this. To make the shakers, I adhered a layer of vellum behind the die cut for the largest stars and acetate for the smaller ones (just for some variation, you could use either). I then added a layer of adhesive foam around the edge, filled the space inside with sequins and glued another layer of vellum behind to keep it all together. Ta da! Instant shaker embellishments.
Next I went to work on my background. I laid down some white gesso on the grey side of All Star patterned paper, then went in with a combination of distress oxide inks, watercolours, pearl watercolours and spray inks in several different shades of blue, using the packaging technique to create lots of messy inky goodness. To finish off the background I added a generous splattering of acrylic ink in a bright metallic silver.
To mat my photo I used Offbeat, Outdoors Type and Wild One patterned papers in several layers, using up some of my scraps from previous layouts. I can’t stand to waste a single of piece of the gorgeous paper in this collection! I positioned my photo in the centre of my mixed media background and arranged the shaker stars around it, adding in lots of fussy cut stars from All Star patterned paper to fill in the gaps.
For my title I chose the words ‘Super Star’ from the die cut titles and machine stitched them onto the background, running it through back and forth several times with white thread for lots of texture. I added in some tiny stars from the clear stickers on top of my photo and in the centre of the large shakers for a bit of extra something!
Next I dug into the accessory stickers, choosing a label for the date and a couple of tiny word stickers at the bottom of my photo to help anchor it. I included a few lines of handwritten journaling to the right of my photo following the diagonal of my title, then added a sprinkle of enamel dots in three places to add the perfect finishing touch!
I hope you enjoyed this layout as much as I did! I just love all the little details. There is a process video below if you would like to watch this page come together. Thank you for joining me today!
Hello Friends. It’s Anna here with my newest layout. This week we are focusing on die cut titles – awesome product for all the layout makers. You can find them in few recent collections such as “Legendary“, “Happiness” and “Midnight“. Other collections have words too, made as a foam stickers or chipboards. You can easily mix and match them on your page. Sets are perfect for title building and you can combine few words in longer phrases. I decided to use “Midnight” collection as I still have a lot of elements form it. I created five rows of words on my background making meaningful clusters that describe my photos.
I started my project with “All the things” pattern paper and arranged words in an order. It’s a really simple layout as I wanted die cut titles to shine. They are the main focus and they didn’t need much of embellishing.
I printed my photos in black and white version to better fit the overall mood of the page. Very deep navy color of the words looks almost like black and pink, monochromatic background is a good, neutral base for them.
I embellished areas around the pictures using leftover chipboard flowers but you can easily replace them with flowers from ephemera pack or the ones fussy cut from paper. I also added even more words in different size and font.
I finished my page by stitching through every row using white thread. I wasn’t planning doing that at first but the layout looked like it needed something more so I carefully step in with my sewing machine. It created extra layer of texture and I am happy I did it.
Last step was to add enamel dots. This collection didn’t have a matching set so I grabbed the ones from “Unforgettable” line.
Do you like die cut titles as much as I do? My fellow DT girls are sharing with you even more ideas on how to use them and how to build longer titles adding alpha letters or stamping. So many great and inspiring ideas!
Thank you for stopping by and see you next month. Can you believe it’s already half of the year with June just around the corner? Crazy times. Stay safe and healthy <3
XO Anna
Hello friends!! Its Melissa here and I’m back again today with another layout made with the stunning Legendary collection – I really can’t stop creating with it! I was given the task of focusing on the Die Cut Titles, so I decided to go all out! Go big or go home right?!
I took this photo of my newly turned 13 teenager (and only son) Sam on his first day ever of high school earlier this year. He looked so smart in his tie and blazer, and I knew I just had to use the gorgeous map patterned paper, which is the B side to Outdoors Type, with a border of the blue and white stripe cut apart from the B side of Total Legend.
I decided to incorporate several of the Die Cut Titles into a letter to Sam, and I used a manual die for the remaining words (cut from Total Legend, One Way, and Wild One). I used my sewing machine to add lines underneath the manual die words for extra texture and interest, and used Enamel Dots for punctuation.
For my photo I layered up some of the same papers, and then simply embellished with the star cut file which Gwen designed to accompany Legendary. I backed the stars with Wild Once, and I love how it brings out the yellow in his tie.
Carrying on with the star theme, which works really well for both boys and back-to-school layouts, I used a couple of the gorgeous stars from the Die Cut Ephemera pack and placed them off the page for interest. I embellished them with arrows from the ephemera pack and phrases from the Accessory Stickers.
A little ephemera tab with the word “memorable” was perfect tucked under my layers.
I’m so happy with this layout, and most importantly so is my son!! It means a lot when they are teenagers and still appreciate layouts that we mums make!
It’s Tarrah back with you and today I am sharing another new layout featuring the awesome new Legendary collection!
I have been mixing up the size layout I have been working on lately and decided to create another 8.5′ x 11′ page today. I started by choosing to cut out the stars from the awesome exclusive FREE Legendary cut files, designed by Gwen. I cut these out from white cardstock using my Silhouette Cameo.I chose the gorgeous rainbow paper called ‘Wild One‘ to back all the stars with. Once the stars were all backed, I added craft foam to the underside of the stars, I then arranged them vertically and adhered them to a white cardstock background that was trimmed down slightly smaller than 8.5′ x 11’. I chose to cut the ‘One Way‘ paper to be the mat behind the white cardstock. I then machined stitched around the edge of the white cardstock as you can see in some of the detailed photos.I matted my photo (which is of my youngest son when he was about 3) to the B side of the ‘Wild One‘ paper. I then adhered it over the top of the stars so that it became the main feature of my page. I added one of the accessory sticker sheet banner stickers to the too right corner of the photo and also overlapped the title onto my photo also. The title is made up of those awesome font die cut cardstock titles, these are so super fun!I added the rainbow star strip from the ‘Epic Tales‘ paper to the top of my layout and I finished off by adding a few more stars in clear stickers, diecuts and the flair badge too, the date stamp almost always makes it onto my pages too, so I stamped the date the photo was taken!Thank you so much for stopping by today! I hope you are getting some creating time in? Why not check out the Cocoa Vanilla store for the awesome Legendary collection plus all the other amazing things in store now too!Happy creating!Tarrah x