It’s Sophie here ! It’s Throwback Thursday today and I am sharing a beautiful fall layout created with a mix of two digital collections: Hello Lovely and Life is Beautiful.
I started my layout with thick white cardstock and cut my title directly on it with my cutting machine. It is a cut file from Justnick Studio.
Then, I backed the title with cardstock and different patterned papers from both collections. With a fine brush, I added a little bit of matching water-colour to the letters to create more depth. I LOVE the effect !
I also created a subtle mixed media background with water-colours where I planned to put my photo.
This photo of my sweet Sabrina was taken a few weeks ago when we went for a walk nearby our home. The fall colors where just breathtaking beautiful !
I fussy cut plenty of leaves and flowers mainly from the Life is Beautiful collection and created a floral cluster on the lower right of the photo. I put adhesive foam on the majority of the embellishments to add interest and dimension.
I also cut a banner “You make me so happy” and a few hearts that I put around my title.
Finally, I hand wrote my journaling directly on the background and stamped the date.
A big title like this is a very easy way to get started on your design ! Here are more close-ups:
And have you noticed that I created my fall theme layout with two gorgeous summer collections ? I had to think outside the box, and love the result ! I hope you do too and that you felt inspired by my page today !
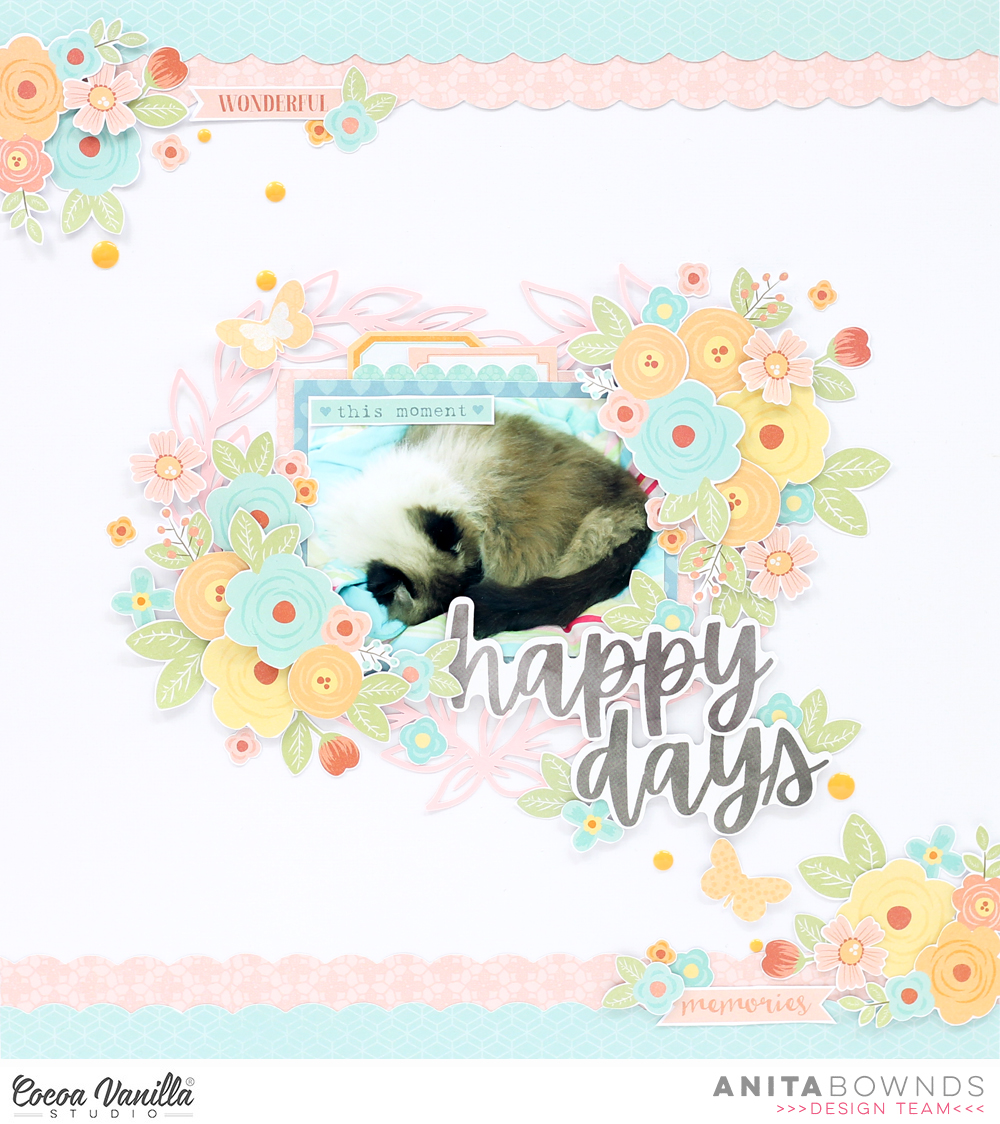
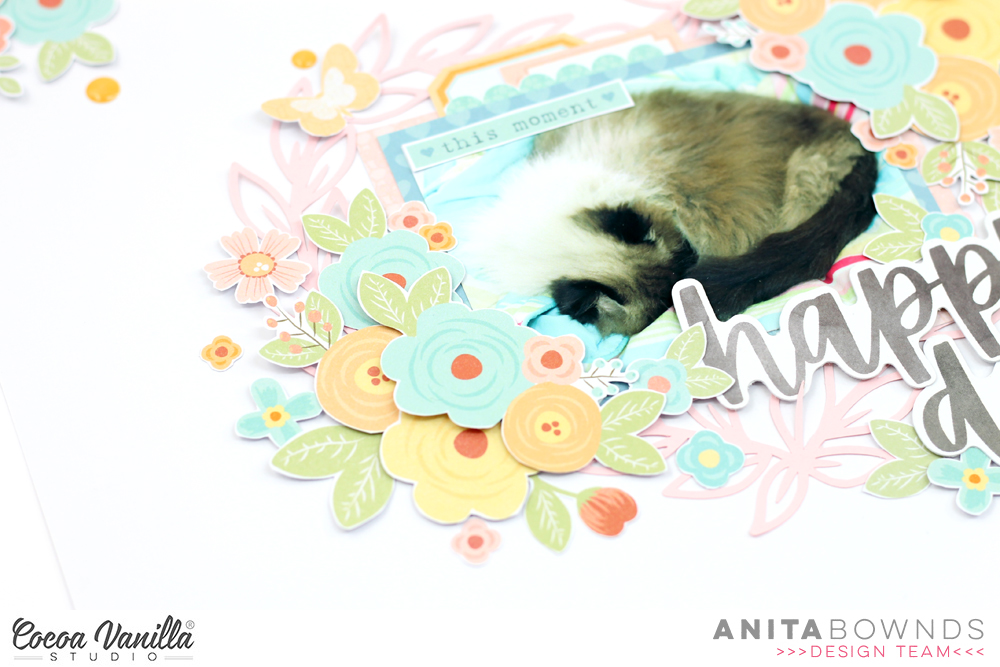
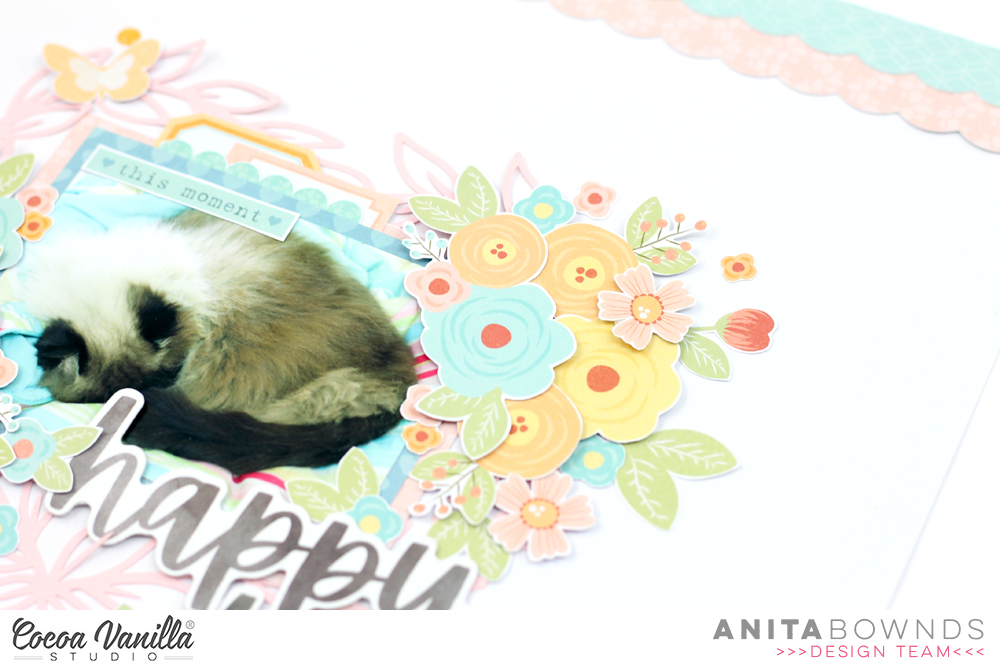
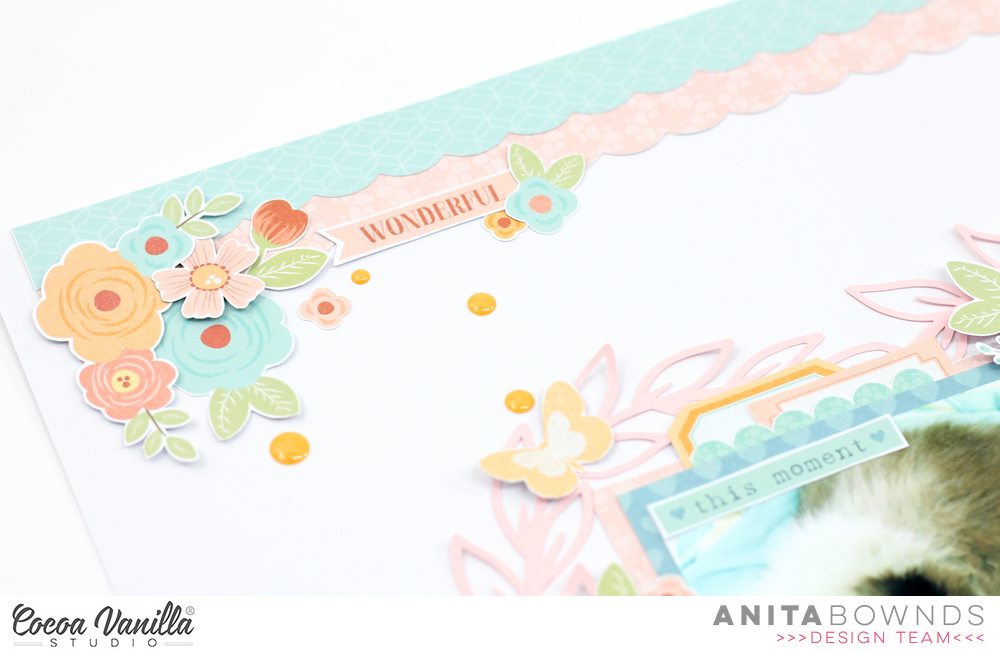
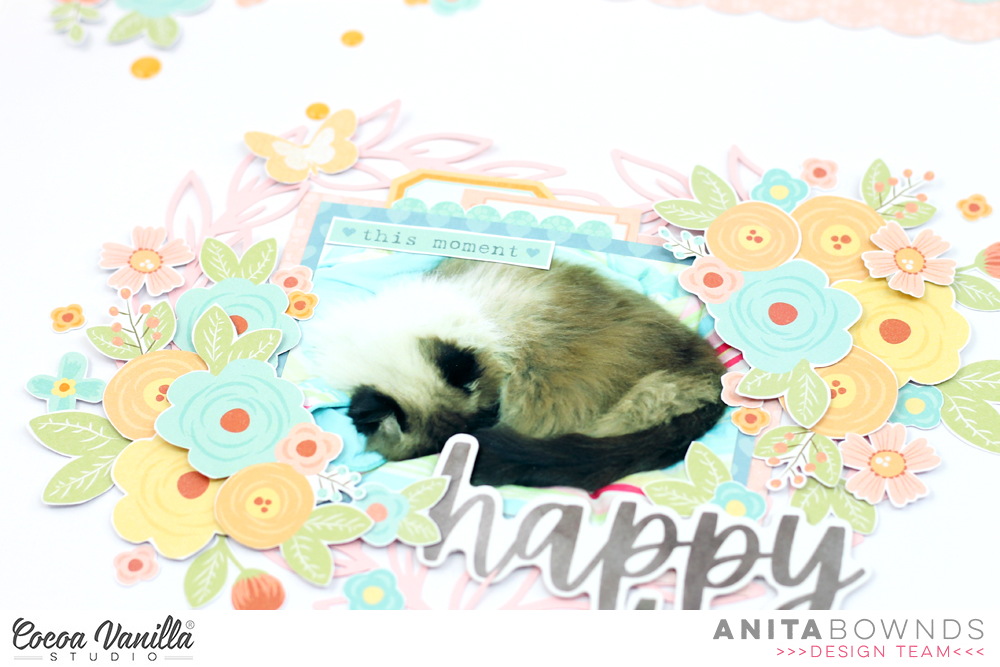
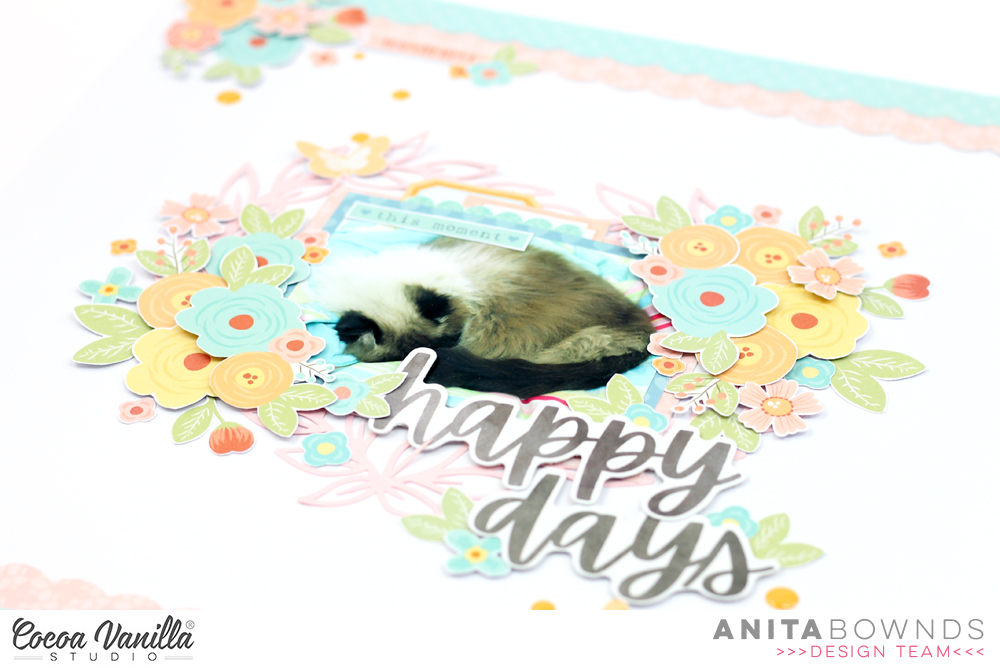
Hi crafty friends, Anita here sharing a layout for throwback Thursday for my layout today I’ve chosen the life is beautiful digital collection all printed on paper specially for digital art … and then all fussy cut out..
I started of by printing out the paper and ephemera pieces and then fussy cutting it out it did take some time to cut out all those flowers but Netflix seems to make the time go quicker..lol
I adhered 2 strips of pattern paper with a scallop border at the top and bottom of the layout and started adding clusters of florals.
Then next I used my cameo and light pink cardstock to cut out a heart leaf wreath from @neatncraftycutz and adhered it in the Centre of my cardstock and then I matted my photo on pattern paper and adhered it in the middle of the heart and added a few bit of ephemera tucked in the top of the photo layouts.
Then I started layering more flowers on 2 sides of the photo building the cluster , I also used the cardstock titles from the day dream collection to add my title underneath my photo and I tucked a few more flowers and leaves around it.
Then I finished off the layout with a few butterflies and enamel dots.
Hello Friend. It’s time for Throwback Thursday kind of a post and you all know I really like revisiting older CVS lines. I have few favorite ones, like “Hello sunshine”, “Life is beautiful” or “Sugar and spice” but I also like to mix collections to use them up to the single piece. Today I want to share with you layout made mostly with “Life is beautiful” with minor elements from some other lines.
This collection is already unavailable but you can still purchase super cool digital kit and print papers and embellishments at home. Element I like the most in “Life is beautiful” are colorful flowers in whimsical shapes. They are easy to fussy cut and look great on any project. I cut out few of them and composed them with papers and photos to make this layout.
We recently got back from our summer vacation in Britanny, France and I have so many fresh photos to scrapbook. This layout is about our visit at Mont Saint Michel. I snapped few photos of Maja posing in front of this amazing monument and I needed to scrapbook how adorable she is. I lined all my elements in one line, creating kind of the vertical banner, composed of papers and photos.
I mixed in few small labels and words trying to keep everything quite simple. Pretty yellow, orange and blue colors worked with my pictures perfectly. I added machine stitching at one end, anchoring my composition to the base paper.
Adding few enamel dots from various collections and some splatters was the last step in my creative process.
That is all for today. I hope you like my page. I encourage you to dig in your stash and rediscover some older products too. Many of them can be combined with new lines. That way you can finally use them up and make room for some more goodies :)
Thank you for stopping by and see you in two weeks.
Hello CVS friends today I have a layout that although the subject matter is of a more serious matter it doesn’t mean it can’t be pretty! I have used Life is Beautiful (Digital collection available) collection, which remains one of my fav CVS collections.
Let’s talk about texture. If you are not a fan or experienced in mixed media how do you add texture to a layout? I focused on texture when creating this layout. Paper tearing is one way to add texture, and paper tearing also allows you to add elements under and over the tears which also adds more visual impact.
Another way of adding texture is to sew on your layout, either by hand or using a sewing machine. I always add machine stitching to my layouts. Another technique with stitching is sewing over a strip of paper and then tearing the paper away from the stitching.
Paper layers, dimension (ie foam tape to attach some elements and enamel dots) and a light spray of paint (here I have used black) all add texture to a layout.
Recently I have dusted off my embossing folders and started to add texture to papers and elements using various embossing folders. So my 2020 did not look ‘flat’ I embossed with a polka dot folder and added dimension fluid dots which I also added over my title also.
I really enjoyed putting this layout together focusing on textures! I also wanted to scrap a part of the Covid 19 journey that I am involved in, because memory keepers is what we are.
Thank you for stopping by today and keep safe and well!
Hello everyone ! It’s Sophie here and I am sharing a sweet layout with you today.
For today’s layout, I used a digital Cocoa Vanilla kit ! It’s the “Life is Beautiful collection“. I fell in love with the color scheme of the collection and all the gorgeous patterned papers and embellishments ! I printed them with my very old printer on good quality paper, and it gave beautiful results !
I started with an easy mixed media background. I call it the “reverse packaging technique”…
I put a few splatters of ink on a 12 x 12 plastic package, add a little bit of water and press my thick white cardstock on it. It always gives interesting results, and it was my starting point for the design of my page.
I teared a part of the beautiful coral-pink patterned paper to put on the left side of the page and did a little bit of stitching with matching thread.
I backed my photo with tissue paper, adhesive foam and a few layers of patterned paper for dimension and interest, and fussy cut plenty of beautiful embellishments from the same collection that I scattered around my photo.
I put a banner and the fussy cut word “Happy” for my title and a few butterflies for which I only glued the center to make their wings pop.
I wrote down my journaling and added the date, as well as a few Nuvo Crystal Drops.
Here are more close-ups:
I hope you felt inspired by my page today ! Digital products are a great alternative for collections that are no longer accessible and you can get them right away on your computer ! But don’t forget that they are all for personal use only !
Thank you so much for passing by the blog today, and happy creating !
Hi everyone! It’s hard to believe we are mere days away from Christmas isn’t it? I hope your preparations are going well and that you don’t have too much left to do.
Today is my turn to share some of my favourite projects that I created during 2019. I am starting off with a layout that features the stunning ‘Happiness’ collection that was released earlier this year. I adore this range, with all its bright colours and beautiful florals. This page also features a photo of myself and a few of my crafty peeps that was taken at a retreat, bringing back some fun memories too.
This layout was actually inspired by a page from my fellow team member Gwen, as part of a “scraplift” theme that we did earlier in the year, and I love how it turned out! I even got my scissors out for some fussy cutting for this page, because those flowers were just begging to be cut out! One of my other favourite things from this collection is definitely the Clear Stickers – especially all the “painty” style ones!
You probably already know that as a mum of twin boys that I am partial to a good boy page; so for my next favourite, I couldn’t go past this mixed media layout of my dynamic duo using an old favourite – the ‘Totally Rad’ collection from 2016. I actually created this one whilst I was at the Cocoa Vanilla retreat, and besides the end result, I think I also love it because I created it whilst I was so relaxed and in such good company. (Seriously, if you have never been to a retreat before, make sure you put it on your bucket list!)
Despite the fact that this collection is no longer available, there is good news for fans of this range that may have missed getting their hands on it. This collection was recently released as a digital range, which you can purchase to print and cut at home! It includes all the papers (which are easy to print A4 size on a normal home printer); all the cool elements, and Zoe has even included three A4 sized ready to print PDFs, so you just have to print them off and cut them out. You can find the bundle in store HERE
My final favourite layout from this year also featured one of our older collections – ‘Life is Beautiful’ and a photo of my daughter and one of her best friends. This range was released waaay back in 2015, and to date it still remains a firm favourite of mine. The colour palette is just SO fresh and pretty, with the navy, aqua and apricot colour combination.
This layout is also a favourite of mine because it features butterflies. (And anyone who has seen my tattoo will already know how much I love butterflies.) I created these large layered butterflies using cut files from Cut to You, which I coloured with Distress Oxides, backed with some of my precious patterned paper scraps, then topped with butterfly stickers from the Accessory Sticker sheet. Combined with fussy cut florals and just enough ink splatters, it makes my creative heart happy. (This range is also now available as a digital collection and you can find it HERE)
Finally, I have to give a mention my other favourite project from this year that wasn’t a layout at all. It was the mini album that I created recently using the ‘Boys Rule’ collection for one of my sons to document the time following his premature birth. This one invoked all kinds of memories as I put it together (both good and bad) and truly was a labour of love.
You find my post with all the details of the album HERE or watch my flip through of the album below.
That’s all from me today, wishing you & your families a very merry Christmas! I hope you get a chance to spend quality time with the people you love most, and make plenty of happy memories to document later. XX


 Let’s talk about texture. If you are not a fan or experienced in mixed media how do you add texture to a layout? I focused on texture when creating this layout. Paper tearing is one way to add texture, and paper tearing also allows you to add elements under and over the tears which also adds more visual impact.
 Another way of adding texture is to sew on your layout, either by hand or using a sewing machine. I always add machine stitching to my layouts. Another technique with stitching is sewing over a strip of paper and then tearing the paper away from the stitching.
 Paper layers, dimension (ie foam tape to attach some elements and enamel dots) and a light spray of paint (here I have used black) all add texture to a layout.
 Recently I have dusted off my embossing folders and started to add texture to papers and elements using various embossing folders. So my 2020 did not look ‘flat’ I embossed with a polka dot folder and added dimension fluid dots which I also added over my title also.
 I really enjoyed putting this layout together focusing on textures! I also wanted to scrap a part of the Covid 19 journey that I am involved in, because memory keepers is what we are.


