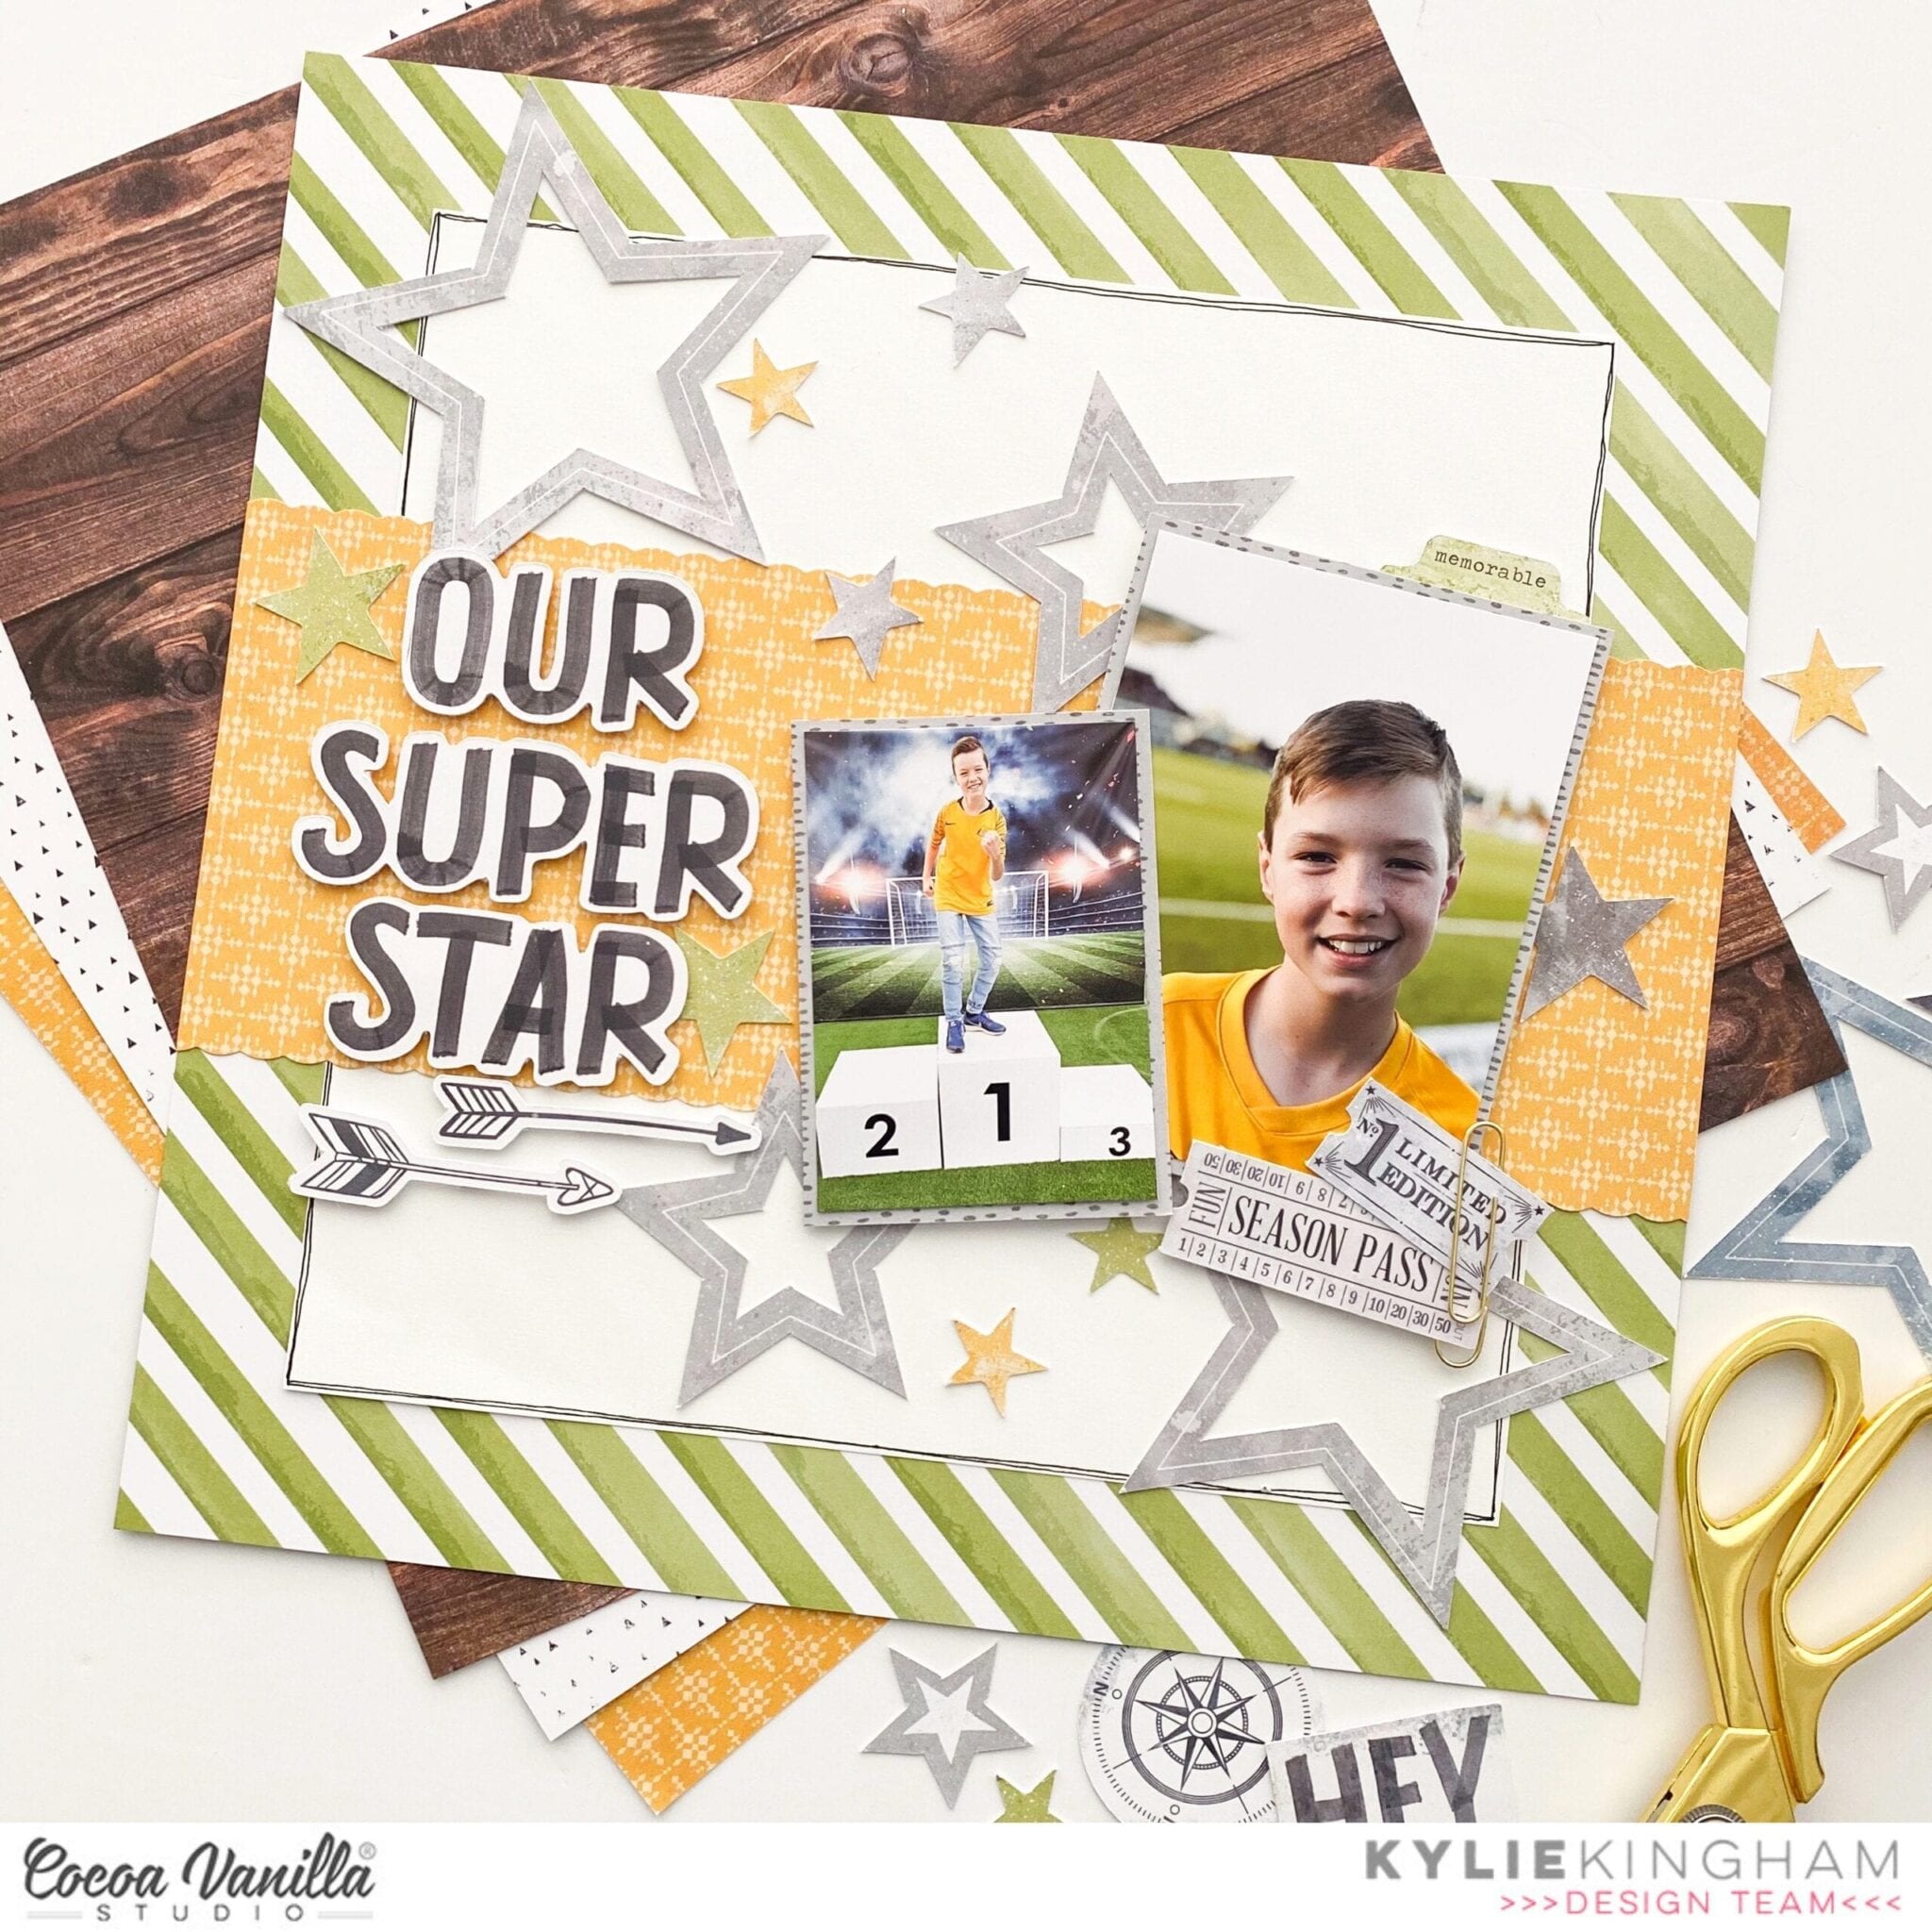
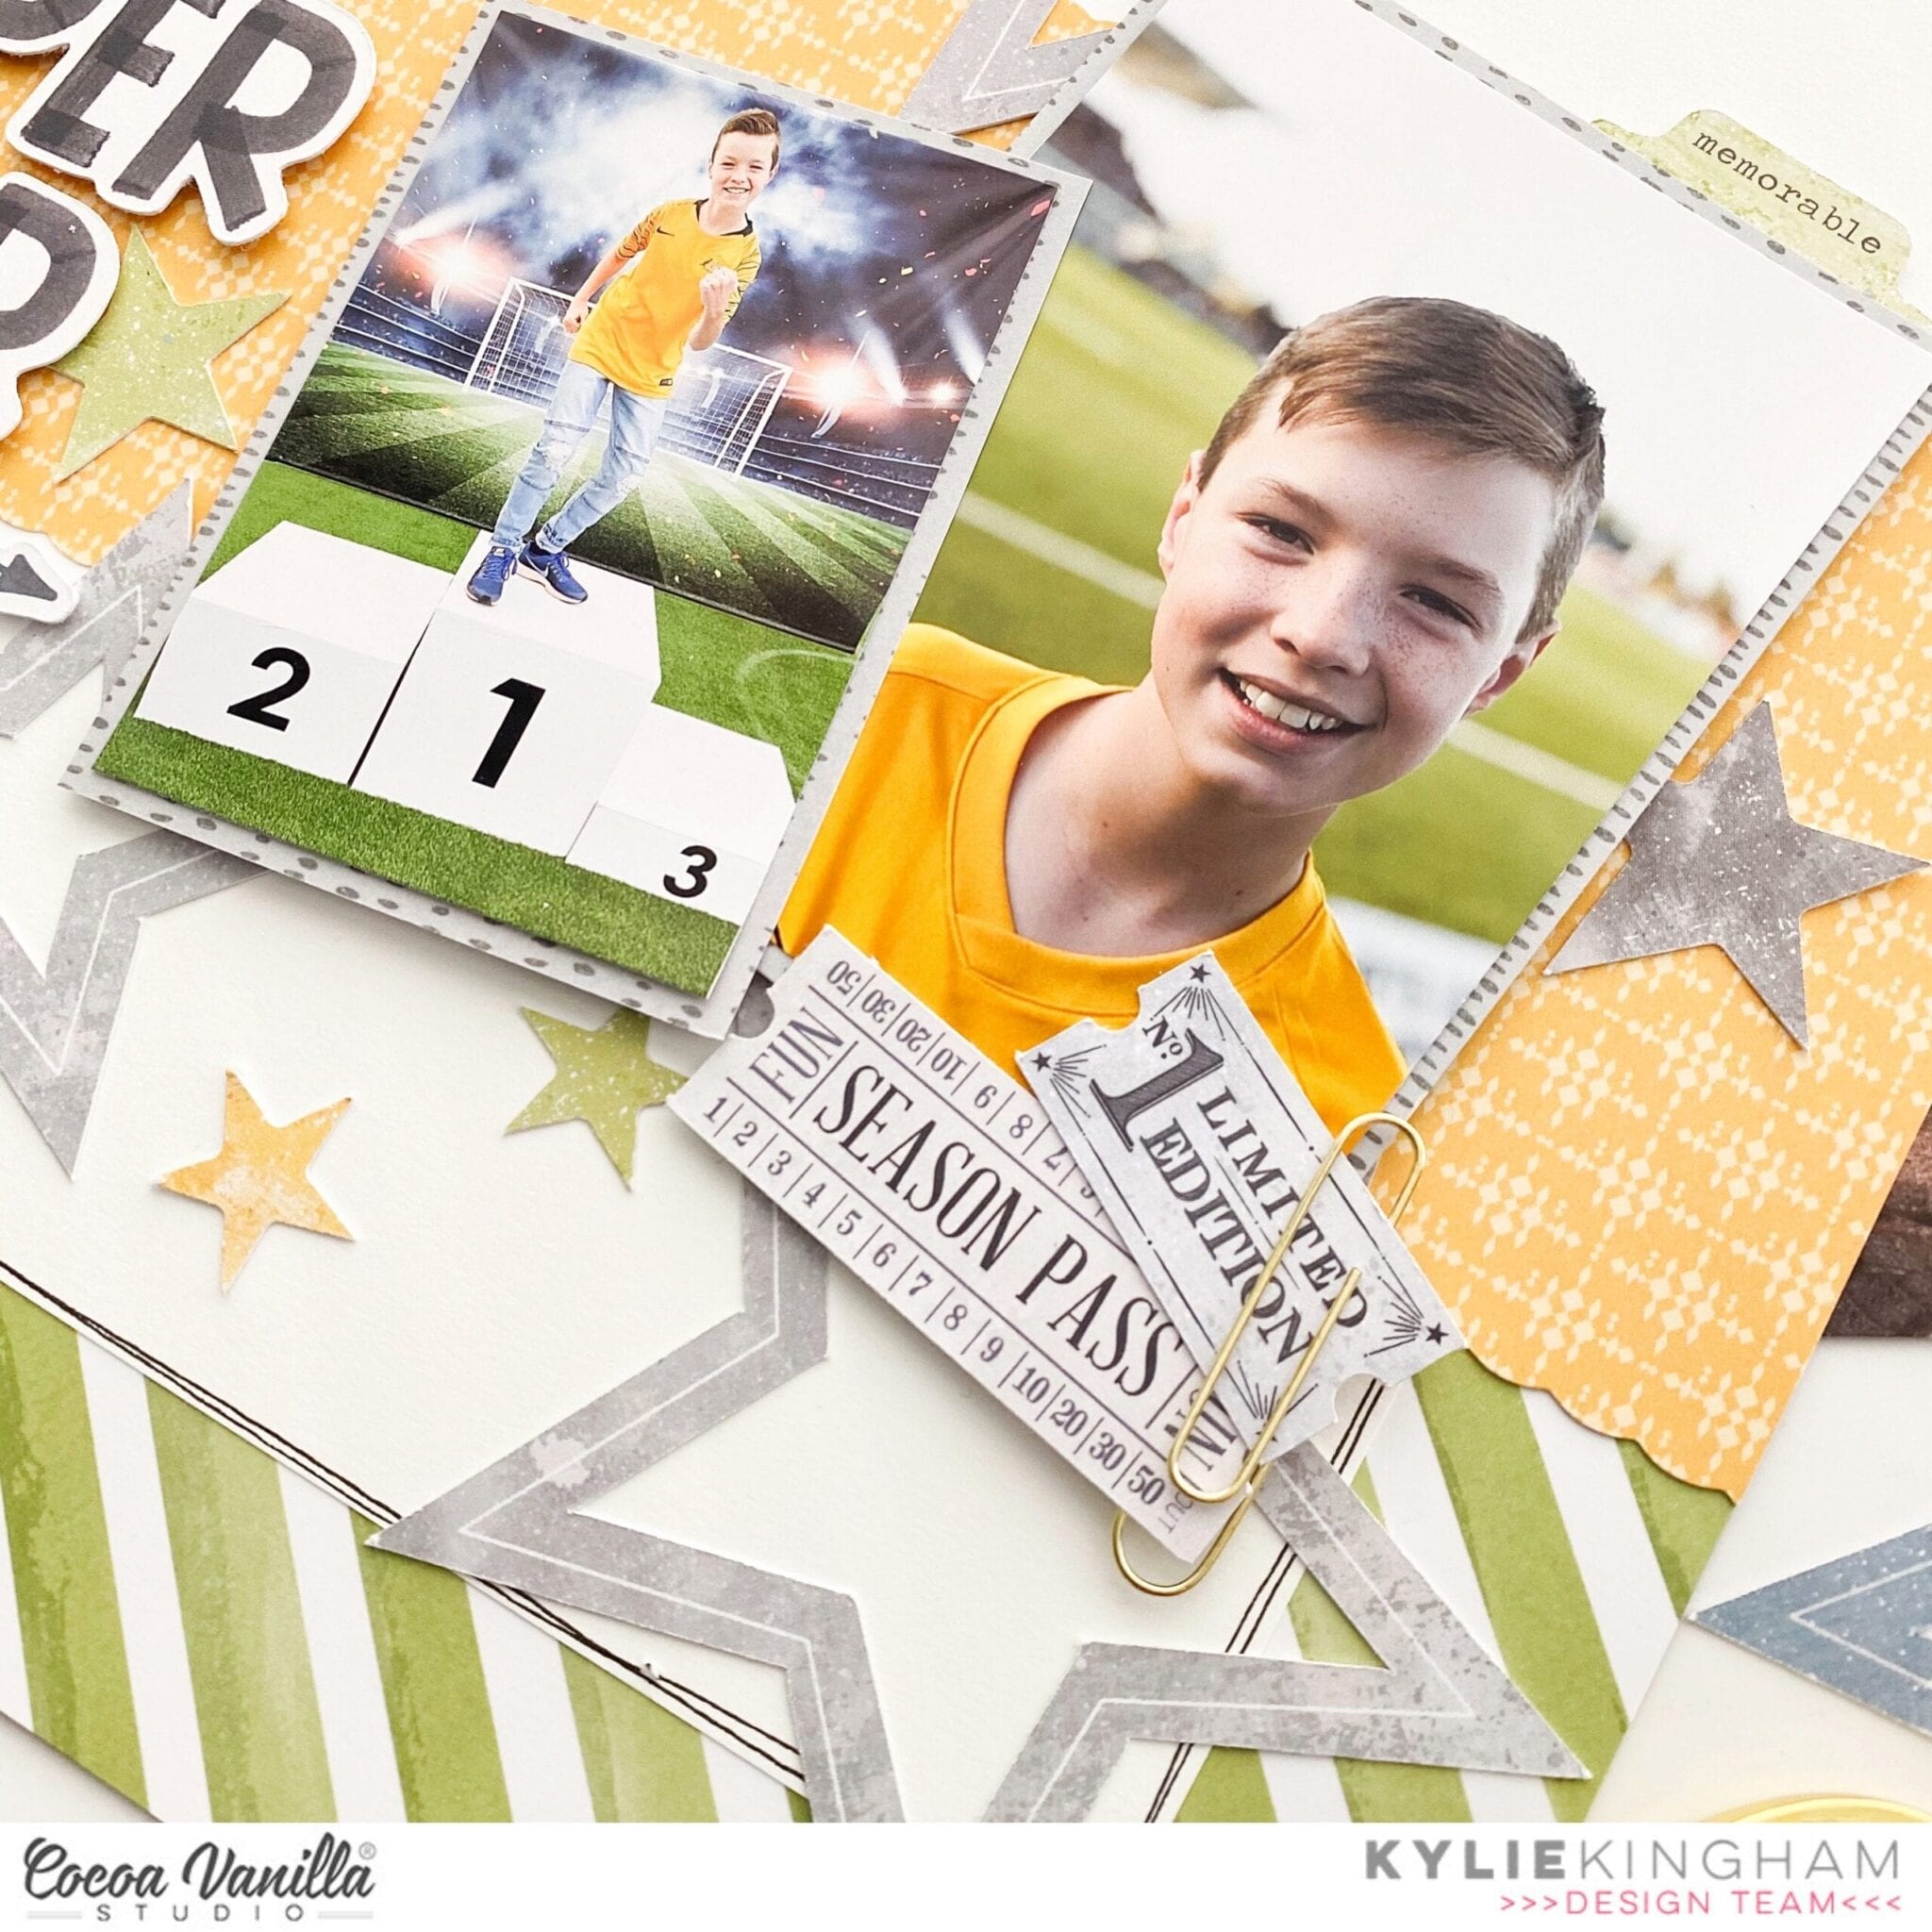
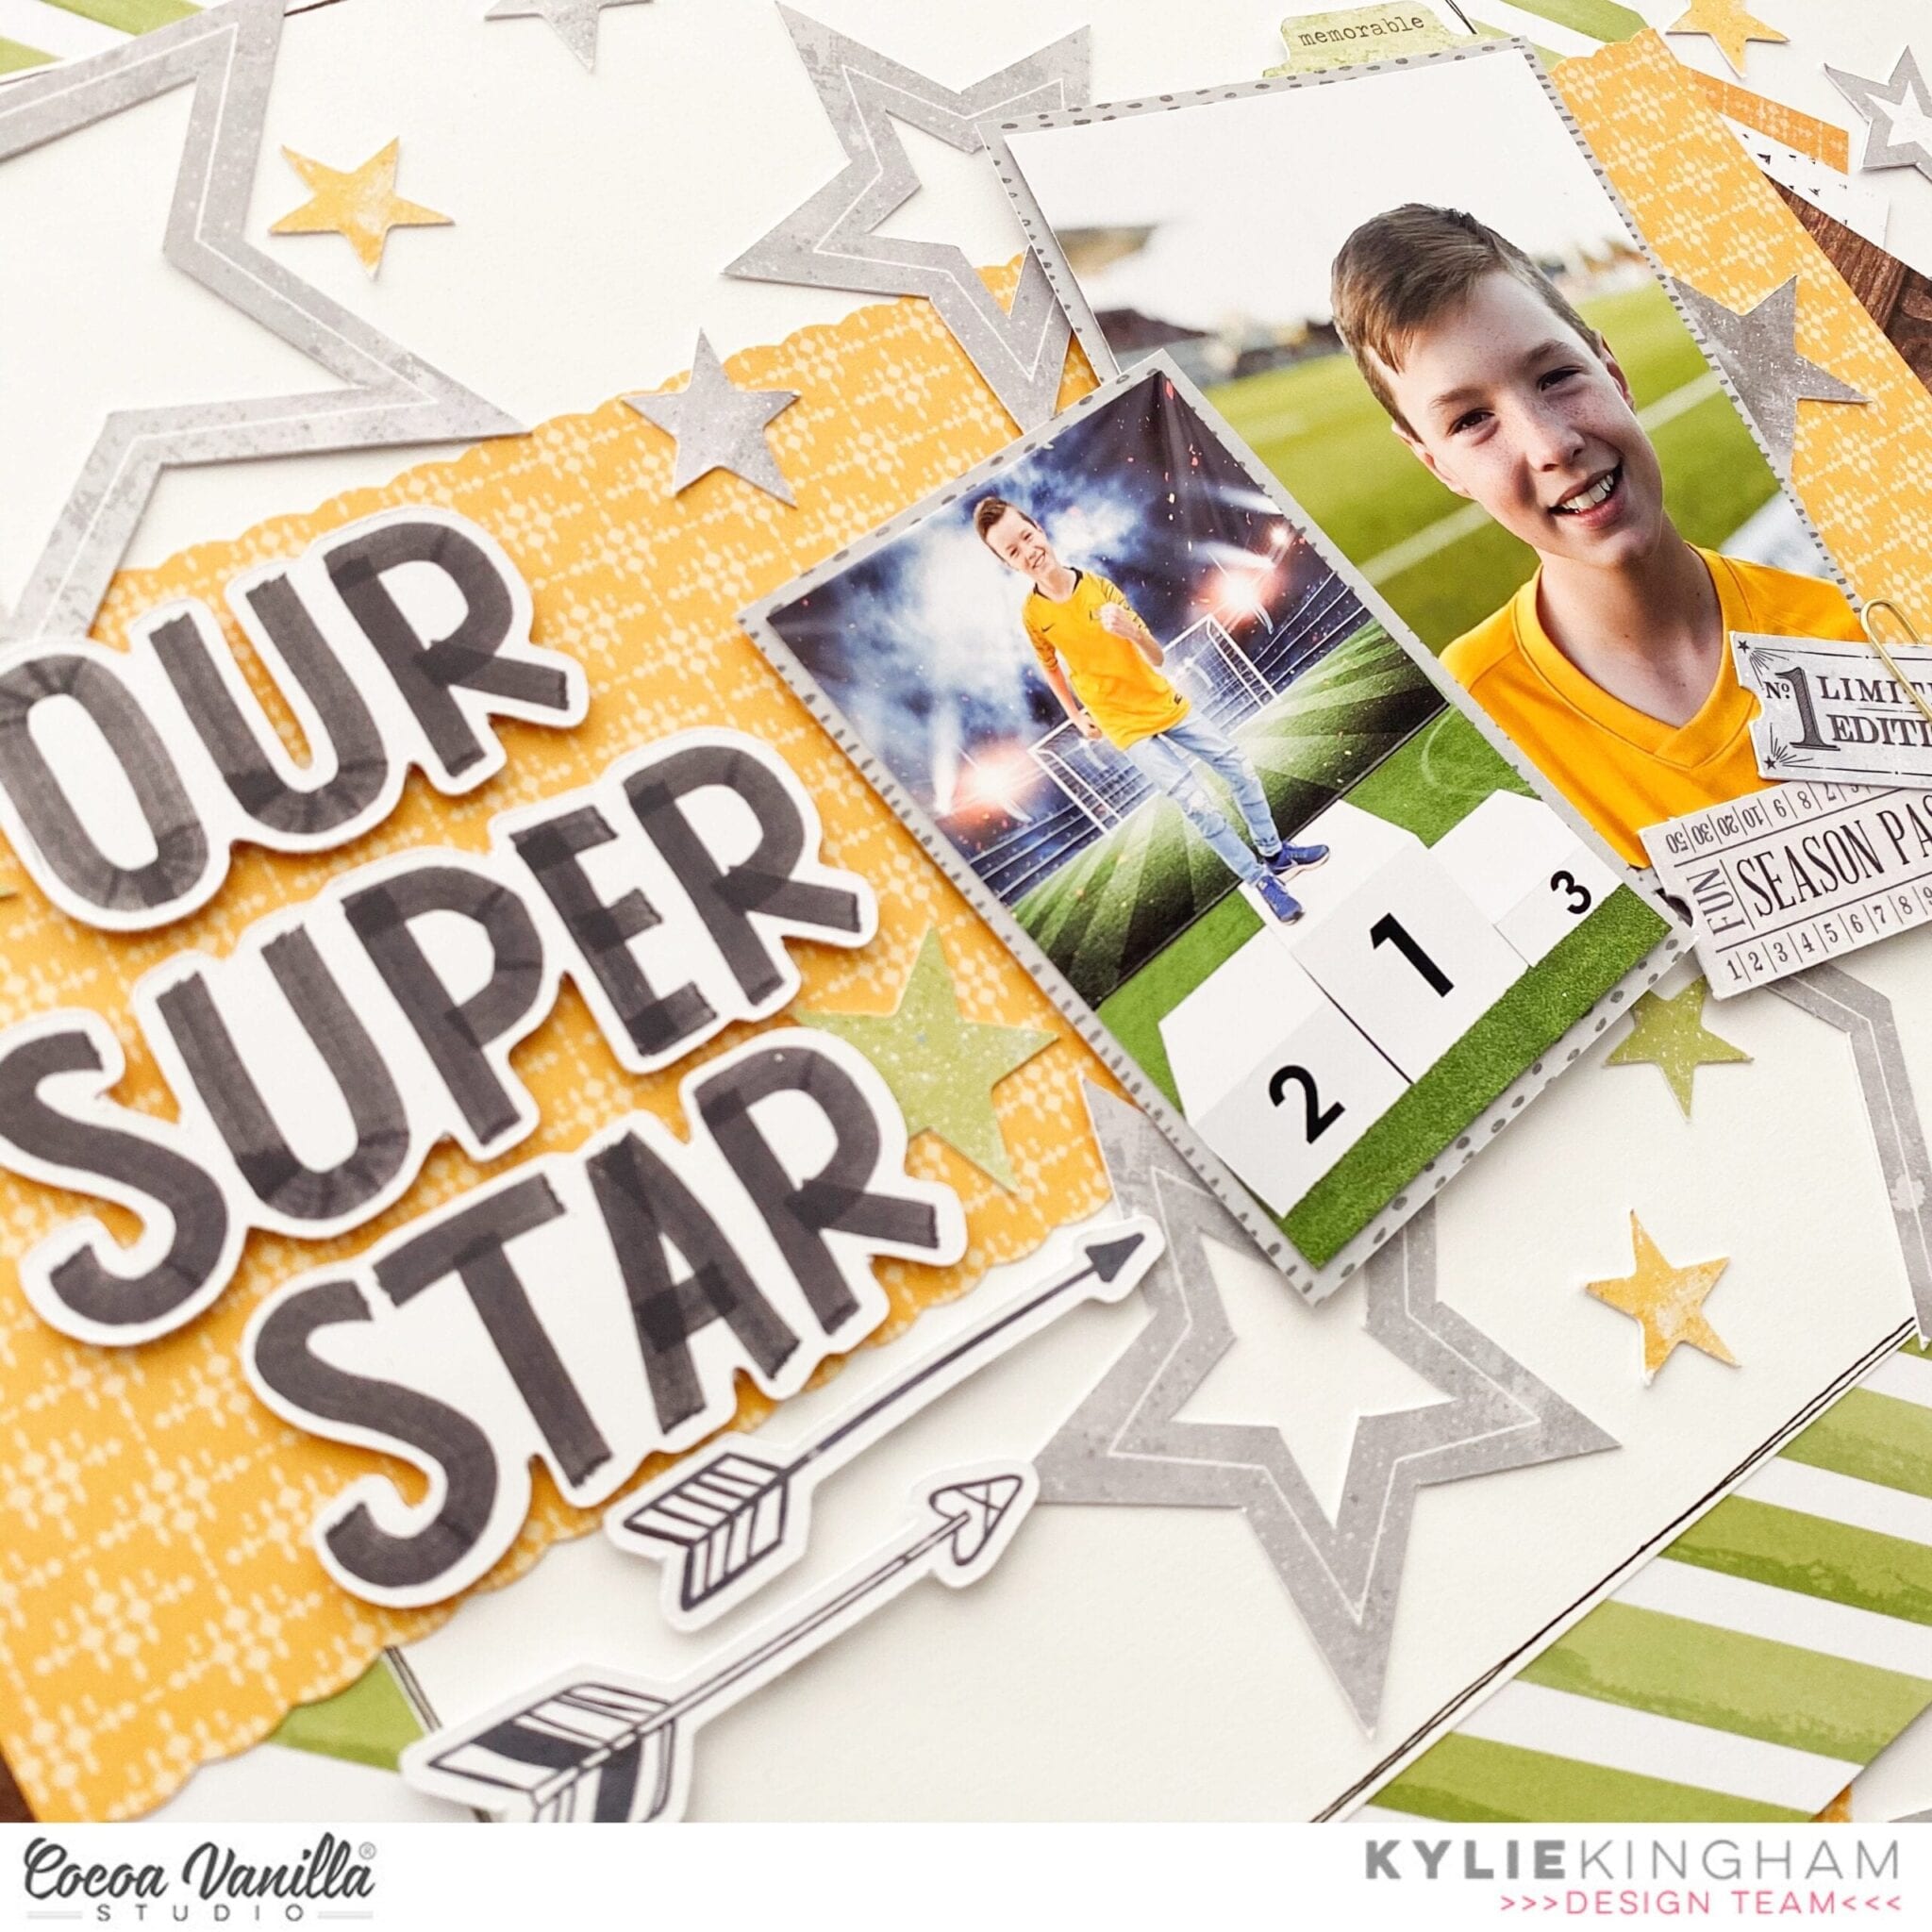
It’s Tarrah back with you today to share a new boy themed scrapbook layout featuring my youngest son and the awesome Legendary collection. The inspiration for this layout definitely came from the awesome circle die cuts in the ephemera pack and the journal card from the Epic Tales paper that says My Sun, My Moon and All of My Stars. I knew that I had the perfect photo to go on this layout. It is of my youngest son sitting in front of a moon and star background at Luna Park.
I chose to pull similar colours from the journal card and use these throughout my layout, the orange, blue and grey colours really spoke to me for this page. I added some subtle grey mixed media to a sheet of plain white cardstock and then began to arrange the elements how I felt they looked best. The ephemera pack is amazing value with so many awesome pieces to help tell your story and enhance your design at the same time!
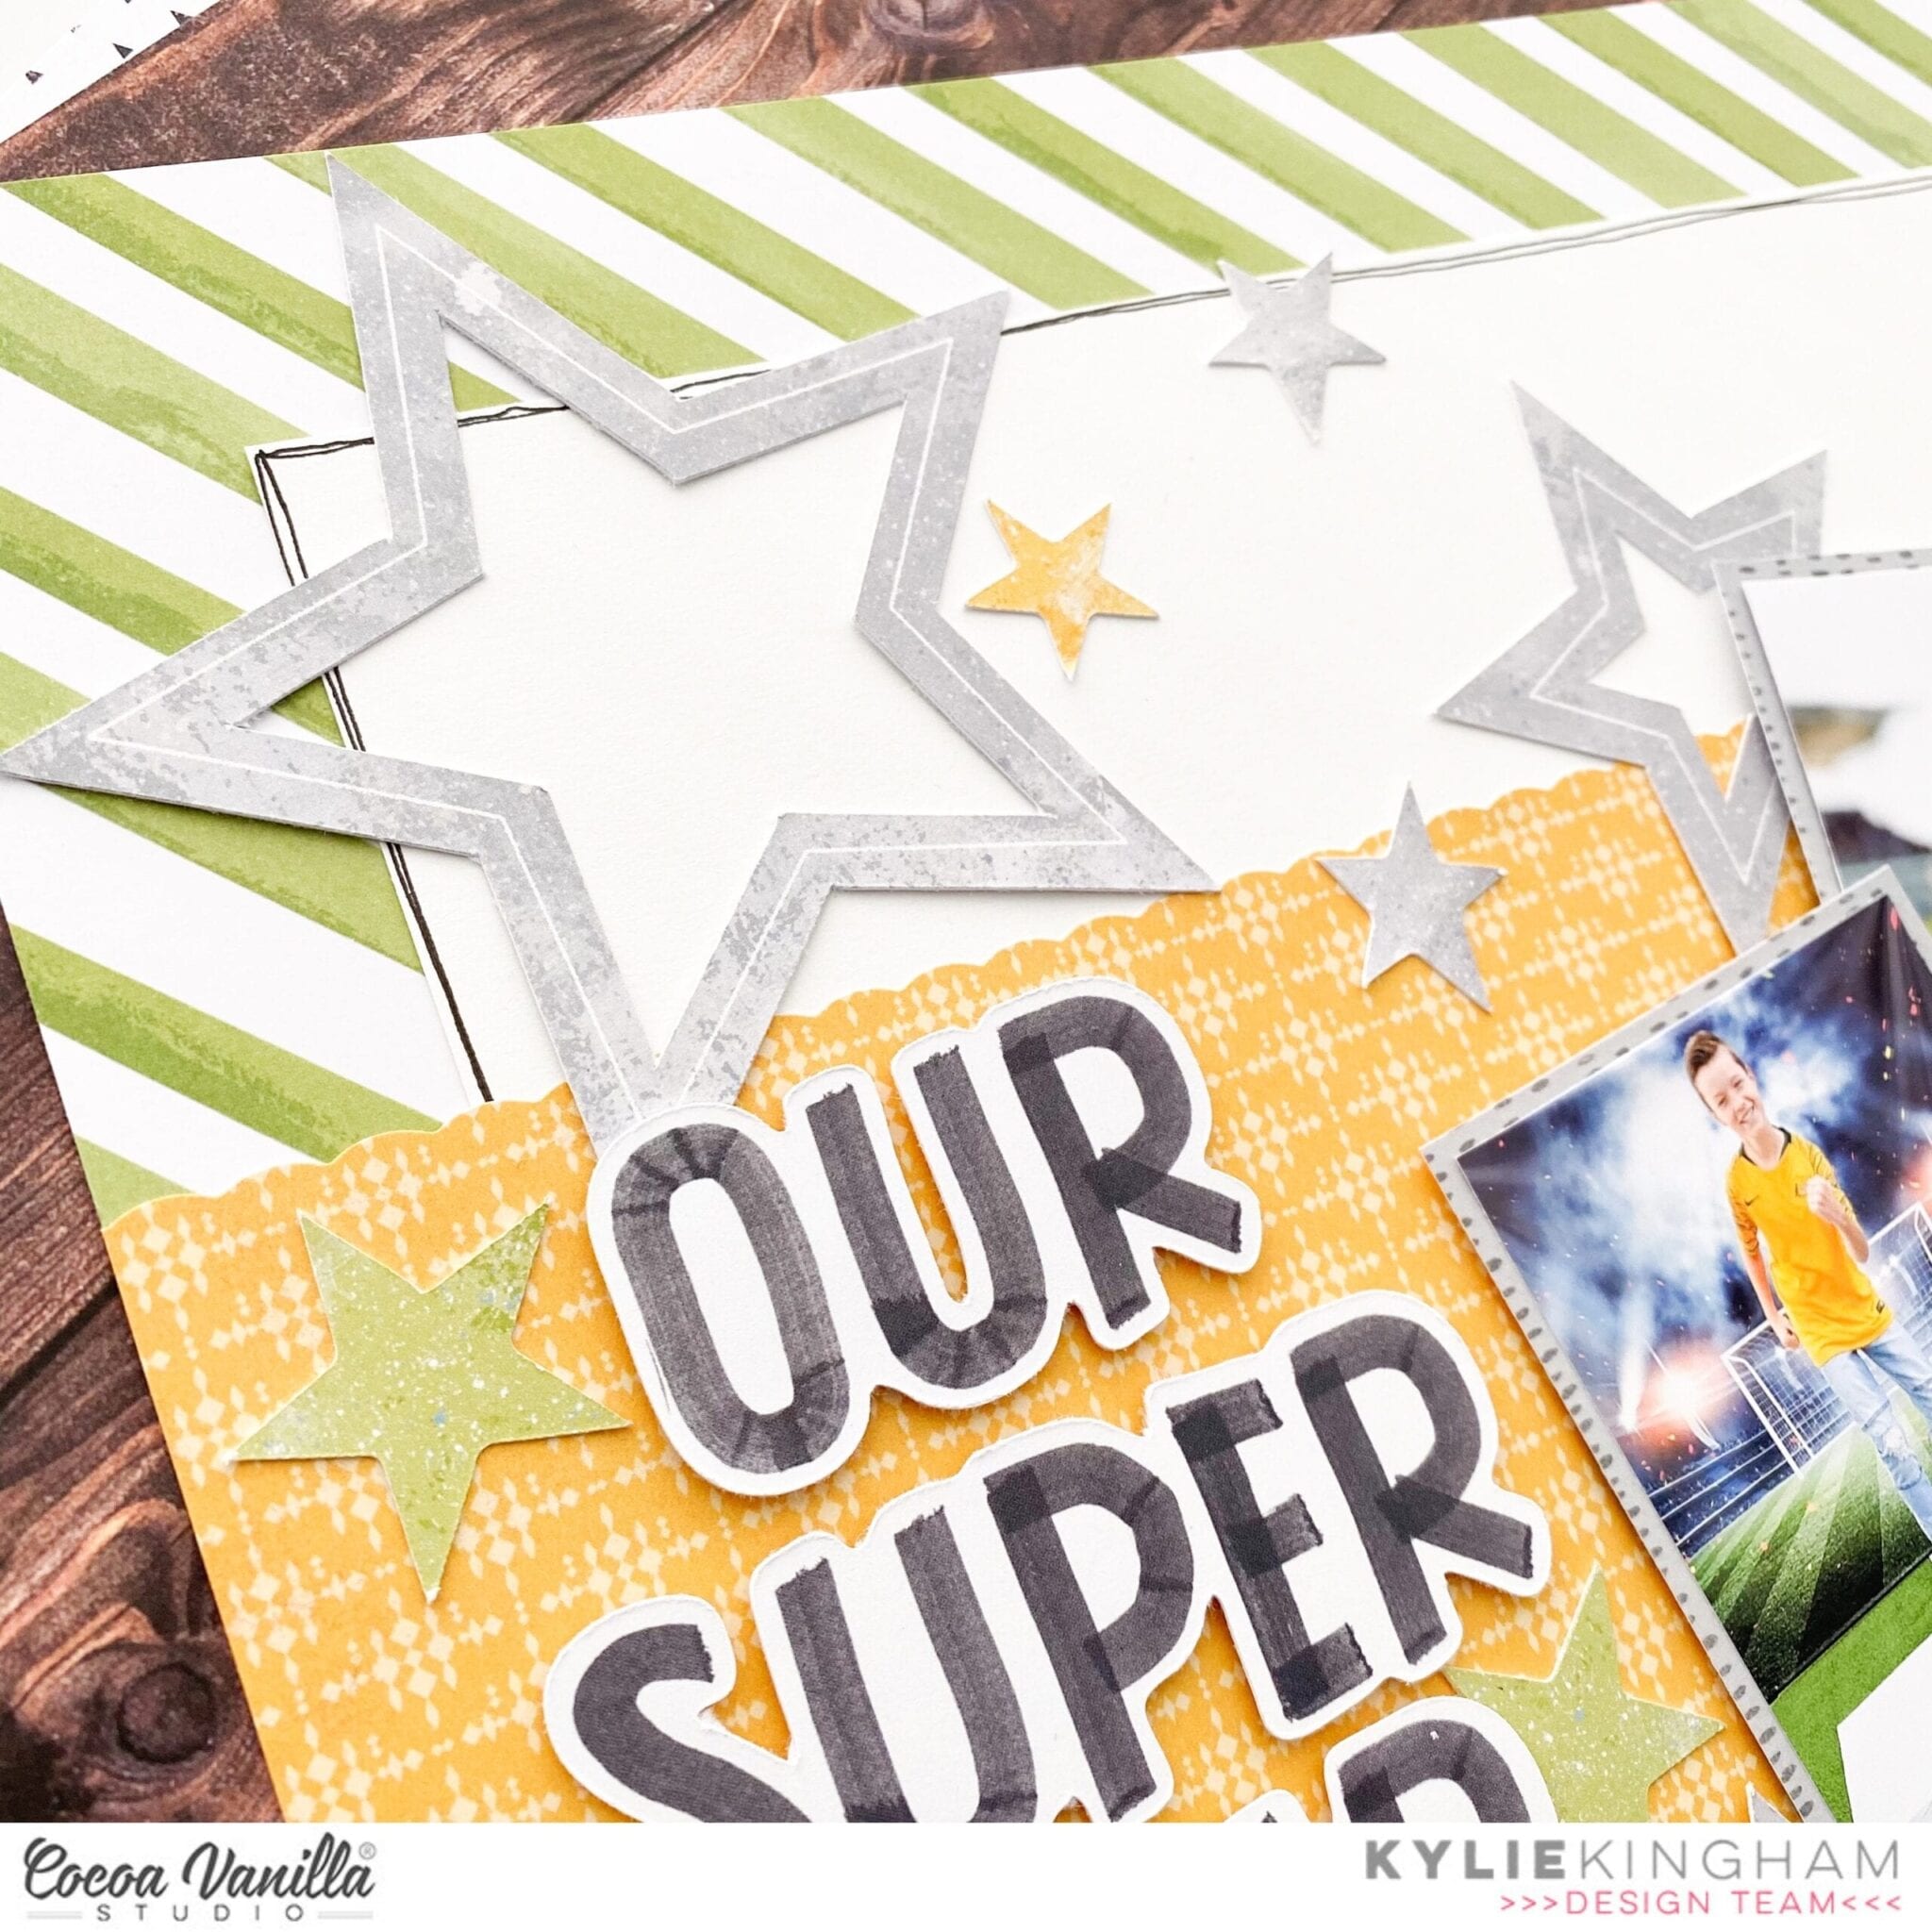
I fussy cut the journal card into a round shape to fit in with all the other elements on the layout. I also cut my photo into a circle and adhered one of the circle frames on top. Of course there had to be stars on this layout too so I pulled out a few large and small ones from the ephemera pack and arranged them amongst the circles.
Once I had most of the larger elements adhered to my page it was time to add some smaller embellishments like some accessory stickers, clear stickers and enamel dots! All of these smaller details were added in and around some of the larger elements on my layout to help draw your eye in.
Lastly I added some sprinkles of black mist and stamped the date. I then trimmed down the white cardstock and framed it using one of the grey patterned papers from the Legendary collection.
Thank you so much for stopping by today, I hope you enjoyed my layout and that you were inspired in some way? Make sure to check out the amazing Cocoa Vanilla Studio online store for the Legendary collection and so many more amazing collections.
Hey y’all! Laura Alberts back again with a fun boy layout! This is an update for my son’s album of his new style, glasses and very long hair. I used the gorgeous Legendary collection, especially the All Star patterned paper and the die cut ephemera. Starting with the larger stars, I created a border on either side of my photos that frame the images in the center. I added gradually smaller and smaller stars, many punched from scraps leftover from previous projects! To add a bit of detail, I added dots of Nuvo for a splattered effect.
I used the die cut titles that accompanied this collection for my “Cool Dude” as well as a phrase sticker from the 6×12 sticker sheet. In the gap between the photo and the title, I squeezed in a quick note about his updated appearance, which has changed quite a lot in the last year! Enamel dots were perfect to add a bit of dimension to some of the stars as well.
On a few of the larger stars, I added small word phrase stickers with angles cut into the edges or arrows from the die cut pack. I love the way this mix of colors worked so well with my photos and was glad to find some of the scraps I had punched were red, which is a common color for my boys to wear! Once I added a neutral border to contain all the flying stars, it felt complete!
I hope this star-filled layout inspires you to look at your scraps a little differently! You can use punches and fussy cutting to use up even the smallest bits and pieces in a collection! To see how the “Cool Dude” layout came together, check out the process video below!
Hello Friends! It’s Kylie back with you all today with a fun new layout to share! The theme on the blog today is yellow and green and I had the perfect set of photos to document of my son from the Soccer World Cup a few years ago! Of course I couldn’t go past the awesome ‘Legendary’ collection to use for my design.
I chose the EXPLORER and WILD ONE papers which matched perfectly to the colours of my photos. Using a sheet of white card stock from my stash, I cut it down to 20cm x 20cm and adhered it centred to the EXPLORER paper. With a fine tip black marker, I drew a free hand border around the very edge of the white. Next, using my wave trimmer board I cut a 14cm strip of the WILD ONE paper and adhered it horizontally through the centre of my page.
The stars from the die cut pack made the perfect back drop and embellishment for this page. I chose to keep a fairly neutral tone and went with mainly the grey as I really wanted the green and yellow of the papers to shine.
I know I keep saying it, but I do love a large page title. The die cut title pack is perfect for constructing a title to suit your page. There are so many ways to format the inclusions from the pack. For my page I chose ‘Our Super Star’.
Thanks so much for stopping by the blog today! I hope you have enjoyed seeing my latest page design!
Hello Cocoa Vanilla maniacs. I have a pleasure to open a RAINBOW LOVE week over the CVS blog. I bet you can imagine my excitement when I saw this theme. I am hudge rainbow fan and I love mixing and matching many collections in one project. I ended up with very energetic page documenting first day of a brand new school year of my older daughter. She is already a sixth grader so it means only two more years before she will finish elementary school and move to high school. I am totally not ready for that moment.
I started making this page with a white watercolor paper sheet. I picked six Distress Oxide ink colors and made a rainbow rays with them, starting in the middle of the page. It’s a really easy and simple process. You can easily replace Oxides with any other inks. They just need to blend easily. After I applied the colors, I sprinkled everything with clean water to create few splatters. Ink reacted with water fading away which added some great texture to the background.
Next step was picking six papers in corresponding colors to layer them over mixed media background. I went through my CVS stash and picked orange and yellow papers from “Legendary”, green and blue from “Boys rule”, pink from “Happiness” and purple from “Bohemian dream”. I run them through my Silhouette Cameo and cut simple arrows in different sizes in each color.
I glued them over the backgroun color on color. Last step was to place the photo with some embellishments around it. This time I gathered 6*12 sticker sheet from many older and newer collections and picked few labels and tabs to add them under the photo. I didn’t want to cover too much of my background.
I went through my collection of enamel dots, also from the previous collections, and placed few of them between the arrows, also color on color.
It was such an easy and fun page to make. I can never say “no” to all those juicy colors. If you want to learn how it was done, you can watch a process video I recorded for you.
I hope you will join in this colorful madness and create your own rainbow. Thank you so much for stopping by and see you in two weeks. I will finally be able to share with you a project made with brand new “Daydream” collection. It just arrived to my doorstep and I am over the moon excited.
Hey everyone! It’s Anna here, sharing this monochromatic layout with you today, featuring the Legendary collection. Two months ago my sister had a baby boy, and we are very happy because is the first boy in the family!! My parents have two girls (me and my little sister) and I also have two daughters. So, at last, we can say “hello boy!”. For this layout, I was inspired by the stars in the picture.
First, I used the distress oxide inks and the plastic technique to make my background in a watercolor 12×12 sheet. I did it with different shades of blue and also add some splatters. I wanted it to look like a sky.
I spread some stars diagonally, from top to bottom of the page. I took them from the Die Cut Ephemera, the Clear Stickers, and also fussy cut some stars from the All Star paper. I put foam dots behind a few stars to add more dimension. In between the stars, I also glued some enamel dots.
On top of the page, I stacked two strips from the Offbeatand Epic Tales papers. I cut the Offbeat paper a little bit crooked, and I used a stamp with white ink to simulate a machine stitching. It’s subtle but I think it gives an extra touch (and I didn’t feel like taking out the sewing machine).
For my title, I used two words from the Die Cut Titles which I raised with foam dots and a phrase from the Clear Stickers. I embellished it with a die cut star and a flair button that matched perfectly with the color and the stars. I don’t usually write journaling on my layouts, but this time I did it. Below it, I placed another die cut that says “legendary”.
With the All Star paper I matted my picture. Behind it, I put some tissue paper too and foam to raise it up. Two more die cuts and another one for layering, and that’s it!!
Once in a while I enjoy making a monochromatic layout, it’s kinda challenging for me. I hope you like it and thank you so much for stopping by today!
It’s Sophie with you today and I have a beautiful layout to share !
This week’s theme is “Outdoor Adventures” and I thought right away that I wanted to create a layout highlighting the amazing trip to Italy that we did last year. We went to the Dolomites, and literally fell in love with this part of the Country. The mountains, lakes, the hikes, the beauty of nature, Ahhh… I can’t wait to go back…!!
The Legendary collection, with its color scheme and embellishments was the perfect collection to document my page.
I started with the Legendary Offbeat Paper as my background. I applied only a thinny bit of dry yellow-orangy ink to the center of the page where I planned to put my photo.
I backed my photo with tissue paper, adhesive foam and the back side of that same patterned paper (yes, thankfully I had two sheets !).
I used a JustNick digital Cut file that I cut on white cardstock and backed with many patterned papers from the collection (Outdoors Type, Total Legend, Wild One and One Way papers). I used adhesive foam on the back of the cut files to make them stand out a bit more and arranged them around my photo.
Finally, I wrote down my journaling directly on the background, added a few more embellishments and some enamel dots, and stamped the date on a colorful Legendary Accessory Sticker.
Here are a few more close-ups !
I truly hope that my page has inspired you in some way. The Legendary collection is so versatile, I am sure it will suit your next design !
Thank you for passing by, and I will see you again soon !
Hi there Cocoa Vanilla fans! Danni here with a bright and happy outdoors themed layout to share with you, using none other than the Legendary collection. This collection has just been absolutely perfect to get all those outdoor adventures documented! This time I have created a multi-photo layout to document my son and his little friend’s sandpit adventures.
I based my layout around this fab sunny sky background cut file, which I cut on a dark blue cardstock on my electronic cutting machine. I knew I wanted to use a light background and I knew the blue would really pop, plus I just love using coloured cardstock! I backed the suns and rainbows in the cut file using patterned papers Total Legend cut apart side and Wild One.
I then decided I wanted to play with some vellum and art media for the clouds. I took some plain vellum, then an iridescent gel medium which I applied first with a paintbrush, then a sponge (I did not find much difference either way) to turn my vellum into a shimmery metallic translucent finish. I love this effect! It was so easy and looks so pretty. Once the vellum dried, I used it to back all the clouds in the cut file.
Next my background. I chose Epic Tales patterned paper for a lovely light bright base, then added a border of Total Legend patterned paper to pull in some of the bright blue from the photos. To avoid the vellum looking invisible on the white background, I spritzed some light blue mist onto the paper roughly in the places the clouds would go. I also added some burnt orange ink splatters for a contrasting colour.
I added some simple photo mats using Wild One and One Way patterned papers and arranged my photos in a diagonal line across the page. My title was easy thanks to the die cut titles – I simply chose ‘Best Buddies’ and added the titles either side of my photo line. So simple!
I chose some of the tags, tickets and banners from the die cut ephemera and theaccessory stickers to embellish around the top and bottom photos, keeping to that diagonal layout. I added my journaling and date on label stickers, then used my very last enamel dots to add some detail to the corners of the photos. I don’t know about you, but it feels so good to use up the last few bits of a scrappy supply – luckily, I have a backup packet!
Thank you so much for joining me today. I hope you enjoyed following the process as much as I enjoyed making it! I have a video linked below if you would like to watch as well. Happy scrapping!
Hi Cocoa Vanilla fans! Danni here, back with another layout using the incredible Legendary collection. This one is a super simple dimensional rainbow layout that doesn’t require any fancy equipment, just a pair of scissors! I added some machine stitching for extra interest, but that step is definitely optional.
I started with a white cardstock background and added a border with Wild One 12×12 paper to echo the rainbow theme. Next, I cut curved sections of paper in the shape of rainbow arches with scissors, using a dinner plate as a template guide. I used One Way, Offbeat, Wild One, Explorer and Total Legend 12×12 patterned papers to get a good mix of mostly solid colours and spaced them evenly on the page so the white background showed through between each stripe. I distressed all the edges to hide any imperfections in my cutting and added some machine stitching along the edges of each stripe.
My photo is a very special one to me, of my husband and I walking with our son and holding hands. You can’t see any of our faces, but the love and feeling is still so clear. I kept the photo mats simple with a layer of plain vellum followed by Epic Tales 12×12 paper. I used a combination of accessory stickers, clear stickers and die cut ephemera to embellish around my photo. I especially love how the clear stickers really pop on a white background, so I took the opportunity to add several of them, including the watercolour brushstrokes.
I added a small cluster at the bottom of the rainbow to help balance out the heavy embellishment near the top of the page. I popped the die cut title “Adventure” up on dimensional foam and added some black alphas to complete my title, positioned underneath my photo.
I wanted to add some of the amazing stars from this collection to echo the star pattern on my son’s jumper, so I used a combination of die cut ephemera and fussy cut All Star 12×12 paper and added them around my embellishment clusters and title. I used a sprinkling of enamel dots to help fill in any gaps between the stars.
For a finishing touch I used some diluted black acrylic paint to add some splatters around my embellishment clusters. I find black splatters add the perfect bold accompaniment to the bright colours in this collection! Thank you for joining me today, there is a process video linked below if you would like to watch. Take care and happy scrapping!
Hi everyone its Melissa here and today I’m going to be sharing something a little bit different. Did you know that you can make your own Traveler’s Notebook inserts? I started doing this because I couldn’t purchase them here in New Zealand, and I found it a perfect way to feature beautiful patterned papers. I also love having control over the weight of paper inside the notebook. This is by no means my own idea, and there are lots of videos on YouTube for how to do this in lots of different ways. Anyway this way is definitely the lazy girls technique because no measuring is required, just an existing notebook to use as a guide. In terms of the actual making, I suggest you watch my process video (at the end of this post) where I demonstrate what you need and exactly how to create them.
I let each of my 4 children choose a patterned paper from limited selection from the Legendary and Unforgettable Collections to make each of the notebook covers. I was pleasantly surprised that two of my girls selected a paper from Legendary which tells me its definitely not just for boys!
Sam (age 13) ended up with the arrow paper by default, but I knew it would be perfect for a teen boy. I embellished with two cut aparts from Epic Tales, one that I tore in half and distressed the edges of, and the second that I fussy cut the word “EPIC” which was perfect for his cover. I did some subtle mixed media splatters and splatters on the background with some shiny mist. I finished his cover with a couple of Accessory Stickers, and I also used some of the Clear Stickers.
Here is a close up of Sam’s notebook.
Next up was Azaria (who has just turned 11), who completely surprised me by choosing the Brave Heart paper for her cover. She loves neutrals, so I decided to mix in some of the gorgeous Unforgettable, and based the embellishment of her cover off the cut apart from the Story Teller paper. I altered the cut apart by cutting off the floral pieces, distressing all edges and then glueing them back together. I love doing this!! I minimally embellished with some Clear Stickers and a Die Cut Ephemera piece. Edgy and girly all at once!
Here is a close up of Azaria’s notebook.
Next up was my girly-girl Brielle (6) who I knew had to have her entire notebook made from Unforgettable! She immediately fell in love with the Glorious paper! For her cover, I started with layering the wreath cut apart from Storyteller over a piece of paper from the 6×8 Paper Stack, and added a Clear Sticker arrow with a heart layered over the top. I distressed all of my edges of course! I needed something to break up the busy floral from the embellishment, so I used white acrylic paint applied with a dry brush, and I applied it very thickly. Once it was dry I added one of the Clear Stickers (cut in half), punched a tab and stapled it on, and my final touch was to add a clear sticker heart on the tab.
Here is a close up of Brielle’s notebook.
Onto the final notebook which was for Ava (3.5) who is my rough and tumble little girl. As soon as she saw the selection of papers in my hand she said “I want the stars” so the Legendary All Star paper was hers! I wanted to challenge myself to use more of Legendary on Ava’s notebook so I used a cut apart from Epic Tales. I distressed all of the edges like I did with the other three notebook cover papers, and for a subtle girly touch I added a Clear Sticker flower from Unforgettable and I totally love the resulting mix of grey and pink!
Here is a close up of Ava’s notebook.
I bound my notebooks by hand stitching with 3-hole pamphlet stitch, and the centre of the notebook looks like this.
And here’s a lovely photo of all the notebooks stacked up. Now to convince my children that they’re not actually getting the notebooks, but they’re for me to document their stories that don’t require a full 12×12 layout!!
You can watch my process in the following video, and I also show the embellishing of the notebook covers.
I hope I’ve inspired you to make your own Traveler’s Notebooks!
Hey friends its Michelle back here today with a new layout share featuring the awesome Legendary Collection. I was so inspired by our recent Stars and Stripes theme that I couldn’t help but use that as the base for this layout. Stars are the perfect embellishment for scrapping a layout of Leila’s ‘Star of the Week’ photo from last year.
I chose a fun new cut-file design from CUT to YOU that features 3 different star designs and resized them to create different focus points for the layout. I cut all 3 designs out on white cardstock and backed the larger design using a mix of different patterns and colours to compliment the stars within the collection. Papers used – ALL STAR, EPIC TALES, EXPLORER, OFF BEAT, TOTAL LEGEND and WILD ONE.
I adhered the star to the left side of the layout using foam sheeting to raise it off the background paper (OUTDOORS TYPE) and added the super cute photo of Leila to the left backed with a piece of BRAVE HEART and a sticker tab from the Accessory Sticker sheet.
I created the title using a cardstock title piece and alpha stickers from previous collections. LOVE LOVE LOVE those white alphas! There’s a sprinkling of stars, both fussy cut and ephemera, on top of the big star also.
I kept the other 2 star designs open and adhered half of each design to the edges of the layout, creating open clusters and tying all the elements of the layout together. In the top cluster I added the ‘Hey You’ banner sticker from the sticker sheet and a mix of fussy cut and ephemera stars.
In the bottom cluster I added pieces from the ephemera pack, fussy cut and ephemera stars plus a word sticker from the Accessory Sticker sheet. Lastly a splattering of gold colour shine to finish it off.
Well friends that’s all from me today. Thanks so much for stopping by.