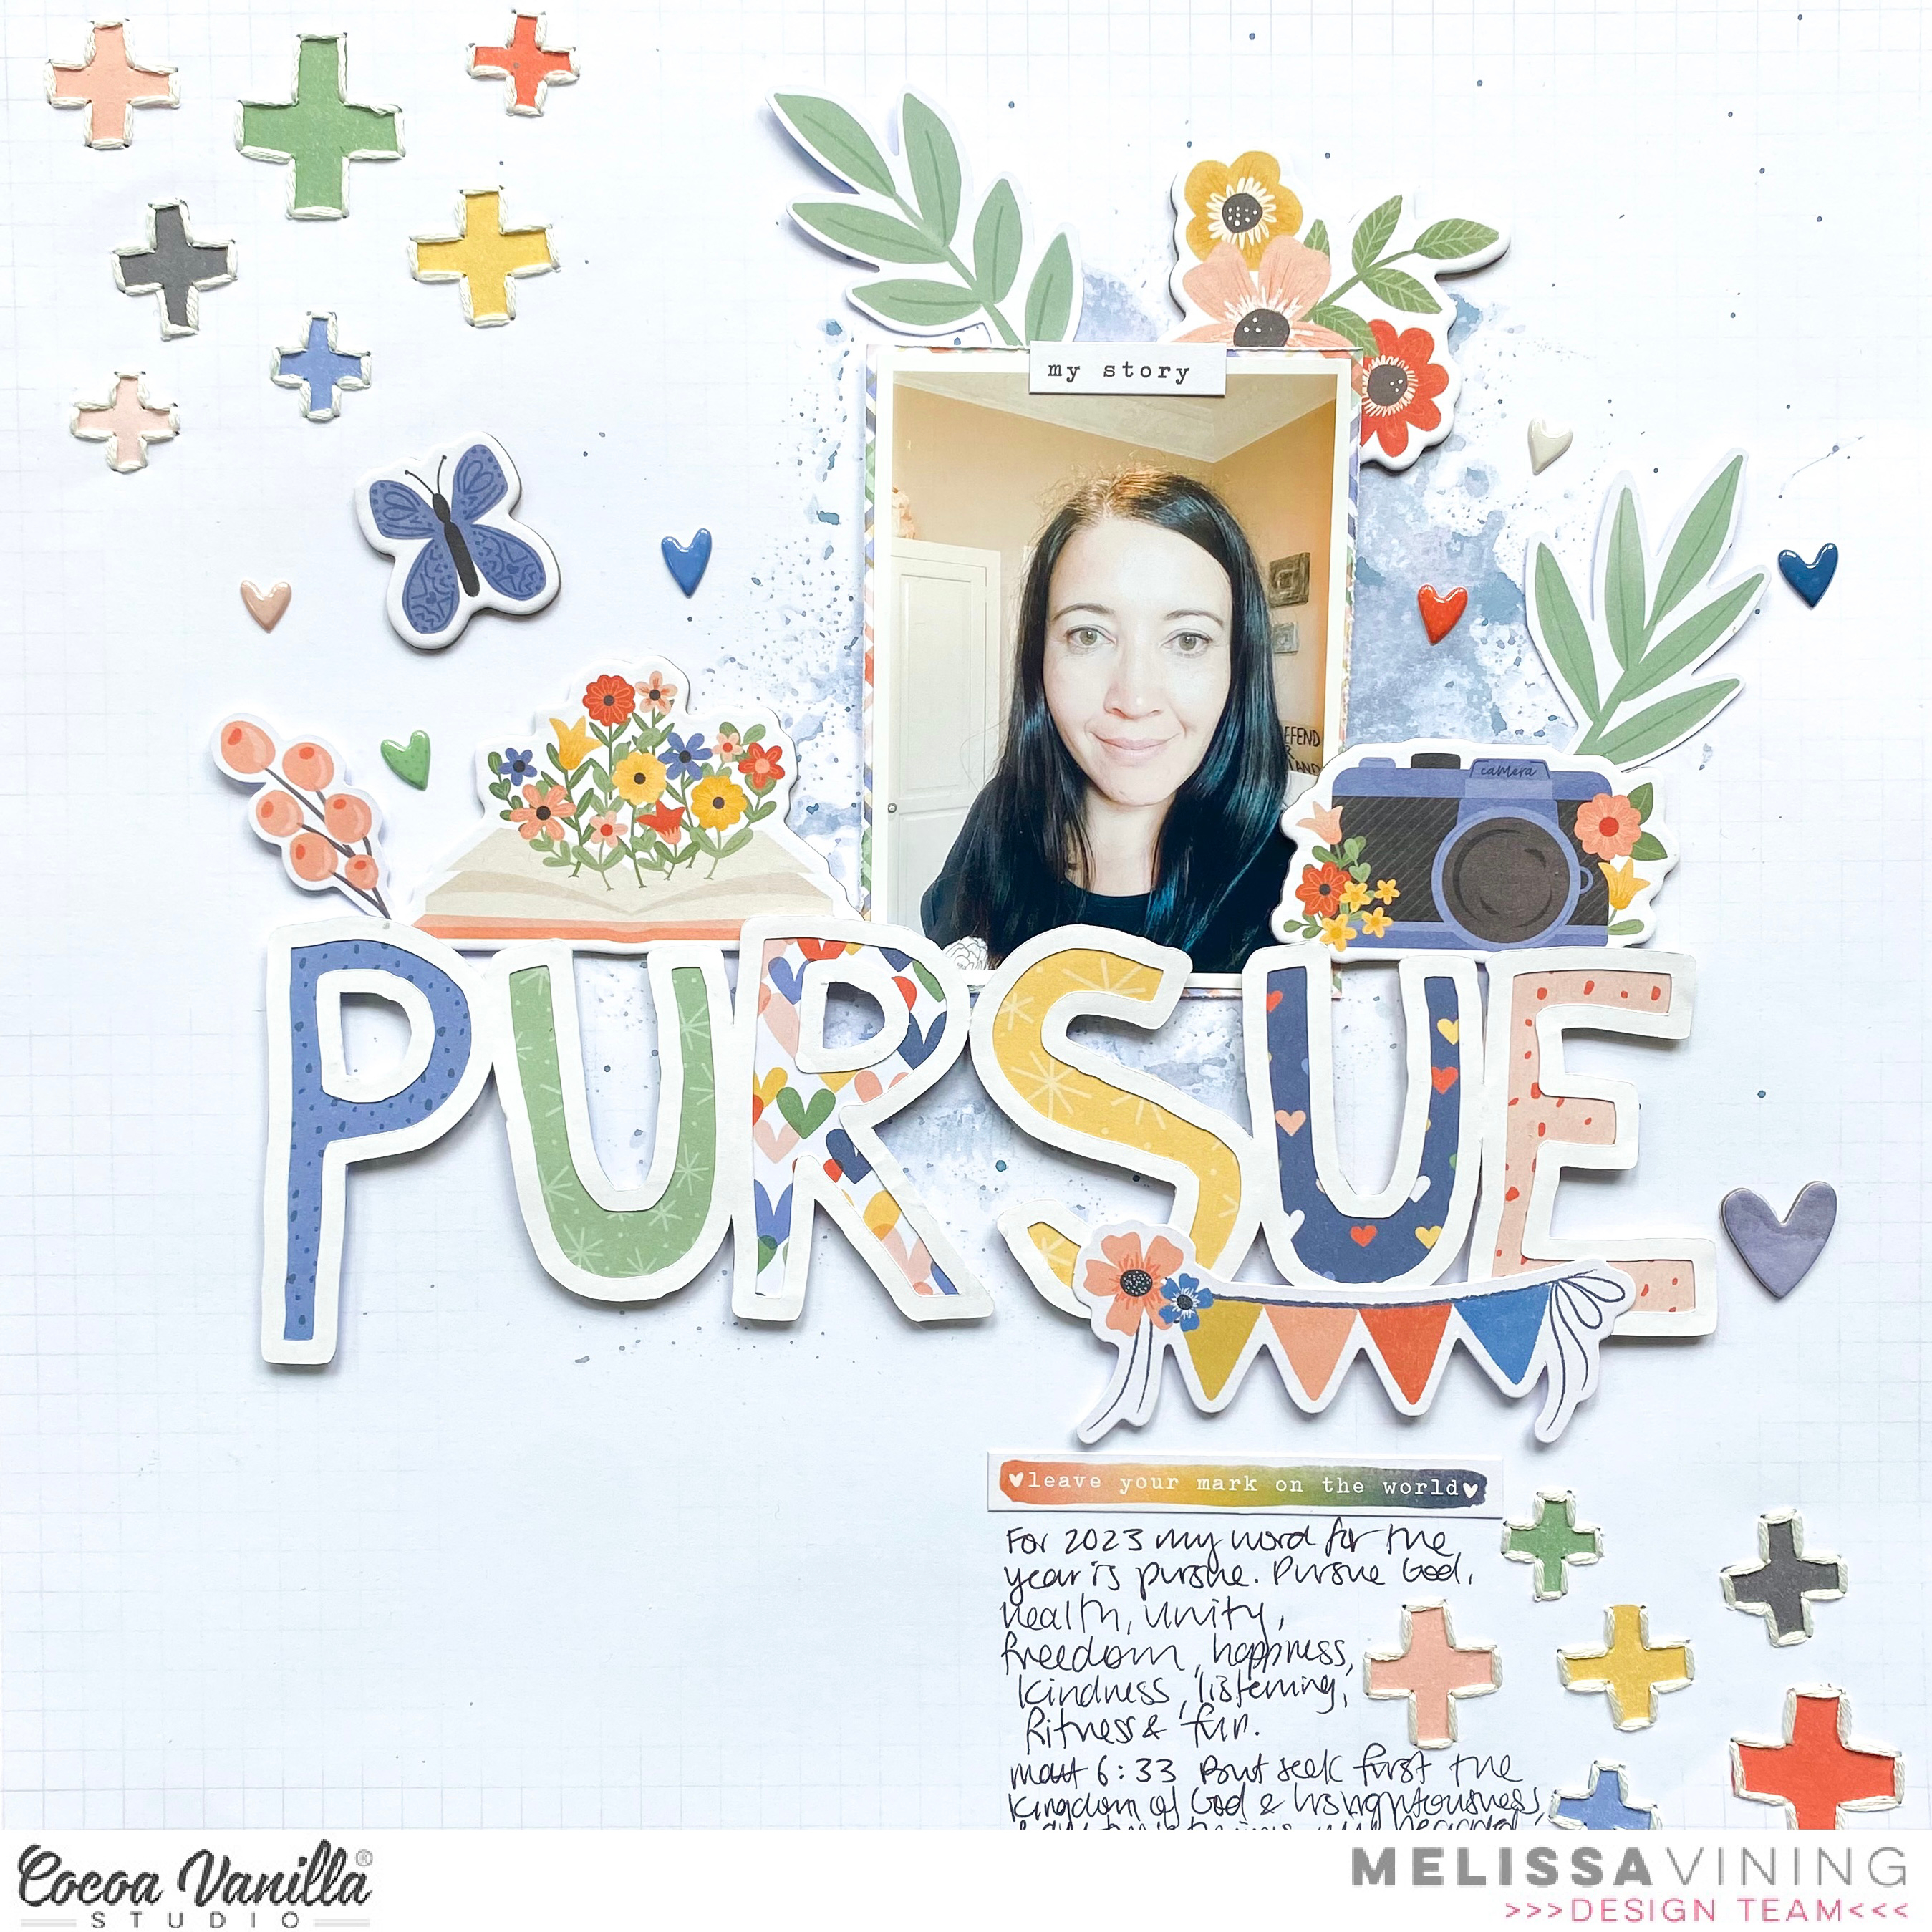
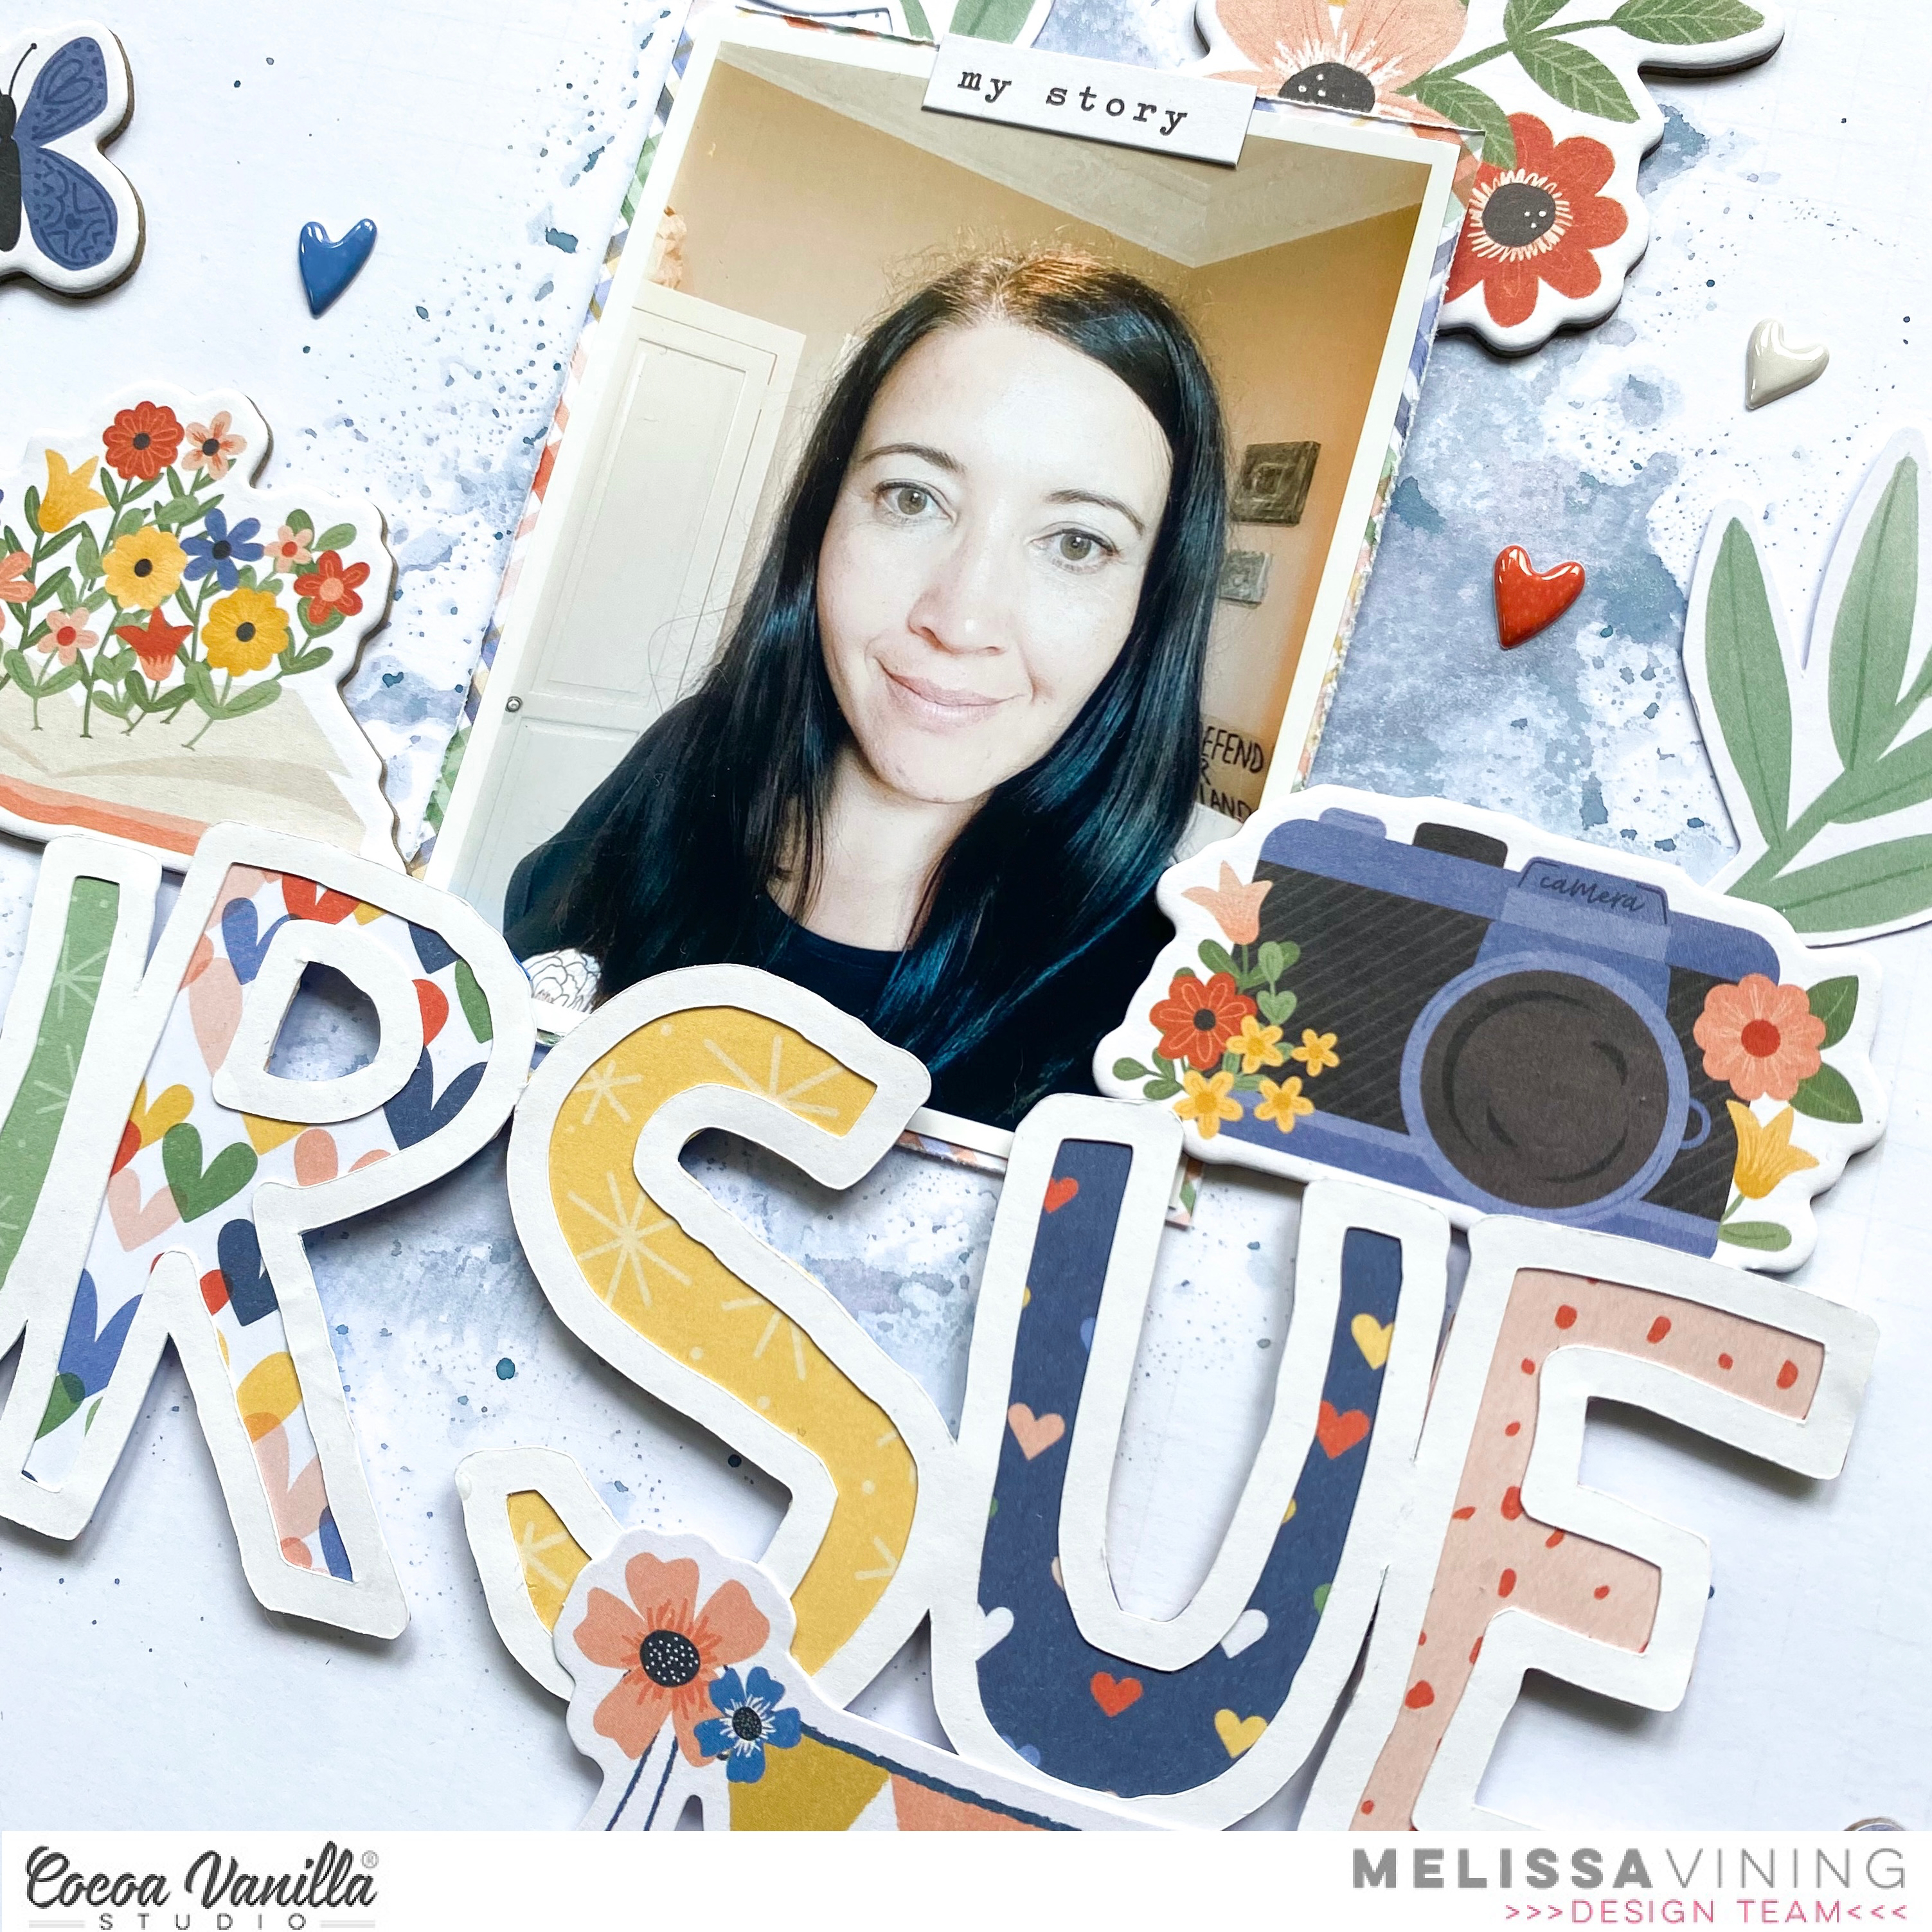
Hi everyone, I know its February already, but this is my first post for this year and I just wanted to say Happy New Year! I hope that 2023 is off to a great start for you! Today I’m sharing a layout that I created with the beautiful Storyteller collection. Every year I create a layout about myself for my word for the year. This year my word is Pursue. I used an alpha cut file from Just Nick Studio, and welded the letters together on Cricut Design Space.
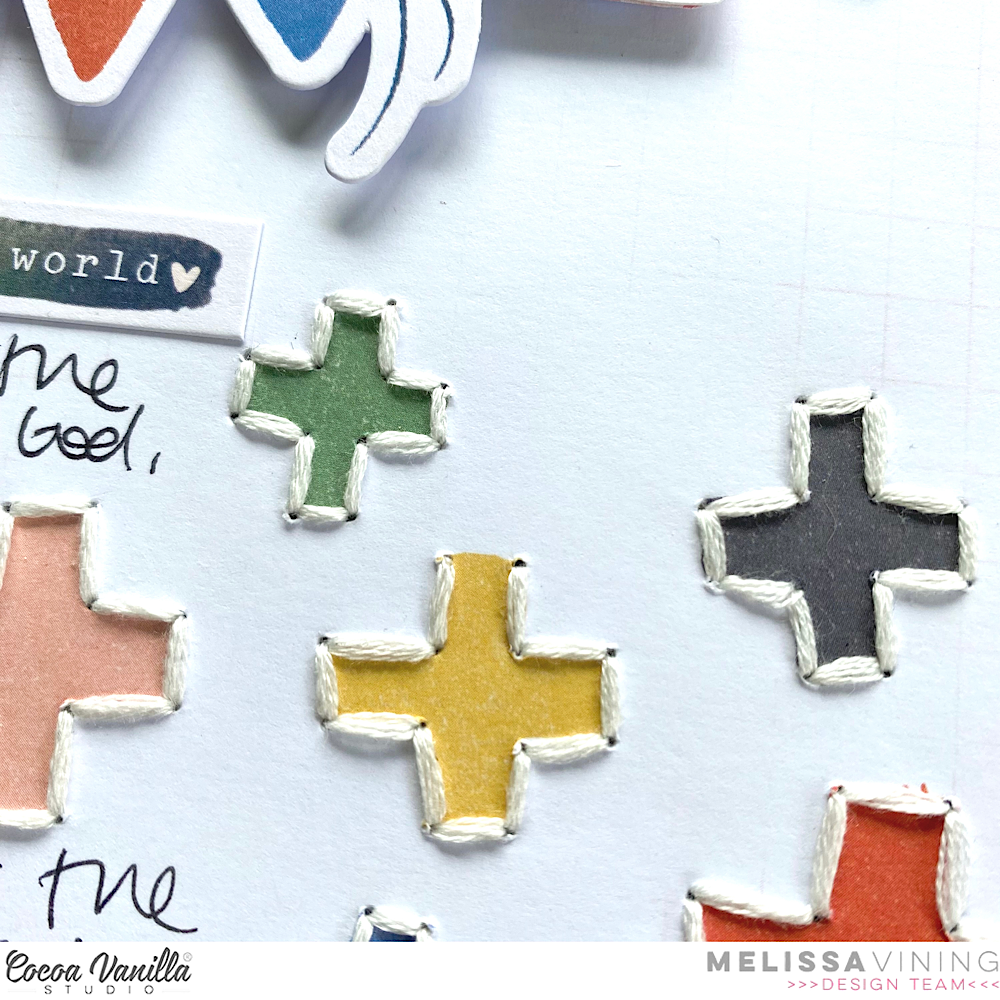
I used used Cross It Off for my background paper and decided to hand stitch around the crosses in white embroidery thread. Love how this adds some subtle texture.
I created backed my title cut file with papers from the A5 Paper Stack. I always love to feature beautiful papers. I used several of the beautiful Chipboard Stickers to embellish around my photo. My background is created with distress oxide ink and the trusty packaging technique.
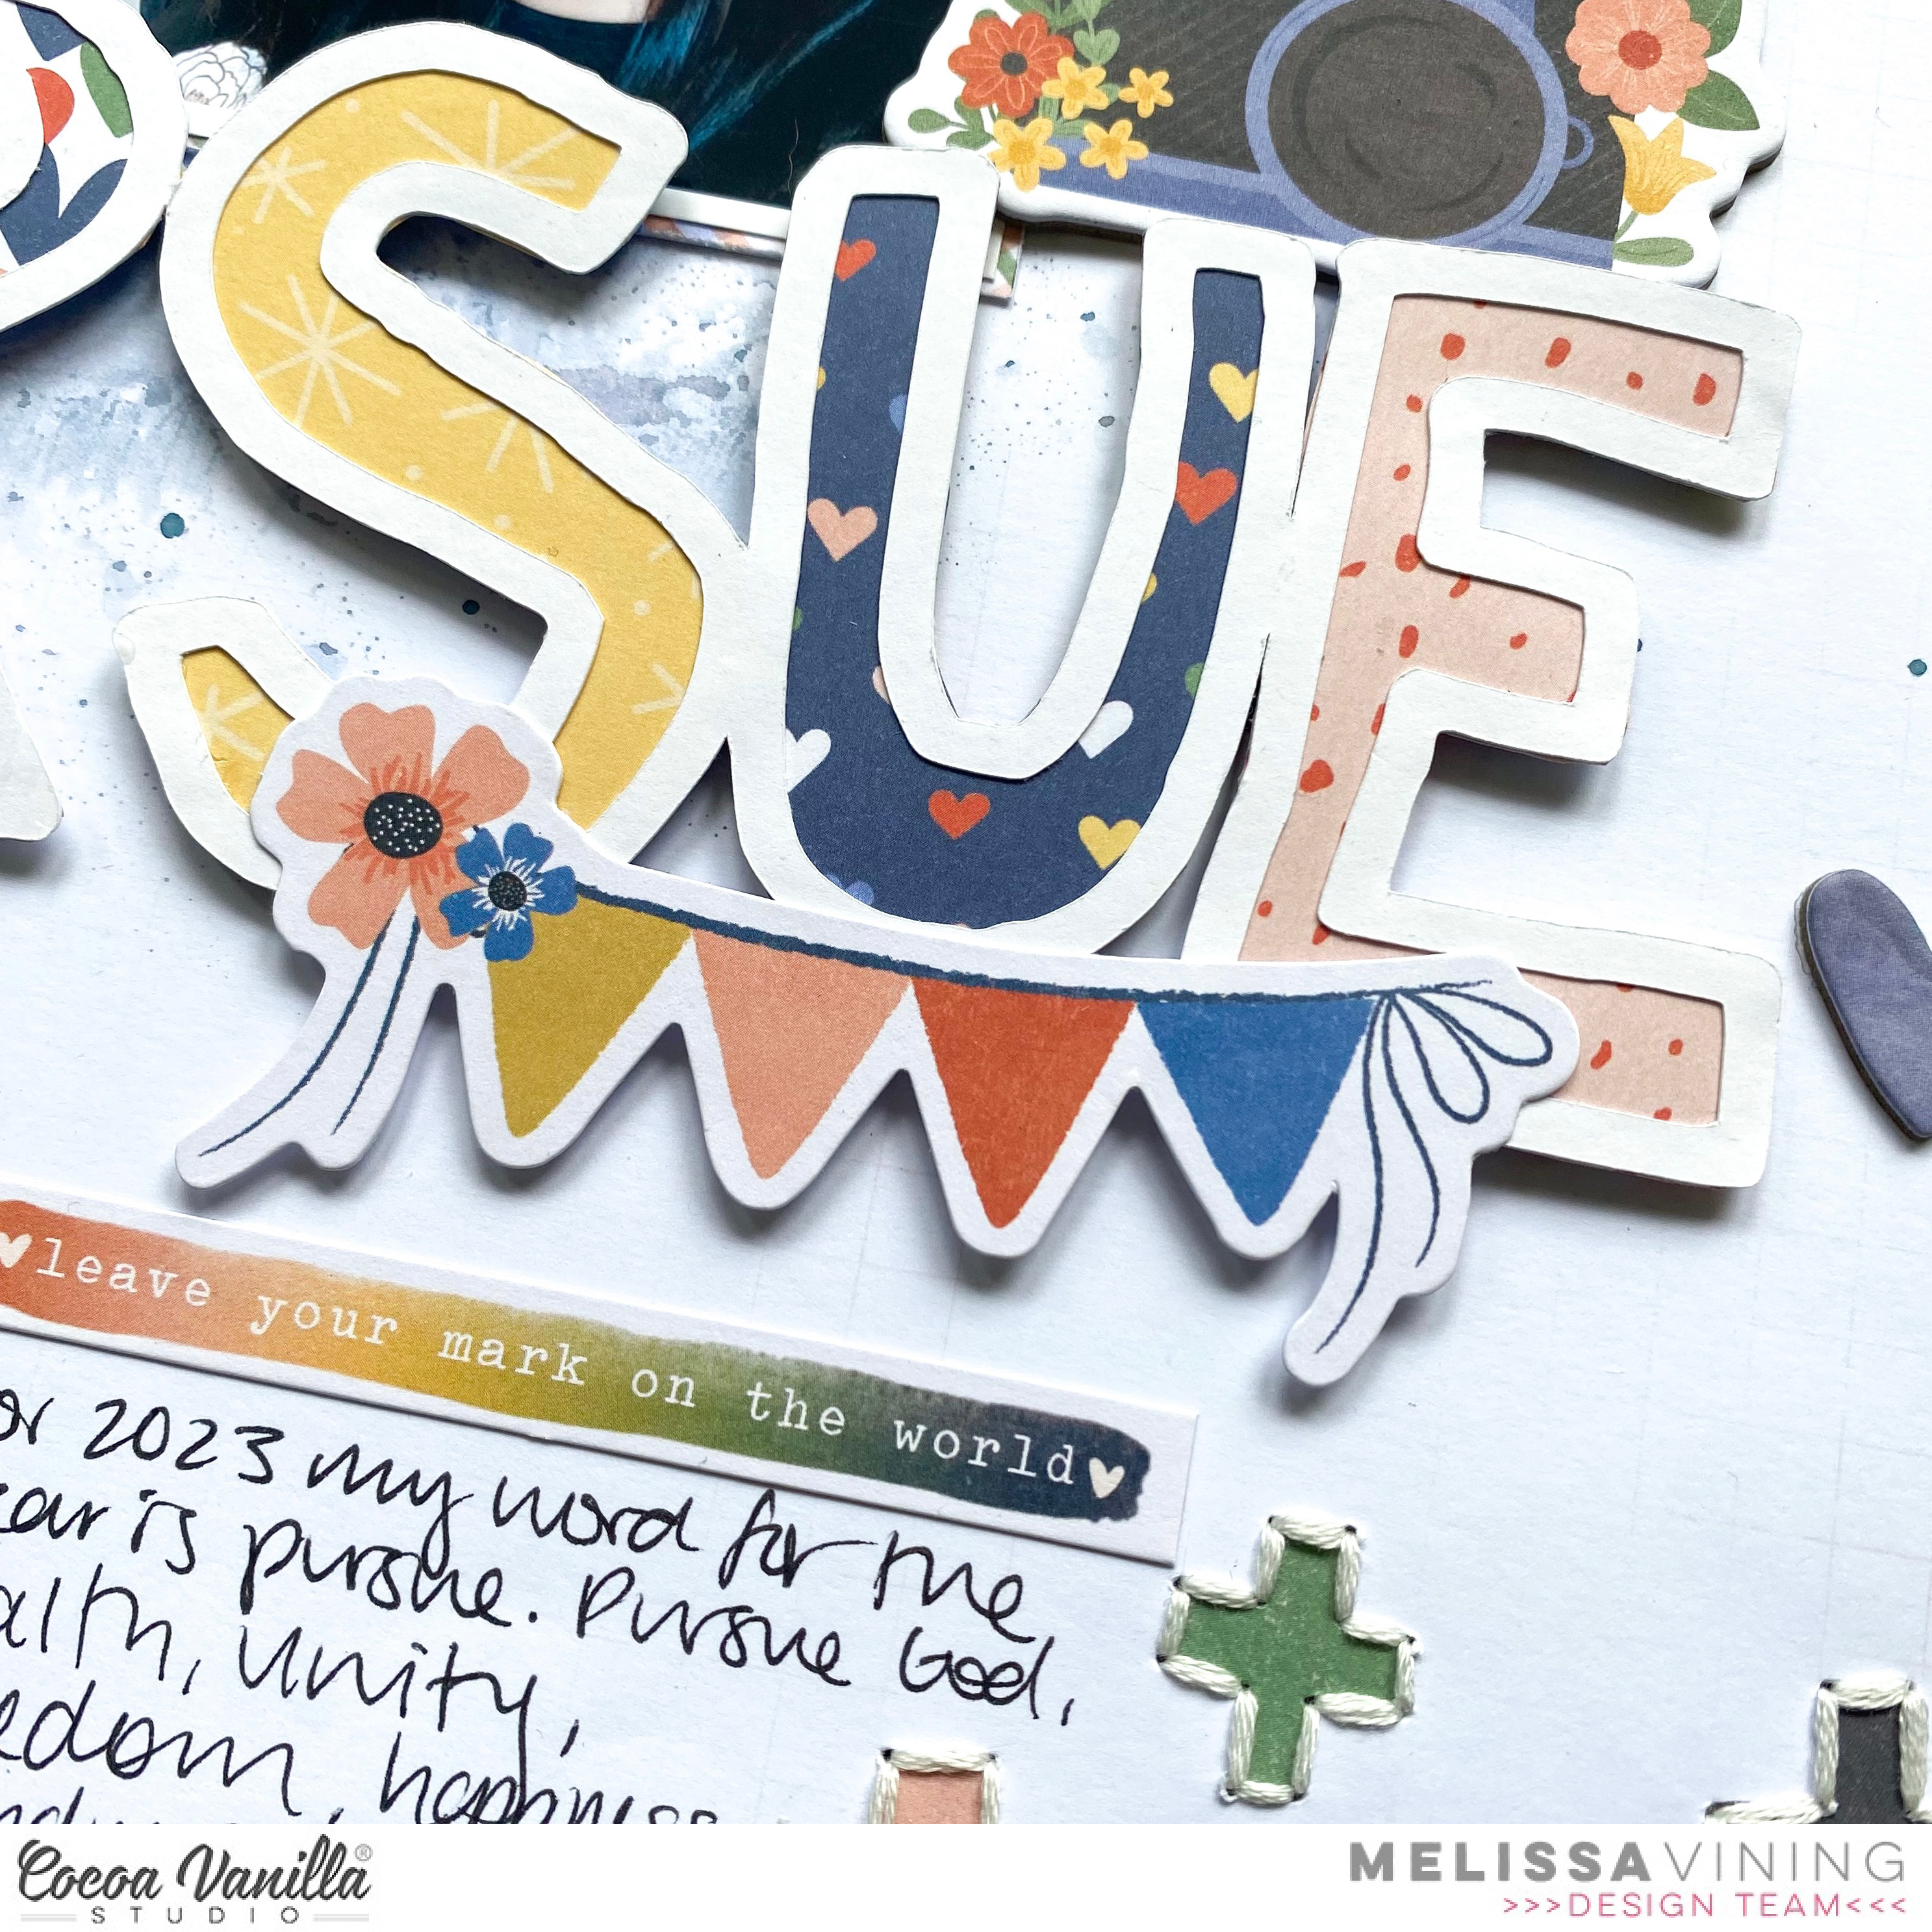
I love the Die Cut Ephemera in this collection. The little banner with flowers was perfect on the title. I used one the phrases from the Accessory Stickers too.
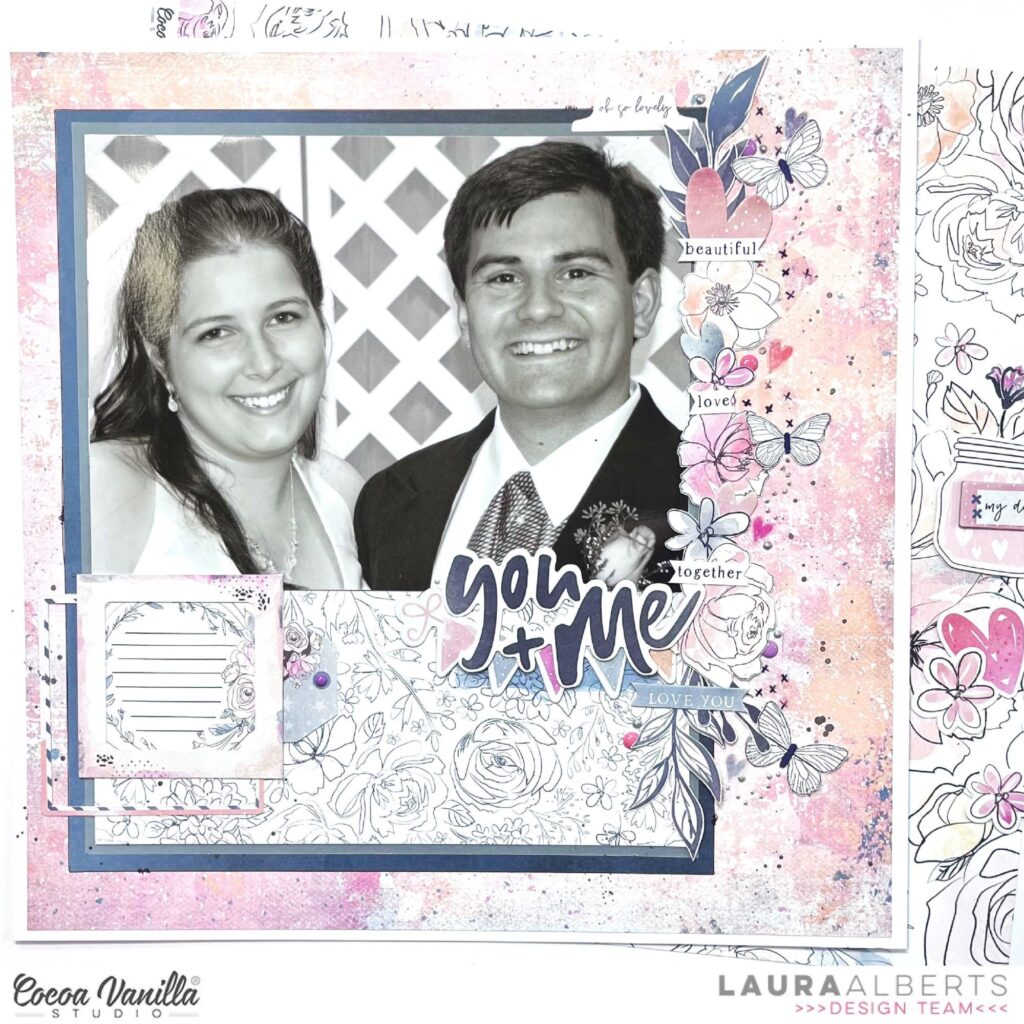
Hey y’all! Laura Alberts back again with a little bit of wedding inspiration using one of the older Cocoa Vanilla Studio collections in my stash, Midnight! I absolutely love the elegant designs and mix of dark navy with pink and purple in this collection, making it perfect for my wedding photos.
Using a large 6×8 photo on this layout filled most of the page, so I kept my embellishing simple with a long border of florals and chipboard hearts down the right side. Behind the florals, I added a few clear stickers to give a tiny bit of detailing to the layers. I tucked a black and white floral underneath the photo and added a layer of vellum to mat my photo.
On the bottom left, I created a journaling spot with a 3D effect by layering frames, a cut-apart piece and a tag. I love how this blends in beautifully with the floral paper in the background, but still adds a pop of interest to the left side of the page.
For the title, I used a die cut ephemera piece, layered it on top of a chipboard banner, then tucked a mixed media style clear sticker underneath. All of these layers give my title depth and dimension. My favorite part is always the Nuvo trails behind the butterflies!
I hope this layout gives you a little inspiration to use for your next formal event!
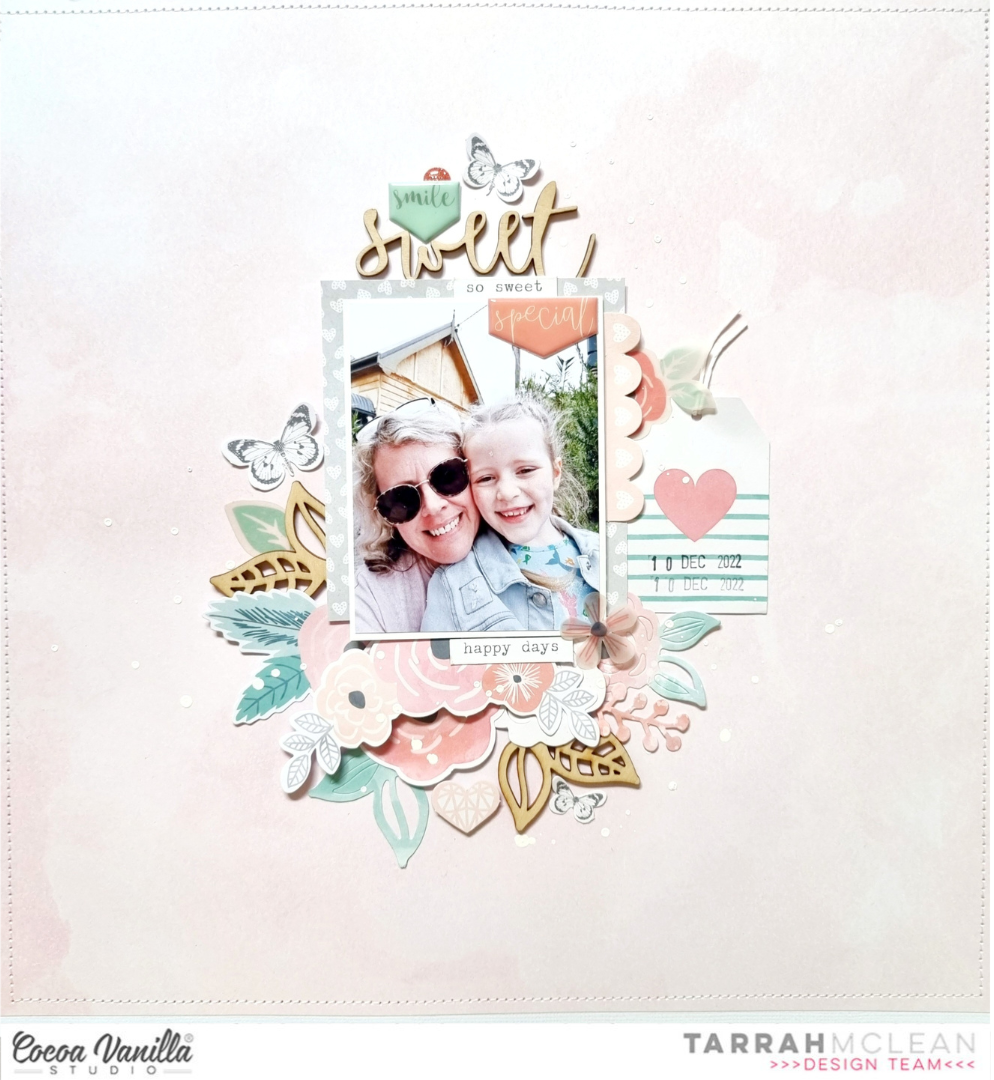
It’s Tarrah back with you and today I am sharing a sweet layout featuring the gorgeous Love Always collection!
My assignment for today was to create a project for the Throwback Thursday feature that we sometimes run, I just had to use the Love Always collection for love month!
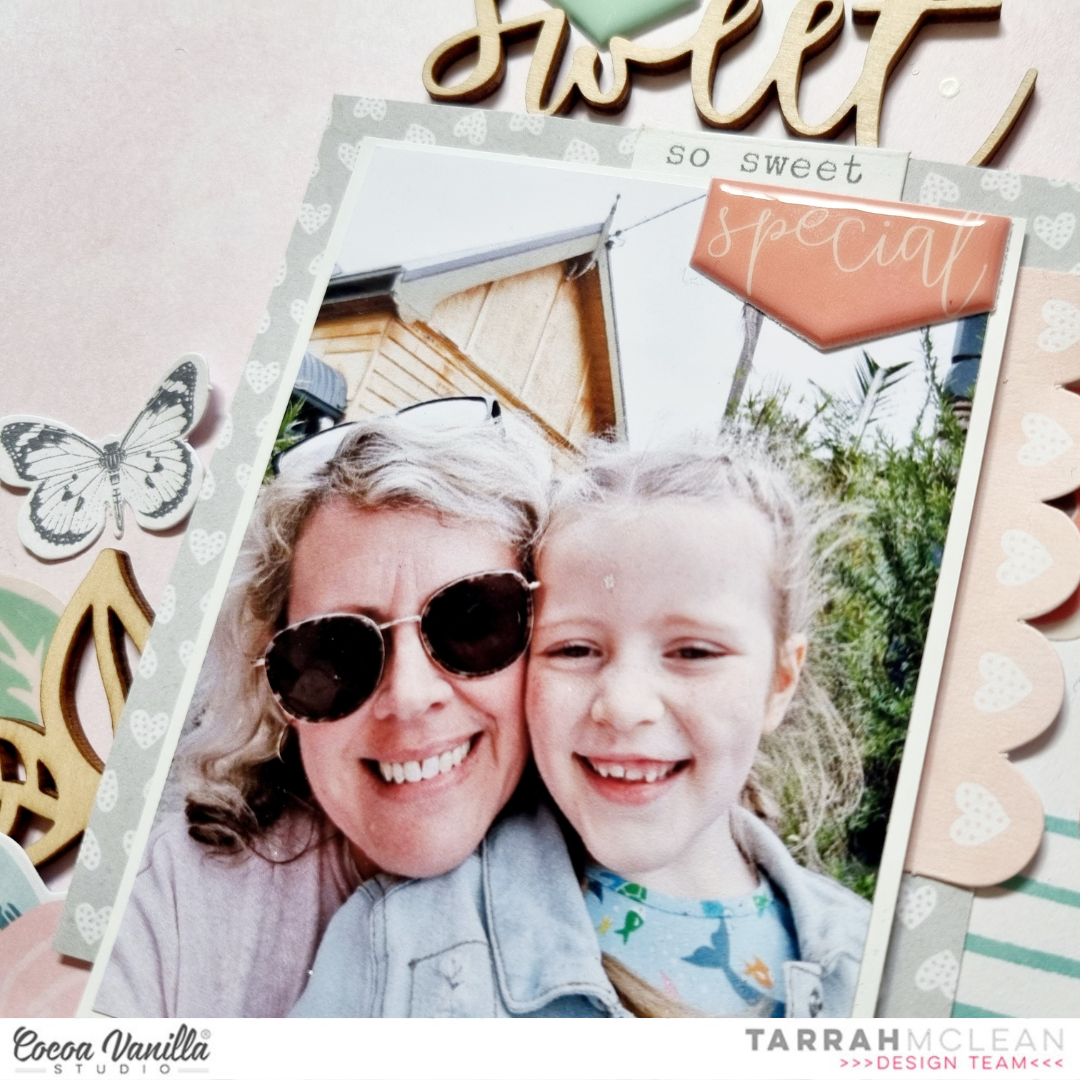
Documenting a sweet photo of myself and my eldest niece together when she was last visiting. She is always up for a selfie with her Aunty! Love her gorgeous face!
The Love Always collection has such pretty floral ephemera and I knew that I wanted to include a lot of them on this layout. I decided to build some layers of florals below the photo which I made the focus of the page by placing it in the centre of the page. I included both vellum florals and ephemera florals for some different textures on my layout.
Under the photo, I layered a piece of the grey paper with the small white hearts and I tucked in the scalloped border die-cut on the right hand side as well. On top of the photo, I placed one of the cute puffy stickers and a sticker from the accessory sticker sheet.
Also on the right of the photo, I tucked in the die-cut tag and added some twine through the hole in the top of the tag. I stamped the date stamp using black ink on the tag also. On the left I continued the floral layers including some wood veneers this time. Here I also added one of the gorgeous butterfly die-cuts.
For my title, I could not go past the gorgeous wood veneer word, deciding on the word ‘Sweet’ from the wood veneer pack. I did however add the cute puffy banner sticker that says ‘Smile’ too. I added another of the butterfly die-cuts here at the top and also a cute small one down the bottom below the wood veneerleaves.
I trimmed down the patterned paper background that I chose for my layout and matted it to a sheet of plain white cardstock. I then machine stitched around the edge of the entire page to create a border. Some of the last things to finish off my page were to add some more of the phrase and word stickers from the accessory sticker sheet, a few more die-cuts and I also sprinkled some white mist on my page.
Thank you so much for stopping by the Cocoa Vanilla blog today! I hope you enjoyed reading about how I created my layout as much as I enjoyed creating it!
Hi everyone, it’s Sue Plumb here today to share my latest design team project with you.
I have to admit, things have been super busy in my world lately, and I have really found myself pushed for both time and inspiration to create. In times like these, I often find it helpful to reach for a sketch so I have somewhere to start and can get going quickly. It was for this reason I decided to use a Page Maps sketch for this page, along with the beautiful ‘Storyteller’ collection.
And here is the sketch I was working with…
As you can see, I stuck fairly closely with the overall sketch design. One of the greatest things about using sketches though, is that they are designed to inspire you, so you have the ability to interpret different elements of the sketch however you want.
This is exactly what I did when it came to my background. I began with a sheet of patterned paper (Fly Away), just as the sketch suggested, however instead of layering this with another piece of paper or cardstock, I chose to add acrylic paint to define the focal area of my page. I then added a piece of the rainbow striped Brighter Days paper that I had leftover from a previous project.
The sketch had a couple of vertical elements, so I used one scrap strip of paper I had on hand, plus the heart strip from the Story Time cut apart paper. For my title, I used the best ever card from the Pocket Cards pack and in keeping with the sketch I punched along the top edge of it using a notebook style punch. Before sticking down the photos of my daughter and I; I added a small paper doily and some frayed gauze to create texture behind them.
With all the main components in place, it was then simply a matter of adding my embellishments. Again I stuck fairly closely with the design of the sketch, but instead of using stars, I substituted flowers instead. I created three clusters using a variety of pieces from the Floral Ephemera pack, and I topped one of the flowers with an Epoxy Wood Button. Other embellishments used included a small banner and heart from the Die Cut Ephemera pack; some Accessory Stickers; and Puffy Stickers.
You can watch how this layout came together in my process video below:
Thanks for stopping by so I could share this today. If you have found yourself short on time or mojo lately, try using a sketch like I did for this layout. You can stick close to the original design or use it as a jumping off point – just get those memories documented!
I decided to use a big black and white photo of my sweet Sabrina at the beach as the focus on the page. I layered it with tissue paper and foam adhesive, and placed it to the right of the page.
I used a cut file from JustNick Studio named “Travel often” for both my title and suitcases. I backed them with different patterned papers from the Sunkissed A5 paperpack.
I fussy cut beautiful florals from the “Growing Wild” paper and mixed them with floral die cuts arranged in clusters around the suitcases and title. I also added a lovely umbrella, a banner and a few fussy cut clouds to decorate the page.
I grounded everything on a teared piece of the “Just Chillin‘” paper.
A little bit of sad news to share today as we say farewell (again) to one of our beloved team – Lina Monaco. Lina has been a treasured member of our Cocoa Vanilla Studio family for many years, having been a team member twice now after we wooed her back to do another tour with us. Unfortunately for us however, life is just way too busy now for Lina to keep up with everything, so we have to wave goodbye.
So let’s take another look at some of Lina’s recent projects that she created for us. First up, a beautiful layout featuring a photo of the lady of the hour herself along with her husband, and using our ‘Storyteller’ collection…
Lina loves working with bright colours, so next up we are sharing a gorgeous mixed media layout featuring our ‘Sunkissed’ collection…
One of the things we love about Lina is her versatility – she can rock a boy layout just as well as she can rock a girl one. Here’s a gorgeous one she created using ‘No Limits’…
And to round things out, we couldn’t resist sharing this layout that Lina created for our Throwback Thursday featuring one of her all-time favourite collections, ‘Bohemian Dream’. (I think this collection can be found on a lot of people’s favourite list!)
Lina – thank you SO much for all the amazing inspiration you have shared with us over the years and for being such a great ambassador for Cocoa Vanilla Studio. You’ll always be part of the family. We love you and wish you all the best!
Mandy here today to share a new layout featuring the ever-so-sweet Joyful collection. I’m still documenting our Christmas memories and for this page I chose to scrapbook a few family pics from our annual tree decorating day. Of course I couldn’t go past using the lovely Joyful collection with it’s fresh colours and super cute woodland creatures.
My favourite patterned paper in this collection is the gorgeous Holly Days paper. I’ve already created two other layouts featuring the beautiful wreath from this paper, but I love it so much that I wanted to use it again for this layout! I started with this paper as my background and used the wreath design to frame my three square photos. Each of the photos were matted with a different patterned paper from the A5 Paper Stack to help them pop off the page, and one of the photos was adhered with craft foam for extra dimension.
I fussy cut some additional flowers from the beautiful Tis the Season paper to add around the wreath. This again helped give the layout some additional movement and dimension. I embellished around the photos with various die cuts including the cute little squirrel and a banner with the phrase ‘The most wonderful time’.
In the centre of a couple of the flowers I added a Gold Glitter Puffy Star. I love the extra sparkle and pizzazz that this adds to the page! Perfect for a Christmas themed layout! For my title I chose the ‘Ho Ho Ho’ chipboard sticker.
I created a little embellishment cluster at the bottom of the wreath that includes a sweet reindeer die cutand a couple of gifts. To add the date to my layout I used a label from the Accessory Sticker sheet. A sprinkling of die cut, puffy and gold stars were the final finishing touches to the page.
Thanks so much for joining me here on the blog today! I’ll be back later in the month with another project to share!
Hi Cocoa Vanilla fans! Danni here with a layout featuring the incredible Storyteller Collection. This layout is all about me, something that many scrappers struggle with, myself included. This very recent photo is of myself enjoying a glass of champagne while celebrating my acceptance to medical school! This was a huge achieement for me and something I felt was important to document right away. You’ll notice there’s no journalling included; I’m going to include that in a separate layout because it is a significant story to tell. This makes Storyteller the perfect collection to document this memory.
To begin this layout I took two A4 sheets of white cardstock (this is a standard Australian paper size, somewhere in between 8.5×11″ and 9×12″) and tore one in half vertically down the centre. I laid one torn half on top of the intact sheet, then took hybrid inks in two different shades of pink and created a messy watercolour effect coming out from underneath the torn paper, using a combination of the packaging technique, paintbrush and splatters.
I added some dimensional foam under my photo, then added some layers of paper from the A5 paper stack. Adding foam between the photo and the matting paper gives a different look and creates multiple layers for tucking embellishments. I placed my photo on top of the overlapping section of cardstock, then sorted through the floral ephemera to find various sized flowers in yellows and pinks. I clustered these around the edge of my photo, tucking some in underneath the torn edge of the cardstock, some in between the layers of my photo matting.
I tucked in a butterfly and a camera piece from the chipboard stickers, adding a die cut ephemera button over the camera lens to add a touch of whimsy. I also tucked an epoxy wood button and a die cut ephemera heart among the flowers, popping the heart up on foam squares. I also sprinkled around some puffy sticker hearts and dots around the edges of the flowers for some tiny details.
I kept the title simple, using a large title piece from the chipboard stickers as the main focus. I added some alphas from my stash and included some tiny words from the accessory stickers as a subtitle.
As a final touch I included a dashed border using a black fineliner pen, keeping this on the uppermost torn piece of cardstock. This was to emphasise the difference between the soft mixed media side on the right and the clean white side on the left.
I really hope you enoyed joining me today for this layout. I have loved every minute spent creating with these wonderful products, and I hope you find as much joy in them as I have. Happy scrapping everyone.
Hey y’all! Laura Alberts here again with a birthday layout using the lovely Legendary collection! I adore the masculine collections for my sons’ layouts and Legendary has a special place in my heart thanks to all of the stunning reds and blues! This layout focuses on using up scraps.
To create these journaling spots on either side of my photos, I used the inside of the woodgrain frame in the ephemera pack and cut it in half. Each side outlines an area that was perfect for a little bit of writing! Added to the fussy cut and punched stars I sprinkled all around the ephemera stars, it gives this layout a whimsical feel.
With word phrases from the accessories sticker sheet and enamel dots scattered around my clusters, this layout has a fun, light-hearted feel that fits my sons’ personalities perfectly.
I hope this layout inspires you to use up the scraps from your older collections! If you’d like to see how “Best Buddies” came together, check out the process video below:
Hello Hello! It’s Michelle here today with a new layout share for you all. I’ve continued on with my Christmas crafting in January using the Merry & Bright Collection and a bunch of fun and oh so flattering photos from Christmas Eve and Christmas Morning.
I based this layout off one that I made a few years back that grouped photos together over a chunk of pattern paper with a big floral cluster underneath. This was a fun layout to recreate, even with the cringeworthy photos I chose.
All papers used are from the Merry & Bright Collection with a mix of both 12×12 and A5 papers used. Jingle all the Way was the paper of choice to use behind all the photos, combined with a strip of Happy Holidays to use as a base for the title.
I added a massive cluster of florals under the title banner using the wreath design from the HappyHolidays paper along with a mix of ephemera and fussy cut florals from the A5 version of Joy to the World.
Different forms of adhesive used for this cluster to achieve dimension of all kinds.
I used my all time favourite whitealphas for the title, with a pop of machine stitching to keep them in place for years to come.
I added more fussy cut florals around the page and tucked in ephemera pieces, accessorystickers and even layered in a couple of old school doilies within the photo groups. Also, please excuse the hot mess shown above, we were having a little too much fun with the photo booth set up haha
Even the sweet doggo’s made an appearance in this layout.
The papers used to back the photos all came from scraps I had left from past projects, with the addition of some vellum behind a couple.
Here’s a final look at the entire layout, splattered with gold ink to finish it off.
Well thats all from me today, thanks so much for stopping by.


 I fussy cut some additional flowers from the beautiful


