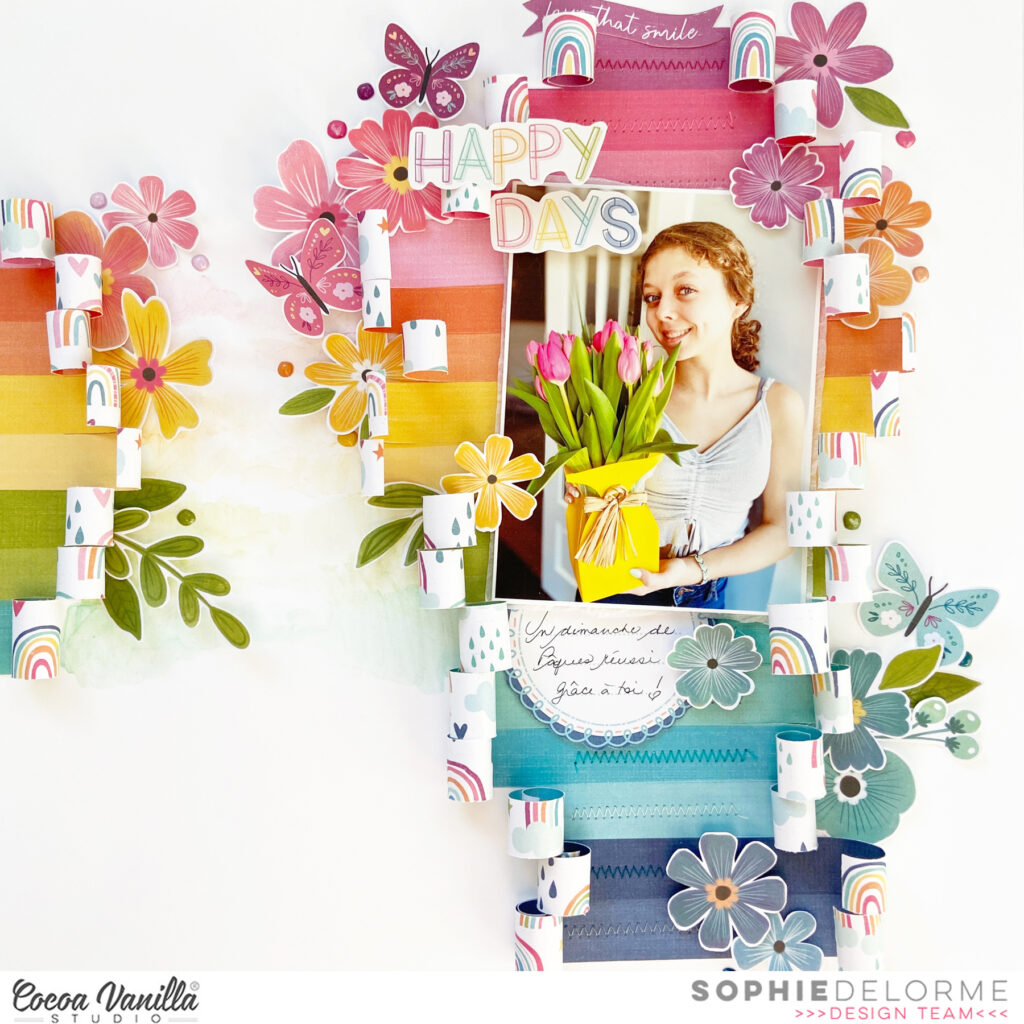
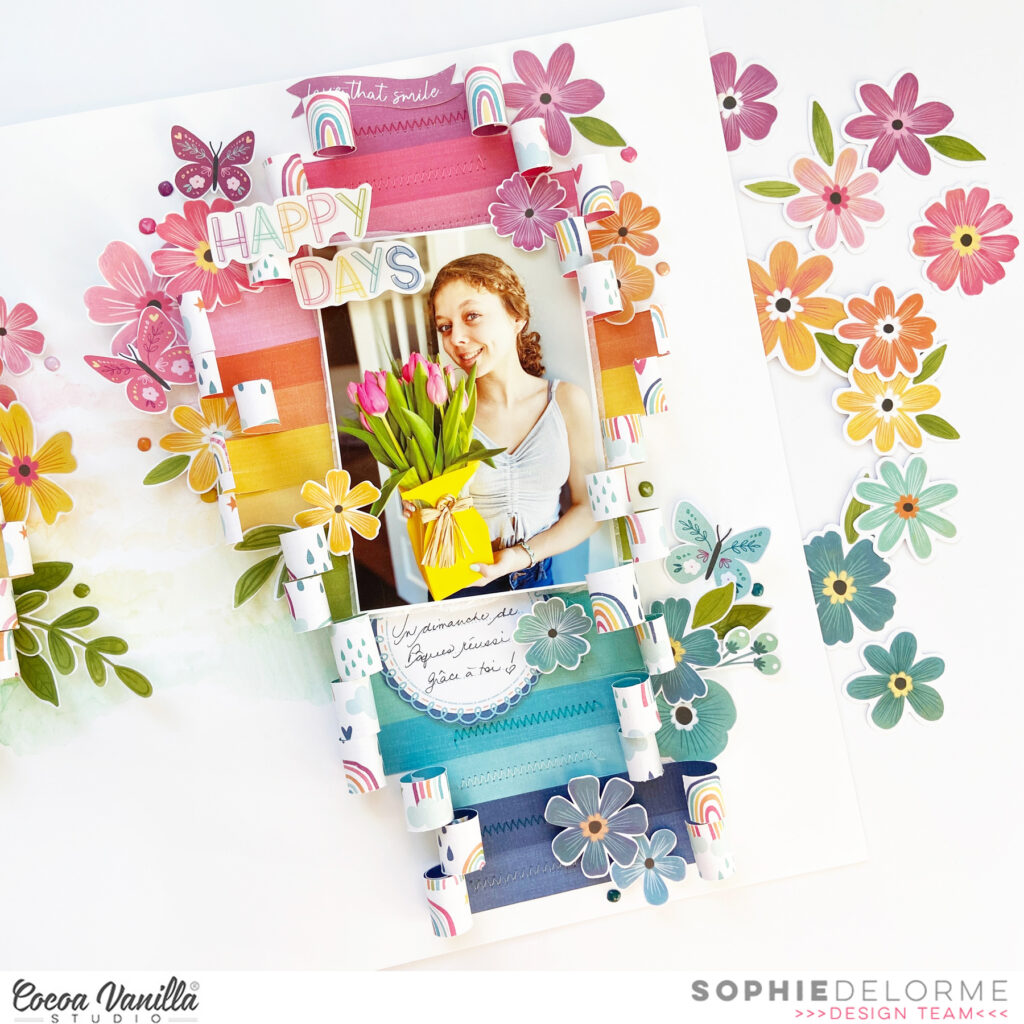
It’s Sophie with you today and I am SO excited to share my very first layout with the AMAZING Happy Days collection!
I had an assignment to focus on florals for this page…My favorite assignment EVER!!
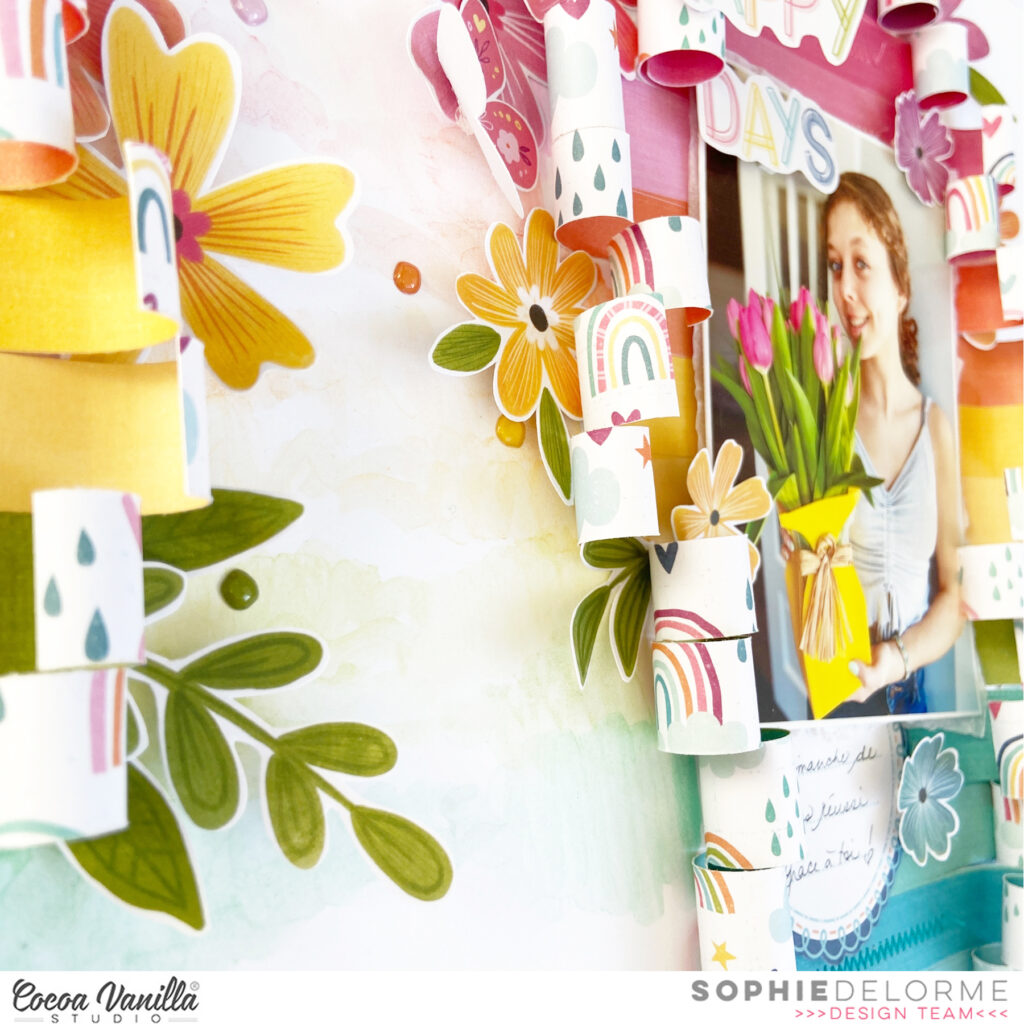
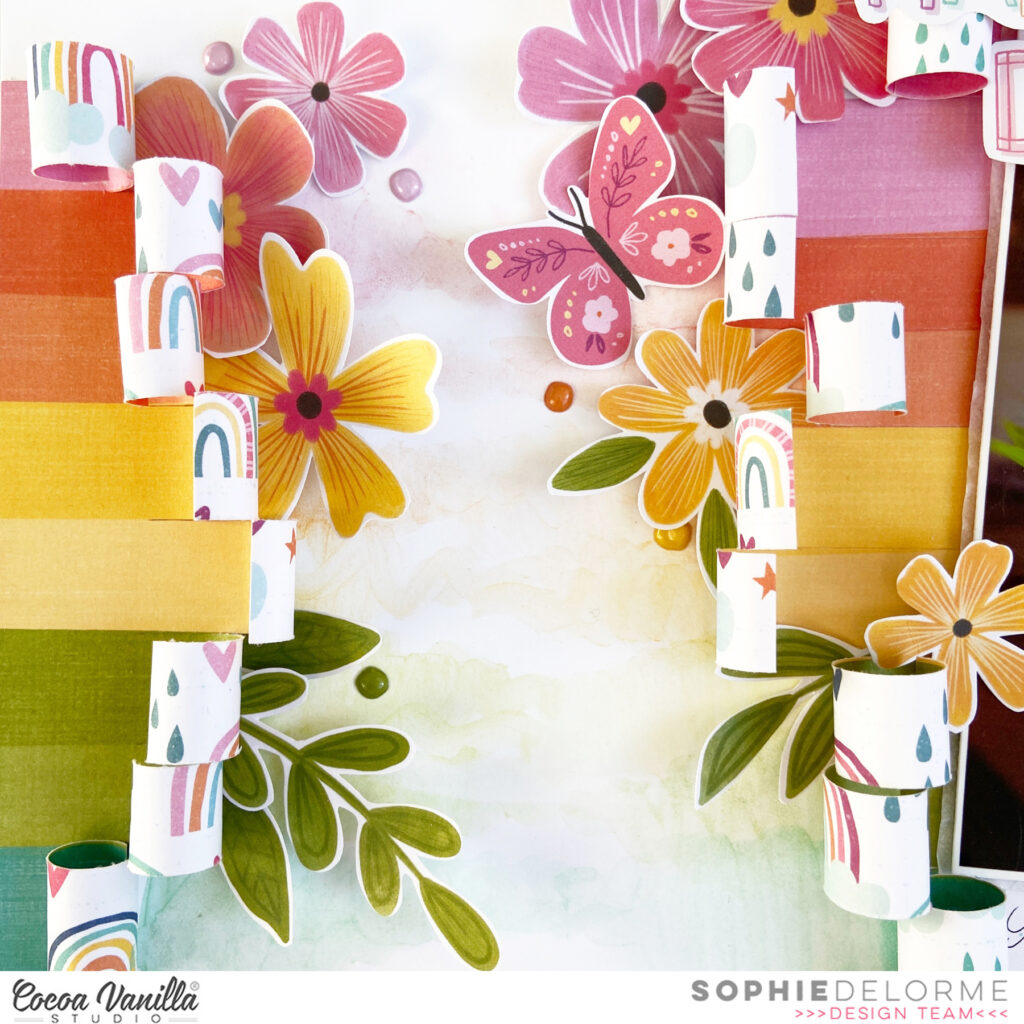
I decided to go with a rainbow themed layout with this beautiful “Sunshine Lollipops” that caught my eye instantly!
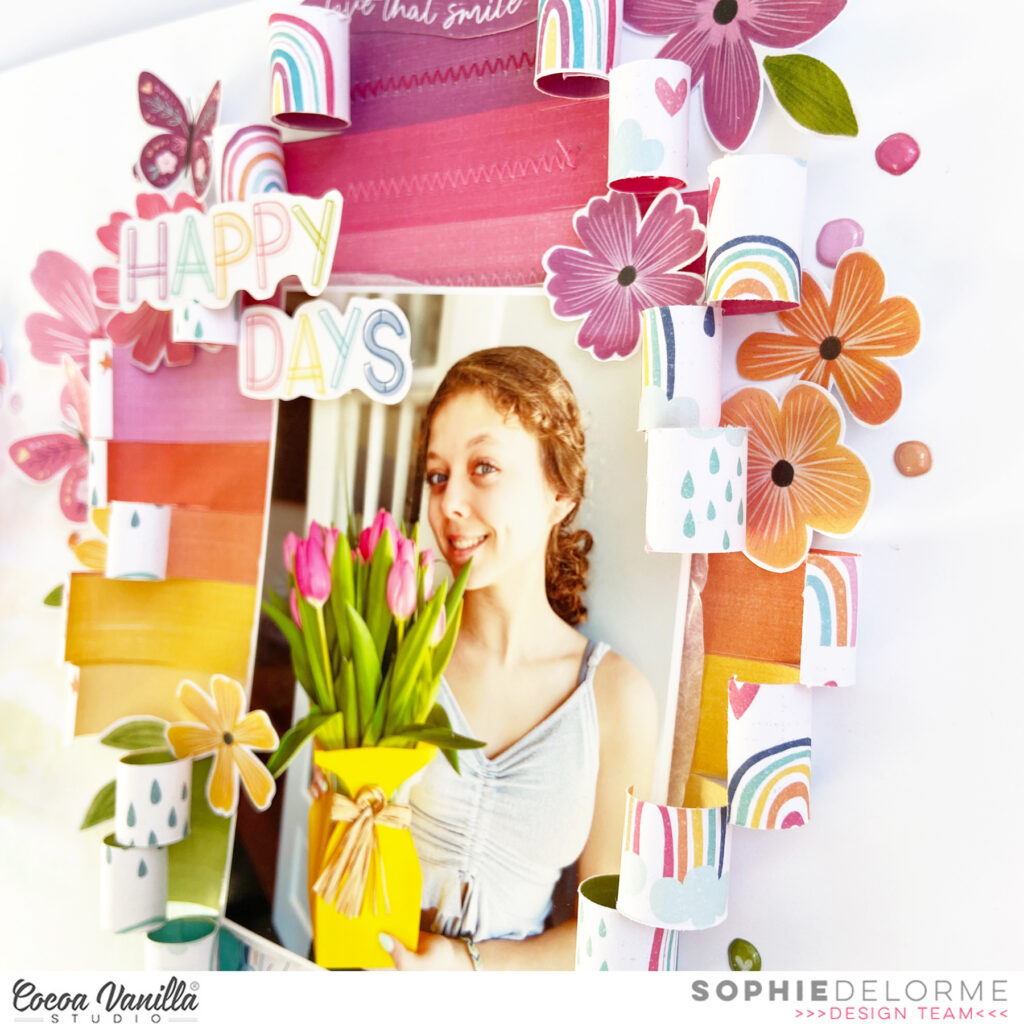
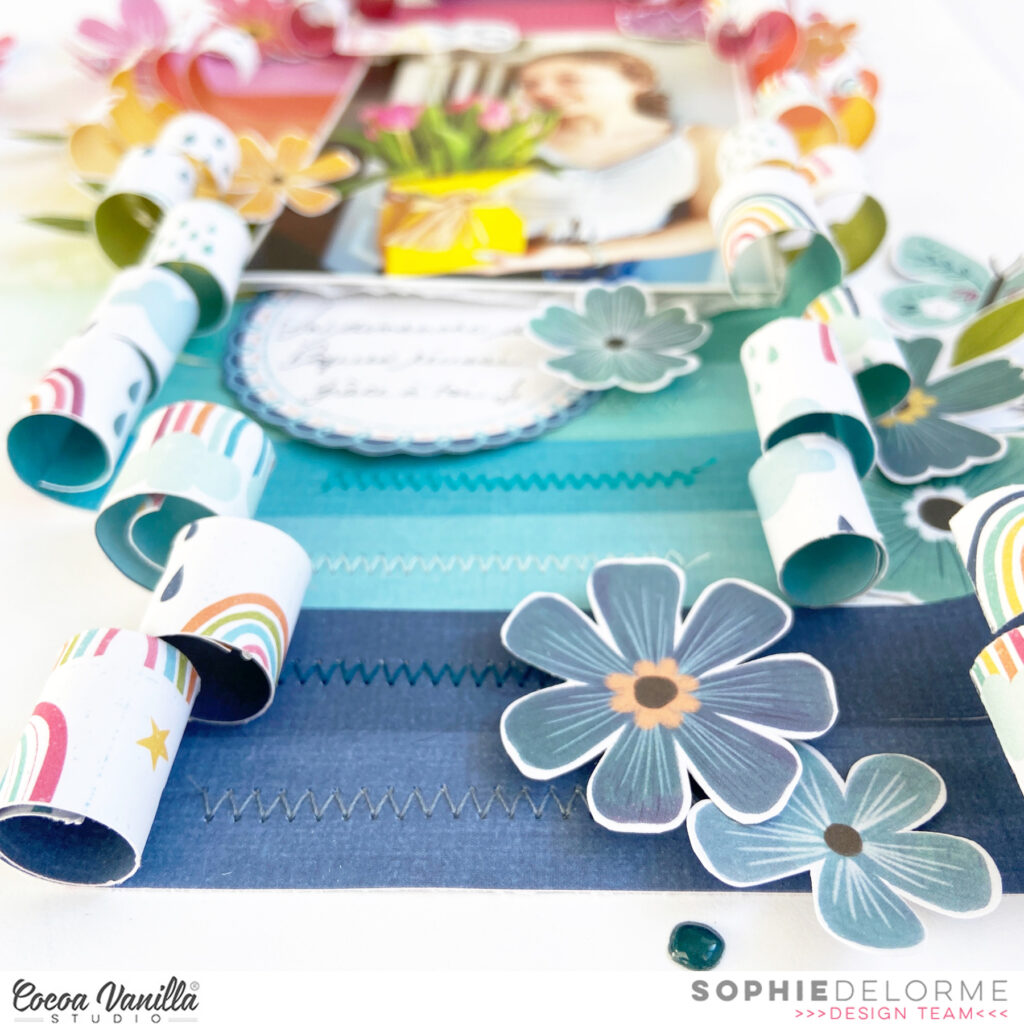
I cut along each colored strip at different lengths and rolled up the edges. I placed the rolled piece of paper on thick white cardstock and added a zigzag stitch with matching thread in the center of each colored strip.
I also placed a smaller piece of that rainbow paper on the left side of the layout and linked both piece of paper together with a very soft watercolor paint.
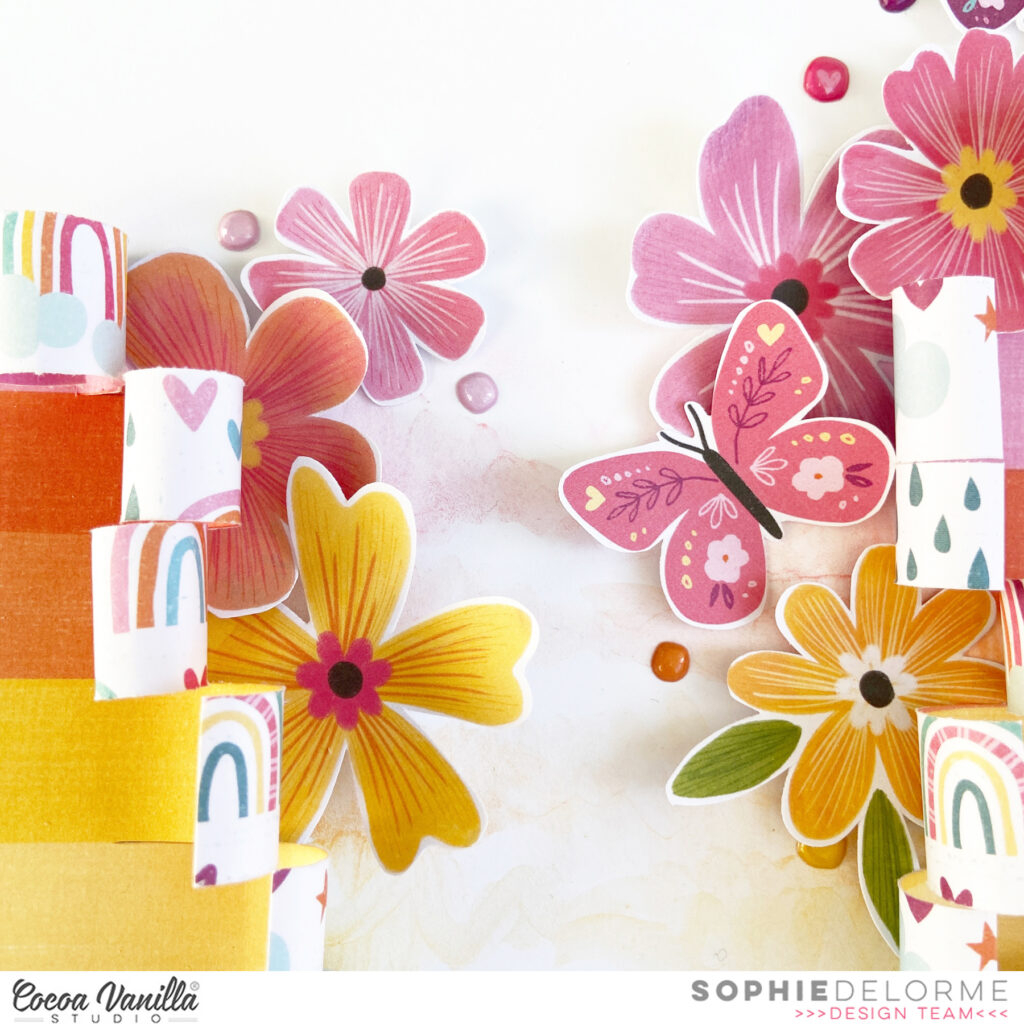
Then, I embellished the page with numerous flowers and leaves from the Floral Ephemera pack. I scattered them around the page in a tone-on-tone manner.
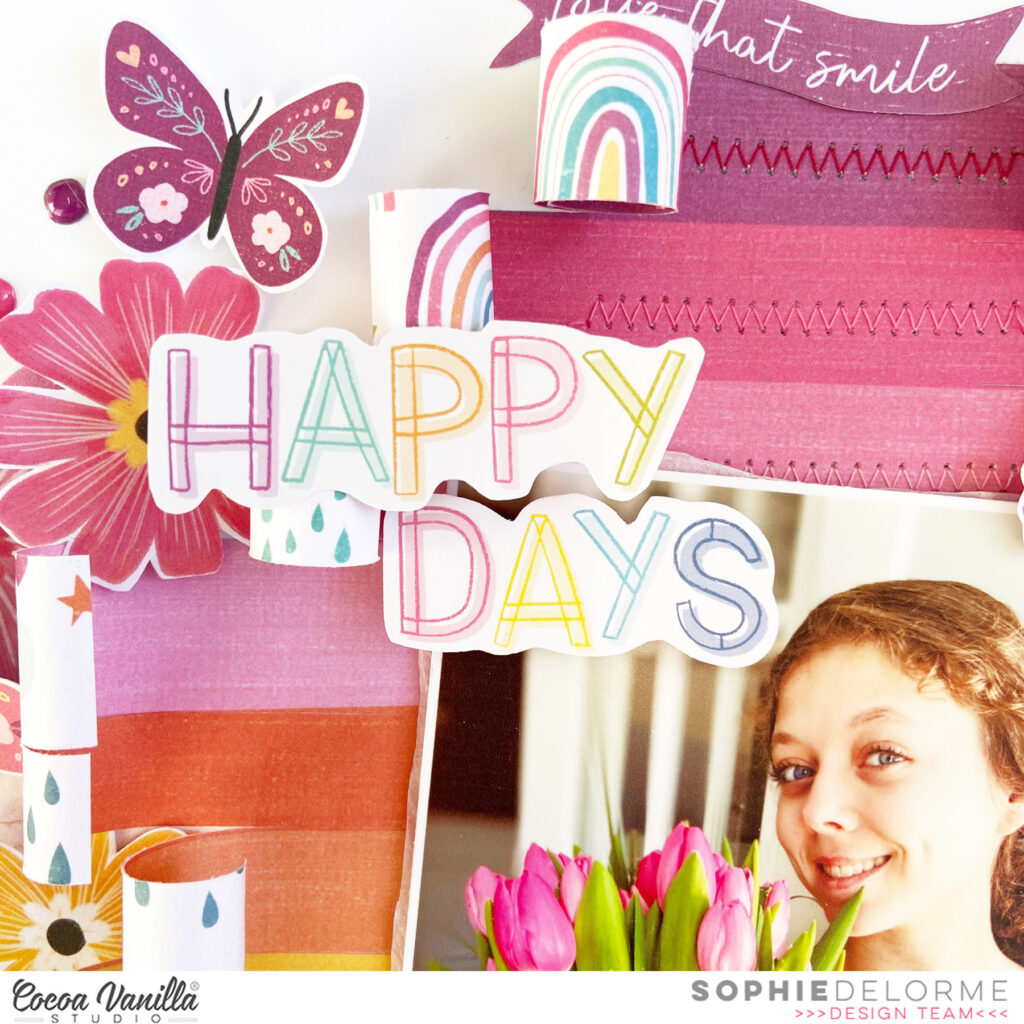
I fussy cut the title “Happy Days” from a packaging and mounted the words on foam adhesive before placing them on the top left corner of my photo.
Finally, I handwrote my journaling on a fussy cut label and added a few puffy stickers as the finishing touch.
Here are more close-ups:
This colorful page came together in no time, with only one sheet of patterned paper!
Hope this was inspiring for you! This whole Happy Days collection is a must have!!
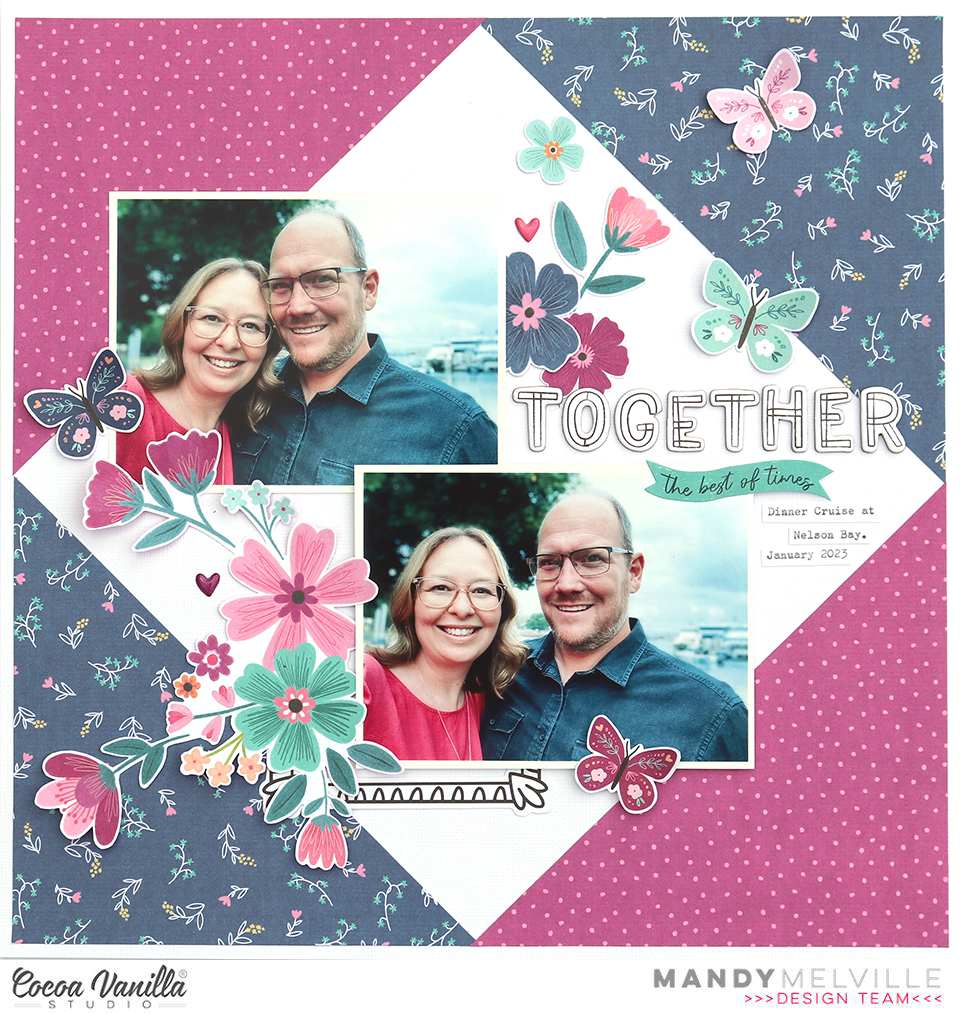
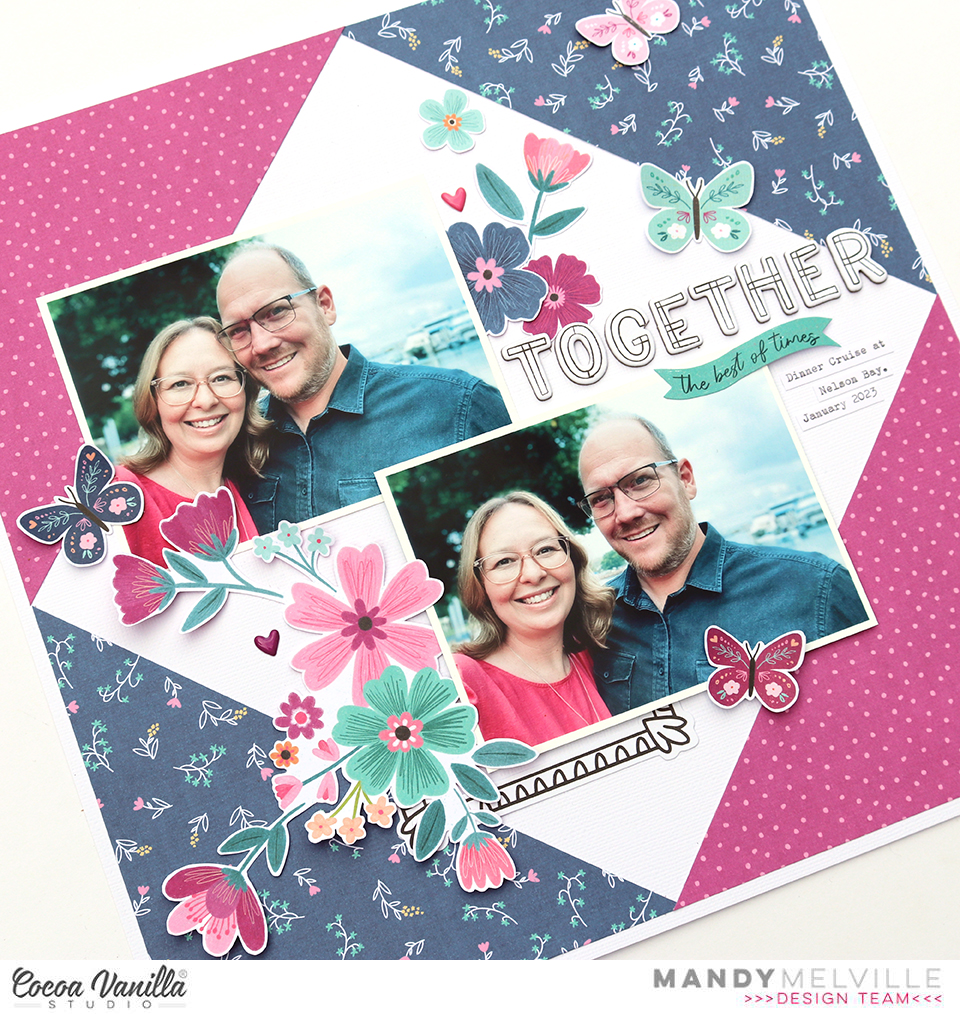
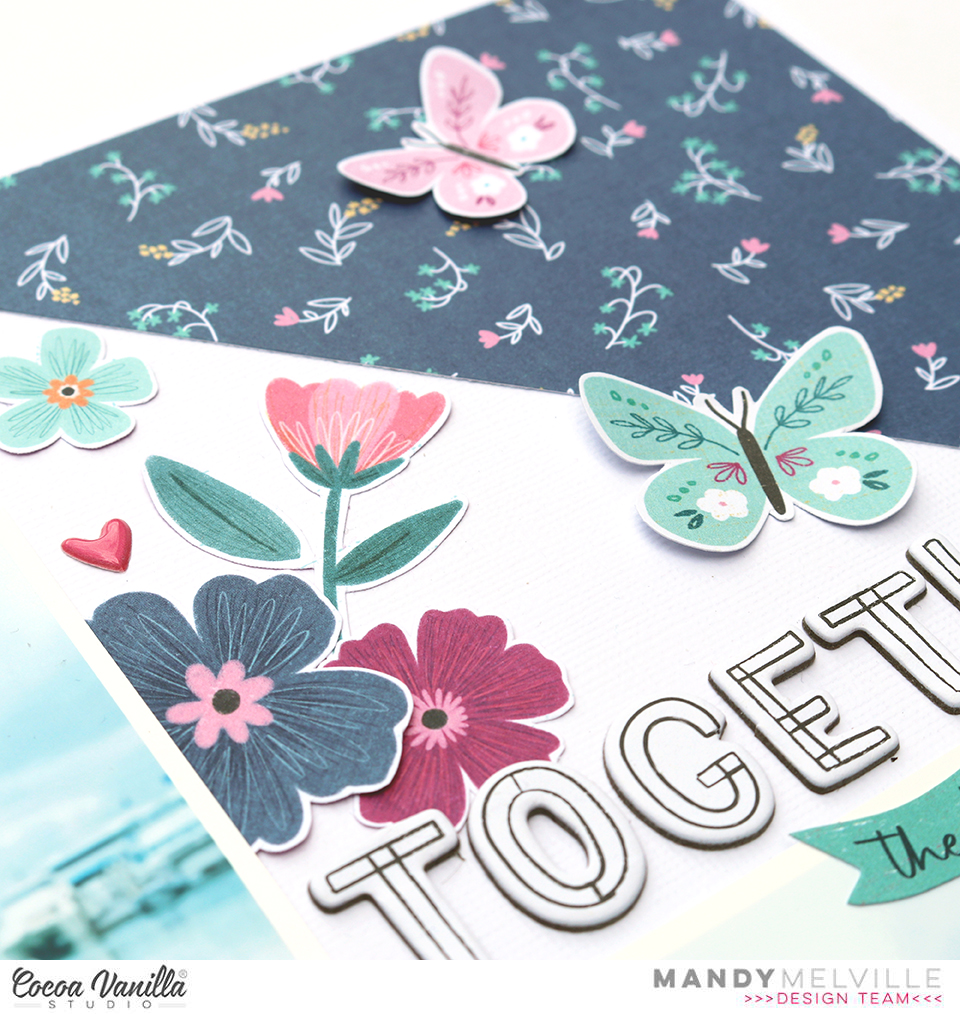
Mandy here today to share another layout featuring the super GORGEOUS Happy Dayscollection! One thing I love about this collection is how versatile it is! For my layout today I decided to scrapbook photos of my hubby and I taken when we enjoyed a date night dinner cruise. Our kids gave us a voucher for the cruise as a gift for Christmas last year, and we had such a fun night out! The Happy Days collection was perfect for documenting this special memory.
I started this layout off by cutting a 6 inch square out of the B-side of both the Definitive and the Flutterby papers. I then cut these papers in half diagonally and adhered them to the corners of a white sheet of cardstock. I chose these two papers because they matched the colours in the photos perfectly. I love the way this design frames the page and creates a diamond shape in the middle of the layout where I could add my photos and embellishing.
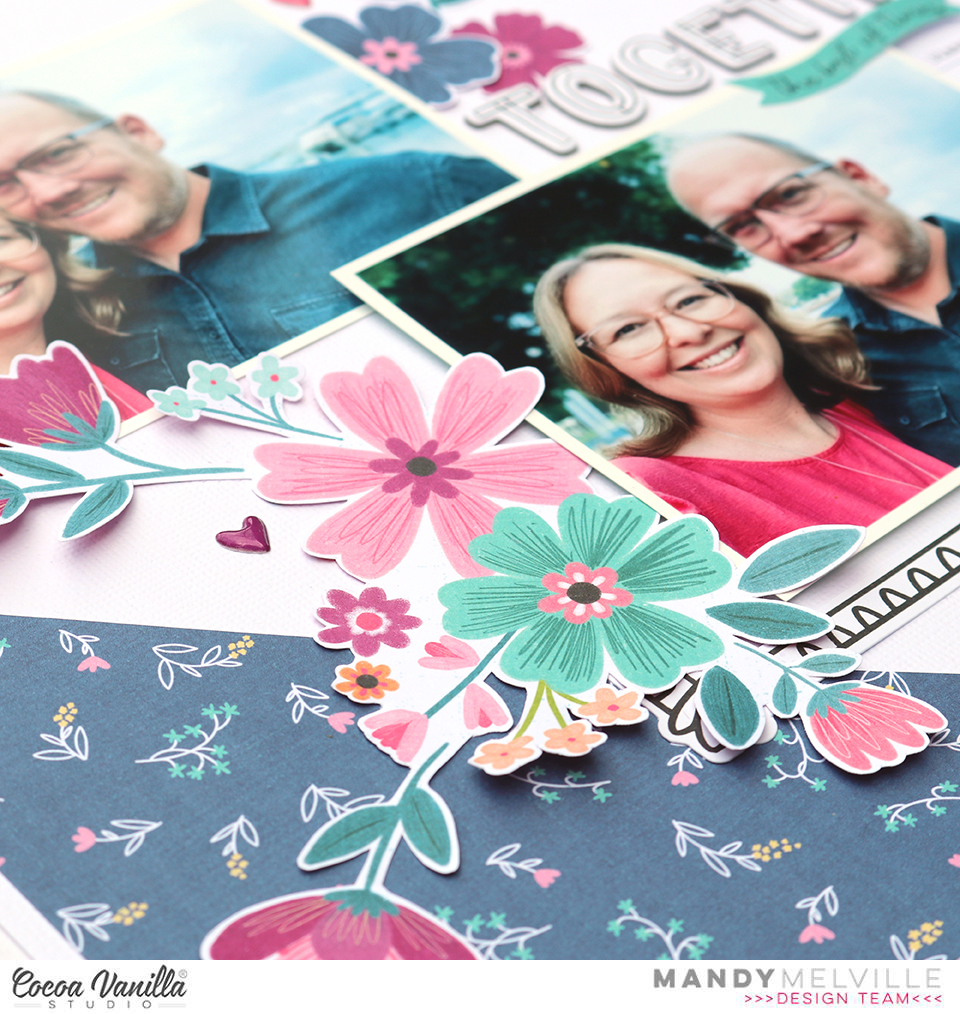
Of course I couldn’t resist fussy cutting some of the beautiful floral clusters out of the Lush Blooms paper. I tucked one under the left hand side of the bottom photo, along with a die cut frame. I love the touch of prettiness that this adds to the page!
For my title, I used the word ‘Together’ from the lovely Chipboard Titles. There are so many perfect words and phrases in this pack and it makes it super easy to add a title to your layout! Plus how sweet is that font!
To balance out the floral cluster in the bottom left, I added some more fussy cut florals to the right of the top photo. This gives the layout a diagonal flow and helps to draw the viewers eye through the photos. I finished the page off with a few die cut and fussy cut butterflies and a couple of the Puffy Stickers.
Thanks so much for stopping by the blog today! I hope that you enjoyed taking a look at my layout featuring the beautiful Happy Days collection!
Hey y’all! Laura back again with a new layout featuring the stunning new collection Happy Days! These sweet photos from our trip to Michigan over Thanksgiving were perfect for this color scheme and I just had to give them a big bold purple mat to let them pop off the page!
One of my favorite pieces in this collection are these puffy fabric hearts! They are so soft and add a sweet, whimsical feel to the page. I used them to embellish the cut-apart labels that I wrote out my journaling on.
To give my design a little extra flair, I layered some floral and icon ephemera with this “Awesome” cut-apart piece to create a dramatic title that helps focus the attention on my photos as well as accent the shape of this simple, linear design.
I hope this layout inspires you to pull out your puffy embellishments from Happy Days or any of the past collections and give them some love! To see how “Awesome” came together, check out the process video below.
Hello, hello! It’s Anna here and I have a brand new layout to share with you. I just got brand new “Happy days” collection and I couldn’t wait to start creating with it. As always, first project is somehow hard as there are so many options and decission making process is complicated. So many patterns and colors to choose from! I like to focus on limited color combo at first or even make a monochromatic page to help me narrow the choices. This time I decided to use pink – yellow – plum colors with a bit of green added.
I started with white cardstock and green ink applied with a soft brush. Next I added some texture using white chalk paste and floral stencil and left it to dry. In the meantime, waiting for the background to dry, I started fussy cutting flowers from LUSH BLOOMS PAPER. I like having a lot of florals on hand even though I have three full packs of FLORAL EPHEMERA. You can never have too many of them!
After my background was dry, it was time to add some pretty papers and embellishments. My idea for this page was to create banners on the string using different patter papers. The biggest one is made with yellow FEEL GOOD PAPER. Second one is cut out from LUSH BLOOMS PAPER (the same one I cut out flowers too!). Smallest banner in plum color is cut out with cute FLUTTERBY PAPER. I added some holes for the string to each one and glued them down to my base.
With all my main elements in place, I was ready to add my photo on the biggest banner. I decorated it with previously fussy cut flowers, some EPHEMERA pieces and butterflies cut out from FLUTTERBY PAPER. I also reached for pretty PUFFY HEARTS pack to add them here and there.
My title is a combination of word “happy” taken from EPHEMERA PACK with word “times” taken from CHIPBOARD TITLES. They look fantastic together. I love this font so much! Here I also added some flowers.
The smallest banner is decorated similar way as the other ones – with flowers and butterflies. You can also spot some cute, puffy stickers in heart shapes as a finishing touch. After finishing my composition I decided I needed to add something on the top and in the bottom of the layout as it seemed too white so I cut off strips of the papers I used for banner and glued them down! Now my page was done!
That is all for today! I hope you like my page! I already have an idea for few other projects with this line. Sending you a lot of hugs.
It’s Tarrah back with you today, I am very excited to be sharing my first layout featuring the gorgeous new Happy Days collection!
I was tasked with using the gorgeous April mood board as my inspiration for my project this week, the Happy Days collection has so many elements in it that match perfectly with the mood board!
I am documenting 2 photos of my nieces from Easter last year, I love their sweet faces so much!
As the mood board is mostly Easter themed, I chose an Easter title cut file from CUT to YOU and backed it with one of the large 12′ x 12′ papers. I love the yellow plaid patterned paper!
You can see from the mood board image below that I was inspired by many things from the mood board! The Happy Days ephemera pack has the gorgeous tassel banner included in it, I knew I was definitely going to add that to this layout! It is perfect!
I absolutely love this mood board! There are so many things you can inspired from this board!
I placed a large white paper doily down on the heart background patterned paper and then adhered the cut file down using craft foam, leaving some room for my photos above the title. I did trim down the heart patterned paper and adhered it to the pink/purple spotted paper. I then machine stitched a zig zag border down the edges where the papers meet. I love the texture that the machine stitching adds to a layout!
I layered one of the papers from the A5 paper stack underneath my photos to help lift them a little bit. I added craft foam underneath the photos as well and also added craft foam under the tassel banner and adhered this at the bottom of the title. Now that I am happy with the placement of the largest elements on my layout, its time to embellish and tell some of the story!
Do you ever look at embellishments and think about how you can use them for something they aren’t originally intended for?
I do this a lot! When I saw the fabric puffy hearts in the Happy Days collection, I just knew I had to add them to this page to mimic bunny ears! Really hoping that you picked out the bunny ears before I pointed them out to you hehe! Aren’t they the cutest?! I added 4 of these in the end, tucking them in enough so that they peek out of the tops of what they are adhered behind.
By using craft foam underneath some of the larger elements on my page, it creates some shadows and dimension to my page which I love! You can see in the photo above the shadows created under the tassel banner. I didn’t add too many embellishments to this layout as sometimes less is more when it comes to embellishing. I did add a few die-cuts from the ephemera pack like the Yay banner, the small flower to the right of my photos and the round journal spot above the photos. I also added the phrase across the cut file, to help break up all that yellow! I also added the cute Love This tab to the left of my photos as well.
Lastly I helped tell the story of my layout by adding the small phrase and word stickers from the Accessory sticker sheet. One of my signature things I do on almost all of my layouts is to stamp the date stamp, the date is of when the photo was taken. Another thing I like to do is, and you don’t see this but I like to sign the back of my layouts and I write the date that I created it as well. I have doing this for years now! Do you have something you like to include on all of your projects? Please share with us!
Thank you so much for stopping by the Cocoa Vanilla Studio blog today! I hope you enjoyed reading how I created my layout as much as I enjoyed creating it!
Make sure you get your hands on the gorgeous NEW Happy Days collection from your local scrapbook store or favourite online store!
I cut two strips of the “Take Flight” polka dot paper and placed them on the top and bottom part of a 12×12 thick white cardstock. I added some stitching with yellow thread and white embroidery floss.
I used a precious photo of me and my son Gabriel. I mounted it on tissue paper and foam adhesive, and centered it on the page.
I fussy cut three frames out of the “Wall of Fame” paper that I placed around the photo, and decorated them with Die Cut Ephemeras, stickers and fussy cut flowers.
I created my title with a mix of alpha dies from my stash and some Foam Title Stickers from the collection.
I placed a few phrases from the Accessory Stickers sheet, and scattered a few butterflies as the finishing touch.
Here are more close-ups:
I am so happy with the result and hope you like it too!
Hey CVS fans, welcome back to the blog and I’m so excited to share my first page using the BRAND NEW ‘Happy Days’collection.
This collection is so bright and fun with lots of cute icons…. I don’t think it would be possible to not create something that would make your heart happy. Here is a look at my page..
My assignment for today was to focus on the specialty paper from this range. It is a full sheet of gold frames with lots of cute icons such as butterflies, cameras, florals etc. I was immediately inspired to cut the whole sheet up and use some of the pieces individually. To start I pulled out some of the circular frames and decided these would form the base of my page, popping my photos behind some of them.
My background paper is the gorgeous ‘Juicy Fruit’paper … I love this paper for the mixed media look it has around the edges.. a great way to have the mixed media look without the mess!
I positioned my photos horizontally across the middle of my page, then I added some circles cut from the 6×8 paper stack to add more colour to my page.
For my title I used the ‘Happy Days’ die cut piece from the ephemera pack. I cut the letters out individually so I could wrap them around the circles….the word ‘Happy’ at the top, and ‘Days’ at the bottom. I love how this looks and emphasis’ the circular look. I also popped these up on foam to pop them off the page.
I wanted to add some of the icons from the specialty paper…you will see I added a banner on the left side of my page and a rainbow and florals to the right.
Next I added a bunch of pieces from the ephemera pack, some stickers from the ‘Accessory Sticker Sheet’ and I also cut some rainbows out from the ‘Sunshine Lollipop’patterned paper.
The ‘Puffy Hearts’are so sweet and dimensional so I HAD to add one to the centre of my page …they are a little sparkly too which adds to the fun!
To finish my page I used some of the Puffy Stickersand a light spray of gold mist…
I hope you are excited to get your hands on this collection and get creating. I cant wait to create more with Happy Days!
Hi y’all! Diving into one of my favorite collections today! I absolutely love the bold red and navy in the No Limits collection, so it is one I automatically reach for to scrap photos of my sons. For this photo of my son in his new snarky t-shirt, it was perfect!
I focused primarily on using up a ton of paper scraps on this one! The small stripes of color on the branding strips and 1/4 to 1/3 inch strips leftover from previous layouts were layered together to create a fun, colorful background on the Spark patterned paper.
To extend my photo cluster, I tucked in two cut apart pieces from the A5 paper stack to the right side of the photo. To give the photo more presence on the page, I added a frame from the ephemera pack that I cut in half and wedged in on either side of the photo cluster. Then, I finished it with a light embellishing of stars, cut apart phrases, and a chipboard title for a finishing touch!
I hope this layout inspires you to try and use up those tiny paper scraps and branding strips floating around your stash! If you’d like to see how “You’re Epic” came together, check out the process video below!
I’m so thrilled to be sharing my first layout featuring the brand new Happy Days collection! As always, Zoe has knocked it out of the park with this collection! It’s bright and fun and it’s perfect for scrapping all of your happy snaps! The hardest part for me was deciding which photos I should scrap first with these beautiful products! I ended up deciding to document the first time that my eldest daughter rode her bike with no training wheels.
I couldn’t resist using all of the gorgeous patterned papers in the collection and decided to trim the papers into one inch strips and arrange them along the top and bottom of the page. I love the way this adds lots of beautiful pattern and colour to the page and draws the viewer’s eye in towards the photos. I also added the rainbow border from the Feel Good paper along the edge of the strips. For my background I chose to use the Rainbow Bright paper with the tiny hearts on it as this provided a nice neutral contrast to all of the patterned paper strips. I matted my photos with the magenta Flutterby paper and adhered them to towards the left hand side of the page, using craft foam for added dimension.
Tucked under the top edge of the photo on the left, I added a die cut pinwheel and a flag banner. These add a fun element to the page, complementing the theme of the photos. I adhered the pinwheel with foam tape and added a chipboard star to the middle of it for some extra interest.
Of course I had to use that sweet bicycle die cut on this page! I also added the ‘Love that smile’ die cut and one of the super gorgeous Puffy Hearts to finish off this little cluster of embellishments. The puffy hearts are soft and pretty!
For my title I used the words ‘So Happy’ from Chipboard Titles pack. I love the fun and playful font that’s been used for these titles! To finish off the layout I added some typed journaling, and I couldn’t resist adding a few blooms from the Floral Ephemera pack.
Thanks so much for stopping by the blog today and taking a look at my layout! I hope that you’re as excited for this new collection as I am! I can’t wait to share more projects using Happy Days!
Hi everyone, Its Melissa here and I’m back with a new layout. Its Thursday which means Throwback time! Yay!! What I love the most about Throwback Thursday is going through my stash of gorgeous Cocoa Vanilla Studio and deciding which collection to create with! For this layout I decided to use the beautiful Daydream collection to document a family photo from Mother’s Day 2021.
This collection has gorgeous florals, and for this layout I decided to feature ‘Daisy Days’. A great way to feature a patterned paper is to tear it, and place it on a white background. This enables breathing space against a busy paper, and the use of mixed media helps integrate the two paper and cardstock. I used a distress oxide ink and the packaging technique to create some interest.
I used lots of ‘Die Cut Ephemera’ florals for my embellishing, some ‘Accessory Stickers’ and also a couple of fussy cut moths from ‘All Aflutter’. I bent up the edges of the flowers for interest and dimension. I was also very happy to get one of the ‘Flair Buttons’ onto the page!
For my titles I used one of the ‘Die Cut Ephemera’, and a word from the ‘Die Cut Titles’. I love that combining the two made for a very easy title!!
I hope you enjoyed seeing a layout created with Daydream, and I hope I’ve inspired you to dig into your Cocoa Vanilla Studio stash. If you’re like me you may want to hoard pretty supplies, but there is nothing like using up products and documenting memories!
 For my title, I used the word ‘Together’ from the lovely Chipboard Titles. There are so many perfect words and phrases in this pack and it makes it super easy to add a title to your layout! Plus how sweet is that font!
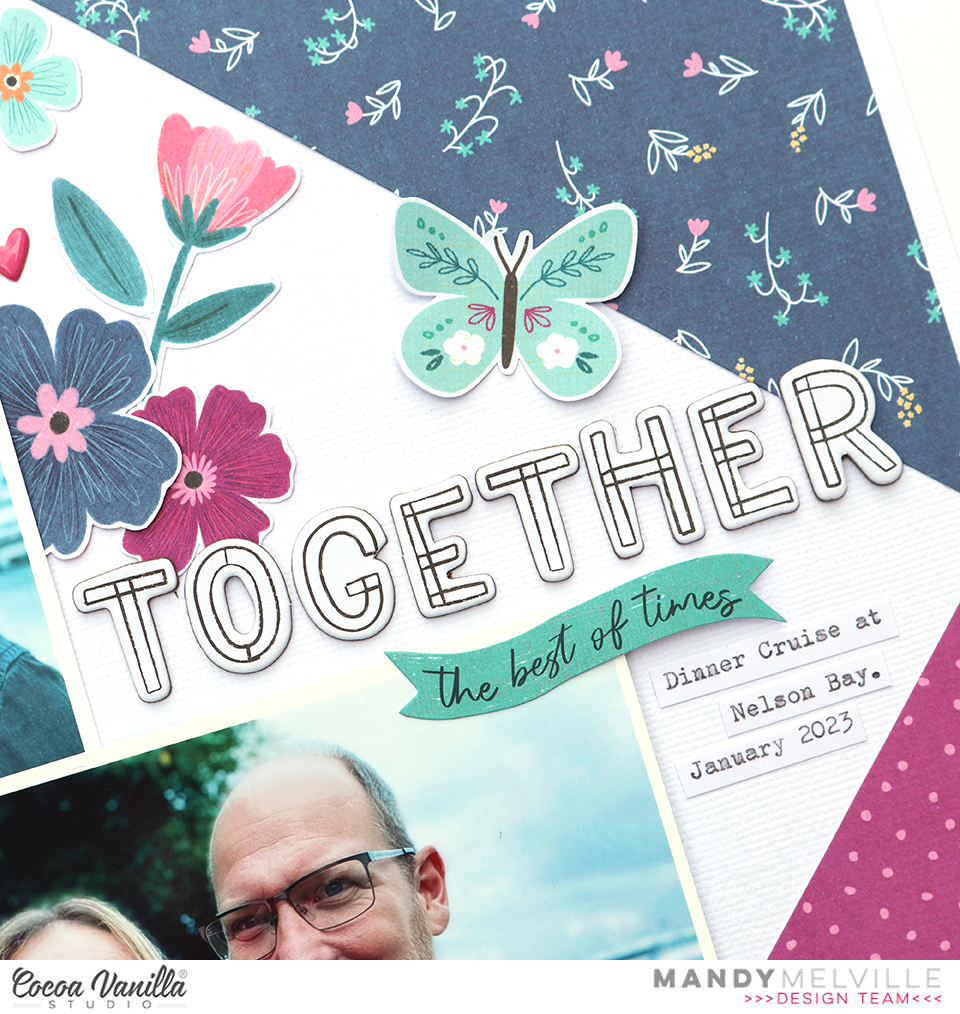


 Tucked under the top edge of the photo on the left, I added a die cut pinwheel and a flag banner. These add a fun element to the page, complementing the theme of the photos. I adhered the pinwheel with foam tape and added a chipboard star to the middle of it for some extra interest.
 For my title I used the words ‘So Happy’ from Chipboard Titles pack. I love the fun and playful font that’s been used for these titles! To finish off the layout I added some typed journaling, and I couldn’t resist adding a few blooms from the Floral Ephemera pack.
 Thanks so much for stopping by the blog today and taking a look at my layout! I hope that you’re as excited for this new collection as I am! I can’t wait to share more projects using Happy Days!


