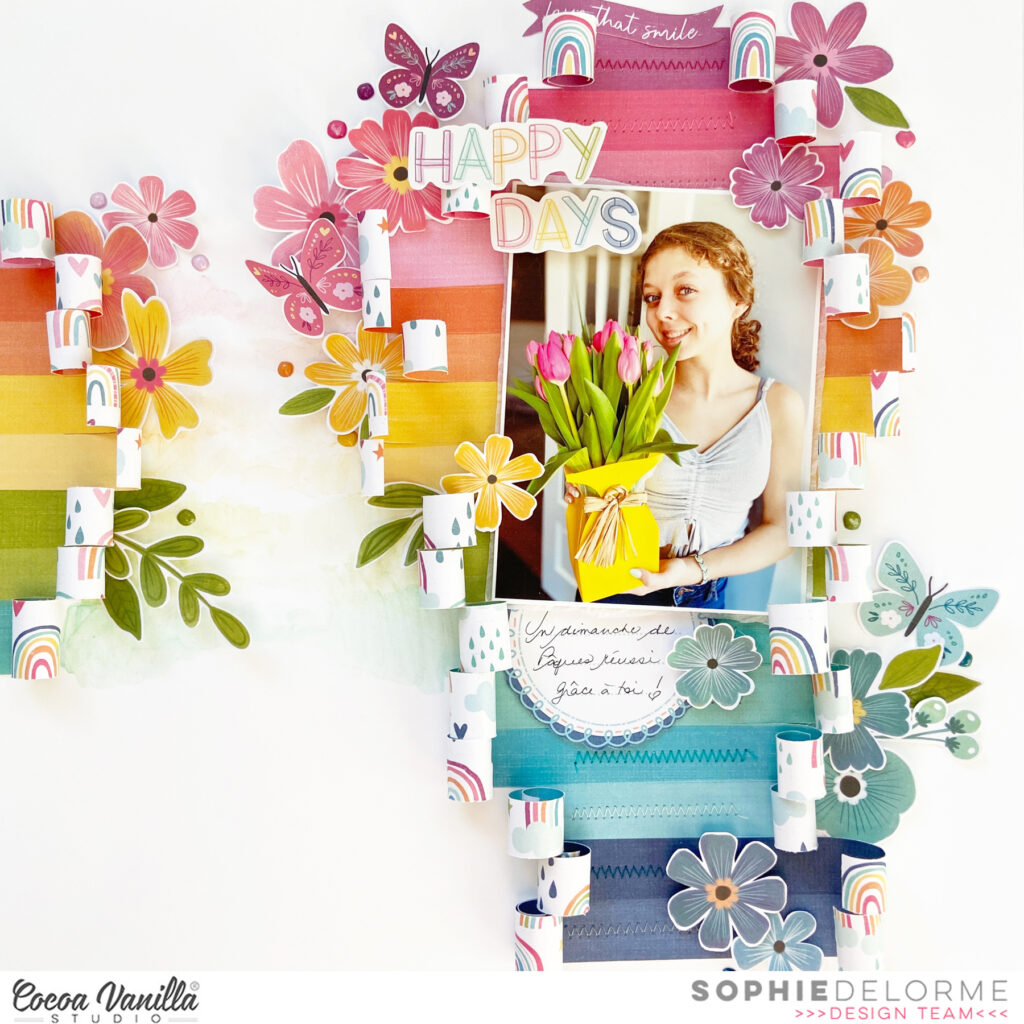
It’s Sophie with you today and I am SO excited to share my very first layout with the AMAZING Happy Days collection!
I had an assignment to focus on florals for this page…My favorite assignment EVER!!
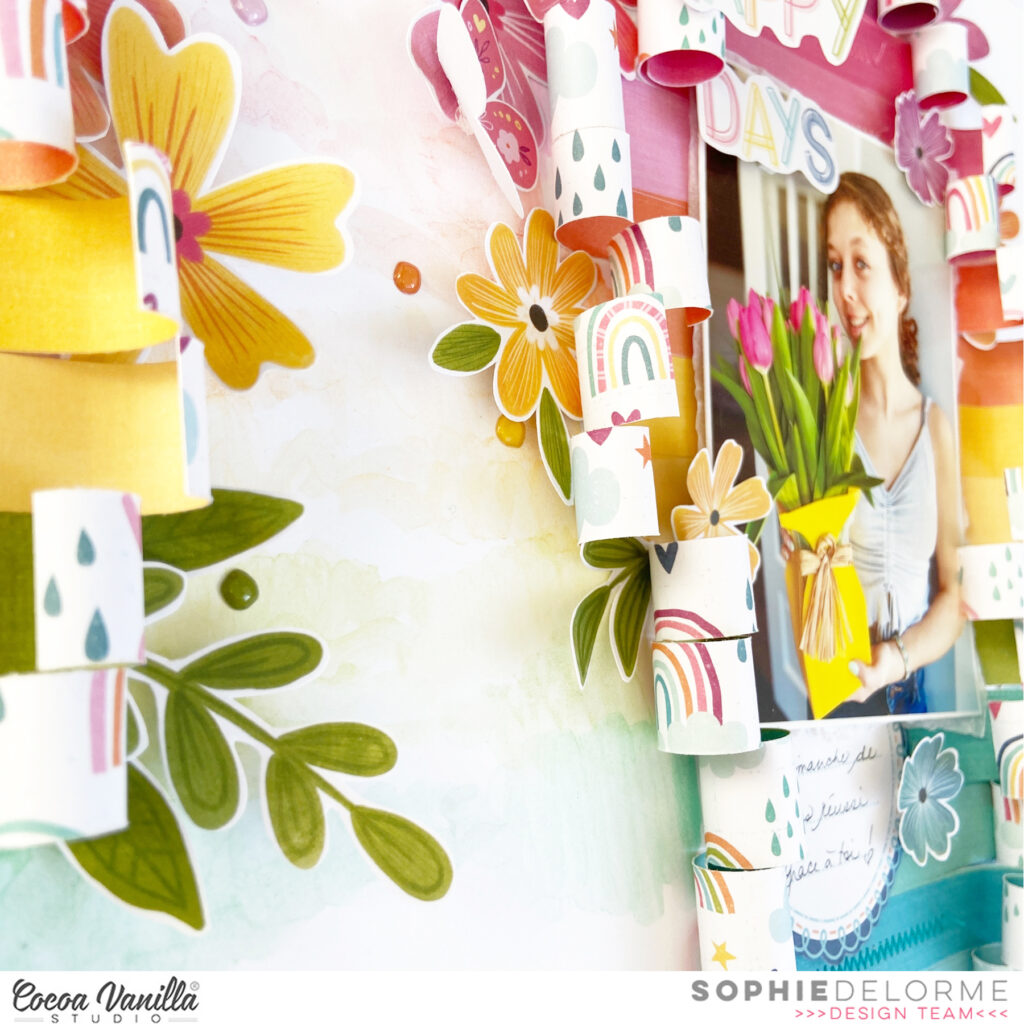
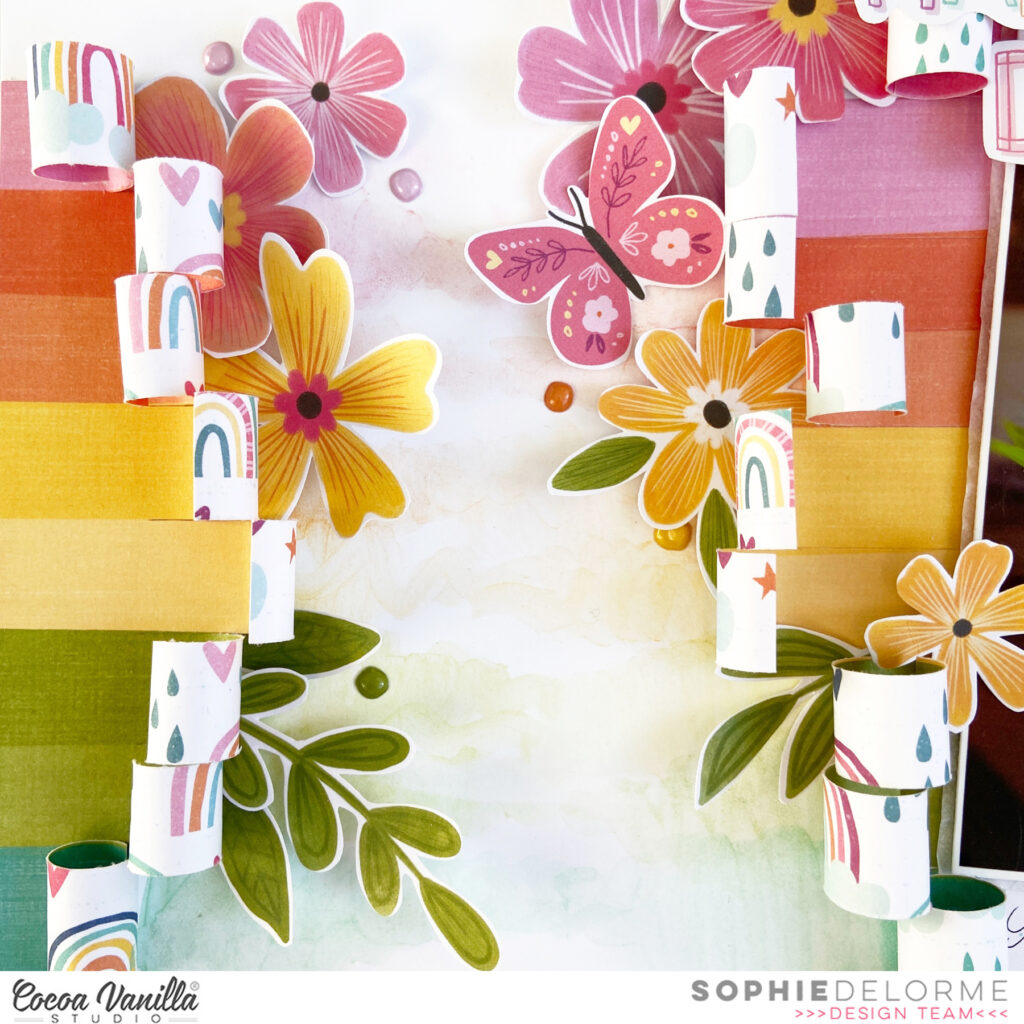
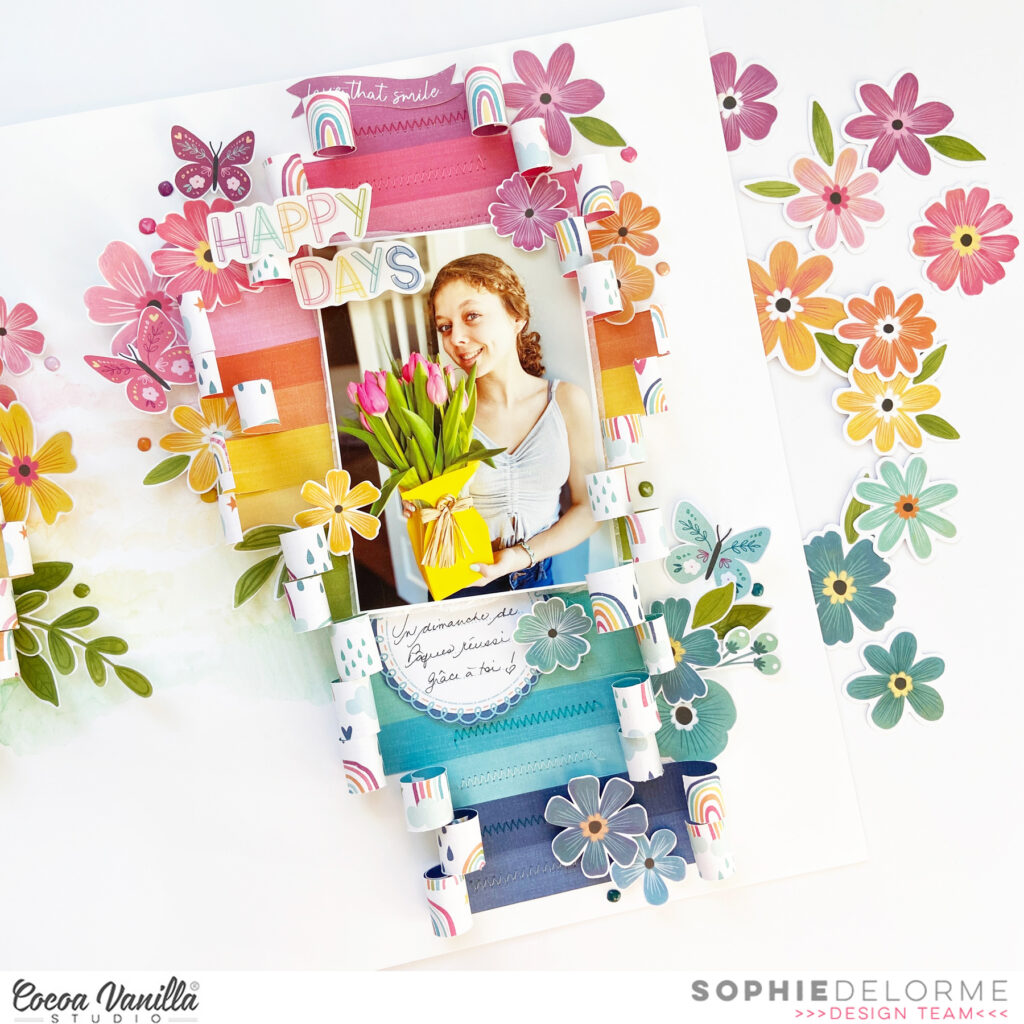
I decided to go with a rainbow themed layout with this beautiful “Sunshine Lollipops” that caught my eye instantly!
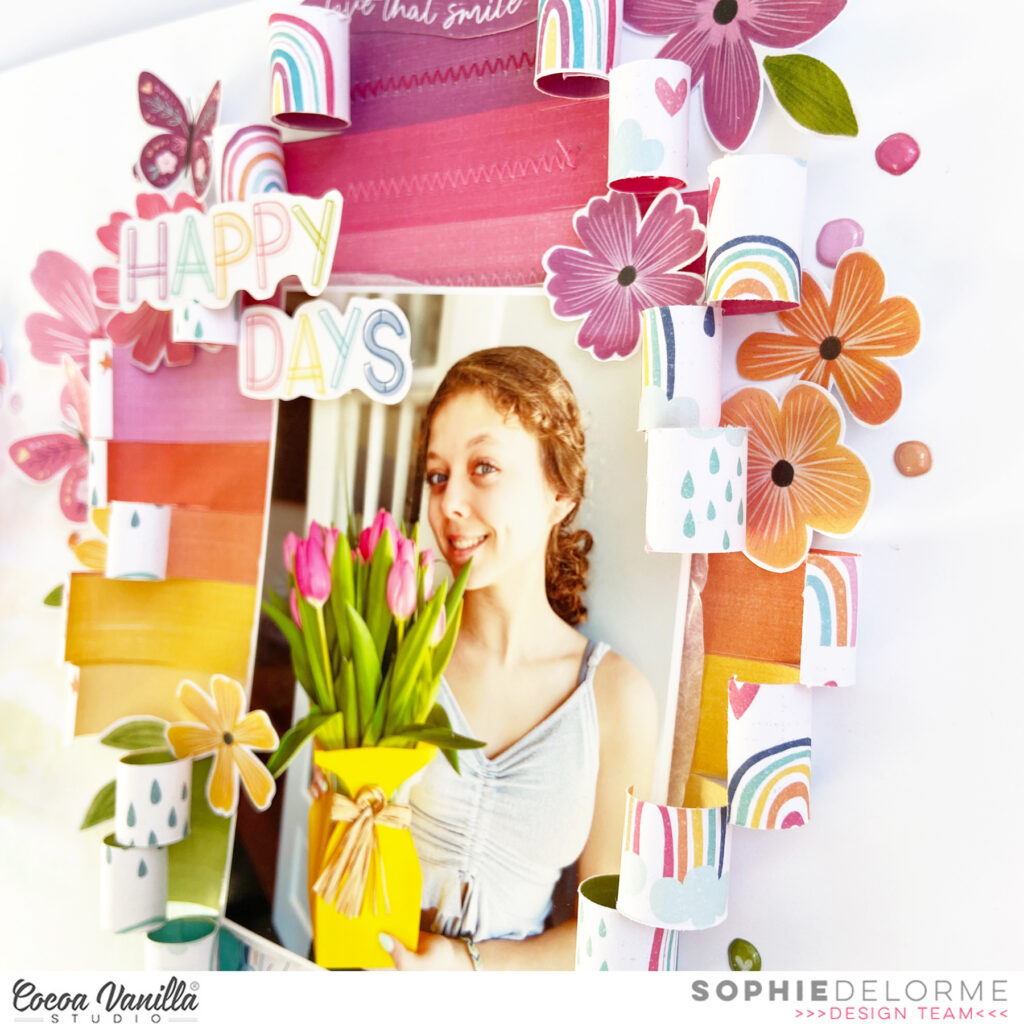
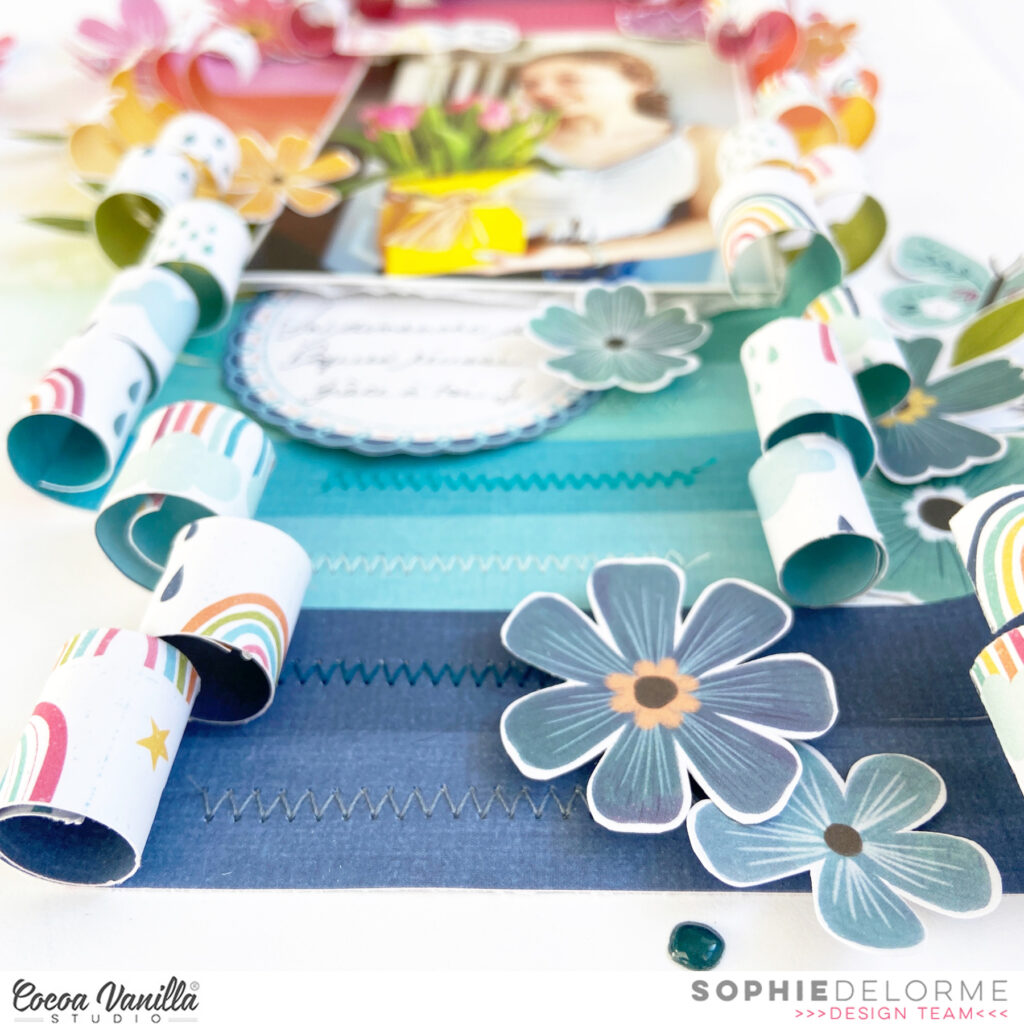
I cut along each colored strip at different lengths and rolled up the edges. I placed the rolled piece of paper on thick white cardstock and added a zigzag stitch with matching thread in the center of each colored strip.
I also placed a smaller piece of that rainbow paper on the left side of the layout and linked both piece of paper together with a very soft watercolor paint.
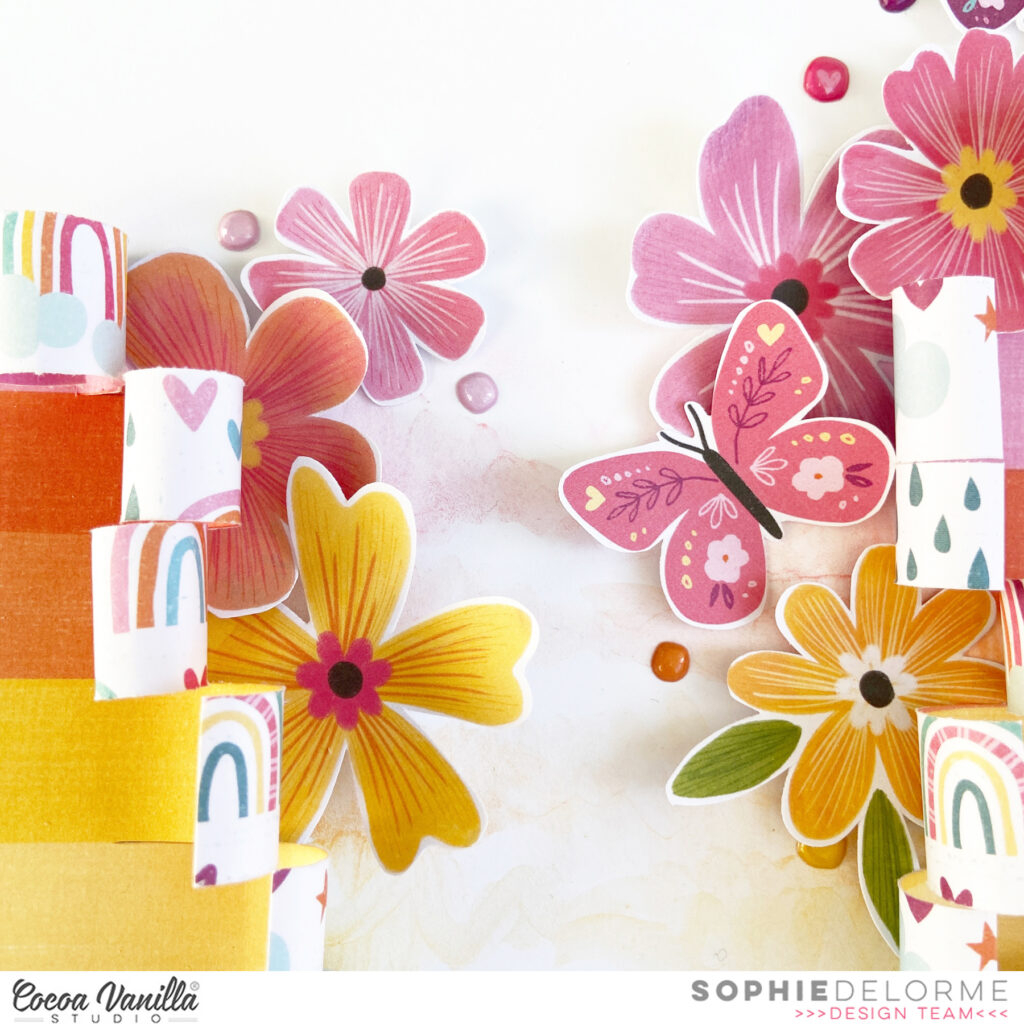
Then, I embellished the page with numerous flowers and leaves from the Floral Ephemera pack. I scattered them around the page in a tone-on-tone manner.
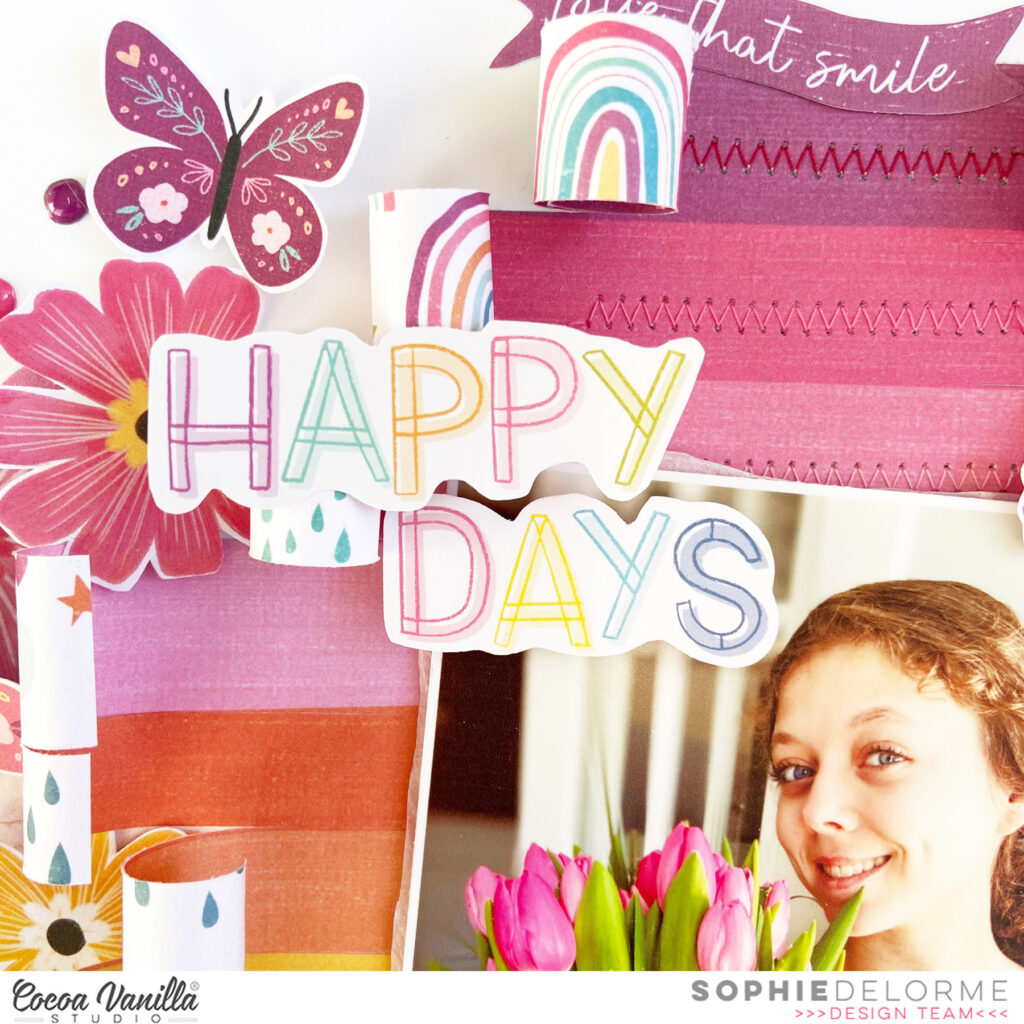
I fussy cut the title “Happy Days” from a packaging and mounted the words on foam adhesive before placing them on the top left corner of my photo.
Finally, I handwrote my journaling on a fussy cut label and added a few puffy stickers as the finishing touch.
Here are more close-ups:
This colorful page came together in no time, with only one sheet of patterned paper!
Hope this was inspiring for you! This whole Happy Days collection is a must have!!
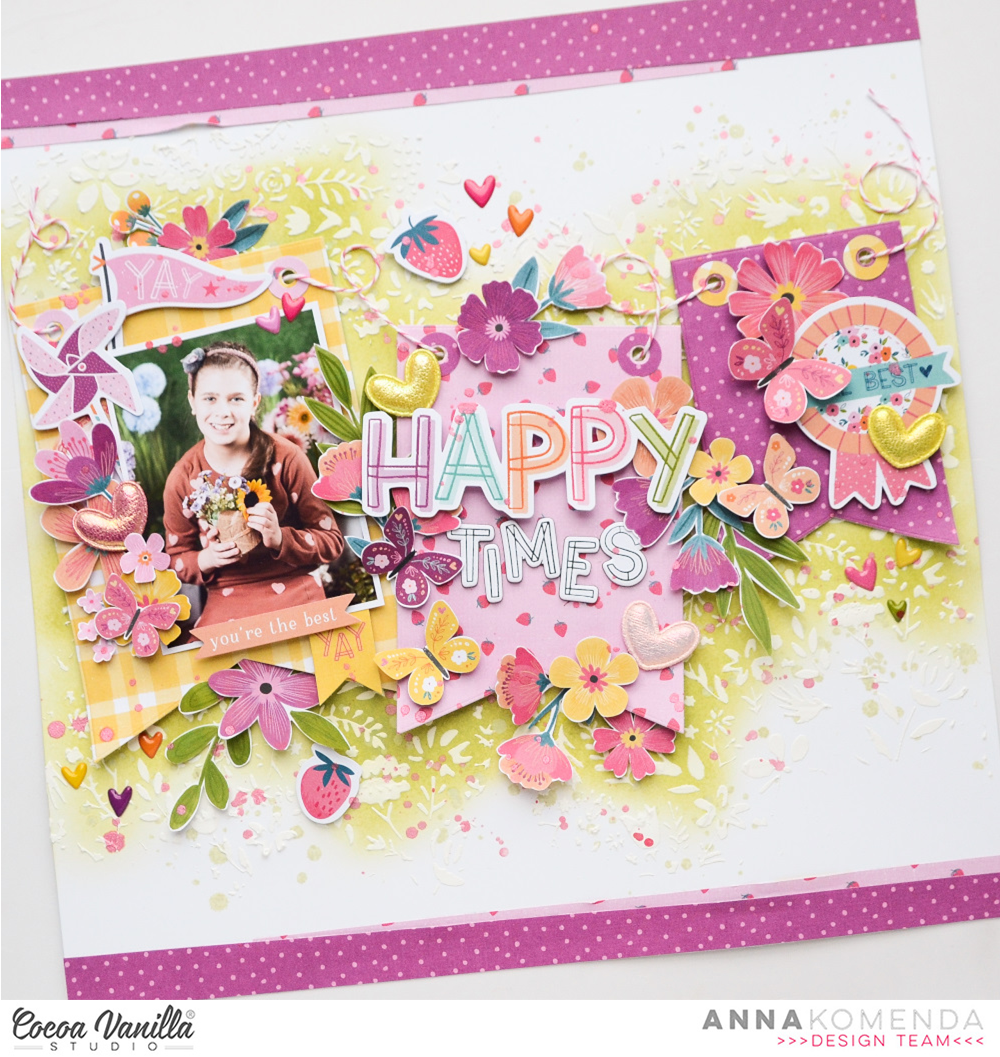
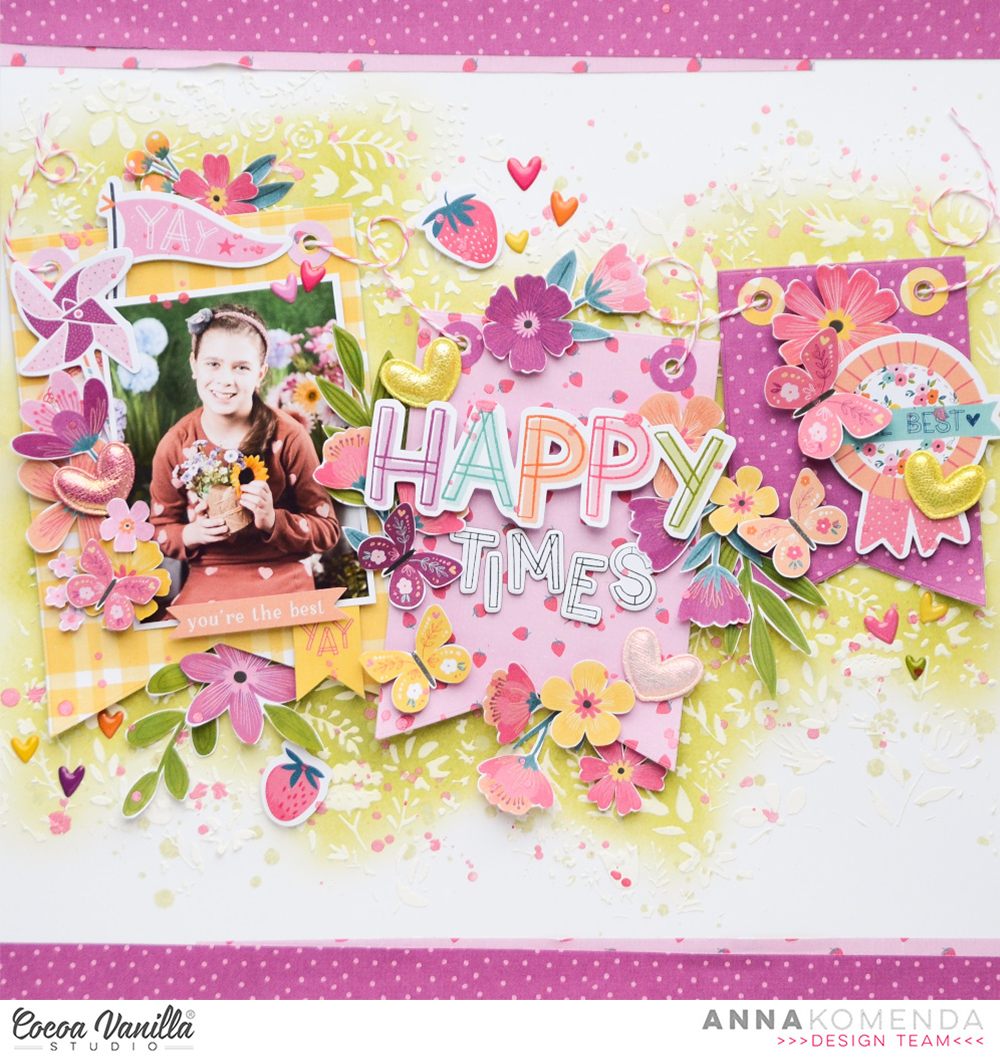
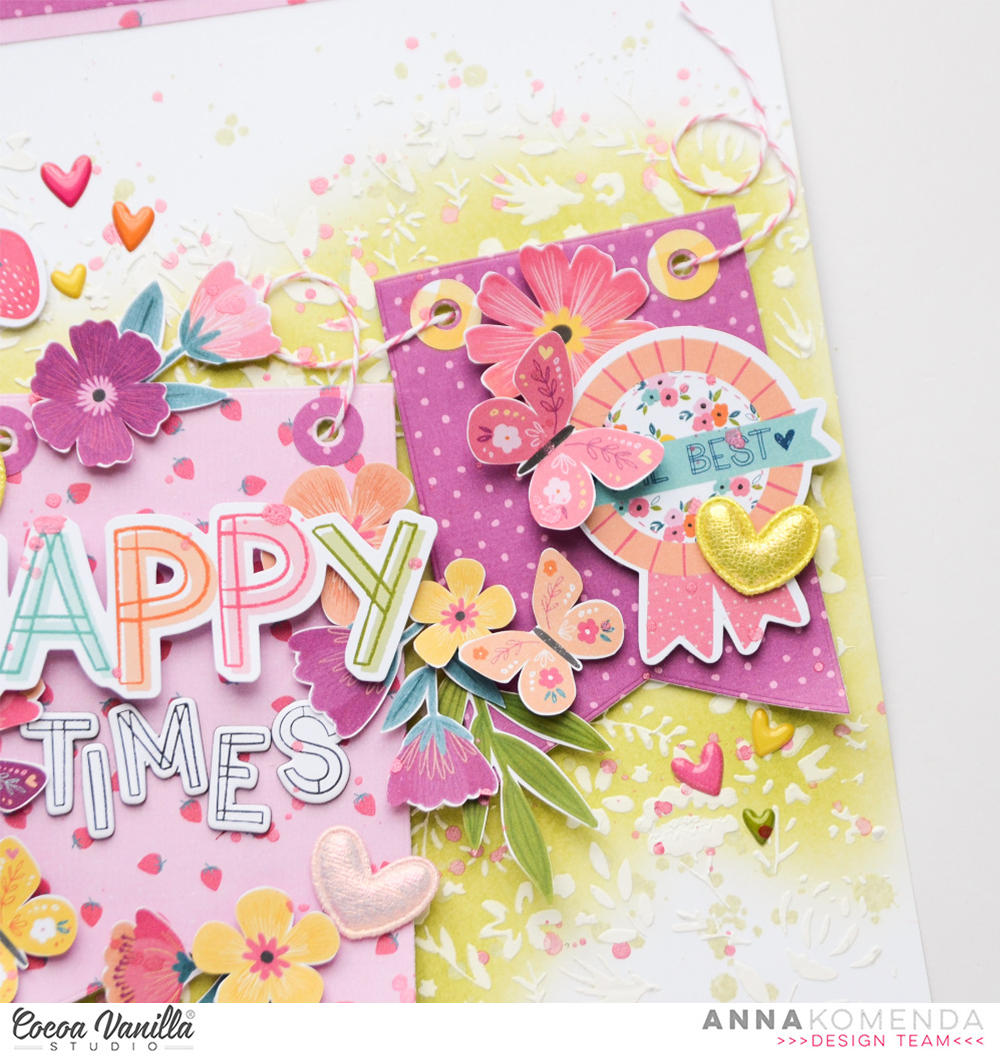
Hello, hello! It’s Anna here and I have a brand new layout to share with you. I just got brand new “Happy days” collection and I couldn’t wait to start creating with it. As always, first project is somehow hard as there are so many options and decission making process is complicated. So many patterns and colors to choose from! I like to focus on limited color combo at first or even make a monochromatic page to help me narrow the choices. This time I decided to use pink – yellow – plum colors with a bit of green added.
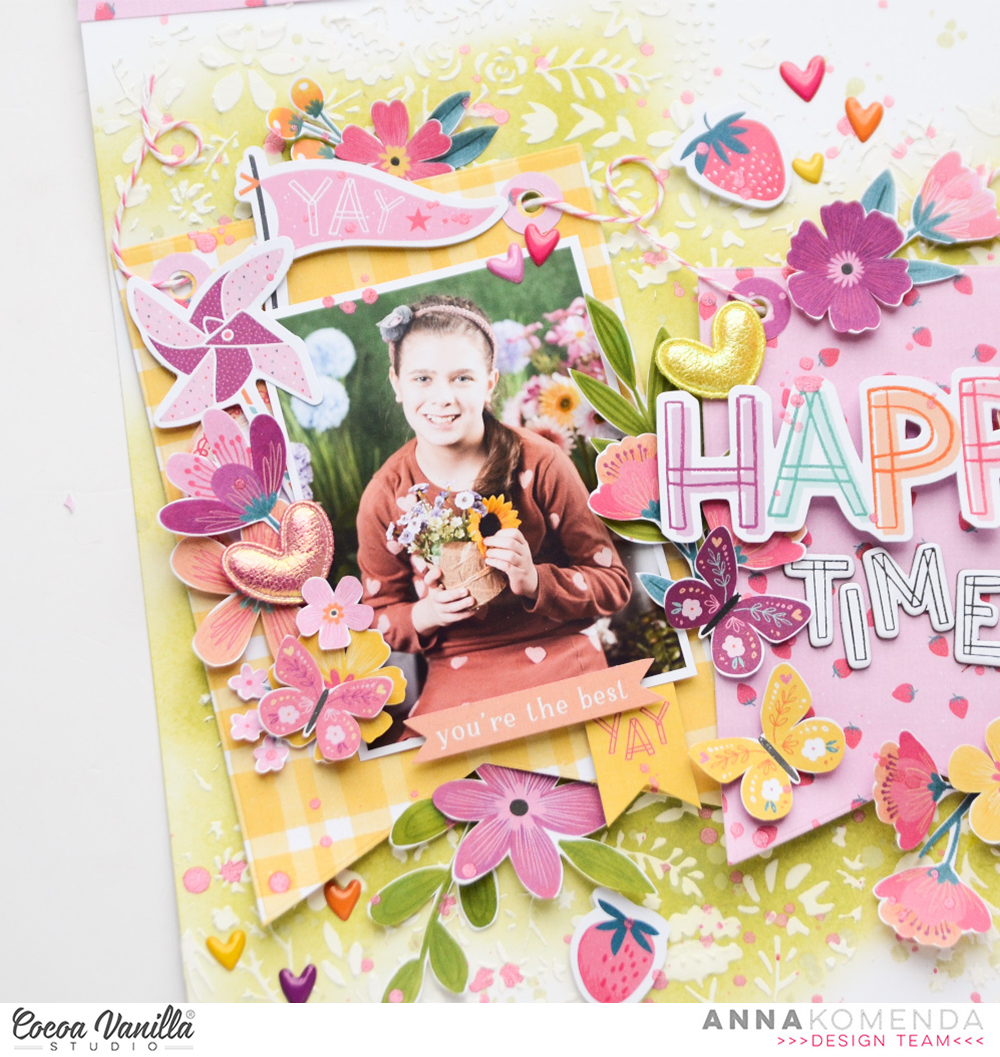
I started with white cardstock and green ink applied with a soft brush. Next I added some texture using white chalk paste and floral stencil and left it to dry. In the meantime, waiting for the background to dry, I started fussy cutting flowers from LUSH BLOOMS PAPER. I like having a lot of florals on hand even though I have three full packs of FLORAL EPHEMERA. You can never have too many of them!
After my background was dry, it was time to add some pretty papers and embellishments. My idea for this page was to create banners on the string using different patter papers. The biggest one is made with yellow FEEL GOOD PAPER. Second one is cut out from LUSH BLOOMS PAPER (the same one I cut out flowers too!). Smallest banner in plum color is cut out with cute FLUTTERBY PAPER. I added some holes for the string to each one and glued them down to my base.
With all my main elements in place, I was ready to add my photo on the biggest banner. I decorated it with previously fussy cut flowers, some EPHEMERA pieces and butterflies cut out from FLUTTERBY PAPER. I also reached for pretty PUFFY HEARTS pack to add them here and there.
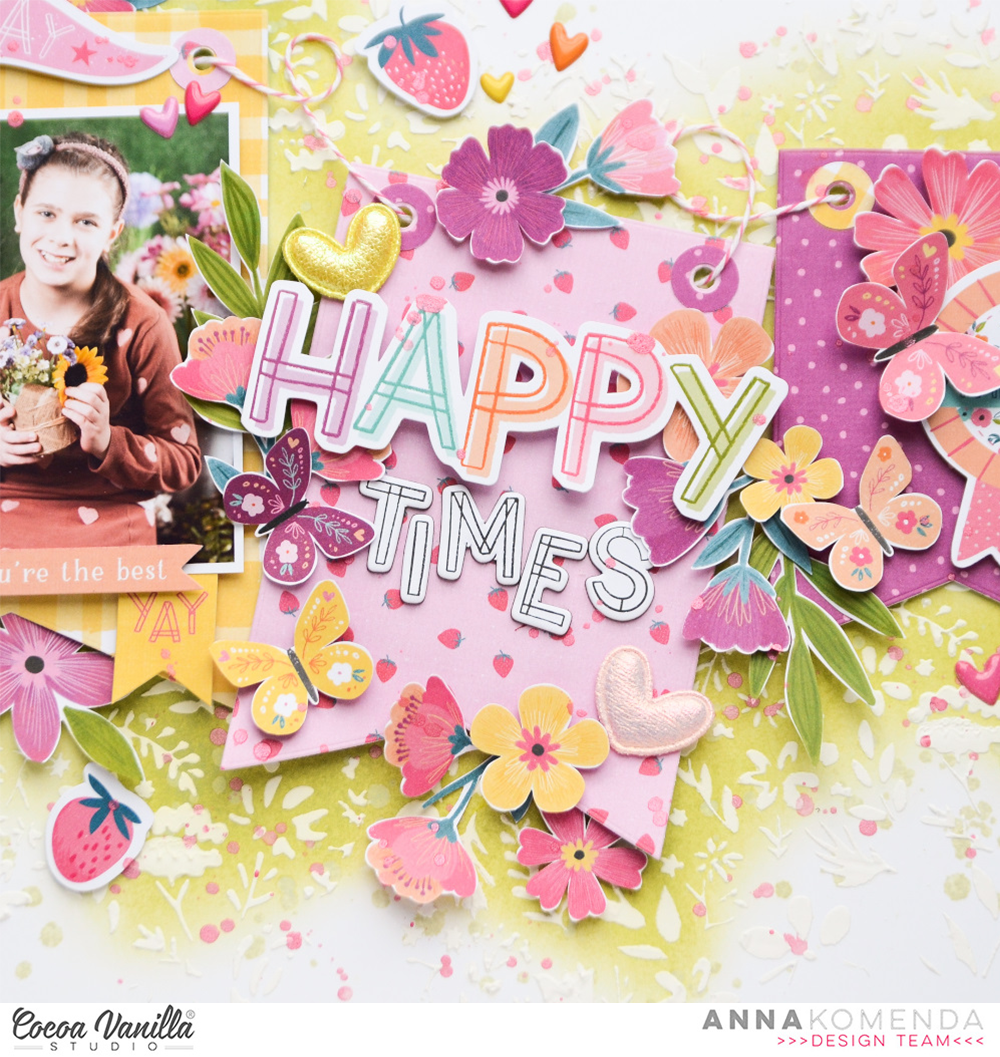
My title is a combination of word “happy” taken from EPHEMERA PACK with word “times” taken from CHIPBOARD TITLES. They look fantastic together. I love this font so much! Here I also added some flowers.
The smallest banner is decorated similar way as the other ones – with flowers and butterflies. You can also spot some cute, puffy stickers in heart shapes as a finishing touch. After finishing my composition I decided I needed to add something on the top and in the bottom of the layout as it seemed too white so I cut off strips of the papers I used for banner and glued them down! Now my page was done!
That is all for today! I hope you like my page! I already have an idea for few other projects with this line. Sending you a lot of hugs.
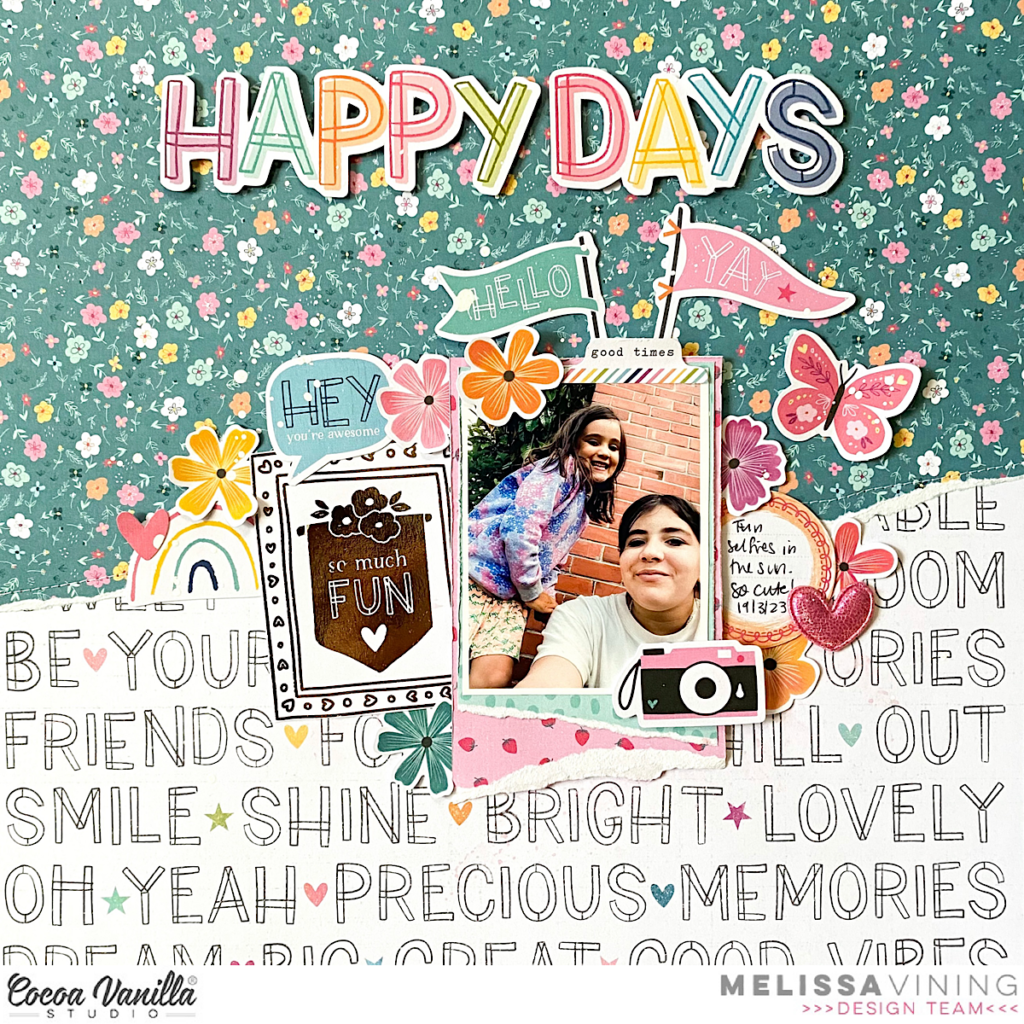
Hi everyone, it’s Melissa here and I’m so excited to be back sharing the first layout that I’ve created with the brand new Happy Days collection!! This collection arrived last week, in perfect timing for my layout today! Yay!! I don’t know about you but I always struggle with a new collection because I don’t want to cut into anything. I decided to create my ‘go-to’ design which is to feature a large piece of beautiful patterned paper, or in this instance two!
I just had to feature ‘Definitive’ and ‘Little Blossom’. Both sides of all the papers are stunning, and I’d highly recommend purchasing at least two pieces of all the papers! I tore the edge of Little Blossom and glued it onto Definitive. I machine stitched the edge for texture.
The photo is a cute selfie of two of my daughters that my oldest daughter took and I discovered on my phone. Love it when that happens! For my title I just had to use the name of the collection from the ‘Die Cut Titles’! So perfect!
I cut apart one of the gorgeous images from the ‘Specialty Paper’, and I just love the gold foiling. I tucked it slightly under my photo and then embellished around with ‘Die Cut Floral Ephemera’, ‘Die Cut Ephemera’, and one of the stunning ‘Puffy Hearts’.
You can watch my process video below.
I hope you enjoyed my first layout created with this stunning collection using my go-to design!
Cocoa Vanilla Studio has just released a new collection called Happy Days, and I’m absolutely in love with the beautiful embellishments, colors and designs! This collection is perfect for creating scrapbook layouts that are filled with fun, bright colors and playful patterns.
One of my favorite layouts to create using the Happy Days collection is a page that highlights the good things in life. Start by selecting a colorful patterned paper to fussy cut and create a round and colorful background on a white piece of cardstock with all these cute little peaches and lemons. Then, choose several coordinating patterned papers to layer underneath your photo.
Next, it’s time to add some embellishments to your page. The Happy Days collection includes a variety of stickers, die cuts, and chipboard accents that are perfect for adding pops of color and dimension to your layout. Choose a few of your favorite embellishments and scatter them around your page, being sure to balance out the colors and textures. For the title of this page I used a little banner with the quote “The best of Times”
I placed a view little puffy hearts randomly on the page and cut a gold foil butterfly from the special gold foil paper. I cut more butterflies from the pattern paper and placed them on the page as well. Between the peaches and lemon I put some green sewing thread. I love how that looks. Finally, I splatter some with white gesso and gold acrylic paint.
Overall, I highly recommend trying out this fun and beautiful scrapbook collection designed by Cocoa Vanilla Studio calls “Happy Days” With its bright colors and cheerful patterns, this collection is sure to bring a smile to your face and help you create memories that will last a lifetime!I would love if I was able to inspire you with this fun and happy layout and can’t wait to make more scrapbook projects with this awesome collection.
I hope to see you next time on the Cocoa Vanilla Studio blog with a new Scrapbook layout. Wish you a lovely and crafty day friends.
XoXo, Jo
It’s Tarrah back with you today, I am very excited to be sharing my first layout featuring the gorgeous new Happy Days collection!
I was tasked with using the gorgeous April mood board as my inspiration for my project this week, the Happy Days collection has so many elements in it that match perfectly with the mood board!
I am documenting 2 photos of my nieces from Easter last year, I love their sweet faces so much!
As the mood board is mostly Easter themed, I chose an Easter title cut file from CUT to YOU and backed it with one of the large 12′ x 12′ papers. I love the yellow plaid patterned paper!
You can see from the mood board image below that I was inspired by many things from the mood board! The Happy Days ephemera pack has the gorgeous tassel banner included in it, I knew I was definitely going to add that to this layout! It is perfect!
I absolutely love this mood board! There are so many things you can inspired from this board!
I placed a large white paper doily down on the heart background patterned paper and then adhered the cut file down using craft foam, leaving some room for my photos above the title. I did trim down the heart patterned paper and adhered it to the pink/purple spotted paper. I then machine stitched a zig zag border down the edges where the papers meet. I love the texture that the machine stitching adds to a layout!
I layered one of the papers from the A5 paper stack underneath my photos to help lift them a little bit. I added craft foam underneath the photos as well and also added craft foam under the tassel banner and adhered this at the bottom of the title. Now that I am happy with the placement of the largest elements on my layout, its time to embellish and tell some of the story!
Do you ever look at embellishments and think about how you can use them for something they aren’t originally intended for?
I do this a lot! When I saw the fabric puffy hearts in the Happy Days collection, I just knew I had to add them to this page to mimic bunny ears! Really hoping that you picked out the bunny ears before I pointed them out to you hehe! Aren’t they the cutest?! I added 4 of these in the end, tucking them in enough so that they peek out of the tops of what they are adhered behind.
By using craft foam underneath some of the larger elements on my page, it creates some shadows and dimension to my page which I love! You can see in the photo above the shadows created under the tassel banner. I didn’t add too many embellishments to this layout as sometimes less is more when it comes to embellishing. I did add a few die-cuts from the ephemera pack like the Yay banner, the small flower to the right of my photos and the round journal spot above the photos. I also added the phrase across the cut file, to help break up all that yellow! I also added the cute Love This tab to the left of my photos as well.
Lastly I helped tell the story of my layout by adding the small phrase and word stickers from the Accessory sticker sheet. One of my signature things I do on almost all of my layouts is to stamp the date stamp, the date is of when the photo was taken. Another thing I like to do is, and you don’t see this but I like to sign the back of my layouts and I write the date that I created it as well. I have doing this for years now! Do you have something you like to include on all of your projects? Please share with us!
Thank you so much for stopping by the Cocoa Vanilla Studio blog today! I hope you enjoyed reading how I created my layout as much as I enjoyed creating it!
Make sure you get your hands on the gorgeous NEW Happy Days collection from your local scrapbook store or favourite online store!


 I placed a view little puffy hearts randomly on the page and cut a gold foil butterfly from the special gold foil paper. I cut more butterflies from the pattern paper and placed them on the page as well. Between the peaches and lemon I put some green sewing thread. I love how that looks. Finally, I splatter some with white gesso and gold acrylic paint.


