Hey y’all! Laura here, sharing a wedding layout using the beautiful Happiness Collection. I absolutely love this gorgeous patterned paper, Expressive, and had to use it for the background. It has such a beautiful mixed media design to it with little marks that appear hand-drawn, stunning! I decided to add a little bit of extra media via texture paste through a stencil to create a landing spot for my photo. With just a few scraps of papers from the 6×8 paper pad along the left side of the photo helps create a defined foundation.
I tucked in several floral ephemera pieces on the left side of the photo along with a few butterflies that I fussy cut from the 6×8 paper pad for a bit of fun. A couple of flags from the sticker sheet on the corner of the cluster. The title is layered along the bottom corner, overlapping a journaling spot with a sweet message about my darling husband.
Starting at the bottom right corner, I created a kaleidoscope of butterflies fluttering off toward the top, left corner, a few overlapping the photo. With a little bit of Nuvo Glitter Drops to create butterfly trails, it gives the appearance of movement on the layout. A little bit of gold ink splatter finishes off the edges!
I hope you found some inspiration in this wedding layout! It was so much fun to fussy cut out all of these beautiful butterflies from the Bright & Beautiful patterned paper. I find if I just adhere the butterflies at the center and leave the wings free it gives a fun 3-D look without adding bulk. Below is the process video for this layout, enjoy!
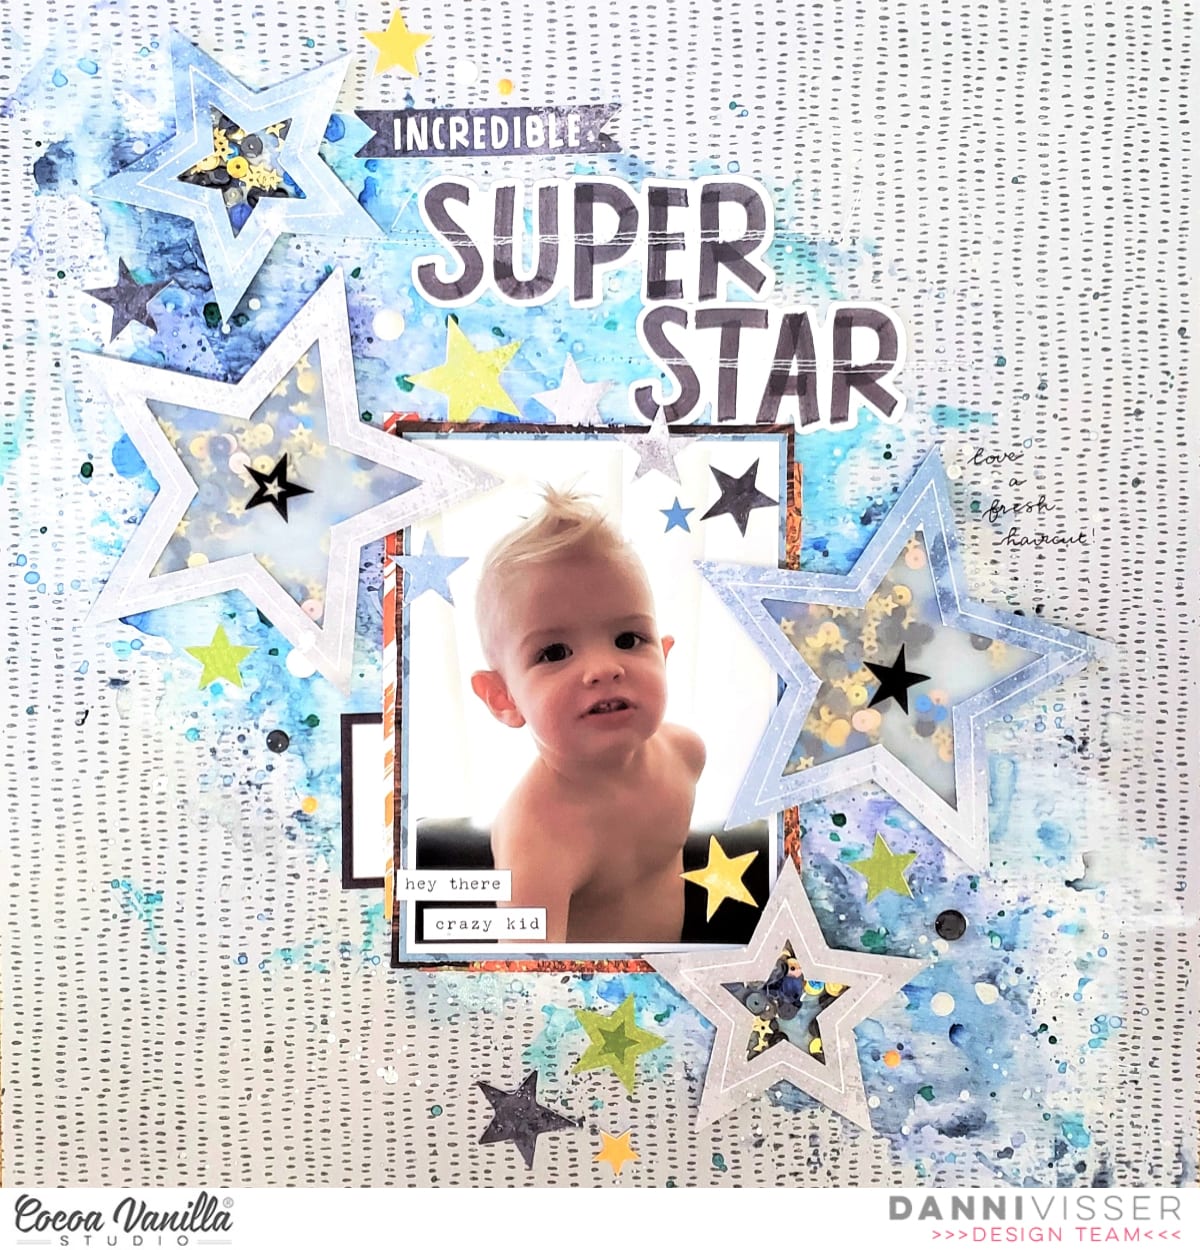
Hi there! Danni here, back with another fun layout using Legendary. You know we all LOVE stars over here at Cocoa Vanilla and I have been eyeing off the large star die cuts from the die cut ephemera for quite a while now. For this layout I decided to go sequin-happy and make some shaker embellishments!
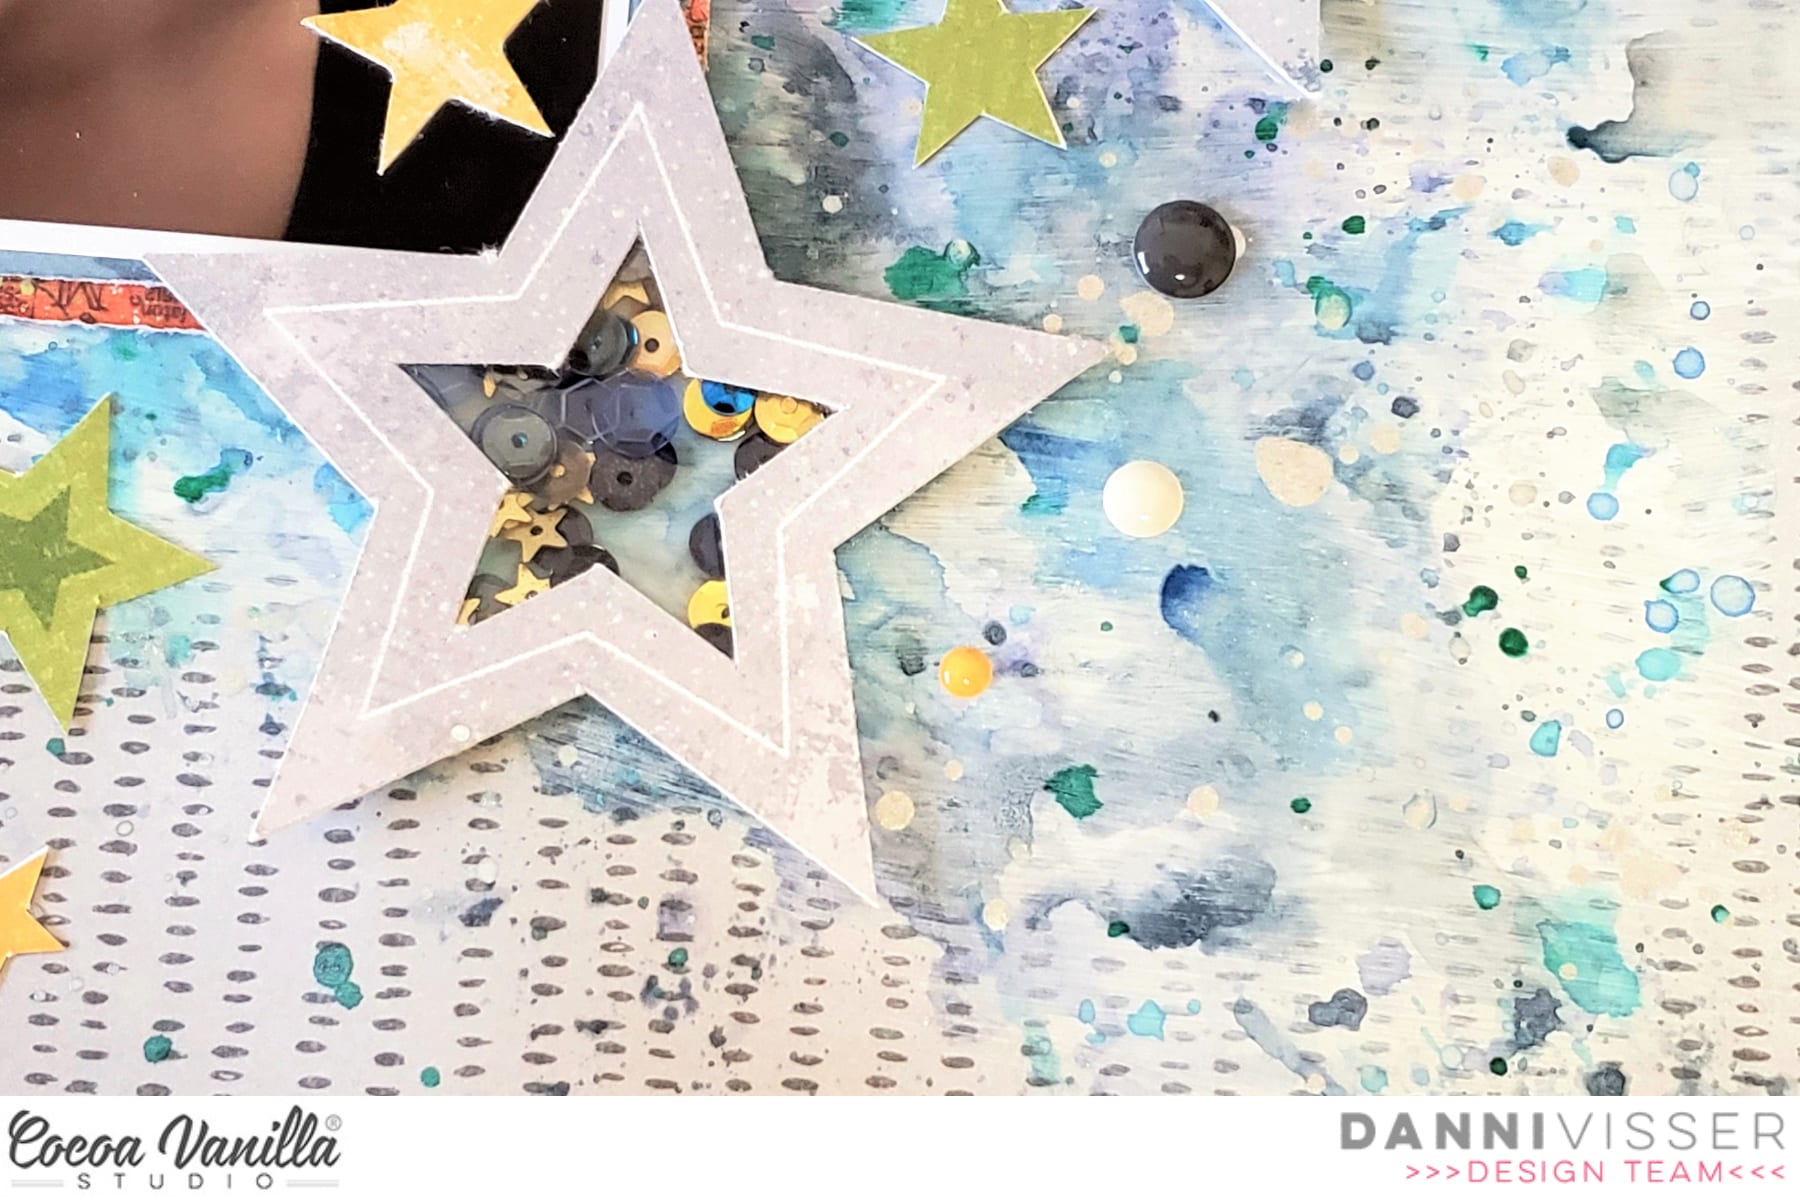
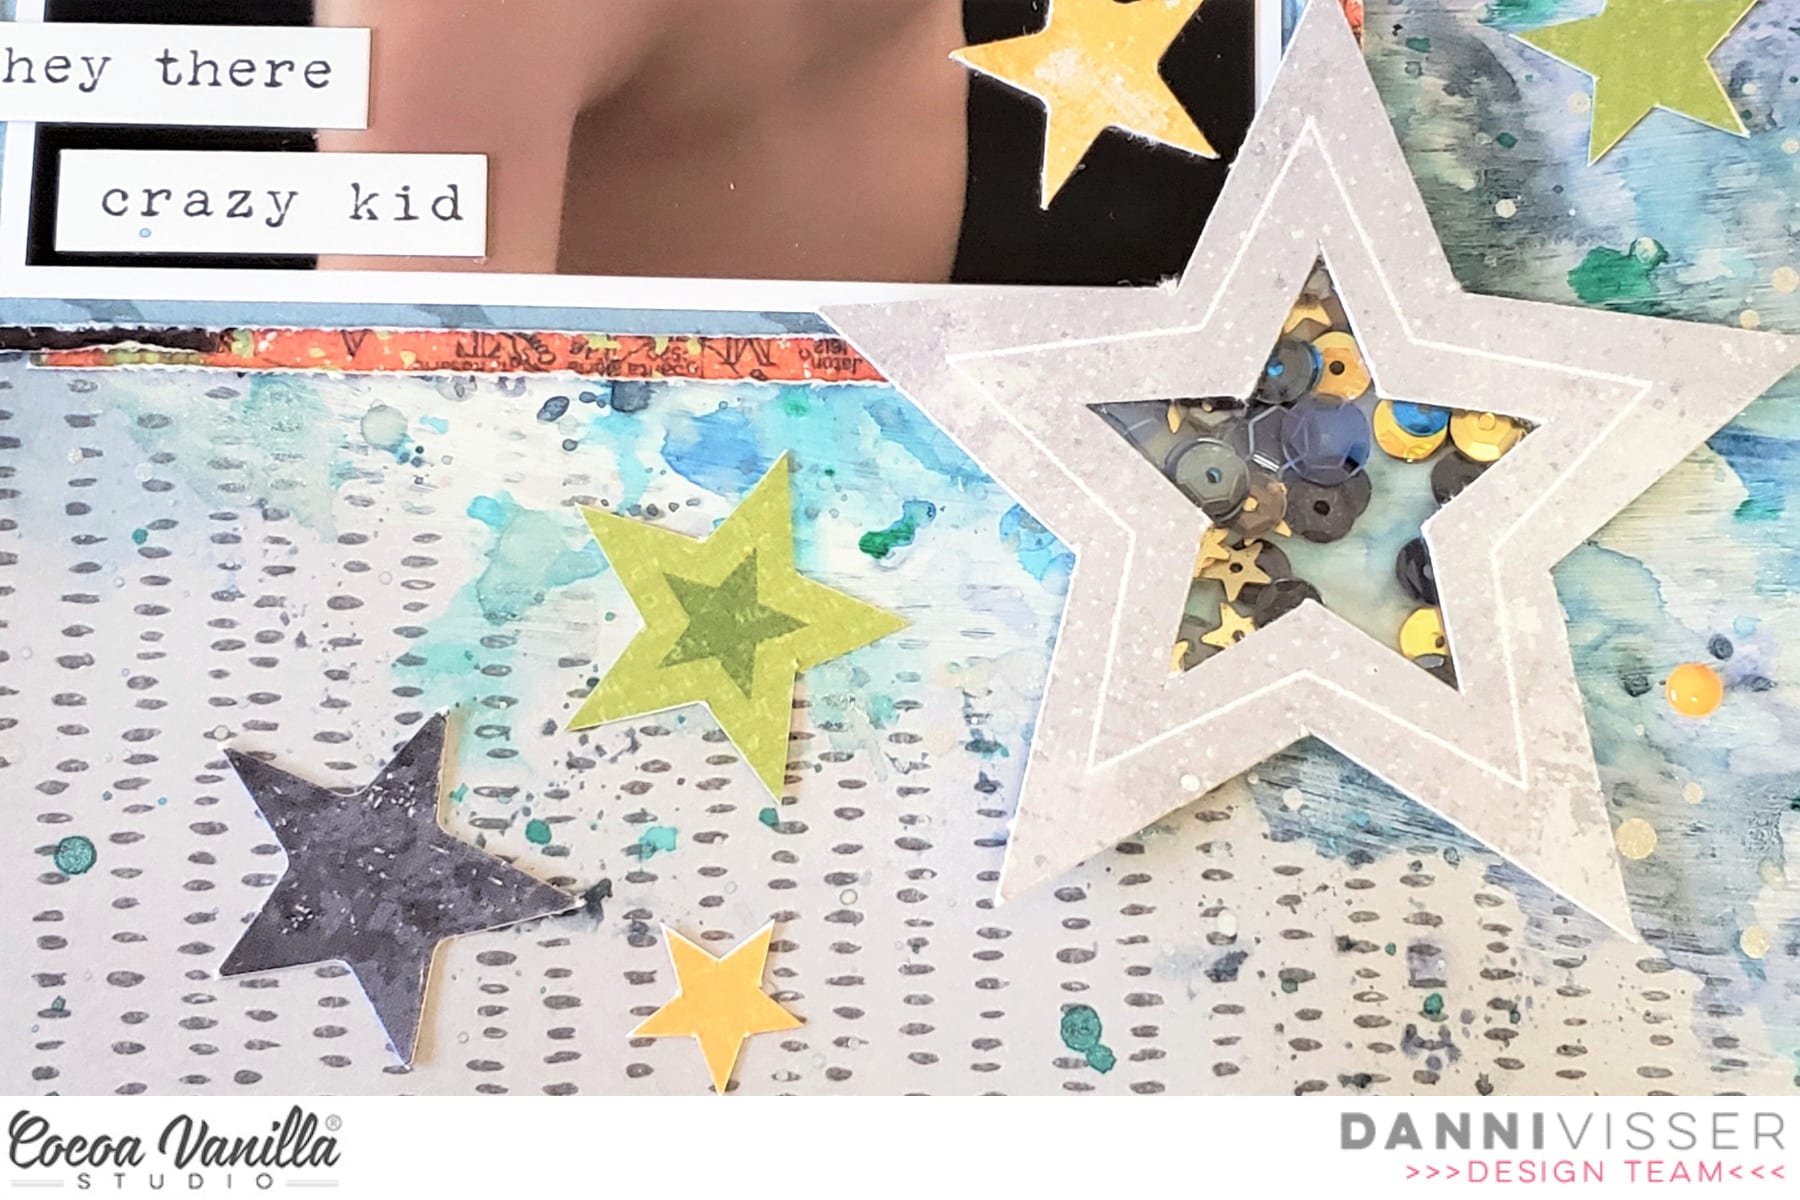
I took four of the large star die cuts with the negative space in the centres to make my shakers, they were just absolutely perfect for this. To make the shakers, I adhered a layer of vellum behind the die cut for the largest stars and acetate for the smaller ones (just for some variation, you could use either). I then added a layer of adhesive foam around the edge, filled the space inside with sequins and glued another layer of vellum behind to keep it all together. Ta da! Instant shaker embellishments.
Next I went to work on my background. I laid down some white gesso on the grey side of All Star patterned paper, then went in with a combination of distress oxide inks, watercolours, pearl watercolours and spray inks in several different shades of blue, using the packaging technique to create lots of messy inky goodness. To finish off the background I added a generous splattering of acrylic ink in a bright metallic silver.
To mat my photo I used Offbeat, Outdoors Type and Wild One patterned papers in several layers, using up some of my scraps from previous layouts. I can’t stand to waste a single of piece of the gorgeous paper in this collection! I positioned my photo in the centre of my mixed media background and arranged the shaker stars around it, adding in lots of fussy cut stars from All Star patterned paper to fill in the gaps.
For my title I chose the words ‘Super Star’ from the die cut titles and machine stitched them onto the background, running it through back and forth several times with white thread for lots of texture. I added in some tiny stars from the clear stickers on top of my photo and in the centre of the large shakers for a bit of extra something!
Next I dug into the accessory stickers, choosing a label for the date and a couple of tiny word stickers at the bottom of my photo to help anchor it. I included a few lines of handwritten journaling to the right of my photo following the diagonal of my title, then added a sprinkle of enamel dots in three places to add the perfect finishing touch!
I hope you enjoyed this layout as much as I did! I just love all the little details. There is a process video below if you would like to watch this page come together. Thank you for joining me today!
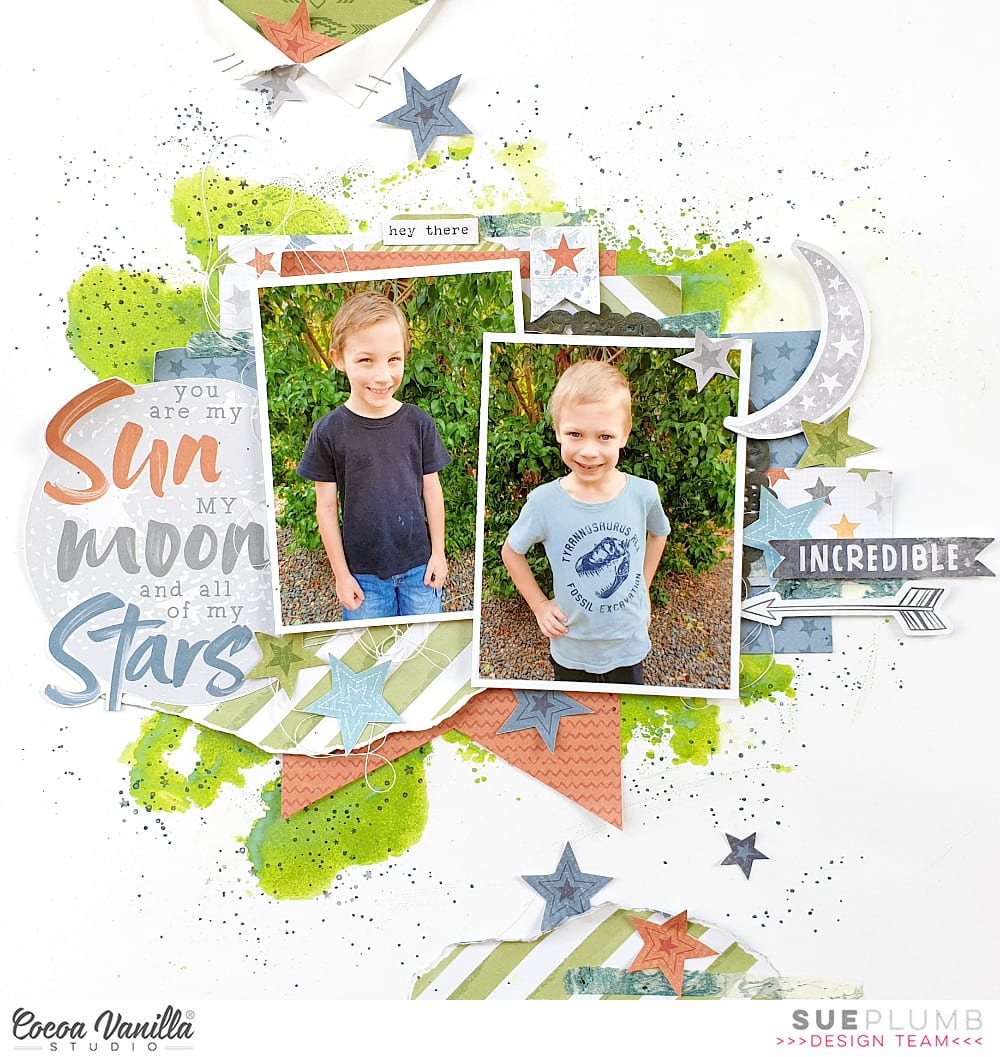
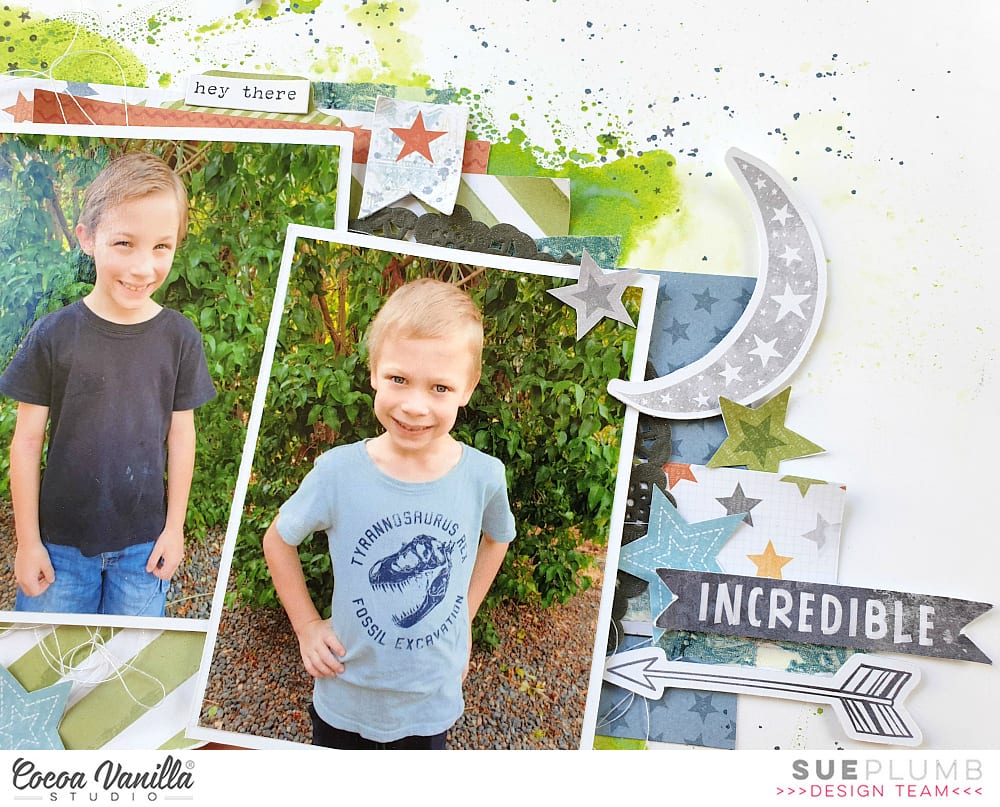
Hi everyone! It’s Sue Plumb here to share another layout featuring the ‘Legendary’ collection with you. For this one I wanted to create a mixed media page to document these sweet photos of my two boys. (I’ll take smiling non-silly photos from them whenever I can get them!)
To start, I began with a sheet of white cardstock and some green ink, as I wanted to tie in the colour of the foliage behind them in the photos. I applied the ink to my messy mat, added a little water and swirled it through with my finger before I placed my cardstock over the top to soak it up. I then allowed it to dry before I repeated the process with some blue ink, then added some stamping with black ink using a stamp that featured tiny stars.
Once the inks were dry, I added a small tear along the top edge of the cardstock, then folded the edges of the tear back and fastened with tiny staples. I then backed the tear using some of the green print from the cut apart Total Legendpaper. To balance it out, I then added a torn piece of the green striped print from the Explorer paper, adding a little torn marble print washi tape from my stash over the top.
I then turned my attention to the main focal area of my page, adding pieces of layered papers to create a photo mat. The papers I used included the blue star print from the Offbeat paper; more of the green stripe; the bold orange from the One Way paper; and the multi coloured stars of the All Star paper. I also added some more of the torn washi tape, frayed gauze, and a charcoal coloured paper doily from my stash.
After fastening all my layers in place and then adding my photos on top, it was time to get busy embellishing! The first piece I added was my title piece, which I fussy cut from the Epic Tales cut apart paper. I don’t tend to add my titles before other embellishments, but because this was a large piece and it had to be placed to the left of my photos (to hide the straight edge along the right side of it), I needed to place it first.
Now it was time to add “the sprinkles” – because that’s what embellishments are, right?! The sweet little morsels we add to finish things off. First and foremost, my layout needed STARS! (What else was I going to use with a title like that?) I fussy cut a handful of various sized stars from the All Star paper and scattered them around my page, bending the points up for extra dimension.
To balance my title, I needed a cluster to the right of my photos so I added a moon, the incredible label and an arrow from the Die Cut Ephemera pack (using foam tape to pop them up a little from the background). Above my photos I added a little star banner (also from the ephemera pack) and the little hey there phrase from the Accessory Sticker sheet. I then finished off my page with a splattering of navy mist.
Thanks so much for stopping by today so I could share this with you, I hope you are feeling inspired to pull out your supplies and get creative to. Until next time, happy scrapping!
Hey y’all! Laura Alberts back again with a sweet layout of my grandmother using the stunning Happiness Collection. I started with a cut file from Hip Kit and filled it with papers from the Happiness 6×8 paper pad, then added it to this gorgeous teal background on the Good Vibes patterned paper. Using floral swags from the ephemera pack on the left and bottom of the photo and adding a cut-a-part piece from the Little Things patterned paper to add my journaling.
The larger butterflies are fussy cut from a cut-a-part sheet and the smaller butterflies are all fussy cut from the Bright & Beautiful patterned paper. I love the simple elegance trenbolone these add to this layout, it’s amazing the mileage you can get from patterned paper if you’re willing to fussy cut out the beautiful icons! I thought these lovely butterflies were perfect for a memorial page honoring my grandmother’s amazing life.
To finish this layout off, I added clear heart stickers around the clusters and the arrows by the die-cut title. Then, a little flourish with Nuvo drops in gold and white, as well as gold splatter! I love the way the tiny details like butterfly trails give this layout such movement and interest.
I hope this layout inspires you to try adding some extra tiny details to your layouts! If you’d like to see this layout created, I have a process video below! Have a wonderful and creative day!
Hello!! Its Melissa here and I’m so happy to be back with you sharing another layout that I made with the amazing Legendary collection. For this layout I decided to work with the stunning Explorer paper (shown below), specifically the B side with the stunning circular pattern.
I always knew that I wanted to hand stitch this paper, but I wasn’t sure exactly how. When I looked at the paper I could see a snowflake, which was perfect for scrapbooking two chairlift selfies that I took on Coronet Peak Ski Field (here in Queenstown, New Zealand) last Winter of my daughter Azaria and I.
I started making this layout by piercing holes along the lines of the snowflake, back stitching in white embroidery thread (full 6 strands), and then fussy cutting it out. To be honest I wasn’t sure how it was going to look, because the entire pattern with only some of it stitched didn’t look like a snowflake until I cut it away from the rest of the paper. I was pleasantly surprised that it worked, and Azaria was very excited, as she had helped me find the lines of the snowflake!
I’ve been very inspired by the other Design Team ladies that use mixed media, specifically Sue, Tazhiana and Danni, all of whom I watched create live during our International Scrapbook Day Celebration. For my layout I applied clear gesso to white card stock, and then used the packing technique with blue media, and then added some splatters in gold and white. I love how this media brings the wintry feel of my layout to life! The photo below also shows a peek of my torn border that I placed on the bottom of my layout to look like mountains. The paper is one of my favourite cut apart patterns from the B side of Total Legend!
The Legendary collection has Die Cut Titles, and I went through the pack to find the perfect title for my layout. “Hello Adventure” was perfect to describe the many afternoons my daughter and I spent skiing (her) and snowboarding (I) together. Even though Legendary is a guy collection, it works so well for documenting outdoor memories. I also had to add some whimsy with several of the adorable Clear Stickers.
I kept my embellishment to a minimum because I wanted the focus to be on the snowflake, but I did find the perfect phrase sticker and “Lets Go” sticker from the Accessory Stickers. The two papers that I used to back my photos are Epic Tales and Total Legend (the A side). I added texture to these papers by tearing the bottom edge and distressing the other three edges.
Hi Everyone it’s Michelle here with you today to share a new layout I made to round out our Mothers Day Celebrations. I hope all the mummas out there had a wonderful day yesterday with those near and dear to them. I’ve used the sweet Happiness Collection for my layout today that documents a sweet moment of Leila and I snuggling, and a cut file design from CUT to YOU.
I chose this photo from a few years back so the quality isn’t perfect, but it totally sums up one of the many things I love about being a mum. The endless snuggles while they’re still little. Snuggles these days are very few and far between, so I Cherish the ones we do have.
I cut out the cut file design from CUT to YOU (Hearts on Strings) using the EXPRESSIVE paper and used the outer edge remnants to back frame the white cardstock background paper. I used tiny raised glue dots to adhere the cut file to the cardstock to give a slight lift off the paper.
Next I gathered some complimentary pattern papers to layer under the photo, 2 of my most used colours from this collection I think, the reverse of both GOOD VIBES and EXPRESSIVE with a tiny strip of hearts from the SO FRESH paper.
To the left of the photo I added a couple of pieces from the cut apart paper LITTLE THINGS to create a title for the layout. I also included a word sticker from the ACCESSORY Sticker sheet and some handwriting on a tag.
I fussy cut florals from the wreath pattern paper SO FRESH to create clusters both left and right of the photo/title piece and added some stickers from the Accessory sticker sheet and glitter enamels from the Make a Wish collection to finish them off.
Theres also a good splattering of gold colour shine around the page and some machine stitching of the edges to add a little extra fun to the layout.
Well thats all from me today. Thanks so much for stopping by and seeing my layout that celebrates a special moment in this mummas life. I hope you can share your precious moments with us too in the CVS Facebook group. We do love to see what you all create using CVS products.
Hi everyone! It’s Sue Plumb here to share my latest project with you. Today I am sharing a layout I created last weekend as part of the Cocoa Vanilla International Scrapbook Day celebration event. It was such an amazing weekend – full of fun, friendship, and of course, inspiration! I am so proud of our team and all the work they put into the event, and to hear how much everyone who took part enjoyed it, really made it all worthwhile.
So the layout I am sharing here was designed for Gwen’s “Grab 5” challenge where we had to include – a chipboard element; a die cut title; a flair button; enamel dots; and something fussy cut. I decided to document this fabulous photo of my daughter being hit with holi powder that was taken by a friend of mine who is a photographer. And what better to pair a splash of colour with, than the beautiful ‘Bohemian Dream’ collection?
Given the “arty” theme of this photograph, I decided the best approach would be to have some arty fun whilst I created it. I started with a sheet of white cardstock that I cut down to measure 11×11″ with the intention of mounting it on patterned paper later on. I pulled out my gelatos (if you don’t have gelatos you can substitute any sort of water soluble pastel or art crayon). I chose some colours that would match with the palette of the collection, and used them to create a very simple “scribbled” background in a rough square shape. I then used my fingertip and a baby wipe to blend the colours out.
With my background work complete, I then turned my attention to creating some layers for behind my photo. I gathered some scraps of the Gypsy Heart and Dreamer papers and added them behind my photo, tucking in a yellow paper doily from my stash as well. I also added a tag that I cut and the you brighten my world tag sticker from the Accessory Sticker sheet, both tied with twine.
For the fussy cut element of my page, I couldn’t go past using the stunning floral print from the collection – Abundant. I cut three pieces from the paper, tucking each of them under the edges of my photo to form a triangle around it. I also added the live a colourful life sticker along the bottom edge of the photo.
By now I needed to tick off a few other items from my criteria list, as I only had one in place so far. I grabbed a flair button from the Flair Button pack, adding it on top of the floral cluster to the left of photo. The next element I wanted to add was the chipboard element, so I chose a few pieces from the coordinating Chipboard Accent Sticker sheet – a couple of small hearts and the beautiful pink moth.
For my title, I knew exactly what I wanted it to say, so I grabbed the ‘Happiness’ Die Cut Titles pack and chose the words life is beautiful. To complete my title I fussy cut a mess from one of the cards on the cut apart Boho Bitspaper, then mounted all the words down along the right side of my photo.
I finished off my page with a scattering of sweet enamel shapes (hearts) and a splattering of some navy mist. I was so happy with how this pretty page turned out!
If you haven’t joined the INSD group yet, you can find it on Facebook HERE. There are still a few days left to enter the challenges, plus there is also a free online class from Zoe you can access (including a printable digital kit); process, live scrap and instructional videos from different members of the team; and plenty of inspiration as well, of course.
Thanks so much for stopping by today so I cold share this with you. Until next time, happy scrapping!
Hey scrappy friends, I hope you are doing well in these challenging times. Here is a layout to brighten your day! I have used the beautiful Unforgettable collection.
I have gone a little old school with this layout using lots of different shaped and coloured border strips. So get those those border punches out! If you have a cutting machine then you will be able to do the same. Mine measure 6 inches horizontally, so the 6×8 inch paper stack is perfect to use. I added a row of machine stitching on the border strips to add texture.
I added my 3.5×3.5 inch photo slightly off centre and with foam tape, I chose not to mat or frame my photo because I didn’t want to look too ‘busy’.
I then added my title using the Foam Title Stickers which really stands out against the colours chosen for the border strips.
I added a floral bunch to the top of my photo, I fussy cut some of the floral bunches from the Garland paper and also adding some smaller Die Cut Ephemera pack .
I did the same to the bottom of my photo creating another floral bunch.
I used two sentiment phrases from the Accessory Sheet and over the top I added a paint brush stroke from the Clear Stickers sheet. I added two hearts from the Foam Title Stickers under my sub to draw your eye.
To finish off I fussy cut butterflies from the Lacewing paper and placed them in a way on my layout so they looked like they were fluttering around (I also added with foam tape). A light splattering of black paint optional!
Well that’s it from me today but I hope this layout inspired you in some way. Thank you for stopping by and see you all again soon. Happy scrapping!
Hey y’all! Laura Alberts back with a Wild & Free layout featuring my youngest son and his stockpile of sister-annoying weapons. He is ready to take on all three of his sisters with this setup! I couldn’t stop giggling while scrapping this one, he’s so serious in his games and he was ready to rock and roll. This cut file from Paper Issues was absolutely perfect for this “target practice” style layout! I used the front and back of the Wild One patterned paper from the Legendary collection to build my background and then fussy cut tons of stars from the All Stars patterned paper to create a cascade that follows the color pattern of the background!
By tucking this larger ephemera star behind my photo, it helps to draw your attention to the photo as well as give the impression of the smaller stars shooting off from the larger one, a cool effect and perfect for this layout! I added a scattering of enamel dots and gold ink splatter to add detail to this cascade of stars.
I used a cut apart piece for my title and an arrow to draw your eye back to the photo again! On a one photo layout, it’s important to reinforce that this is the focal point in more than one way. And finally, I added these word phrase strips below the photo to create a pre-made journaling spot! I love how this layout came out and I think it really captures the feeling of that moment for my son.
I hope you’ve found some inspiration in this design and I would love to see how you capture your photo’s moment in time with your design! And don’t be afraid to fussy cut these brilliant stars that inspired this layout for me! They make for fantastic embellishments that already perfectly match the collection! A little bit of extra time can make a huge difference in your creations, those details can take your creativity even higher!
Thank you so much for joining me on the sister-blasting adventure and enjoy the process video for this fun layout below! Until next time, my friends!
Hi there scrappers! Danni here sharing a large photo layout using Legendary. I was itching to get some outdoor photos scrapped with this collection, so I decided to use this landscape photo of Tasmania’s Dove Lake at Cradle Mountain. It’s such a stunning image and I have been waiting for the right collection to scrap it – the mountain images in Legendary made it absolutely perfect!
My layout base is a 12×12 pale blue cardstock background. I went through all the patterned papers in this collection and cut a bunch of different size triangles from contrasting colours and patterns. A little tip for cutting even triangles – cut squares or rectangles, fold in half and pinch at the centre to mark it, then use a paper trimmer to cut straight lines from the two bottom corners to the centre point.
To create texture and interest, I added machine stitching to edges of some triangles. On others I used either white gel pen or black pen to add sketchy lines or faux stitching, while a few I left blank. I then arranged all the triangles in a horizontal line across the page, making sure to overlap them. My intention was to create the illusion of a mountain range behind my photo. Because you can see the mountains reflected in the water, I added some triangles at the bottom pointing down as well. To create a 3D effect, I popped the peaks of mountains on foam squares.
I matted the photo with a single simple layer using Outdoors Type paper. I happened to find the perfect mountains die cut from the die cut ephemera, which I layered behind the Explore cut apart from Epic Tales paper as my title to left of my photo. Three tiny word stickers from the accessory stickers were perfect accents to the right and top of the photo. The mountain flair button to the right of my photo perfectly echoes the mountain die cut on the opposite side.
For the sky, I added the moon from the die cut ephemera and fussy-cut a bunch of stars from All Star paper. Next I scattered some stars from the clear stickers throughout the sky and a couple on top of my photo. I particularly love clear stickers for layering on photos! To fill in any gaps in the sky, I sprinkled in some enamel dots.
As a finishing touch I splattered some white, gold and black inks on the background, mountains and a little on the edge of the photo. I really hope you enjoyed joining me today and that you are inspired to scrap some of your outdoors photos with this amazing collection! There is a process video below too.