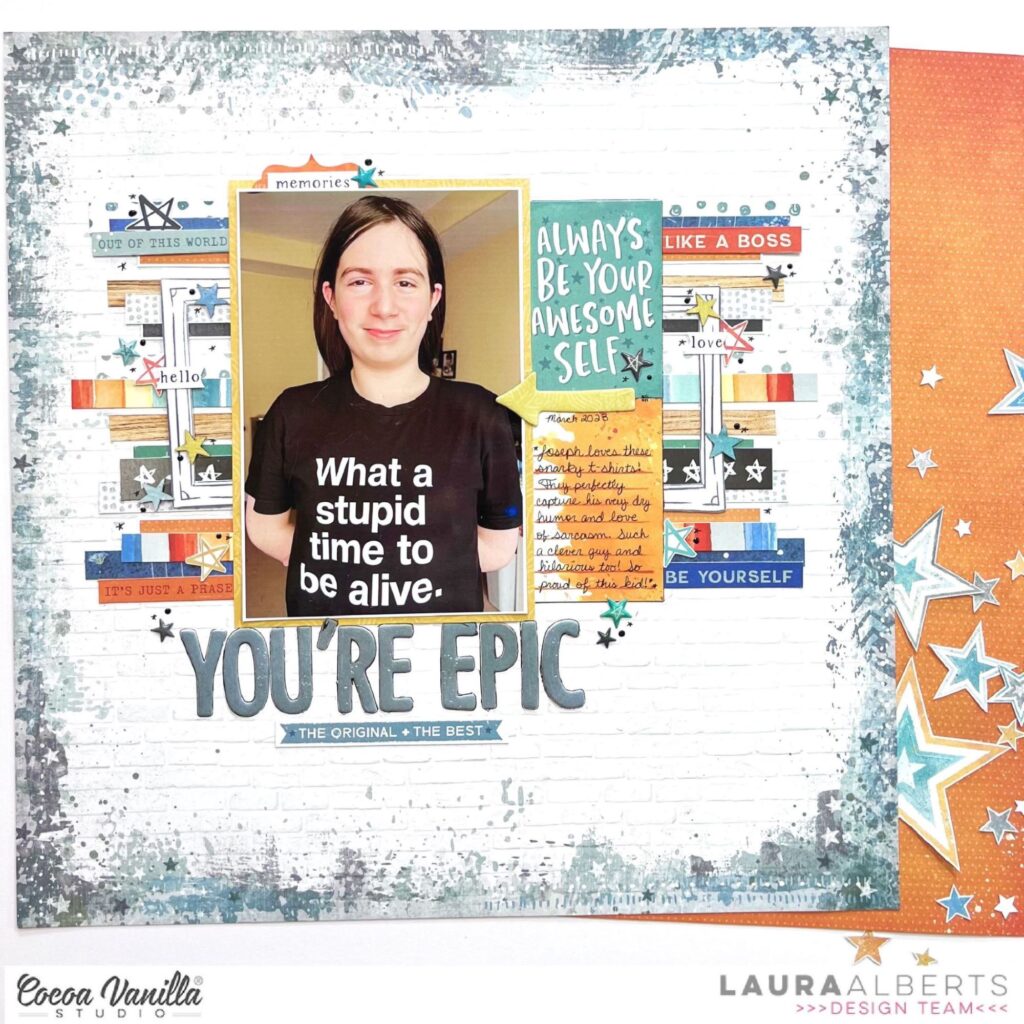
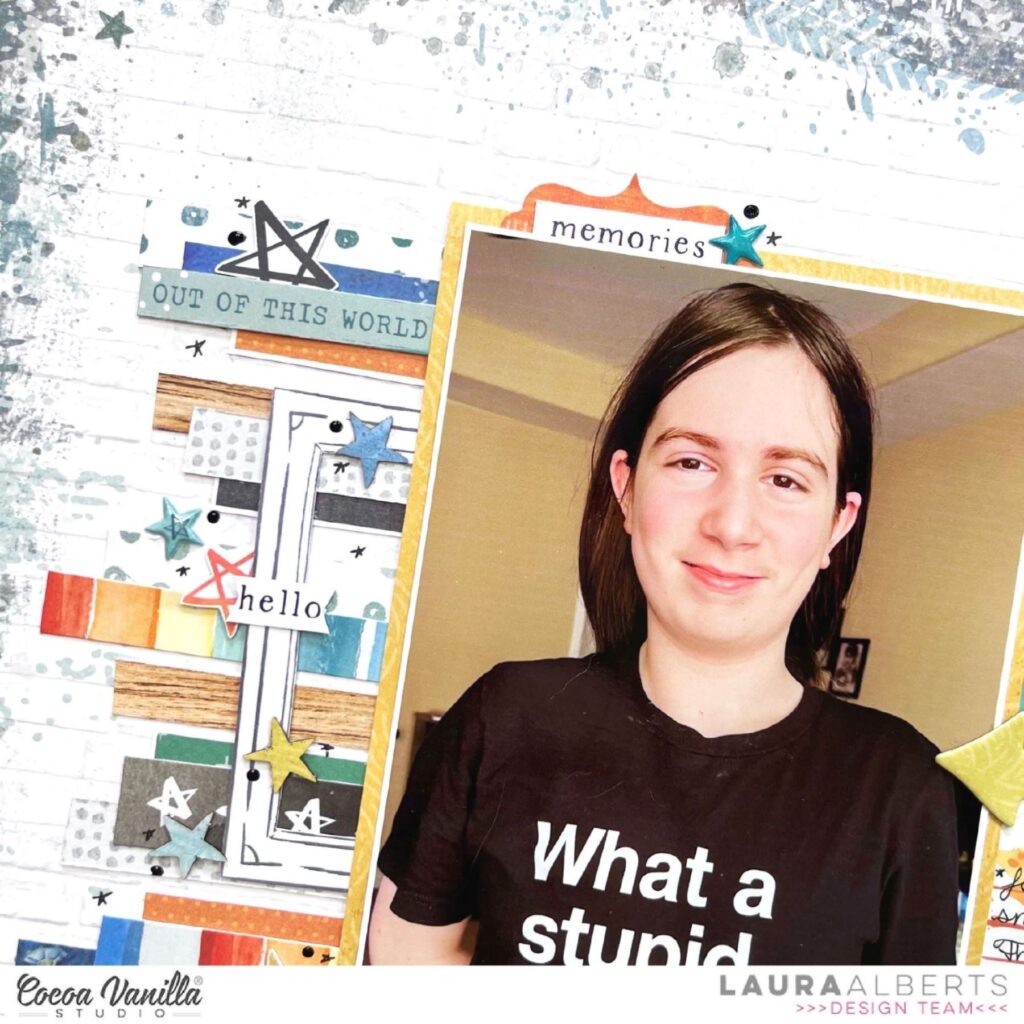
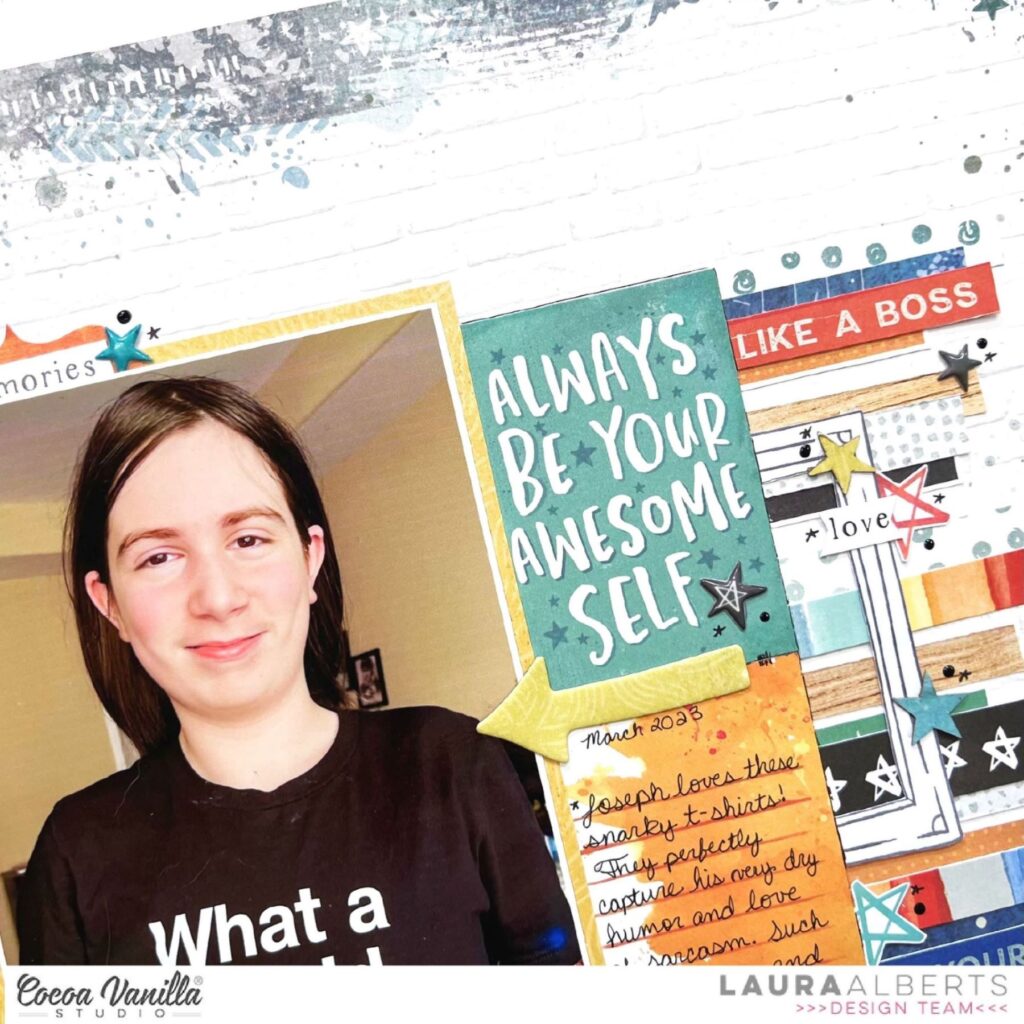
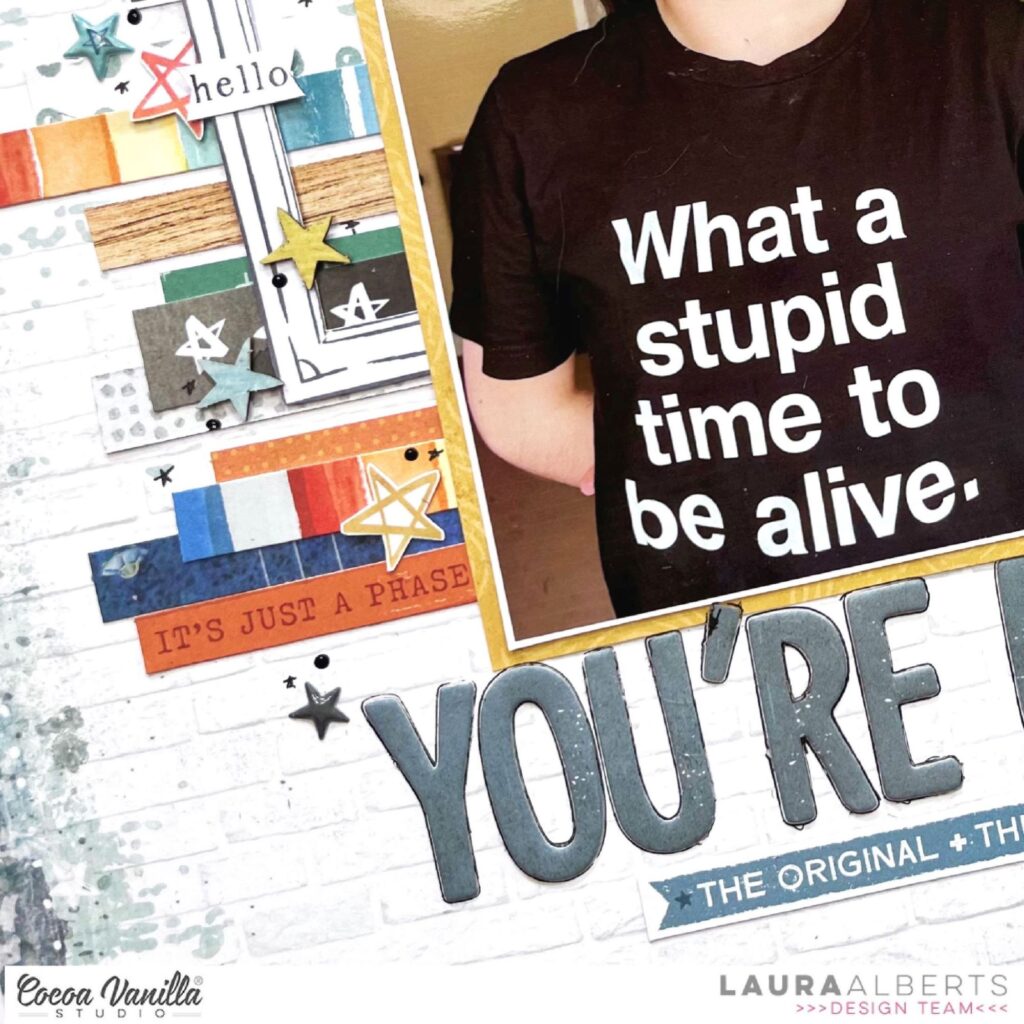
Hi y’all! Diving into one of my favorite collections today! I absolutely love the bold red and navy in the No Limits collection, so it is one I automatically reach for to scrap photos of my sons. For this photo of my son in his new snarky t-shirt, it was perfect!
I focused primarily on using up a ton of paper scraps on this one! The small stripes of color on the branding strips and 1/4 to 1/3 inch strips leftover from previous layouts were layered together to create a fun, colorful background on the Spark patterned paper.
To extend my photo cluster, I tucked in two cut apart pieces from the A5 paper stack to the right side of the photo. To give the photo more presence on the page, I added a frame from the ephemera pack that I cut in half and wedged in on either side of the photo cluster. Then, I finished it with a light embellishing of stars, cut apart phrases, and a chipboard title for a finishing touch!
I hope this layout inspires you to try and use up those tiny paper scraps and branding strips floating around your stash! If you’d like to see how “You’re Epic” came together, check out the process video below!
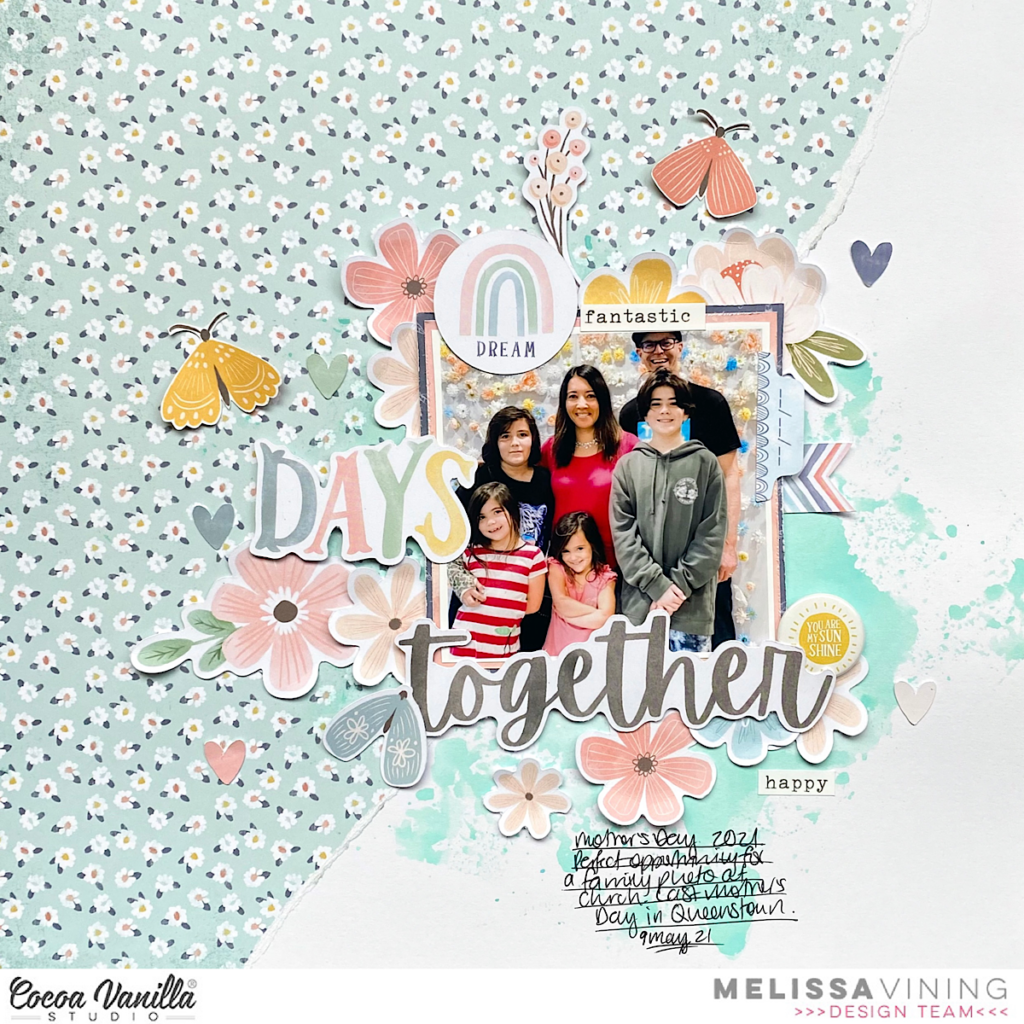
Hi everyone, Its Melissa here and I’m back with a new layout. Its Thursday which means Throwback time! Yay!! What I love the most about Throwback Thursday is going through my stash of gorgeous Cocoa Vanilla Studio and deciding which collection to create with! For this layout I decided to use the beautiful Daydream collection to document a family photo from Mother’s Day 2021.
This collection has gorgeous florals, and for this layout I decided to feature ‘Daisy Days’. A great way to feature a patterned paper is to tear it, and place it on a white background. This enables breathing space against a busy paper, and the use of mixed media helps integrate the two paper and cardstock. I used a distress oxide ink and the packaging technique to create some interest.
I used lots of ‘Die Cut Ephemera’ florals for my embellishing, some ‘Accessory Stickers’ and also a couple of fussy cut moths from ‘All Aflutter’. I bent up the edges of the flowers for interest and dimension. I was also very happy to get one of the ‘Flair Buttons’ onto the page!
For my titles I used one of the ‘Die Cut Ephemera’, and a word from the ‘Die Cut Titles’. I love that combining the two made for a very easy title!!
I hope you enjoyed seeing a layout created with Daydream, and I hope I’ve inspired you to dig into your Cocoa Vanilla Studio stash. If you’re like me you may want to hoard pretty supplies, but there is nothing like using up products and documenting memories!
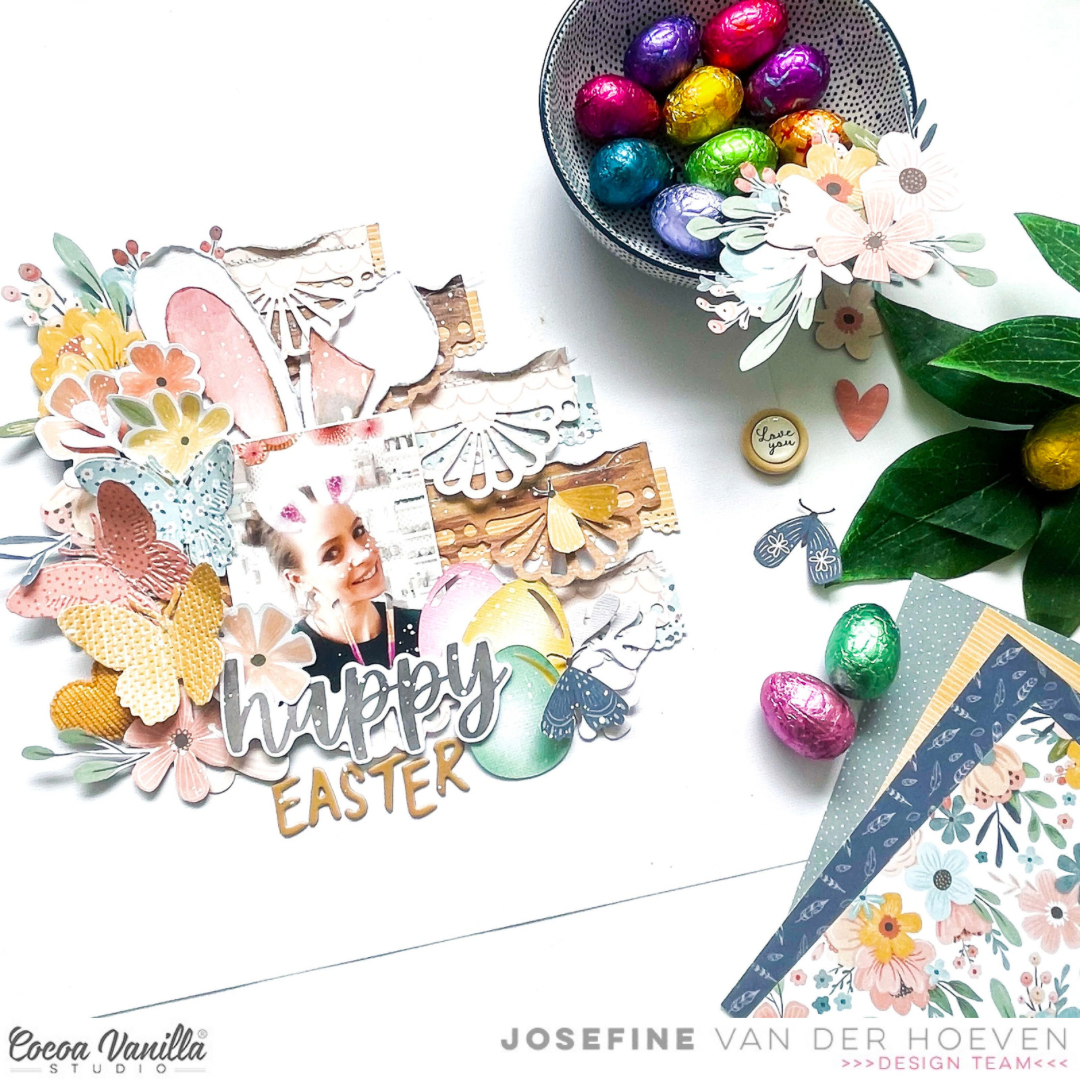
I hope you all had a wonderful easter weekend and welcome to the Cocoa Vanilla blog today! On this layout, I turned myself into an Easter bunny and chose for the amazing “Daydream” collection. One of my favorite things to do at Easter is painting eggs and, of course, baking fresh Easter cupcakes with the kids. The beautiful soft pastel shades from the “Daydream” collection fit this Easter theme perfectly. The cutfile of the bunny ears and the Easter eggs are from the Cricut store.
First, I cut eight strips of patterned paper to size and use two edge punches from Martha Stewart and stitch the top of the strips with light blue sewing thread. I place the strips of patterned paper centered on the white cardstock.
I placed my Easter selphy on top of the paper strips and start decorating on the left side of the photo. I used different embellishments from the “Daydream” collection and a view elements from the “These Days” collection. I found a view butterflies from my previous scrapbook project and they fit the theme perfectly. I layered the flowers, butterflies and a cute yellow heart from fabric by using double-sided tape and 3D foam.
I cut three Easter eggs from a piece of white cardstock just as I did with the bunny ears. I colored the eggs with three different colors of distress oxide inks. ( evergreen bough, mustard seed and kitch flamingo) I playfully lay the colored Easter eggs on top of each other on the right side of the photo then I placed the rabbit ears above the photo and I think it gives a very funny snapchat effect.
In some places of the strips of patterned paper I curl and fold it a little bit. With white gesso I make some fun and festive splatters on my layout. For the title I use the word “Happy” from the Cocoa Vanilla word ephemra and used a mustard colored alpha set from my own stash to create the word easter.
I want to thank you for visiting the Cocoa Vanilla blog today and hope I was able to inspire you with the Easter bunny layout. I wish you a beautiful and happy day and until next time.
XoXo,
Jo
Hello Hello, it’s Michelle here today with a fun gift tag project to share with you all. After a few years of minor easter celebrations due to Covid (and another thats about to be spent in ISO again) I was lacking in photos to scrap so I made these cute little gift tags to add to our family Easter presents.
I’ve used the These Days collection, some cute bunny cut files from the silhouette store and a couple of mini paper treat bags that I made and now they’re ready for gifting to our loved ones when were well enough to see them.
I used papers from the A5 paper stack to create the Bunnies and the strips layered behind. I mixed up the patterns to create some really pretty bundles then tied string bows around the necks. I couldn’t not add some fussy cut flowers which I adhered using glue dots, then stapled on the pom pom trim and the Hip Hop Happy Easter tags into place.
Here’s a close up of each
So cute! I might have to make some more so that I can keep one for myself.
Once these were made I worked on creating some mini treat bags. I searched the inter webs high and low, but I couldn’t find a pattern or tutorial anywhere for the type of bag I wanted to use so I just winged it with some rough measurements and so far they’ve not fallen apart. They came together really well once I tied the tags onto them
I made 4 of these little bags using pieces of 12×12 cardstock that I cut down to an 8x12inch piece. I used my scoring blade in my paper trimmer to score lines to assist in folding and gluing together then added the bunny tags using some white ribbon that I had in my stash. I’ll work on making a tutorial for how I made them if anyone is interested, just leave me a comment below.
The other 2 tags I added to some larger white paper bags for the smaller kids in the family
You can find bags like these in Art n Craft stores, or even discount stores in packs of different colours. They’re the perfect size for small gifts
Well friends thats all from me today, thanks so much for stopping by. I hope you’ve enjoyed seeing this quick little gift tag idea, it really was a lot of fun to create.
Hello CVS friends! Today I have a layout created using the beautiful These Days collection.
My envelope with hearts cut file is from the Silhouette Design Store, this cut file provides a novel way to include your photo and a journal block.
I created a water colour wash on my background page, mixing up a peach/apricot colour. A great technique to use when you have chosen a patterned background photo. I also tore three edges of my base paper and then backed with a blue paper from the A5 paper pad. I next added my cut file cut in white cardstock.
I used the small floral paper for the actual envelope and then a mix of the two peach coloured papers from the A5 pad. I added these papers with foam tape to create dimension. I also cut a few extra hearts to double layer several of them.
I next added my 3×4 inch portrait photo. I fussy cut the journal block from one of the Pocket Cards and used the word stickers from the Accessory Sticker Sheet.
I created a floral cluster to the right side of the envelope, slightly tucking under the envelope.
I created an embellishment cluster below the floral cluster, adding the books die cut and cup from the Die Cut Ephemera pack, fishing off with another cup from the Clear Sticker Sheet.
I added a smaller embellishment cluster to the left of the envelope cut file, layering and using the Wood Epoxy Buttons to add dimension. I finished off my layout adding a small floral cluster to the top of my photo and a butterfly because I just can’t do a layout without a butterfly somewhere on it!
This layout is quite busy for me but I really wanted to challenge myself by using a patterned background paper instead of my standard white.
Thank you for stopping by and later in the month I have another layout using These Days collection, sadly using the last of what I have.
It’s Sophie on the blog today with a cute layout to share!
I used a collection that I LOVE: These Days! I paired it with a beautiful cut file from Echo Park Paper for the title of my page.
I cut the cut file on white textured cardstock on the left side of the page, and used it for my title. I placed a sweet photo of Sabrina and our dog Fiona right next to the title, mounted the photo on tissue paper, patterned paper and foam adhesive.
I backed the cut file with different patterned papers from the These Days A5 Paper Stack. I popped a few words slightly off from the cut words to add interest and dimension to the title.
I decorated with Die Cuts around the photo, scattered a few butterflies and handwrote my journaling on a wreath cut out from a pocket card.
Here are some close-ups:
This layout came together in no time at all! A big title cut file, a beautiful photo and a few embellishments from an amazing collection is all it takes to create precious memories!
I hope you found some inspiration in my page today,
While waiting for the new “Happy Days” collection to arrive, I pulled out an old favourite of mine… Day Dream! Im such a big fan of using rainbows, I think they are such a fun and happy motif so I cut out a bunch from the patterned paper and added some handstitching to add texture and I love the result.
To start my page I used the woodgrain paper to create a base for where the majority of my elements were going to sit. I think it brings some nice warmth to the page with all the pastel colours.
Next I created a heart with the pink heart paper and again stitched around the edge to help it pop on the page. I placed the heart to the top left of my photo so that it stuck out from behind my photo and draws the eye in.
I wanted to add a bit more to the white cardstock as it felt a bit stark for my liking so I used a stencil and distress oxide to add some circles around my design… I think it adds a little something without overpowering the page.
From the ephemera pack I chose a scalloped circle diecut that I cut out and added half to the left of the page and the other half to the right…this helps create balance. I added one of the flair badges inside the circle with some gold thread underneath it, again creating that texture. On my page you will see a house to the right of my photo and a sun to the top left…these are both from the ephemera pack, as well as the row of rainbows under my photo.
Next, I added the rainbows around my page…how sweet are they?!
For my title I used words from the word die cuts….I wanted the word ‘loves’ not love, so I cut and ‘s’ off another word…make the products work for you!
Lastly I added some torn paper strips to the top left and bottom right of my page…. creating more a diagonal design.
I hope you found some inspiration today…and maybe even adding some hand stitching to your own pages.
Hey y’all! Laura back again with a stash dive! This stunning Happiness collection is one of my all time favorites. To build this background, I cut a piece of the Expressive patterned paper in half diagonally and layered it onto navy cardstock. For the corners, I cut up a frame from the ephemera pack.
These lovely photos of a Tulip magnolia tree were a perfect color match to the bold pinks in this collection, so I knew it would compliment them. I added floral ephemera clusters on the inside corners of the stair-stepped photos and framed cut-aparts on the outside corners.
The tiny little florals are fussy cut from the A5 paper stack and I love the detailing these add to the page. With a little bit of gold Nuvo and ink spray for splattering, this one was done!
I hope this layout inspires you to dive into your stash for some crafty fun soon! To see how “Lovely” came together, check out the process video below:
Hey Everyone, It’s Michelle here today with a little scrappy inspiration featuring the These Days Collection. I made both a layout and a couple of cards that can be shown off in a frame as part of your home decor so I think thats a win for today. Lets take a walk through how it all came together..
First up we will start with the layout. I fell in love with the little village of houses on the Neighbourhood paper the minute I saw it, but could never think of the right way to show them off. That was until recently when I had an idea to fussy cut them all out and line them up with some ‘grass’ and other bits to make one of the cutest layouts I think I’ve ever made.
I chopped my white cardstock into 3 even strips that I could line the houses up on, then sewed strips of the green and white spotted paper ‘Family Ties‘ to create the grass. I used a pair of herb shredder scissors that are pretty much the same as a pair of fringing scissors, I just felt these scissors would be better suited to my craft room than left in the trusty kitchen gadget draw haha.
I added machine stitching to each green strip then fluffed up the grass and added all the tiny houses to the rows.
I even added in a couple of trees, some mini potted plants, happy dogs and rabbits, some of the little people and a bike. Sweet tiny details that really made the layout come together.
Once I had the rows of houses sorted out and adhered with foam, I glued the 3 white cardstock strips onto a second piece of white cardstock, spacing them out evenly down the page, then I moved on to creating a mixed title
I used both the foam title stickers and mini alphabet stickers to combine together in a mixed font title. I sewed through all the pieces to keep them in place as I’d moved them around that many times to find the right place that they had lost their stickiness.
Next up I added my photos to the layout. I chose 2 family photos that worked with the title that I had created and printed them out in black and white so they didn’t clash with all the pretty house colours. I tucked the photos in the gaps I created between a few of the houses in 2 of the rows and popped them up slightly using foam behind them.
It may have taken many tries to get this recent family photo, with plenty of giggles in between.
I used some of the sweet little puffy heart stickers from the puffy stickers pack to create little puffs of smoke from a couple of the chimneys
Then splattered the white space with gold ink to create a star like sky, even though I haven’t used a dark background.
I really enjoyed creating this little village, so much so that I don’t think its going to be added to an album any time soon, I think it deserves to be out on show in a shadowbox frame for all to enjoy.
Speaking of enjoying crafty things, I had a couple of little houses left over that I thought I would make a couple of cards that can be interchanged in a frame and kept out on display in our living room.
I used all the same elements for these that I did in the layout, just in a 4x6inch size. Going to have a hard time switching them around that I might need a second frame to add to a different area of the house and make use of both cards at the same time.
Well friends, Thank you so much for stopping by to check out my creations using the These Days Collection. Be sure to check out the shop for the epic sale on this very collection, then we can all have little villages on layouts! If you do recreate this layout for your own family, please share it with us in the Facebook Community Group so that I can see how yours came together. I love seeing layouts that have been inspired by my own.
Before I share my page today, have you seen the sale on the ‘These Days’ collection in the shop?! There are still some gorgeous pieces left from this collection at a hugely reduced price… you can check it out HERE.
SO for today’s layout, I thought I would create something with this collection to inspire you to grab the last pieces available for this collection or grab out what you have in your craft room.
This is a picture from Christmas, with a bunch of our family…These Days is perfect for documenting family, home…anything close to your heart really.
I used the black and white dot paper for the base of my page…a great neutral to get started. Next, I adhered 3 strips of patterned paper to add colour and layers to my page…these are 3×8 inch in size. These were adhered with foam to create dimension.
I created multiple layers behind my photo with different papers. I cut the mason jar and the blue scalloped frame from cards found in the Pocket Cards.
On the right of my photo I added some tabs from the Die Cut Ephemera. Also one of the Wood Epoxy Buttons to the bottom right and top of my photo. The heart tab is from the cut apart paper.
The strip of houses under my photo is also cut from the cut apart paper… then to fill out my page I used a bunch of florals from the floral ephemera pack and also fussy cut some out from the floral paper. To add more black to the page I added some of the black foam stems found on the title sticker sheet. You may also spot a few of the Puffy Stickers on my page..they are so cute!
I hope you enjoyed my page and are inspired to check out the ‘These Days’ SALE.


 I want to thank you for visiting the Cocoa Vanilla blog today and hope I was able to inspire you with the Easter bunny layout. I wish you a beautiful and happy day and until next time.


