You’re Awesome | No Limits collection | Tarrah McLean
Hi creative friends,
It’s Tarrah back with you on the Cocoa Vanilla blog today sharing a new layout featuring the awesome No Limits collection!
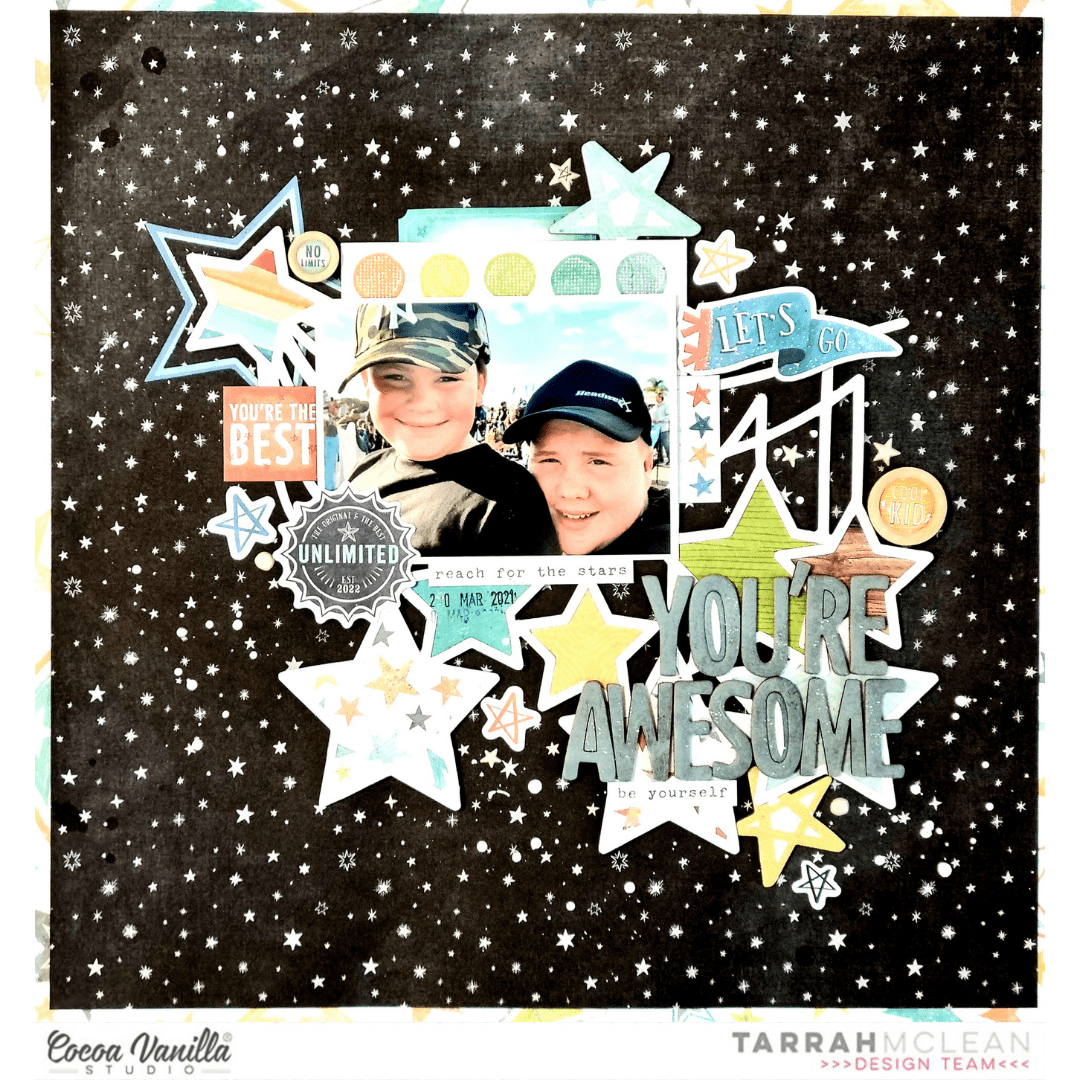
I started out by choosing a dark background, deciding on the Orbit paper as I knew I wanted to add the white star cut file from CUT to YOU. I love how the white cut file pops against the dark paper. I did add some different papers from the A5 paper stack behind each star in the cut file before adhering it to the background paper with craft foam. I trimmed down the Orbit paper slightly and adhered it to the Nebular paper for another layer on my page.

I adhered the photo of my 2 sons hanging out together on top of the cut file over towards the left slightly, I layered one of the 3′ x 4′ journal cards horizontally under the photo. On the right of the photo, I tucked in one of the Accessory Stickers with the stars on it, above the photo and journal card I tucked in one of the tab Accessory Stickers also. On the left I added the Accessory Sticker that says ‘You’re the Best’ and the bottom left corner overlapping the photo I adhered the ‘Unlimited’ die cut ephemera piece.

My title is made up of the awesome chipboard in the No Limits collection…I just love the dimension that the chipboard brings to my layout. I spelt out the words, ‘You’re Awesome’ and placed it in the bottom right overlapping the cut file. I was ok with the title covering up the cut file a little bit as by placing it where I placed it, below the photo and slightly to the right, it helps to balance out the heaviness of the photo, die-cuts and stickers in the top left. In the top left where the large star from the cut file is, I adhered the large star die-cut to frame the star and to help draw attention to the photo. On the right of the photo, I also added the flag die-cut piece that says ‘Let’s Go’. When I embellish my pages, I sometimes add elements that go with the theme of my page and other times I add elements because I need a certain colour in a certain area so that my page is visually pleasing to the eye.

Some of the last embellishments I chose were the cool wooden epoxy buttons, I added 2 to this page – the No Limits one and the Cool Kid one. I tucked in one of the large star chipboard pieces at the top of the photo, all of the other stars adhered around the page are from the ephemera pack. I also placed some of the super cute puffy stickers in grey and white colours to enhance the background paper even more and I also kept these neutral as there was already lots of colour on my page. I chose some more phrase stickers from the Accessory Stickers help to tell my story. Lastly I stamped the date stamp of the day the photo of my sons was taken and sprinkled some white mist around my page.

I hope you enjoyed my layout as much as I enjoyed creating it?! Thanks so much for stopping by the Cocoa Vanilla blog today!
Make sure to get your hands on the awesome No Limits collection! Look out for it coming to the Cocoa Vanilla online store soon!
Happy creating!
Tarrah x
 Here is my throwback Thursday layout featuring a photo of my daughter. I went for an uplifting/inspirational layout for her. As you can see I have used a mix of collections here but they still coordinate so well together. I used two cut files from the Silhouette design store, paint palette and title ‘paint your dreams’.
 I used the script writing inspirational paper as my base. I cut a 10×10 inch white cardstock strip and centred this on my base page. I next cut the paint palette and brush as this was the feature of my page. I found a wood grain paper in my CVS 12×12 paper box, once cut I added machine stitching to the edge. I backed it with a marble paper and to add a little something extra I added glitter to the paint blotches. I then added with foam tape off centre onto the white cardstock.
 I then added my paint brush and added some small butterfly die cuts under the palette. I found a gorgeous die cut doily and used this to mat my photo. I used some phrase sentiments under my photo and finished off with a camera die cut.
 I added my title, I used some silver glitter paper for one word to stop it from looking too flat visually. I also added a light splash of black paint to add some contrast.
 To finish off my page I added some beautiful die cut flowers and enamel dots. I added some more light splatters of black paint.
 Most of these papers and embellishments are no longer in the store but you can recreate this layout with what you have in your CVS stash and don’t forget CVS have


 What I loved about the page kit was the paper strips were already designed to a length and width. Being a smaller layout, I was able to trim these narrower and shorter and still get the desired effect. I machine stitched the strips to the page and was able to curve the ends inwards to create dimension.
 I did add a couple of products from my stash to this page, but they were minimal. One thing I added was a piece of pink patterned paper from the ‘Make a wish’ collection to frame the whole layout in. I felt that the layout needed a border to ground it. I also machine stitched around the border. The other thing I added from my stash apart from white cardstock was the wood veneer pieces, they were from both the older collection Free Spirit and Colour me Happy. I had forgotten that I had them in my stash and were a surprising and welcomed addition to help complete this page. They added that finishing touch that I was after.


