It’s Tarrah back with you today to share a new layout using the awesome Legendary collection!
I love how versatile this collection is, it can be used for boy projects, travel projects and even girl projects! Make sure to check your local or favourite online scrapbook store and get your hands on it!
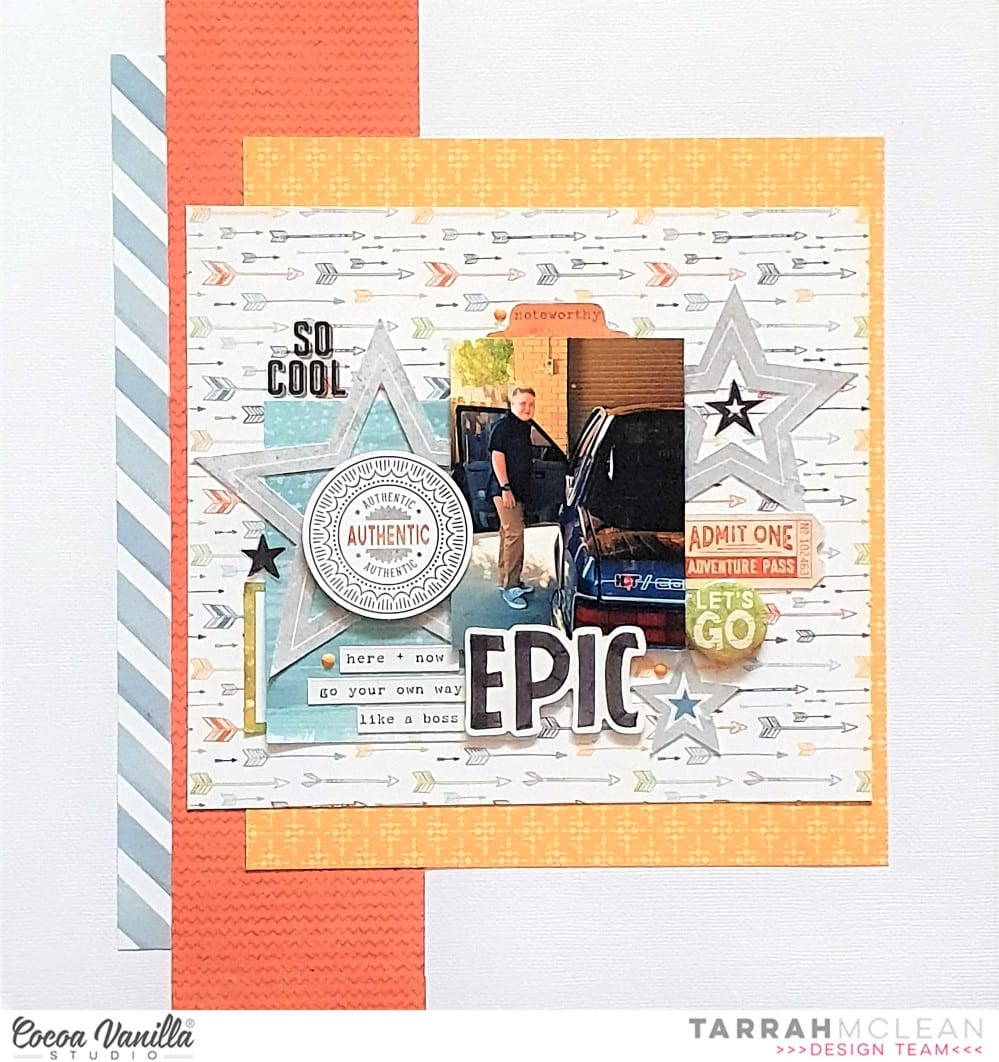
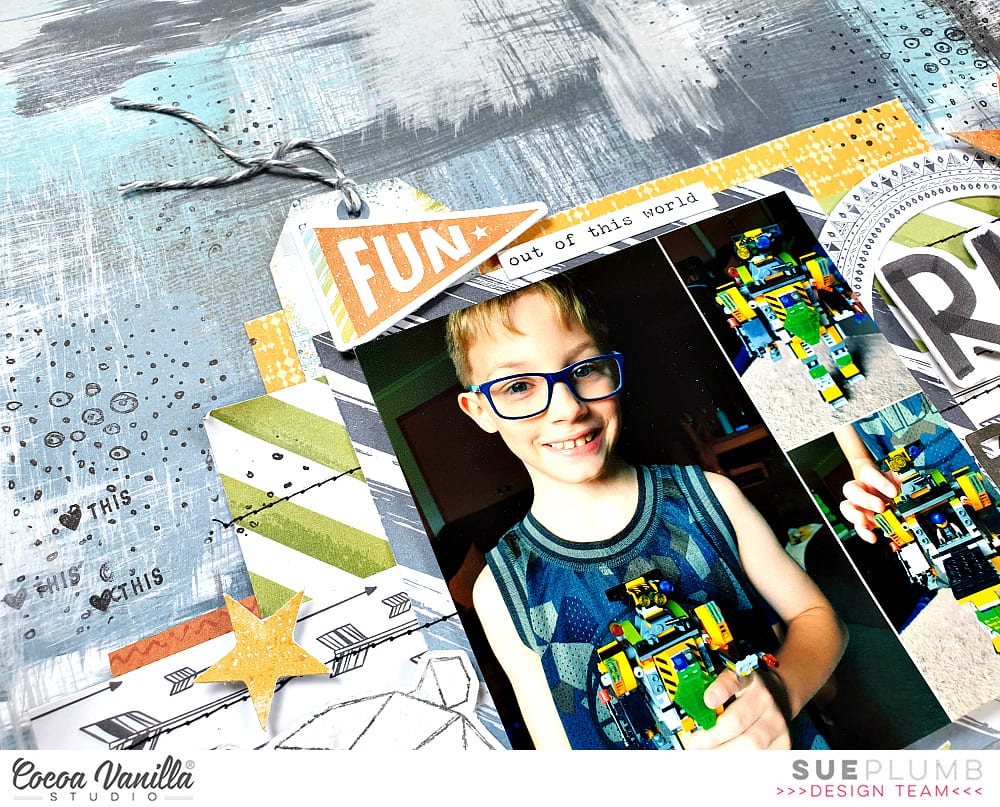
I started out by trimming some of the papers into a few different sizes and arranged them on a white cardstock background. I chose the white arrow paper to feature my photo and some of the main embellishments. My photo is one of my eldest son looking handsome and going to his Year 6 farewell night a few years back.
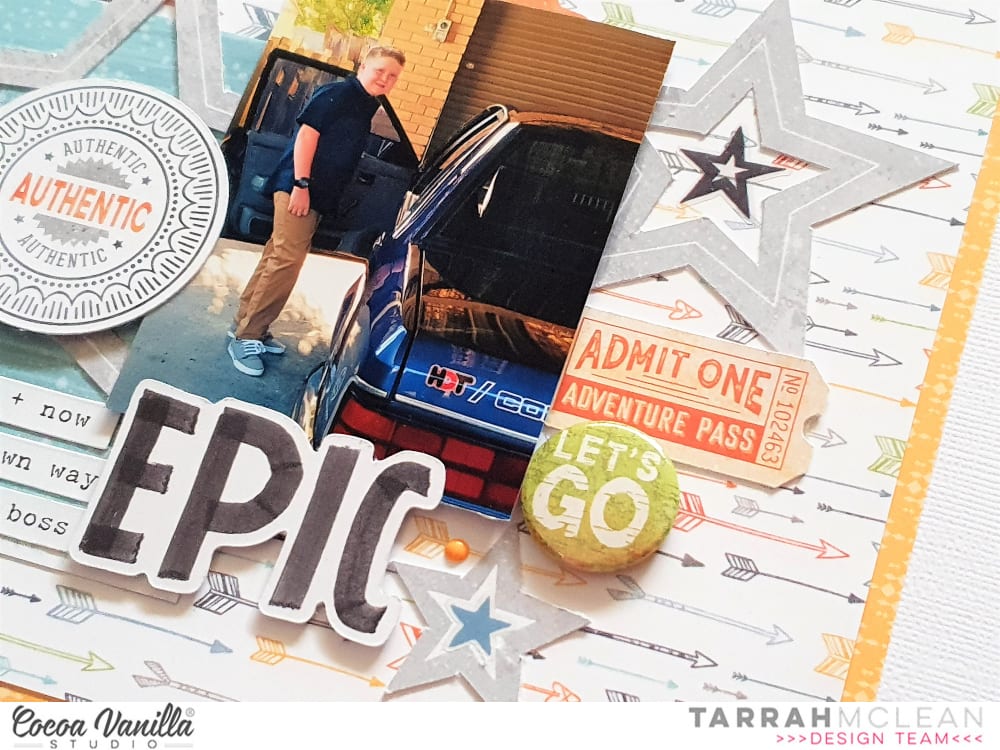
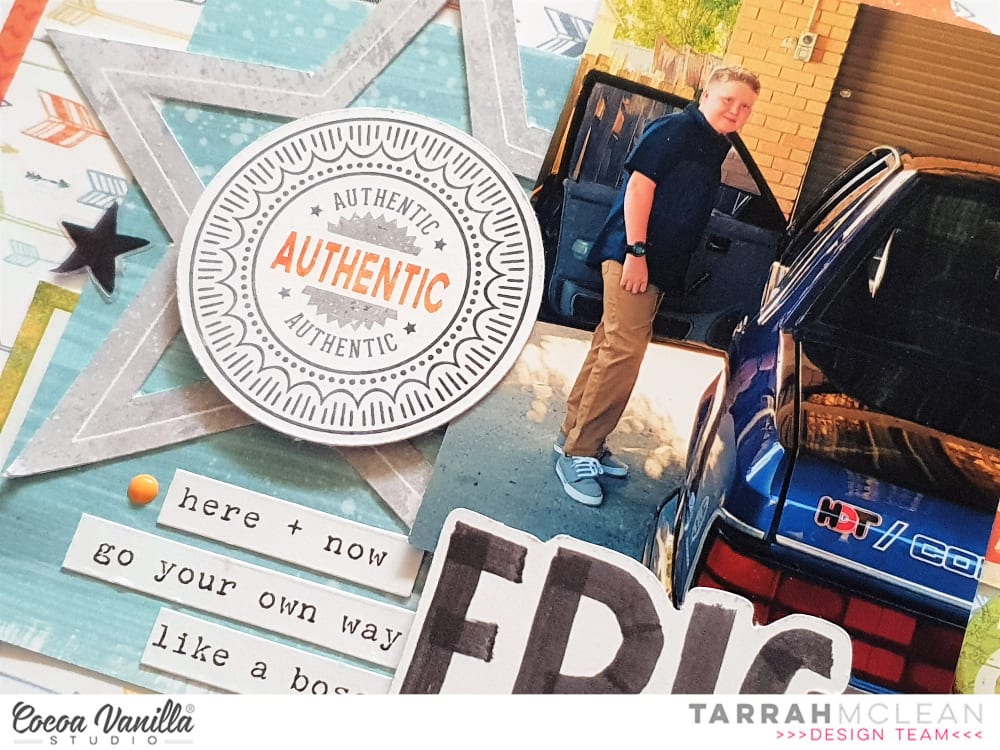
I love the star die-cuts in the ephemera pack, I added the grey ones in 3 places to create a visual triangle on my page. I like how this takes your eye around the page. In between 2 of the stars I added some of the clear sticker stars, I like how this adds a bit more impact to the die-cut ones.
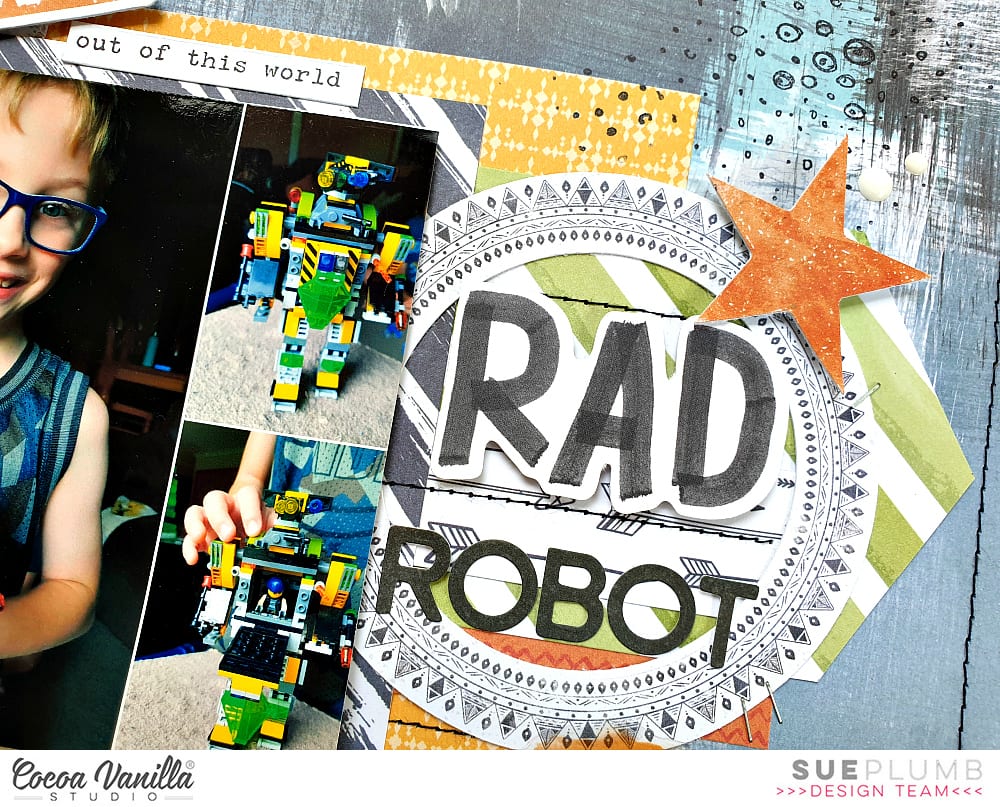
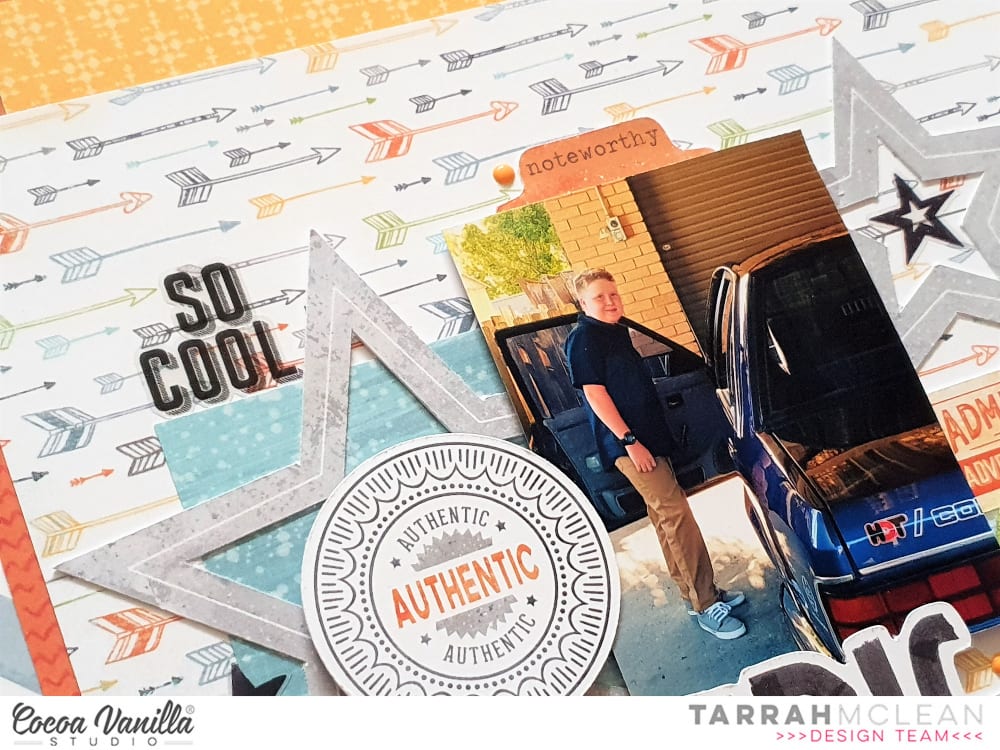
Inside the large grey star, I added one of the large circle Authentic die-cuts, I used craft foam underneath it to raise it up, I like how it gives it shadow and dimension. I also added the ‘Epic’ die-cut title below my photo, this became my title for my page. The flairs are awesome in this collection so I added the ‘Let’s Go’ one on this page since the photo is my son getting into the car! I also added the ‘Admit One Adventure Pass’ ticket just above the flair also.
Thank you so much for stopping by today. I hope my layout inspires you in some way! Make sure to keep an eye on the Cocoa Vanilla online store as the Legendary collection will be in the online store in the next few weeks!
Sue Plumb here to share another design team project using the brand new ‘Legendary’ collection with you. Today I am sharing a 12×12″ layout I created to document some photos of one of my boys and the awesome Lego robot he made with his dad. Building Lego is one of the activities they really enjoy doing together and I love seeing what they come up with. I couldn’t resist snapping some shots of this robot, it was very impressive!
I began my layout with the reverse side of the Brave Heart paper which features a fabulous painty style pattern. I then stacked a variety of pieces taken from the Wild One; One Way; and Explorer papers to define the focal area of my page and form a mat for my photo. These were topped with the strip featuring black and white arrows that was cut from the Total Legend cut apart paper.
Once the papers were in place, I added some lines of black machine stitching to help define the horizontal structure of the stack and also add some extra visual interest. I also added a rough stitched border around the outer edge of the page to help connect the background with the foreground, before adding my photo on top of the paper stack.
Now it was time to turn up the fun factor by adding some embellishments. (I usually have trouble deciding which pieces to use when I receive a new collection, as there are always so many to choose from.)
I began to the left of my photo, creating a small cluster using the die cut geo bear and a star from the Die Cut Ephemera pack, as well as a few Enamel Dots.
To the right of my photo I created my title cluster using the round frame and another star from the ephemera pack; the word RAD from the Die Cut Titles; a few enamel dots; and some small alphabet stickers I had left from the Made of Awesome collection. For an little extra pop of colour I also added the orange paint splat from the Clear Sticker set.
I created a third small cluster (because – visual triangle and rule of threes!) above my photo using the tag and phrase stickers from the Accessory Sticker sheet; with the small die cut flag layered over the top. I brought further balance to my page (and my mind) by adding an extra die cut star below my photo, which completed my secondary visual triangle.
I also created a small cluster for my journalling at the top of the page to counteract the fact that my page was so “bottom heavy”. The label and the strip of stars both came from the Epic Tales cut apart paper. I then finished off my layout with some black stamping using texture and phrase stamps and a few well placed tiny staples.
Thanks for stopping by today so I could share this with you. I am so enjoying creating with this new collection and I hope I have inspired you to get creative too.
Hey Creative friends, Gwen here today with some more scrapbook inspiration using the new ‘Legendary’ collection. This photo is of my husband, taken on a recent family vacation… for those who don’t know, he is a photographer, so it’s rare that he is in front of the camera! I do try and pry it out of his hands and take some shots, so it was so good to get these fun photos scrapped.
For this page, I knew I wanted to use two photos and that they would take up quite a lot of space on my page, so the design had to be kept quite simple. I decided to go with a vertical design for the photos, and add interest to the background with a grid design. To do this, I’ve used a cut file, this one from CUT to YOU and cut it from the pattern paper ‘Brave Heart’. I’ve then arranged it on a white cardstock base. I’ve also mounted this onto the same pattern paper, to create a border for my page.
*TIP – If you aren’t a fan of backing cut files but love their look, use pattern paper to cut them out and then simply add to your page, no backing required!
I’ve then worked on the photo mats for my photos. I’ve gone with a double mount, first up using the ‘All Star’ pattern paper, and then using the ‘One Way’ paper. I am loving the pop of orange here with the blue and grey tones of the other elements. As usual, I’ve added stitching around my photos and then around the edge of the layout for detail.
Next, I’ve worked on my title. For this, I’ve used the ‘Die Cut Title pack’ and gone with the title “My Hero”, I’ve pulled out the ‘Super Star’ banner piece from the ‘Die Cut Ephemera’ pack to use as part of my title as well. I’ve also pulled out all of the elements that I could find that were either blue or orange; I’m keeping the colour palette very simple with this one.
I love this large prize ribbon element and find something round like this softens the look of the page. I’ve teamed it with a flair from the ‘Flair Buttons’ pack to create a cluster and round out the title element.
I’ve also included here some of the typed sentiments from the ‘Accessory Stickers Sheet’, added to the page with foam tape for dimension.
With my main cluster complete, I’ve added a second cluster to balance the page out. The ‘Die Cut Ephemera’ has lots of tags and tickets included and they are really fab way to build clusters and interest on your page. I’ve firstly chosen elements due to their colour, and then how they fit together to help me tell the story of the photo. The star elements here balance out and coordinate with the star image on the flair button and also balance out the pops of orange on the page.
I’ve also added some of the ‘Enamel Dots’ to my embellishment clusters to help draw the eye around the page and it finishes everything off nicely.
Thanks for popping by today to see my latest project. Do you have your hands on this collection yet? As always, be sure to pop into the Cocoa Vanilla Studio Facebook group to share your pages, I love seeing what you make.
Hi there crafty friends , Anita here today sharing a girly layout using the legendary collection
Yes you can make beautiful girly layouts with a boy collection and using a cut file can help a lot if you don’t know where to start ..my go to is flowers totally love them!! I really enjoy making them and adding lots of depth and colour and they always give that feminine touch to any project
So I chose 2 cut files from @neatncraftycutz a background full of butterflies and tiny hearts to add colour using papers ( total legend , wild one , one way ) and a flower cut file to bring that girly vibe
( wild one , one way and offbeat)
And I really wanted to bring more of those colours to the background I matted my white cardstock on
Pattern ( Wild one ) and machine stitched around the border..
When matting my photo I decided on colours and patterned papers (total legend)
so that didn’t over power but blended With the colours of pattern papers of the butterflies .
I also tucked lots of (ephemera and accessory stickers ) in the paper layers to add more colour
With my title I used The ( die cut titles and accessory stickers) to balance out the colour I added a small flower above the title I also add a (flair button ) to break up the colour with the flowers.
Hi Scrappy friends! Danni here, super excited to be sharing my first project as a member of the Design Team! And what an incredible collection to get started with – the adventure-packed new LEGENDARY! Of course, I had to start with a scrapbook layout featuring my gorgeous little man and those big beautiful eyes.
I was very inspired by the mandala-like pattern on the EXPLORER paper the second I saw it, so I decided to fussy-cut the design out and add some texture by hand-stitching with a chain-link stitch and white embroidery thread. Stitching is one of my absolute favourite techniques to add yummy texture to a page!
I made sure to keep the rest of the EXPLORER paper to use as a border for my layout. I layered plain white cardstock on top with lots of messy blue ink splatters – I just love the contrast between the white and dark navy blue. I popped up the fussy-cut mandala on adhesive foam for dimension before adhering it to the layout.
I used WILD ONE and EPIC TALES papers to mat my photo, then used a mixture of ephemera and accessory stickers to create a couple of small clusters around my photo. I made sure to include a label from the accessory stickers for the date!
My title was easy with the amazing die cut titles included in the collection – ‘Love This Kid’ was just perfect for this special little person. For finishing touches I added some stars from the die cut ephemera and clear stickers, then sprinkled some of the gorgeous enamel dots around the layout.
I simply adore this new collection! Cocoa Vanilla have really knocked it out of the park with this one, don’t you agree? If you would like to watch me put this page together, there is a process video below. Thank you for joining me today!
Hello my sweet friends. We continue to inspire you with projects made with brand new “Legendary” collection. I made travel themed layout with this line already and this time I decided to make a mini album. I am a mom of two girls and very lovely beagle dog Pirat. It was a great opportunity to change pink and glitter into some other color palette :) After all, he also deserves his own pages, right?
I decided to use circles as a base of my album. I picked some solid patterns from the papers included into “Legendary” collection: All star, Offbeat, Wild one, Total legend, Explorer, One way, Outdoor type and Brave heart. They are very colorful and perfect for any type of project, not only masculine ones.
I used every single item from “Legendary” in this album. Various products add various textures and this is something I am always aiming for. This line can be easily mixed with some older boyish collections from CVS – “Boys rule” and “You rock“. I used some bits and pieces from them to add some decorative hanging element on the album ring.
Each page holds one or two pictures taken during different occasions. My boy is fancy, lazy, sporty, elegant and crazy. “Legendary” line is filled with pretty starts so you can find this motif on almost every page. I mixed them with tabs and words from sticker sheet and ephemera pack. I also added few flair buttons and titles from Titles pack. I finished my project adding enamel dots. here are all the pages included into this mini book:
That is all for today. Do you like my album? Isn’t Pirat the cutest dog ever? It was so fun to scrapbook so many pictures of him at once. He is already a senior dog with 13 years behind him so I cherish every single photo I have. Despite his age he is still full of live and loves to play.
Thank you for stopping by and see you in two weeks <3
It’s Tarrah McLean back with you today to share my second layout using the awesome Legendary collection! Having 2 sons and a hubby, I get so excited when the boy collections are released! It makes it so easy to create pages about the boys with all this amazing product!
As you can see I stuck with a sort of mono tone colour scheme for this layout, pulling out pieces that were blue, grey and black.
For this layout I chose one of the muted background papers to begin my page with and then I added the dark blue paper behind to lift it and act as a frame for the entire page. The photo I have chosen to document, is one of my youngest son when we last traveled 3 years ago, there are lots of exploring references in this collection so this was the perfect photo! I matted my photo in one of the papers from the large 12′ x 12′ cut out sheet and adhered it flat the background in the centre, only adding adhesive to the centre and top and bottom of the under side of the photo. This allowed me tuck in those die-cut pieces either side of the photo with ease.
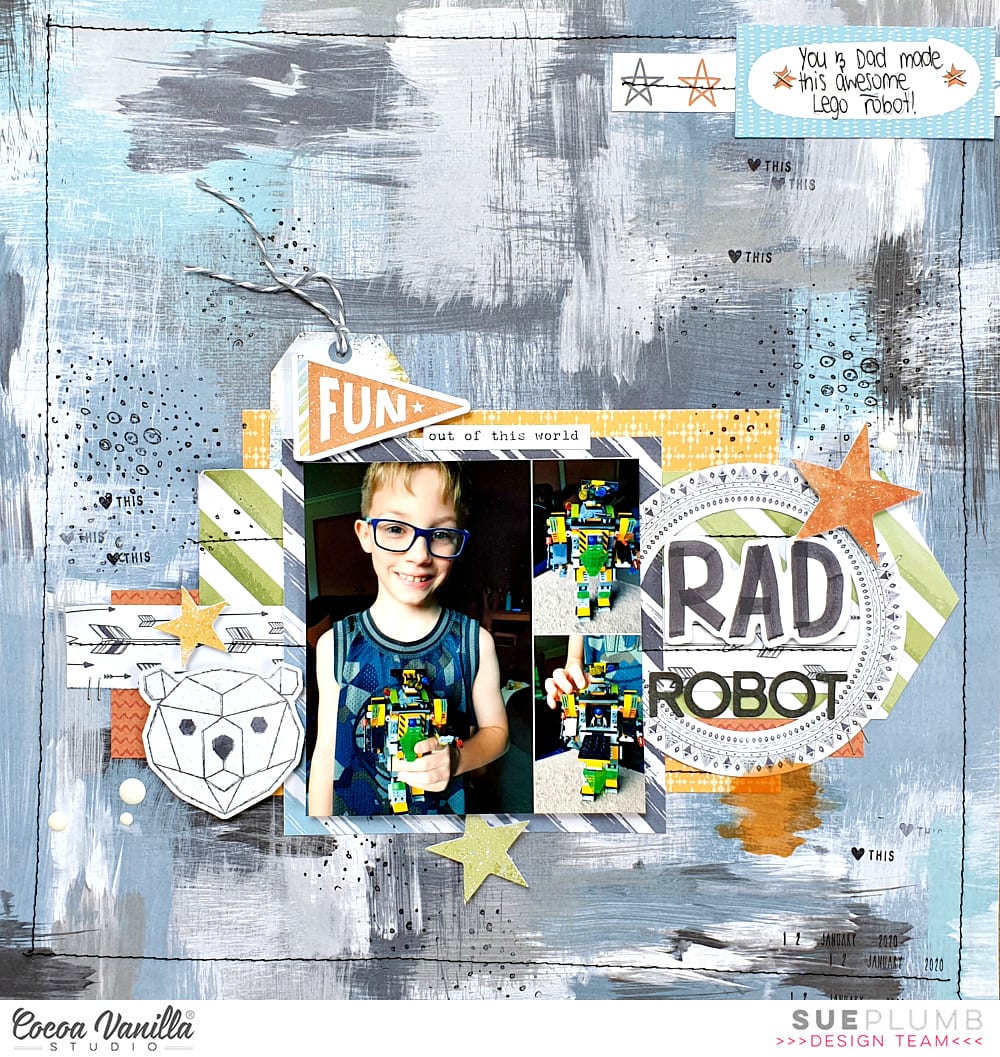
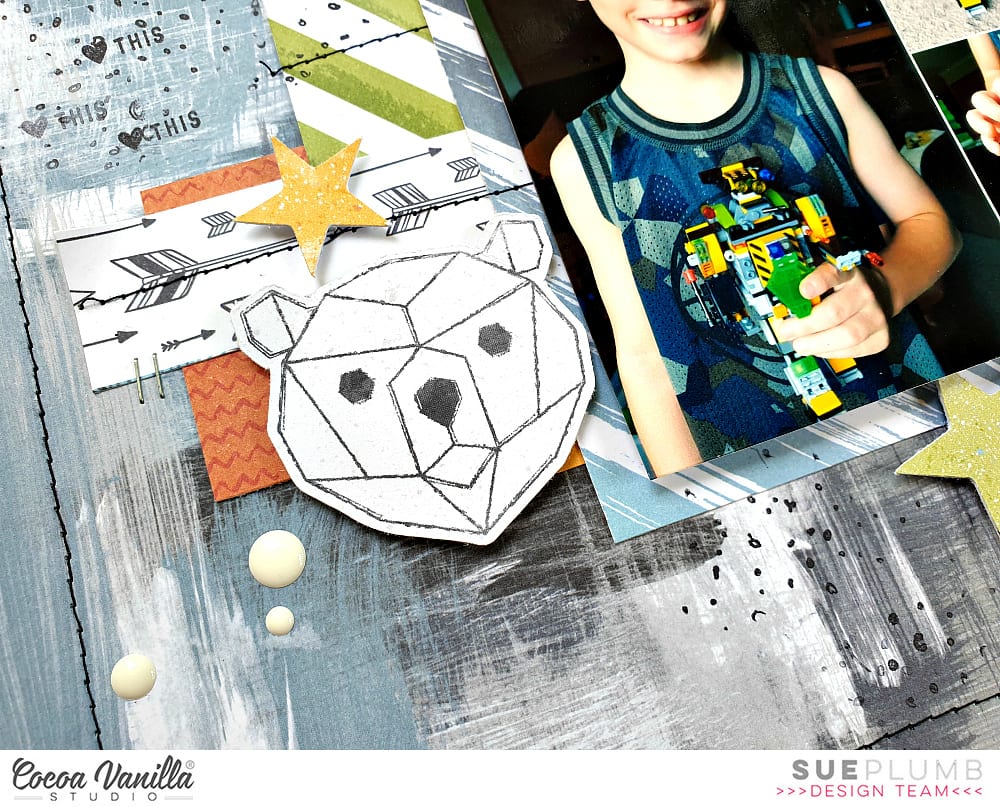
My title is one of the awesome cardstock titles and I added foam dots under this to pop it up at the bottom of my photo, I also layered one of the accessory phrase stickers over the top of the title. I absolutely adore that bear face die-cut so that had to make it on to this page! He looks super cute just above the title on the left overlapping on to my photo. Some more die-cuts were added including the mountains, the stars, hot air balloon, Limited Edition ticket, compass and Stay Wild banner at the top. Some of the stars are popped up using foam dots, I love how this creates shadows and height on my page.
Under the title I tucked in the round compass die cut and added a navy enamel dot to the centre, I also tucked in one of the tabs from the accessory sticker sheet and the large grey star here too. The ‘Epic’ clear sticker was also added here to enhance the adventure theme. I added a few more of the navy enamel dots around my page and also one of the gorgeous flair buttons. I chose the one with the mountains so that it could be layered over the mountain die-cut on the right. Lastly a few more accessory phrase stickers were added and some black mist splatters to finish off.
Thanks so much for stopping by today! I hope you are inspired in some way by my layout and that you can take an idea or 2 from this page and create your own layout!
Hi all, Rachel here! I am loving all the boy layouts on the blog currently, the new Legendary Collection is so fab that’s for sure! Here is my first layout featuring a photo of my three boys.
I used this wild bear cut file as the main element of my page, the Outdoors Type paper just so perfect with it’s two colour tones and map print. I added it to my base paper, Offbeat with foam tape. I had already worked out my title so added a clear sticker word (Adventure) and the Let’s Go flair.
My photo is 4×6 inches long as I wanted it to centre it above the bear but needed room to add another die cut ephemera word to complete my title. I used the clear sticker paint brush strokes to frame my photo, using several of the colour options. I also added a smaller green one over my title word Epic.
I added in a random manner die cut ephemera stars around the border and to add texture I added messy machine stitching.
I added some blue paint splotches clear stickers around the bears paws so it gave the illusion of water splashing as he is walking (well that’s the picture in my head lol!).
I finished off my layout using an Accessory Sticker so I could add the date later and a clear sticker arrow. This layout is easy and quick to put together, having a mixed media base paper and a large cut file really just leaved the finer details to add.
The wild bear cut file is available in the Silhouette Design store. Thank you for stopping by today and see you again later in the month where I have a super cute mini album to share using Legendary of course!
Hey Creative friends, Gwen back on the blog today and I’m super excited to be sharing my first scrapbook page using their new collection ‘Legendary’!
Whilst you’ll all know I’m not normally a ‘boy’ scrapper, I love these opportunities to create pages featuring my husband. Cocoa Vanilla Studios really is the only masculine products I’ll use; I just love how Zoe puts her boy collections together. This one is going to be great for all things ‘boy’ and ‘adventure’ so if you haven’t seen it yet, be sure to check it out!
So, the idea for the layout started with my photo. This one was taken a few years back on a family cruising holiday. As it was my first page with the collection, I was keen to dive into all the patterns and papers, but not really sure where to start… you know, that ‘first cut’ anxiety? I suffer from that A LOT! To combat that, I’ve started with the ‘Total Legend’ paper. It’s a fab sheet of patterns that can easily be cut apart. I’ve used these to back a cut file, this one from CUT to YOU.
Working around the cut file, I’ve just backed each of the squares with a different pattern paper, making sure to put contrasting designs side by side. I’ve then placed this onto the ‘Epic Tales’ pattern paper for my background. I usually use a white background, but I just love how this paper is subtle enough to use but has those fun arrows for interest.
I’ve also mounted my background onto the ‘Explorer’ pattern paper. I like that bold deep blue to frame my layout. I made sure to keep the inner section of this one, and plan to fussy cut out the design and use on another page. Next, I’ve added a photo mat using the ‘All Star’ pattern paper and then some stitching for added detail.
I’ve positioned my photo and mat onto the page adding in some foam for dimension. Now the design for the layout was locked in, I can get to adding my embellishments and finishing touches.
I’ve started with the ‘Die Cut Ephemera’ pack, there are over 50 pieces in this one, all really great to add to your layouts. I’ve used fun flags, sentiment banners and stars. I also love the compass element, which is a nod to the fact that my photo was on a cruise ship. I’ve also pulled out the flair that says ‘Let’s Go’. It helps the other circle element to fit in with all the other square elements and it helps tell my travel adventure story.
I’ve also added in some of the tiny word stickers from the ‘Accessory Stickers Sheet’, (this collection really has a lot of Adventure and Travel themed elements) as well as the tab that says ‘noteworthy’ down the right-hand side of my photo. My title ‘Adventure’ is from the ‘Die Cut Titles’ pack, these are a ‘must grab’… so versatile and you get so many in the pack!
Thanks for popping by today to see my latest project, I hope it inspires you to grab this collection and get making! As always, be sure to pop into the Cocoa Vanilla Studio Facebook group to share your pages, I love seeing what you make.
Hello Cocoa Vanilla fans. It’s Anna here with fresh from the oven page. I got my stash of brand new “Legendary” collection and I knew I had to use it right away. You know I am a mom of two girls, big fan of flowers and pink, but Cocoa Vanilla masculine lines are always so colorful that I would want them anyway. “Legendary” line is also perfect for all your outdoor adventures and this it the way I decided to use it first. I am planning some mini album with my oldest, furry child, who is a good boy but I needed a warm up first.
I was very inspired by the paper with a map pattern “Outdoors type”. Because let’s be honest – what can be better as a background for travel page? The problem is that I love the B side too… Such a pretty wooden pattern. So I combined them both :) They look amazing with my photos taken in Tatry mountains during our first (me and hubby) trip as a couple. It was time before fancy cameras and I do not have many decent photos from that time. I managed to pick few when we were reaching a high peak using a cable car. Landscape from above looked amazing that day.
I picked some ephemera pieces that may fit the travel theme and gathered then under the photos. I also added a title using a word from “Die cut titles”. This is such an amazing product and it makes adding titles so easy. You can use words separately or build longer sentences.
I also have an idea for a very simple embellishment – add little wooden sticks to the flags included into ephemera pack and you will have some dimensional element to add to your projects. I placed my flags over the mountains silhouettes.
I finished my page adding date stamp, few stars and enamel dots. Did you noticed that they are back to the CVS products range? “Unforgettable” collection had them and this line also has matching ones. I love this product and I am so happy to see it back.
That is all for today. I hope you love “Legendary” line as much as I do. It’s appearing in the shops around the world already if you feel you need to have it right away (BTW – I know you do :D). Thank you for stopping by and see you in March.