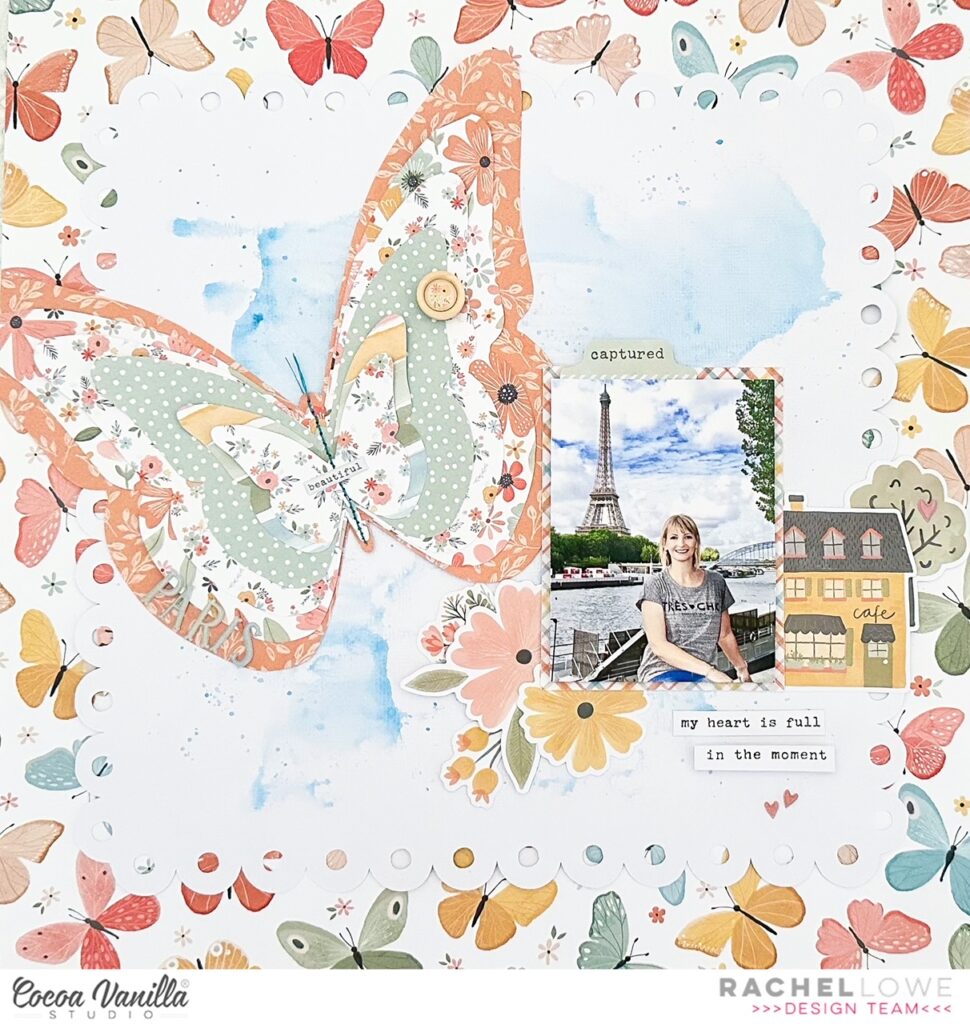
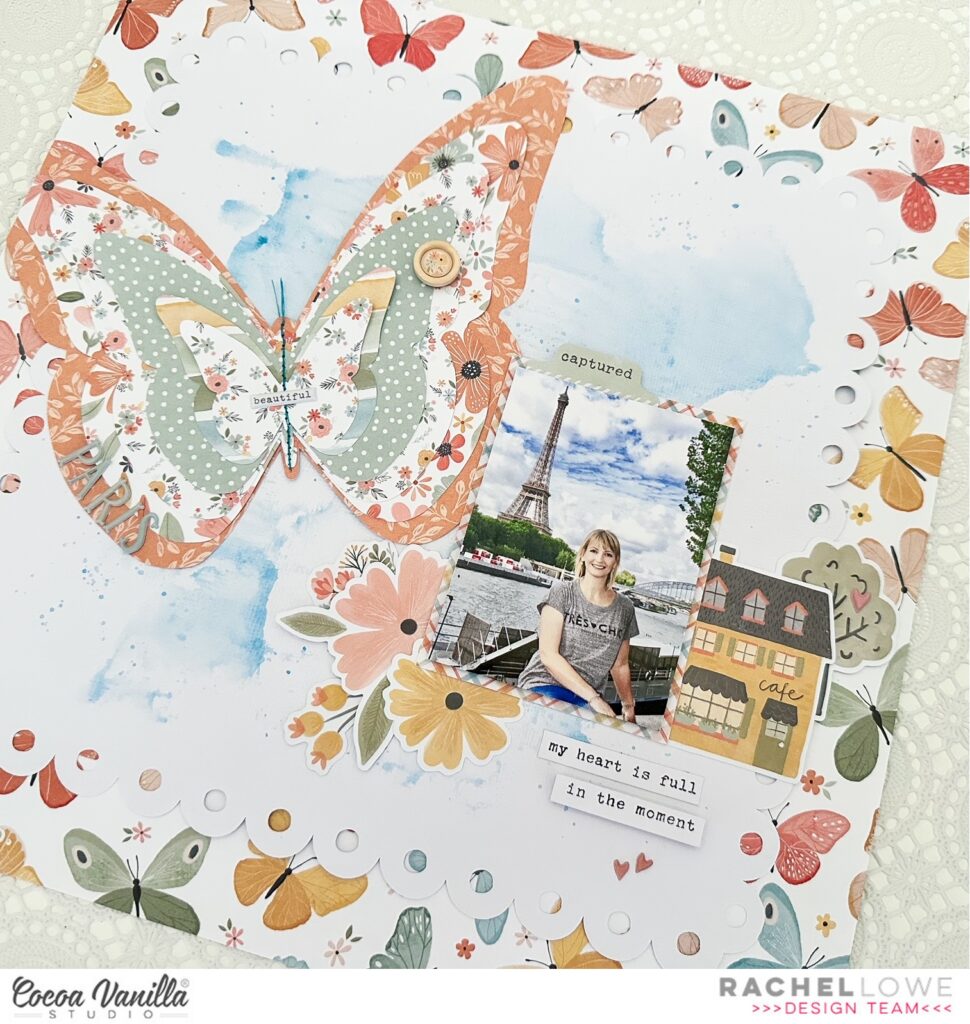
Today I have a layout to share using the beautiful These Days collection. I am a little sad as this is the last of it but on a positive note I have the new Happy Days collection to start creating with (happy dance).
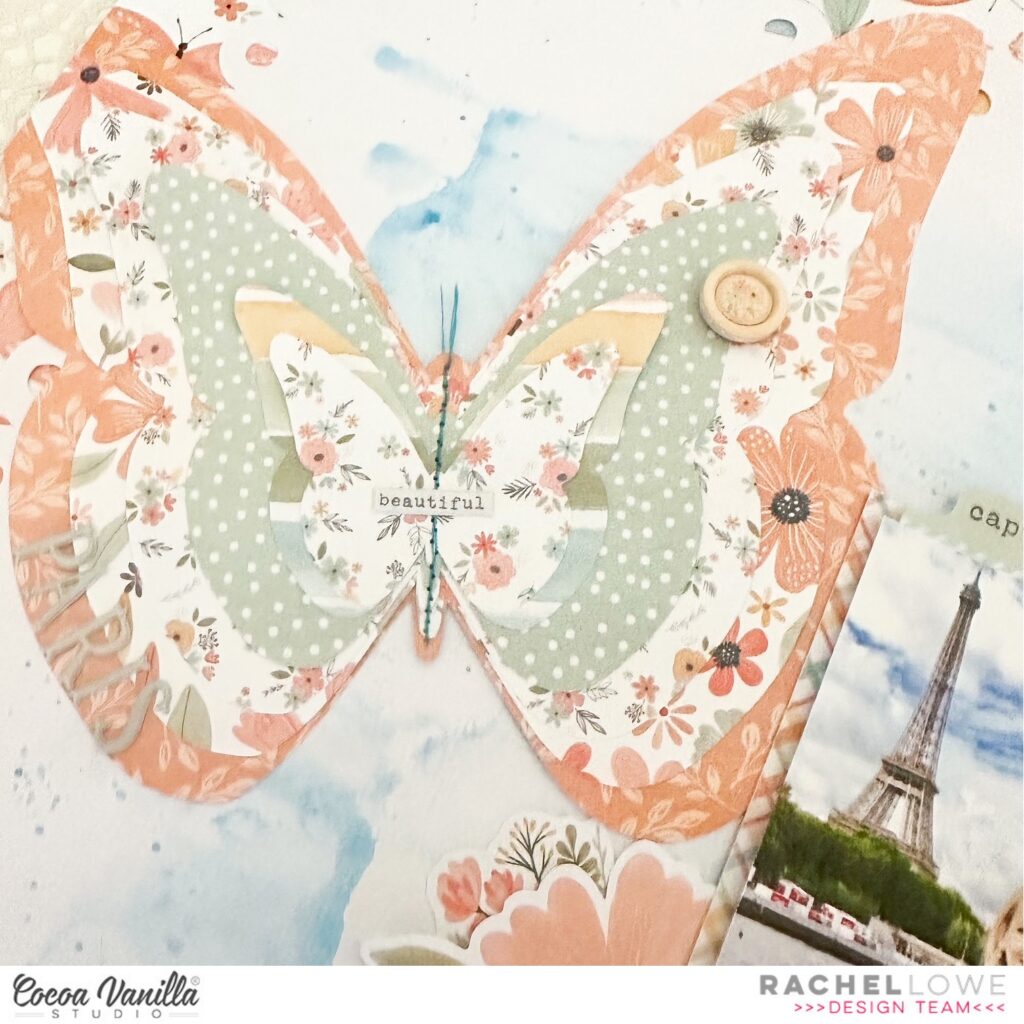
As I only had the butterfly 12×12 paper left I decided to use it as my base paper but adding a white scalloped square to the middle with a blue colour wash to add contrast. Using a cut file I cut 5 butterflies to layer them for dimension. I used my sewing machine to add stitching down the centre.
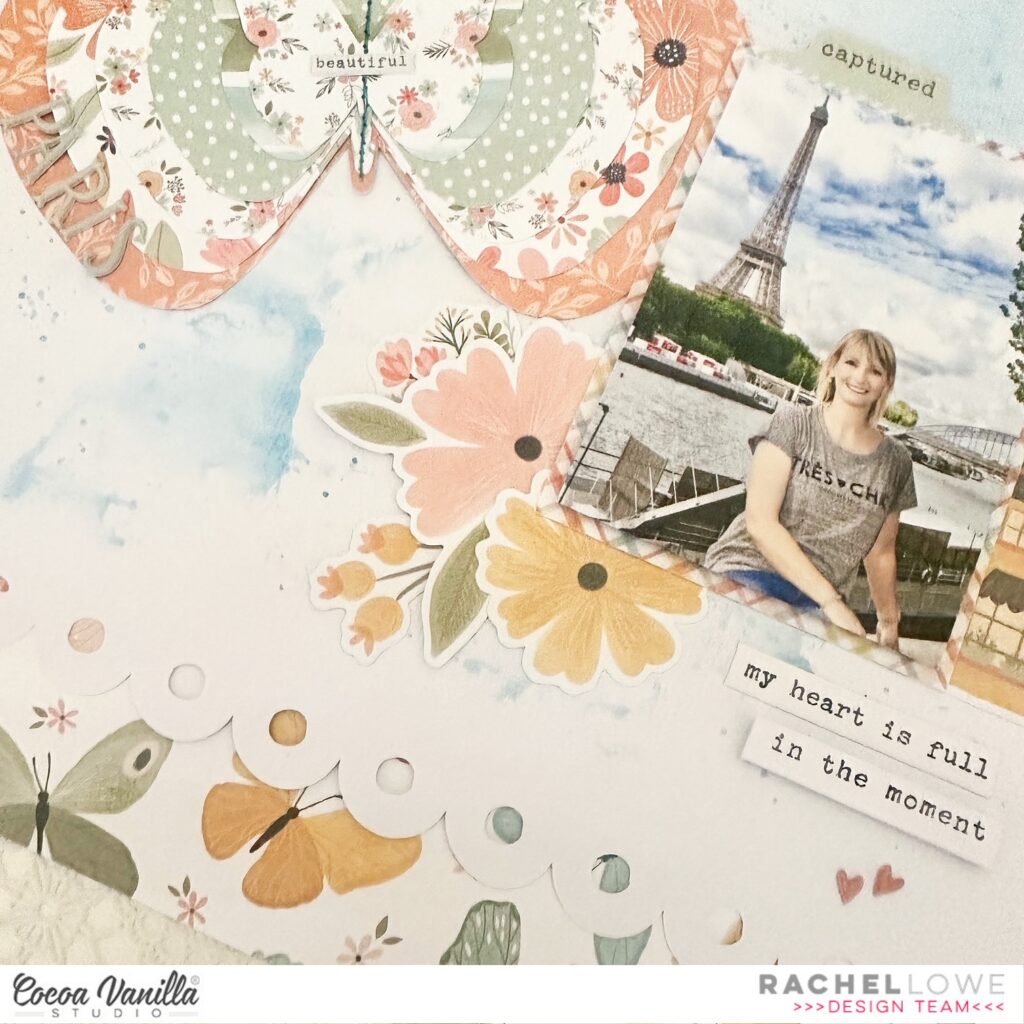
I next added my 3×4 inch photo of me hanging out in Paris as you do lol! Which I matted and used foam tape to add. My photo is where I added a larger embellishment cluster. I cafe die cut reminded me of Paris so it had to be added to my cluster, I added a tree die cut behind it and then used phrase sentiments from the accessory sticker sheet to journal.
On the opposite side I created a floral cluster and finished off my adding a die cut tab at the top of my photo and a puffy heart sticker on the tree.
I added of the wood epoxy buttons on the butterfly wing. I then used the puffy stickers alphas to add Paris to the other butterfly wing. This layout is simple and quick to put together but the butterfly paper, mixed media background and layered butterfly cut file give it lots of visual impact.
There are some These Days product left in the CVS shop.
Thank you for stopping by and I look forward to sharing my first layout using Happy Days!
Hello crafty friends today I am celebrating all things Spring (well if you live in the Southern Hemisphere anyway!), flowers, sun, bare feet and yellow!!! Storyteller is a perfect collection for spring themed layouts.
I firstly created a water colour background effect on my white card stock, using yellow as it reminds me of spring, I then found a cute vase cut file from the silhouette design store. I used Oh My Heart paper to create my vase.
Now for the fun part, I created flowers for my vase using the Floral die cut ephemera pack. I added them with foam tape to add dimension and then tucked in extra leaves and sprigs.
I add a phrase sentiment banner from the die cut ephemera pack on the vase. I chose a wood grain paper from the A5 paper pad to mat my photo.
Next I created my title using a cut file which I cut using Ditsy Daisy paper. I added a camera die cut and added a wood epoxy button to the lens of the camera.
To finish my layout off I went back and added some die cut butterflies and puffy stickers in amongst the flowers and under the butterfly wings.
A simple layout technique wise but visually beautiful with the colour choices and lots of flowers!
Thank you for stopping by today and I will be back later in the month with some more inspiration.
Hello everyone and welcome back to the Cocoa Vanilla blog.
Today I’m sharing my first page using the new ‘Storyteller’collection and it was so fun and overwhelming to jump into a brand new collection with so many things to choose from ….does anyone else have trouble making decisions when faced with ALL the choices?!
First, I decided on the ‘Cross it off ‘ paper to use as my base…I love a subtle grid for a background.
I decided to use a cutfile for my title so pulled out the A5 paper stack to back the letters….no having to cut into the 12×12 papers!! To help make the white of the cutfile stand out I added another piece of the ‘Cross it Off’ paper behind it.
To give some dimension, I added foam tape behind my title.
I loved these pics of my son from several years ago being a ham in front of the camera and his clothes were a perfect match for this collection. As they were action shots I decided to cut my photos into silhouettes so they added a fun element to my page. Next I chose a frame the Diecut ephemera pack to add under my sons pic to ground his photo to the page, and stop it look like he was floating.
I love the cameras in this collection and added one between my photos. To add some texture to my camera I added the inside of a ‘Wooden Button’ to the lens… I like the pop of yellow! I also added a sticker from the ‘Accessory Sticker Sheet.’
Give me all the puffy stickers in a collection, and the hearts and dots in this range wont disappoint you….so fun! I added some either side of my two photos.
I hope you enjoyed my page today and are looking forward to getting this collection in you hands…it’s not too far away now!
Hello CVS friends today I have another boy themed layout to share using the fab No Limits collection! I have used two cut files on this layout, star background and Awesome 3D title, both can be found in the Silhouette Design Store.
I used the latitude paper under the star cut file so you had a multitude of colours showing through. My white cardstock is cut at 11×11 inches and I used Spark paper for my border.
I used the grey side of the universal paper to cut the outline of the Awesome cut file. I then used nebula paper for the letters which I added with foam tape to give my layout dimension.
I chose two photos of my boy which I sized at 2.5 x 2.5 inches. As they are smaller photos I embellished on the photos to draw your eye to them, tucking elements under and over the photos. I have used a combination of die cut ephemera, wood epoxy buttonspuffy stickers and chipboard.
Really the cut files do a lot of the work for you here! This layout is all about colour and dimension.
I love how this turned out and works so well with photos of a teenage boy!
As always thank you for stopping by today and happy creating.
Hi everyone, It’s Melissa here for Throwback Thursday! Today I have something a little different to share with you. This year I’m doing Memory Planning in an attempt to limit the number of 12×12 layouts that I create, and to streamline my documenting process because not every story needs a big layout of its own. I’m using a Memory Planner by Heidi Swapp and the gorgeous Daydream collection. This collection works so well with the Planner.
The Memory Planner paper has the lines, days of the week, dots beneath the days and the “week of:” printed on it. I stamped the numbers and the week details. Aside from the washi tape, everything else I used is from Daydream. Here is my left side page. As you can see I used lots of Die Cut Ephemera to embellish my page.
I added an interactive element that I made with papers from the A5 Paper Stack. Here is the inside:
Here is the page on the right side. I used my sewing machine on several elements to add texture. I stitched before I adhered these elements so that the stitching wouldn’t go through the page. The edge of my The rainbow is a cut apart piece and was perfect for my journaling.
I have more journaling hidden under my interactive piece on this page.
I loved getting the rainbow ephemera piece and an Accessory Sticker onto my page, so perfect for my beach photos!
I love that Daydream is so versatile and can be used for lots of different memory keeping projects!
Gwen back on the blog today with a new share featuring the ‘Happiness’ collection. On the blog this week, the design team have been playing along with the theme “circles or squares” and I’ve got to say, I really struggle with circle elements so I absolutely took the easy way out and created a page featuring squares. This photo is one I took of my daughter quite a few years ago while we were at a theme park and I’ve come up with a fun way to use up a bunch of pattern paper scraps on my layout within the Squares theme I’m working with.
To begin my page, I’ve started with a white Cardstock background from my stash and a cut file from CUT to YOU. I’ve then pulled out a bunch of pattern paper scraps in the collection and backed the squares in the design. You could also do something similar to this with a basic square punch. Backing the file went quite quickly actually because the square is a very simple shape to cut out. I didn’t think too hard about the colour placement of the pattern paper, I was just a little bit careful not to put two of the same colours side by side. I even left some of the squares in the design open for interest.
Next, I’ve positioned the backed cut file onto the centre of my background and added stitching around the edge. From there, I’ve backed my photo with the ‘Little Things‘ pattern paper, added some stitching and then mounted with 3D foam.
My daughter is positioned towards the right hand side of the photo so I want to position my photo towards the right hand side of my page, I like to have the subjects in my photos looking towards the centre of the page rather than off to the side of the page. It’s not a rule, just the way that I prefer to do it. I just find it easier for me to embellish when I do it this way.
I can now begin to work on my embellishment clusters. I’ve pulled elements from the ‘Die Cut Ephemera’ pack starting with the pretty floral elements and that sweet prize ribbon die cut. I’m going to create an embellishment cluster along the right hand side of my photo and then balance that out with a separate cluster in the top left hand corner of the page. As always, I’ll position the largest pieces first and then work towards the smaller elements.
I’ve also added in a couple of the cute tassels from the ‘Die Cut Ephemera’ pack and a couple of stickers from the ‘Accessory Sticker Sheet’. For the stickers, I often like to add them with 3D foam tape for dimension. It’s nice to have layers within your clusters and try to nestle everything in close together.
I’ve also pulled a flair button from the ‘Flair Buttons’ pack and added that to the top right hand corner of my page. The title for the layout has come from the ‘Die Cut Pack’ as well. To finish everything off I have fussy cut out a couple of the stunning butterflies from the ‘Bright and Beautiful’ pattern paper and added them onto my background.
I’ve also made a YouTube video of my process which you can watch here:
I hope my page has inspired you to work with some squares on your next layout or to use up some of your stash of the ‘Happiness’ collection.
Gwen back on the blog today with a new share featuring the ‘Sunkissed‘ collection. For this layout, I thought it would be fun to pull out some of my metal dies and my Sizzix machine. I’ve cut out a bunch of floral elements to create a fun background for my layout.
To begin the page, I’ve die-cut out a stack of floral elements from the ‘Feeling Fine‘ pattern paper. I love this pattern paper as it has a mixed media look about it, without the mess and warping that comes with making one myself. All that hard work is done :) I’ve also used this paper as the border for my page with my background being a pink piece of cardstock from my stash.
For the die-cut florals, I have three different sizes to work with and have just arranged them onto the background of my page randomly. No real method for this, I was just careful to spread out the colours in the pattern paper evenly.
Next, I’ve backed my 4×4 photo also using this pattern paper. I’ve added stitching around the edge and around the edge of my page for added detail.
For my embellishments, I’ve created the main cluster to the left of my photo which also includes my title ‘Fun in the Sun’. This title piece and this darling rainbow are from the ‘Ephemera Pack‘. You will also find the fun flag that says ‘Hello’ in this pack and loads of other super fun Summer themed icons. I’ve also added bright florals in yellow and blue from the ‘Floral Ephemera pack‘.
For some dimension, I’ve included several of the ‘Wood Epoxy Buttons‘, I just love the soft wood tone in these, they are so fun to add to a page. You can also see here a few elements from the ‘Accessory Sticker Sheet‘ including the sticker above my photo that says ‘Summer Days’ and the typed sentiment sticker below my photo that says ‘Holiday Highlights’.
To finish off the page, I’ve added Enamel Dots from my stash into the center of each of the flowers and then added some small puffy sticker hearts from the ‘Puffy Sticker sheet‘.
I’ve also made a YouTube video where you can see my process. You can watch it here:
Hello CVS friends! Well I couldn’t resist ‘that’ amazing rainbow paper from the Sunkissed collection any longer and have a tropical themed layout featuring some gorgeous summer cocktails.
I fussy cut out the rainbow from the Bright Side paper, leaving out the red outer strip as I wanted the pinks to feature. I added to white cardstock and machine stitching the outer pink strip of the rainbow to add definition.
I next made three tropical flowers slightly varying in sizes. I used a cut file from the Silhouette design store. I used Fun in the Sun and Feelin Fine papers to make my flowers. Once I made my tropical flowers I added to my rainbow but only wet gluing the centres so I could tuck elements under. From the Floral die cut pack I then added sprigs and leaves under my flowers.
I added my 5×4 inch landscape photo with foam tape, tucking under the sun die cut and adding a Wooden epoxy button over my photo. To connect my photo I added the Love This die cut words.
I created an embellishment cluster focusing on the drinks and fruits from the die cut pack and Puffy Stickers finishing off with some phrase sentiment die cuts. To avoid my layout looking ‘flat’ I added these elements with foam tape.
Due to the colour overload I ensured there was enough negative space between embellishment clusters. I love creating layouts that have ‘no people’ photos and focusing on those little life pleasures which are just as important to document. Thank you for stopping by today!


 I fussy cut out the rainbow from the
  I next made three tropical flowers slightly varying in sizes. I used a cut file from the Silhouette design store. I used
  I added my 5×4 inch landscape photo with foam tape, tucking under the sun
  I created an embellishment cluster focusing on the drinks and fruits from the die cut pack and Puffy Stickers finishing off with some phrase sentiment die cuts. To avoid my layout looking ‘flat’ I added these elements with foam tape.
 Due to the colour overload I ensured there was enough negative space between embellishment clusters. I love creating layouts that have ‘no people’ photos and focusing on those little life pleasures which are just as important to document. Thank you for stopping by today!