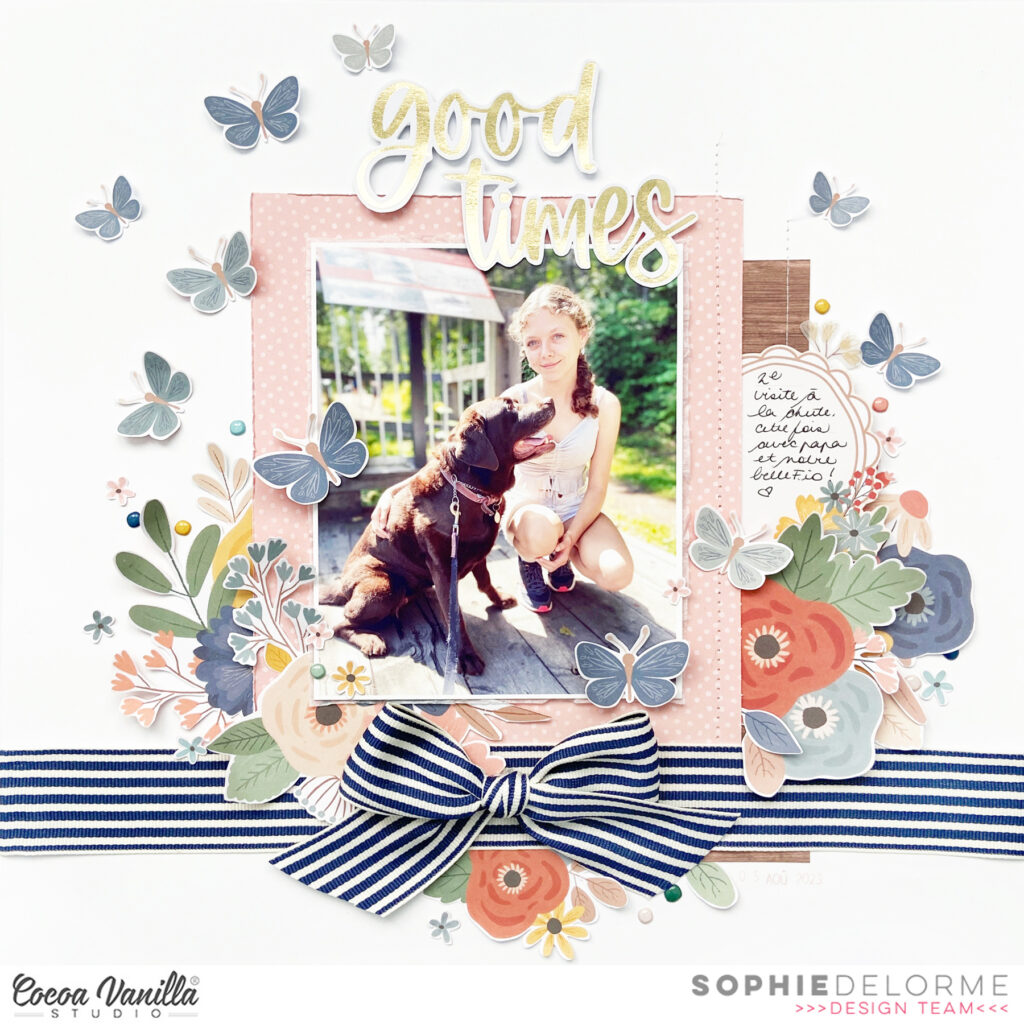
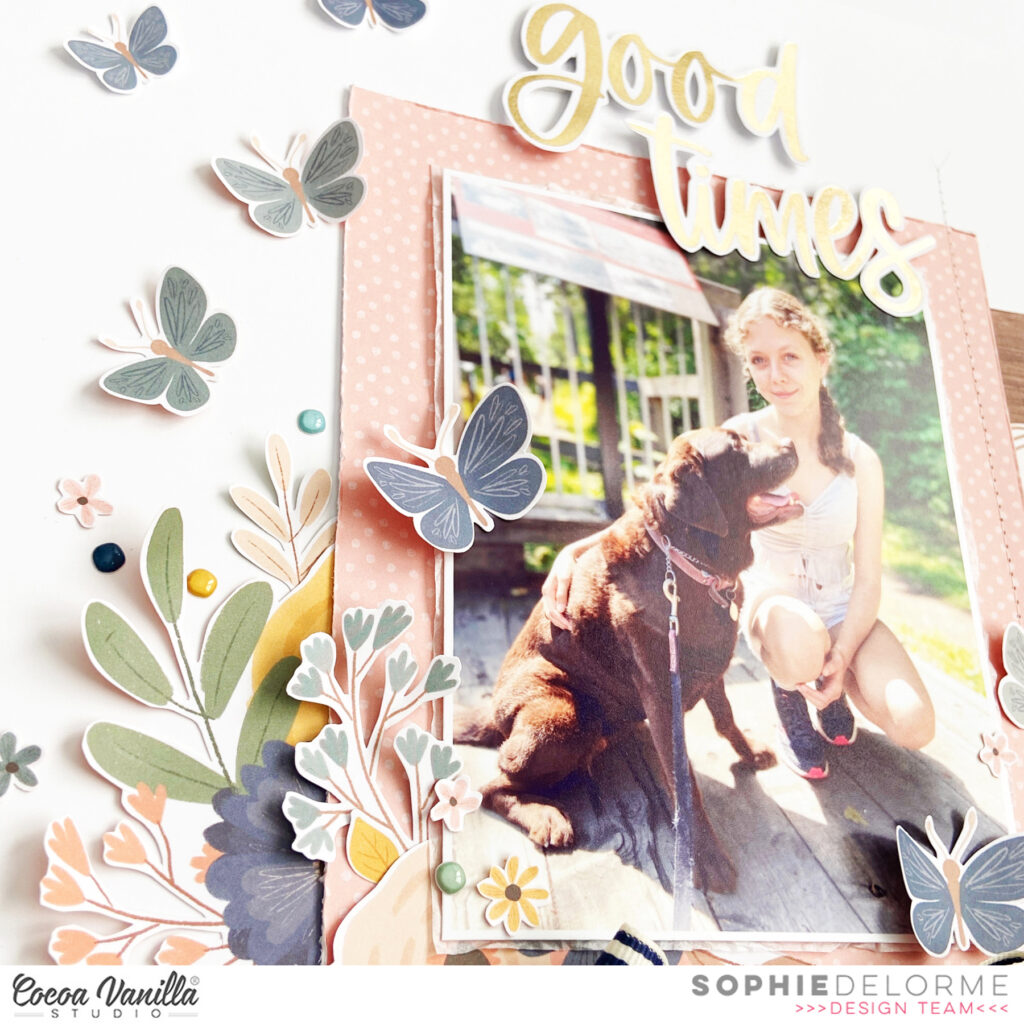
It’s Sophie on the blog with a new layout to share!
I used the beautiful Heart & Home collection again!
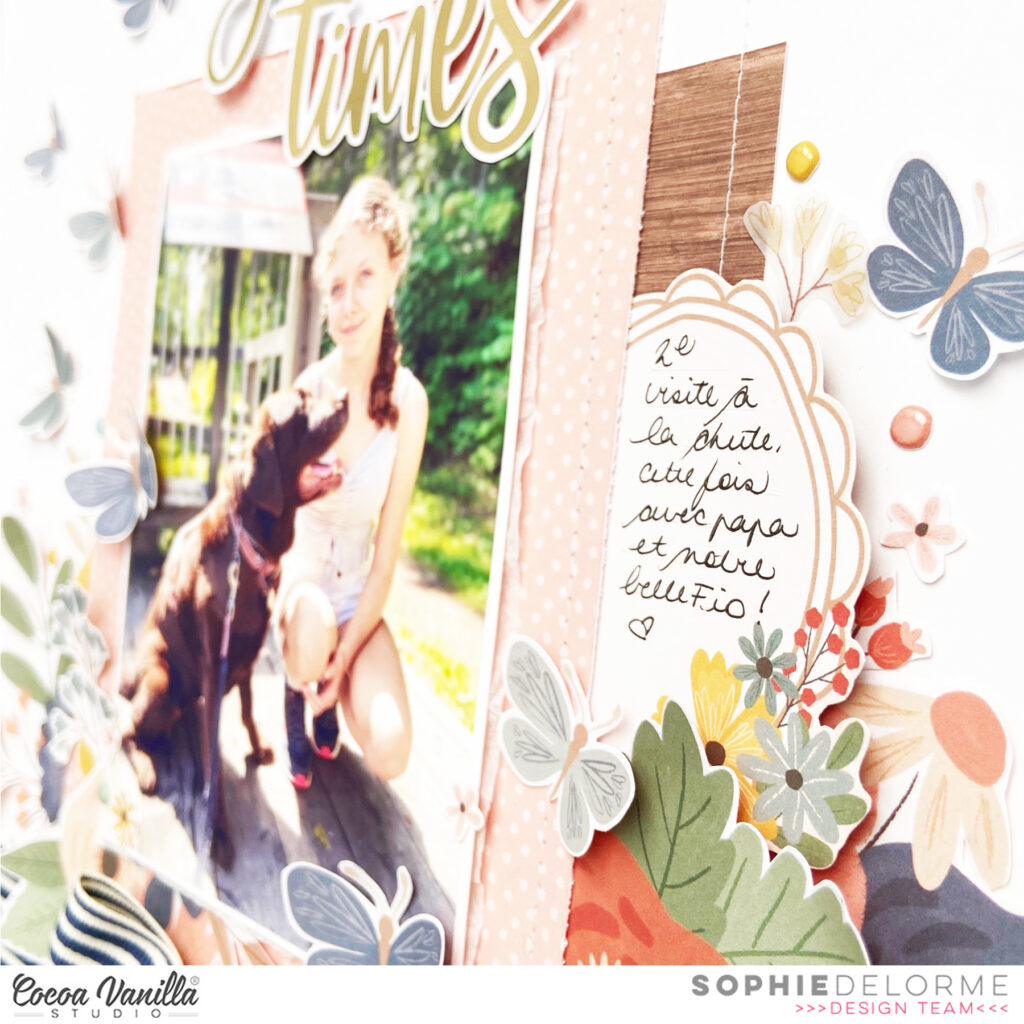
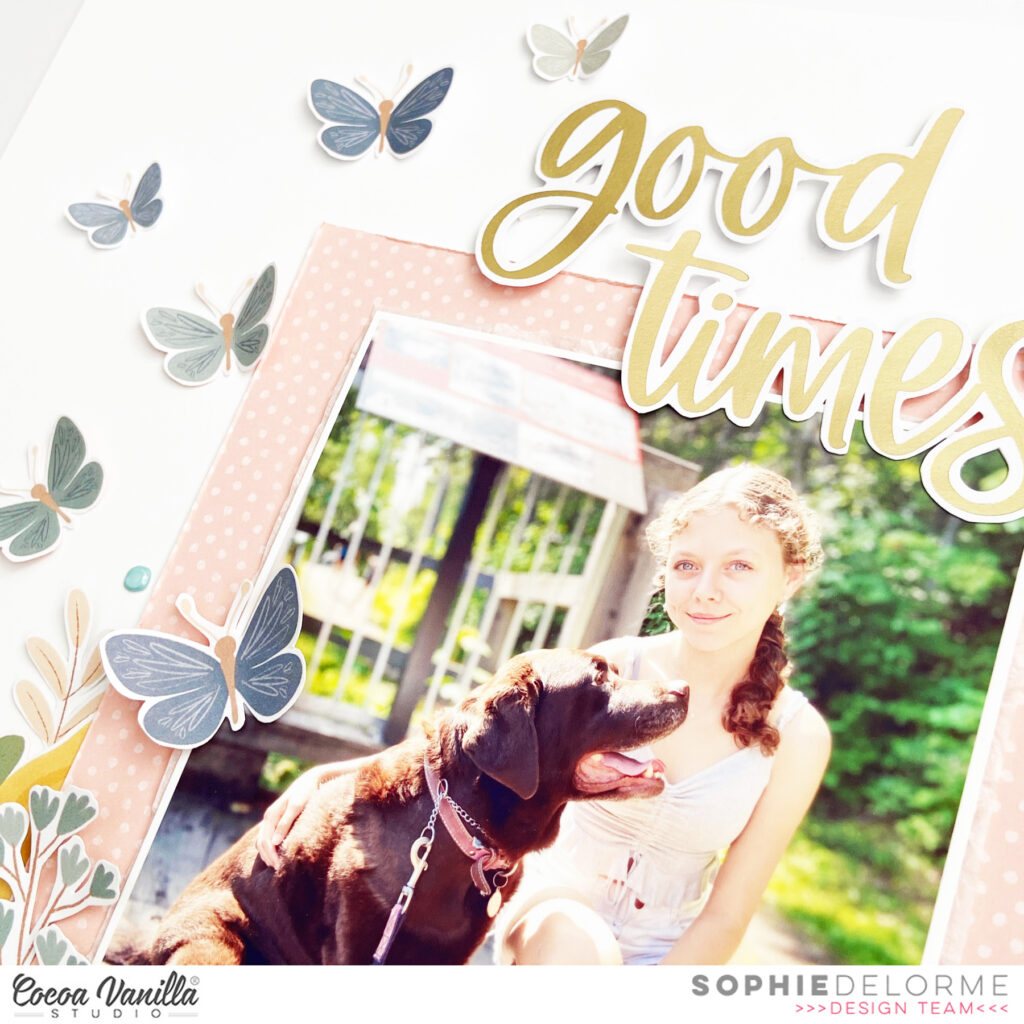
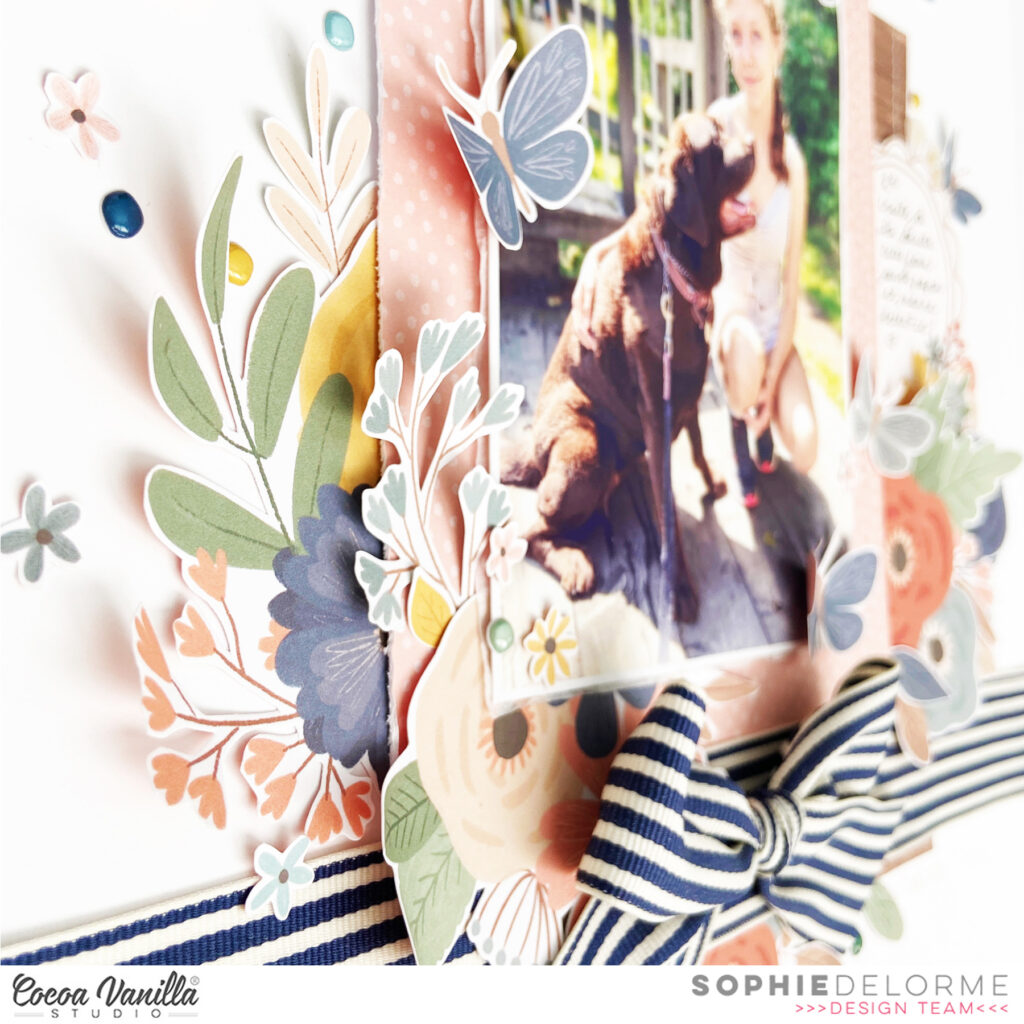
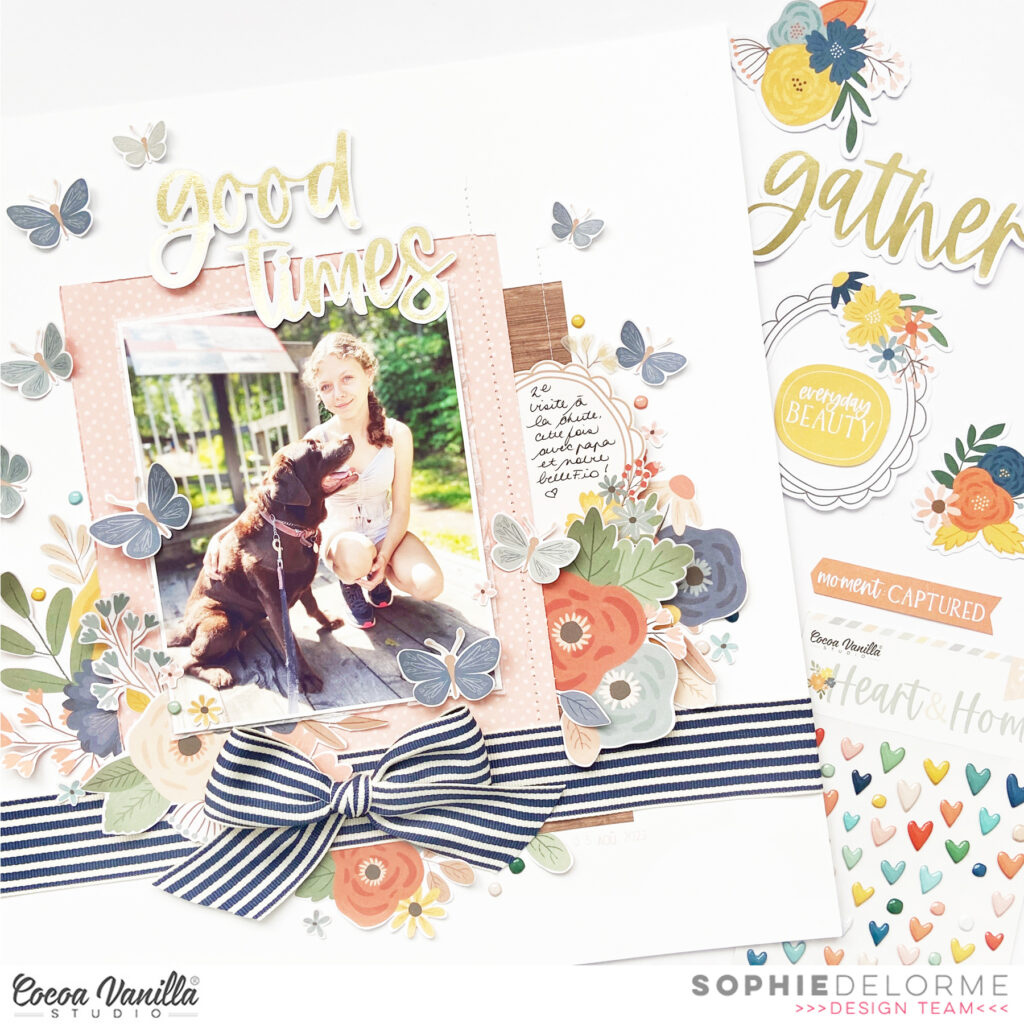
I started with a white background and placed two patterned papers; a wood grain and a soft pink polka dot (both come from the A5 Paper stack) in the center of the page, stitching them down on the cardstock. I centered a photo on the polka dot paper, added tissue paper and adhesive foam to make it stand out a little bit more.
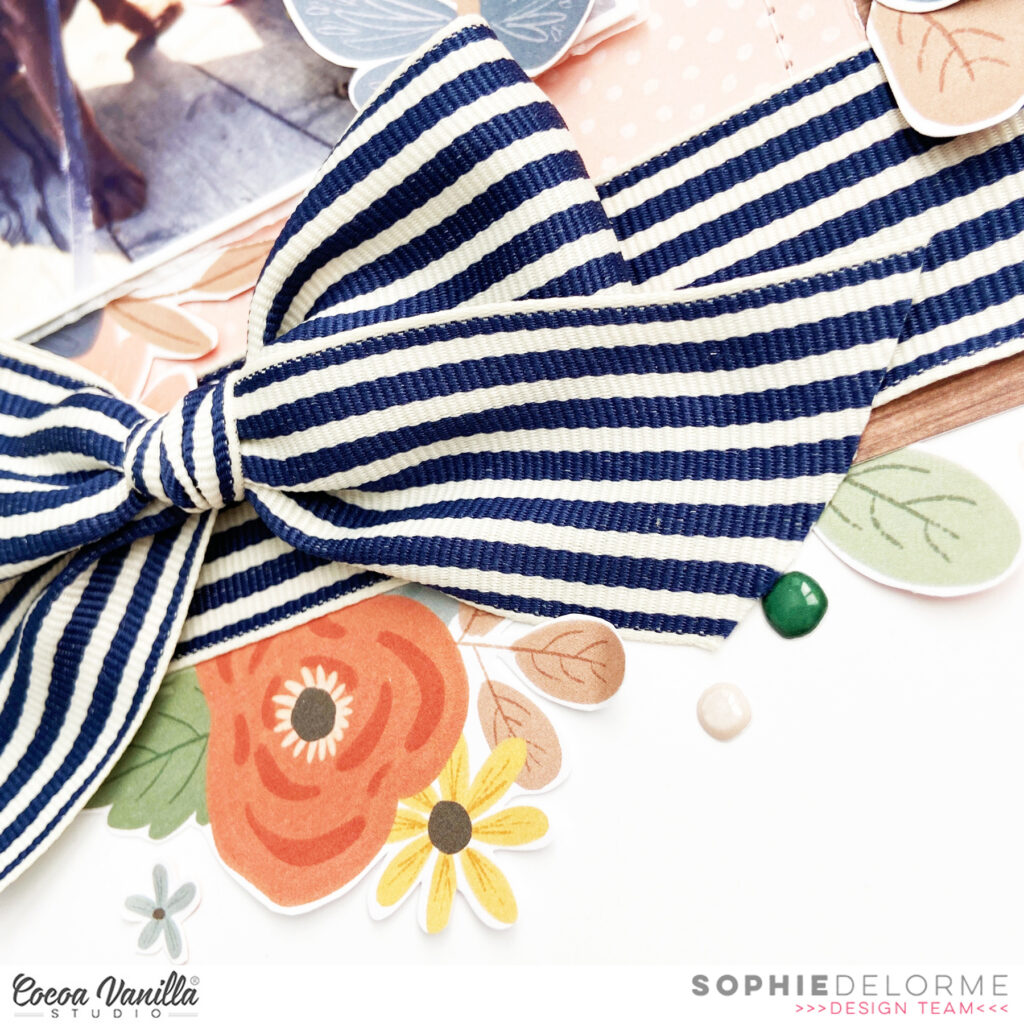
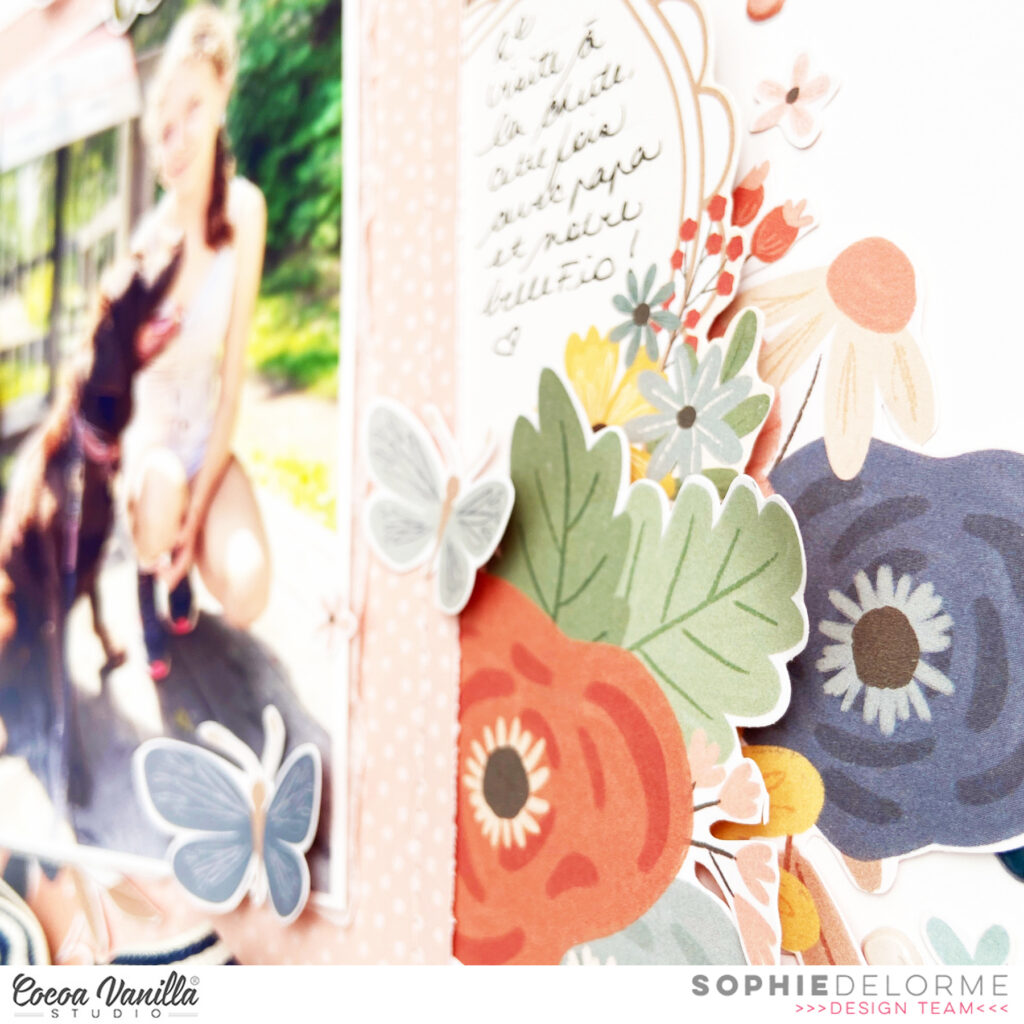
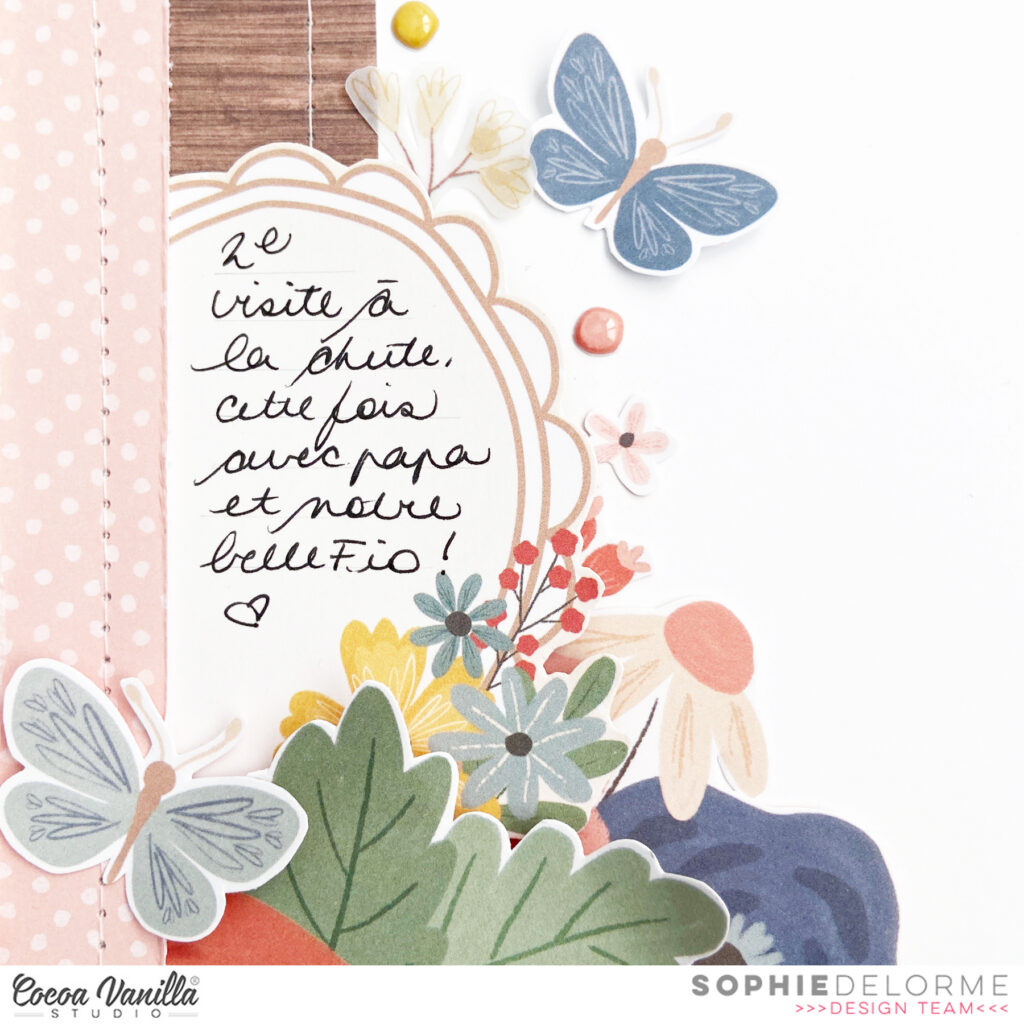
I fussy cut numerous florals from the 12×12 “Bountiful” paper and placed them around the photo.
I wrote down my journaling on a beautiful frame, used the Heart & Home Gold Foil Words for my title and scattered plenty of cute fussy cut butterflies flying around the page.
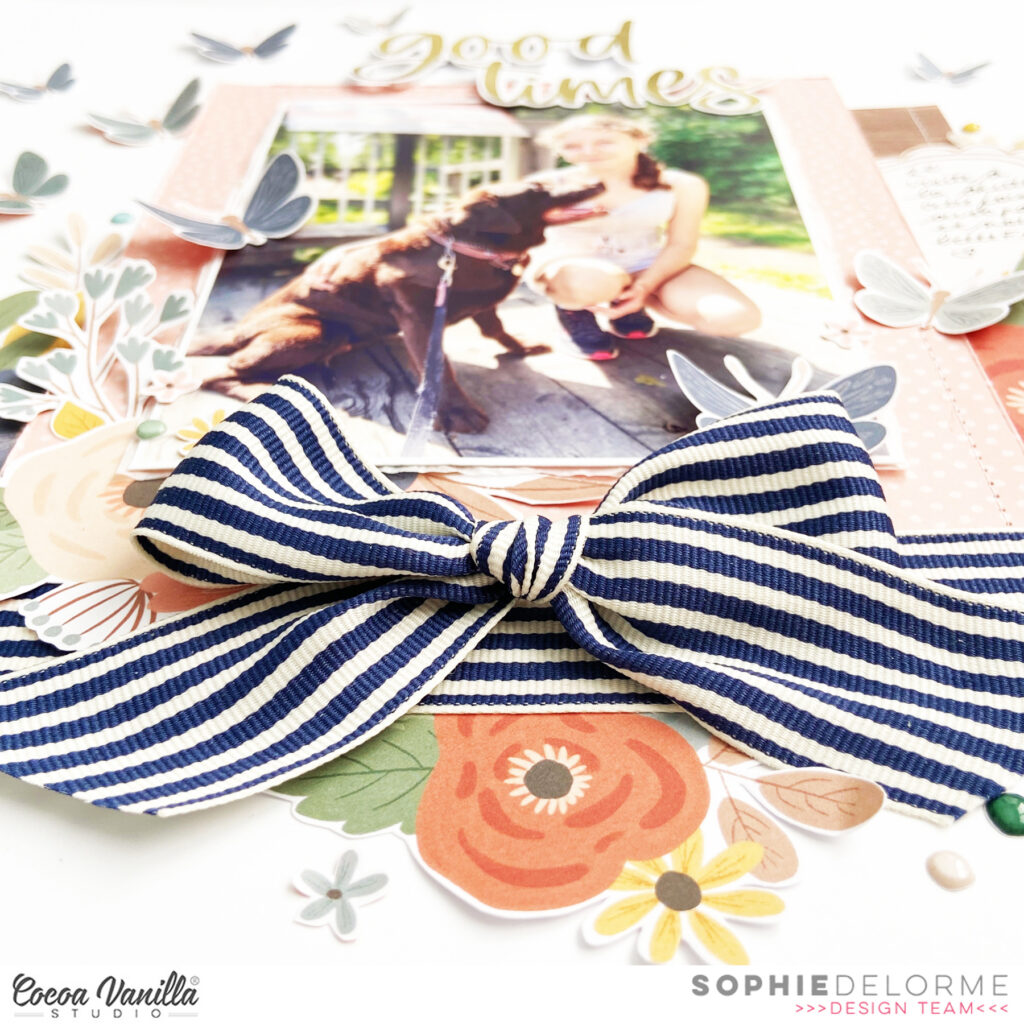
Finally, I tied everything together with a huge bow created from ribbon in my stash.
Here are more close-ups:
I love the result! Just can’t get enough of this wonderful collection!
Hello Everyone, it’s Kel here today to share my first layout for the month of October….how this year is flying by!!
For today’s page I’m using Heart and Home and I decided to focus on the cooler tones…here is a look…
To start my page, I made some origami hearts (found a simple tutorial on Youtube) and to add more detail I added some hand stitching …they turned out really cute ! I used them as a feature across the bottom of my page.
I am documenting two pics of my youngest boy from many years ago…he was such a sweet baby. I placed my two photos to the top left of my page and placed paper strips under my photos to ground them to my page. To the top of my photos I added a tab and word phrase sticker from the Accessory Sticker Sheet.
I used the paper ‘Fall Beauty’ to fussy cut a bunch of the butterflies and placed them diagonally from the bottom and right side of the page so they flow up to my photos and draw attention to them. I also stitched some trails behind the butterflies.
Next I added some florals on both sides of my photos and these also have stitching added to them.
Lastly I added my title using a mix of the Puffy Mini Alpha Stickers and a Title with Gold Foil.
I hope you have been inspired today and are having lots of fun with the new Heart and Home collection.
Mandy here today to share another layout featuring the gorgeous new Heart & Home collection. I absolutely love the beautiful colours in this collection and how versatile it is! For my layout today I chose to document some photos of my son from a day that we spent getting out in nature together.
I started my layout with the striped Harvest paper as my background. On top of that I layered a piece of the woodgrain Framed paper which gave a neutral area for me to add my photos and title. Down the left hand side of the page I created a border by layering the Fall Beauty and the Leaf Litter papers and finishing it off with a punched honeycomb border.
To give some extra interest to the photos, and to help them stand out from the background, I added some patterned paper layers behind them. I also adhered the photos at a slight angle which gives the layout a more whimsical feel rather than being too structured.
When it was time for embellishing, I couldn’t resist fussy cutting some of the beautiful floral clusters out of the Bountiful patterned paper. I added the first cluster in the top left hand corner of the page, layering some smaller florals from the Die Cut Ephemera pack with it, as well as a small banner sticker to finish it off.
Next I added another floral cluster in the bottom right hand corner of the page. This balances out the first cluster and gives the layout a diagonal flow, drawing the viewer’s eye down through the photos. In this cluster I again used more fussy cut florals, as well as a journaling piece from the die cut ephemera pack.
For my title, I took inspiration from the ‘Family’ die cut pieces in the ephemera pack. I love that each letter is a different colour, and decided to create a similar style title using some metal alphabet dies from my stash. I cut each letter out of a patterned papers from the A5 Paper Stack and combined it with Mini Puffy Alpha Stickers. The title ‘Love this Kid’ seemed like the perfect sentiment for these photos!
I finished the layout off with a couple more stickers and the ‘Together is Better’ piece that I fussy cut out of the Gather patterned paper.
Thanks so much for joining me here on the blog today. I hope that you enjoyed taking a look at my layout and found some inspiration!
Hey y’all, Laura Alberts back again with a fun spin on a grid layout. For these four 3×4 inch photos from a camping trip, I puzzled the pictures together with ephemera and cut apart pieces to create a collage in the center of my page. The border around the outside gives the collage a little bit of structure and helps it feel cohesive.
In blank spots that were a little too narrow for additional embellishments, I added a row of chain-stitching with ombre embroidery floss that coordinated with the Heart & Home collection. These sweet puffy heart stickers were the perfect accent for this banner piece!
The floral ephemera pack is always one of my favorite parts of a new collection and these darling flowers had to make an appearance on my layout too! The hand-stitched elements work beautifully with the cross-stitch designs on the cut aparts that I used for titles.
I hope this layout inspires you to try a new design with multiple photos! If you’d like to see how “Family” came together, check out the process video below.
Hello everyone. It’s Anna here with my newest layout, made with brand new “Heart & Home” collection. I am a big fan of fall projects and this line is just perfect for making one (or two :) ). Autumn is just starting to appear this year and leaves are still green but I had a perfect picture from my last year walk in the forest. Sun was low and it was shining through the leaves and tree trunks creating beautiful halo and rays. It looked so magical, like straight from the fairy tale. I snapped few photos enjoying this little wonder of nature.
I knew I wanted to use many pattern papers in this project making die cut leaves. I chose nine different patterns in brown, red-ish, orange, yello and green colors. Some of them are 12*12 papers like “Bountiful”, “Leaf litter”, “Fall beauty” and “Gather” and some are from A5 Paper Stack.
After cutting leaves I added some Distress Oxide inks on the white backgroud creating strips of color, that blend together. It’s a sort of fall halfrainbow. With the background done, I could add leaves using color on color technique. I only applied glue in the middle, and run through the rows with sewing machine and white thread. This way I was sure my leaves will stay in place.
My title is a mix of Mini Puffy Alpha Stickers and letters from word “family”, you can find in Ephemera Pack. I used original F, A and L letters and created second L using first one as a stencil.
At this point my layout was already colorful and full of texture so I only added few embellishments. I searched through Ephemera Pack to fing all the fall related elements and placed them color on color, highlighting the stripes. I found mugs, some leaves and few inscriptions. I also reached for 6*12 Accesory Stickers to embellish area around the photo.
Final step was adding tiny, cute Puffy Stickers, also using color on color technique. Creating this page was so much fun and a perfect combination of mixed media products and paper embellishments. My favourite kind of layout.
That is all for today! Thank you so much for spending your precious time with me. See you in October!
It’s Tarrah back with you and today I am sharing a new scrapbook layout featuring the gorgeous Heart & Home collection! I don’t know about you but I have loads of special family photos that I have to document. The Heart & Home collection is so perfect to use to document family photos. I have added 3 photos to this layout and although they are small, they get the memories documented. These photos are of my 2 sons with their 2 younger girl cousins who they ADORE.
I absolutely love the ‘B’ side of the Golden Fields paper with the typewriter looking phrases and I knew I wanted to use that piece as the background for my layout. I trimmed this piece down to approximately 11′ x 11′ and then adhered it to the ‘B’ side of the Leaf Litter paper. I then cut out the blue 3′ x 4′ card in the top right corner of the Gather paper. I got out my craft knife and cut out the centre of the frame so I could place a photo behind it. I also took the die-cut frame with the 2 spaces from the ephemera pack and placed small photos behind them.
I took several more pieces out of the ephemera pack that I thought would suit my photos including the tag, the ‘Our Story’ journal card, the floral wreath and the Family title. I started to arrange these on the page, deciding on a rounded horizontal look. For elements that I wanted to stand out and make a statement on the page I adhered using craft foam to add shadows and dimension. I will admit I had some ‘help’ in deciding what to add in the centre – I walked away from my page for a little while, when I came back, my man had been adding bits and pieces to it for me! What a gem! He added the small family die-cut and the wreath in the centre for me. I loved it that much so I just went with it! How do you think he did? Once I had the horizontal design arranged and glued down how I liked it, I started to add other smaller embellishments.
For my title I took one of the gorgeous Gold Foiled die-cut titles for the title pack and adhered this at the top using craft foam. I then took the individual letters that spell ‘Family’ from the ephemera pack and adhered these at the bottom of the design also using craft foam. I also layered a phrase sticker from the Accessory Sticker Sheet over the top of these letters. Under the letters I added an arrow die-cut as well. With the tag, I added some twine and tied it in a bow through the hole in the top, I love adding some sort of texture to my layouts, usually it is ribbon or twine or something like that. I absolutely HAD to add some gorgeous florals from the floral ephemera pack, I mostly tucked these into the top corners at each end of the tag and journal card.
Some of the final touches to my layout are the puffy heart stickers (love these!) some more phrase stickers from the Accessory Sticker Sheet and a few smaller die-cuts from the ephemera pack. I cut out a small piece from the Gather paper and adhered this piece above the Beautiful title. I love tucking things in here and there – as you can probably see! Lastly I stamped the date stamp of when the photos were taken as I always do.
Thanks so much for stopping by the Cocoa Vanilla blogtoday! I hope I have inspired you to get creating with your Heart & Home collection! If you haven’t already got this gorgeous collection, you REALLY NEED IT! It’s sooo pretty!
Hello Rachel here and today I sharing another Fall themed layout featuring my daughter using the beautiful Heart and Home collection.
I have used several cut files from the Silhouette Design store, butterflies and a fall wreath. You can see the I have covered the flowers and most of the leaves so I could add the Floral Ephemera and add my own layering where needed.
Once I had adhered the wreath cut file I then added the ‘flying butterflies’. I used the A5paper pad to cut the butterflies and the larger ones I cut two so I could layer them up with foam tape. I added the heart Puffy Stickers to create the butterfly body.
I used a 6×4 inch landscape photo, I sadly had to convert it to black and white as my daughters top was purple! I added a thin mat and tucked it under some of the wreath so it looked a part of it. I next added two floral clusters using a mix of the Floral Ephemera and Die Cut pack. I added a sticker from the Accessory Sticker sheet tucking it slightly under the flowers and leaves.
I used larger blooms to cover the cut file flowers at the top of the wreath and layering the flowers, leaves and sprigs with foam tape. I used phrase sentiments to create sub journalling.
You can find this journal block in the die cut ephemera pack, I will go back and add some handwriting later. I finished this off by adding the super cute pumpkin with flowers die cut and another phrase sentiment sticker. The only 12×12 inch papers I used for this layout was Gather and Leaf Litter.
I really wish my daughter had worn a different colour top so I could have added a colour photo, showing the beauty of autumn leaves and colours which I think would give this layout another layer of colour, warmer I think. Anyway next time I will do better with clothing choices and colours!!!!
I have a new layout to share today created with the lovely Heart & Home collection !
I based my design on a black and white photo of my daughter Sabrina walking on a bridge this summer. I “continued” the road with white Cardstock and added a yellow border with the “Gather” patterned paper. I hand stitched on the papers with matching thread, and placed everything on the beautiful “Leaf Litter” green paper.
I cut the page into a 11 inches square and mounted it with adhesive foam on a 12×12 white cardstock on which I scored a few lines, as shown in a close-up here:
I decorated around the photo along the road with Die Cuts from the Die Cut Ephemera pack and fussy cut flowers and leaves out of patterned papers.
My title is a little banner from the Die Cut Ephemera pack. I drew, cut and stitched little clouds around the photo as the finishing touch, and handwrote my journaling with a brown pen.
Here are more close-ups:
This is a very different design for me but I am so happy of how it turned out !
I hope you like what you see and are being inspired by this gorgeous collection !
Hey y’all! Laura Alberts back again with a sweet shelf design to scrap these photos of a curious little squirrel that I saw fairly often while wandering the campus in college last year. It was a mascot of sorts for one of the English buildings and I looked for him every time I walked past. For this layout, I used the stunning new Heart & Home collection and went wild with fussy cutting!
Using the diagonal stripe from the cut apart sheet as a base and adding a branding strip on top, I created two shelves for my photos and title to sit on. Starting from this base, I built up clusters of fussy cut florals from both the patterned paper and vellum, as well as sticker sheet and ephemera icons. I even fussy cut the tiny little flowers to use as scattering bits around my clusters.
On the right side, I added a label for journaling and an adorable little house. On the bottom, I used the line for a large title from the gold foiled titles pack. The falling florals and leaves seemed fitting for photos from autumn here in the United States. I adore these sweet little moments with nature!
I hope this layout inspires you to take photos of unexpected moments or animals that you encounter and record those too! You never know what these memories will mean to you in the future. To see how “Good Life” came together, check out the process video below:
Mandy here with you today and I’m so excited to be sharing my first layout using the stunning new Heart and Homecollection! I absolutely adore the soft muted colours and lovely ‘homely’ feel of this collection. For my first layout, I decided to document a recent photo of my hubby and kids taken on Fathers Day.
As this layout is focused on my hubby on Fathers Day, I decided to give it a bit more of a masculine feel by narrowing the colour palette down to the blues, greens and browns in the collection. I chose four of the patterned papers – Harvest, Golden Fields, Leaf Litter and Fall Beauty – and cut each into a large triangle before piecing them together to create my background. I matted my photo with the woodgrain patterned paper from the A5 Paper Stack and adhered it in the middle of the page using craft foam to help it ‘pop’ off the page.
To embellish the layout I created three floral clusters which create a visual triangle and help to draw the viewer’s eye to the photo. The first cluster underneath the photo includes some flowers and sprigs from the Floral Ephemera pack, as well as a label sticker that I added the date to, and a die cut phrase. I also fussy cut an acorn and leaf from the Leaf Litter paper to add to the cluster. Underneath the photo I added a sub-title using the sweet Mini Puffy Alpha Stickers.
Next I created a cluster to the left of the photo. Again I used Floral and Die Cut Ephemera, and the same colours that I used in the first cluster. To create some dimension in the cluster, I tucked some elements underneath the photo and adhered some overlapping the edge of the photo.
I created a third and final cluster at the top of the page using similar pieces that I’d used in the first two clusters. By repeating colours and elements throughout each of the embellishment clusters it helps to make the layout feel cohesive and balanced. I also finished off each cluster with a Puffy heart Sticker. Above the photo I added my title using one of the stunning words from the Gold Titles pack and underneath the title I added a final finishing touch with a tiny word sticker that says ‘family is everything’.
Thanks so much for joining me here on the blog today. I hope that you enjoyed taking a look at my layout featuring the beautiful new Heart and Home collection!

 I started my layout with the striped Harvest paper as my background. On top of that I layered a piece of the woodgrain Framed paper which gave a neutral area for me to add my photos and title. Down the left hand side of the page I created a border by layering the Fall Beauty and the Leaf Litter papers and finishing it off with a punched honeycomb border.
 To give some extra interest to the photos, and to help them stand out from the background, I added some patterned paper layers behind them. I also adhered the photos at a slight angle which gives the layout a more whimsical feel rather than being too structured.
 Next I added another floral cluster in the bottom right hand corner of the page. This balances out the first cluster and gives the layout a diagonal flow, drawing the viewer’s eye down through the photos. In this cluster I again used more fussy cut florals, as well as a journaling piece from the die cut ephemera pack.
 For my title, I took inspiration from the ‘Family’ die cut pieces in the ephemera pack. I love that each letter is a different colour, and decided to create a similar style title using some metal alphabet dies from my stash. I cut each letter out of a patterned papers from the A5 Paper Stack and combined it with Mini Puffy Alpha Stickers. The title ‘Love this Kid’ seemed like the perfect sentiment for these photos!


 As this layout is focused on my hubby on Fathers Day, I decided to give it a bit more of a masculine feel by narrowing the colour palette down to the blues, greens and browns in the collection. I chose four of the patterned papers – Harvest, Golden Fields, Leaf Litter and Fall Beauty – and cut each into a large triangle before piecing them together to create my background. I matted my photo with the woodgrain patterned paper from the A5 Paper Stack and adhered it in the middle of the page using craft foam to help it ‘pop’ off the page.
 Next I created a cluster to the left of the photo. Again I used Floral and Die Cut Ephemera, and the same colours that I used in the first cluster. To create some dimension in the cluster, I tucked some elements underneath the photo and adhered some overlapping the edge of the photo.
 I created a third and final cluster at the top of the page using similar pieces that I’d used in the first two clusters. By repeating colours and elements throughout each of the embellishment clusters it helps to make the layout feel cohesive and balanced. I also finished off each cluster with a Puffy heart Sticker. Above the photo I added my title using one of the stunning words from the Gold Titles pack and underneath the title I added a final finishing touch with a tiny word sticker that says ‘family is everything’.
 Thanks so much for joining me here on the blog today. I hope that you enjoyed taking a look at my layout featuring the beautiful new Heart and Home collection!