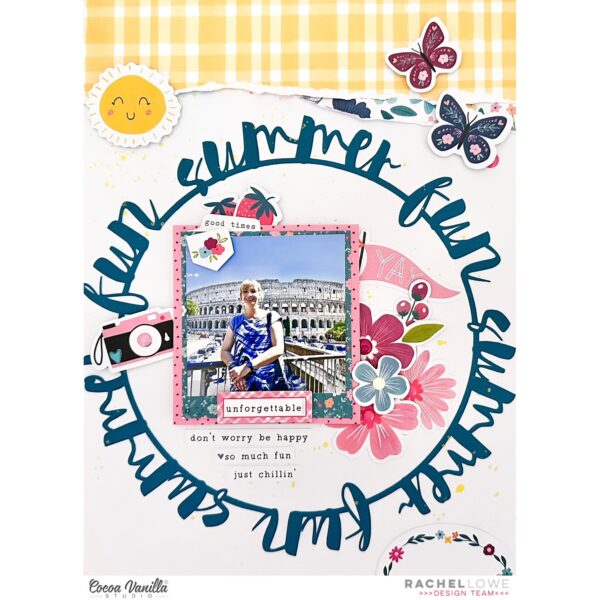
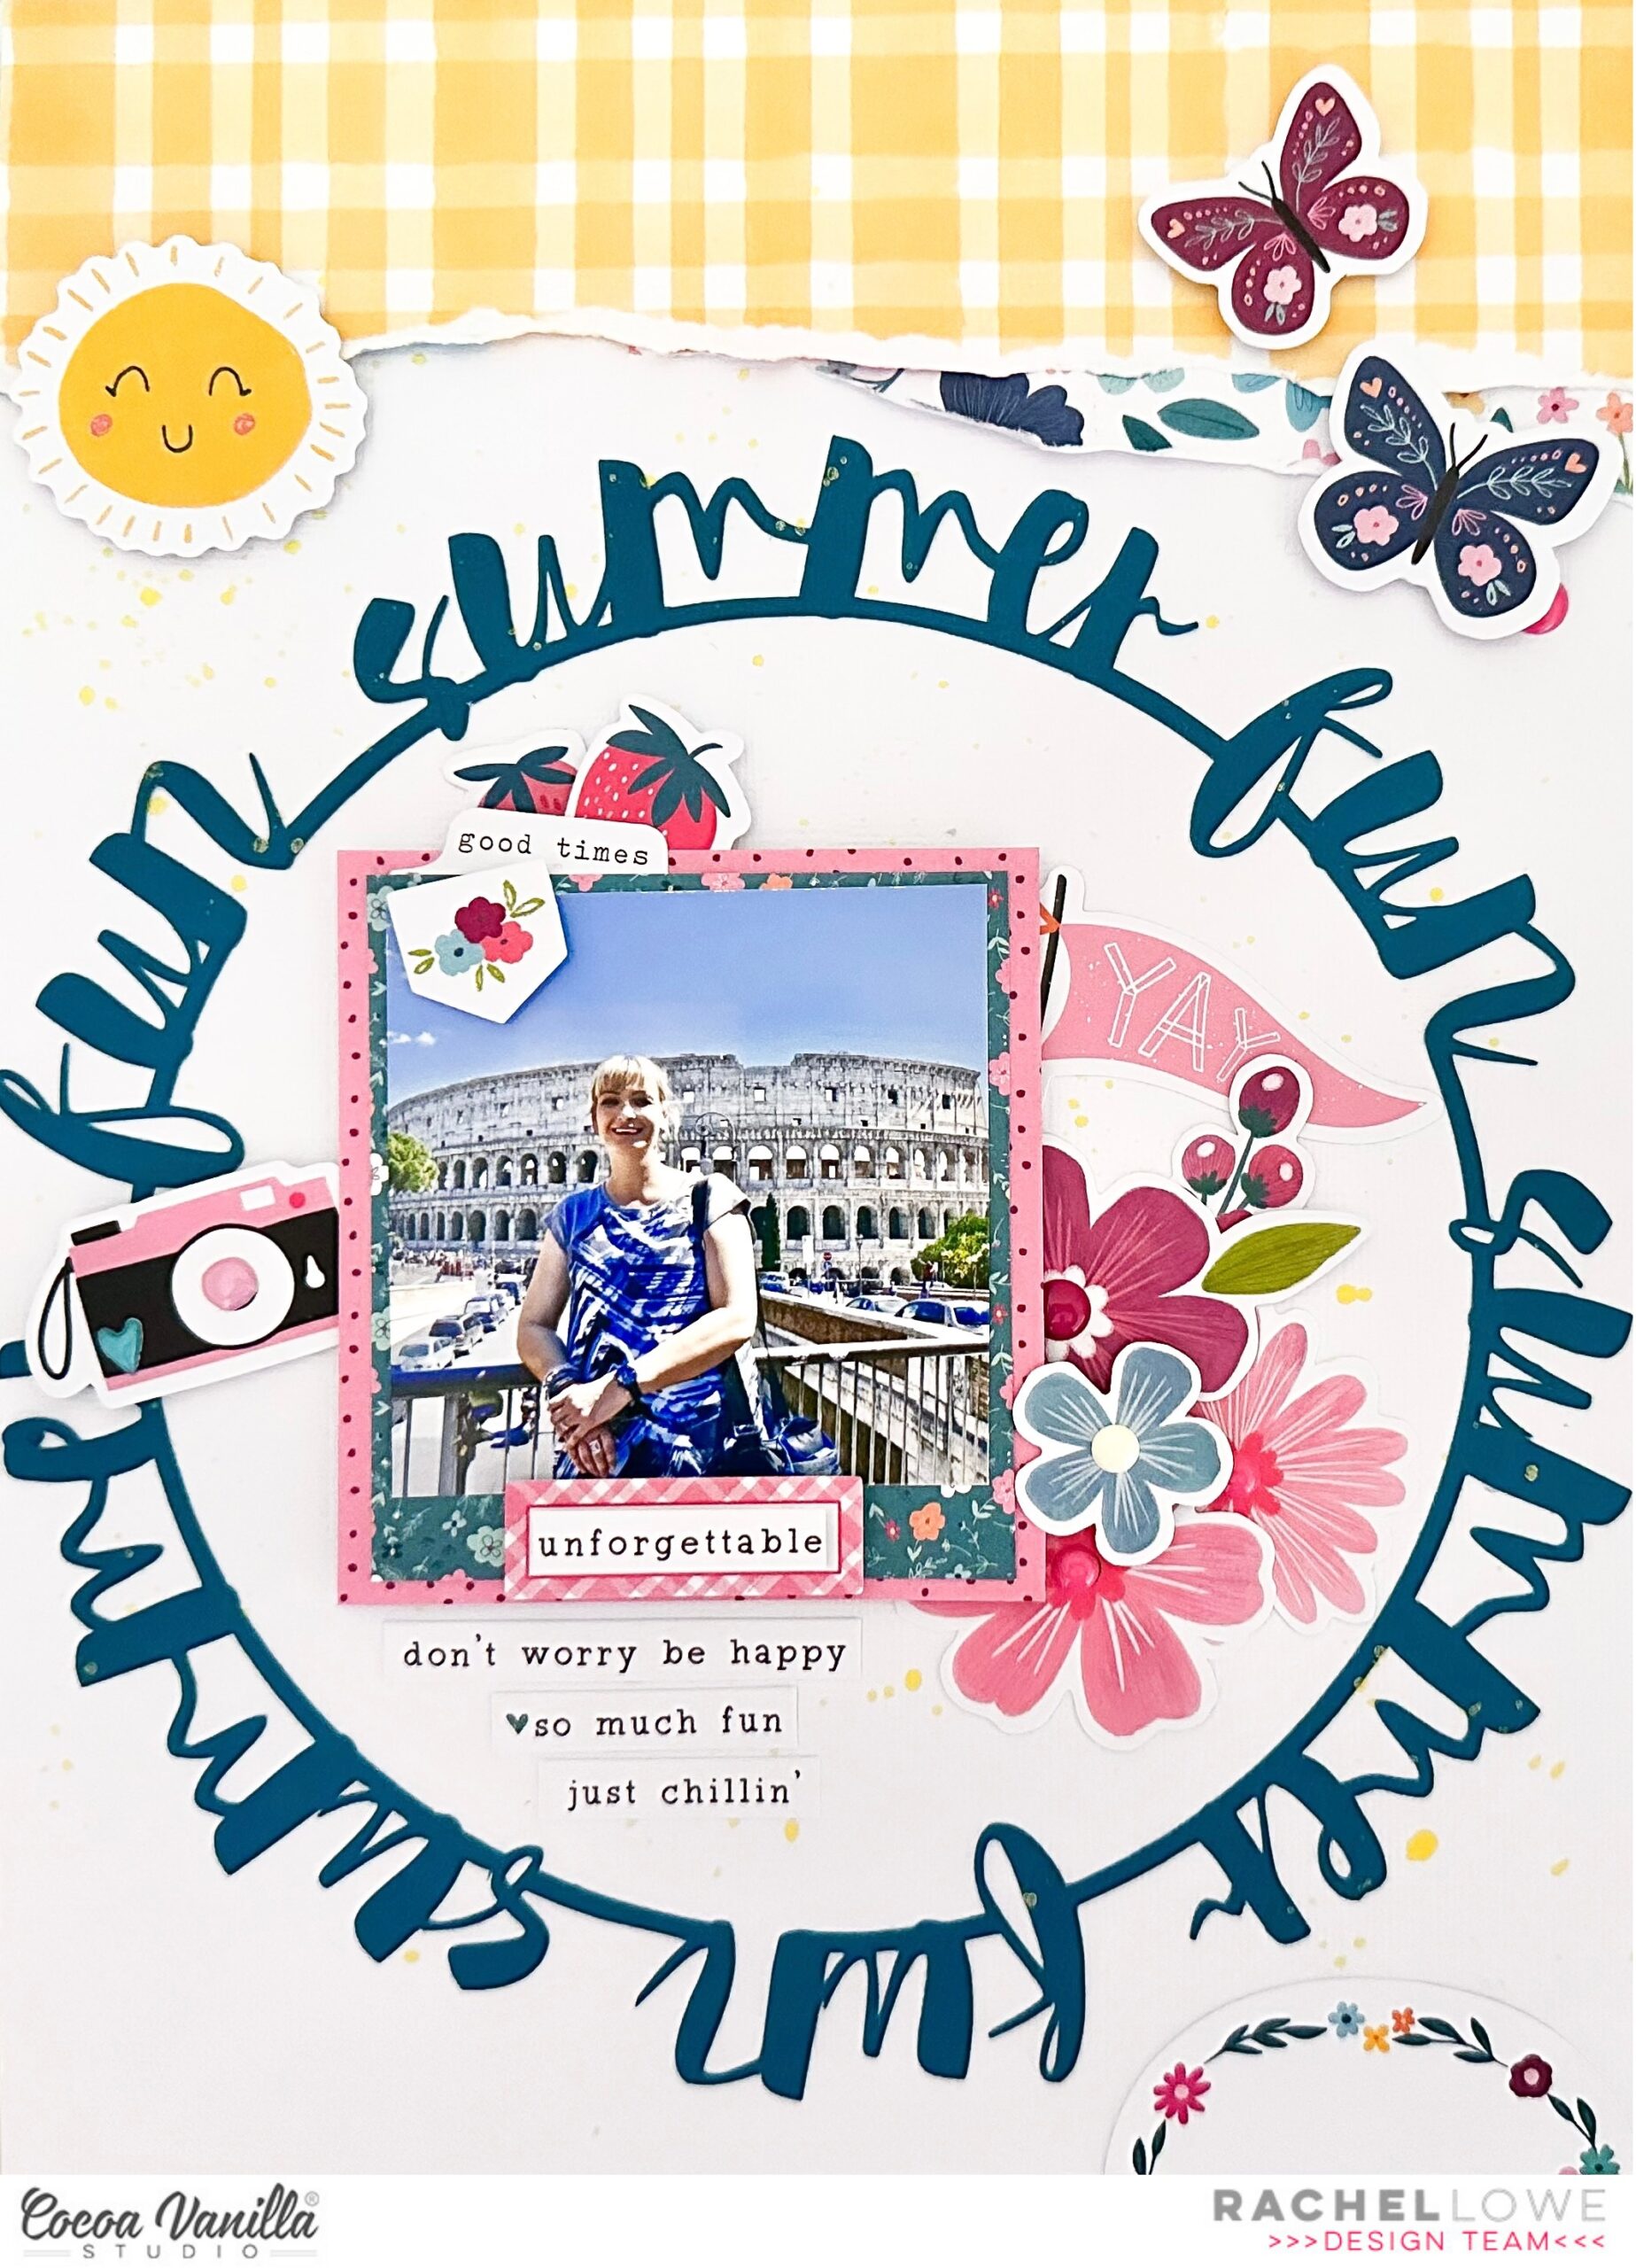
Hello CVS friends! Today I have a fun summer themed layout to share. I chose a 8.5 x 11 inch layout as this is the size I always use for my travel layouts. I have of course used the gorgeous Happy Days collection.
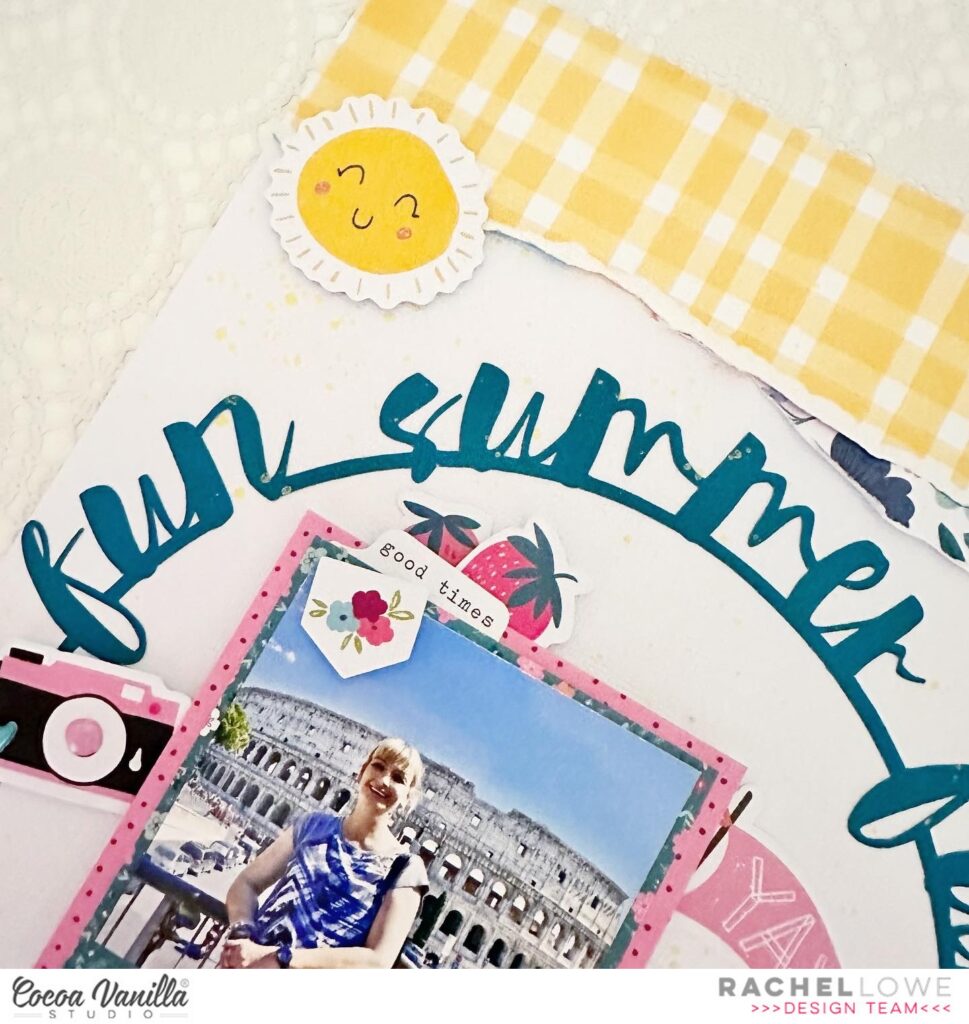
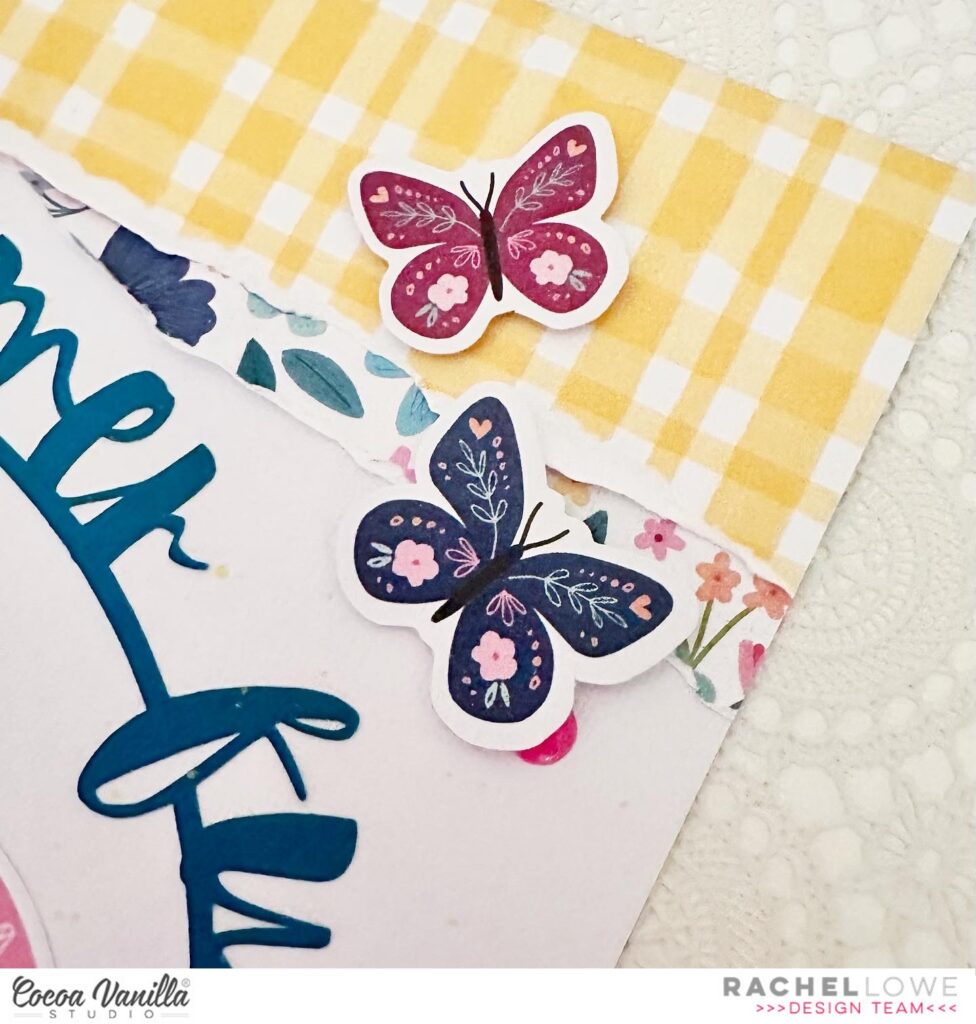
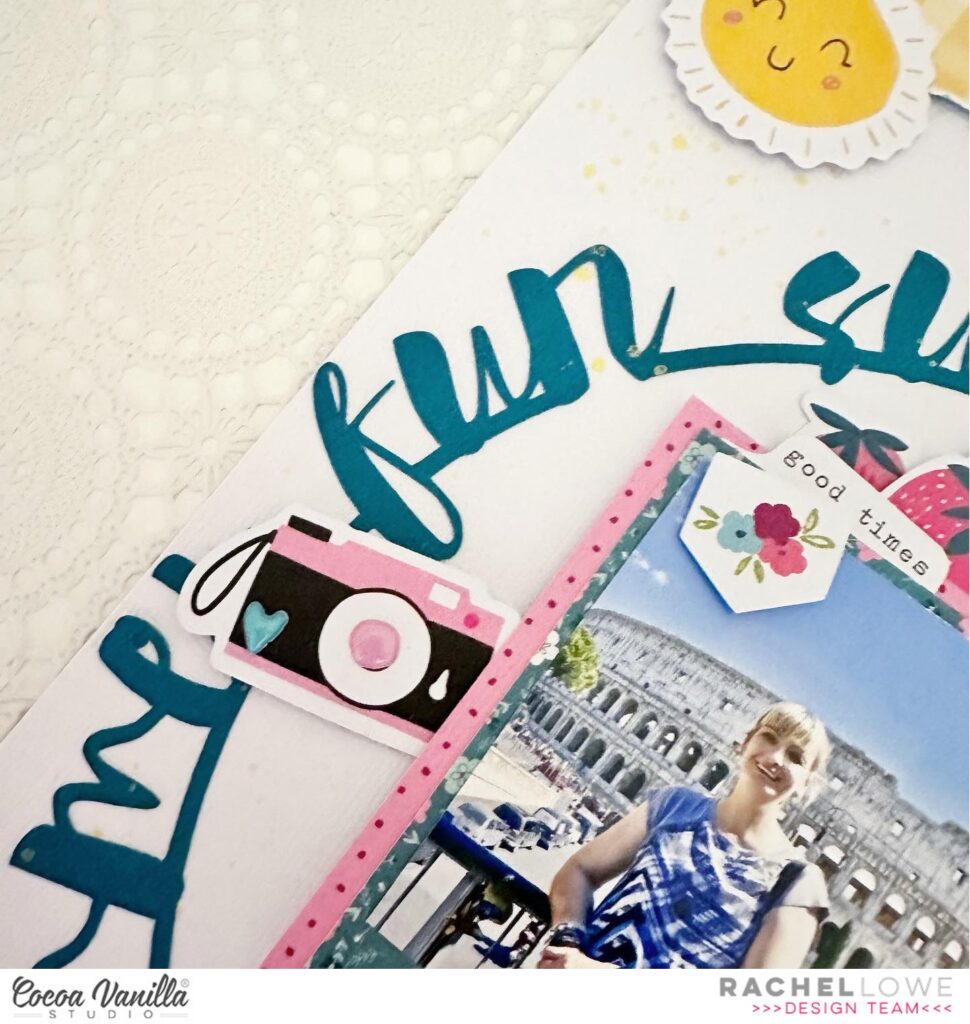
I found this summer fun cut file in the Silhouette Design store and cut it to fit my 8.5 x 11 inch layout. I used a turquoise card stock. I used the Feel Good paper, yellow cheque side cutting at 8.5 inches and tearing at 1.5 inches. Before adhering to the top of my page a added a tiny strip of Lush Blooms paper to add a contrast. I next added two die cutephemera butterflies with foam tape to add dimension and finished off adding a die cut sun which I added two blush pink puffy stickers for the cheeks.
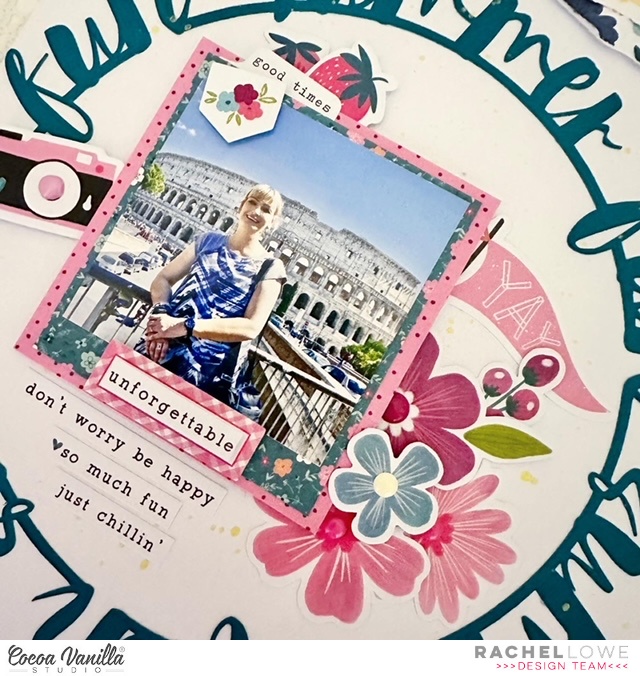
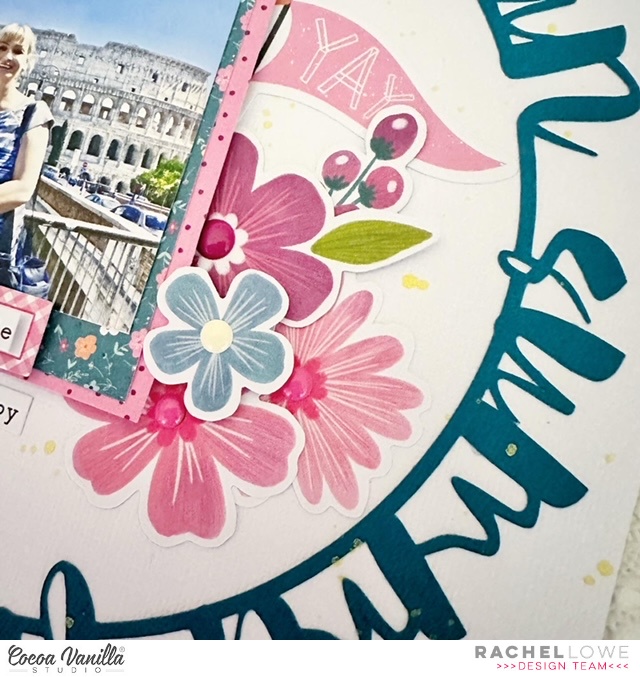
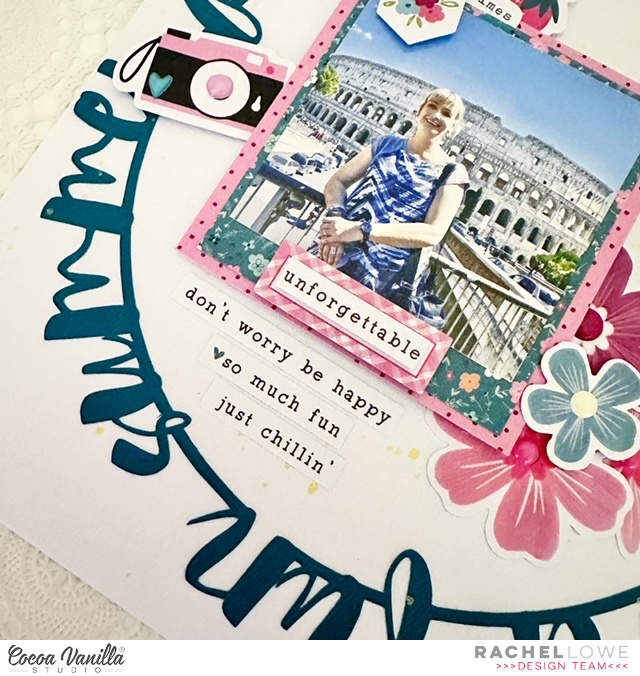
I adhered the cut file with a small amount of wet glue. I used the A5 paper stack to create my layered photo frame. My photo is 3.5×3.5 inches. I set about making this my focal point. To the right I created a floral cluster using the floral ephemera. At the top of my photo I created another embellishment cluster adding die cut strawberries, tab and word sentiment.
To the left of my photo I added a die cut camera with foam tape tucking it slightly under my photo. Tucking elements under and over photos prevents your layout from appearing ‘flat’. I added journalling using the accessory sticker sheet, phrase sentiments on my photo and under it.
I used some yellow paint and made random splatters over my page (protecting my photo of course!) I added a journalling block to the bottom right of my page and will add details of photo later.
This design could be used for so many different themed layouts! I hope my layout has inspired you in some way and if you have only ever tried a 12×12 inch layout I encourage you to try a different size.
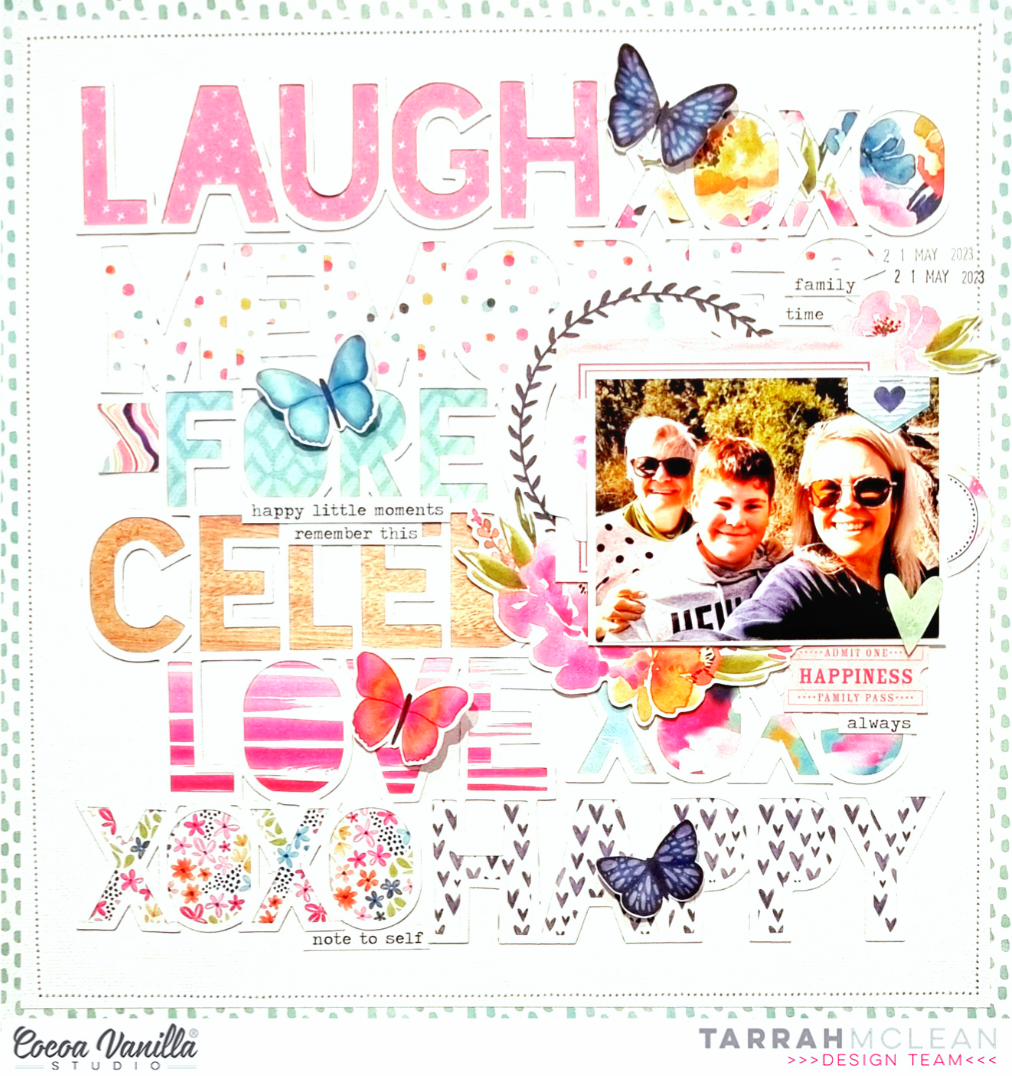
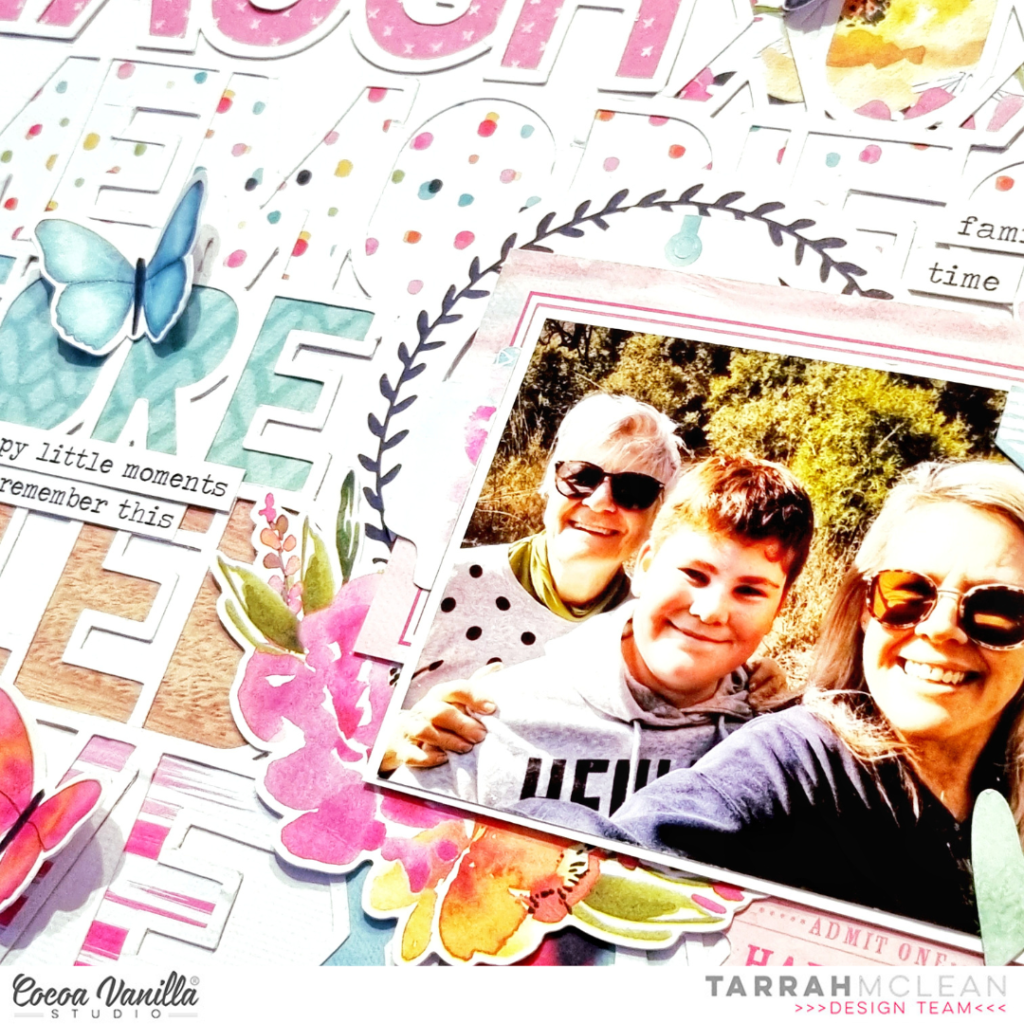
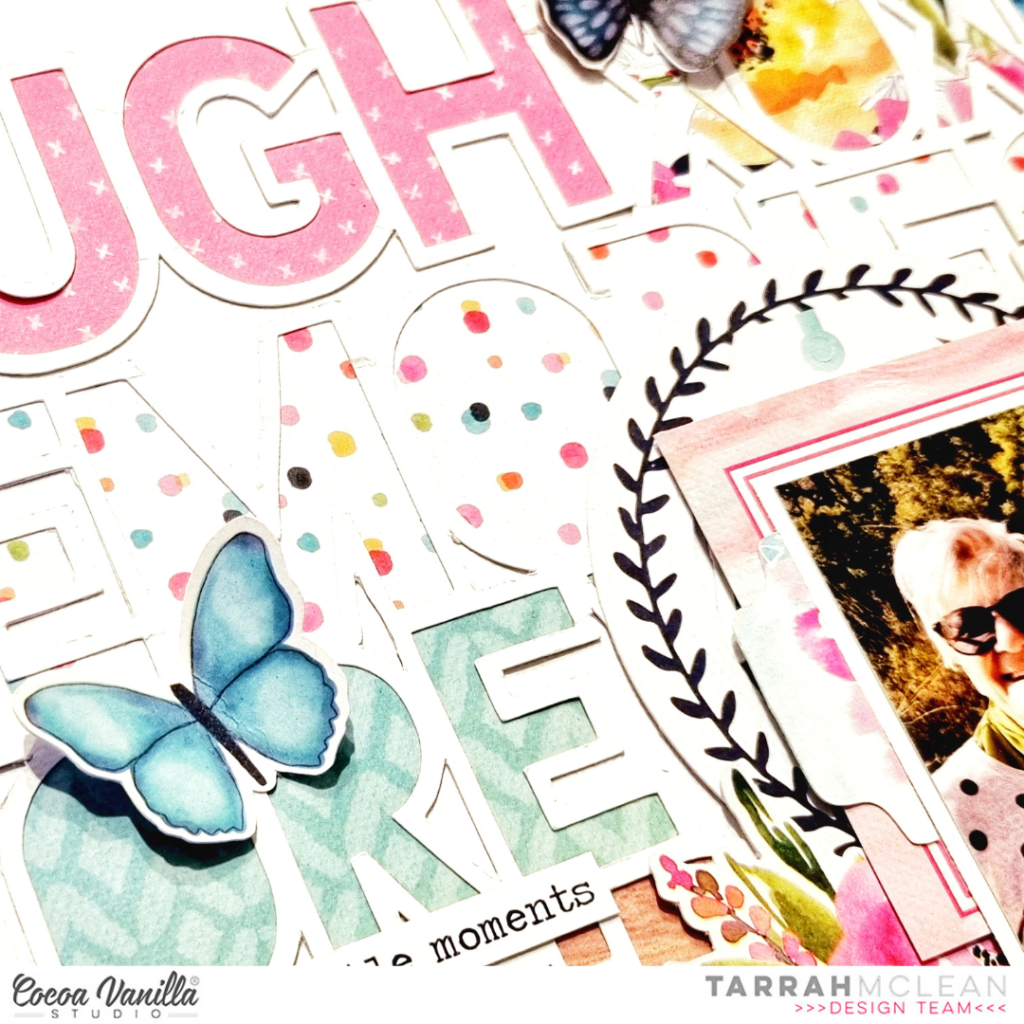
It’s Tarrah back with you and today I am here to share a new scrapbook layout featuring the older but still GORGEOUS Happiness collection! The Happiness collection would have to be one of my absolute favourites by Cocoa Vanilla Studio! I love it sooo much!
The Happiness collection was the perfect collection to document a photo of my son, my Mum and I out exploring recently. We love getting outside and exploring my parents farm together!
I cut out a large cut file from CUT to YOU using white cardstock, I then chose lots of different papers from the A5 paper stack and backed all of the words with a different paper. This does take some time to get everything all backed however I love the end result and all that time it takes is worth it. I adhered the cut file to another sheet of plain white cardstock using regular adhesive, I often use craft foam underneath cut files but this time I didn’t. I trimmed down the cardstock to about 11′ x 11′ and adhered it to the Little Things 12′ x 12′ paper. I then machine stitched a border around the outside edge to create some texture.
Tip: If you only have a small amount of a collection left (mainly papers) and you want to use it up, cutting out a large cut file is a great way to use up some excess papers, you don’t need too many embellishments by doing this either.
I placed my photo over on the right hand side of the layout, I did have to cover up some of the cut file but I knew that and I am ok with that. I layered a paper underneath the photo and one of the round die-cuts from the ephemera pack and also tucked in some of the gorgeous florals in the top right and bottom left corners. The florals in this collection are stunning don’t you agree?!
To help draw the eye towards the photo some more, I added a die-cut heart in the bottom right corner of the photo, a banner sticker to the top right corner and a tab on the left of the photo. On the right hand side, I tucked in one of the circle stickers, above the photo, I placed some phrase stickers and stamped the date stamp. Creating layers gives the layout depth and lots of interest and really draws the eye into the subject of the layout.
To help the readers eye travel around the layout, I added more phrase stickers from the Accessory Sticker Sheet reading from the top of the page to the bottom of the page. These phrase stickers help to tell the story of the photo and are great to use instead of journalling. I don’t like my handwriting at all so these stickers are perfect for me to use for this purpose. I took some of the gorgeous butterfly die-cuts from the Ephemera pack and placed them tone on tone on the layout. I bent up their wings to add dimension and texture.
Thank you so much for stopping by the Cocoa Vanilla blog today! I hope you enjoyed reading about how I created my layout as much as I enjoyed creating it!
Hello Hello, It’s Michelle back here today with a new layout share for you all using the HappyDaysCollection. I went bold with my pattern paper choice for the background of this one and let the rainbow paint strokes of the SunshineLollipops paper shine.
I chose a large cut file design from the CUT to YOU store to use as part of the background design, and it almost became part of the title for the layout. I’ve documented a happy family snap from my birthday a few weeks back, but as it was a ‘quiet’ dinner with family I didn’t think YAY YAY HAPPY WOO TIME was the best option to use, although it does sound quite funny.
I adhered the cutfile to the background using foam tape, giving the design a slight 3d effect.
I printed the photo in black and white so that there was no colour clashing with the background paper and used the frame from the ephemerapack to use as a layering element for this stack. I added fussy cut florals from the A5paperstack in colour blocked groups according to the direction of colours on the background paper
In the top right corner I added a cluster of ephemera pieces and fussycutflorals from the LUSHBLOOMS paper that blended with the top of the background paper
And then created a second cluster in the bottom left with more ephemera, florals and fussy cut pieces. I added the title ‘My Birthday’ to the journal card using the minipuffyalphas from this collection. So cute and colourful, and so many options for mini titles.
Heres another look at the entire layout, including my usual sprinkling of gold ink to finish it all off. I’m really happy with how colourful this layout turned out, it came together quite quickly which is the best way to create a layout. I don’t think I’ll ever get tired of using this collection. It’s bright happy colours and patterns are the absolute best!
Well thats all from me today, thanks so much for stopping by. Be sure to keep sharing all your amazing creations with us in the Cocoa Vanilla Studio Community Group on Facebook, we love to see what you all make!
I love this photo, its not a visually stunning photo, no amazing scenery or backdrop but it is me with all my children after having a great day today. I have used the Happy Days collection!
I decided to go with a white background as I knew I was going to used Flutterby paper which is a dark contrast. I cut a seven inch circle in the Flutterby paper. I then cut three hearts in three different sizes and lastly a double bow.
I then used the butterfly side of Flutterby and Little Blossom paper to create the top and bottom paper angled design.
I created an embellishment cluster in the bottom paper pieces using die cuts from the ephemera pack. As you can see I tucked them in and under.
I machine stitched the hearts down the middle to create a 3D heart. I next added my photo which I double matted and used the chipboard title stickers to create my title. I followed the flow of the circle paper and left enough space in between to add chipboard hearts.
I added small floral cluster using the floral die cuts and finished this area off with a phrase sentiment from the accessory sticker sheet.
Lastly I added my paper bow (I used a cut file from the Silhouette Design store) and added a puffy heart to the centre.
This is a great design for multi photos if you wanted and you get to use many pattern pieces on one layout. My photo is double matted on paper from the A5 paper pad, which means you do not have to cut into 12×12 papers!
Thank you for stopping by and I hope this layout has inspired you in some way!
Today I am sharing a page for Throwback Thursday and I pulled out the Midnight collection which I still have a nice stash of…not surprising as I have hoarded a lot of Cocoa Vanilla products!
Here is a look at my page..
To start my page I used a stitching cutfile from Paige Evans of a branch which I stitched using a chain stitch in a soft pink which creates some nice dimension. This serves as the landing space for my photo..
Next, I pulled out lots of florals, hearts and butterflies from the ephemera pack and accessory sticker sheet to fill out the stitched branch and add lots of interest and dimension.
I also added some stickers to the top of my photo to add more interest..
For my title I used the word ‘Happy’ from the Chipboard pieces to complete my title, then I used one of the clear stickers under the word Happy to ground it to my page..
Under my title I used a banner from the chipboard pieces..
To finish my page I popped a few more of the clear stickers around my page to fill in some of the open spots…I love how this this turned out and finished off my page.
Thanks for popping by today, I hope you found some inspiration to maybe pull out some of your older CVS stash to get crafty!
It’s Tarrah back with you and today I am sharing a new layout featuring the gorgeous Happy Days collection!
For this project I was given the assignment of using patterned paper for my background and chose the ‘B’ side of the ‘Feel Good patterned paper’ to document a photo of my Mum and I taken a few years ago.
I chose a title cut file from CUT to YOU to add to my layout, cutting it from white cardstock. I then backed the open letters in the word ‘Happy’ with various papers from the A5 paper stack. I added craft foam to the underneath of the cut file and then adhered it to the background. I love how the white cardstock is a big contrast to the yellow background, this really helps the elements pop off the yellow patterned paper. I made sure to only use a small amount of adhesive so that things could be tucked underneath the cut file.
Above the cut file I tucked in my photo, I first layered one of the papers from the A5 paper stack under the photo, I also tucked in two of the stickers from the Accessory Sticker Sheet and tucked them in either side of the photo. I cut out some phrases from another sheet of the ‘Feel Good patterned paper’ and adhered one on top of the photo and the other on top of the cut file. I love to layer embellishments on top of cut files to add some more interest.
At the bottom of the cut file, I adhered the long paper strip with the tabs on it to also from the Feel Good patterned paper, I love how that looks like the cut file is sitting on a shelf of sorts. This was a great opportunity to add some of the small phrase stickers from the Accessory Sticker Sheet to the strip. I cut out the Choose Happy journal card also from the Feel Good paper and adhered it to the right of the photo, I then added some quotes about being happy to it.
Some of the smaller embellishments I added to my page are the Chipboard hearts, the gold foil butterflies cut out of the specialty paper, puffy hearts, ephemera, enamel hearts and some more accessory stickers. I love the dimension that my layout has and I love how it turned out too. Lastly I stamped the date stamp as I always do on my layouts. Don’t be afraid to use a busy patterned paper as your starting point for your page, you can still keep the focus on the photo by using clever techniques to draw your eye to the photo.
Thank you so much for stopping by the Cocoa Vanilla blog today! I hope you enjoyed reading about how I created my layout as much as I enjoyed creating it!
Hey everyone and welcome back for another share from me combining the new ‘Happy Days’collection mixed with the older ‘Sunkissed’ collection. These two lines combine beautifully, so if you have them both, have a go and mxing them together! Here is my page…
My jumping off point was the rainbow paper from Happy Days called ‘Sunshine Lollipops’. I cut two 2 inch strips and adhered them down to each side of my page. To add some interest I also tore some of the ‘Feel Good‘ paper and had it popping out from underneath.
I have 2 photos on my page which I double matted using papers from the A5 paper stack from the Sunkissed collection.
Next, I worked on my title. I used a cutfile from Peartree Cutfiles. Instead of backing it with patterned papers I decided to use my distress oxides in matching colours to create an ombre effect.. I love how this turned out. Backing the cutfile onto some black cardstock really makes the title pop off the page. I also added some blue oxide behind my title.
Once I decided where I wanted my photos to go, the white cardstock needed some colour so I used a stencil to add some yellow suns to my page.
All of my embellishments come from the Sunkissed collection.
Next to the left photo I added a palm tree and flip flops from the ephemera packand a starfish puffy sticker. On the bottom right there is a pineapple and flower puffy sticker.
Above my photos I have used a cloud, rainbow and word tab from the ephemera packand a sticker from the Accessory Sticker Sheet.
To finish my page, I have added some heart puffy stickers and some of the word phrases from the Accessory Sticker Sheet.
I hope you have enjoyed my page today, and have found some inspiration!
Today I am back sharing my second layout with the new ‘Happy Days’ collection. For my page today I was tasked with the assignment of focusing on the floral ephemera…so easy when the florals are always so gorgeous in all Cocoa Vanilla collections right?! Here is a look at my page..
To start, I chose a cutfile from my stash (sorry it’s an older one so Im not sure where I got it.) I backed the large section of the heart in the yellow plaid which is called ‘Feel Good’..then I backed the flower with two papers from the A5 paper stack. To give the page more interest, I hand stitched around the flower and the heart.
For the design of my page I decided to go with a diagonal…this always looks good, and I used this opportunity to use the florals from the floral ephemera pack to flow down my page, placing them above my photos, under my title then down to the bottom right of my page.
When adhering my florals i like to give them dimension in several ways… adding foam adhesive, pinching the petals together and not sticking the flowers straight down onto the background. This allows them to ‘pop’ up off the page ..
Next to my photos on the right side, I used one of the cut cards from the A5 paper stack.. it suits my pics perfectly!
For my title I used the word ‘Together’ from the Chipboard Title Stickers, I love the the playful font on these.
Under my photos I used some of the word phrases from the cut apart sheet called ‘Feel Good’ as well as from the A5 paper stack..
To finish my page I added some yellow oxide ink around my heart to create depth and dimension… super easy way to add mixed media followed by a sprinkle of the puffy stickers.
Thats it for today, I hope you enjoyed my page and you are starting to get to play with this fun new collection.
It’s Tarrah back with you today, I am very excited to be sharing my first layout featuring the gorgeous new Happy Days collection!
I was tasked with using the gorgeous April mood board as my inspiration for my project this week, the Happy Days collection has so many elements in it that match perfectly with the mood board!
I am documenting 2 photos of my nieces from Easter last year, I love their sweet faces so much!
As the mood board is mostly Easter themed, I chose an Easter title cut file from CUT to YOU and backed it with one of the large 12′ x 12′ papers. I love the yellow plaid patterned paper!
You can see from the mood board image below that I was inspired by many things from the mood board! The Happy Days ephemera pack has the gorgeous tassel banner included in it, I knew I was definitely going to add that to this layout! It is perfect!
I absolutely love this mood board! There are so many things you can inspired from this board!
I placed a large white paper doily down on the heart background patterned paper and then adhered the cut file down using craft foam, leaving some room for my photos above the title. I did trim down the heart patterned paper and adhered it to the pink/purple spotted paper. I then machine stitched a zig zag border down the edges where the papers meet. I love the texture that the machine stitching adds to a layout!
I layered one of the papers from the A5 paper stack underneath my photos to help lift them a little bit. I added craft foam underneath the photos as well and also added craft foam under the tassel banner and adhered this at the bottom of the title. Now that I am happy with the placement of the largest elements on my layout, its time to embellish and tell some of the story!
Do you ever look at embellishments and think about how you can use them for something they aren’t originally intended for?
I do this a lot! When I saw the fabric puffy hearts in the Happy Days collection, I just knew I had to add them to this page to mimic bunny ears! Really hoping that you picked out the bunny ears before I pointed them out to you hehe! Aren’t they the cutest?! I added 4 of these in the end, tucking them in enough so that they peek out of the tops of what they are adhered behind.
By using craft foam underneath some of the larger elements on my page, it creates some shadows and dimension to my page which I love! You can see in the photo above the shadows created under the tassel banner. I didn’t add too many embellishments to this layout as sometimes less is more when it comes to embellishing. I did add a few die-cuts from the ephemera pack like the Yay banner, the small flower to the right of my photos and the round journal spot above the photos. I also added the phrase across the cut file, to help break up all that yellow! I also added the cute Love This tab to the left of my photos as well.
Lastly I helped tell the story of my layout by adding the small phrase and word stickers from the Accessory sticker sheet. One of my signature things I do on almost all of my layouts is to stamp the date stamp, the date is of when the photo was taken. Another thing I like to do is, and you don’t see this but I like to sign the back of my layouts and I write the date that I created it as well. I have doing this for years now! Do you have something you like to include on all of your projects? Please share with us!
Thank you so much for stopping by the Cocoa Vanilla Studio blog today! I hope you enjoyed reading how I created my layout as much as I enjoyed creating it!
Make sure you get your hands on the gorgeous NEW Happy Days collection from your local scrapbook store or favourite online store!
Today I have a layout to share using the beautiful These Days collection. I am a little sad as this is the last of it but on a positive note I have the new Happy Days collection to start creating with (happy dance).
As I only had the butterfly 12×12 paper left I decided to use it as my base paper but adding a white scalloped square to the middle with a blue colour wash to add contrast. Using a cut file I cut 5 butterflies to layer them for dimension. I used my sewing machine to add stitching down the centre.
I next added my 3×4 inch photo of me hanging out in Paris as you do lol! Which I matted and used foam tape to add. My photo is where I added a larger embellishment cluster. I cafe die cut reminded me of Paris so it had to be added to my cluster, I added a tree die cut behind it and then used phrase sentiments from the accessory sticker sheet to journal.
On the opposite side I created a floral cluster and finished off my adding a die cut tab at the top of my photo and a puffy heart sticker on the tree.
I added of the wood epoxy buttons on the butterfly wing. I then used the puffy stickers alphas to add Paris to the other butterfly wing. This layout is simple and quick to put together but the butterfly paper, mixed media background and layered butterfly cut file give it lots of visual impact.
There are some These Days product left in the CVS shop.
Thank you for stopping by and I look forward to sharing my first layout using Happy Days!