Hey CVS friend, today I have some boy love to share! I have used the fab new Legendary collection.I have used a fun cut file from Silhouette Design store, I chose it so I could use more of the designs on one layout.
I cut my white card stock down to 10×10 inches and adhered it to the Wild One paper. Keeping to the rule of thirds, I chose three papers to paper piece the cut file, Wild One – yellow side, All Star paper and One Way paper. I used foam tape to adhere the finished cut file to create a 3D effect.I then added my photo and again with foam to create more height. I chose to create an embellishment cluster around my photo, using the die cut ephemera and accessory stickers. How gorgeous is the geometric bear I tucked behind my photo!I used the accessory stickers to add my subtitle/journalling.
I have used more foam tape to add die cuts to create more height and added some enamel dots under some of the die cuts.I love all these colours together but because I didn’t want my layout to look ‘too’ busy I was careful when it came to my embellishing.
And there you have it one super colourful and super fun boy layout! Thank you for stopping by today and have a wonderful week!
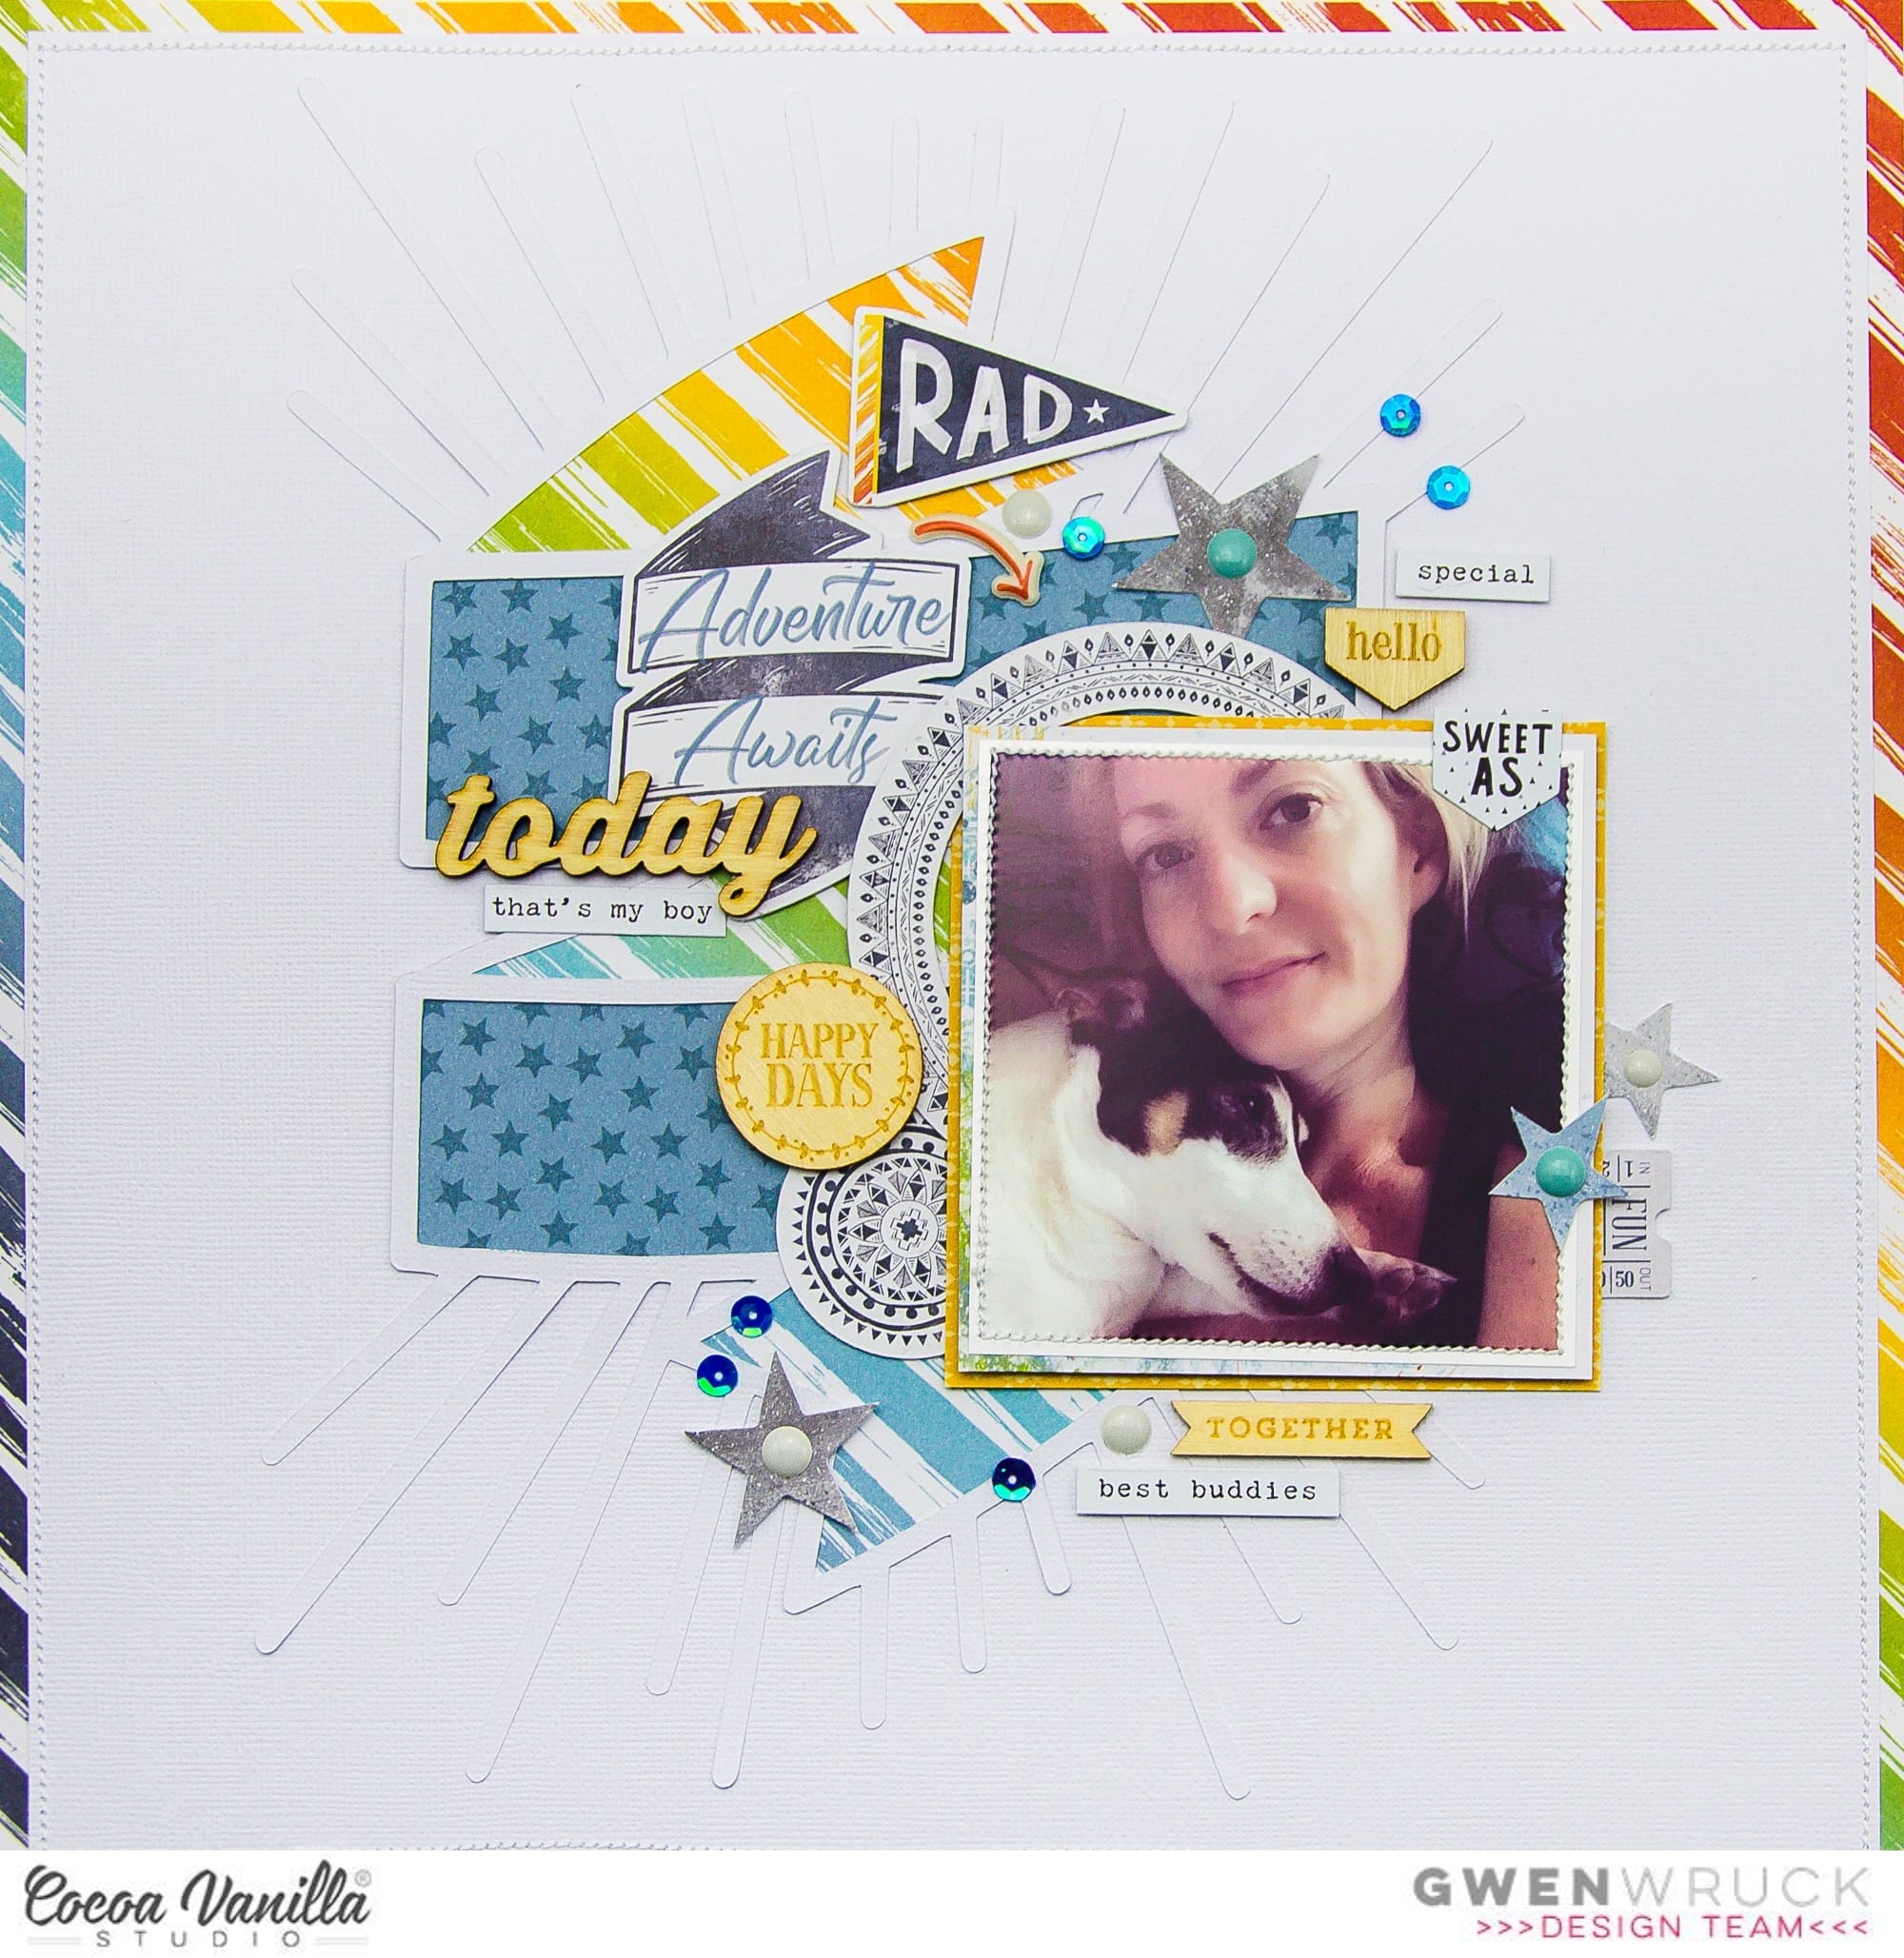
Hey Creative friends, Gwen on the blog today with some more scrapbook inspiration. I have a special share for this one using the new ‘Legendary’ collection. It’s my sisters birthday today, so for this page, I really wanted to create a page for her and her fur-baby. I won’t be able to visit her for her birthday this year, so I thought this would be a nice way to help her feel special today.
For this page, I started with the ‘Wild One’ pattern paper as I really wanted to add some colour for this page. I’ve used it as a frame for my layout and also to back the cut file banner here. This cut file is part of the set that was designed by CUT to YOU for the Legendary collection and is available for FREE download here. If you don’t have a cutting machine, CUT to YOU offers a cutting service and ships worldwide. I’ve resized the banner piece as large I could to make it a background feature and used it as an anchor for the other elements in my page.
I’ve also used the ‘Off Beat’ B-Side pattern paper on the banner for contrast. For my photo, I’ve gone with a double mat, using the A-Side of the ‘Off Beat’ pattern paper and the pop of yellow from the B -Side of the ‘Wild One’ pattern paper. **Design Tip – I’ve only used 2 pattern papers for this page, but it looks like more because I’ve made sure to include and A and B sides of both.
With my large banner cut file centred on my page, I decided to offset my photo, pushing it slightly to the right. To balance out the page, I’m going to add my embellishing to the left. For this, I’ve gone with elements from the Die Cut Ephemera pack, starting with the largest elements first.
I’ve decided to go with the ‘Adventure Awaits’ Banner piece which mirrors the cut file shape and also doubles as my title. I’ve also added in some of the round elements from the die-cut pack for interest. I’ve added these into my layers. It was at this point that I wanted to add some more warmth to the page. To do this, I’ve dug deep into my stash and found some vintage ‘Life is Beautiful’ pieces of wood veneer. These are long gone from the store, but you could use any wood veneer you have in your stash to replicate this look.
With the larger embellishment pieces locked into place, I’ve gone back and added in some smaller details such as the die-cut stars and some typed sentiments from the ‘Accessory Sticker sheet’. I’ve also added some enamel dots from the collection as well as a sprinkling of sequins from my stash and called the layout complete.
I had a lot of fun making this page for my sister, I hope she likes it! I hope it has inspired you in some way. If you haven’t seen the new ‘Legendary’ collection, it’s shipping now from a store near you so be sure to check it out.
Hello again, it’s Melissa here and I can’t believe it’s nearly the end of April!! I hope you’re all well and finding some time to be creative.
I have another layout to share with the amazing ‘Legendary’ collection today, and its the toughest photo I’ve ever scrapped! This photo is of my brother in law Blair and our youngest daughter Ava a week after he was diagnosed with terminal cancer in 2018. Blair passed away in October 2019, and I’ve held off documenting any photos from his journey until now, mostly because I felt that I couldn’t do his memory justice. But the Legendary collection speaks to me, and is perfect for documenting this special photo.
I knew that I wanted to fussy cut some of the stars from the ALL STAR paper and make a wreath to represent what a star Blair was during his nearly 1 year battle with cancer. I used a cut file from Paige Evans, and backed the stars with several papers from the collection (including WILD ONE, TOTAL LEGEND and Brave Heart) that had small repeating patterns. I also added some velum from my stash for some lightness. I matted my photo with ALL STAR and EPIC TALES and distressed the edges.
The OFFBEAT paper was perfect for my background as it helps direct the eye towards the centre of my page, and of course towards the photo. I did some subtle machine stitching in white thread, and just drew a circle with pencil and stitched around it abut 5 times. Its always easier to machine stitch when it doesn’t have to be perfect!!
I didn’t do much embellishing on this layout, mostly because all of the stars are embellishment! But I did add a tab sticker, word sticker, die cut ephemera tab, and some of the clear stickers. My title was easily made with two of the die cut words which I popped up on foam.
I will admit that I found this layout hard to make emotionally, but I’m so happy I finally managed to start scrapbooking Blair’s Epic Journey. Blair was an amazing bother in law who was able to present to the New Zealand Government the largest cancer petition in history, and made significant changes to cancer care in my country before he passed away. I’m so grateful for our wonderful memory keeping hobby, and I hope I’ve inspired you to scrapbook the photos and memories you find difficult too.
You can watch my process video for this layout here.
Hey y’all! Laura Alberts back with a Wild & Free layout featuring my youngest son and his stockpile of sister-annoying weapons. He is ready to take on all three of his sisters with this setup! I couldn’t stop giggling while scrapping this one, he’s so serious in his games and he was ready to rock and roll. This cut file from Paper Issues was absolutely perfect for this “target practice” style layout! I used the front and back of the Wild One patterned paper from the Legendary collection to build my background and then fussy cut tons of stars from the All Stars patterned paper to create a cascade that follows the color pattern of the background!
By tucking this larger ephemera star behind my photo, it helps to draw your attention to the photo as well as give the impression of the smaller stars shooting off from the larger one, a cool effect and perfect for this layout! I added a scattering of enamel dots and gold ink splatter to add detail to this cascade of stars.
I used a cut apart piece for my title and an arrow to draw your eye back to the photo again! On a one photo layout, it’s important to reinforce that this is the focal point in more than one way. And finally, I added these word phrase strips below the photo to create a pre-made journaling spot! I love how this layout came out and I think it really captures the feeling of that moment for my son.
I hope you’ve found some inspiration in this design and I would love to see how you capture your photo’s moment in time with your design! And don’t be afraid to fussy cut these brilliant stars that inspired this layout for me! They make for fantastic embellishments that already perfectly match the collection! A little bit of extra time can make a huge difference in your creations, those details can take your creativity even higher!
Thank you so much for joining me on the sister-blasting adventure and enjoy the process video for this fun layout below! Until next time, my friends!
Hello and Happy Easter Monday. Its Melissa here! I hope you had a lovely Easter with your loved ones wherever you are in the world. I’m so excited to be working with the amazing Legendary collection, and there was a lot of excitement (from my kids and I) when the courier came to our door!
I decided to challenge myself to scrap an Easter photo with this rad collection, with an extra twist of using a floral cut file ,and to use it to document my son Sam. The cut file is from Confessions of a Paper Addict.
The first thing I did was to pull all of the papers that I thought would work for this cut file, bearing in mind that it has a lot of florals. Often I find that the B-sides are best for backing smaller details on cut files. Cut part sheets are also great for finding extra patterns and colours.
The title word said “Brothers”, but as I only have one son I altered it by cutting off the “s” to make it work for this photo of Sam. The story behind this photo is that although he was a big 12 year old last Easter, he still joined in the Easter hunt and even posed for this photo for the sake of his youngest sisters. If you have kids that are nearly teenagers you’ll know what I mean!!
I love using a patterned paper for a background, and this gorgeous small repeating triangle was perfect. I added some small blue and yellow splatters for some subtle detail. I really wanted the feature of may layout to be the photo and the cut file, so I kept embellishment to a minimum. I added some of the clear stickers to help draw the eye in, and my final touch was to use blue drops on the two flowers that were too small to back with patterned paper.
I hope you enjoyed my Easter layout. Thanks for looking, and I’ll be back later this month.
Hello Hello its Michelle here today with my first layout share this month. I hope this post finds you safe and well during the Easter break. This weekend is looking a little different, and a lot quieter than previous years so I thought what better way to brighten it up than to create something Easter related using the cheerful HAPPINESS Collection. Full of wonderful happy colours to brighten our moods.
I chose a sweet cut file from CUT to YOU, a basket thats full of eggs reminiscent of most Easter mornings after the big fluffy bunny has been and left a wonderful mess. As Leila is getting older this may be on of the last years in our house that we can share in the joy of the Easter Bunny with her. Lets hope we get at least one more..
I started my creative process by cutting the design out a few different ways. First was the basket using the woodgrain pattern on the BRIGHT & BEAUTIFUL paper. I’ve cut both the detailed design of the basket and also the backing piece using the same paper to replicate the look of a real basket. Next I cut the eggs multiple times so that I could individually back them with pattern paper then layer them together in the basket at different heights. If only Easter eggs looked this good!
This layout documents one of many fond memories – the excitement and sheer concentration of opening all the hunting eggs to see whats inside. I layered 2 photos together, both backed with a piece of EXPRESSIVE paper with some fussy cut florals layered to the right.
I used the SPRINKLES paper that reminds me of confetti for the bow on top of the basket, along with a lighter hint of pink from the MEADOWpaper. The eggs are backed using MEADOW, LITTLE THINGS, GOOD VIBES, SO FRESH and EXPRESSIVE.
I fussy cut butterflies from both the 12×12 and 6×8 versions of BRIGHT & BEAUTIFUL along with a floral cluster from the SOFRESH wreath to layer along the edge of the basket rim. I also tucked in a couple of leaf strands and stapled tiny hearts to the eggs from the EPHEMERA pack.
The title is made up of a CARDSTOCK TITLE word and alphabet letters from older collections.
Theres a few more tiny fussy cut flowers scattered here and there from both the MEADOW paper and 6×8 version of BOTANICAL BLISS and a good splattering of gold colour shine to finish it off. Once the ink was dry I trimmed the edges of the white cardstock and adhered the layout to a 12×12 piece of BOTANICAL BLISS to bring all the colours together.
Well friends thats all from me today, thanks so much for stopping by. I hope you have enjoyed seeing my Easter themed share this weekend. Be sure to pop in to the Cocoa Vanilla Studio Community group on facebook to share all your crafty ventures with us over the Easter long weekend. We do love seeing what you all create using CVS products.
Until next time, Happy Scrapping, enjoy the chocolate and stay safe
Hello CVS crafty friends, I hope you are all doing well and staying safe during these challenging times! Today I have a layout featuring the fab new Legendary collection. With Easter nearly upon us I wanted to create an Easter themed layout, so I chose colour, patterns and elements from the collection to do so. I have used a Easter Egg Wreath cut file from the Silhouette Design store.
I have used the Total Legend paper for the spring flowers on the wreath. I then chose Wild One paper to cut the super cute bunnies in the yellow and then used the reverse side (cuttting the blue/green stripes from the pattern) to paper back one of the eggs. I cut out the 3×4 inch journal card from the reverse of the Total Legend paper, white with yellow triangles and cut three stripes to go the egg. For the final egg I cut the dark green 3×4 inch journal card from the Total Legend paper and paper backed it, creating a contrast against the white.
I added some machine stitching to the branches of the wreath to add texture and definition. I used enamel drops from the collection for the centre of the flowers. I added a small white pom pom to each of the bunnies tails.
I have used two photos, one being 3×3 inches and the other 2.5×2.5 inches. I matted the larger photo on the blue cut apart paper from the Total Legend paper and the smaller photo on a green square (again from Total Legend paper), adding the smaller photo with foam tape to create height. I also added some machine stitching around the larger photo mat and finished off adding a Flair appropriate to my photo and the Sweet As sticker from the Accessory Sticker Sheet.
To break up the white of the page I added some bright coloured paint splotches from the Clear Stickers and added under two of the bunnies.
To create my title I used the Super word from the Clear Stickers and adding a blue paint brush stroke clear sticker over it, finished off with a word sentiment from the Accessory Sticker Sheet.
Well that’s it from me today, thank you for stopping by and sending you all a virtual hug from Australia.
Hi again Cocoa Vanilla Studio fans! Danni here with a Super Sweet layout to share using the colourful Legendary collection. I was challenged to make flair buttons a feature on this layout, and I absolutely love flair, so I was really excited to get creating this one! For this layout, I wanted to feature multiple smaller photos of my little boy enjoying this bowl of ice cream. Because of the dessert, I decided to use sweets as the theme! I started with this super cool gumball machine cutfile and backed it with lots of different coloured patterns from the patterned papers in the collection.
For my background, I took the Wild One 12×12 paper and mounted it with a thin white cardstock border, then popped some bright yellow card stock in the centre. I love how the rainbow stripe really pops between the two layers of plain cardstock! For some extra texture and to secure all the layers together, I machine stitched with white thread around the edge of the layers. Once my base was done, I added some peach and blue ink splatters on the background following a diagonal – this is roughly the way I planned to have my photos positioned across the page, so I wanted to draw the eye in the same direction with the splatters.
The photos were matted with alternating layers of One Way, Brave Heart and Explorer patterned papers, with 2 simple layers on each photo. I went through and distressed the edges of my photo mats too – I just love the textural effect this provides! I arranged my photos in a cascade from the top of the cutfile to the bottom, making sure they overlapped each other and showed the progression of events. How adorable is his little face?
Time for flair buttons! I added them in three places, making sure to place one in the slot at the base of the machine, to looks as if a gumball was falling out. I just love how that looks! I went ahead and added some decorative clusters using the die cut ephemera and accessory stickers, taking care to strategically cover the random people in the background of the photos. I also punched a bunch of small circles from the patterned papers and used them to fill in any gaps.
For my title I used SUPER from the die cut titles and some white foam alphas to make ‘SUPER Sweet’. I think that fits the theme of the layout quite nicely! To finish off I added a sprinkling of enamel dots and a few lines of journaling in grey pen.
Thank you so much for joining me today! I just love how colourful my layouts are turning out with the Legendary collection. There is a process video below if you would like to watch <3
Danni x
https://youtu.be/sptSMo7H8OM
Hi CVS friends! This Is Anna and I’m so thrilled to be here today sharing my first layout with you! It’s awesome to be part of the Cocoa Vanilla Studio Design Team!
I’ve made this scrapbook page using the beautiful More than words collection and the Unforgettable freebie cut file.
I decided to use this photo that I took of my friend Monica with her daughter because the colors were perfect for these papers.
For the base of my layout I used the B side of the pretty Collage paper. It makes contrast with the bright floral paper.
Then I ripped two strips from the Darling Buds paper and I placed them up and down of the page. I also put a ripped strip vellum between both patterned papers.
I filled both sides of this “central path” with the flowers that I cut with my Silhouette Cameo.
For my main title I used the white chipboard titles, and I inked it by making a pink ombre. It was so easy because of the smooth texture of the chipboard.
On both edges of the page I sewed two thin strips from the 6×6 pad Treasure paper.
The page is pretty busy, so I didn’t use a lot of embellishments. Just two chipboard butterflies, a banner die cut, a sticker phrase and a heart-shaped enamel dot.
Thank you so much for stopping by today. I’m looking forward to share with you my next creations ! Take care!
Hello everyone! It’s Kylie with you again, back with another layout featuring the ‘Legendary’ collection.My son is having a birthday very, very soon and I wanted to create a page capturing him at this age.You will see I have incorporated a ‘Thirteen’ cut file into my background. This has been designed by Paige Evans.
I’ve layered papers ‘Wild One’ and ‘Total Legend’ together to create a framed background. I also drew a free hand border close to the edge with a black fine tip marker. I ended up cutting the ‘Thirteen’ cut file three times to add to my background. These were backed with some of my favourite coloured papers from the collection, before being adhered to the background with foam tape. By doing this, helped make them look like they were ‘floating’ on my background.
With so much going on in my background, I really didn’t feel I needed to add a lot of embellishments to support my photos. A few colour co-ordinated stars were tucked in behind, as well as some of the phrase quote stickers which act as a smaller sub-title, supporting my photo theme. I also couldn’t resist adding in one of the fun Flair Buttons.
To finish my layout I added in a few small clusters of the enamel dots, which just provided a nice balance to my photo cluster.
Thanks so much for stopping by the blog today. I hope you have enjoyed seeing my layout.
 I have used a fun cut file from Silhouette Design store, I chose it so I could use more of the designs on one layout.
 I then added my photo and again with foam to create more height. I chose to create an embellishment cluster around my photo, using the die cut ephemera and accessory stickers. How gorgeous is the geometric bear I tucked behind my photo!
 I used the accessory stickers to add my subtitle/journalling.
 I have used more foam tape to add die cuts to create more height and added some enamel dots under some of the die cuts.
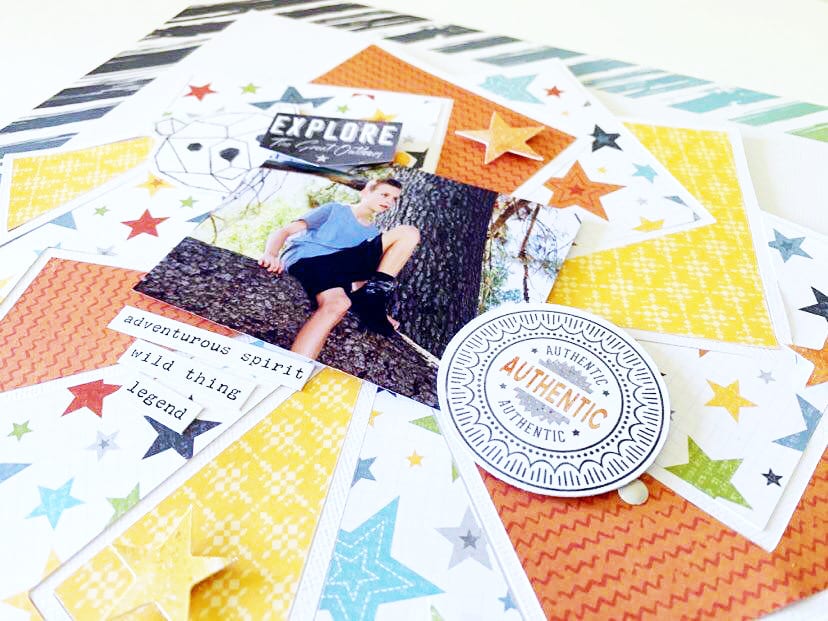 I love all these colours together but because I didn’t want my layout to look ‘too’ busy I was careful when it came to my embellishing.
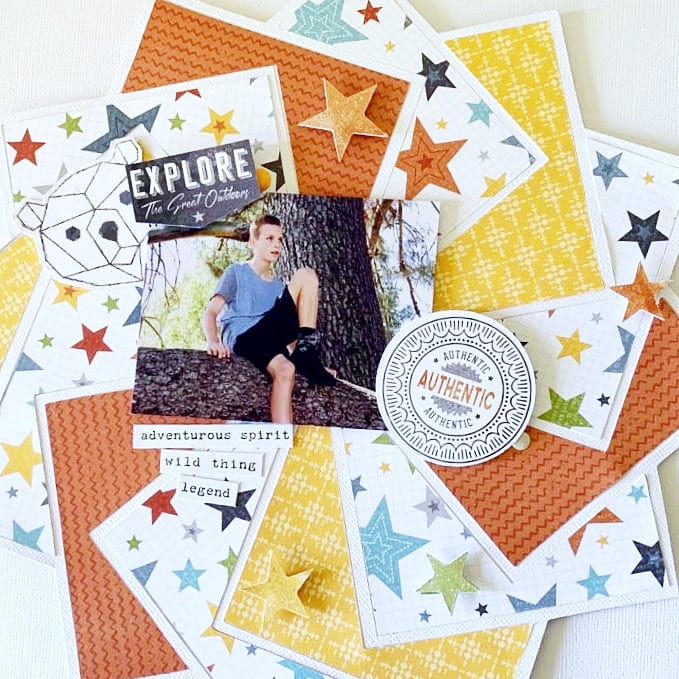


 To create my title I used the Super word from the Clear Stickers and adding a blue paint brush stroke clear sticker over it, finished off with a word sentiment from the Accessory Sticker Sheet.


