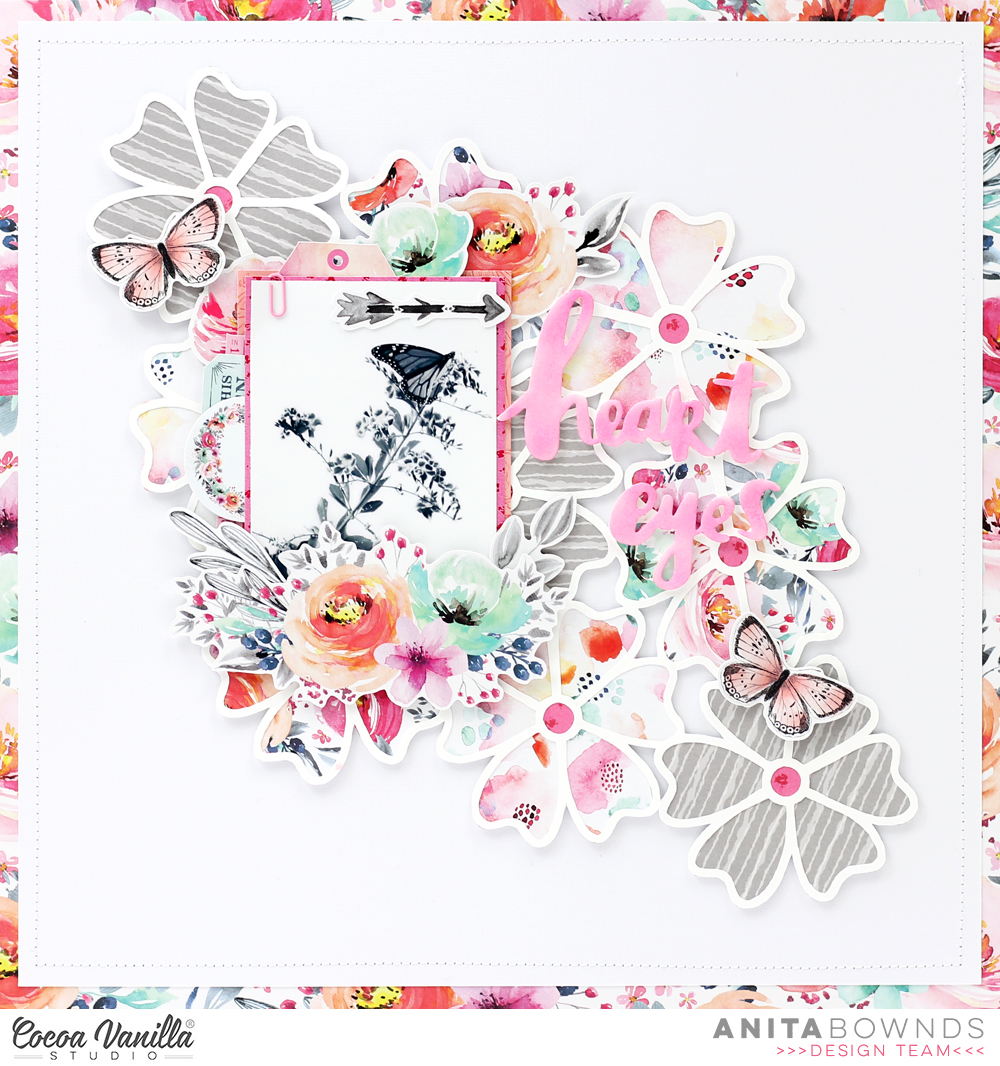
Hi CVS friends, Rachel here! Today I have a fun layout using lots of colour and busy patterns which if done in a balanced way and with a white (or black) contrast totally work. I have used Bohemian Dream collection. I cut a piece of white cardstock to 10×10 inches. I added some turquoise paint brush strokes randomly across the page and splattered lightly with some black paint (this is as messy as I can get lol). I then added messy machine stitching in a turquoise colour. I also tore some of the white cardstock edges for texture.
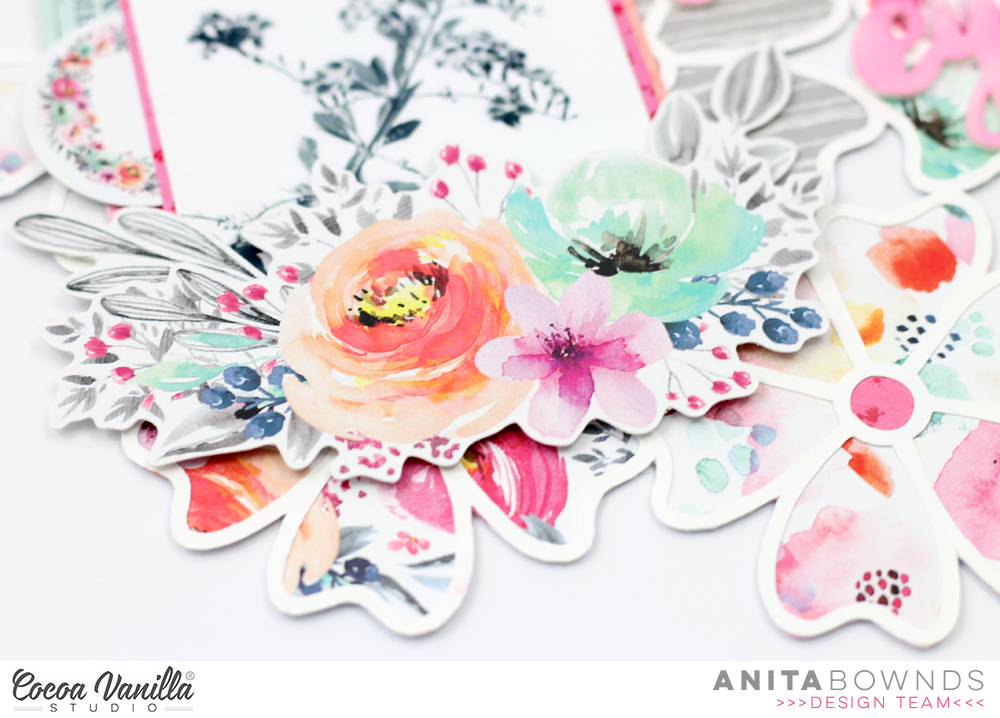
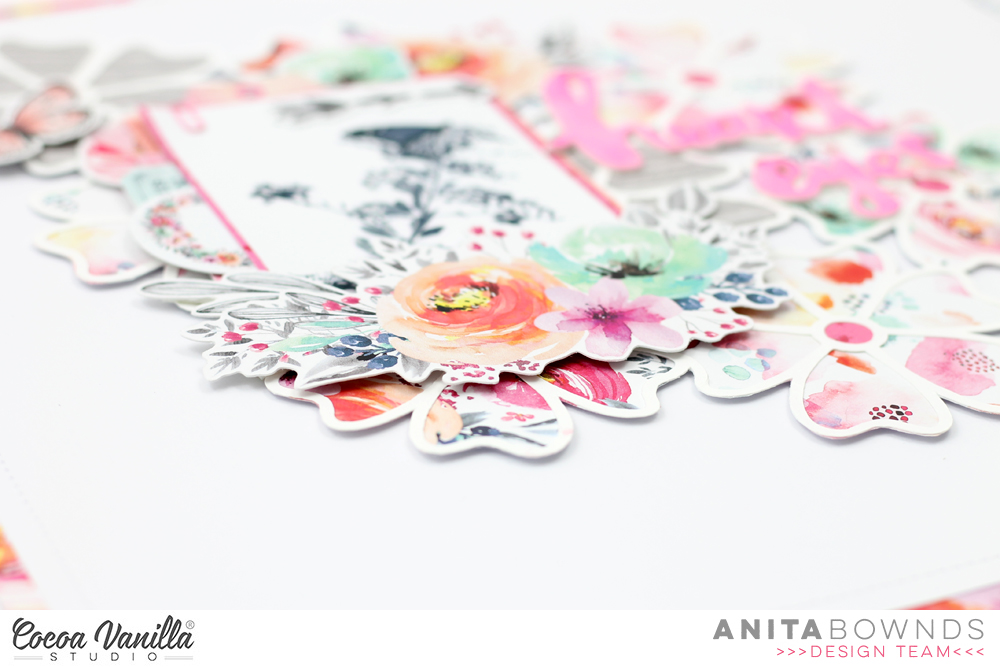
I attached this to the stunning Abundant paper as a stunning border. I used two floral cut files from the Silhouette Design to add to the sides of my pages. I used another busy paper Flower Child to paper back these, which you can do as they have the white background paper to contrast.
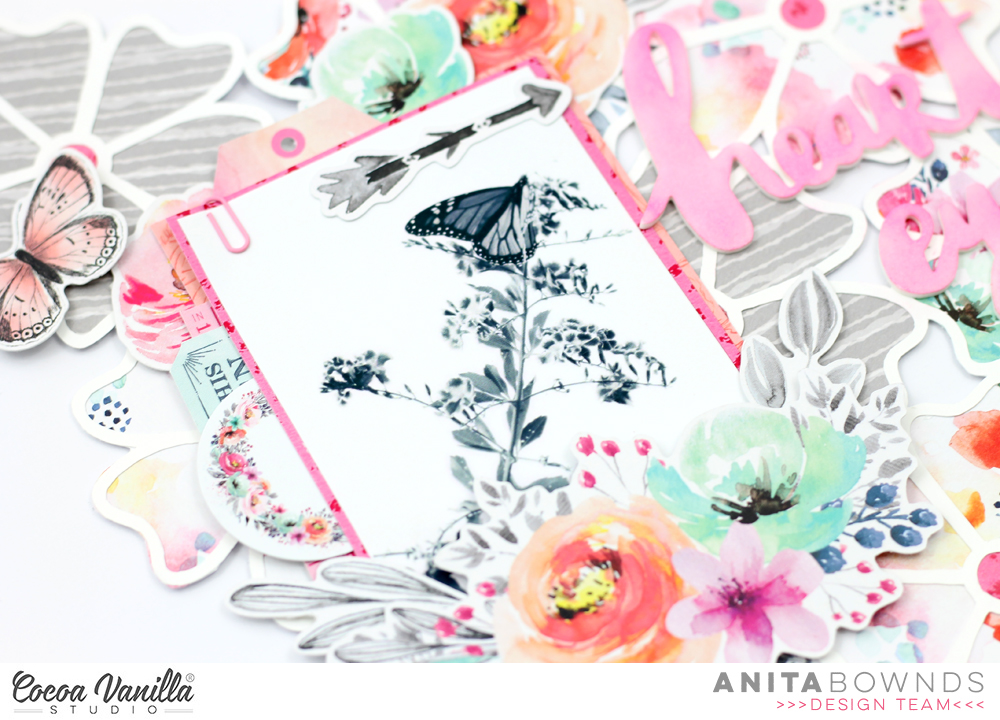
I love using the Accessory Stickers to create my journalling which I usually tuck into embellishment cluster.
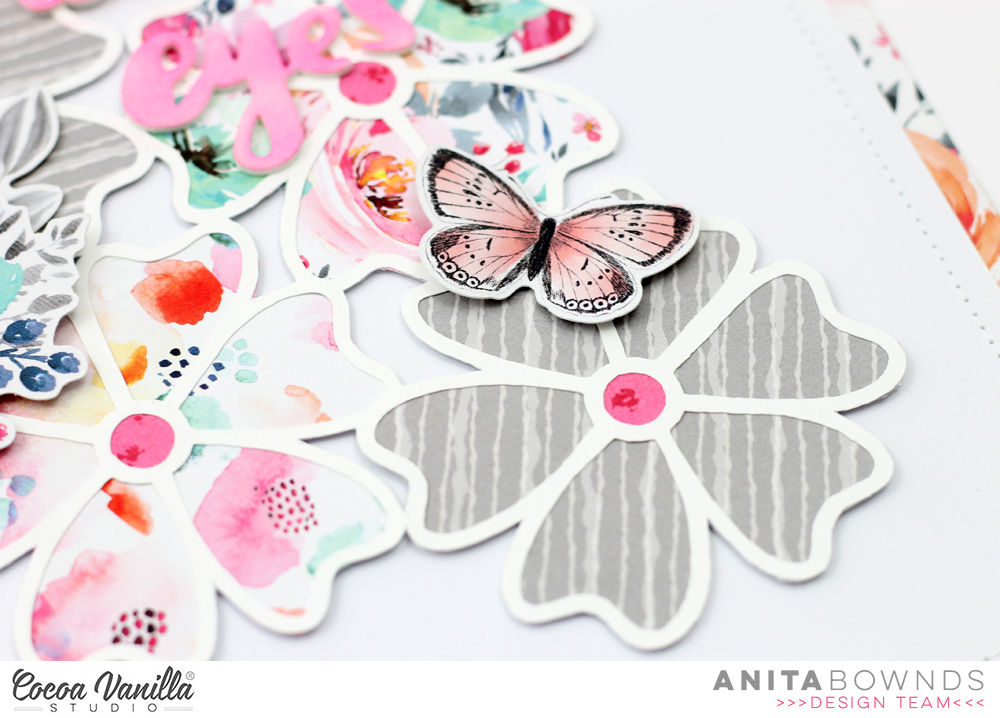
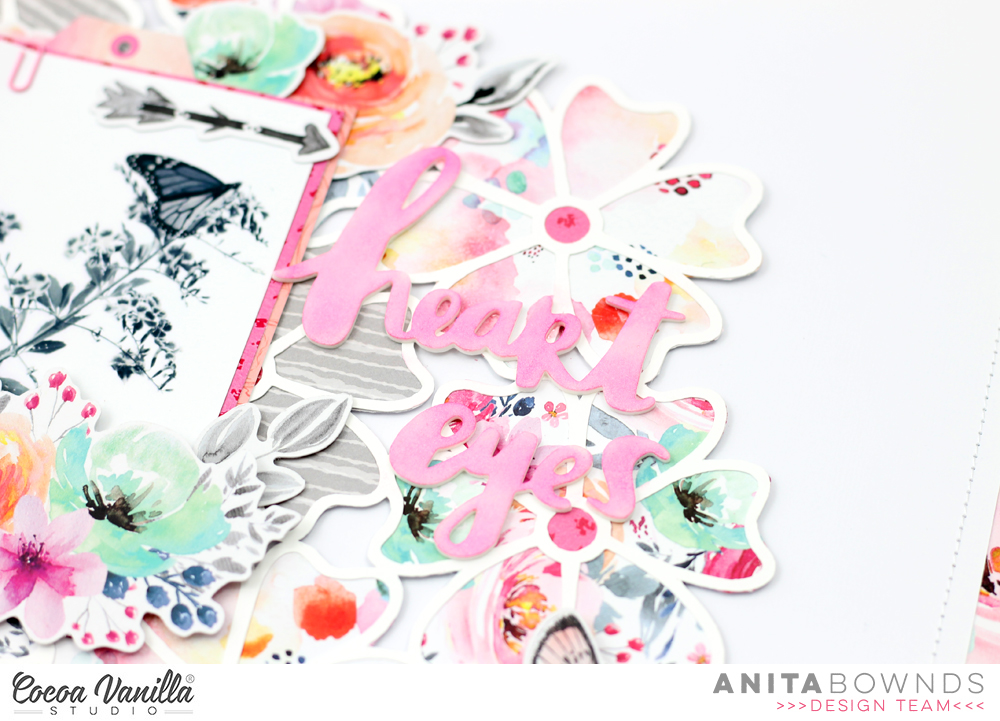
I added my photo using s die cut frame and then added more florals to either side and finished off adding some phrase banners under my photo and not forgetting a gorgeous butterfly which I had to add because the colour was perfect! I also added my photo with foam tape which I always do when I am using a smaller photo so it has dimension.Lastly I added my title using a die cut and accessory sticker words, I love the contrast between big and small in a title. I went back and added some enamel dots to add more texture.This layout would be perfect for a teenage girl themed layout, it’s modern, bright, bold and lots of fun!Thank you so much for stopping by today and I am so excited to share my first layout using the stunning Day Dream collection, so see you all soon. Happy creating.
It’s Sophie with you today and I have a beautiful layout to share !
This week’s theme is “Outdoor Adventures” and I thought right away that I wanted to create a layout highlighting the amazing trip to Italy that we did last year. We went to the Dolomites, and literally fell in love with this part of the Country. The mountains, lakes, the hikes, the beauty of nature, Ahhh… I can’t wait to go back…!!
The Legendary collection, with its color scheme and embellishments was the perfect collection to document my page.
I started with the Legendary Offbeat Paper as my background. I applied only a thinny bit of dry yellow-orangy ink to the center of the page where I planned to put my photo.
I backed my photo with tissue paper, adhesive foam and the back side of that same patterned paper (yes, thankfully I had two sheets !).
I used a JustNick digital Cut file that I cut on white cardstock and backed with many patterned papers from the collection (Outdoors Type, Total Legend, Wild One and One Way papers). I used adhesive foam on the back of the cut files to make them stand out a bit more and arranged them around my photo.
Finally, I wrote down my journaling directly on the background, added a few more embellishments and some enamel dots, and stamped the date on a colorful Legendary Accessory Sticker.
Here are a few more close-ups !
I truly hope that my page has inspired you in some way. The Legendary collection is so versatile, I am sure it will suit your next design !
Thank you for passing by, and I will see you again soon !
Hi there Cocoa Vanilla fans! Danni here with a bright and happy outdoors themed layout to share with you, using none other than the Legendary collection. This collection has just been absolutely perfect to get all those outdoor adventures documented! This time I have created a multi-photo layout to document my son and his little friend’s sandpit adventures.
I based my layout around this fab sunny sky background cut file, which I cut on a dark blue cardstock on my electronic cutting machine. I knew I wanted to use a light background and I knew the blue would really pop, plus I just love using coloured cardstock! I backed the suns and rainbows in the cut file using patterned papers Total Legend cut apart side and Wild One.
I then decided I wanted to play with some vellum and art media for the clouds. I took some plain vellum, then an iridescent gel medium which I applied first with a paintbrush, then a sponge (I did not find much difference either way) to turn my vellum into a shimmery metallic translucent finish. I love this effect! It was so easy and looks so pretty. Once the vellum dried, I used it to back all the clouds in the cut file.
Next my background. I chose Epic Tales patterned paper for a lovely light bright base, then added a border of Total Legend patterned paper to pull in some of the bright blue from the photos. To avoid the vellum looking invisible on the white background, I spritzed some light blue mist onto the paper roughly in the places the clouds would go. I also added some burnt orange ink splatters for a contrasting colour.
I added some simple photo mats using Wild One and One Way patterned papers and arranged my photos in a diagonal line across the page. My title was easy thanks to the die cut titles – I simply chose ‘Best Buddies’ and added the titles either side of my photo line. So simple!
I chose some of the tags, tickets and banners from the die cut ephemera and theaccessory stickers to embellish around the top and bottom photos, keeping to that diagonal layout. I added my journaling and date on label stickers, then used my very last enamel dots to add some detail to the corners of the photos. I don’t know about you, but it feels so good to use up the last few bits of a scrappy supply – luckily, I have a backup packet!
Thank you so much for joining me today. I hope you enjoyed following the process as much as I enjoyed making it! I have a video linked below if you would like to watch as well. Happy scrapping!
Hello and happy Thursday!! Its Melissa here and I’m so excited to be here with you for a ‘Throw Back Thursday’ where we use an older collection! I’ve been patiently waiting my turn for this, and I’ve always known that I’d create with the gorgeous Make a Wish collection, which reminds me of when I first fell in love with Cocoa Vanilla Studio.
I decided to make a birthday layout with the pieces of this collection that I have left, and if I’m honest have been hoarding! Brielle turned 6 during our Lockdown, and we still tried to make it a fun day for her.
For my layout I was inspired by this cut apart with beautiful paint stripes that I recreated on my background with watercolour paint. I added several splatters too for extra interest, and because I couldn’t help myself!
I used a cut file around my photo to bridge the gap between the stunning floral patterned paper and the paint stripes. I then embellished on the cut file.
I used the chipboard “YAY” for my title with a 6! from my letter and number sticker stash. I also added a little cluster on the bottom right of my page to provide balance.
I loved adding dimension to this page by using dimensional adhesive behind my floral clusters. I added sparkle with the shimmery hearts from a mixed embellishment pack and some glittery enamel dots, also from the collection.
You can watch how I put this layout together below in my process video.
Hi there crafty friends, Anita here with you today sharing a layout using the beautiful unforgettable collection
Even though it’s winter we still have butterflies fluttering around and flowers are still blooming so it has inspired me to create this layout full of flowers with butterflies…
I started by cutting out the flower background cut file from @neatncraftycutz and backing it with unscripted, sprightly and glorious to fill each flower then I back my white cardstock on glorious and added some machine stitching around the border
Next I adhered the flower cut file to the middle of the cardstock with double sided foam tape to add a bit of dimension.
I then matted my photo on papers from the 6×8 paper pad using pink and orange to tie in the colours so they blended. I then tucked in a few bits of ephemera and accessory stickers to add extra colour and depth.
I added clusters of flowers using the ephemera at the top and bottom of my photo and scattered a few butterflies to tie in with the theme
I found this cute white foam title in my stash that I coloured with pink ink to match the colours.
If you would love to see how this layout came together check out my process video
Hi there! Danni here with a soft and subtle mixed media layout using the stunningly pretty Happiness collection. I still adore all the bright happy colours in this collection and I had so much fun dipping back into it. The colours were a perfect match for the blue floral dress I am wearing in this photo.
I started with the lovely Sprinkles 12×12 patterned paper as a background because it already has that mixed media effect . I applied some iridescent gel medium in a diagonal across my page; this is a really fun medium to play with that adds a beautiful pearlescent finish. While it was still wet, I added some colour with distress oxide ink pads and sprays in a variety of blue and pink shades, using both a paintbrush for splattering and spraying directly onto the paper.
While that mixed media dried I took some butterfly die cuts I had lying around and traced them onto patterned papers, fussy cut those shapes out then glued them together along the centre of the butterfly body, leaving the rest of the shape free to add dimension.
I backed my photo with patterned paper as well as some white crepe paper ruffle along the sides for lots of lovely texture. I popped my photo right in the centre of my page and added the butterflies along that diagonal line of the mixed media. I filled in the gaps with the beautiful little butterflies fussy cut from Bright & Beautiful 12×12 patterned paper, bending them in the middle and only gluing down the centre to make it seem as if they are flying off the page!
I added a few florals and leaves from the die cut ephemera either side of my photo and a simple “happy” title from the die cut titles. I adore the script font of these, it is just so pretty! I went ahead and added several tiny word phrases and another butterfly from the accessory stickers and added a few lines of simple journaling on strips of white cardstock above my photo.
To finish off the layout I added a sprinkling of gold ink; you can never have too much sparkle in my opinion! There is a process video linked below if you would like to watch me talk through the process. Thank you so much for joining me today.
Hello again!! It’s Melissa here and I’m back today sharing a layout focussing on using a patterned paper background using the gorgeous Unforgettable collection! For this layout I made sure I selected a paper that wasn’t white based, because lets be honest – that would easy!! I also didn’t gravitate toward a woodgrain, which also would be easy for me! In order to not overwhelm myself, and to really focus on the paper I chose a neutral photo (without a lot of colours) and I printed it large because I adore this photo of Brielle dressed up in her bother’s stormtrooper costume. The patterned paper I used for my background is called Lacewing, and it is the B side of the gorgeous butterfly paper. I added some small splatters of water activated sparkly gold mist for a little bit of interest, but most of it got covered up!!
I backed my photo with Forget Me Not and made two triangles with a scrap of Unscripted from the 6×8 Paper Stack. Of course I had to distress all the edges of the paper! I used some leaf and flower cut files (designed by Anita for International Scrapbooking Day) that were left over from my scraplift layout. It was very satisfying to use them up on this layout!
I created two main embellishment clusters and once smaller one. I used lots of Die Cut Ephemera, the cut file flowers and leaves, and fussy cut butterflies from Lacewing. I always give butterflies more dimension by glueing them in the centre and popping up their wings with dimensional adhesive. Here’s a close up look at the butterflies on my top cluster.
For my small cluster I featured a Flair Button and another fussy cut butterfly. The “love this” flair button was perfect for my photo.
I also used the some of the Accessory Sticker phrases and a label which I lifted up on some craft foam for extra stability and dimension. I wrote my journaling on a label that I cut from Story Teller.
Two of the Foam Title Stickers were perfect for my title, and I used three of the foam hearts as embellishment around my page too. White Enamel Dots were my final touch!
I hope I’ve encouraged you to try using a patterned paper for a background. Cocoa Vanilla Studio collections have a wonderful mix of both bold and subtle patterns, and I find that the more subtle B sides work beautifully for backgrounds.
Hey Everyone its Michelle back here today with a new layout share for part of our Pattern Paper Background theme. I’ve used the Make a Wish collection for this layout which was perfect to document my recent birthday that we ended up ‘celebrating’ COVID style. I love the colours and patterns within this collection so it was fun to dip into my remaining stash.
Now we all know that I love using white cardstock as my base for most layouts that I create. I love the crisp white open space it provides to make the other elements on the layout stand out, but I also like to step out of my comfort zone every now and then and create something with next to no white cardstock. I think I succeeded today and I may have snuck in a little for the cut file from CUT to YOU but that was all.
The woodgrain design in the Make a Wish collection would have to be by far my most favourite of all the woodgrain patterns that Zoe has designed and its perfect for full page background use. I combined it with a grid of other bright patterns from the collection, including those sweet mini florals, and sewed around the edges of each to secure them to the background.
I added 3 black and white photos, printed slightly larger than the pattern paper squares and adhered using foam tape to raise them up off the background just a tad. To the right of the photo above I’ve created a mini cluster using ephemera pieces, cut apart tag and glitter enamels.
I added the title to the bottom half of the grid mixed with older alpha stickers from both this collection and one of the very first collections Cocoa Vanilla Studio released.
I created a couple of mini floral clusters diagonally across from each other using pieced from the ephemera pack and some fussy cut party hats from the cut apart sheet. I didn’t add to many bits as the layout itself is already quite busy with all the different patterns and colours.
I also added a couple of bits to the bottom left corner to coordinate with the mini cluster of bits to the photo above the title. This made the layout look complete and balanced all the elements out just nicely.
Lastly I added a sprinkling of gold ink around the layout, I’m going to be super sad when that little bottle runs out as its the perfect finishing touch to almost all the layouts I create using CVS products.
For now thats all from me, thank you so much for stopping by today. As always be sure to share your amazing creations with us in the CVS Facebook group. We love to see what your inspired to create!
Until next time, Happy Scrapping!
Michelle xx
**PS Please note If you’re hoping to get your hands on this sweet collection sadly theres only a couple of papers left in physical form in the CVS shop, and its not been released in DIGITAL form. Maybe you might already have a good stash of it at your place and you can keep creating with it.
Hello crafty friends! It’s Kylie back with you today, with a new layout for ‘Throwback Thursday’. I got to create a new page with a past collection and couldn’t resist working with the ‘Love Always’ range. The pastel tones and florals are so, so pretty and were perfect for my page design.
I chose the CLASS ACT paper as a background and added some torn border edges of both BOUQUET and FROLIC for some extra colour and texture. I really loved the ‘Memories’ cut file designed by Paige Evans, which I backed with a pink and black tonal theme from the collection. In place of the ‘O’ I added my photo.Once it was all in place I backed the cut file with some foam adhesive and adhered it to my page.
To create an even balance on my page I have added several clusters of die cuts. Some with foam adhesive to build a nice dimension.I was careful with their placement so that I didn’t cover over the cut file too much so that it couldn’t be read.Because I had adhered the cut file with foam adhesive, it allowed me to be able to tuck some of the embellishments in underneath.
To complete my page I added some smaller phrase die cuts below my photo. I loved the blend of pastel colour once it was finished!
Hey friends its Michelle back here today with a new layout share featuring the awesome Legendary Collection. I was so inspired by our recent Stars and Stripes theme that I couldn’t help but use that as the base for this layout. Stars are the perfect embellishment for scrapping a layout of Leila’s ‘Star of the Week’ photo from last year.
I chose a fun new cut-file design from CUT to YOU that features 3 different star designs and resized them to create different focus points for the layout. I cut all 3 designs out on white cardstock and backed the larger design using a mix of different patterns and colours to compliment the stars within the collection. Papers used – ALL STAR, EPIC TALES, EXPLORER, OFF BEAT, TOTAL LEGEND and WILD ONE.
I adhered the star to the left side of the layout using foam sheeting to raise it off the background paper (OUTDOORS TYPE) and added the super cute photo of Leila to the left backed with a piece of BRAVE HEART and a sticker tab from the Accessory Sticker sheet.
I created the title using a cardstock title piece and alpha stickers from previous collections. LOVE LOVE LOVE those white alphas! There’s a sprinkling of stars, both fussy cut and ephemera, on top of the big star also.
I kept the other 2 star designs open and adhered half of each design to the edges of the layout, creating open clusters and tying all the elements of the layout together. In the top cluster I added the ‘Hey You’ banner sticker from the sticker sheet and a mix of fussy cut and ephemera stars.
In the bottom cluster I added pieces from the ephemera pack, fussy cut and ephemera stars plus a word sticker from the Accessory Sticker sheet. Lastly a splattering of gold colour shine to finish it off.
Well friends that’s all from me today. Thanks so much for stopping by.