Hey y’all! Laura back again with a super sweet baby layout featuring the new holiday themed Joyful collection. I love to challenge myself to scrap outside the theme as much as possible to stretch my creativity and get the most of my favourite collections. One of the inspirations for this layout was the adorable animal icons on the Magical Moments patterned paper. I just had to fussy cut them out and create a mobile with them above these sweet photos of my daughter cuddled up with me. To create the hanging lines, I simply free-handed some loops and then hand-stitched them with floss.
I added several fabric stars and wood buttons amid the hanging animals to fill in the gaps and give the impression of a sky. Both the mobile and the night sky are imagery that fits these sleeping baby photos perfectly and really help to set the mood for the overall page. On the top left of the photo, I pulled in a few stickers from 6×12 sticker sheet as well as a scattering of these puffy stars from the puffy titles. Love the pop of gold in this collection, it’s just the perfect addition to the soft color tones.
Along the right and left side of my photos, I added a cluster of florals that I fussy cut from the A5 paper stack, including these teeny tiny ones that I use to add details around the outside edge. To add a bit of definition to this page, I outlined the main photo mat with a pen. The finishing touches to this lovely layout was a puffy gold title, journaling, and splatters. Overall, I think I captured the soft, sleepy mood perfectly with the Joyful collection and I can’t wait to see what other photos I can scrap with it!
I hope this layout inspires you to scrap outside the theme too! If you’d like to see how Our Memories came together, check out the process video below.
Hello crafty Friends. It’s Anna here and today I want to share with you super cute baby page made with not so baby themed “Joyful” collection. This brand new line was designed for christmas and it’s filled with with patterns and elements that correspond with winter and December celebrations. Howver, when I say all those cute critters like deer, fox and bunny, I knew I have to make a baby page. Let’s be honest – I am a bit of Grinch when it comes to christmas projects. I love the season but I prefer scrapbooking summer and travels. Most of christmas collections has very traditional color palette and the same motiffs. It kind of gets boring after a while. That’s why I was so exctited to see “Joyful” collection. This line has such a beautiful colors and many versatile patterns so I knew I will be able to use it whole year round.
As a mom of two lovely girls I always find a photo to scrapbook with any cute collection. I picked pictures of Maja, when she was less than a year old and paired them with all the pink and beige I could find in “Joyful” collection. I not only went through 12*12 papers, but also checked the 6*8 paper stack and pocket cards. I finally settled with very neutral background called “Very merry” and “Advent for one of the clouds. Did you noticed that 6*8 paper stack contains of a little bit different patterns or the same patterns but in different colors? It makes it a must have product! I managed to find two red – pink papers there and I cute a biggest cloud and backed my photos with them. Pink stars pattern is the back of one of the pocket cards!
This page is quite simple so I wanted to add some extra texture to the clouds by stitching the clouds with pale pink thread. Photos are surrounded with cute critters and generic words and other elements. I just love the drop of metallic gold added to this line. I also love new chipboard stickers!!!! They are so fun to use and look just beautiful. Deer and fox doesn’t look christmassy and can be used for any kind of project. That’s why I decided to use them here.
I embellished my composition with a lot of stars. They are often combined with baby themed collections so I thought they will match to my page as well. I fussy cut some bigger ones from “Making spirits bright” paper, added few smaller ones from ephemera pack and few with gold foiling from cardboard stickers sheet. Few wooden buttons and puffy stickers and my page was almost ready.
My title is a combination of word “joy” from cardboard stickers sheet and some pink foam alpha from my stash. Making this page gave so much fun and I just loved looking for elements that I might use. I also can’t wait to make some christmas themed project with it!
That is all for today. Thank you so much for stopping by and see you in December! I can’t believe it’s almost here. It feels like I just cleaned up the last year christmas tree and decorations. What a crazy year it has been.
Hello paperlovers,
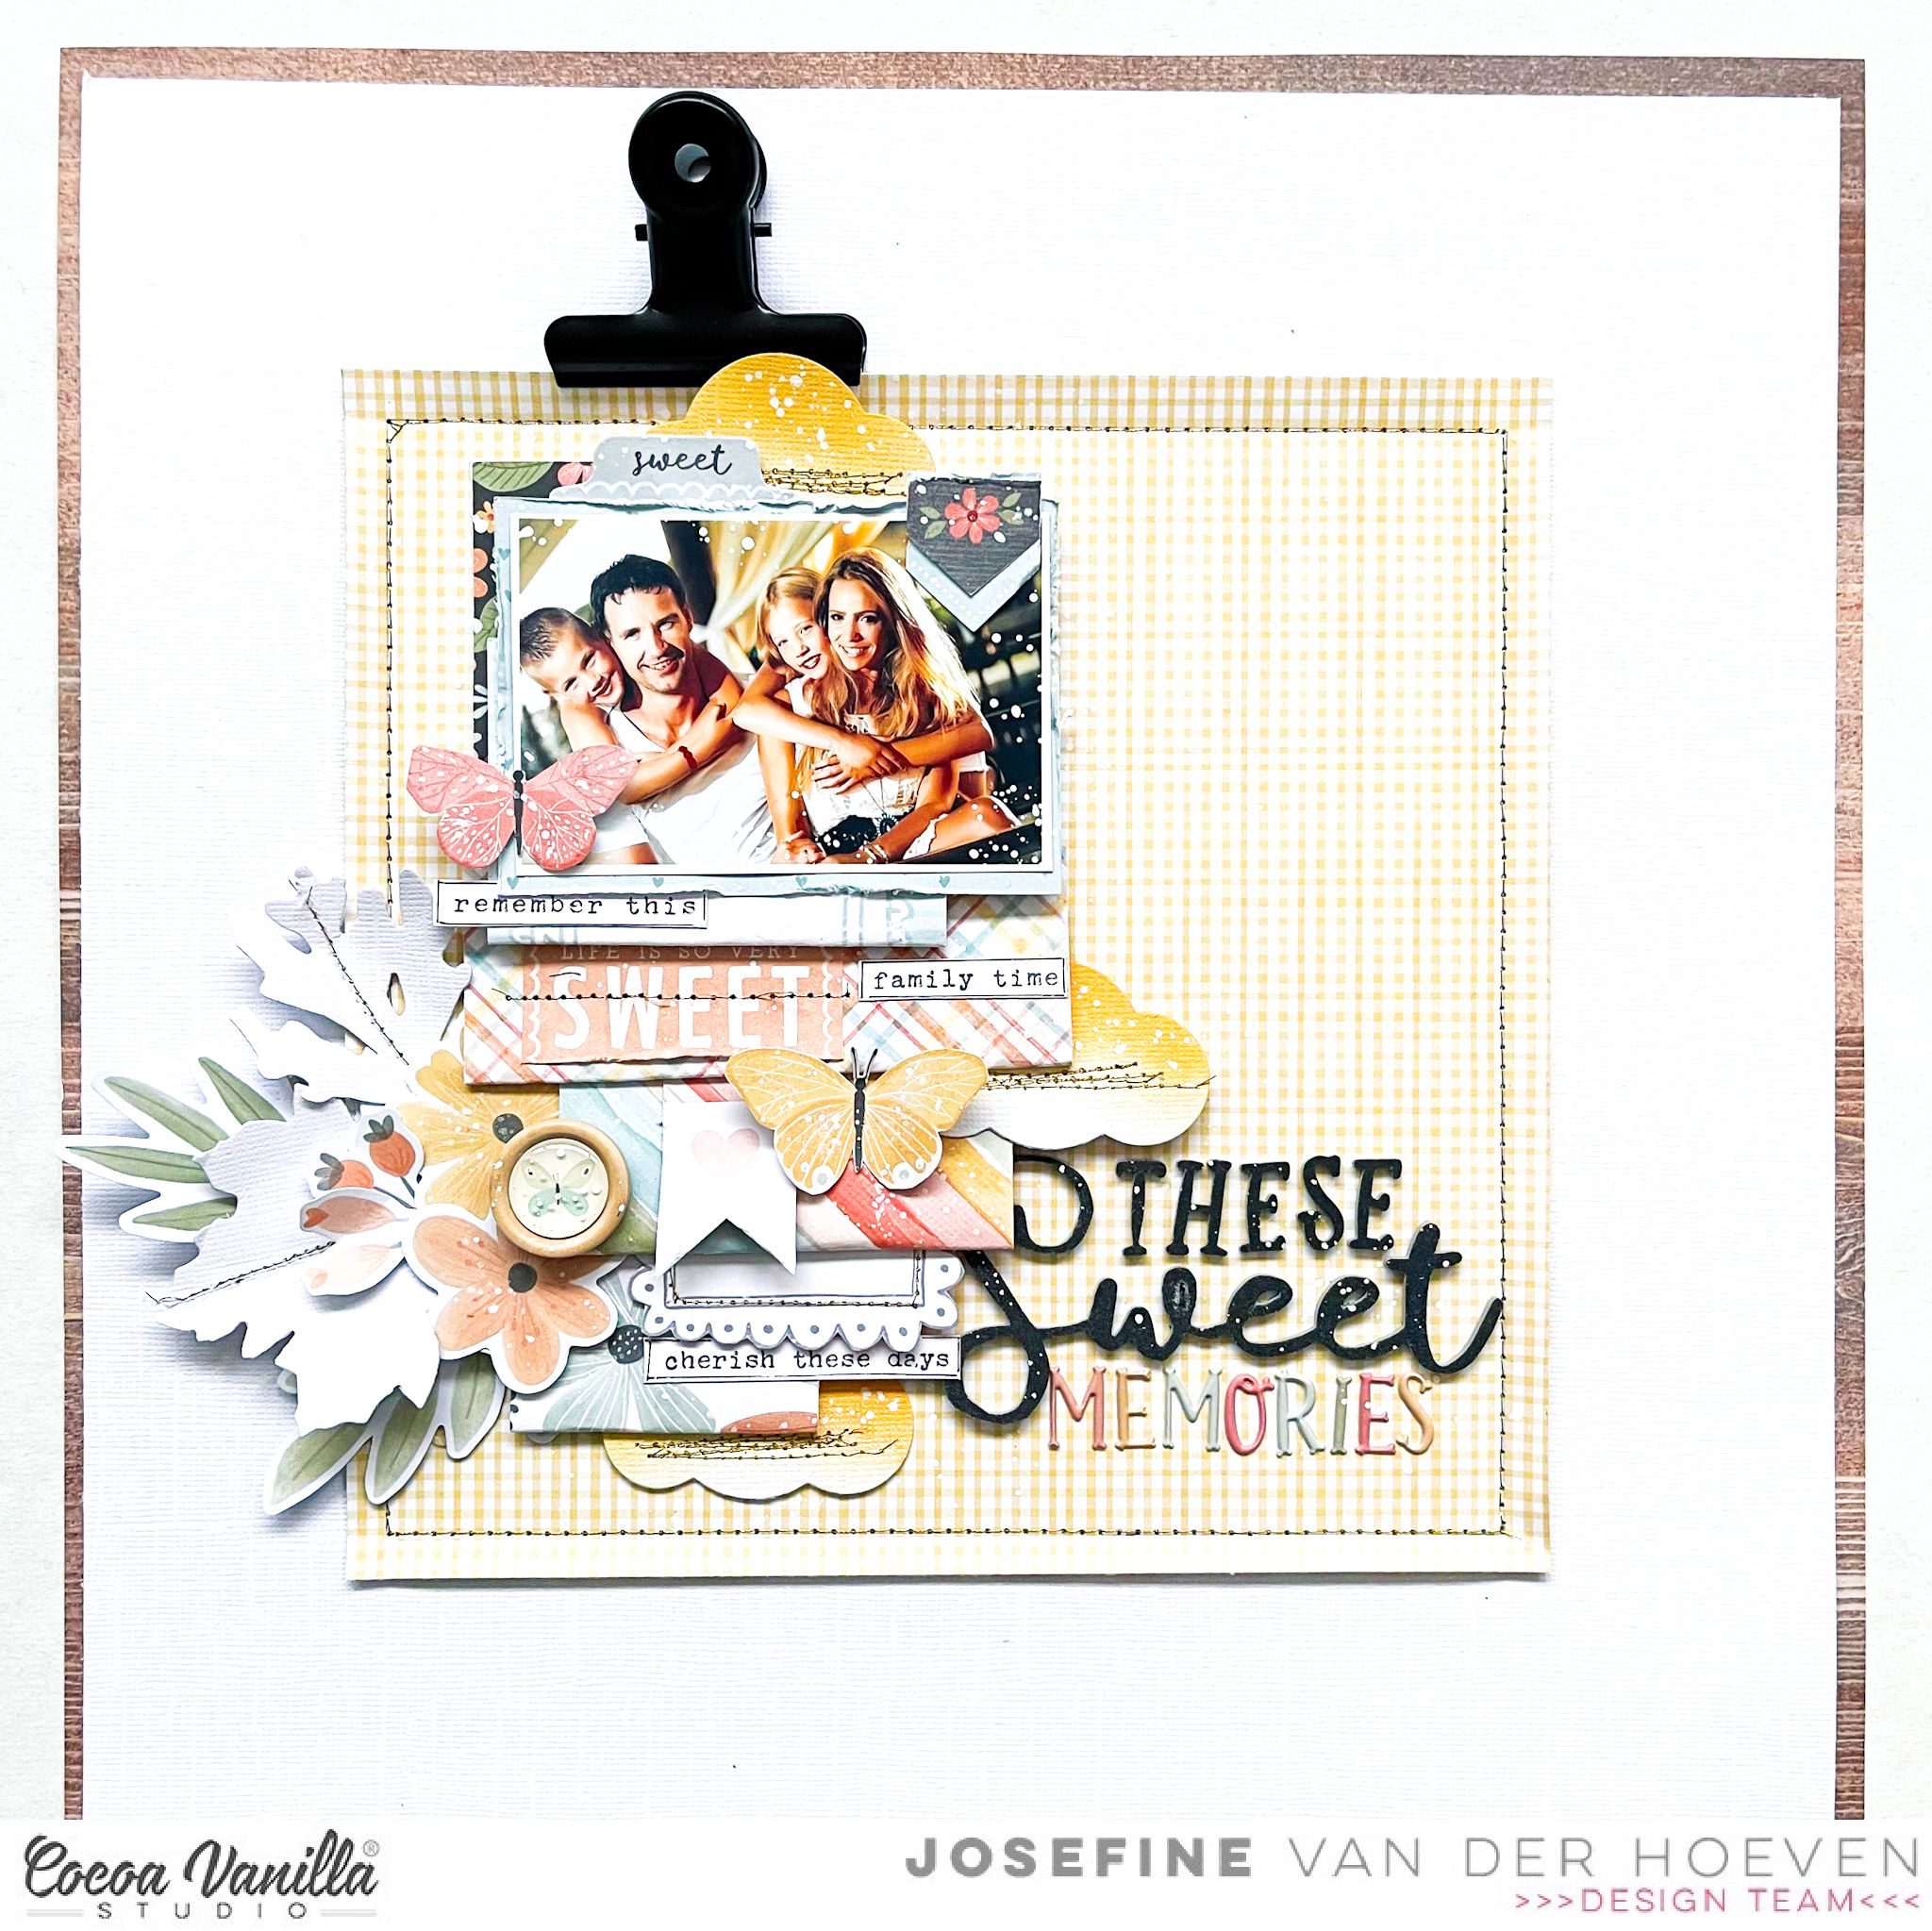
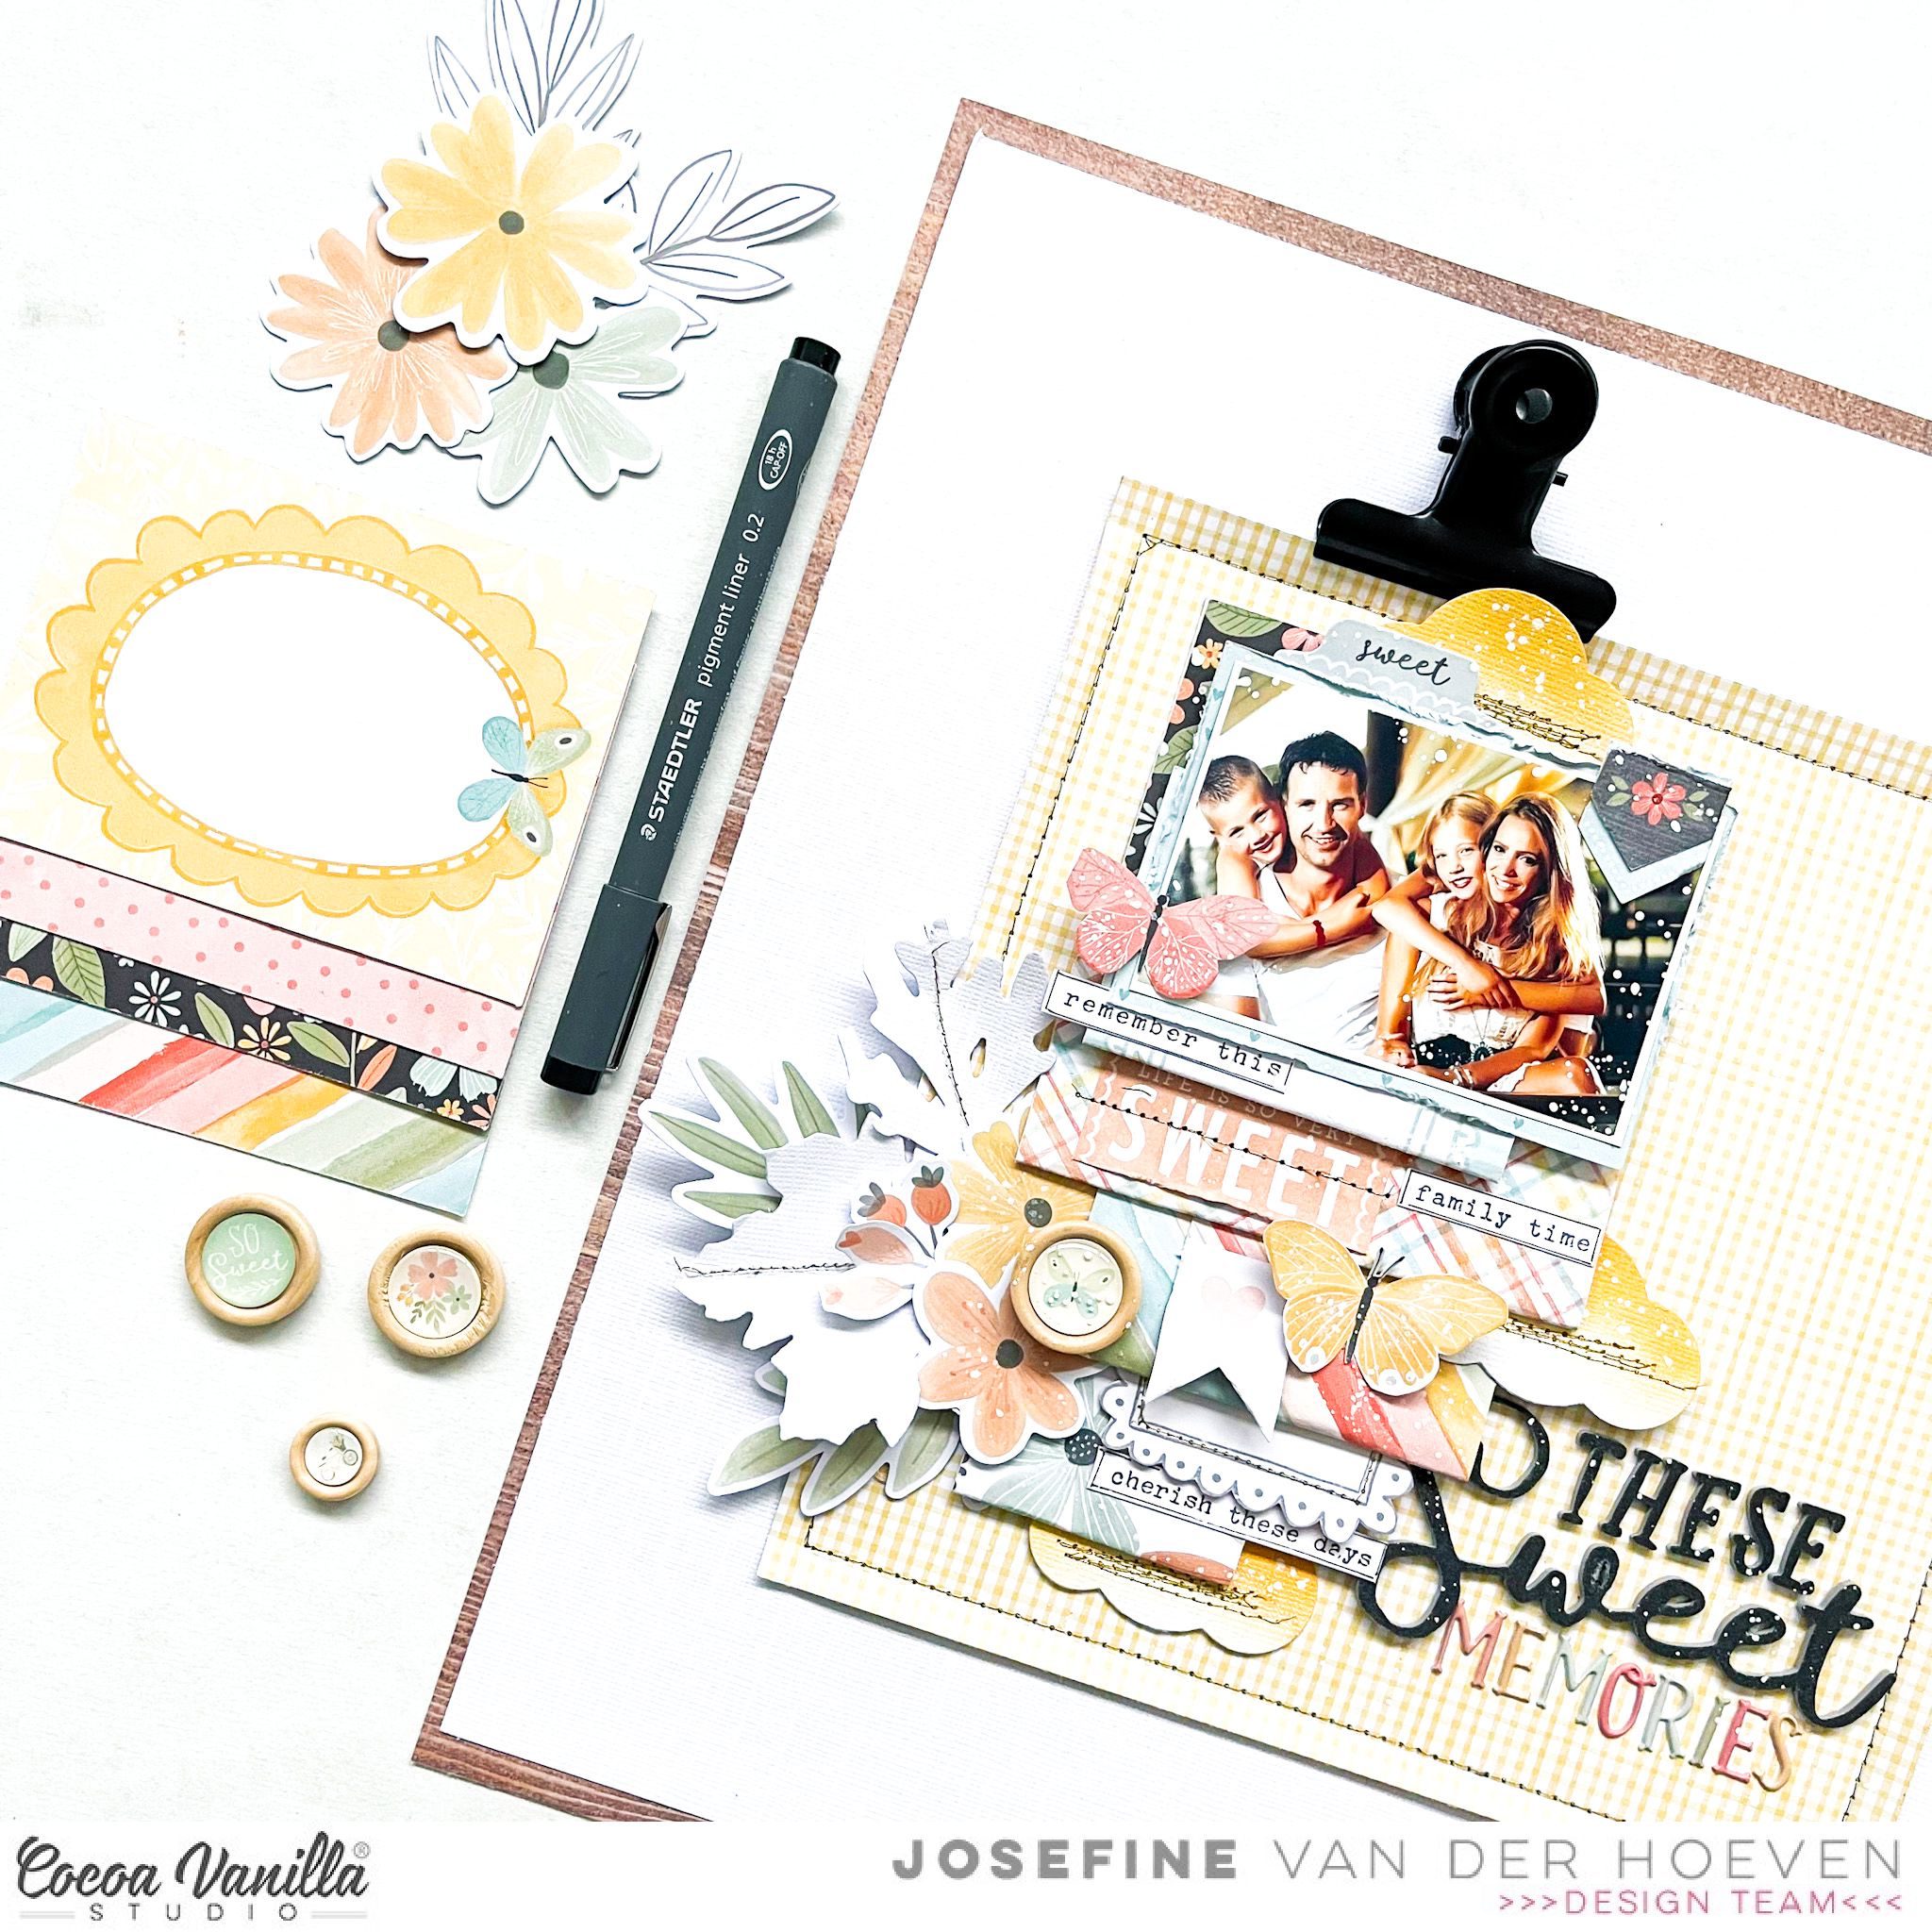
Welcome to the Cocoa Vanilla blog today! So great to share a new layout with you. I was inspired by the March 2021 Moodboard. I thought the little yellow clouds were a fun idea to slide them between the paper layers.I love how that turned out.
I started with a white piece of cardstock. I cut the beautiful designer paper from the “These Days” collection to size by 6×6 inches. I stitched the square with gold sewing thread in the center of the layout with my sewing machine. I picked out several pocket page cards and folded them in half. I created layers and put them on top of each other with adhesive tape.
I placed the photo on top of these design paper layers. I start by making a cluster on the left side. I use different flower die-cuts, leaves from white cardstock and wooden buttons. I cut photo frames from the design paper and sew the edges with gold thread. I slide the photo frames between all these layers.
I am decorating my layout with more beautiful embellishments from this amazing collection by Cocoa Vanilla studio. I used word strips, stickers and butterflies. I cut the clouds from white cardstock and colored them with Distress Oxide. The color I used is “spiced marmalade” I stitch the clouds with gold thread and I placed them between these paper layers.
I combined the title “These Sweet Memories” with the beautiful black elegant foam words and the small colored puffy alphas. At the top of this layout I placed a black metal clip. This way it looks just like a clipboard. I placed the white cardstock on top of a woodgrain design paper and splattered with white acrylic paint. I am surprised how this layout turned out and am happy with the result.
I hope I was able to inspire you with this layout and hope to see you next time on the blog. For now, I wish you a happy and creative day! Enjoy your creativity friends.
Hi creative friends, it’s Tarrah back with and today I am very excited to be sharing my first scrapbook layout using the stunning new Joyful collection!
This collection is absolutely amazing and I hope you love it as much as I love it too!
I started by choosing 2 background patterned papers, I chose the white with gold spots and the multi stripe paper also. I trimmed down the white with gold spots and matted it to the multi stripe paper. I then machine stitched a border around the outer edge. I decided to cut out a gift cut file from CUT to YOU and backed all of the spaces with papers from the A5 paper stack. Once the cut file was all backed, I adhered it to the gold spotted paper using craft foam to give some dimension to the page.
I adhered the black and white photo of my sons, taken one Christmas Day, slightly over to the right tucking in one of the 3′ x 4′ journal cards here also. I also layered 2 pieces of ephemera from the ephemera pack on top of the photo too. To the left of my photo, I placed my title which is ‘Christmas Joy’ from the chipboard icons. I decided to keep the embellishing pretty minimal since the cut file takes up lots of space and is the focus of the page.
I did pull out a few super cute puffy stickers though and placed the reindeer one to the left of my page, the FaLaLaLa one I placed at the bottom section of the cut file. The stars also got a spot on this page as well as one of the gorgeous epoxy wood buttons that I placed in a small cluster over to the left of the page. I added a few more ephemera pieces like the stars, the pink gift that I placed at the bottom of the photo and the Merry Days tag above the photo. I don’t know about you but when I create a layout with one whole collection, I like to add at least 1 of everything to my page! I guess I feel like I am honouring it by using all the things haha!
Thank you so much for stopping by the Cocoa Vanilla blog today! Make sure you get your hands on this stunning Christmas collection called Joyful from Cocoa Vanilla Studio as soon as you can! I promise you will not be disappointed! The online store will not have it as yet, you will need to find your nearest stockist or an online retailer who will have it in stock!
Hi everyone, Sue Plumb here today to share my very first layout using the new ‘Joyful’ collection.
You may have noticed that I haven’t shared a project here on the blog for a while? Unfortunately I haven’t had access to my scrap stuff for quite some time while we were going through the process of moving house. I am pleased to report however, that I am now settled into my new house and after many years, I finally have a craft room again – happy days!
I was super excited to receive this new collection, and as usual, Zoe has totally hit it out of the park! I am not usually a big fan of Christmas collections because of the strong red/green colour palette they often use, but this one is so beautiful with its more muted tones and sweet little animals scattered throughout. I was also surprised to find myself drawn to use the Holly Days paper, which features a gorgeous wreath (a design I don’t often reach for first).
The photo I was working with was a photo of my three kids and my cat that I took in front of our tree on Christmas Eve, not long before they went to bed. (You can tell by the expression on their faces they were excited about what was to come the following day… except for the cat of course, who was horrified at the fact they were making him wear a turkey hat! haha)
I decided to keep the wreath paper intact and use it as my layout background. This gave me a good base to work from, with the focal area already defined for me. The first thing I did was choose some patterned papers from the A5 Paper Stack to use as a mat behind my photo and to create some layers on my page. I tore along the bottom edges of the papers, then ruffled them up a little more with my fingernail to add texture. I also added a small mint coloured doily into my layers, and some frayed gauze on top of them, then stapled the entire stack together and attached it to my page.
I then chose two different colour Distress Oxides (Rustic Wilderness and Worn Lipstick), mixed them with a little water, and used a fine brush to add tiny splatters around the entire wreath. I then repeated the process with some gold mist as well. Once dry, I adhered my photo down on top of my paper stack using a liquid adhesive and set about adding some embellishments.
In the top left corner of my photo, I tucked in a Chipboard Sticker present underneath the edge of the layers, then the sweet little season’s greetings envelope from the Die Cut Ephemera pack over the corner of the photo. (Embellishing directly onto my photos is something I love to do.) I also added the magic moments banner piece along the bottom edge of the photo (also from the ephemera pack).
To the right of my photo I added the ho ho ho Chipboard Sticker for my page title, and underneath I added the sleeps til Christmas sticker from the Accessory Sticker sheet. (For the number 1, I actually used one of the Mini Puffy Alpha Stickers from the ‘These Days’ collection.) In the bottom right corner of my photo I added that sweet little fox from the Die Cut Ephemera pack, and put a little foam tape behind him to pop him up to the same height as my photo.
To embellish around my wreath, I fussy cut some large stars from the Making Spirits Brightpaper, which I mixed with a few smaller ones from the Die Cut Ephemera pack.
I finished off with a few gold foil phrase stickers from the Accessory Sticker sheet and I was done! I am so happy with how this page turned out (especially considering I thought I would be a little rusty after my time away, but this collection made it so easy!)
If you haven’t gotten your hands on this beautiful range yet, then make sure you do. As it is seasonal, it will not be re-stocked after it sells out, so grab it while you can. You can find a retailer near you via our stockist list HERE. (Please note that not all stockists carry all collections, so you will need to contact individual retailers to enquire.)
It’s Sophie with you today with a new autumnal page created with the lovely These Days collection !
I used the Pretty Posies woodgrain paper as the main part of my background. I paired it with a scalloped border punched out of the Home Grown paper and created a little hand stitched line with white embroidery floss.
I printed my photo in black in white so that it wouldn’t compete with all the colors I planned to use on my page. It softens the overall look of the layout and it drives the eye easily to the photo.
I wanted to use clusters of branches and flowers all around the photo, since it was taken in the forest new our home.
I cut two cut files from the Anett Design store on white paper and backed the beautiful leaves with different patterned papers from the These Days A5 Paper Stack. I also cut strips of the Family Ties paper in different colors. I bent each strip in different length and placed them at the base of all the leaves. I added a handstitched knot to each bent paper in matching colors. Although it was a very simple little thing to do, I love the beautiful dimension it adds to the page.
I placed the two branch cutfiles on each side of the photo, adding many floral ephemeras at each base and on a few leaves.
I printed my journaling on white cardstock and cut it into strips under the photo.
My title comes from a mix of These Days Mini Puffy Alphabet stickers and letters cut with a die from my stach.
I stamped the date and added a few Nuvo Crystal drops as the finishing touch.
Gwen back on the blog today with a stash busting share for you featuring the ‘Endless Summer‘ collection. Whilst this collection is from a while ago now (2016), I still really love the soft tones in it and the sweet icons, they are perfect for documenting beach photos; these taken of my daughter many years ago. I have quite a few embellishments for this line in my stash so I thought it would be a great opportunity to get some of those used up as well!
The idea for the page was to create a landscape of sorts, with my photos sitting towards the bottom of the page and the top portion of the page being a pretty summer sky. I’ve used the ‘Blue Skies’ pattern paper for my background and then created a frame with the ‘Sun Bleached’ ombre pattern paper. I’ve used this paper to create photo mats for my photos as well.
For a fun element to add to my sky background, I’ve cut two paper kites using a cut file from CUT to YOU. I’ve backed these in the ‘Sun Bleached’ pattern paper as well as the ‘Aloha’ pattern paper, a fun tropical floral print. I’ve added some stitching detail to really make them a feature of the design.
My photos also have a stitched border added for extra detail and they run along the bottom of the edge of the layout. I wanted them to feel grounded against my background.
With the photo and large cut file elements in place, now I get to audition the embellishments in the collection. I noticed at this point that I had a lot of little sentiments to work with from the ‘Die Cut Ephemera’ pack as well as the ‘Accessory Stickers’. I even had some that had been fussy cut from the ‘This and That’ pattern paper. I also had some of the ‘Flair Buttons’ in my stash and am happy to have included two on this layout.
Thinking about the way the eye will flow from the top of the page down to my photos and across to the left, I have nestled in elements along the left hand edge of my paper kites. I’ve also added a longer sentiment at the bottom of the page to balance things out and help that bottom section feel more grounded. Here you can see how the cloud icons in the background pattern paper are matched to the flair button. I love this layered look.
I’ve then added in a floral sticker from the ‘Accessory Sticker Sheet’ (which I cut in half) as well as some other round elements to soften the look of the page and add more interest. The different sized round elements really add to the dimension of the page as well. Lastly, I’ve added in two of the die cut butterflies from the ‘Accessory Sticker Sheet’ as well as a couple of ‘Enamel Shapes’ as a last finishing detail.
I have made a YouTube process video for this one which you can watch here:
I hope this layout inspires you to dive into your stash and get creating!
Hey y’all! Laura back again with three holiday card from the stunning new Cocoa Vanilla Studio Joyful collection! I really adore the sweet icons and beautiful patterns in this one. It was so much fun to experiment with a variety of papers, fussy cutting everything, and adding the sparkly finishing touches! For the first card, I layered fussy cut florals in the background with a tree from the ephemera pack and a chipboard piece that says “Falalalala” for my central focal point. The title is simply “Jolly” wrapped over the top from the ephemera pack. Those tiny details really are what makes this one pop! With one of the gold fabric stars for the top of the tree and gold Nuvo Drops dotted in the center of the florals and around the backyard, this card really shines!
On the second card, I layered two patterned papers from the A5 paper stack as a base for my large title. The “Christmas Joy” is from the chipboard stickers and is a stunning gold foil! I layered a large fussy cut swag behind the “Joy” and then added dimension with a second layer of fussy cut florals on top of it. My favorite part of this particular card are the little floral bits that look like they are flitting around the outside of both the swag and the title. With more Nuvo Drops for a sparkly detail, this card came together rather quickly after all of that fussy cutting!
For the third card, I decided to create a scene with these adorable animal icons! A little white card stock for snow along the bottom was a quick and easy base for this sweet deer and squirrel. I created the appearance of depth to this one by layering the tree and sign behind the deer, which gives the allusion they are further back. I added chipboard stars across the top of the card with Nuvo Drop trails leading down to them, so that they appear to be hanging from the sky! The “Jingle All the Way” sentiment is from the chipboard stickers and just like before, gold Nuvo Drops were the final details this one needed!
I hope you enjoyed my take on holiday cards using the gorgeous new Joyful collection! They were so much fun to make and I can’t wait to share them with family and friends! Don’t be afraid to use some of the dimensional embellishments on your cards! Once I removed several layers of chipboard behind the titles, they laid quite flat!
I am back with another winner announcement today. This time I am super excited to announce the winners of our ‘Joyful’ collection giveway!
I was so touched with all the lovely comments you left on the giveaway post (and yes, I do read every one of them!) and am thrilled you love this collection as much as I do. Thank you everyone for your support and to all of our retailers who have already ordered. (If you are looking for somewhere to buy this range, start by checking our stockist list HERE.) This collection will not be re-stocked by us, so make sure you grab it while you can!
Now onto our winners! Our lucky first winner who will receive the ENTIRE ‘Joyful’ collection is…
Congratulations Alexandra Skifton!
And our runner-up who will receive a collection kit is…
Congratulations Joy Coxsell!
Congratulations to both our lucky winners. (Please keep an eye on your Inbox and Sue will be in touch to organise your prizes.)
To everyone else – thank you again for your support for this collection, I am looking forward to seeing all those Christmas craft projects!
Hello, hello! Welcome Cocoa Vanilla friends. It’s Anna here with my newest page made with “These days” collection. I am still waiting for a brand new christmas line to come to my other side of Earth so I have more time to scrapbook fall photos. Although this collection isn’t exactly fall themed, warm colors make it very easy to combine them with red, yellow and dark green of Polish autumn. Versatility is always the great feature of all CVS lines! Zoe knows hot to design them the way they match many themes and many photos.
This time I had a picture of my older daughter Gabrysia feeding the squirell. In one of the parks we like to visit those cute little creatures are tame enough to take nuts directly from the palm of the hand. My girls love it so much and mamarazzi also like it :) I created very simple and easy to make page.
I picked papers in warm colors like this “Home grown” pattern with flowers on one side and whimsy squares on the other. I love both sides so I decided to fold the corner of the paper to showcase two of them. Lacking triangle was filled with piece of “Daybreak” paper. Next step was to add chosen photo with a layer of cardboard for more dimension.
I gathered few flowers from Floral ephemera pack and some small elements from Ephemera pack and added them around the photo. I would say it’s my signature style thing – I don’t like empty space around photos so I always try to tuck some tabs or flowers behind them. I also found few trees and added them to the mix too.
Bottom part of the page felt empty and needed little something to be added to maintain the balance of the layout. It was a good spot for title, that I made combining Alpha stickers and Foam phrases. I removed the letter “s” from word DAYS to better fit my needs. Don’t be shy with altering stickers or other premade elements. Even though they seem “ready” they are only a starting point and you can change the colors, cut them into smaller pieces – whatever suits you. I like to fussy cut smaller elements from bigger ephemeras or stickers!
My last step was to add super cute wooden buttons and splash everything with yellow and orange mist. Little mess always adds this unique touch to the page.
Do you like making simple pages? I am more of “sweat and blood” scrapbooker but sometimes I just need to sit down and relax with quick layout like this one. That is all for today my fellow scrapbookers. Thank you for stopping by and see you in two weeks.


 I started with a white piece of cardstock. I cut the beautiful designer paper from the “These Days” collection to size by 6×6 inches. I stitched the square with gold sewing thread in the center of the layout with my sewing machine. I picked out several pocket page cards and folded them in half. I created layers and put them on top of each other with adhesive tape.
 I placed the photo on top of these design paper layers. I start by making a cluster on the left side. I use different flower die-cuts, leaves from white cardstock and wooden buttons. I cut photo frames from the design paper and sew the edges with gold thread. I slide the photo frames between all these layers.
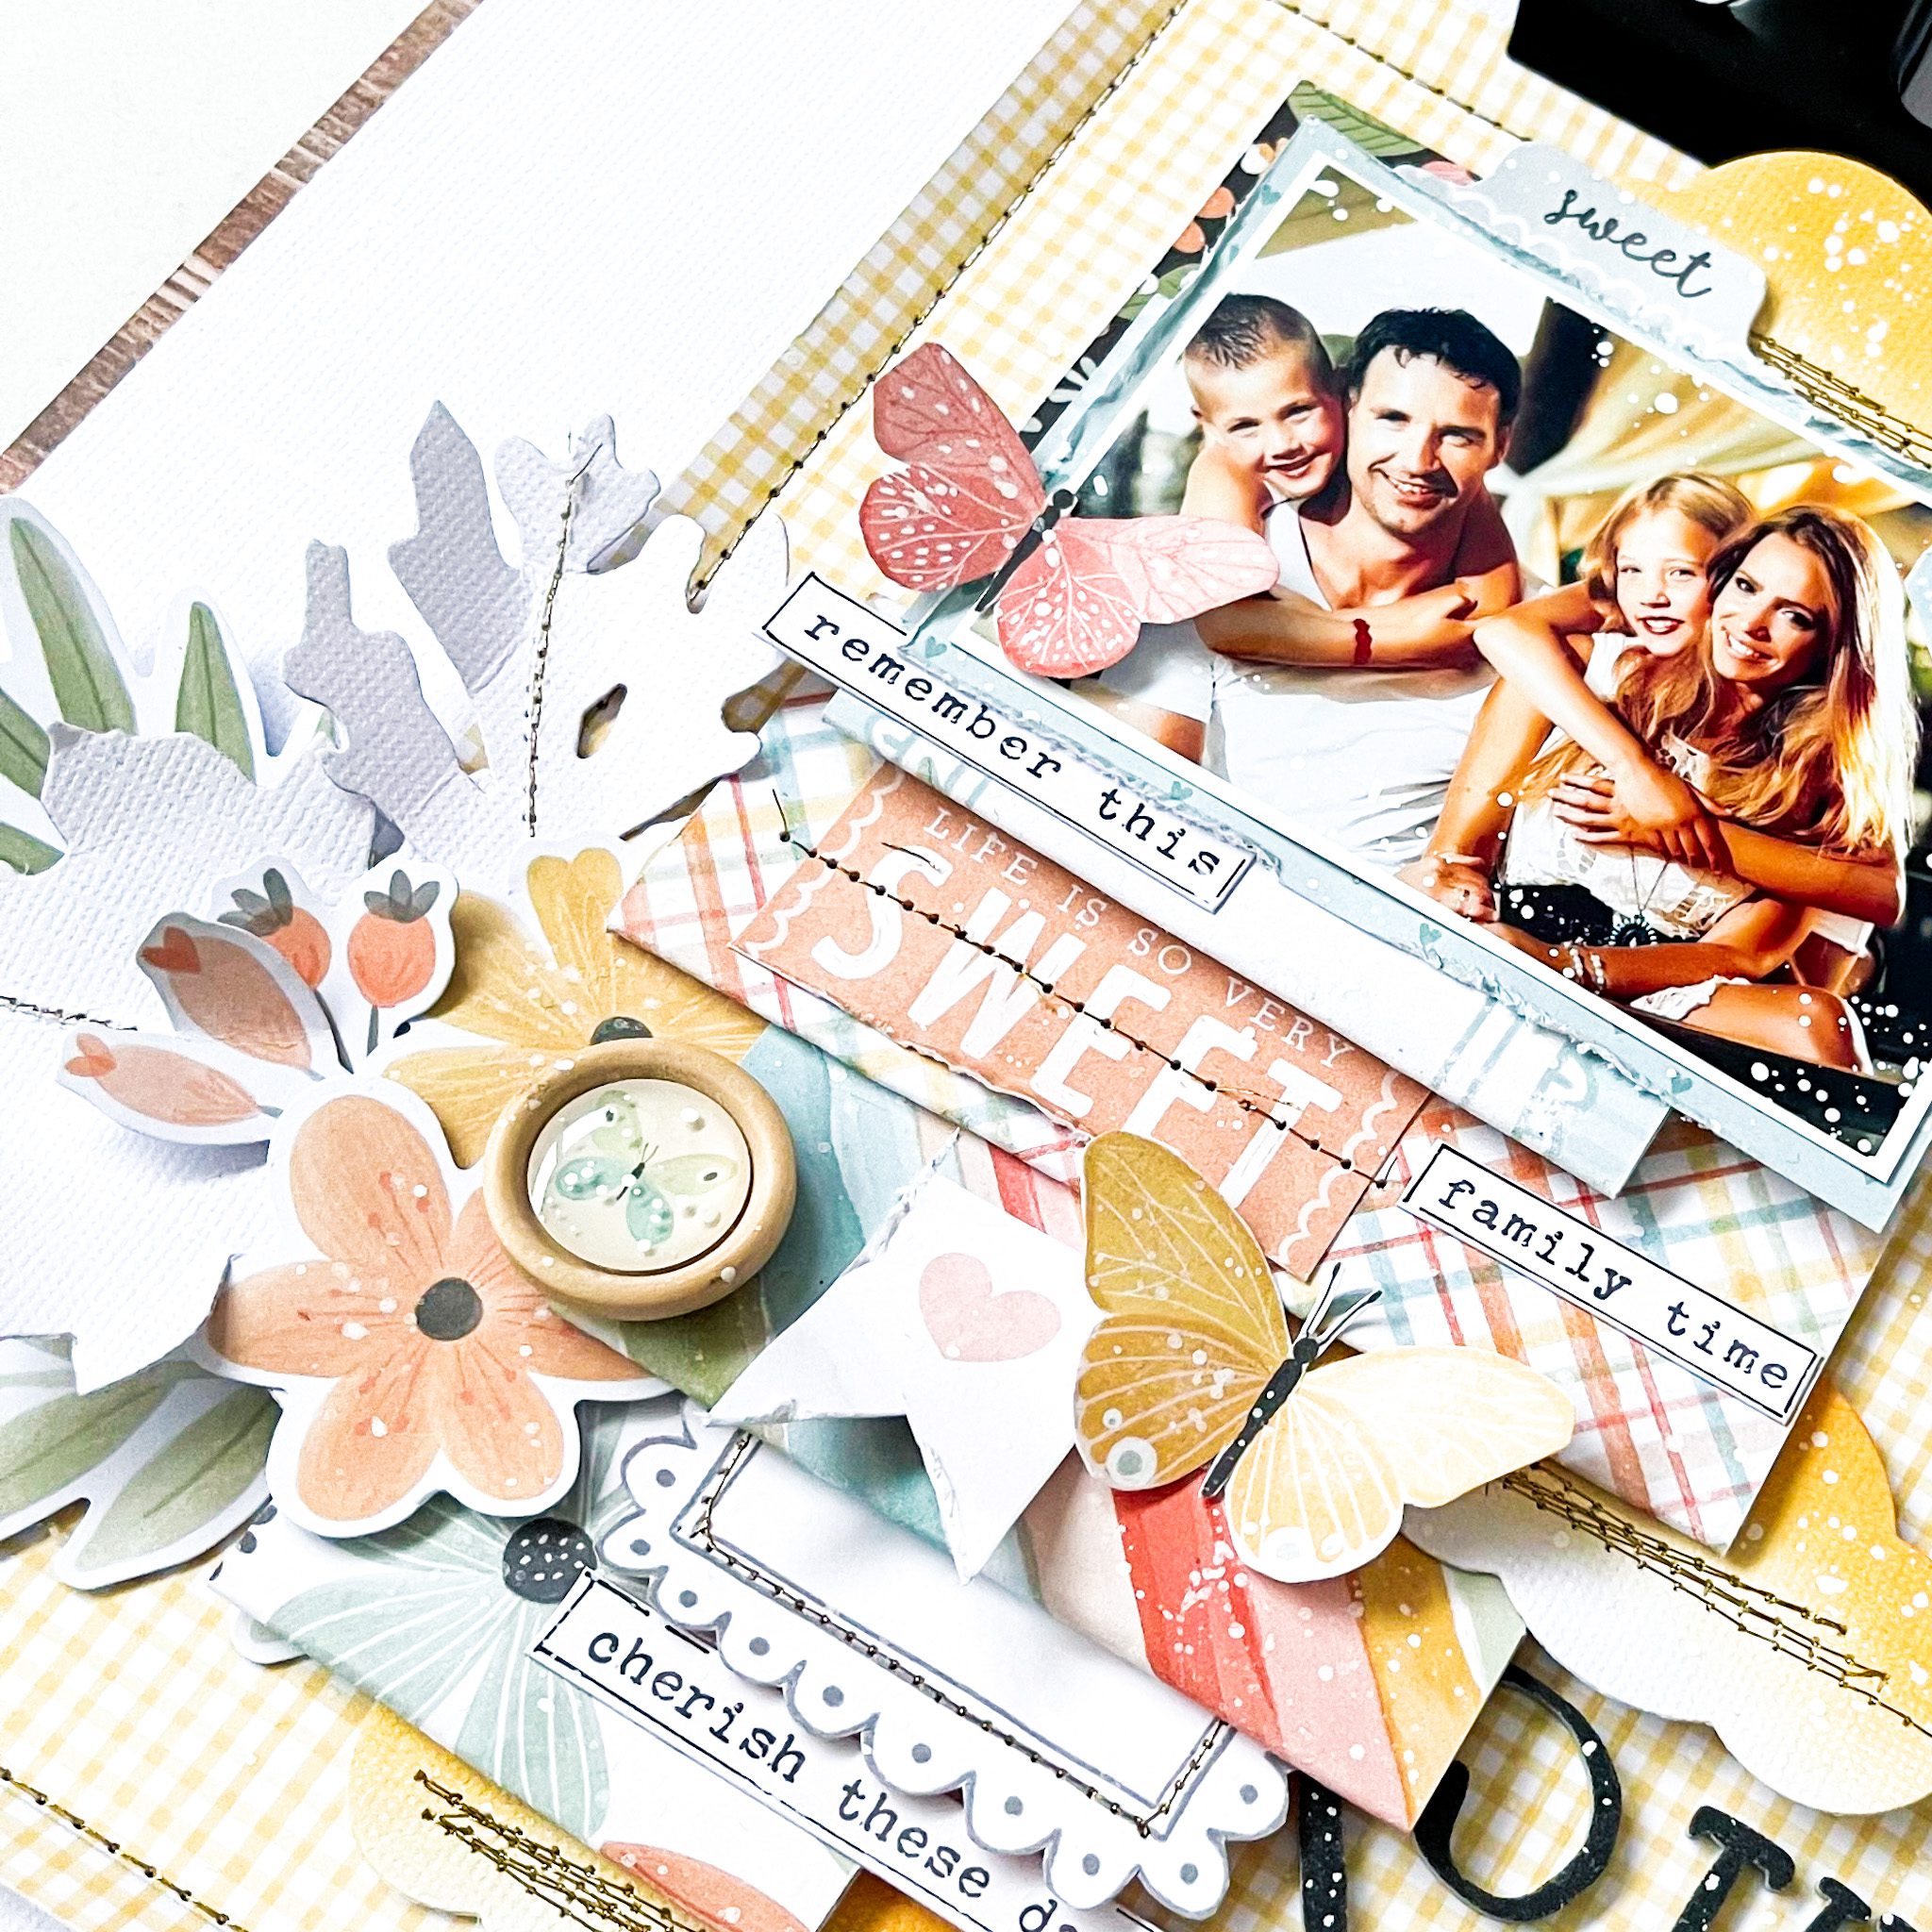 I am decorating my layout with more beautiful embellishments from this amazing collection by Cocoa Vanilla studio. I used word strips, stickers and butterflies. I cut the clouds from white cardstock and colored them with Distress Oxide. The color I used is “spiced marmalade” I stitch the clouds with gold thread and I placed them between these paper layers.