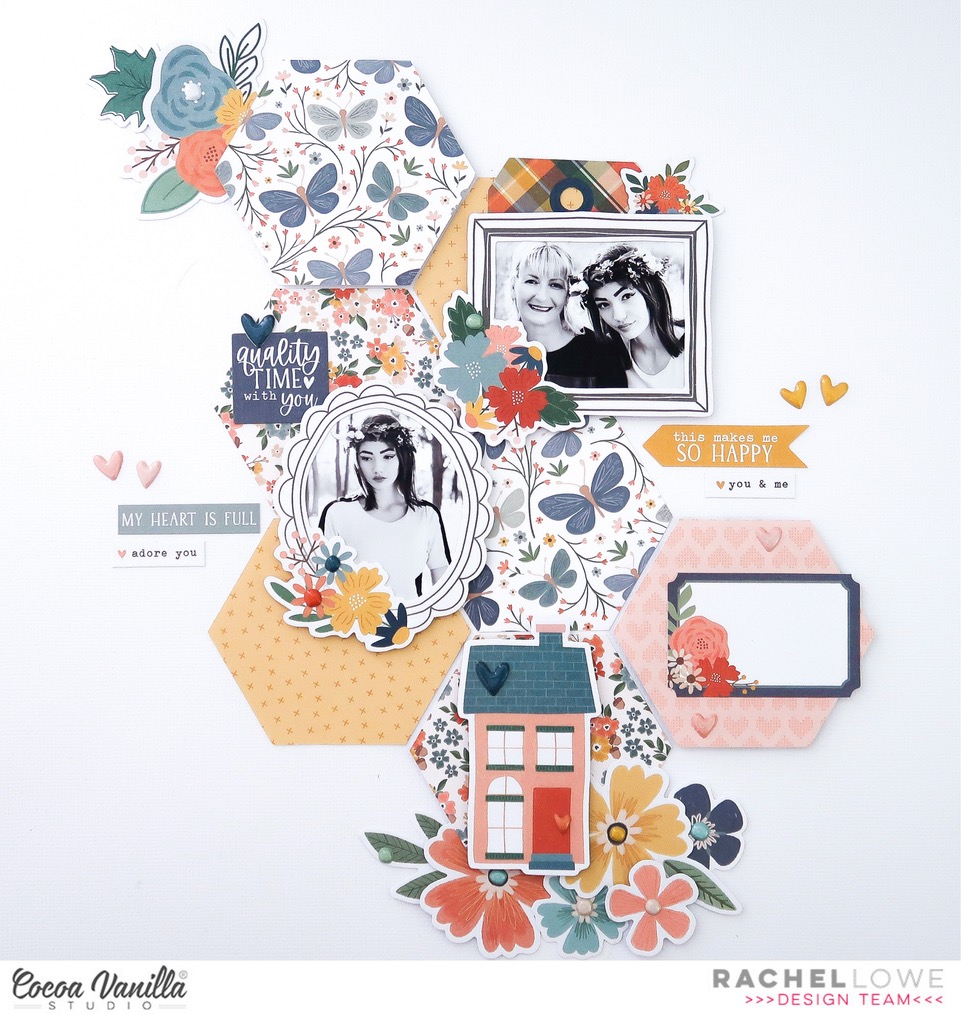
Welcome June and hello crafty friends. Today I have another layout created with only papers from the A5 paper pad. I have used Heart & Home collection to create this feminine layout of my daughter an I.
I cut 7 2 inch hexagons using three different designs of the papers from the A5 paper pad. Once I had arranged them in a pattern I liked I adhered to my page but added the top and bottom ones with foam tape to add dimension.
I next added my photos using two of the frames from the ephemera die cut pack. I added these with foam tape to add more dimension to my layout.
On the left side of my photo I added some phrase sentiments using the accessory stickers sheet and then some puffy hearts and circle centres to the flowers.
The photo to the right of my page I tucked a tag and small floral bloom behind it for visual interest.
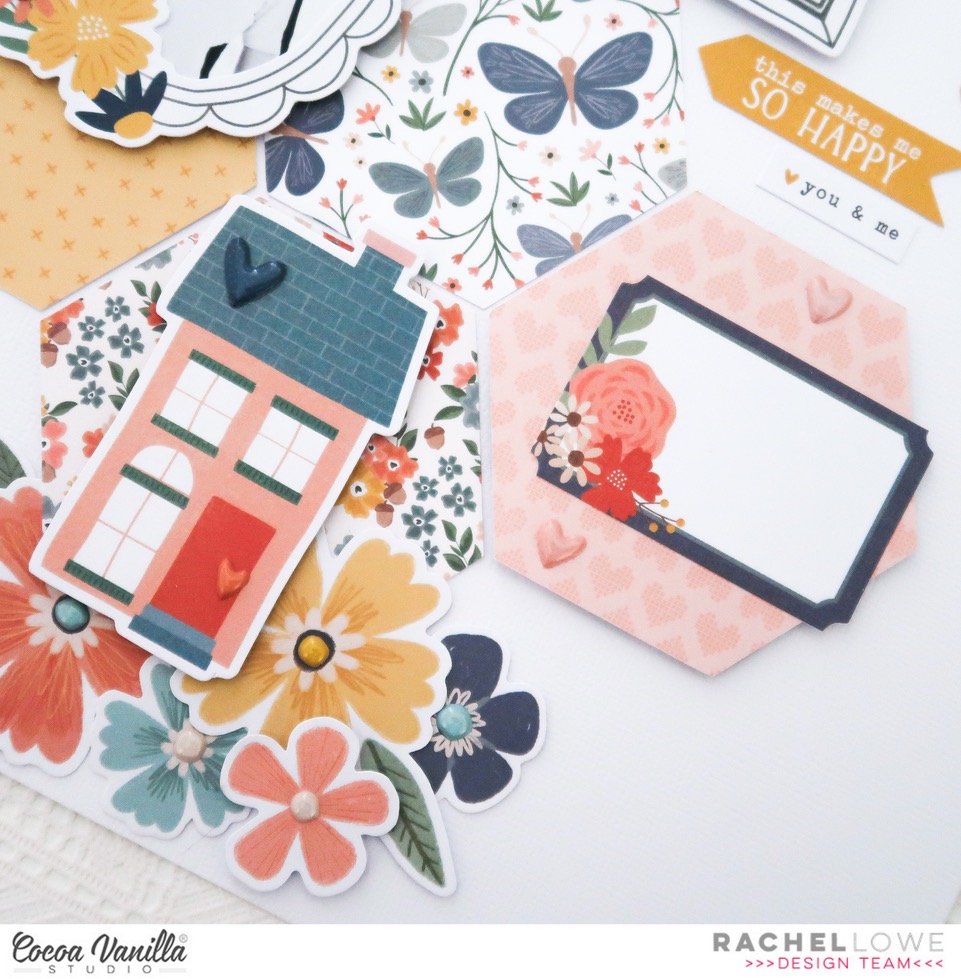
I created a feature of the bottom hexagon by adding the house die cut and adding floral blooms under the house from the floral die cut pack, and puffy hearts and circles. I used a journalling block to the hexagon next to it and then finished off adding more phrase sentiments. I went back and added a floral bloom to the top left hexagon.
This is a simple layout to put together and using the A5 paper pad makes it super cost effective also!
Today I am sharing another layout using the fab! Great Escape collection! This layout has been created using only the A5 Paper Pad.
The only thing you have to remember is that anything you cut must be 6×8 inches. This is a great way to either save your 12×12 inch papers or when your supply of the 12×12 inches papers is running low. I cut 10 scallop strips using different colours and patterns to create my background. So they stood out I added some black machine stitching to each strip.
I next cut my title Wild & Free using a cut file from the Silhouette design store which I then offset using a darker colour to add contrast so my title really popped on the white background paper.
Using another cut file from the Silhouette Design store, polaroid Frames, which I back filled with the journal cards also from the A5 paper pad. I added my two photos and set about embellishing this with Puffy Stickers, Accessory stickers and ephemera die cuts.
I used chipboard pieces to add over my scallop paper strips to add dimension. I layered the stars and used foam tape to add dimension.
This layout was super easy to put together and you could do a 8 1/2 x 11 inch version. You could also add larger photos or more photos. I love the colours of this collection and the A5 paper pad has some colours/designs that are not in the 12×12 collection pack.
As always thank you for stopping by and I hope I have inspired you to get out your A5 paper pad and think of ways you can use it to create a layout.
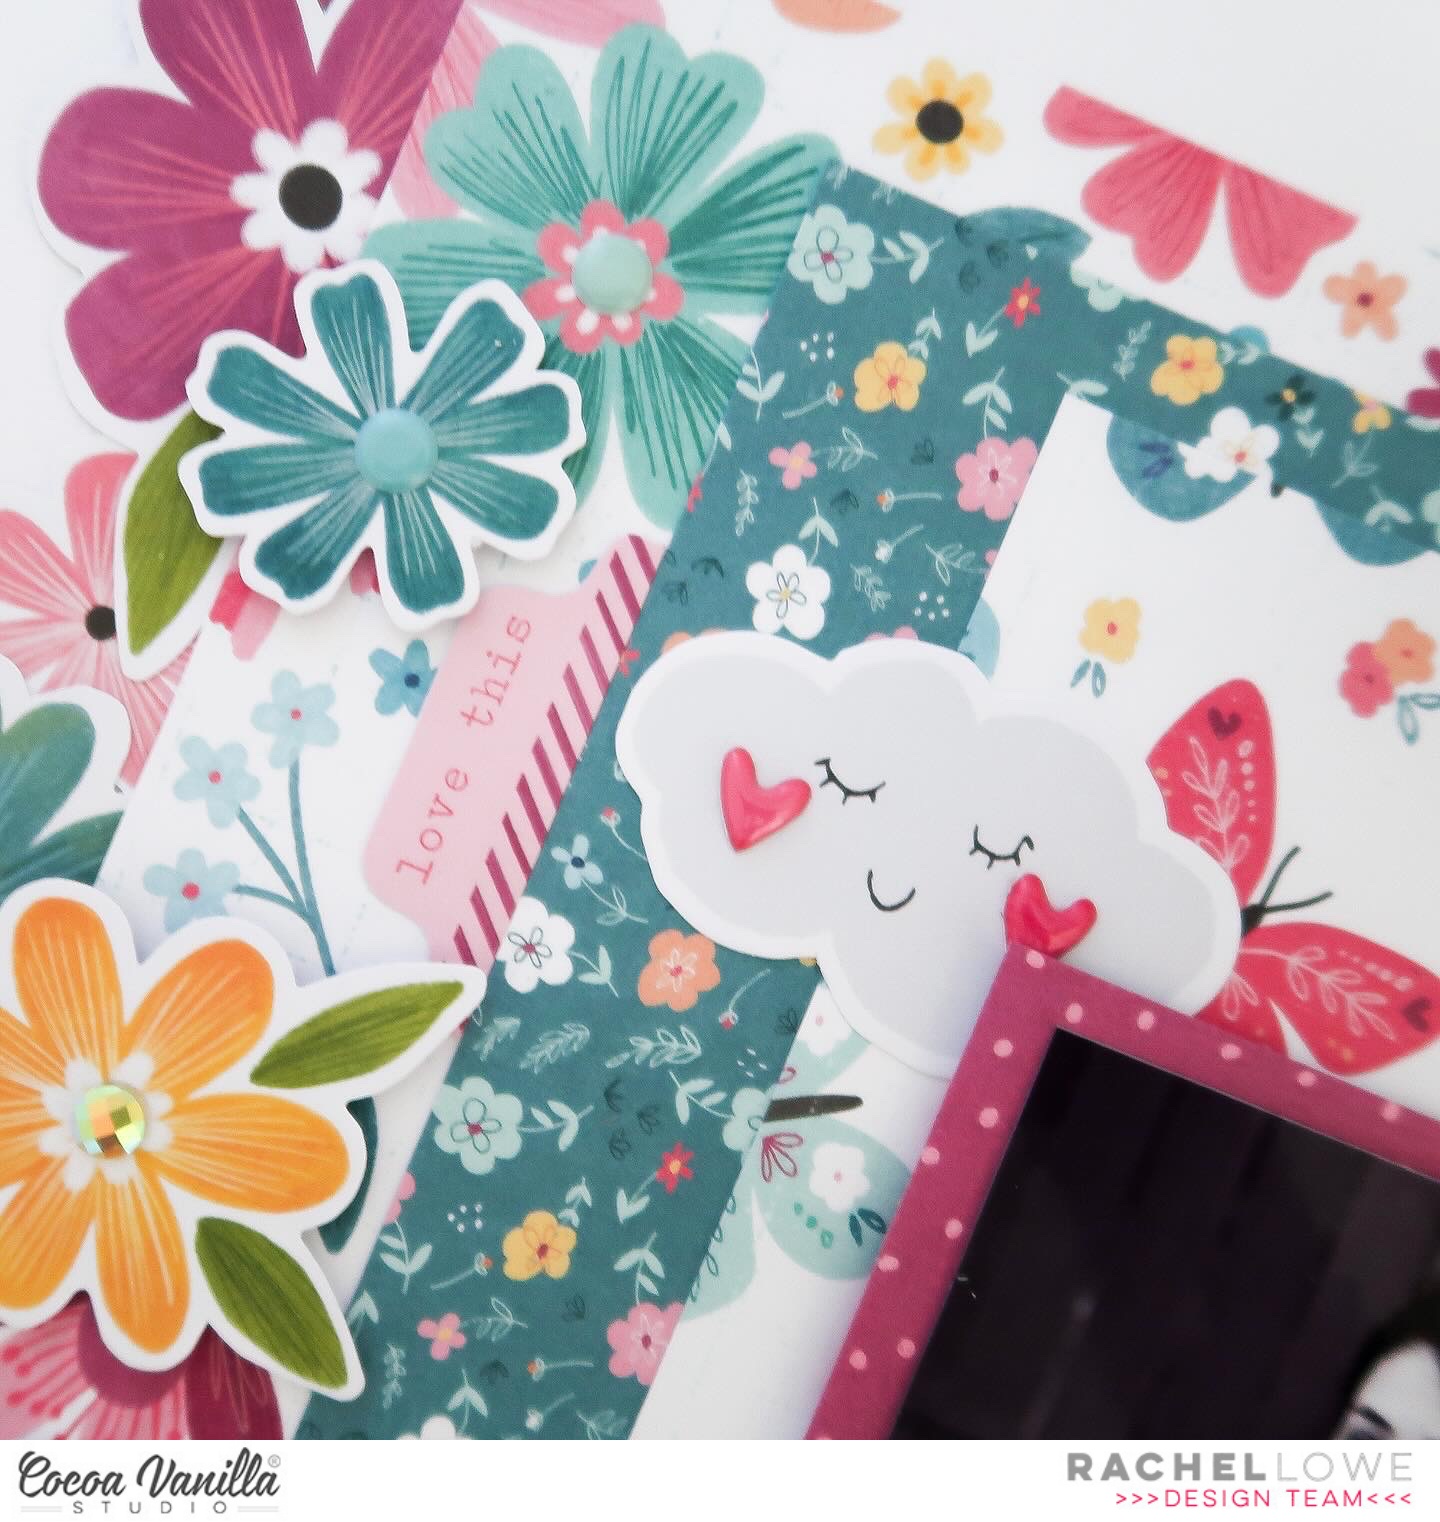
Hello everyone! I thought I would join in the May challenge fun by creating a layout using the Floral Frenzy theme. I have used Happy Days collection which I love so much.
I don’t do ‘busy’ layouts generally but I wanted my flowers to be the focus and went all in! I chose three papers to layer with the larger floral on the outer so I could layer my florals on it. I used Little Blossom, Lush Blooms and Flutterby papers.
I then took my floral ephemera and started layering under and over the Lush Blooms paper strip. I used foam tape of some of the florals to create dimension. I added enamel dots from my stash to some of the centres. Lastly I added some leaves from the floral ephemera
I used the reverse of the Flutterbuy to mat my 6×4 inch photo, I went with a black and white photo my daughter as there is so many colours and patterns in this layout, I didn’t want my photo to get ‘lost’.
I created three embellishment clusters around my photo using the die cut ephemera, adding the super cute cloud (which I added heart puffy stickers) , the bike and a phrase sentiment added over it with foam tape and another floral bunch, finished off with a butterfly and phrase sentiment from the Accessory Stickers.
Lastly I created my title using the chipboard titles and a super cute strawberry die cut to tie it all together.
And there you have it, one super girly layout! I look forward to seeing what you create with the floral frenzy challenge.
It’s Tarrah back with you and today I am sharing a new layout inspired by the new April challenge to include a big rainbow as the main element on your layout. I decided to go with a non-traditional rainbow and created my own using various papers from the Boys Rule collection.
The new monthly challenge for April is to include a BIG rainbow as the main design element on your layout.
To help create the arches of the rainbow, I used various sized dinner plates and traced around the tops of them on the different patterned papers I chose from the Boys Rule collection. I chose these following papers from the Boys Rule collection: ‘Fun and Games’, ‘Straight and Narrow’, ‘Entitled’, ‘Expressionist’ and ‘Star Fall’. I then arranged them on a plain white cardstock background and adhered them down. I trimmed the white cardstock down to measure roughly 11′ x 11′ and adhered it to the ‘Boys Stuff’ patterned paper. I then machine-stitched each individual colour in the rainbow with matching thread.
At the base of the rainbow, I adhered a strip of the ‘Straight and Narrow’ paper horizontally to add another layer to my layout. I added craft foam underneath my photo and placed it over on the right side of my page, I layered the frame and journal spot from the ephemera pack tucked in on the left hand side of the photo, on top of the photo I added one of the banner stickers from the Accessory Sticker sheet. My title is from the chipboard pack, I love these words! I added the ‘You’ and ‘Are’ words at the top of the rainbow and the ‘Awesome’ word under the photo. Either side of the ‘Awesome’ word, I added the scalloped border sticker from the Clear Sticker sheet. Above the photo, I added one of the banner stickers from the Accessory Sticker sheet. I punched out some stars from the ‘Happy Go Lucky’ paperand then layered some of the star stickers over the top. I placed a few of these around my page.
Once I was happy with how the larger elements were placed on my layout, I started adding some smaller embellishments including more clear stickers, more accessory stickers and some more ephemera also. One of my signature features on my layouts is to stamp the date of when the photo was taken and this layout is no exception, I stamped the date stamp using some black ink.
I don’t often journal on my pages so I love the phrase and word stickers from the accessory sticker sheet. I add them to all of my Cocoa Vanilla layouts, where I can, to help tell the story. Boy layouts are one of my favourite projects to create and this one was so much fun to create! I really love how it turned out too. Make sure you create a layout and add a big rainbow element as your main design feature and share it with us by uploading it to the Cocoa Vanilla Studio Community Facebook page.
Thank you so much for stopping by the Cocoa Vanilla blog today! I hope you enjoyed reading about how I created my layout as much as I enjoyed creating it!
Hello CVS crafty friends Rachel here! Today I am sharing another layout created using the fab Great Escape collection scrapping an older photo of my youngest.
Boys and stars just go together! Firstly I cut the Star Gazing paper at 5×12 inches. I used the banner paper strip from the Wild Life paper and added to the bottom of the star paper piece. I used a note book border cut file from the Silhouette Design store and cut this using the blue part of the Horizon paper and added to the top of the star paper piece.
I chose a dark blue to ensure I had contrast against the busy star paper. I next cut two stars using both sides of the Starry Night paper, 5 1/2 and 5 inches. I layered these off centre to the left.
I next added my 3×5 inch photo, matting it on the yellow side of the Horizon paper and then adding a strip of the Journey paper, green side. I added my photo with foam tape to create dimension. I love the Chipboard pieces and created an embellishment cluster to the left side of my photo finishing of it with a phrase sentiment die cut.
I used the Adventure Awaits journal strip from the Wild Life paper and added under my photo, this being my title of my layout. I added the compass die cut with foam tape so this element didn’t look ‘flat’.
I always use the Accessory Sticker Sheet to add sub journalling and these phrase sentiments suite my boy so much!
To balance my layout I added a embellishment to the top left of my page, using the tag and ‘play’ banner from the Accessory Sticker sheet, adding the Puffy Star stickers and then some twine.
You could add a larger photo on this layout or even two smaller landscape photos. I did go back and add some Chipboard Stickers and Puffy Star Stickers over some of the stars of the Starry Night paper to add more dimension.
And there you have it another boy layout that is fun and fabulous!
Hey crafty friends Rachel here! Today I have another layout created with the fabulous Great Escape collection. I have used a photo of my oldest boy who is now in the Air Force and has made this mum very proud.
I used this awesome geometric cut file from the Silhouette Design store and cut it in black for impact, I chose the Happy Camper orange side paper to back the cut file as it contrast so well. I used white cardstock as my base paper and added a grey/blue paint wash and splatters and added the Adventurer paper as a border.
I again used the Adventurer paper and cut a strip 4×9 inches and placed to the left of the circle cut file. I used the dark blue strip from the Wild Life paper over this trip. I next added my 6×4 portrait photo with foam tape so I could add elements under.
I used chipboard pieces to add dimension to my layout and to emphasise the patterns of the paper. to ensure my photo did not get ‘lost’ amongst the patterns and colours I added clusters of embellishments around it. Layering over and under elements greats great visual interest.
I love the Puffy Title stickers and as you can see you on my layout I manipulated them to curve following the shape of the circle cut file. I added some Puffy Star stickers in amongst my colour wash to create the illusion of a sky.
I did try a coloured version of my photo but as there are many colours and patterns in this layout it just didn’t work but a black & white version really popped off the page!
Thank you for stopping by today and happy scrapping!
Hello everybody, welcome back to the Cocoa Vanilla blog, it’s Kel here today to share my latest creation using the new ‘The Great Escape’collection. Here it is…
To start my page I decided I wanted to use the yellow paper called ‘Horizon’to make a sun feature on my background. I cut the paper into strips at an even level to create the rays. Before I stuck them down I added some yellow ink behind the rays to add some depth and interest. After I stuck them down, I added some hand stitching.
I placed my 2 photos in the middle of the page, matting them on papers from the A5 paper stack as well as some black card stock to help them pop. Once they were down, I made some trees.. the trunks from a wood paper from ‘No Limits’ and the green paper called ‘Journey.‘ One tree to the left of the photos and one on the right to create balance.
Next, I cut some clouds from the ‘Starry Night’ paper and added them to the top left of my page. Above the left photo I added a tab and word sticker from the Accessory Sticker Sheet.
Above the right photo I added a frame and wood piece from the die cut ephemera pack. Then to the right of the photo I added a flag and some stars.
For my title I used the words ‘Great Outdoors’ from the Puffy Title Stickers. I popped them onto white card stock to help them stand out. Underneath I used some phrases which I cut from the cut apart paper called Wild Life.
I finished my page adding some more stars cut from the Star Gazing paper and some of the Puffy Star Stickers.
Thats my page, I hope you have been inspired today and I will see you soon!
Welcome to my my second layout created using the new fab Great Escape collection. I have scrapped a photo of son number two (I have three!!!) sitting in front of a rusting old car.
I chose this fab star cut file from the Silhouette design store and cut it in black to create a contrast. I chose the colourful striped Journey paper for the centre star and the green Direction paper for the outer smaller stars. I added foam tape to some of the smaller stars to create dimension.
I added my 3×5 inch photo which I matted on a paper from the A5 paper stack and added black machine stitching to create a border. I added two stickers to the top of my photo from the Accessory Sticker sheet. I went back and added several of the larger Die Cut Ephemera stars and then Puffy Stickers to the centres.
I then created an embellishments to each side of my photo, how cute is the car with luggage and map, perfect for my photo!
Next I used the Chipboard stickers to create my title, adding FUN to the bottom of my photo and TIMES under the photo, don’t be afraid to mix it up by making your title interesting in placement.
I used Wild Life paper as my background paper but felt it needed a darker contrast so add torn notebook edge (cut file from the Silhouette Design store) using Starry Night paper and finished off by adding black sitting to these.
This is a ‘busy’ layout for me but I love how it turned out!
Thanks for stopping by today and see you agin soon.
Firstly I wish you all a Happy Christmas and a New Year. This year went in a blink of an eye!
I went back through the layouts I have made and have chosen four of my favs I created using all things Cocoa Vanilla Studio!
Heart and Home collection to me was all about Autumn days and family. This layout features my fav photos of my youngest boy and I. As you know I love adding cut files to my layouts and here I used two so add texture and layers.
These Days collection is such a pretty collection and can be used for so many themes. It’s not often that I do mixed media but as here I used several patterned papers I needed to add white and so it wasn’t so stark I add a blue paint wish to it.
Happy Days collection is bright and beautiful. I loved the many colours of the collection. This is a very ‘busy’ layout for me but I love how it came together and everything about this layout says ‘HAPPY’.
This was a throw back Thursday layout I created this year and having three sons I just can’t go by a fab boy collection and No Limits is that. How awesome is this pie graph cut file! I cut two at different sizes and then layered, love the effect of the light against the dark paper.
Thank you for all your love on social media and also sharing your wonderful layouts!
Welcome back today friends, it’s Kel back today to share my final post for 2023…and to share my favourite creation from this year.
Going back through all of my pages, my top 3 pages were all from the Happy Days collection…the colours are just so beautiful ad vibrant but I had to choose just one…. and I think it is this one..
I think it’s the colour palette…yellow always makes a page bright and happy, and mixed with aqua and magenta, it’s a chefs kiss.
I love circles in my designs and the pops of black help highlight the colours…
I hope you have all enjoyed the inspiration the design team and I have provided in 2023 and are looking forward to seeing what 2024 brings!
Wishing everyone a Merry Christmas… stay safe and enjoy the festivities!