Hey y’all! Laura Alberts back again with a sweet layout of my grandmother using the stunning Happiness Collection. I started with a cut file from Hip Kit and filled it with papers from the Happiness 6×8 paper pad, then added it to this gorgeous teal background on the Good Vibes patterned paper. Using floral swags from the ephemera pack on the left and bottom of the photo and adding a cut-a-part piece from the Little Things patterned paper to add my journaling.
The larger butterflies are fussy cut from a cut-a-part sheet and the smaller butterflies are all fussy cut from the Bright & Beautiful patterned paper. I love the simple elegance trenbolone these add to this layout, it’s amazing the mileage you can get from patterned paper if you’re willing to fussy cut out the beautiful icons! I thought these lovely butterflies were perfect for a memorial page honoring my grandmother’s amazing life.
To finish this layout off, I added clear heart stickers around the clusters and the arrows by the die-cut title. Then, a little flourish with Nuvo drops in gold and white, as well as gold splatter! I love the way the tiny details like butterfly trails give this layout such movement and interest.
I hope this layout inspires you to try adding some extra tiny details to your layouts! If you’d like to see this layout created, I have a process video below! Have a wonderful and creative day!
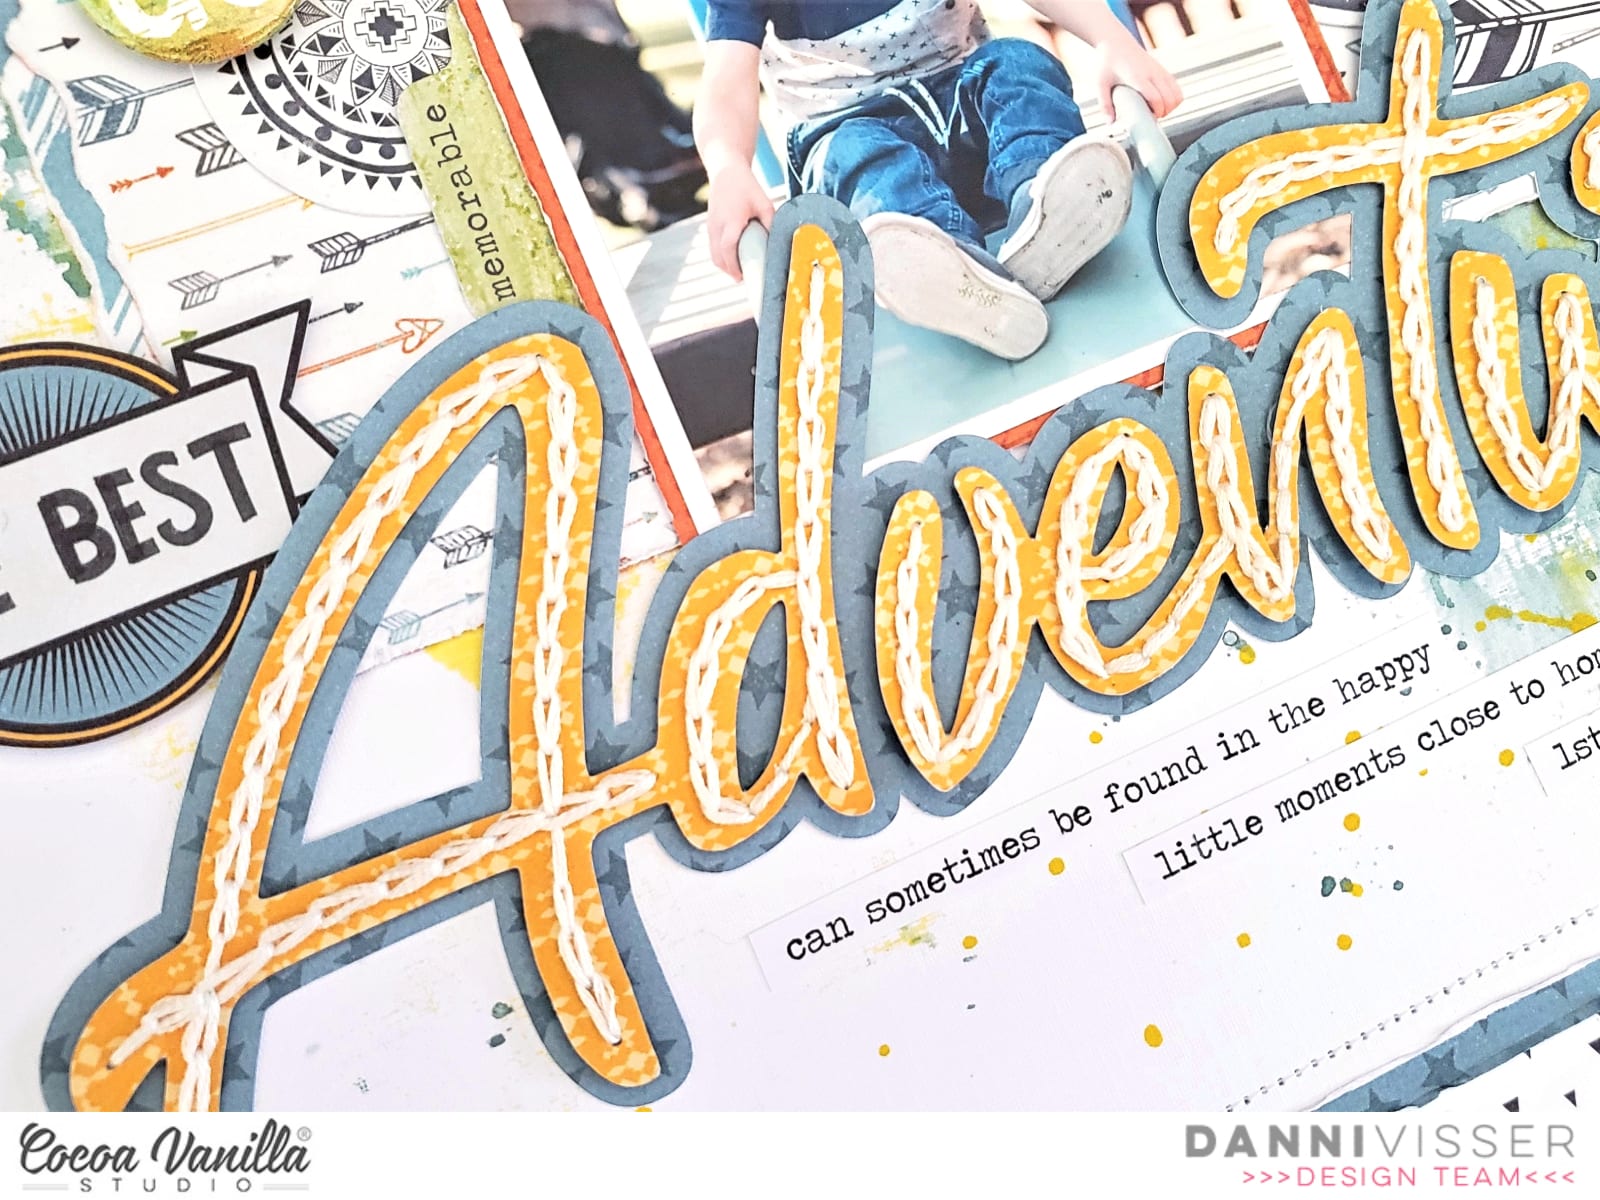
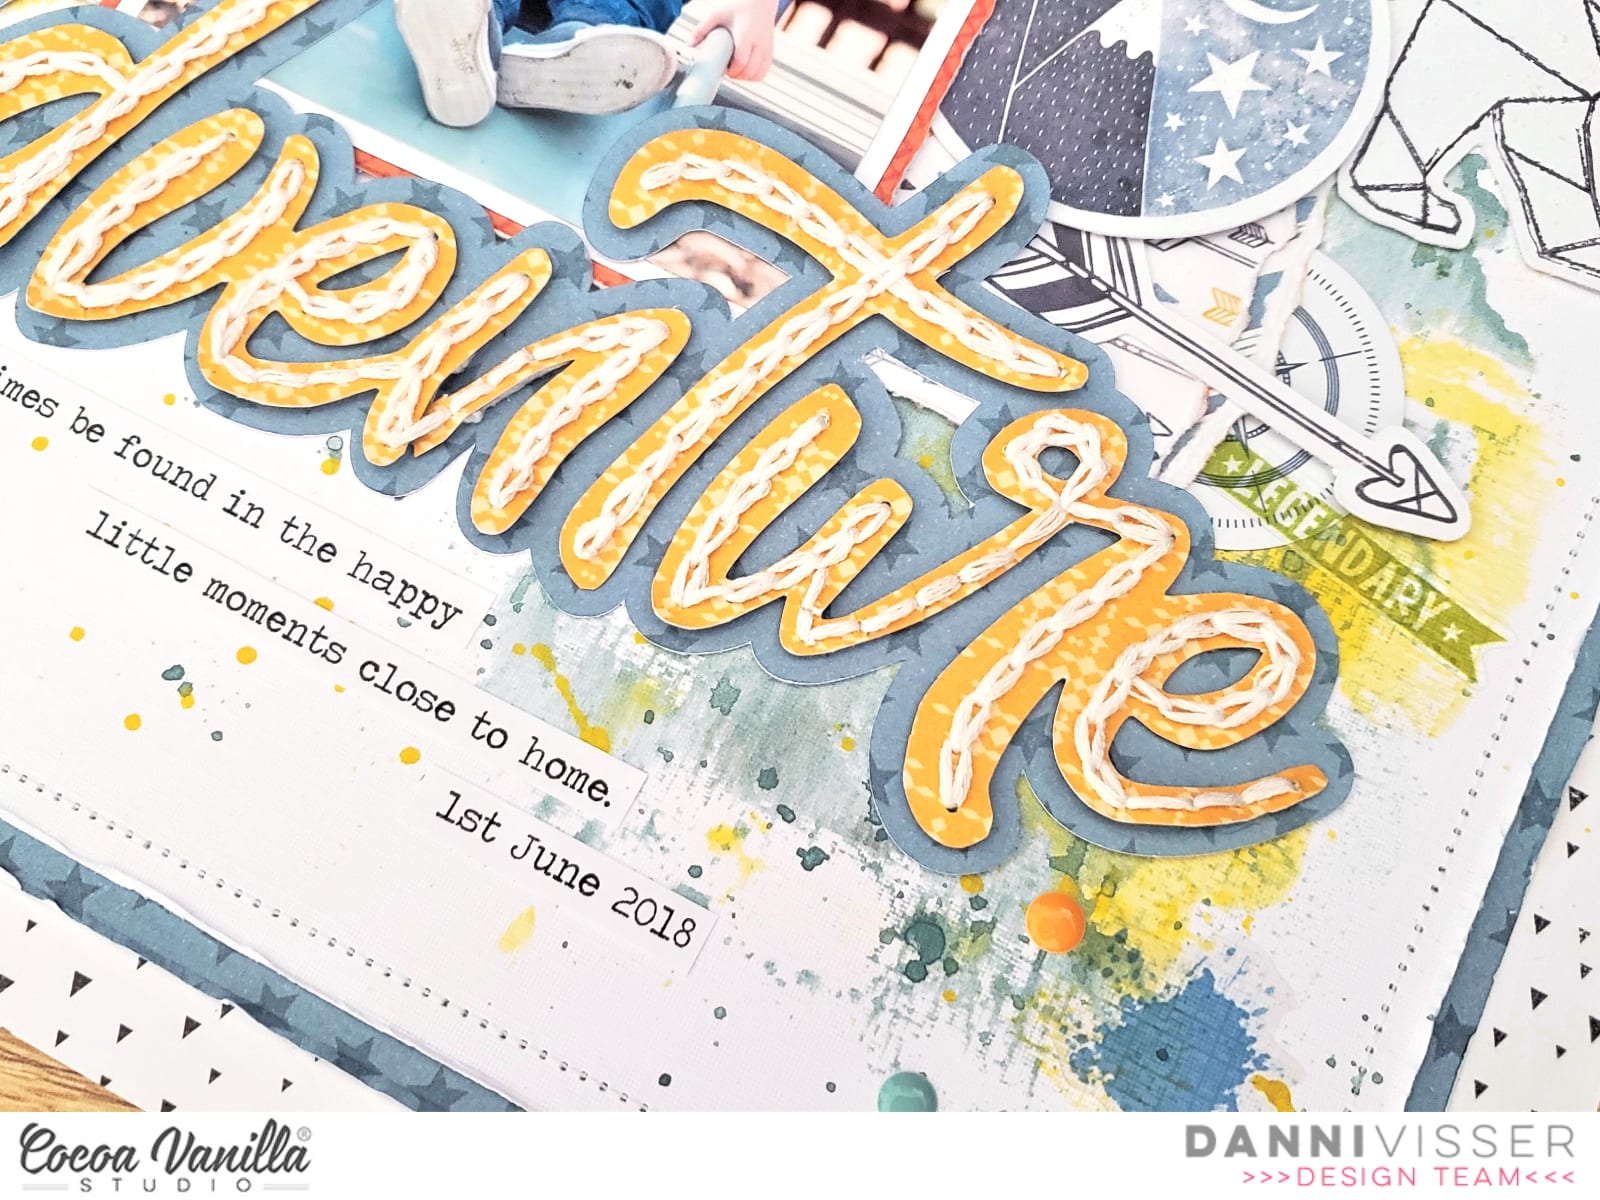
Hi everyone! Danni here, back again playing with the beautiful Legendary collection. Once again, I am scrapping an outdoors photo and I chose this adorable photo of my son playing at a local park. This week we were challenged to feature the incredible Legendary free cutfiles that are available for download, and I decided to use the Adventure word as my title. I cut it once from the yellow side of Wild One patterned paper, then used the offset tool in Silhouette studio to cut a slightly larger backing piece from Offbeat patterned paper. I then went ahead and hand-stitched a single line of chain stitch following each of the letters. I am on a big hand-stitching kick lately, I just love the texture it provides, and I find the process very relaxing! Once I finished the stitching, I adhered the title to the backing piece using tacky glue.
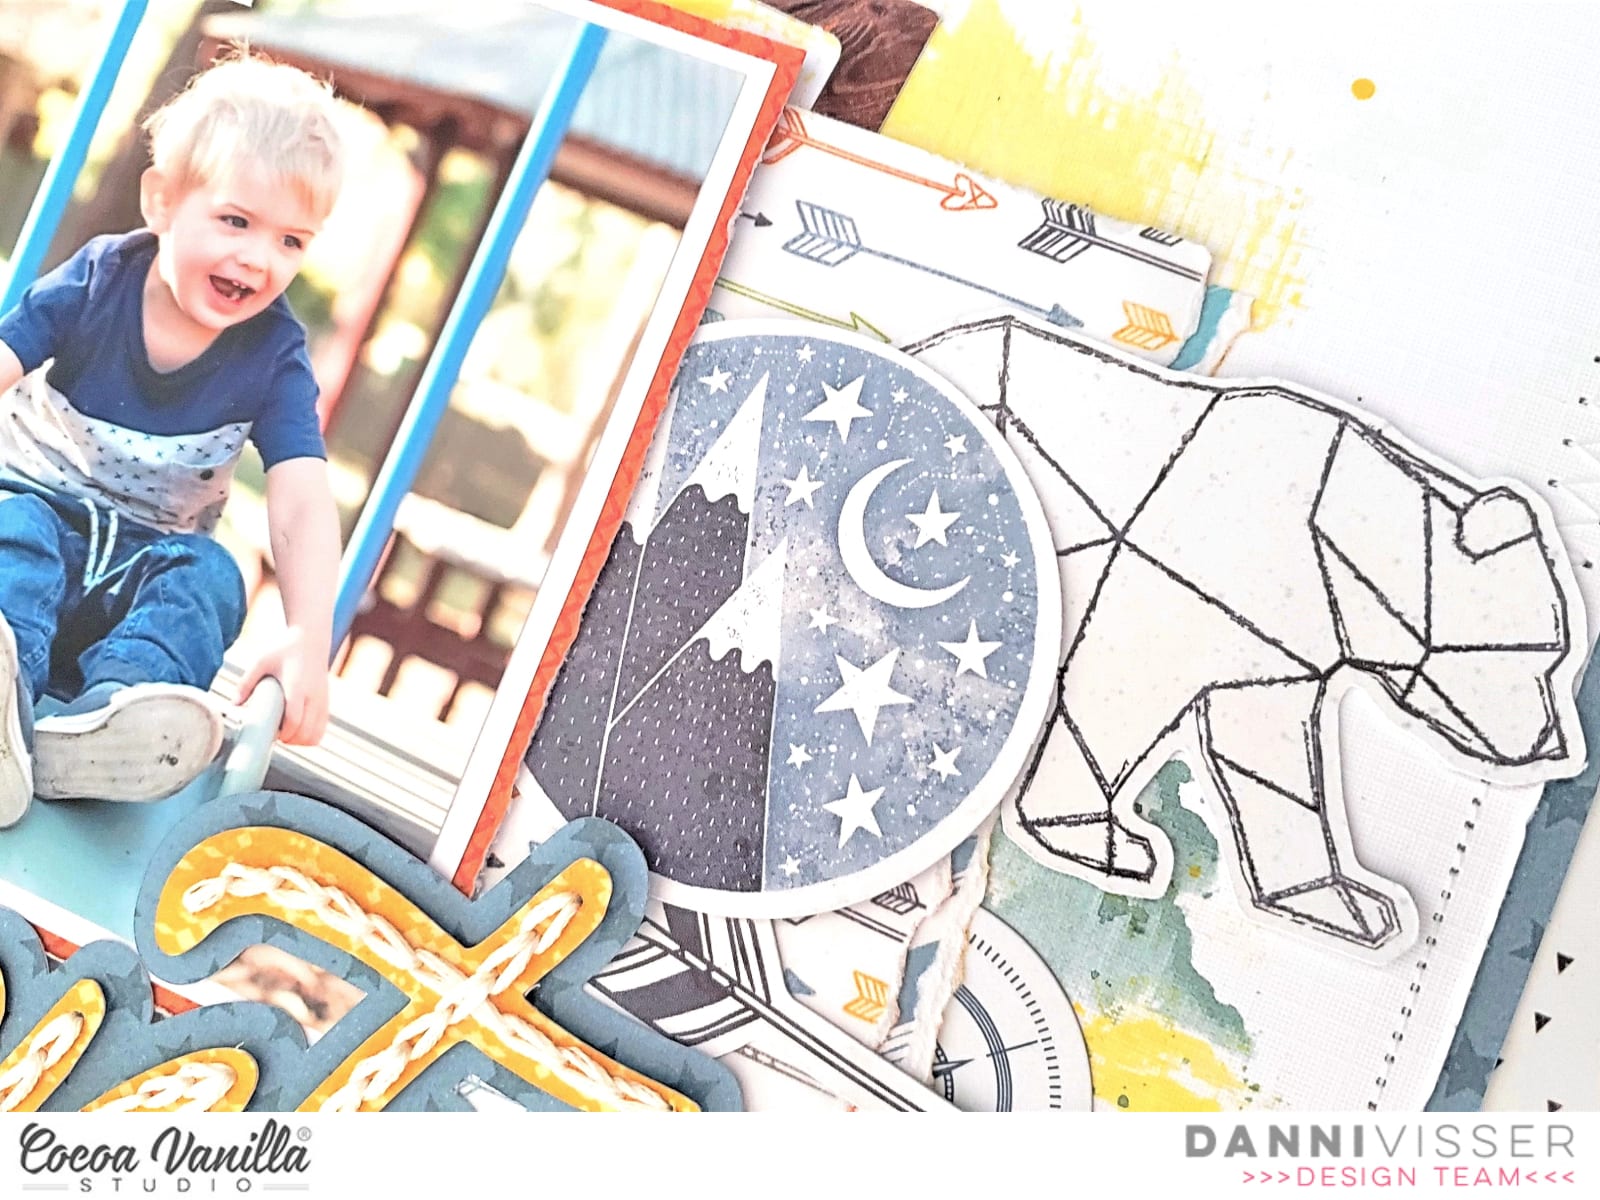
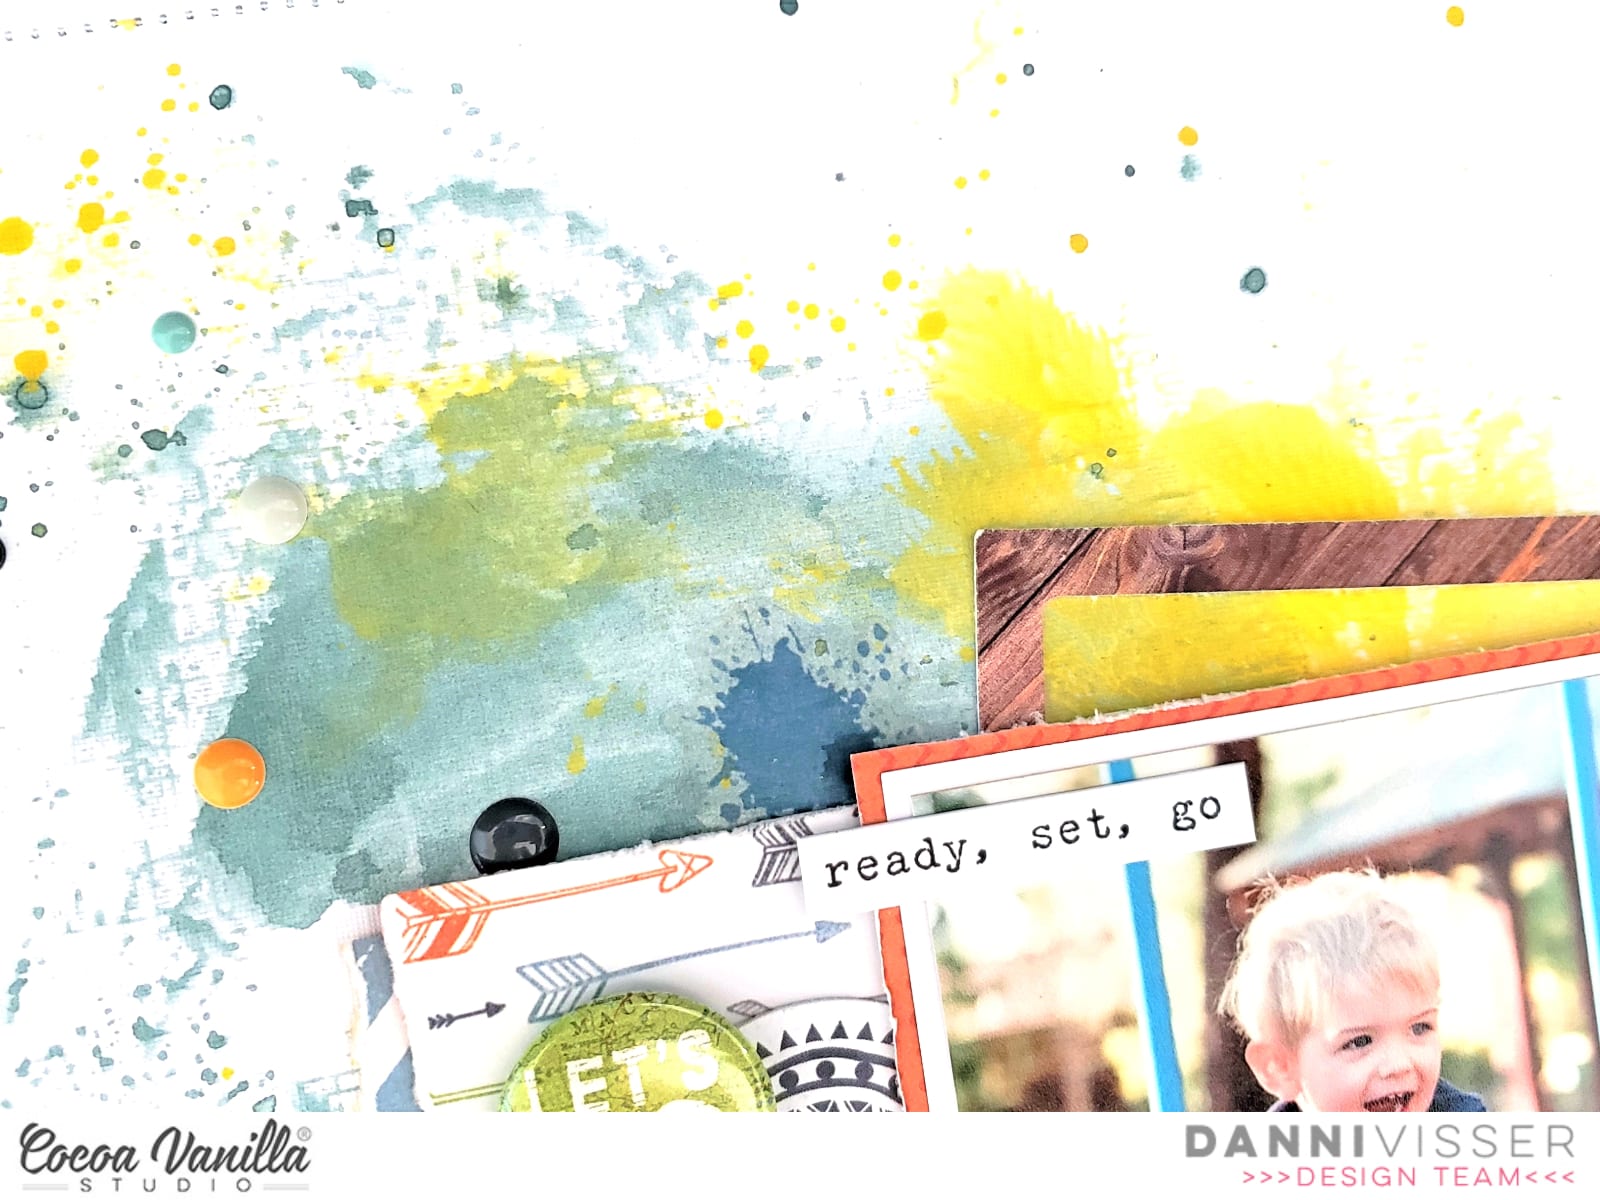
Next I got to work on creating my background by using Offbeat and Epic Tales patterned papers to frame a piece of white mixed equipoise.online media cardstock and machine stitching around the edge using a combination of straight and zig zag stitch for added interest. I went through and distressed all the edges with my fingers to really emphasise the layers. Too jazz up the white background I added some colour in blue and yellow using watered-down artist acrylics and the packaging technique, followed by lots of splatters. I added some of the paint splatters from the Clear Stickers too, these are perfect for adding that mixed media effect.
I matted my photo in white followed by the orange One Way patterned paper to really draw the eye to the photo. I flipped One Way over and used the reverse side as a larger layering piece behind my photo, creating a space for embellishments to sit. I added some torn strips of Wild One paper as well for some extra colour.
To complete my title, I fussy-cut the ‘The Best’ banner from Epic Tales cut-apart patterned paper and layered it behind my main ‘Adventure’ title. I embellished either side of my photo using a combination of Accessory Stickers and Die Cut Ephemera, using several circular elements to tie in with the ‘The Best’ banner. The green ‘Let’s Go’ Flair Button was the perfect addition to this theme.
My few lines of journaling I added in strips of typeface font in that perfect little space below my title. I added in one of the tiny word stickers from the Accessory Stickers at the top of my photo to help frame it and finished the layout with a sprinkling of the Enamel Dots in all the colours. I’m really pleased with this one! It wasn’t planned out and definitely came together during the creative process, and those are definitely some of my favourite layouts.
There is a process video linked below if you would like to watch this one come together.
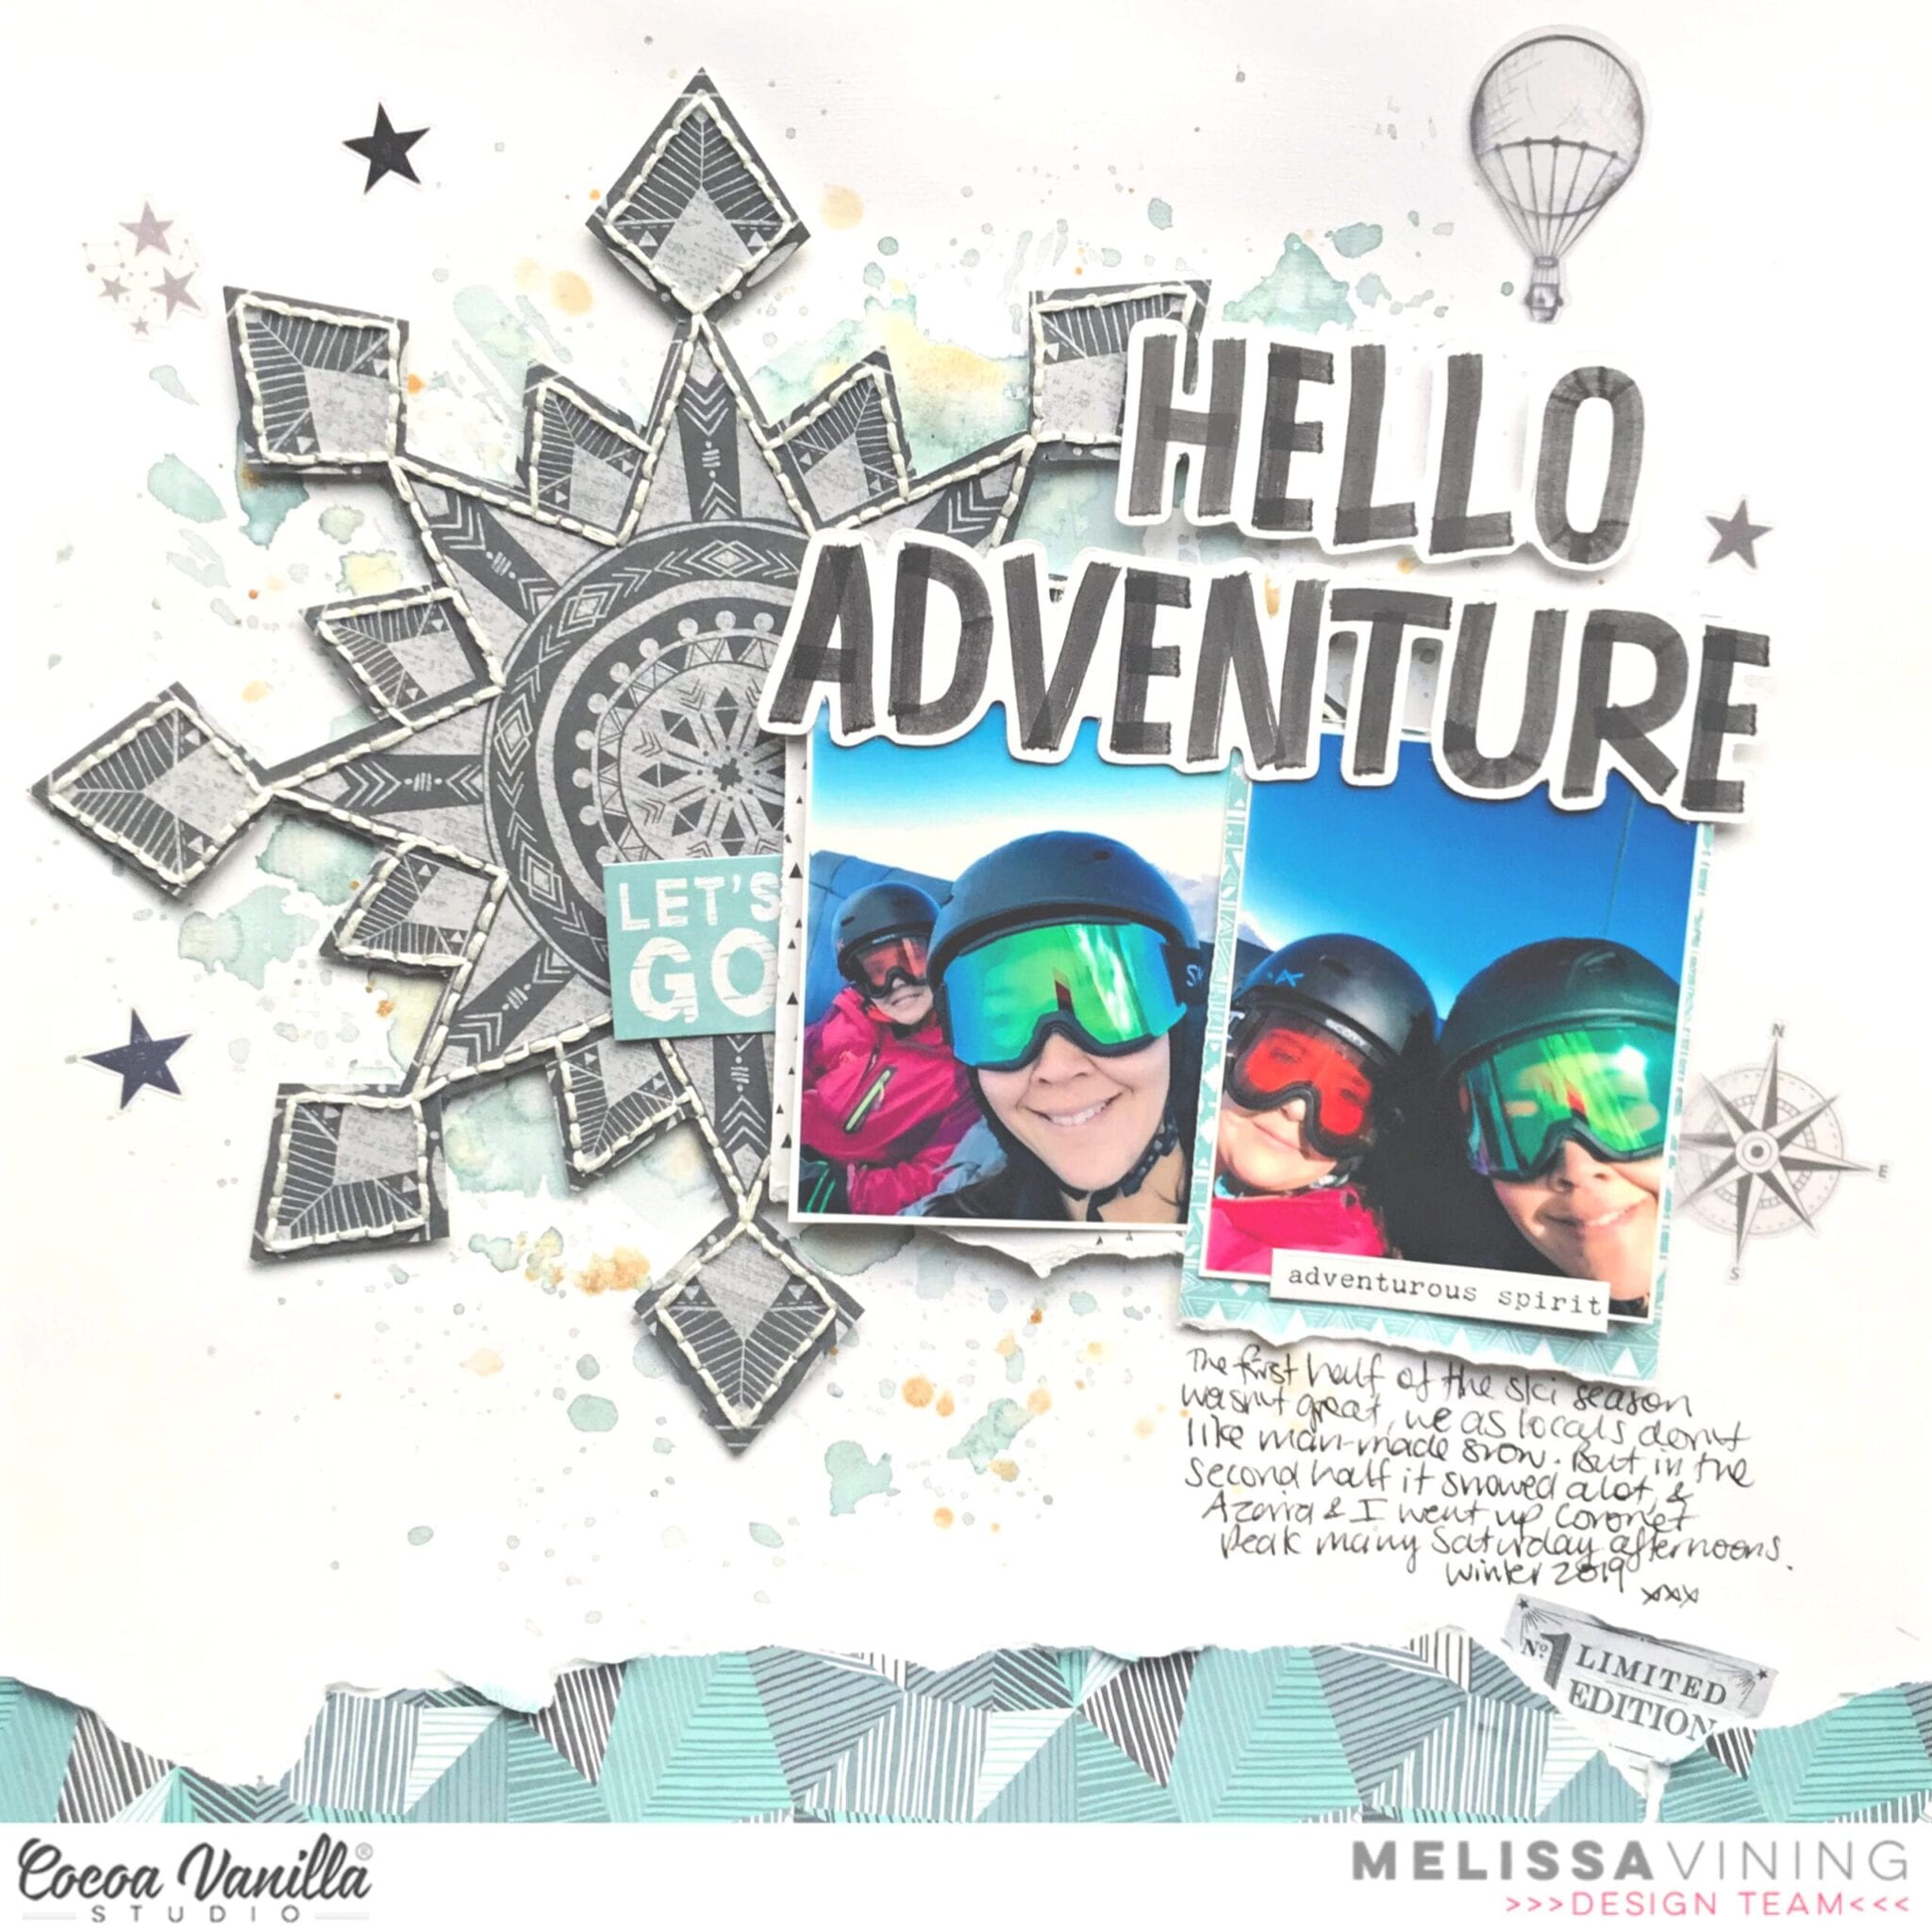
Hello!! Its Melissa here and I’m so happy to be back with you sharing another layout that I made with the amazing Legendary collection. For this layout I decided to work with the stunning Explorer paper (shown below), specifically the B side with the stunning circular pattern.
I always knew that I wanted to hand stitch this paper, but I wasn’t sure exactly how. When I looked at the paper I could see a snowflake, which was perfect for scrapbooking two chairlift selfies that I took on Coronet Peak Ski Field (here in Queenstown, New Zealand) last Winter of my daughter Azaria and I.
I started making this layout by piercing holes along the lines of the snowflake, back stitching in white embroidery thread (full 6 strands), and then fussy cutting it out. To be honest I wasn’t sure how it was going to look, because the entire pattern with only some of it stitched didn’t look like a snowflake until I cut it away from the rest of the paper. I was pleasantly surprised that it worked, and Azaria was very excited, as she had helped me find the lines of the snowflake!
I’ve been very inspired by the other Design Team ladies that use mixed media, specifically Sue, Tazhiana and Danni, all of whom I watched create live during our International Scrapbook Day Celebration. For my layout I applied clear gesso to white card stock, and then used the packing technique with blue media, and then added some splatters in gold and white. I love how this media brings the wintry feel of my layout to life! The photo below also shows a peek of my torn border that I placed on the bottom of my layout to look like mountains. The paper is one of my favourite cut apart patterns from the B side of Total Legend!
The Legendary collection has Die Cut Titles, and I went through the pack to find the perfect title for my layout. “Hello Adventure” was perfect to describe the many afternoons my daughter and I spent skiing (her) and snowboarding (I) together. Even though Legendary is a guy collection, it works so well for documenting outdoor memories. I also had to add some whimsy with several of the adorable Clear Stickers.
I kept my embellishment to a minimum because I wanted the focus to be on the snowflake, but I did find the perfect phrase sticker and “Lets Go” sticker from the Accessory Stickers. The two papers that I used to back my photos are Epic Tales and Total Legend (the A side). I added texture to these papers by tearing the bottom edge and distressing the other three edges.
It’s Tarrah back with you and today I am sharing a new layout for our Mother’s Day theme we have going on this week on the blog! I decided to document a special photo of my beautiful Mum and myself on Sydney Harbour when we went to the ballet a year ago. I pulled out the gorgeous Midnight collection to help me document this special memory.
I found a really lovely cut file designed by fellow team member Gwen from Cut To You, I cut it out from white cardstock and then backed the hearts at the top of the cut file with the pink side of the Shine Bright paper the Special word in the cut file, I backed with the ‘B’ side of the Inky Depths paper, I love that small soft floral side. Once it was all backed, I placed craft foam underneath both the hearts and the ‘Special’ word.
I chose the ‘B’ side of the Mixed Blessing paper for my background and also matted that piece with another sheet of the Inky Depths paper. I machine stitched around the entire edge to add some texture and interest. I placed the cut file title in the centre of the page and I cut a strip of the Bloom and Grow paper and placed it underneath the bottom of the cut file before I adhered it all down. I matted my photo in the orange part of the Shine Bright paper and added craft foam underneath the photo and mat, it fit perfectly just above the word ‘Special’ with one of the hearts from the cut file overlapping onto the photo also.
I tucked in one of the cute die-cut frames from the die-cut ephemera pack into the top of my photo, I then took one of the paint strip clear stickers and added it to white cardstock, I then fussy cut it out and tucked it into the right side of my photo. I also added one of the cute flair buttons here. The jar and flower chipboard piece fit perfectly there just above the ‘You’ in the cut file, I love how this looks here. I also tucked in one of the floral die-cuts to the left of the jar to bring in some more of the florals to the page. I also added a few chipboard hearts and also a clear sticker heart too. Lastly I added some of the accessory word and phrase stickers and the date stamp to finish off!
Thank you so much for stopping by the Cocoa Vanilla blog today! I hope you have plenty of Mother’s Day memories you can document!
Hello again, it’s Melissa here and I can’t believe it’s nearly the end of April!! I hope you’re all well and finding some time to be creative.
I have another layout to share with the amazing ‘Legendary’ collection today, and its the toughest photo I’ve ever scrapped! This photo is of my brother in law Blair and our youngest daughter Ava a week after he was diagnosed with terminal cancer in 2018. Blair passed away in October 2019, and I’ve held off documenting any photos from his journey until now, mostly because I felt that I couldn’t do his memory justice. But the Legendary collection speaks to me, and is perfect for documenting this special photo.
I knew that I wanted to fussy cut some of the stars from the ALL STAR paper and make a wreath to represent what a star Blair was during his nearly 1 year battle with cancer. I used a cut file from Paige Evans, and backed the stars with several papers from the collection (including WILD ONE, TOTAL LEGEND and Brave Heart) that had small repeating patterns. I also added some velum from my stash for some lightness. I matted my photo with ALL STAR and EPIC TALES and distressed the edges.
The OFFBEAT paper was perfect for my background as it helps direct the eye towards the centre of my page, and of course towards the photo. I did some subtle machine stitching in white thread, and just drew a circle with pencil and stitched around it abut 5 times. Its always easier to machine stitch when it doesn’t have to be perfect!!
I didn’t do much embellishing on this layout, mostly because all of the stars are embellishment! But I did add a tab sticker, word sticker, die cut ephemera tab, and some of the clear stickers. My title was easily made with two of the die cut words which I popped up on foam.
I will admit that I found this layout hard to make emotionally, but I’m so happy I finally managed to start scrapbooking Blair’s Epic Journey. Blair was an amazing bother in law who was able to present to the New Zealand Government the largest cancer petition in history, and made significant changes to cancer care in my country before he passed away. I’m so grateful for our wonderful memory keeping hobby, and I hope I’ve inspired you to scrapbook the photos and memories you find difficult too.
You can watch my process video for this layout here.
Hey scrappy friends, I hope you are doing well in these challenging times. Here is a layout to brighten your day! I have used the beautiful Unforgettable collection.
I have gone a little old school with this layout using lots of different shaped and coloured border strips. So get those those border punches out! If you have a cutting machine then you will be able to do the same. Mine measure 6 inches horizontally, so the 6×8 inch paper stack is perfect to use. I added a row of machine stitching on the border strips to add texture.
I added my 3.5×3.5 inch photo slightly off centre and with foam tape, I chose not to mat or frame my photo because I didn’t want to look too ‘busy’.
I then added my title using the Foam Title Stickers which really stands out against the colours chosen for the border strips.
I added a floral bunch to the top of my photo, I fussy cut some of the floral bunches from the Garland paper and also adding some smaller Die Cut Ephemera pack .
I did the same to the bottom of my photo creating another floral bunch.
I used two sentiment phrases from the Accessory Sheet and over the top I added a paint brush stroke from the Clear Stickers sheet. I added two hearts from the Foam Title Stickers under my sub to draw your eye.
To finish off I fussy cut butterflies from the Lacewing paper and placed them in a way on my layout so they looked like they were fluttering around (I also added with foam tape). A light splattering of black paint optional!
Well that’s it from me today but I hope this layout inspired you in some way. Thank you for stopping by and see you all again soon. Happy scrapping!
Hi everyone! It’s Sue Plumb here to share my latest design team project with you. For this layout I was tasked with incorporating the theme of “sewing”, which gave me a great excuse to dust off my sewing machine and put it to good use. I decided to use the ‘Legendary’ collection for my page and pair it with a series of photos of my boys and hubby having some fun with a swing at the park.
I started with a sheet of white cardstock that I cut down to measure 11×11″, and then mounted it against the fabulous rainbow stripe of the Wild One paper. I chose this paper as my base as I really wanted to coordinate with all the colours that were present in my photos. It also opened up a broad colour scheme for the papers I was going to use on my page.
For my design I knew I wanted something fun with lots of colour and a feeling of movement to echo the action in the photos, so I decided to create a large banner. Once I had decided where my photos were going to sit on the page, it was simply a matter of cutting an assortment of different sized paper pieces for the sections of the banner. (The papers I used included All Star; Total Legend; Wild One; Offbeat; and Explorer.) I then used a small amount of glue to tack the pieces lightly in place before I used my sewing machine to stitch down the middle of a few of them.
I then tacked the photos lightly in place before adding several lines of stitching back and forth across the top to represent the string of the banner and hold them firmly in place. (I deliberately left all the loose threads hanging intact, as they added to the texture of the page.) I then went back and bent up the tails of the banner pieces, as well as the bottom edges of my photos so they would look as though they were blowing in the breeze. Now it was time for some embellishments!
I started by tucking the large circular frame / mandala piece from the Die Cut Ephemera pack in underneath the middle photo, then added a large star over the top (which I also bent up from the page). I chose the words super and silly from the Die Cut Titles pack and tacked them along the top of my photos. I then took to it with my sewing machine again, and added some lines of stitching over the top, before I added the word fun from the Clear Stickers pack underneath.
In amongst the banner pieces, I tucked in a couple of tickets and a small flag from the Die Cut Ephemera pack; then I added a couple of phrases stickers from the Accessory Sticker sheet along the bottom of the left photo. From the Clear Sticker set, I added two chevrons on either side of my photos to indicate a “swinging” motion and to help draw the viewer’s eye through.
At the top of my page I added some crazy, silly stitching in each of the top corners, then added a date label from the Accessory Sticker sheet to the right hand side. I finished off by adding a few paint splat Clear Stickers, and then a few splatters of black ink and I was done!
This was a really fun page to put together, (especially doing all that random wild sewing!) and I am really happy with the result. If you have a sewing machine but you aren’t confident sewing on a layout, then this type of project might be right for you because perfection is not necessary.
Thanks so much for stopping by today so I could share this with you. Until next time, happy scrapping!
It’s Tarrah back with you and today I am sharing a new layout for the stitching theme we are featuring here on the CVS blog this week using the awesome new Legendary collection. The photo I am documenting is a recent one of myself and my boys getting out for some exercise and fresh air during Covid-19 isolation!
I have wanted to try doing an 8.5′ x 11′ sized layout for some time now, I have created a few in my time but not many that I have shared before. I loved the smaller space to work with! I decided to incorporate machine stitching right around the entire perimeter of the blue star background paper, bending up the edges to create some texture.
I decided to cut out an arrow design cut file (free from Paper Issues) from white cardstock and backed all the arrows with different patterned papers. I love how it looks with all the colours. I added craft foam underneath to give it dimension and placed it to the centre of the page.
Once the cut file was adhered, I placed my photo towards the top right corner, adding craft foam and 2 of the stickers from the accessory sticker sheet underneath the photo. My title is made up of the cardstock titles, I added craft foam underneath the title also and placed that opposite the photo at the top.
Some of the embellishments I included on my page are all from the Legendary collection, including the clear stickers, die-cuts, enamel dots, a flair button and some of the small phrase and word stickers from the accessory sheet. Lastly I added the date stamp to the ‘Best Ever’ sticker at the bottom.
The Legendary collection is perfect for documenting both the boys and girls in your life! Make sure you get your hands on some!
Thank you so much for taking the time to stop by the Cocoa Vanilla blog during these uncertain and crazy times. I hope you all stay safe and healthy.
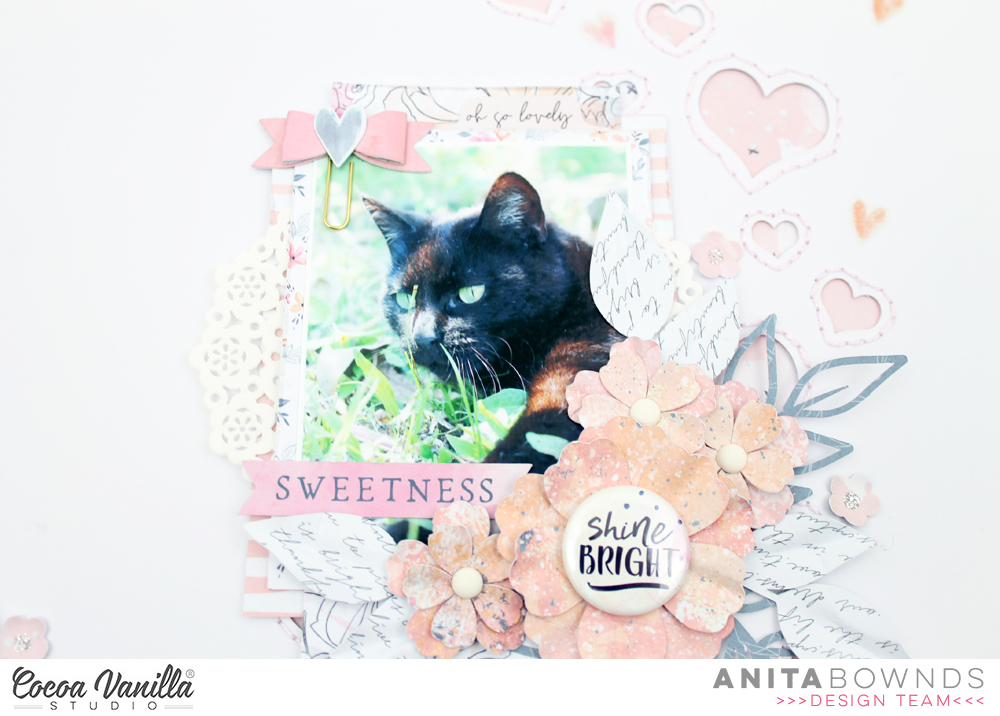
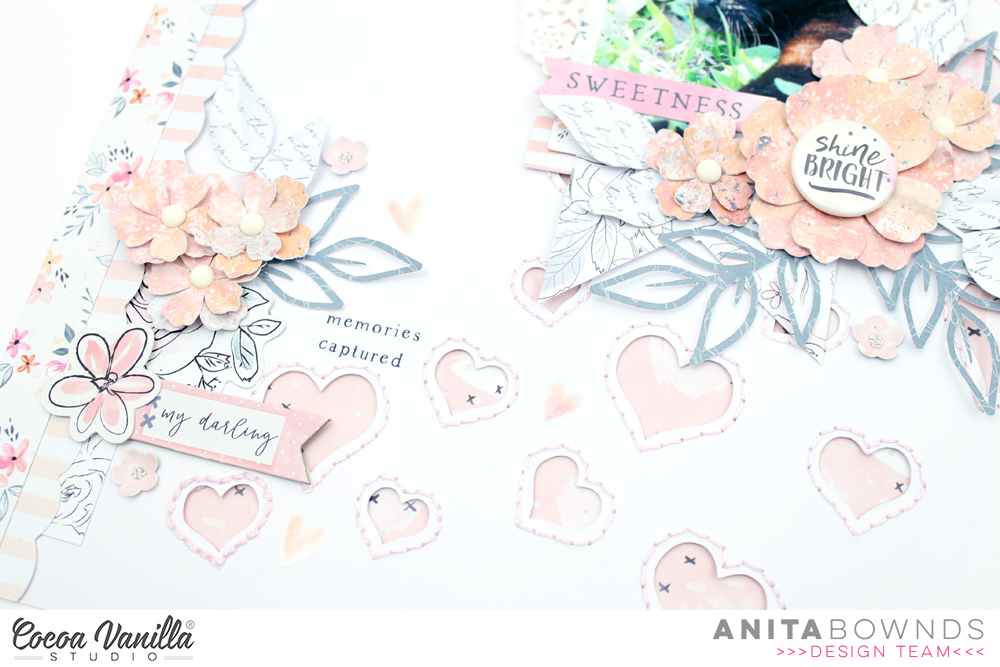
Hi there crafty friends, Anita here with you today sharing a sweet layout using the midnight collection there are lots of soft colours in this collection perfect for those girly shabby chic projects..you know me I love adding some flowers and what better way then to make them yourself from the paper in the collection…
I had a basic design idea in mind for my layout, but wanted to make flowers for my layout using moonlight patterned paper and I used papers from the 6×8 paper pad for the leaves. Then i started off using white cardstock
I then cut a few strips of paper from sophisticated and inky depths to lay on the left side of my cardstock just overlapping then to add a cluster of embellishments and to have it going diagonal up the page
I decided on adding more texture and dimension using a @neatncraftycutz scattered hearts background cut file
Adding some hand stitching and backing it with all the things pattered paper so to bring more of that light pink in the layout and draw the eye to the photo..
Then I layered patterned paper behind my photo with papers from the 6×8 paper pad and tucking a few little doilies in the layers then I started clustering the flowers and leaves around the photo along a few accessory stickers . I also add a few more embellishments chipboard pieces and ephemera to the clusters
Add the flair button in the center of my big flower adds a touch of dimension and texture
And to finish of the layout I add a few clear stickers around the layout..
Hello and Happy Easter Monday. Its Melissa here! I hope you had a lovely Easter with your loved ones wherever you are in the world. I’m so excited to be working with the amazing Legendary collection, and there was a lot of excitement (from my kids and I) when the courier came to our door!
I decided to challenge myself to scrap an Easter photo with this rad collection, with an extra twist of using a floral cut file ,and to use it to document my son Sam. The cut file is from Confessions of a Paper Addict.
The first thing I did was to pull all of the papers that I thought would work for this cut file, bearing in mind that it has a lot of florals. Often I find that the B-sides are best for backing smaller details on cut files. Cut part sheets are also great for finding extra patterns and colours.
The title word said “Brothers”, but as I only have one son I altered it by cutting off the “s” to make it work for this photo of Sam. The story behind this photo is that although he was a big 12 year old last Easter, he still joined in the Easter hunt and even posed for this photo for the sake of his youngest sisters. If you have kids that are nearly teenagers you’ll know what I mean!!
I love using a patterned paper for a background, and this gorgeous small repeating triangle was perfect. I added some small blue and yellow splatters for some subtle detail. I really wanted the feature of may layout to be the photo and the cut file, so I kept embellishment to a minimum. I added some of the clear stickers to help draw the eye in, and my final touch was to use blue drops on the two flowers that were too small to back with patterned paper.
I hope you enjoyed my Easter layout. Thanks for looking, and I’ll be back later this month.


 I found a really lovely cut file designed by fellow team member Gwen from Cut To You, I cut it out from white cardstock and then backed the hearts at the top of the cut file with the pink side of the
  I chose the ‘B’ side of the
 I tucked in one of the cute die-cut frames from the die-cut ephemera pack into the top of my photo, I then took one of the paint strip clear stickers and added it to white cardstock, I then fussy cut it out and tucked it into the right side of my photo. I also added one of the cute flair buttons here. The jar and flower chipboard piece fit perfectly there just above the ‘You’ in the cut file, I love how this looks here. I also tucked in one of the floral die-cuts to the left of the jar to bring in some more of the florals to the page. I also added a few chipboard hearts and also a clear sticker heart too. Lastly I added some of the accessory word and phrase stickers and the date stamp to finish off!


 At the top of my page I added some crazy, silly stitching in each of the top corners, then added a date label from the Accessory Sticker sheet to the right hand side. I finished off by adding a few paint splat Clear Stickers, and then a few splatters of black ink and I was done!