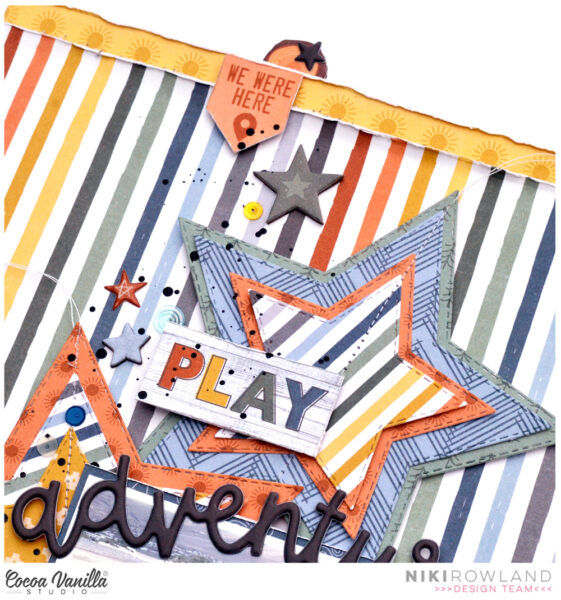
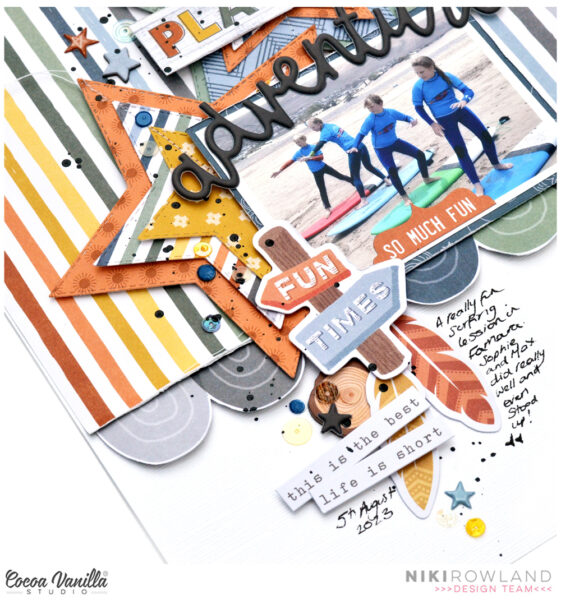
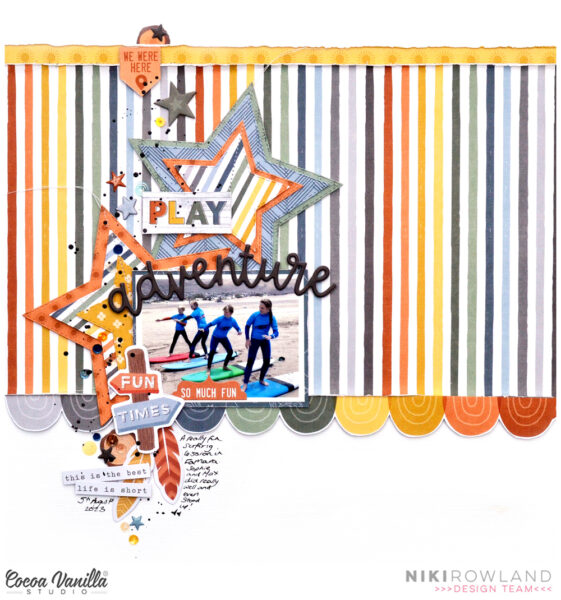
Hey everyone! This is Niki (@nikiclairecreates) with another layout made using the Great Escape collection! I adore the bright stripey paper and decided to make a feature out of that. I started off by cutting a large block of it to go across the layout which I paired with a narrow strip of yellow sun paper to go along the top.
I cut one of the border strips from the cut apart sheet, the one with the rainbow scallops, and added this strip as a boarder along the bottom of the stripes. I love the bright colours!
I mounted my photo onto a piece of navy blue paper from the A5 paper stack to make it stand out against the stripes and added it to the lower horizontal line. I already had two layered stars made that I had leftover from my previous layout so I added those to the layout too, tucked behind the photo.
I added my title ‘adventure’ from the puffy title stickers across the top of my photo together with the word ‘play’ from the cut apart paper. I also added a little label sticker from the Accessory Stickers to the bottom of the photo that says ‘so much fun’.
I then embellished the layout with several pieces of ephemera from the Die Cut Ephemera pack, Chipboard stickers, Puffy Stickers and more Accessory Stickers. I finished off with a few sequins and splatters of black paint!
I love how bright, happy and colourful this layout turned out!
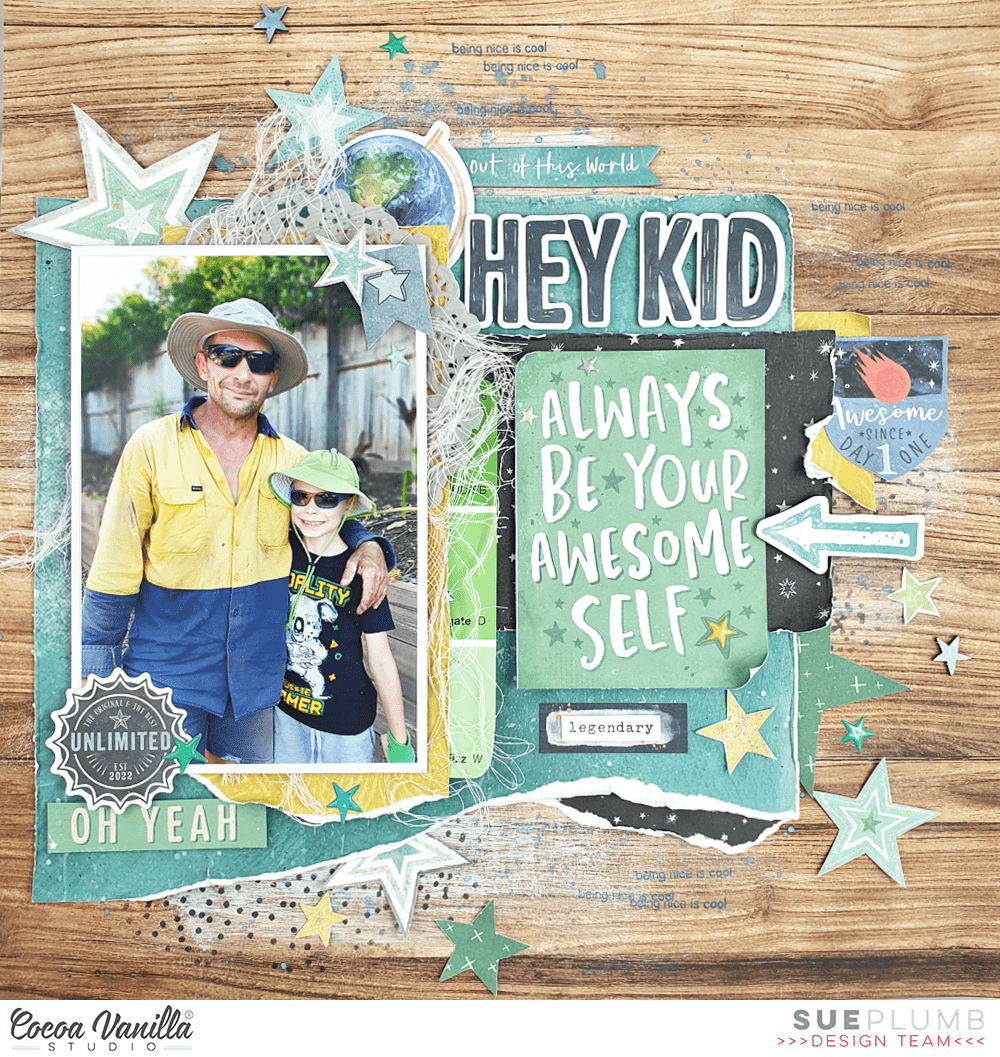
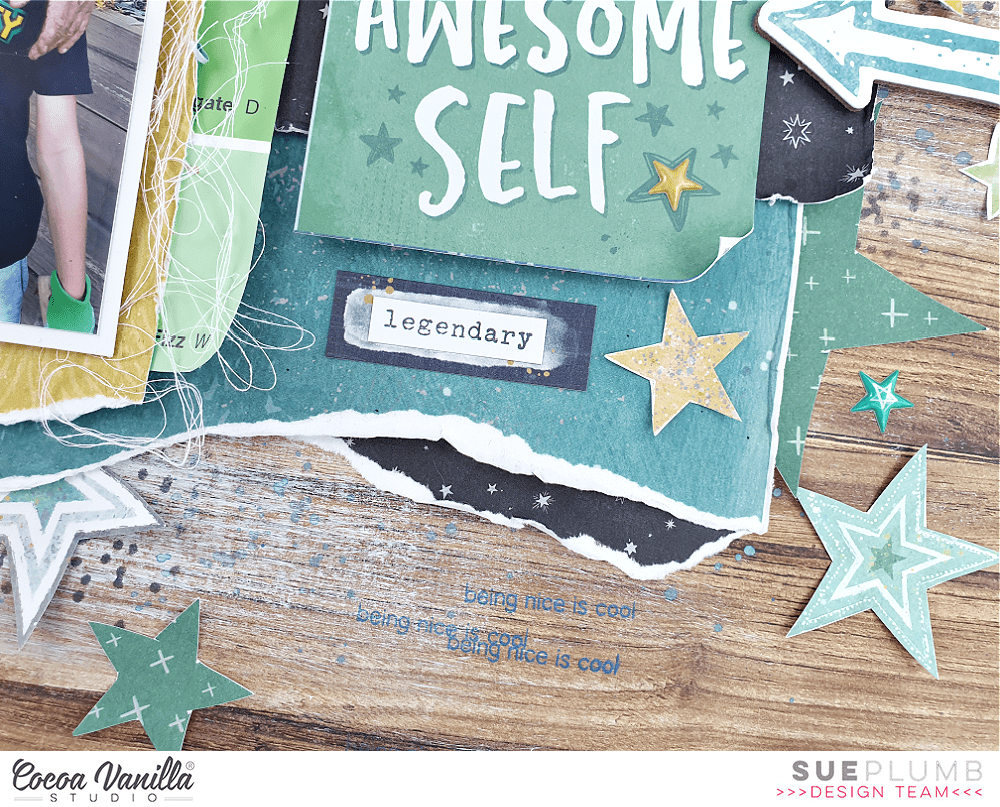
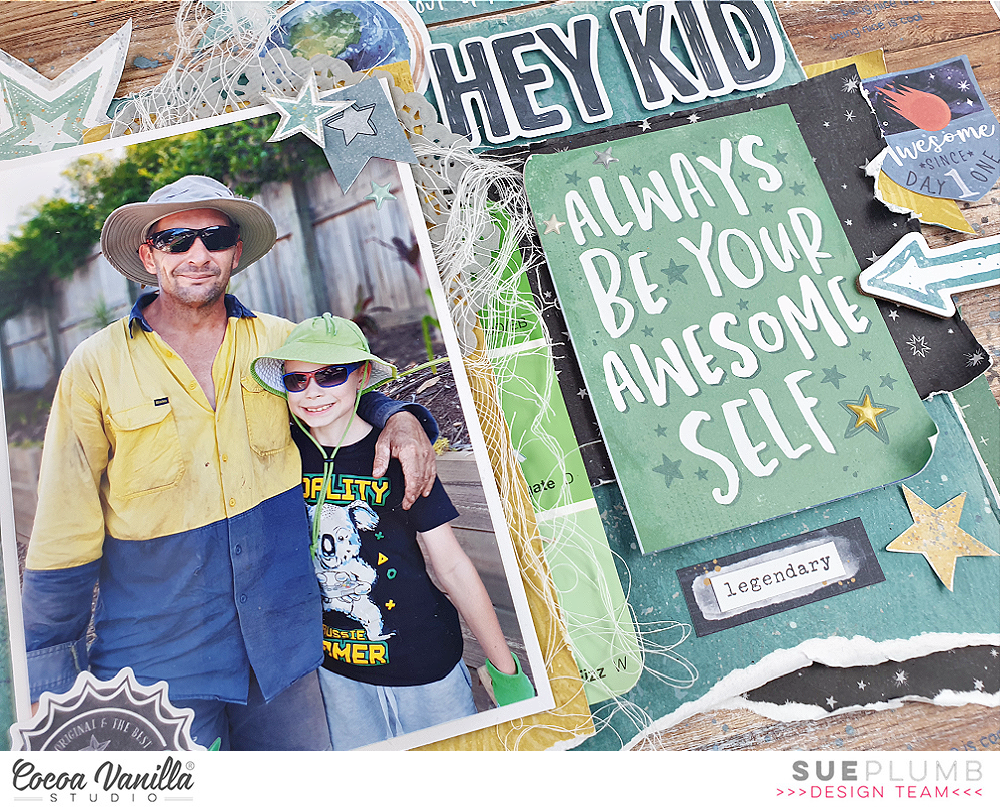
Hi everyone, it’s Sue Plumb here today to share another project using the awesome new ‘No Limits’ collection. (Loving this collection SO much!) This layout features a photo of my hubby and one of my sons that I took while they were busy doing work in our garden recently. (This boy loves to help his Dad with projects in the yard!) I decided to use the wood grain print from the Big Bang patterned paper as my background for this page, as I thought it would work well for the outdoor theme.
You can see I have added some light mixed media layers to my background paper. I used a combination of acrylic paint, a stencil with ink, stamping, and splatters.
I used a mix of layered patterned papers for the focal area of my page that included Stardust, Orbit and Latitude and I used distressing, tearing and some frayed gauze to add texture. I also tucked in a paint sample card from my stash to help draw in the green on my sons hat, which I thought also worked well with the DIY that was happening on the day.
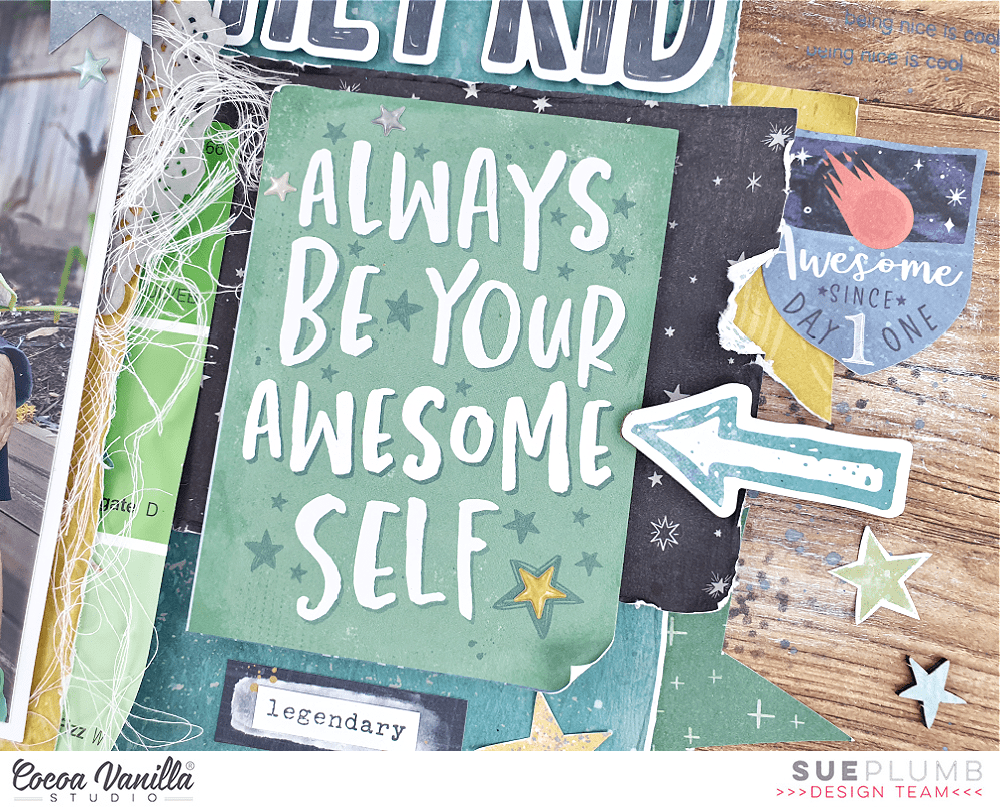
I used Die Cut Title words for my page title, but then used the always be your awesome self quote card from the Universal cut apart paper below it as a subtitle. Both of these were popped up from the page like my photo to create dimension and help them stand out from the background.
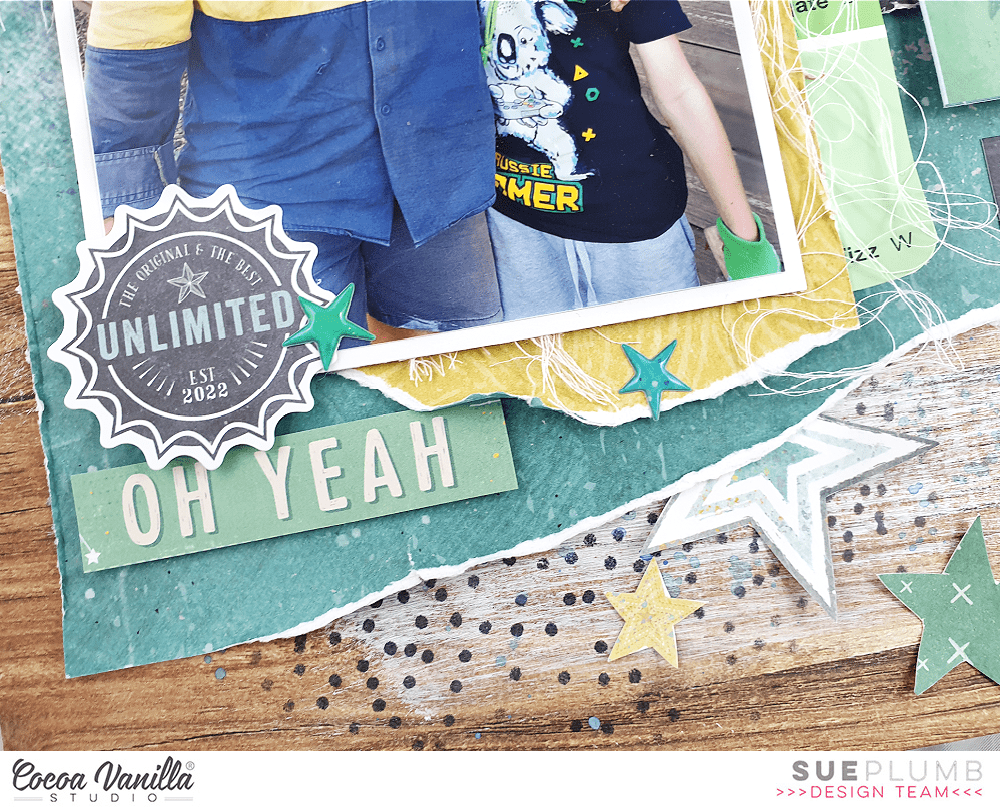
To embellish my layout I used lots of fussy cut stars from the gorgeous Nebula paper, which I combined with pieces from the Die Cut Ephemera pack and Accessory Sticker sheet.
I also added a few pieces from the Chipboard Sticker sheet which also provided some extra dimension.
Of course I couldn’t help but include some of my favourite embellishment from this collection – those stunning Puffy Stickers. (Seriously, I wish I had a million of these things!)
If you would like to see how this layout came together, you can watch my process video here:
Thanks for stopping by today, I hope you are feeling inspired to use up those scraps on your desk! Until next time, happy scrapping.
Hello Friends. it’s Anna here and it’s time for another Throwback Thursday. I recently dug up some older masculine collections from CVS and I decided I need to use them up finally. You know I usually am a bigger fun of flowers and pink so I still had plenty of papers and embellishments to play with. I went bold with this project, cutting into dozen of papers, using up to the last bit 5!!! sheets of 6*12 stickers and 3 sheets of transparent stickers! I am so proud of myself for putting those old goodies in good use. Ladies and gentlemen – I present you a big boy album with a mix of many CVS collections:
Can you name all of the lines I used here? I think I managed to squeeze in every single masculine collection that was ever released at Cocoa Vanilla. You can finds bits and pieces from: “Flying high”, “You rock”, “Boys rule”, Totally rad”, “Legendary” and “Made of awesome”. Most of them are no longer available in the store but “Flying hight”, “Made of awesome” and “Totally rad” were released as digital versions too! So you can print yourself as many papers and elements as you wish.
My album is sized 21*21 cm and it holds 5 pages inside. Each page has some flaps or pockets to hold many photos at 10*15 and 13*18 cm size. There is also plenty of room for a journaling and other keepsakes. I made everything from scratch starting from the cover. I used false leather with a wooden print to make album more durable. I mixed it with kraft cardstock that seemed to work better with all those patterns and colors.
Colorful papers are so joyful and fun – perfect for a little boy album. Even though they are from different collections, they still look good and cohesive together. I am not going to lie – I used so many 12*12 sheets here but I also managed to squeeze in many smaller paper scraps. However I was holding those papers for years and they totally deserved to shine and bring joy to someone.
I embellished my pages with a lot of various embellishments like ephemera pieces, 6*12 stickers, transparent stickers, chipboard stickers, washi strips, flair buttons, wooden elements and resin stars. All of them comes from the collections I listed previously. To be honest, many of them were stored in one bag together as a “boy stuff” that I can no longer tell which collection they belong to. It doesn’t matter though. I am just happy I managed to use up as many of them. It always feels so good to throw away used up sheet of stickers. Does it feel this way for you too?
Some of the pages are more “fancy” with shakers filled with sequins or transparent foil piece. They serve mostly decorative purposed but I can imagine it will be more fun for kids to browse through this kind of album. Hidden spots, pockets, magnets make the album more interactive.
Making this album took me few days for sure (much more hours than I planned) but it was such a great experience. It’s not filled with photos as it will be a gift for my friend and her little boy. I even added his name on the back of the cover.
I hope it will bring her joy and adding photos will be a great dive into memory lane. This is the essence of scrapbooking for me! Now it’s time for a girl version, don’t you think? I still have some of the boy collection left so I will be able to make few mini albums too. There is a chance you will see them here :)
Photos will not give justice to this album so I recorded a flip through video for you. You will be able to see all the flaps and pockets this way.
Thank you so much for stopping by and see you in November.
Hi everyone, it’s Sue Plumb here to share my latest design team project with you. I hope everyone had a chance to celebrate InterNational Scrapbook Day (INSD) last weekend with a bit of creative time? Maybe even one of our special INSD challenges? If you haven’t had a chance to play along yet you still have a couple of days to get your entries in.
In fact, it was one of the challenges that inspired my layout for today, as I played along with Michelle’s “Grab 5” challenge. Here are the challenge criteria:
For my page I decided to document a fun photo of my boys that I took recently at SeaWorld. I used a combination of the ‘Sunkissed’ and ‘Boys Rule’ collections, and went bright, bold and a bit messy!
I started with a sheet of the Summer Lightspaper from the ‘Sunkissed’ collection, which features a stunning colour gradient that runs from yellow at the to, through orange and pink, and finally to red at the bottom. It was absolutely perfect to match with my photo. (In fact, when I took this photo I thought of this paper right away – that’s when you know you are a true scrapper! haha)
I began by dry brushing on some black acrylic paint using a wide brush. This not only provided some great contrast, but also defined the focal area of my page. Over the top of the paint I added the white die cut star background. This left-over piece was actually part of the ‘Boys Rule’ Large Die Cut and Backing Kit. I like the way it added interest to the background right away.
Next, I added more patterned papers with a variety of different sized pieces from both collections that I cut and tore then layered together. I also added a green paper doily and some frayed gauze from my stash and used staples to secure my stack down on the page. I then added my photo on top.
When it came to embellishments, I wanted to ensure that I ticked off the sticker criteria first. I used mix of Accessory and Clear Stickers that I had left-over from ‘Boys Rule’. I also used some Chipboard Pieces and Die Cut Ephemera from the same collection. The sweet little Wood Button was from ‘Sunkissed’. To the right of my photo I added a handmade star embellishment which I topped with a Flair Button.
To add some extra interest to my background I added some stamping using a small stars background stamp and a roller phrase stamp.
Now it was time to finish off my page and tick off the remaining criteria. For something gold I added a few pieces of gold twisted wire, which I stapled down onto the page. For stitching, I added small hand stitched crosses using white embroidery thread. And finally, I added some splatters of white acrylic ink and that was all five criteria covered.
I had a lot of fun putting this layout together and I hope I have inspired you to play along with one of our INSD challenges while you still have time. Entries to the challenges close at midnight (AEST) this Sunday, 9th May. You can find all the challenge rules, or upload your entries via the Cocoa Vanilla Studio Community group.
Hi everyone, it’s Sue here today to share my latest design team project with you. Do you know what day it is today? It’s Throwback Thursday! And that means I am sharing a brand new layout using up some of my older Cocoa Vanilla stash. The purpose of this regular feature is to help inspire everyone to continue using up what they already have (so we can make room for all the new pretties, like the ‘Sunkissed’ collection).
For today’s project I decided to create a boy-themed layout, as I get lots of requests for boy pages, so I dug into my stash of both the ‘Legendary’ and ‘Boys Rule’ collections for an epic mash-up of the two. I love the way they combined for this layout, and I hope you do too!
I started my layout with the mandala-style print of the Explorer paper from the ‘Legendary’ collection as my page base. I then added a small amount of dark grey acrylic paint using a wide brush to help define the focal area of my page. My aim for this layout was to stick with a largely monochromatic palette of black / white / grey, with a pop of one colour, and I chose yellow. I love this colour combination for boys, as it’s a great change away from the traditional blues & greens that are often used for masculine pages.
I added a large piece of the Wild One patterned paper with the gorgeous yellow print in the centre of my page, which provided me with the big pop of colour I was looking for. I used a torn edge to add texture to the page and tucked a smaller piece of the Straight & Narrow striped paper from ‘Boys Rule’ under it. I double matted my photo using the Happy Go Lucky and Messed Up papers (also from ‘Boys Rule’) and added some scrap cardboard under it to pop it up from the page.
My title was the next element I tackled, as I knew I wanted it to fill the space beside my photo. I used a combination of the ‘Boys Rule’ Clear Stickers and ‘Legendary’ Die Cut Titles – because I love a good mixed font title!
For my embellishments, I created three clusters to form a visual triangle. The main cluster was at the bottom right corner of my photo, and consisted of a handmade star embellishment which I topped with one of the ‘Boys Rule’ Flair Buttons. I also added a die cut banner along the bottom edge of my photo and some gold twisted wire which I stapled to the page.
For my remaining embellishments I used a mix of ‘Legendary’ Die Cut Ephemera pieces; a few ‘Boys Rule’ Accessory Stickers and some of the ‘Legendary’ Enamel Dots. Then I finished off my page with some black ink splatters.
If you would like to see exactly how this layout came together, you can watch my process video here:
Thanks for stopping by today. Until next time, happy scrapping!
Hi everyone, it’s Sue here to share my latest design team project with you. Today I am sharing my take on the “school” theme that we have been focusing on for the past few days. For my layout, I decided to document a photo of one of my boys with the academic award he received at the end of last year. This was the first time he had ever received an award like this, and it was a very big deal for him (and only came after a big attitude adjustment and a lot of hard work). I knew the ‘Boys Rule’ collection would be perfect to coordinate with the colours of my photo.
I began this layout with the printed backing sheet from the Large Die Cut and Backing Kit. I had already used the die cut top piece in a separate project, so I had this left over in my stash. I was drawn to use it because of the blackboard style print, with the doodled chalk border around the edge. As I only wanted to use the border part for my background, I cut the centre from the page and kept it aside for some fussy cutting later. I then got to work on some white cardstock that I had cut down to measure 10.5×10.5″.
I added colour to my background by swiping an ink pad to create vertical stripes on the page, then used a wide brush dipped in water to blend the ink out. I then used a stencil with a random spot pattern and grey ink to layer detail over the top.
For my paper layers, I used a combination that included the star print Happy Go Lucky; Expressionist; and a fabulous pop of green from the Straight & Narrow. I used torn edges and frayed gauze to add texture to the page.
When it came to embellishments, I used pieces (tag, label, frame) from the Die Cut Ephemera and Miscellany packs; as well as some stars that I fussy cut from the backing sheet I had begun my layout with.
I used an arrow from the Chipboard Pieces pack to help draw attention to my photo; and added a metallic touch by using some staples around the page. My title was a combination of the die cut word kid from the ephemera pack combined with awesome cut from the cut apart paper.
I used the Clear Stickers to scatter some phrases around the page, and three black crosses from the sheet too. I stamped a little extra detail on the background using a stamp with a random circles and dots pattern (similar to the stencil pattern) and finished off by stamping the date.
I am really happy with how this layout came together, and I hope I have given you some inspiration to create your own page to document some of those school photos, or even just a boy layout.
If you would like to watch me put this one together, I have a process video available:
Hi everyone, it’s Sue Plumb here to share my latest design team project with you. As we all excitedly await the gorgeous new ‘Daydream’ collection, I have been inspired by some of my fellow team members who have been getting ready by doing some stash-busting. So I decided to have a dig into my own stash and see what I could find to use up. I finally settled on the ‘Totally Rad’ collection. For those of you who have been Cocoa Vanilla fans for a long time, you might have some of this hiding in your stash too; and for everyone who missed this range the first time around, you can now purchase it as a digital collection HERE
Here is my layout “Super Totally Rad”…
When it came to the background, I was limited with paper choices so I chose to use the sun burst style pattern on the “Good Times” paper from the ‘Boys Rule’ collection instead. I had a couple of photos from my boys recent 8th birthday, and I thought the colours of the cake would make it a fun subject to pair with the colourful ‘Totally Rad’ collection.
Based on the limited paper I had left to work with, I decided to go with a vertical design using a piece of the cute camera print “Happy Snaps” paper for the focal area of my page. Alongside that, I added a strip of the yellow chevron print which was the reverse side of the cameras. I also added a second strip of the chevrons along he right edge of my page. Because the photos I was working with were different orientations, I wanted to keep them contained on the vertical strip of paper and then fill around them.
The key to keeping this busy design cohesive, was to ensure that all the different elements I planned to use needed to be touching each other. This cascading arrangement meant that the viewer’s eye was automatically drawn down through the design. I used a mix of die cut ephemera pieces, as well as pieces that I had fussy cut from the “Mix Tape” cut apart sheet. I also used a flair button and some enamel shapes.
I am not a huge fan of symmetry in my work, so to balance out how heavy my design was along the central line of the page, I added a small embellishment cluster in the bottom right corner of my page, along with my hand written journalling.
I finished off with some black ink splatters and by stamping the phrase happy birthday to you a few times around the page. I am really happy with the clean simplicity of this page, but also with the fact I got to bust some stash and re-visit a collection that I loved.
I will be back again with another share in a couple of weeks time…and expect a certain new collection to be the star of the show! Until then, happy scrapping!
Hey everyone, it’s Raquel here today sharing a layout inspired by one of our Cocoa Vanilla Facebook community members and from our recent cyber crop Keighley Brennan. I absolutely adored the vertical design of this layout, the circle elements and also the scattering of stars that featured on the page.
Here is Keighley’s layout:
I also used the Legendary collection for my layout too. Here it is.
The subject of my layout is the subject of most of my layouts when I am using a masculine collection, my little man this particular photo was one taken a few years ago that I found in my photo stash – it was such a nice surprise to find it as it had always been a picture that I had wanted to document but just had not done so yet. When I look back at old photos I find it hard to recall when the kids were so little, I’m so thankful for my craft and scrapbooking for documenting all these little moments in our lives.
I used my Sizzix Big Shot and circle dies to create the circular elements for the page. I do of course love my electronic die cutter but the big shot makes it easy to cut elements like shapes so quick and easy if I have a suitable die set to use. Originally I was going to use the same style colour palette with the blues however once I started creating I was drawn to the green diagonal stripe and the rest of the layout progressed from there.
The title is made up of the fussy cut letters spelling EPIC from the cut apart sheet of paper. I loved the font design and thought they made a nice statement title. The colours in the font actually inspired the rest of the colours that I used on the page. I added tiny word stickers as a sub heading to help support the EPIC title.
The flag ephemera piece was a nice way to add detail to the top of the layout. I finished this cluster area with some fussy cut stars from patterned papers, enamel dots and another tiny word sticker.
I did not have the right die size to create a perfect circle mat around my photo using the orange paper so I did my best to keep the circle even using my scissors. The entire layout was backed in the green diagonal stripe paper. I love how this looks.
I hope you have enjoyed stopping my the blog today and found inspiration.
Hi everyone! It’s Sue Plumb here to share another layout featuring the ‘Legendary’ collection with you. For this one I wanted to create a mixed media page to document these sweet photos of my two boys. (I’ll take smiling non-silly photos from them whenever I can get them!)
To start, I began with a sheet of white cardstock and some green ink, as I wanted to tie in the colour of the foliage behind them in the photos. I applied the ink to my messy mat, added a little water and swirled it through with my finger before I placed my cardstock over the top to soak it up. I then allowed it to dry before I repeated the process with some blue ink, then added some stamping with black ink using a stamp that featured tiny stars.
Once the inks were dry, I added a small tear along the top edge of the cardstock, then folded the edges of the tear back and fastened with tiny staples. I then backed the tear using some of the green print from the cut apart Total Legendpaper. To balance it out, I then added a torn piece of the green striped print from the Explorer paper, adding a little torn marble print washi tape from my stash over the top.
I then turned my attention to the main focal area of my page, adding pieces of layered papers to create a photo mat. The papers I used included the blue star print from the Offbeat paper; more of the green stripe; the bold orange from the One Way paper; and the multi coloured stars of the All Star paper. I also added some more of the torn washi tape, frayed gauze, and a charcoal coloured paper doily from my stash.
After fastening all my layers in place and then adding my photos on top, it was time to get busy embellishing! The first piece I added was my title piece, which I fussy cut from the Epic Tales cut apart paper. I don’t tend to add my titles before other embellishments, but because this was a large piece and it had to be placed to the left of my photos (to hide the straight edge along the right side of it), I needed to place it first.
Now it was time to add “the sprinkles” – because that’s what embellishments are, right?! The sweet little morsels we add to finish things off. First and foremost, my layout needed STARS! (What else was I going to use with a title like that?) I fussy cut a handful of various sized stars from the All Star paper and scattered them around my page, bending the points up for extra dimension.
To balance my title, I needed a cluster to the right of my photos so I added a moon, the incredible label and an arrow from the Die Cut Ephemera pack (using foam tape to pop them up a little from the background). Above my photos I added a little star banner (also from the ephemera pack) and the little hey there phrase from the Accessory Sticker sheet. I then finished off my page with a splattering of navy mist.
Thanks so much for stopping by today so I could share this with you, I hope you are feeling inspired to pull out your supplies and get creative to. Until next time, happy scrapping!


 The subject of my layout is the subject of most of my layouts when I am using a masculine collection, my little man this particular photo was one taken a few years ago that I found in my photo stash – it was such a nice surprise to find it as it had always been a picture that I had wanted to document but just had not done so yet. When I look back at old photos I find it hard to recall when the kids were so little, I’m so thankful for my craft and scrapbooking for documenting all these little moments in our lives.


