Hey Hey! It’s Michelle back here today with a new rainbow inspired layout share. I’ve been itching to make something with all the patterns and colours from the Sunkissed collection since it arrived, and even though theres similar layouts out there I just couldn’t myself. The papers practically stuck themselves down haha
I started by cutting and tearing pieces of almost all the patterns within the A5 paper stack, plus a couple from the 12×12 papers. Enough to create a bunch of strips in different sizes to layer together down the side of the page. I originally had them overlapping the edge of the right hand side from top to bottom, but then changed direction after I created the background on cardstock.
I made the Rainbow background using shimmer inks and plastic packing technique to create a watercolour effect, and then ended up covering most of it with the paper strips. Its always a shame to cover up something so pretty.
The photo I’ve documented is a family snap from a couple years back that I realise now as Im typing this I’ve already scrapped. Haha Does this happen to anyone else? You can see in the close up above that Ive sewn through a majority of the paper strips to add a little extra detail to the layout. I’ve also adhered some of the strips using foam tape to give them a little dimension. This made adding the photo a little tricky as it needed different depths of foam adhesive to fit over all the layers.
I backed the photo with the pretty rainbow splatter pattern paper that you can find in the A5 paper stack.
I created the title with the ‘Feelin’ Fine’ piece from the 12×12 cut apart paper – Fun in the Sun, plus one of the last remaining gold glitter title words I have left. I might have to add more of these packs to my collection as I just love them! Both title pieces worked perfectly in rainbow order, right where I needed them to be.
At the top left of the paper strips I created a pink cluster, in line with all the pink coloured strips. I’ve used a mix of florals, stickers, puffy stickers and bits from the cut apart papers
And then I replicated the cluster at the bottom within the blue hue section also. The florals I’ve used are from the Floral Ephemera pack, something I’ve not even touched as I was so floral fussy cutting crazy on previous layouts.
Heres a closer look below at all the layers created with all the pretty paper strips.
Well friends thats all from me today. Thank you so much for stopping by to see my latest rainbow inspired layout using the Sunkissed Collection. I’m sure I’ll be back again soon with yet another rainbow creation, as I just cant help myself. This collection is just so perfect for that kind of scrapping.
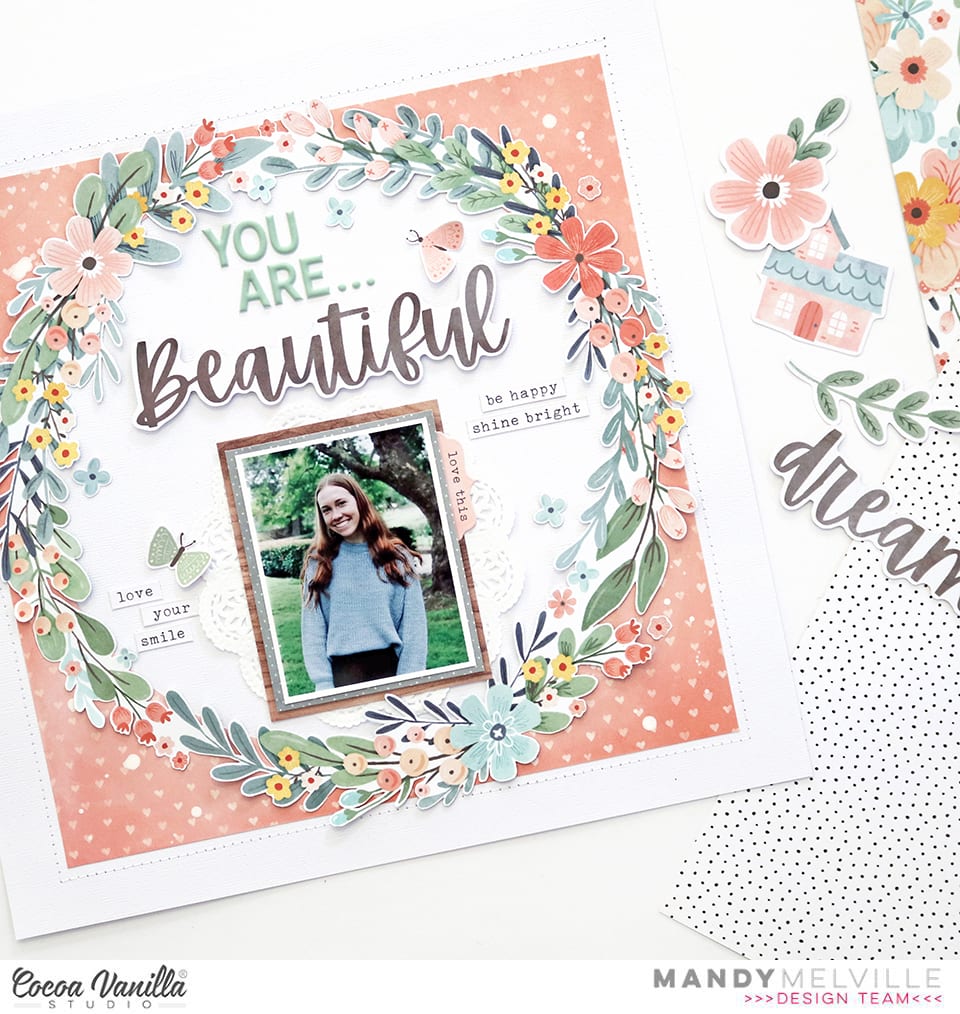
It’s Mandy Melville, and I’m so thrilled to be back here on the CVS blog for the first time in over a year to share some inspiration with you all! Unfortunately I had to take a break from my design team commitments over the past little while due to increased work commitments, but when I was invited to re-join the amazing CVS Design Team recently, of course I couldn’t say no! I love being able to share these gorgeous products with you all!
For my first layout share, I chose to use the absolutely stunning Daydream collection! If I had to pick a favourite scrapbook collection of all-time, it wouldn’t be an easy choice, but I think this collection might just be it! The gorgeous colours and the beautiful florals make it such an enjoyable and easy collection to create with! It was so perfect for documenting this lovely photo that I took of my eldest daughter Abi recently.
I’ve been hoarding the lovely Daisy Dayspatterned paper since I first got this collection, but I decided that it was time to finally use it! If you’re familiar with my scrapbooking style, you’ll know that I LOVE fussy cutting, especially floral elements! So of course I couldn’t resist fussy cutting that beautiful floral wreath to use as the main element on my layout.
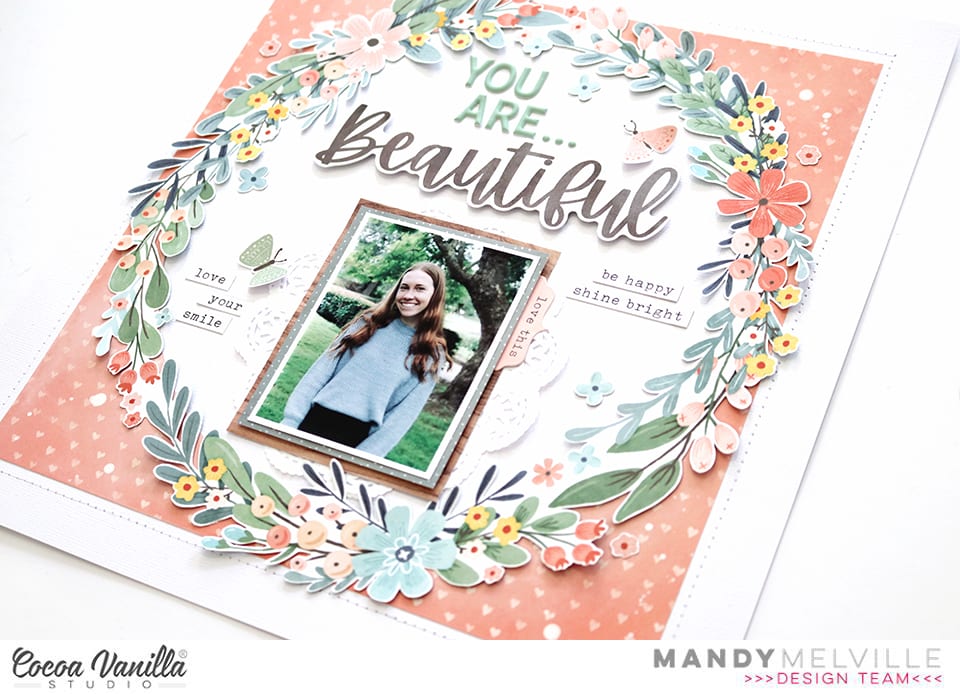
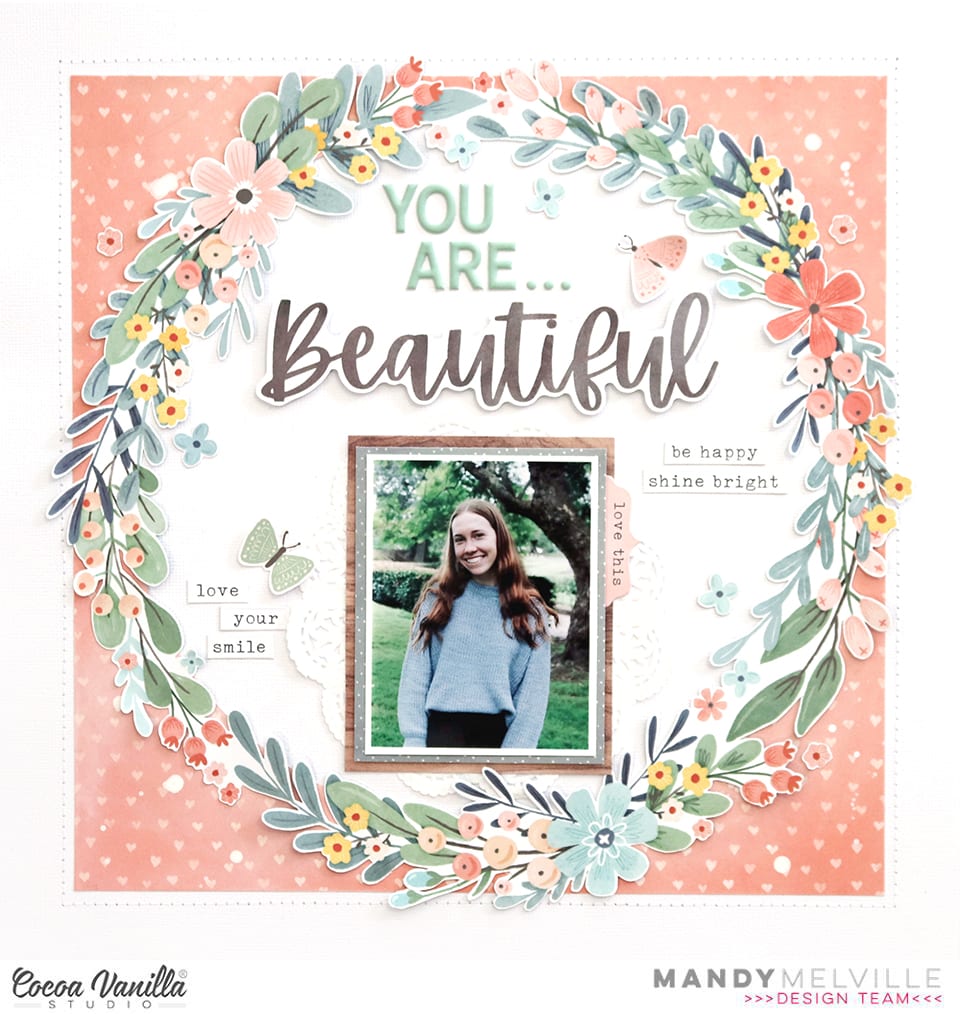
I started my layout layout off with a sheet of American Crafts white textured cardstock as my background, which you can now purchase from the Cocoa Vanilla Studio store! I then cut a 10 inch square out of the heart print All Aflutter patterned paper, and I cut a circle out of the middle of the paper about 8 3/4 inches in diameter. I adhered this patterned paper to my white cardstock, and added some machine stitching around the outside of it to give the page some additional texture. I also smudged some white gesso onto it to fade out the colour just a little bit, as well as a few white splatters. I then layered the fussy cut wreath on top, just adding glue randomly to allow some of the leaves and flowers to lift freely off the page.
For my title, I combined some alphabet stickers from my stash with the word ‘beautiful’ from the Die Cut Titlespack. I love these beautiful scripty die cut words, and they make adding a title to your layouts so easy! I adhered it using foam tape for extra dimension, (which you might know is another thing that I love to add on my pages!)
I double matted my photo using one of the papers from the A5 Paper Stack, as well as the woodgrain polaroid frame from the Die Cut Ephemera pack. I also included a doily from my stash in my photo layers which adds some extra detail and texture. Under the right hand side of the photo I tucked a tab from the Accessory Sticker Sheet.
Next I added a couple of little butterflies that I fussy cut out of the All Aflutter paper from the A5 Paper Stack, as well as some tiny flowers that I cut out of the Garden Variety paper. I finished the layout off with a few little phrase stickers from the Accessory Sticker Sheet, which added the perfect sentiments to my layout about my beautiful girl.
Thanks so much for stopping by today! I hope that you enjoyed taking a look at my layout, and that you’ve found some inspiration. I look forward to sharing with you again here later in month. Until then, happy scrapping!
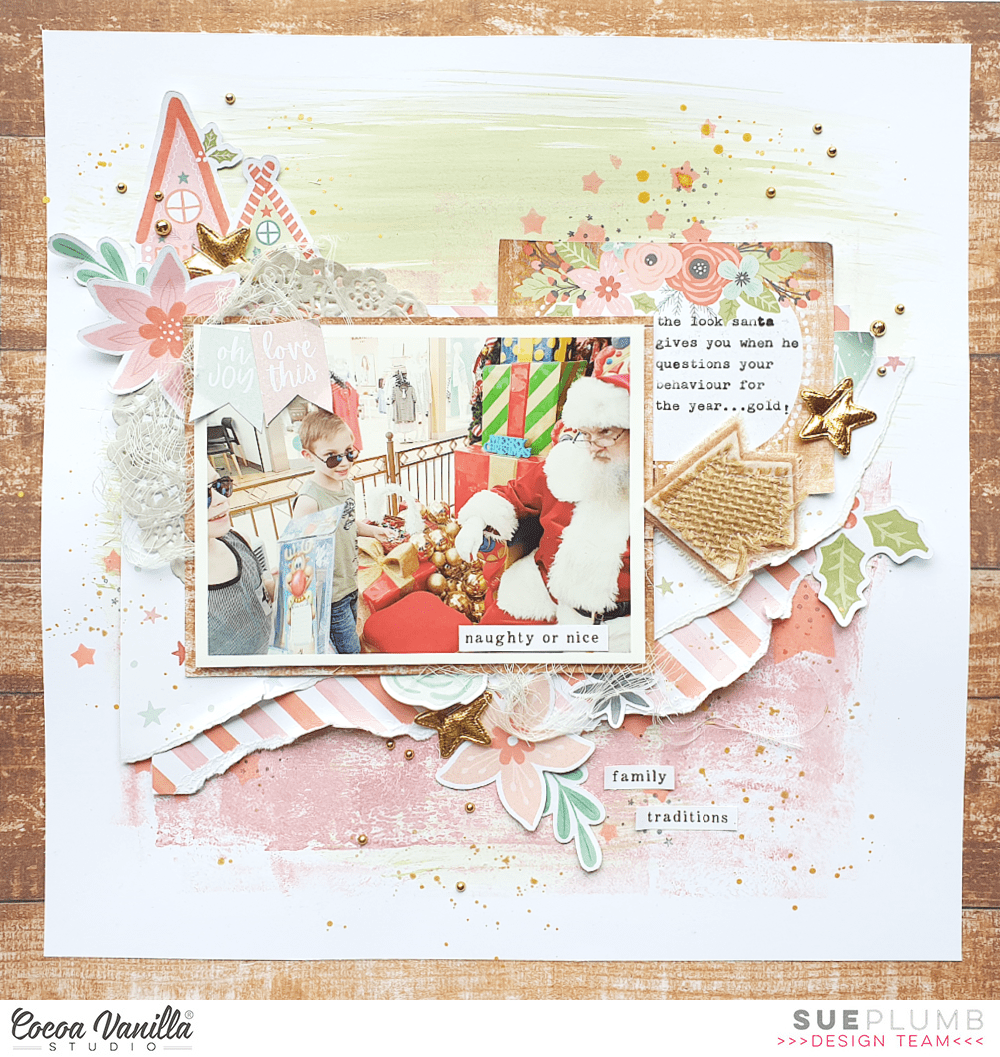
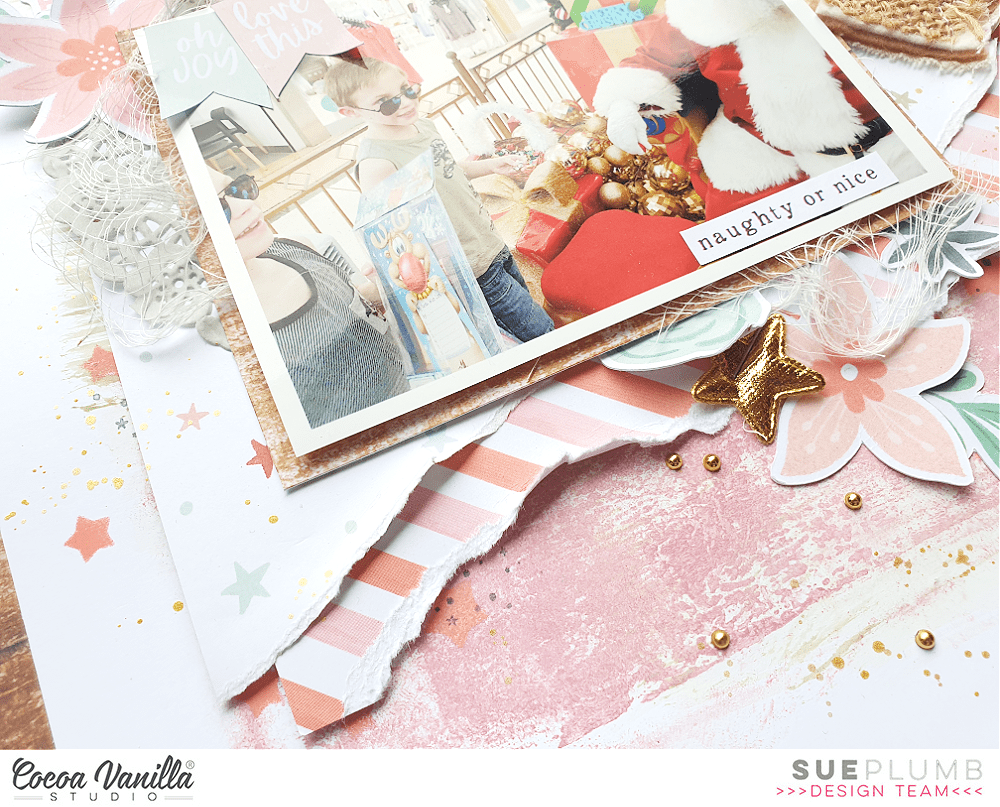
Hi everyone, it’s Sue Plumb here today to share some Throwback Thursday inspiration with you. Throwback Thursday is the feature where our design team members take an older collection and create something new with it. For my project I decided to pull out a collection that wasn’t too far back, but it was one that I didn’t get the chance to create a lot of projects with – ‘Merry and Bright’. Now for those who know me, you might be falling over in shock, because I am not known as a big fan of scrapping Christmas layouts, but I had this hilarious photo of my boys with Santa from 2019 that I just had to document.
For this layout, I decided to create a mixed media page, so I started with white cardstock, acrylic paint and some Distress Oxides. I first used a wide paint brush to brush the diluted green Distress Oxide across the page, then used a rubber brayer to apply pink paint to the lower half of the page. Next, I added some stencilling using a star stencil, sponge dauber and a coral coloured oxide; then topped my background off with some stamping using a star background stamp and grey ink.
After the background was complete I mounted it onto the wood grain print of the Season’s Greetings paper, then started building the papery layers on my page. I cut and tore pieces of the Star Bright and Countdown papers, as well as the diagonal pink/red stripe paper from the A5 Paper Stack. I used my fingernail to ruffle up the torn edges to add extra texture.
I layered my paper pieces together, adding a grey doily from my stash and some frayed gauze for even more texture, and then secured the stack together with staples before adding my photo on top.
To embellish my page I focused on creating 3 main clusters. The first was in the top left hand corner of my photo, where I had a spot on the photo that had to be covered up anyway. I did this by using a couple of stickers from the Accessory Sticker sheet and just sticking them directly onto the photo. This cluster also featured a pair of sweet little houses and flower from the Die Cut Ephemera pack and one of the Puffy Gold Stars.
The second cluster was along the bottom edge of my photo and I again used die cuts and a gold star, plus some phrase stickers from the Accessory Sticker sheet.
The third cluster to the right of my photo was where I included my journalling, which I typed onto one of the coordinating Pocket Cards. I also added a small die cut sprig of holly; another gold star and a handmade arrow embellishment.
I finished my layout off with some gold adhesive pearls and some splatters of gold mist.
If you would like to see how this page came together, you can watch my process video here:
Thanks so much for stopping by today so I could share this with you. I hope I have inspired you to get creative too.
Hey Hey! It’s Michelle back here on the Cocoa Vanilla Studio blog with a new layout featuring our sweet NEW Sunkissed Collection. I’m still loving the bright fun colours of this collection, and yep those florals make another appearance
I created another mixed media background using some green and teal inks, smooshed together using my go to piece of bubble wrap plus a few extra splatters. I created vertically across the layout within the top 2/3. I used some of the cute heart paper ‘Feelin’ Fine’ as the main pattern paper, with hints of the blue version of ‘Fun in the Sun’ florals from the A5 paper stack. Both sections of pattern paper have machine stitching around the edges for a little extra detail.
The photo I’ve documented from 2019 is a cute moment when we visited the local rock pools. This was a time when Mario and Luigi came everywhere with Leila, but she didn’t have enough hands to carry everything while discovering creatures, so had left them safely sitting on a dry area on the rocks. I layered the photo backed with some papers from the A5 paper stack on top of the larger section of pink heart paper, then created a large floral cluster to the left using fussy cut florals from the ‘Growing Wild’ paper and floral ephemera pieces
Love a good floral cluster, as most of you would guess from almost all of my layouts. OOH and how cute are the new puffy stickers that Zoe has added to this collection!!
And excitement PLUS that the Wood Buttons have made a comeback! I think I shared my excitement for them in a previous post too
I used the awesome new Gold Glitter words for the title, so many cool phrases to use within the pack too.
Over on the right I created a cluster of more florals, made a tag using the cute rainbow spot paper from the A5 paper stack and the matching journal card from the ephemerapack. I added the flip flops from the ephemera pack as we were at the beach and another of the cool puffy stickers. All pieces within both clusters either side of the layout were adhered using foam tape and glue dots for different heights of dimension.
Here’s another look at the final layout. I’m really impressed with myself for creating yet another layout with a mixed media background, even if it was just the simple plastic packaging technique.
Well friends thank you so much for stopping by today! I hope you have enjoyed seeing my newest creation as much as I enjoyed creating to share it with you. Be sure to share your latest creations using the sweet Sunkissed Collectionwith us in the Cocoa Vanilla Studio Community Group on Facebook. We all love seeing what you come up with!
Thanks all from me for now. Until next time, Happy Scrapping!
Michelle xx
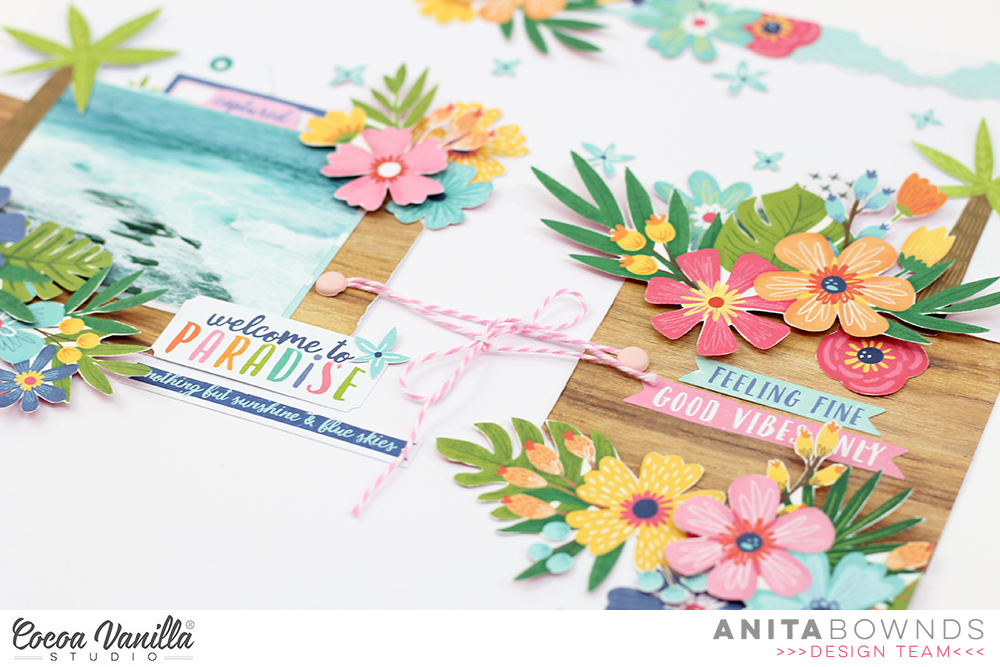
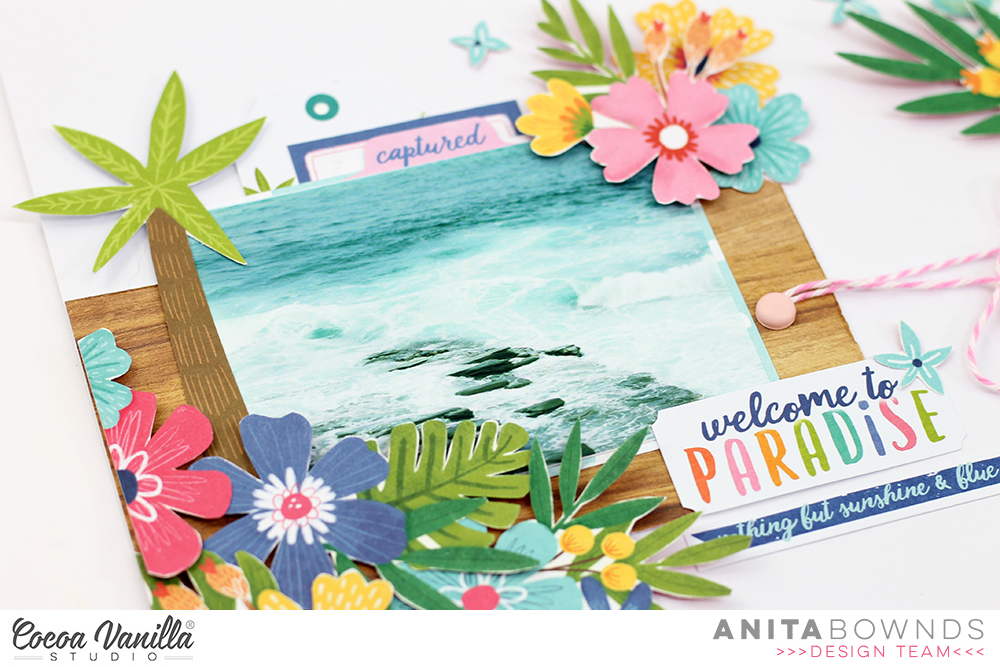
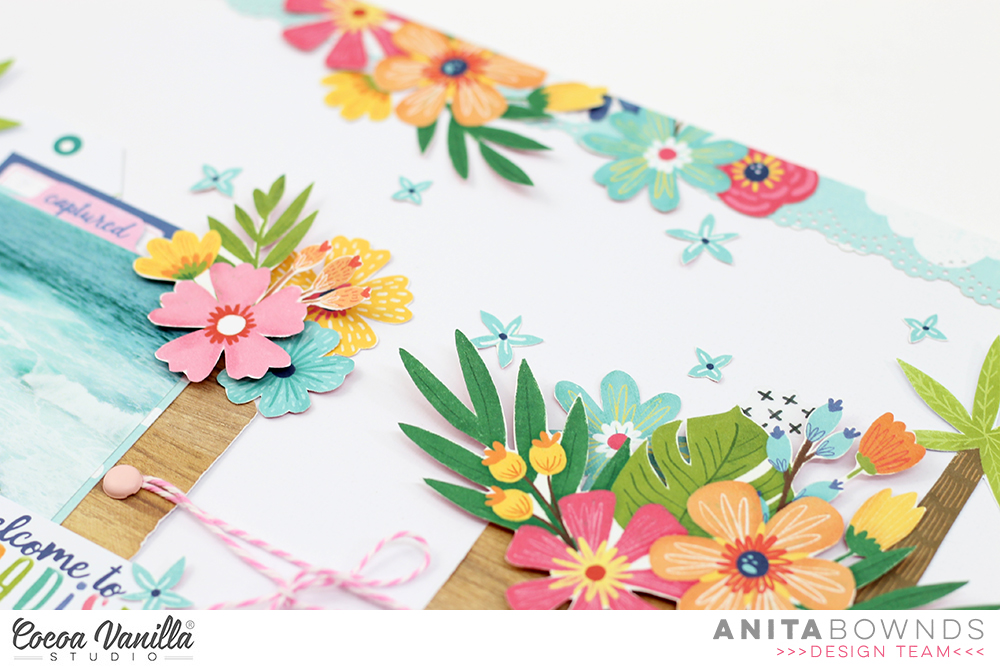
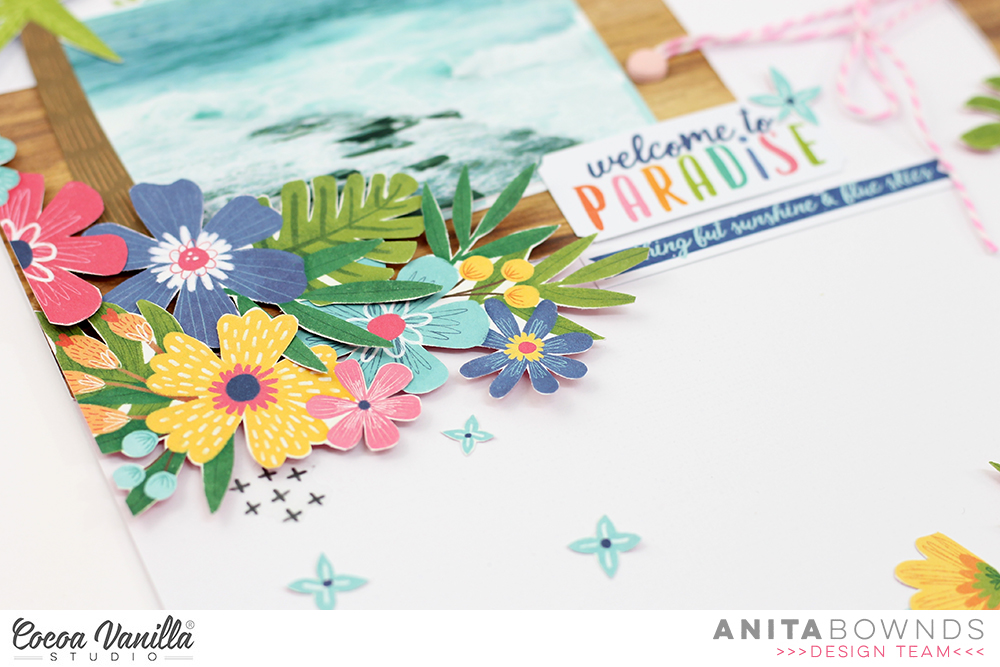
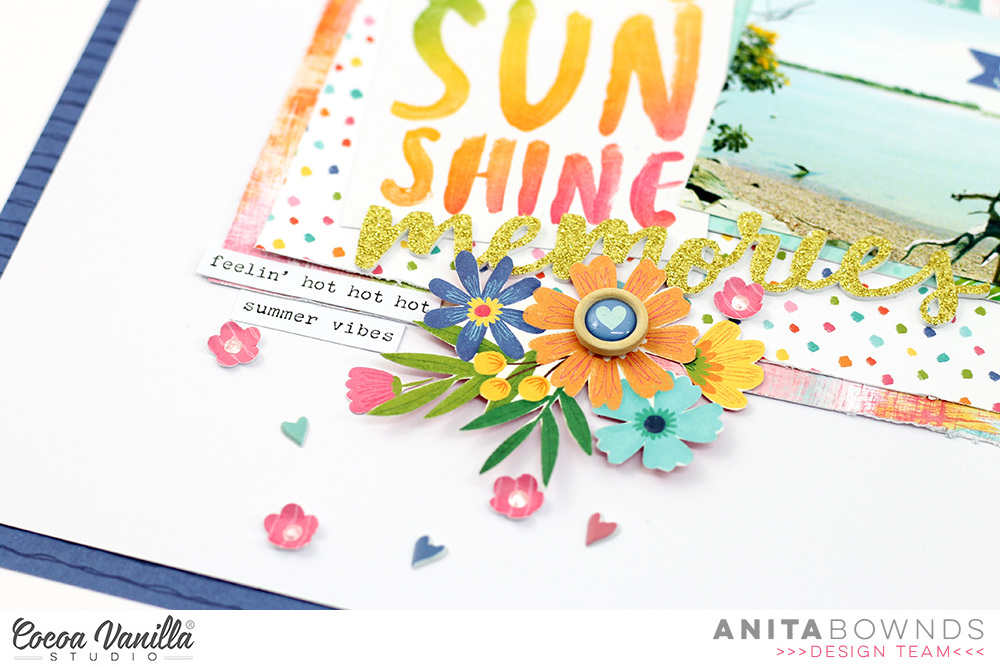
Hey lovely’s Anita here with you today sharing my very first layout with the brand new sun kissed collection as soon as I seen this beautiful bright colourful collection on my desk I knew those flowers had to be fussy cut . Something about the waves crashing on these rocks had me , the swirling of the water it just made me want to take a photo to remember that moment..
I started with white cardstock and using the wood grain pattern paper from the paper pad
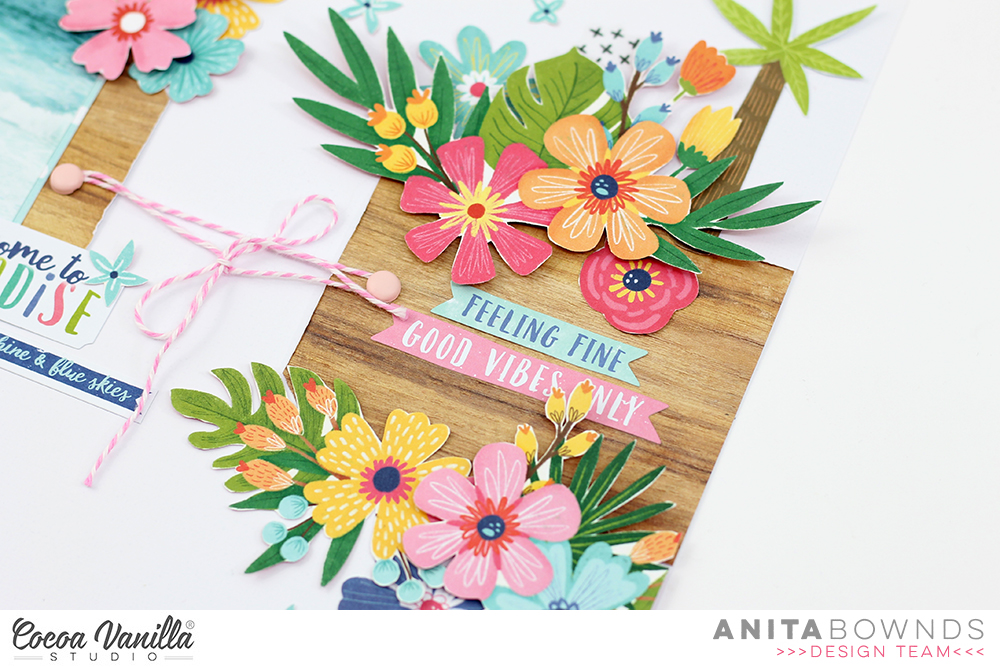
I cut a strips and cut on shorter then the other and made them into tags and glued them down in the middle on both sides
Added brads and twine to tie them together and added my photo backed with pattern paper from the paper pad
Then fussy cut a bunch of flowers from growing wild pattern paper to add around the 2 tags and my photo
Then I tucked ephemera and stickers in the top of the photo and added some to the bottom of my photo. I also added some palm trees, one to the side of the photo and one on the other side of the layout
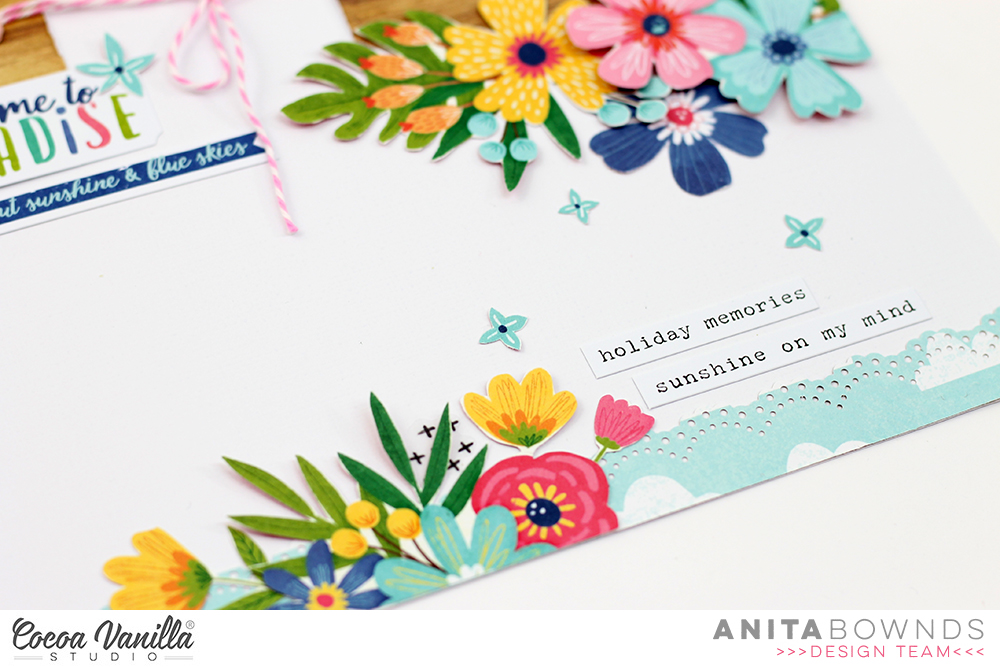
Then I cut 2 strips of just chillin and punched a decorative border on the edges and added them to the top and bottom of layout then I fussy cut out more flowers and added them to the strips to tie it all in , then the little flowers from the growing wild pattern paper to add around the clusters of flowers
And to finish off the layout I used the clear stickers to add something on the edges of the 3 main clusters of flowers.
And a few little phrase stickers at the bottom of the layout.
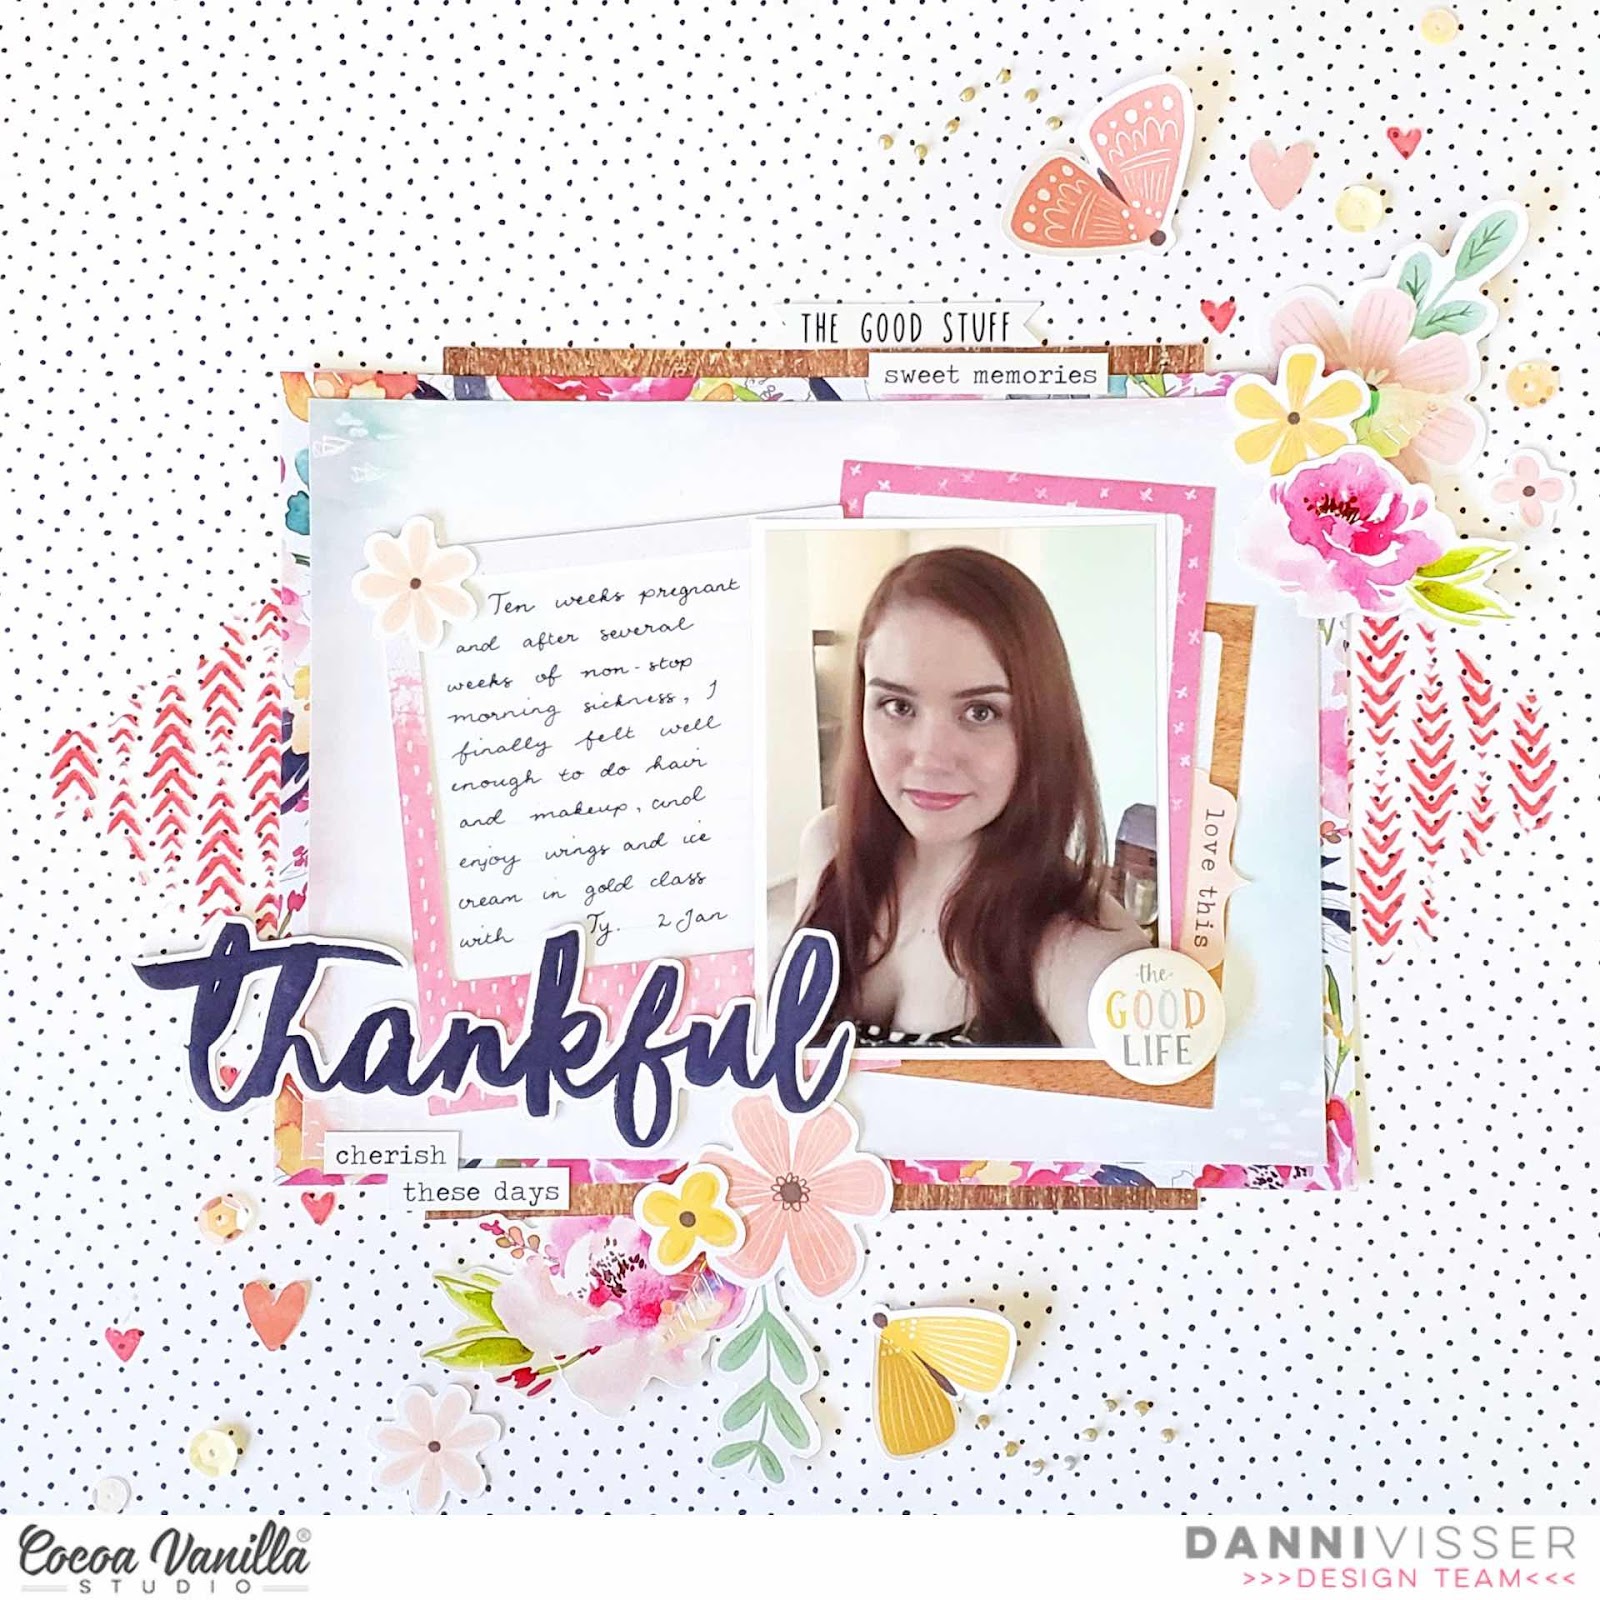
Hey lovely’s Anita here with you today sharing a fun scrap lift swap with the lovely Danny Visser
Using the new beautiful Sunkissed collection so bright and beautiful
A day at the beach breathing in that sea air just absolutely love it ….
(Check out Danny’s sweet layout below )
If you missed seeing Danny’s scrap lift of one of my layouts check it out here
I started off with white cardstock and trimmed 2 sides to add more colour to the background adding Bright side Then I chose 2 pattern papers from the A5 paper stack and adhered them in the center of the layout Next I Matted my photo on 3×4 cards and added a card next to my photo to add a sub title and then started tucking ephemera around the photo along with some cutout pieces from the A5 paper stack
Next I fussy cut out a bunch of flowers from growing wild pattern paper and added them around the layout I also added the rest of my title underneath the pocket card using glitter foam titles
Then I punched little flowers and scattered them around the fussy cut flowers
I popped some of those little puffy hearts around the little flowers from the puffy stickers
Then I added some accessory stickers and a wood epoxy button in the center of one of the flowers to finish off the layout
I hope you have enjoyed my scrap lift inspiration today
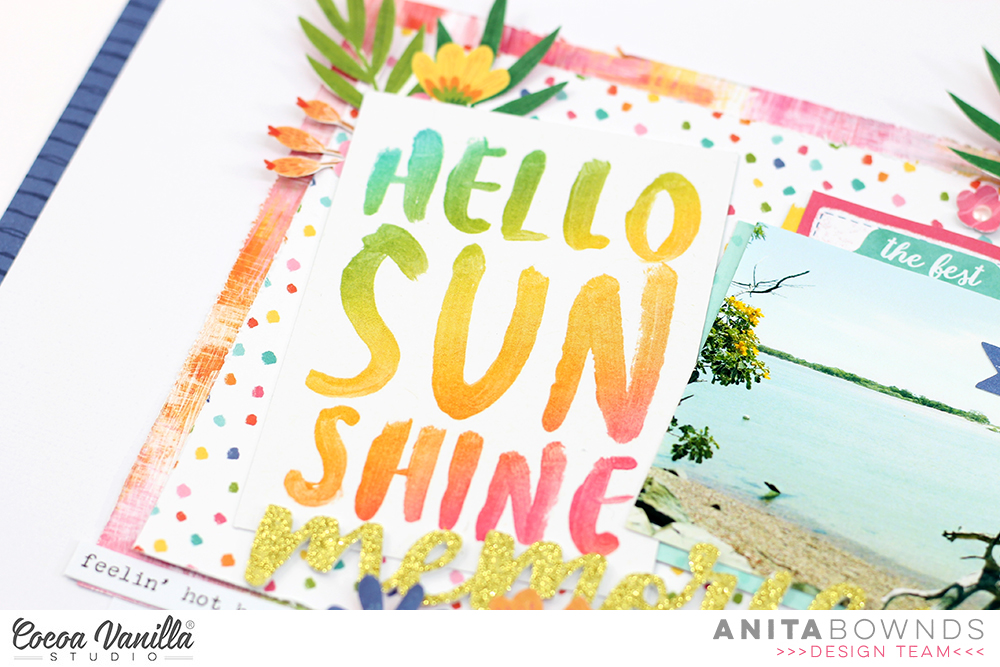
Hi everyone! It’s Sue here today,and I can’t even begin to tell you just how excited I am to share my very first layout with the brand new ‘Sunkissed’ collection. I have to admit, I had another project already prepared to share here today, but after this landed on my doorstep on Friday afternoon, I just COULD NOT WAIT to use it! Let me tell you, the colours in this collection are nothing short of amazing! It’s everything my colour-loving heart could have possibly wanted.
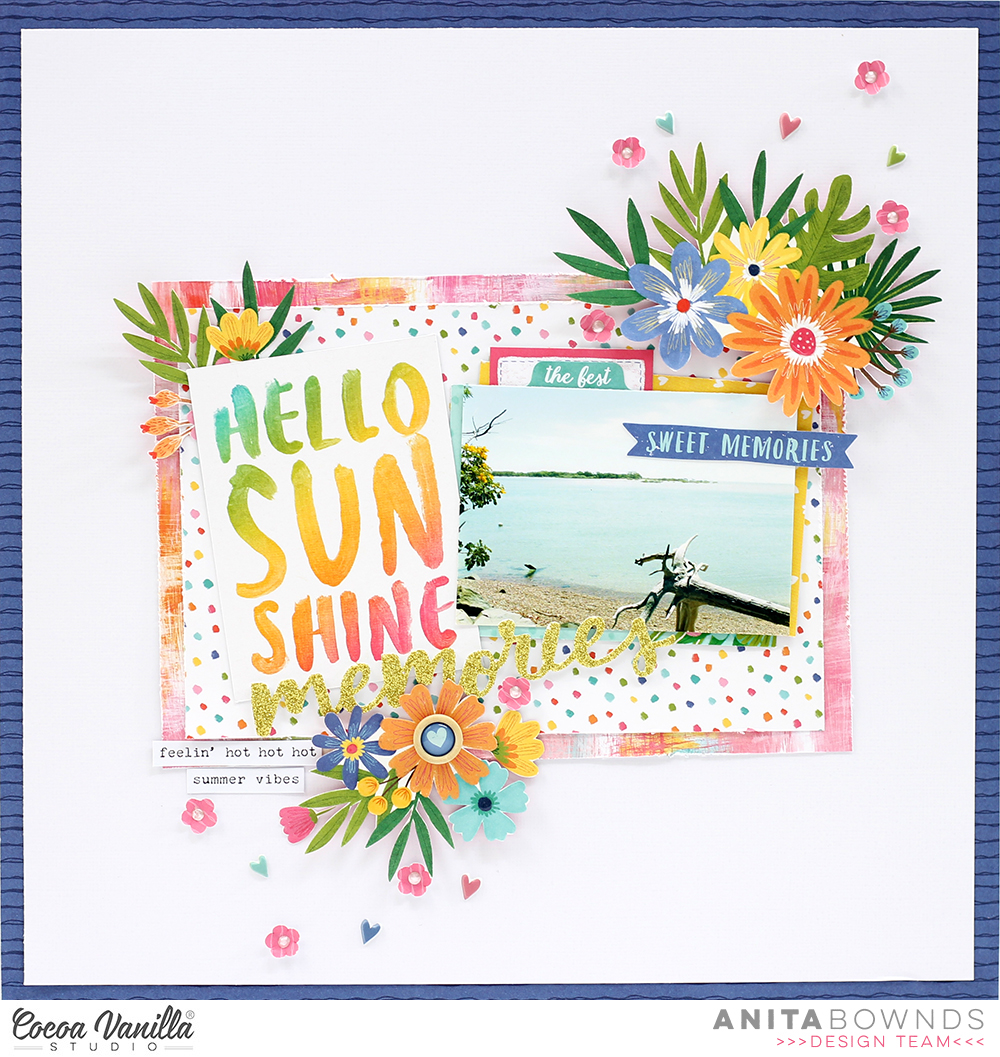
Here is my layout “Sweet Recharge”, (aptly titled, as it features a photo of my kids that I took when we went out one day for milkshakes at a local cafe)…
I began my layout with the gorgeous warm ombre print on the B side of the Summer Lightspaper as my background. As I was dealing with strong, bright colour to start with, I decided to dry brush some white acrylic paint to define the focal area of my page. This would help provide some separation between the background colour and the colours of the papers I was going to use.
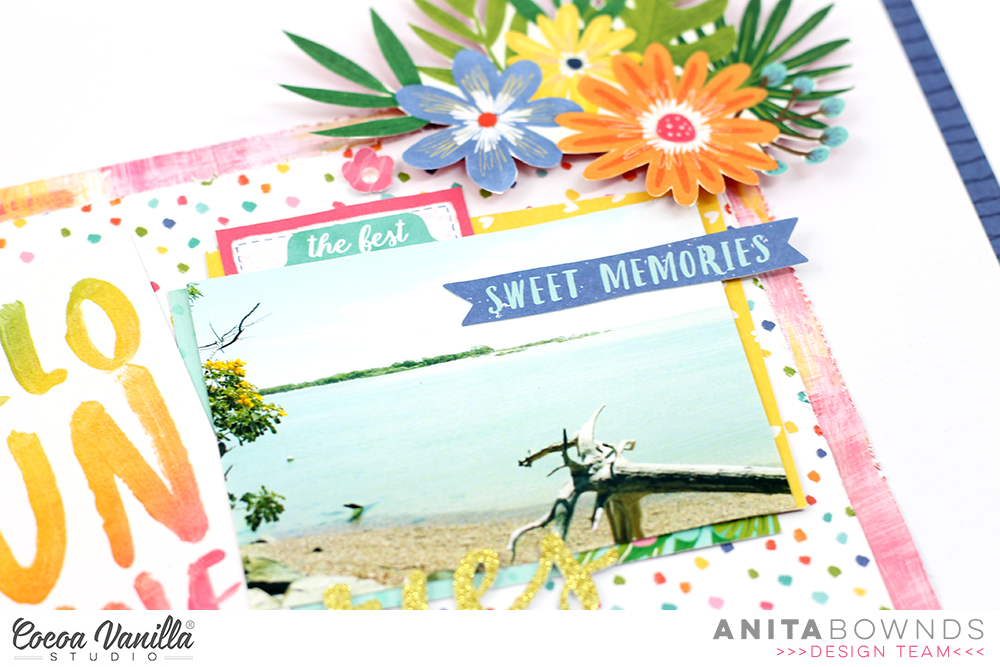
I then took a sheet of the rainbow striped Good Vibrations paper and cut a piece from the area that had the warm tones on it. I layered this with a piece of the rainbow print of the Sunny Dayspaper; then topped it with the polka dot print from the A5 paper stack. (This print is exclusive to the paper stack, and does not appear in the 12×12″ papers.) I also tucked in a small piece of the animal print from the reverse of the Growing Wild paper, then added a paper doily, some frayed gauze for soft texture, and my photo placed on top.
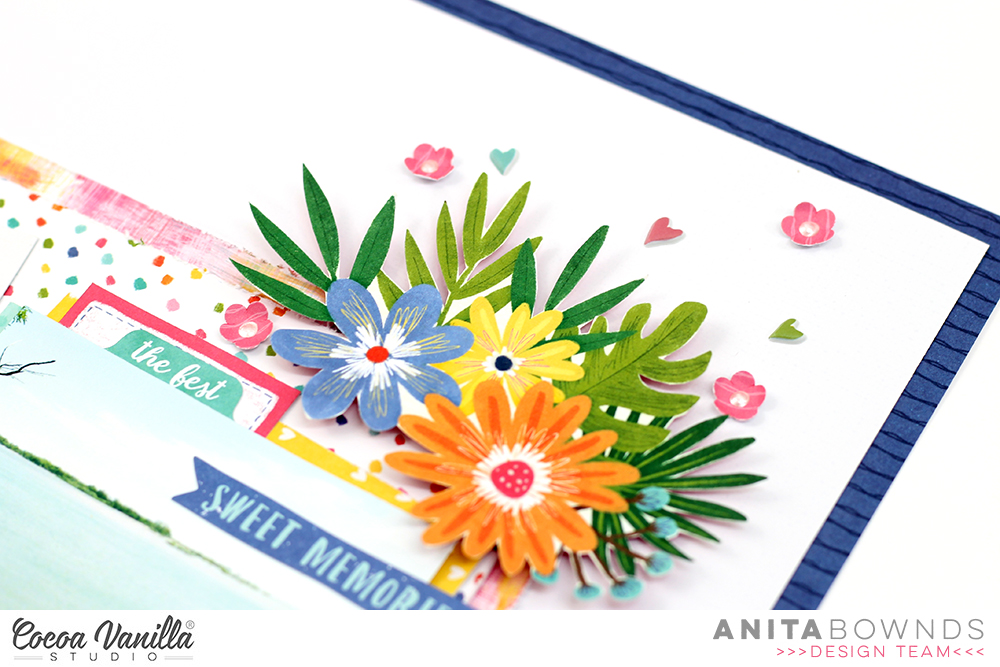
When it came to embellishing my layout, I really was spoiled for choice. This collection has sooo many delicious embellishments to choose from, and I just wanted to use them all! I started with flowers. First, a couple of floral pieces that I fussy cut from the Growing Wildpaper, which is the signature floral from the range. I tucked these pieces in around my photo (one to the right, the other below). I then started a third cluster using some flowers from the new Floral Ephemera pack, which I placed up in the top left corner of my photo. (This formed the “visual triangle” around my photo.)
Also included in this small cluster was the so happy tab, and a cute watermelon sticker (both from the Accessory Sticker sheet) on the corner of my photo; a sweet little flower from the Puffy Sticker sheet; and one of the Wood Buttons. I also placed a phrase sticker from the Accessory Sticker sheet nearby. Above my photo I tucked in a label that was fussy cut from theFun in the Sun cut apart paper, which I wrote my journalling on.
I padded out my remaining two clusters with more flowers and leaves from the Floral Ephemera pack, bending up some of the petals and leaf tips for added dimension. Down at the bottom of my layout I added a cute little garland from the Die Cut Ephemera pack and another couple of phrases from the Accessory Sticker sheet. (One of which I actually used as part of the title.)
The main part of my title came from the new Glitter Foam Title stickers which are really pretty and sparkly. (And if you know anything about my love-hate relationship with glitter, you would know how happy I am to say they did not shed all over my desk!) I finished off my title with one of the cute Puffy Stickers.
Finally, I added a few little heart Clear Stickers; and splattered around some black and white ink. I absolutely love how this page came together and am crushing all the gorgeous colours in this collection! I hope you are feeling inspired and planning on adding this collection to your stash too!
If you would like to watch this one come together, you can watch my process video here:
Thanks so much for stopping by so I could share this with you. Until next time, happy scrapping! X
Hello Hello! It’s Michelle back here today with a new layout share featuring the wonderful Daydream Collection. I’ve chosen to document Leila’s first day back at school photo for 2021 and created a grid using squares of pattern paper from the A5 paper stack.
Its getting harder each year to capture the first day back photo, this years happen to be taken at the end of the day so Leila’s looking a little rough around the edges haha.
I chose a grid design for this layout as I find they are the easiest and quickest way to get a layout done when your lacking mojo or even just strapped for time. I used a mix of patterns from the A5 paper stack that complimented each other as a base for the layout. All were cut into 4x4inch squares and the pieces layered under and on top were slightly smaller by about 1/8 of an inch. Each square has some sort of machine stitching added apart from the top left which has stitching through the photo.
I’ve used the Stepping Stonesand Sun Shower pattern papers for the top left of the grid, raising the photo up with some foam then adding a banner from the Happy Place 12×12 sheet, heart accessory sticker and date tag from the A5 size Happy Place paper.
I created 1 large cluster of embellishments on the bottom right square using a quote from the A5 Happy Place paper, fussy cut florals from the Garden Variety paper, circle frame from the ephemera pack, word sticker and green puffy heart. The papers used on this area of the grid are Up in the Clouds and Sun Shower.
The title square came next using my favourite white alpha stickers, label tag from 12×12 Happy Place paper and some fussy cut florals from Garden Variety. Like always I’ve sewn through all the alpha stickers to keep them adhered for years to come. The pattern papers I used for this part of the grid are Daisy Days and Sweet Serenity.
I added a chunk of handwritten journaling using notepaper that I sewed onto the top right grid section. I also added more fussy cut florals to the edge, overlapping the notepaper and pattern papers. Patterns used are Happy Place and All A Flutter
Along the top of the layout I added an uneven strip of wood grain, Over the Rainbow, and sewed it in place with a tiny strip of Daisy Days
There’s another strip of wood grain along the bottom edge of the layout to bring it all together along with one last accessory word sticker.
I also gave the layout a good splattering of gold ink and a sprinkling of tiny fussy cut flowers on the edges of the clusters.
Heres one final look at the entire layout..
Well that’s all from me today, Thanks so much for stopping by. Be sure to share in the comments below your go to process on how you get layouts done when you’re lacking time and mojo.
Hello Cocoa Vanilla friends, its Michelle back here today with my newest layout share for 2021! I chose the beautiful Daydream collection for this creation, documenting a sweet photo of fellow DT member Raquel and I from a couple years back. We’ve been friends since we started primary school and now our kids are great friends too.
I really wanted to use the wreath paper – Daisy Days – from the collection, and had a hankering for some fussy cutting… as much as I say I hate fussy cutting, it really is therapeutic and fun to do when sitting in front of the TV.
I used the wreath pieces as the base of the circular design and layered extra florals into areas to create large ‘clusters’. I used different types of adhesive to create multiple layers within the cluster, most used are foam tape and glue dots.
I’ve backed the photo using the smaller designs of Sweet Serenity and Sunshower from the A5 paper stack and tucked in a word tab from the ephemera pack. To the left of the photo I’ve added a flair button and butterfly from the ephemera pack and created larger floral clusters above and below this area that curve around the photo.
In the top group of florals I’ve used a mix of florals from the Garden Variety paper as well as the floral wreath piece, some smaller fussy cut tiny florals and a sticker.
In the larger grouping I’ve used florals from both the 12×12 and A5 size Garden Variety paper, a small rainbow from Up in the Clouds and a banner word from the ephemera pack.
And over on the right I’ve used both small and large florals again plus a sticker to complete the floral group, then added the title above to fill some of the open white space. I’ve used a die cut title word and stickers from past collections to create the mixed font title.
Lastly I added the usual splattering of gold ink and felt it was complete. One sweet photo of 2 friends who’ve known each other almost their entire life documented. A friendship that I cherish and am so thankful for. Don’t know what I would do without her.
Well friends that is all from me today. Thank you so much for stopping by!
Hello Hello! Its Michelle here with you today. I hope you’ve all had a wonderful festive season and are all rested and ready to see this crazy year off and start a fresh new one in the next couple of days. I have another instalment of Christmas Memory sharing for you all – the second half of the 2019 album I shared with you last month featuring loads of bits n bobs from the very cheerful Merry & Bright Collection. Like the first post, this one is also very photo heavy so lets jump straight into it..
… starting with the middle of December. There was lego building, tree building and secret letters from Twinkle our Elf. I’ll leave links for all the products I’ve used at the very bottom of this post
This time of year is also when Leila or one of us in this house tends to fall ill. In 2019 for Leila sadly it was a stomach bug that had her wiped out next to the undecorated Christmas Tree’s for an entire day
I created a flip/ shaker pocket to conceal the photo and journalling from that day using a label from the cut apart sheet Oh What Fun and ’14’ from the Countdown paper. There’s some glitter and a couple of ephemera hearts sprinkled into the front of the pocket on top of the pocket page card. To keep them all in place I sewed the flap directly onto the pocket page below.
Over the page I’ve kept things pretty simple using more numbers from the Countdown paper. I’ve repeated this step through the entire album to keep things cohesive.
In between the pocket pages I’ve added a giant paper tag insert using 2 pieces of pattern paper from the A5 paper stack – Joy to the World and the text side of Oh What Fun. I’ve created the round glitter shaker over the top of the floral pattern using the large circular wreath ephemera piece, some left over clear packaging, a tonne of sliver glitter and machine stitched around the wreath to keep out closed. I added flowers and banner from the ephemera pack, then stapled a piece of coordinating ribbon to the top.
I kept the text side of the tag blank as the album is already quite bulky, plus theres a lot going on in the photos to the right. The 18th of December last year was quite the busy day – we treated ourselves to a new car and Twinkle got up to mischief in my craft room creating signs for the Christmas Tree. It was a sad time for Leila saying goodbye to our first family car, but we were all very excited with our new wheels!
Top right of the pockets is another see through glitter pocket using the numbers from the Countdown paper, a single puffy gold star and machine stitched along the top edge to stop the glitter going everywhere.
As we start to creep towards the last third of the month it gets a little busier. The end of school, long days at work, House Elf getting up to mischief and HOT HOT HOT weather.
Another flip pocket using pocket page cards, ephemera and some off cut strips of Jingle all the Way (candy cane stripe) conceal more photos of Leila’s last day at school. One a photo of the crazy mask she made and the other a photo with one of her favourite teachers ( not shared for privacy reasons)
This kid is a hoot! An accessory sticker was perfect to embellish the photo I took of a well needed coffee at work. What a crazy time of year working in Pharmacy can be, and not because its Christmas!
We made it to see Santa to share with him all the things Leila was hoping to receive for Christmas. I had Leila write on the Dear Santa card herself which was the perfect touch to this spread. If you’d like to do the same with your children you can find this card on the Oh What Fun cut apart sheet.
We didn’t get the chance to ‘trim the tree’ until quite late in the month. The lead up to and start of December is always chaotic for us with work, school and Leila’s Birthday so the poor tree always gets neglected until the last minute. We make sure to enjoy it for a few weeks into January before packing it all away.
I used some of the wonderful woodgrain found on the Seasons Greetings paper or in the A5 paper stack as a base for this mini layout. I cut a frame out of the Candy Cane stripe Jingle all the Way to frame the photo then layered 2 trees from the ephemera pack and some stickers to finish it off. On the right hand side I used the darker green print of Oh Christmas Tree to cut a tree design cut file from CUT to YOU. I backed it with some clear velum and sprinkled glitter within each circle to create twinkling lights. I’ve machine stitched the tree onto the Oh What Fun paper to keep it in place.
On the back I created a simple sequin shaker pocket using another ephemera frame and adhered it to some Countdown paper with ephemera pieces and a strip of ‘Christmas rainbow’ diagonal stripe that can be found along the bottom of the Oh What Fun paper.
Over the page I kept the pockets simple using cards from the pocket page card pack. I also documented a photo I screen shot from facebook when our beloved country was on fire.
Were on the home stretch now, just a few more to go…
Another simple insert between pages of photos using vellum, ephemera pieces and a puffy gold star
with a very similar cluster created on the reverse to coincide with the photos of family from Christmas Eve.
Another photo heavy spread with pocket page cards as fillers with the addition of a couple accessory stickers and a cute ephemera house
All the fun of Christmas Day contained in 1 spread. This is literally all the photos I took on this day minus a few extra blurry ones. I chose to live the moments in person rather than a face behind a phone camera, but I’m happy I took just these few.
Lastly we round out the month with a few crazy faces from New Years Eve. Every year so far this crazy kid has been awake and ‘celebrated’ it well and truly into the new year with us. Last year it was on the couch watching fireworks from around the country on tv with her beloved stuffed animals.. and a few crazy selfies with me. You’re welcome lol
Well friends thats a wrap on my 2019 Christmas Memories album, and my creative shares here with you for 2020. Its been a crazy year for us all, and I cant wait to see what the next year brings.. Lets hope its a little less chaotic than 2020 but a heck of a lot more happy!
Thank you all for your love and support throughout the year.