It’s Tarrah McLean back with you today to share a new layout featuring the awesome Legendary collection!
I have chosen to scrap a 8.5′ x 11′ size layout today, I have been on a bit of a kick with this size of late and the photo that I am documenting is of my 2 sons on a recent bush walk where they found a cave.
I trimmed a piece of plain white cardstock to 8.5′ x 11′ and then trimmed the Offbeat paper with the blue stars showing down to 8′ x 10.5′. I machine stitched the paper to the white cardstock and bent up the edges to create a textured look. I then trimmed a piece of the One Way paper, turned it over to show the orange side and cut a banner edge into the bottom. I love how this paper looks as a contrast on the blue star background paper.
I added craft foam underneath the orange paper and the other layers to create shadows and dimension, I adhered these all in the top left corner with my photo. I then added some of the awesome accessory stickers, clear stickers and die-cuts to embellish this main design element on my page.
For the bottom right cluster I had to add that gorgeous bear die-cut, he is popped up off the page with craft foam, I overlapped the Explore piece also and tucked in a few clear stickers here. The stars are clear stickers adhered to white cardstock and then fussy cut out with a foam dot placed under each of them. My title is made of those awesome cardstock die-cut titles with that super cool font!
Lastly I placed some enamel dots and stamped the date stamp to finish my page.
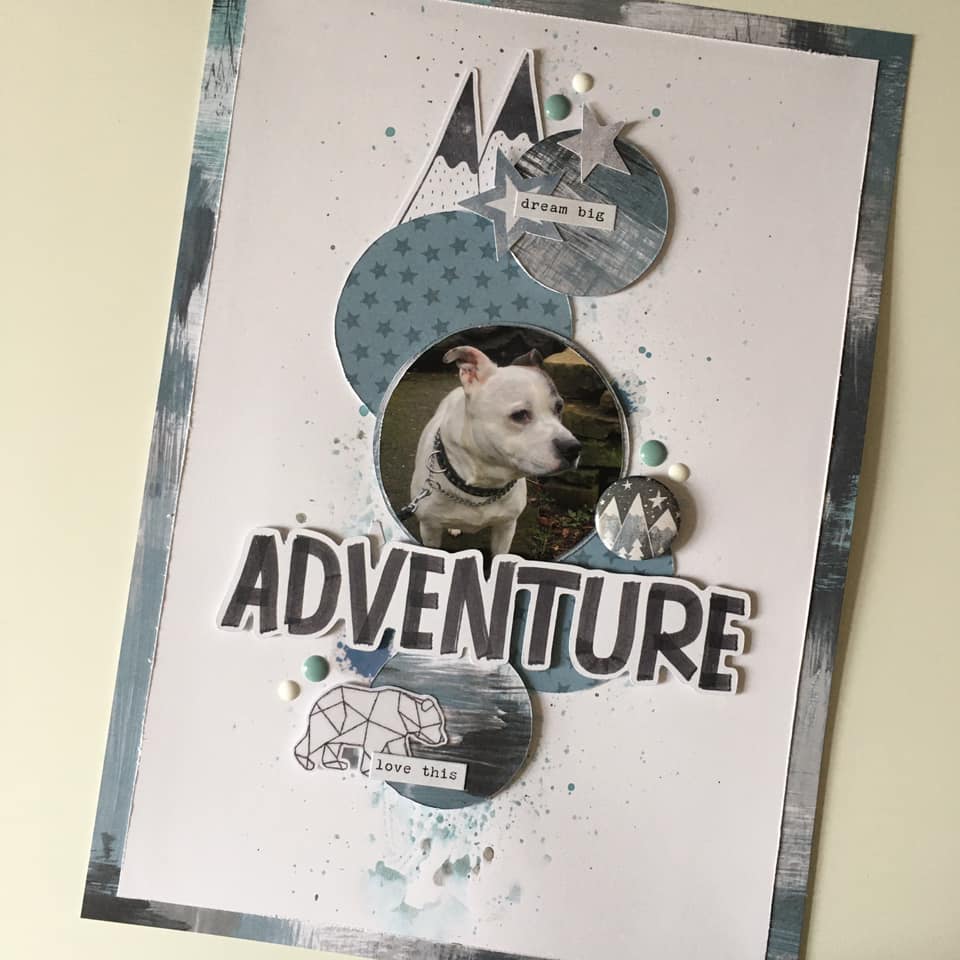
Hey everyone, it’s Raquel here today sharing a layout inspired by one of our Cocoa Vanilla Facebook community members and from our recent cyber crop Keighley Brennan. I absolutely adored the vertical design of this layout, the circle elements and also the scattering of stars that featured on the page.
Here is Keighley’s layout:
I also used the Legendary collection for my layout too. Here it is.
The subject of my layout is the subject of most of my layouts when I am using a masculine collection, my little man this particular photo was one taken a few years ago that I found in my photo stash – it was such a nice surprise to find it as it had always been a picture that I had wanted to document but just had not done so yet. When I look back at old photos I find it hard to recall when the kids were so little, I’m so thankful for my craft and scrapbooking for documenting all these little moments in our lives.
I used my Sizzix Big Shot and circle dies to create the circular elements for the page. I do of course love my electronic die cutter but the big shot makes it easy to cut elements like shapes so quick and easy if I have a suitable die set to use. Originally I was going to use the same style colour palette with the blues however once I started creating I was drawn to the green diagonal stripe and the rest of the layout progressed from there.
The title is made up of the fussy cut letters spelling EPIC from the cut apart sheet of paper. I loved the font design and thought they made a nice statement title. The colours in the font actually inspired the rest of the colours that I used on the page. I added tiny word stickers as a sub heading to help support the EPIC title.
The flag ephemera piece was a nice way to add detail to the top of the layout. I finished this cluster area with some fussy cut stars from patterned papers, enamel dots and another tiny word sticker.
I did not have the right die size to create a perfect circle mat around my photo using the orange paper so I did my best to keep the circle even using my scissors. The entire layout was backed in the green diagonal stripe paper. I love how this looks.
I hope you have enjoyed stopping my the blog today and found inspiration.
Hey everyone! It’s Raquel here sharing a new layout I have created featuring the absolutely stunning Happiness collection. The Happiness collection has to be hands down one of my fave CVS collections. I love the brightness of the collection and the florals … oh boy, the florals are just everything aren’t they?!
Here is the layout that I created:
This layout features a photo of my amazing hubby and my beautiful girl taken on our last family holiday over the summer period. I knew the moment that I snapped this photo it would become one of my faves of these two. I just melt at the love this dad has for his princess. Such a special bond, I hope Charlotte will grow up to know how lucky she is to have such an terrific father figure and role model in her life. I backed the photo in the same patterned paper that I bordered the whole layout with, Bright and Beautiful paper. I feel like this really helps the photo to become the main feature even though the background of the layout is busy and more detailed.
The cut files I have used on this layout are from both Paige Evans (the summer title) and Cut to You (the clouds). I rarely combine two cut files on the one layout however I felt that the photo allowed for it. to back the letter sections Of the cut file I used the 6×8 paper stack. These are a fave never addition to the CVS collections for me, I love that I can use the smaller versions of the patterns within cut files, but also as paper layers to add more detail and dimension to a page.
To the top left of the photo I have a small area of the layout which I embellished. This area contains a combination of accessory stickers and clear stickers. I love the sentiments on the accessory stickers within the tiny word stickers – I always manage to find the perfect wording.
The bottom left of the layout and for cut title featured another cluster and layering of embellishments . These were mainly from the ephemera pack. I am honestly surprised at how far I have stretched the ephemera packs florals. I love them so much! The butterfly is fussy cut from the Bright and Beautiful paper. I love adding a dimensional butterfly to a page and by fussy cutting them from a paper design gives you so many to play with.
As well as clusters of embellishments to either side of the layout, I also layered ephemera behind the photo and on top of the bottom section of the photo. The ‘my happiness’ sentiment was the perfect finishing touch.
Thanks so much for stopping by the CVS blog today. I hope this layout has inspired you to get creating.
Hi everyone, it’s Raquel here today sharing a new layout featuring the amazing new Legendary collection and the freebie cut file designed by Gwen at Cut to You exclusive to CVS. This layout today features my little man, who is not so little anymore, and our gorgeous puppy Lola.
Here is the layout that I created:
Here is a process video for how this layout came together:
The main feature of this layout, along with the photo of course, is the banner cut file which I have cut on black textured card stock. I normally cut all my cut files on a white so choosing the black was a big change for me. I have to say though I love the masculinity that this adds to the layout and that striking pop of contrast. To back the cut file I used both sides of the ‘Total Legend‘ patterned paper. My colour palette for this layout was to stick to the woodgrain, green, blues and greys which I was able to do with the embellishments and papers within the collection. These colours really complimented the colours in the photo of Jack and Lola.
The photo was matted on the green of the ‘Outdoors Type‘ patterned paper. I then added a cute woodgrain tab and a compass ephemera piece to the top left of the photo. The green legendary embellishment that you can see is actually a clear sticker, adhered to a piece of white card stock and cut out. I tend to do this a lot with the clear stickers as that gives me the freedom to move them around. Plus adhering them on white allows them to really feature and pop as an embellishment. I used my tiny attacher to add a few staples to the embellishments – more for a design purpose than for the use of adhesion.
Stars feature on this layout heavily and were mainly chosen from the ephemera pack. There is nothing better than a scattering of stars on a layout, wouldn’t you agree? Of course, I added them in a number of 3. I always tend to work in threes when I embellish.
The enamel dots in this collection have this beautiful shade of blue. I scattered a few on this layout too.
For the title today, it did take me a while to figure out what I wanted to add. When going through my Legendary stash I came across the phrase ‘Stay weird, stay wonderful” on the ‘Epic Tales‘ paper and I just knew this was perfect. I fussy cut the heading out and then added my typewritten journaling in strip form underneath.
The line style stars scattered amongst the page are a fussy cut star from the ‘Epic Tales‘ paper. I love the look of these as an added embellishment.
I framed this layout with the woodgrain from the ‘Outdoors Type‘ paper. I love the woodgrain in this collection. So so amazing. I added extra detain to the border using machine stitching and also some staples.
I hope you have been inspired by todays layout. Thanks so much for stopping by the CVS blog.
Hey everyone, its Raquel here with you today sharing a layout that I created using the free printable INSD kit and free live online class that Zoe did last Friday night. Zoe’s class was created in a 12×12 size and inspired by these home days in isolation. I was so motivated to create a page using the page design and kit as a base for an 8.5×11″ size layout.
Here is the layout that I created:
I created a process video to show how this layout came together, you can see it here:
The layout features two photos of my kiddies taken recently during our home learning. We are going onto our 7th week of isolation here in our household and are currently home learning. Our school has an amazingly supportive program for these two kiddies, but being 5 and 7 they of course need constant support to complete set tasks. Getting used to this new normal and Mummy as the teacher has been new for us all. While supporting my kiddies to learn, I am also a Foundation school teacher so as well as supporting my own kiddies I have a class of 19 to work with as well. To say its been a juggle is speaking lightly. I am very much looking forward to life resuming to normal and everyone being safe and healthy as I am sure we all are.
The photos are printed on my home printer (an Epson picture mate) and in black and white. Printing in black and white allows any colour palette to use. I will often print my photos in black and white if my photo is very busy with a lot of competing colours. The page kit itself had four approx 3×4″ cards in the printables. These cards were designed to act as photo mats. I used them for the same reason and was able to double mat my photos with what was included.
What I loved about the page kit was the paper strips were already designed to a length and width. Being a smaller layout, I was able to trim these narrower and shorter and still get the desired effect. I machine stitched the strips to the page and was able to curve the ends inwards to create dimension.
The page kit also came with a page of ephemera pieces. I am sure if you are tech savvy there would be a way of print and cutting these with a die cut machine. However, I simply took mine to the couch while I was with my family and fussy cut them out with some precision tip scissors.
I adhered the clusters with a combination of clear glue dots, liquid adhesive and adhesive foam squares. I love the multidimensional look the varying adhesives brings to a page.
I did add a couple of products from my stash to this page, but they were minimal. One thing I added was a piece of pink patterned paper from the ‘Make a wish’ collection to frame the whole layout in. I felt that the layout needed a border to ground it. I also machine stitched around the border. The other thing I added from my stash apart from white cardstock was the wood veneer pieces, they were from both the older collection Free Spirit and Colour me Happy. I had forgotten that I had them in my stash and were a surprising and welcomed addition to help complete this page. They added that finishing touch that I was after.
The digital kits intended title was ‘home life’ however because I work in a smaller size I felt like it was too overpowering. I was happy to find the memories wood veneer piece to finish my title area. I used the tag in the kit to layer my typewritten journaling onto. I didn’t go into too much detail of the whole home learning experience but plan to on future layouts to document this unprecedented time in our lives. The little bow with the crochet thread added that nice finishing touch to the tag and element of journaling.
I hope that you got to join us, the CVS team in the INSD weekend celebrations. It was so much fun with lots of challenges and inspiration shared.
It’s Tarrah back with you and today I am sharing a new layout for the stitching theme we are featuring here on the CVS blog this week using the awesome new Legendary collection. The photo I am documenting is a recent one of myself and my boys getting out for some exercise and fresh air during Covid-19 isolation!
I have wanted to try doing an 8.5′ x 11′ sized layout for some time now, I have created a few in my time but not many that I have shared before. I loved the smaller space to work with! I decided to incorporate machine stitching right around the entire perimeter of the blue star background paper, bending up the edges to create some texture.
I decided to cut out an arrow design cut file (free from Paper Issues) from white cardstock and backed all the arrows with different patterned papers. I love how it looks with all the colours. I added craft foam underneath to give it dimension and placed it to the centre of the page.
Once the cut file was adhered, I placed my photo towards the top right corner, adding craft foam and 2 of the stickers from the accessory sticker sheet underneath the photo. My title is made up of the cardstock titles, I added craft foam underneath the title also and placed that opposite the photo at the top.
Some of the embellishments I included on my page are all from the Legendary collection, including the clear stickers, die-cuts, enamel dots, a flair button and some of the small phrase and word stickers from the accessory sheet. Lastly I added the date stamp to the ‘Best Ever’ sticker at the bottom.
The Legendary collection is perfect for documenting both the boys and girls in your life! Make sure you get your hands on some!
Thank you so much for taking the time to stop by the Cocoa Vanilla blog during these uncertain and crazy times. I hope you all stay safe and healthy.
Hey everyone, it’s Raquel here, back on the blog today sharing my latest layout using the new Legendary collection. I always use the release of a more masculine collection to get some layouts of my little man Jack who is five years old completed.
Here is the layout that I completed:
The main design element of this layout is stars and it was created to scatter across the layout in a diagonal direction.. I used main card stock as the base of the layout and bordered the layout using the ‘Wild One’ patterned paper. The photo and focus of this layout is my little man. Over the new year period we head away as a family to a coastal town. It is just so beautiful there and we spend our days together exploring the town and in the afternoons at the beach. The kids love it so much and brings so many happy memories, ones I know that they will have and look back on as ‘good times’ when they are older.
The star elements on the page are from a few places, the ephemera pack, fussy cut from the ‘All Star’ patterned paper and also from the clear stickers. I loved the yellow in the background paper and was able to add pops of that yellow throughout the page in the form of the stars.
To create the title of the page ‘Super Awesome’ I used the clear sticker sheets. I adhered the words super and awesome into white card stock and fussy cut around them. This process was a little fiddly and did take a while but the result was so worth it. I was able to use foam adhesive dots to adhere the title and give it some dimension.
The journaling is typewritten, my usual approach, and quite short and sweet in detail. I adhered the journaling on a slight angle as that is how the title was adhered also.
I was really wanting a red patterned paper to mat my photo and luckily I noticed that the cut apart paper ‘Total Legend’ had a red 3×4 card in the design that fit my photo perfectly. That was a crafty win!
I finished the layout with some super tiny fussy cut stars from the ‘All Star’ patterned paper and some machine stitching around the border.
I hope this layout has inspired you to create today.
Take care and stay safe,
Hey everyone, well it’s been a long time between posts for me here on the CVS blog but I am excited to be back creating and sharing projects with you all. My first layout I am sharing with you is using the new Legendary collection. I have both a boy (5) and girl (7) at home so always love when Zoe creates a masculine collection to use to document our stories.
Here is the layout that I created:
I have used white card stock as my base for this layout and framed it with the ‘Total Legend’ patterned paper. I loved the geometric Aztec design of the bside of this paper and thought it added a nice border to the whole layout. My statement piece on this page is the cut file from Cut 2 You which I backed with the ‘wild one’ ‘offbeat’ and ‘all star’ papers. This was added to the page with foam dots to create shadow and dimension against the white background. I wanted this page to feature pops of yellow and compliment the colour in my kids tops so the colours in the ‘wild one’ paper was perfect for this. Stars feature heavily in design elements for this collection so of course I had to feature the, on this page of my two little superstars.
The design of the layout is a diagonal design where the embellishments flow from the upper left corner to the bottom right creating balance. I am a lover of layers so for my portrait photo I have layered multiple patterned papers behind it to add detail and dimension. The final layer I cut fishtail ends into just for something different. That whole layered piece is also adhered to my layout using a foam sheet. To be more cost effective in my craft and because I love to add dimension to my layout I buy foam sheets in bulk packs from stores like Spotlight or Lincraft.
The star embellishments featured on this page are from a couple of different items in the collection; the ephemera pack and fussy cut from the ‘all star’ paper. To add detail to the stars I have either adhered them with a clear glue dot or added machine stitching for texture.
I always love to hand type my journaling and cut it into strips. This particular page features my kiddies love hate relationship… siblings right?!?
Thanks so much for stopping by the CVS blog today. I hope you have been inspired to create, I am so happy to be back.
Sending lots of love and prayers to you all in this scary time in our world.
Raquel x
 The subject of my layout is the subject of most of my layouts when I am using a masculine collection, my little man this particular photo was one taken a few years ago that I found in my photo stash – it was such a nice surprise to find it as it had always been a picture that I had wanted to document but just had not done so yet. When I look back at old photos I find it hard to recall when the kids were so little, I’m so thankful for my craft and scrapbooking for documenting all these little moments in our lives.


 What I loved about the page kit was the paper strips were already designed to a length and width. Being a smaller layout, I was able to trim these narrower and shorter and still get the desired effect. I machine stitched the strips to the page and was able to curve the ends inwards to create dimension.
 I did add a couple of products from my stash to this page, but they were minimal. One thing I added was a piece of pink patterned paper from the ‘Make a wish’ collection to frame the whole layout in. I felt that the layout needed a border to ground it. I also machine stitched around the border. The other thing I added from my stash apart from white cardstock was the wood veneer pieces, they were from both the older collection Free Spirit and Colour me Happy. I had forgotten that I had them in my stash and were a surprising and welcomed addition to help complete this page. They added that finishing touch that I was after.


