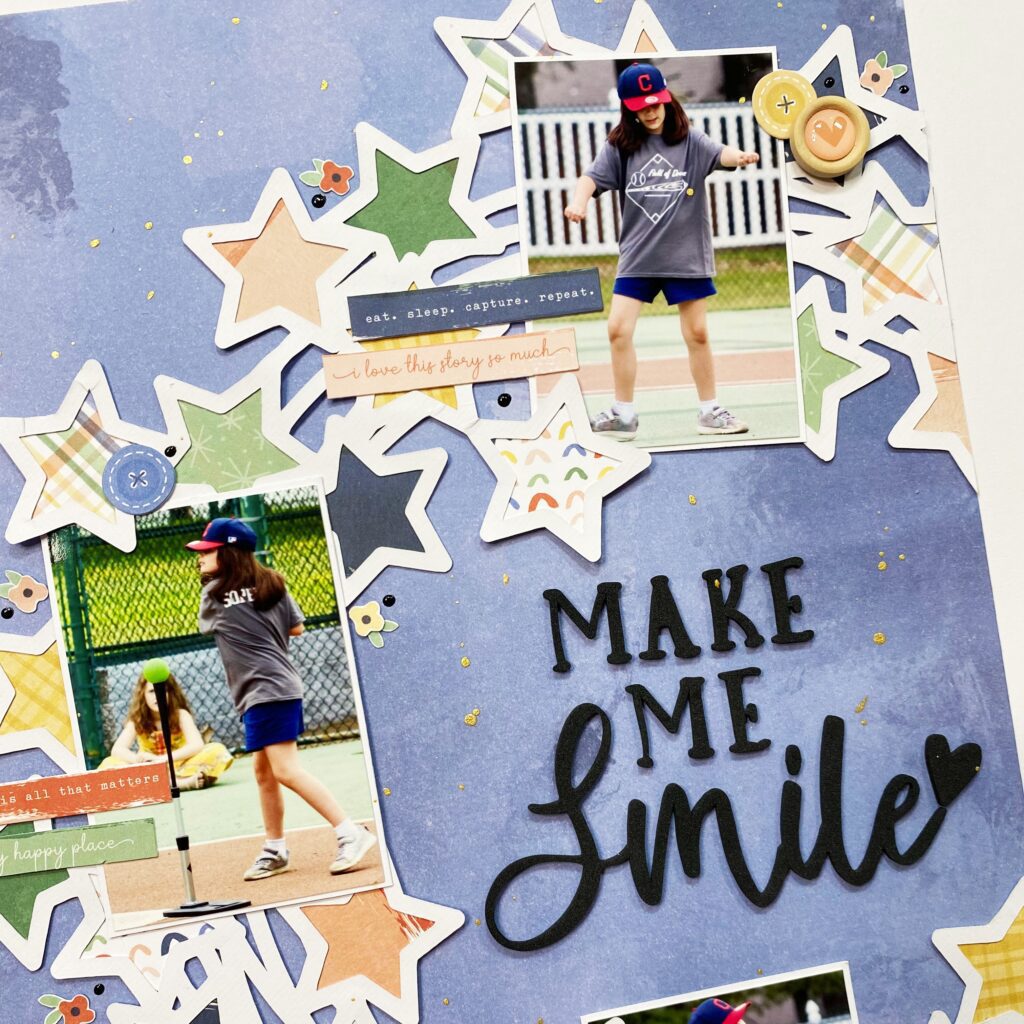
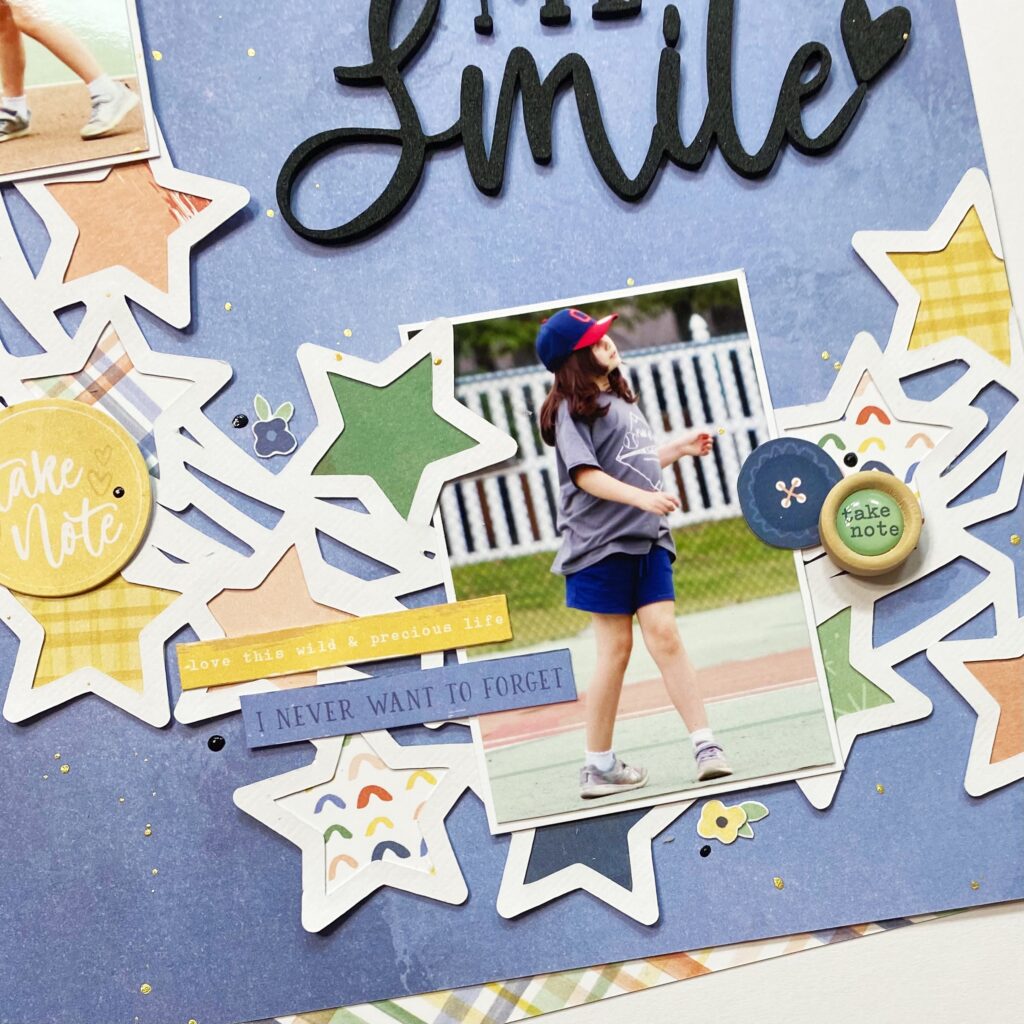
Hey y’all! Laura Alberts back again with a fun baseball layout using the gorgeous new Storyteller collection. This beautiful Spring Fling patterned paper with a mixed media vibe was perfect for these sweet photos of my youngest at her t-ball game. Using a star wreath cut file from Paige Taylor Evans, I backed it with paper from the A5 paper stack. The title in the center of the wreath is from the Foam Title Stickers.
These word phrases are fussy cut from the cut apart sheet in the A5 paper stack. Loved layering these up on my photos in place of journaling! The sweet little buttons are from the icon ephemera pack and the expoxy wood buttons layered over them perfectly! Loved all the layering with this layout.
One of my favourite details on this layout are the tiny little flowers that I fussy cut from the gorgeous Fly Away patterned paper. These little details add such a lovely touch of whimsy to the layout and softens the overall effect of a largely geometric design. Finishing it off with black Nuvo drops and gold ink spray splatter.
I hope this layout inspires you to try layering your embellishments over the edges of your photos. It’s such a fun technique! To see how ‘Make Me Smile’ came together, check out the process video below:
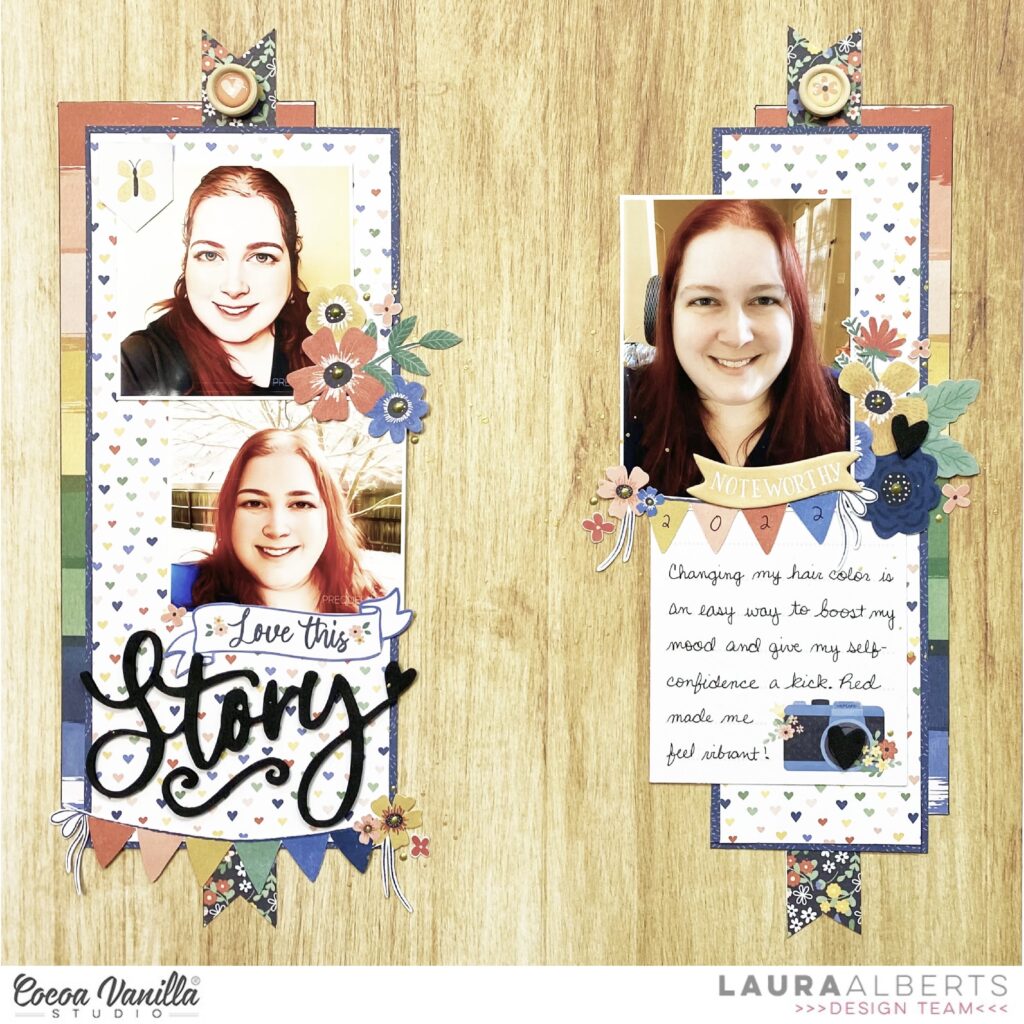
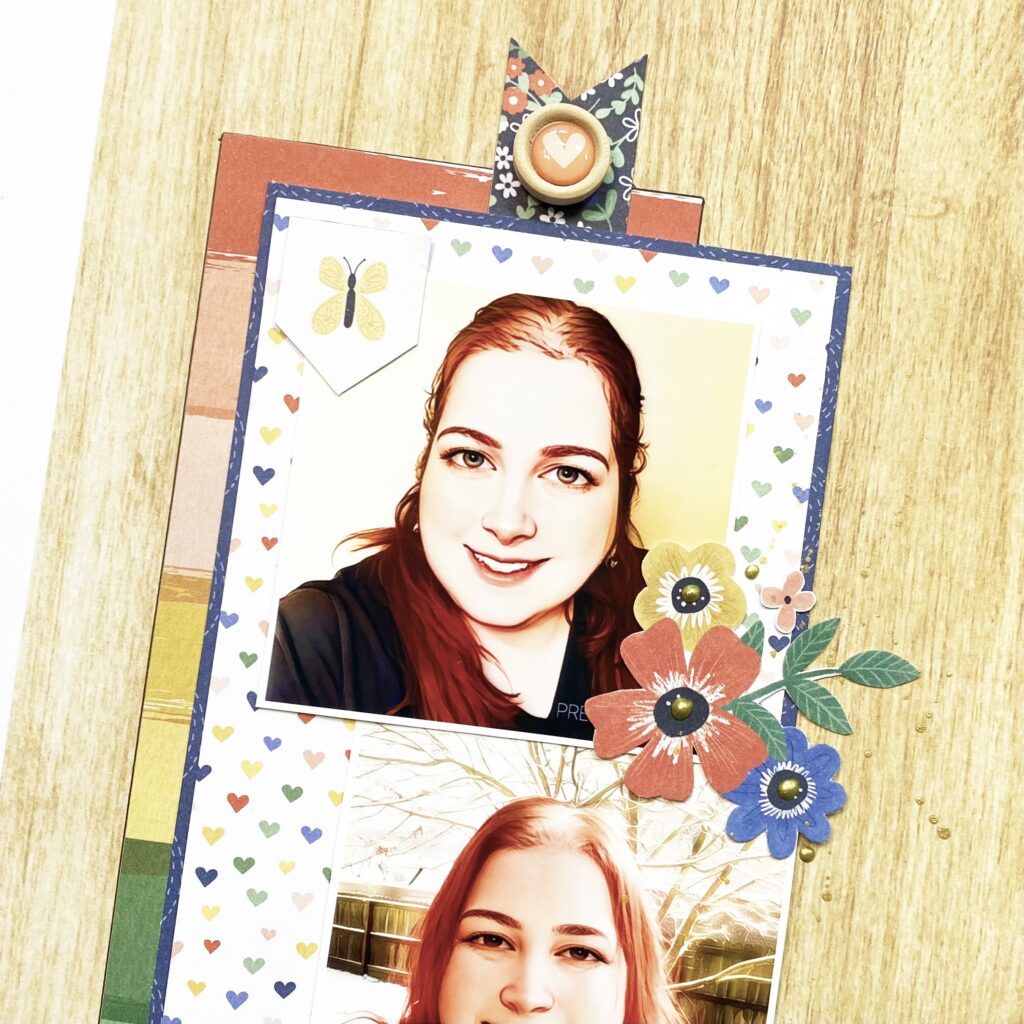
Hey y’all! Laura Alberts back again with a fun column style layout featuring the gorgeous new Storyteller collection! I am completely in love with this one! The stunning color scheme and all of the tiny details are just perfection. Scrapping a handful of fun selfies for this layout, I opted for two columns on either side of the page. Using the Cross It Off woodgrain paper for the background really helps these photos a pop off the page. Then, I pulled in three papers from the A5 paper stack for my columns, as well as a floral strip from the Story Time cut-apart paper.
I stacked two 3×3″ photos together on the left column and then added a mixed title below them. The ‘Love this’ is from the icon ephemera pack and then ‘Story’ is a foam title. Along with a floral cluster between the two photos, I added a banner along the bottom of the column. One of my favorite details on this page is the tiny flowers I fussy cut and added around my clusters and title.
On the right column, I combined a 3×4″ photo and a 3×4″ journaling card to mimic the stacked design on the left. Tucking in a floral cluster between them and then adding a banner gave it the perfect, simple touch it needed. The wood buttons made the best little accents at the top of my columns, giving the impression that they are pinned to this woodgrain paper. Such a fun detail!
I hope this layout gave you some inspiration to incorporate a variety of different-sized photos into your layout! If you’d like to see how ‘Love This Story’ came together, check out the process video below!
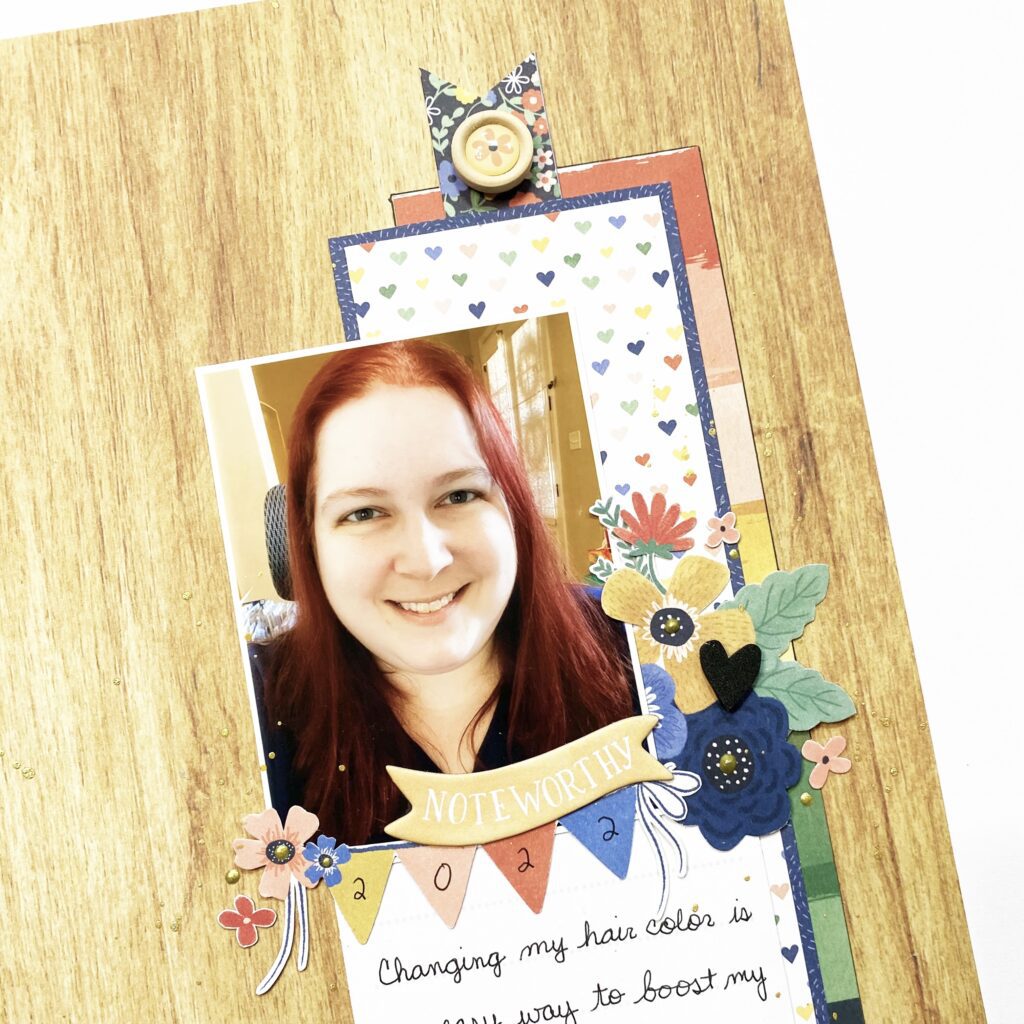
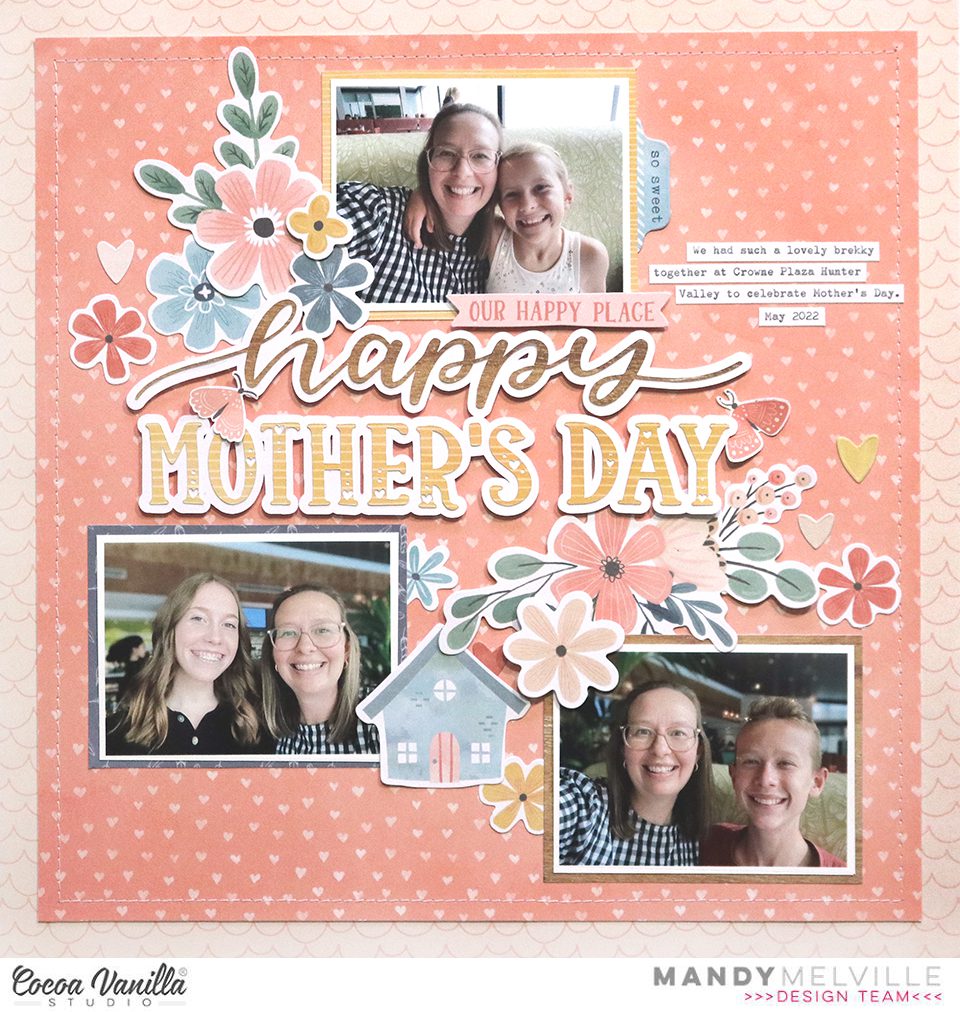
Mandy here today to share a new layout with you. This week on the blog it’s all about different ways of featuring your photos. When creating a layout I always try to make the photo/s the focus of the page. Sometimes I only need one photo to tell the story, and other times it’s important to include more, but either way, all of the other elements on a page are there to complement and support the photo and story. For today’s layout I wanted to include three photos – one with each of my kids on Mother’s Day, and I chose to use one of my all-time favourite collections, Daydream to document these photos.
I started this layout off with a sheet of the All Aflutter paper as my background. I trimmed it down to 11 inches square, added some machine stitching around the edge, and then matted it on the Happy Place paper. This framed the layout nicely, and helped to make all of the elements on the page feel contained.
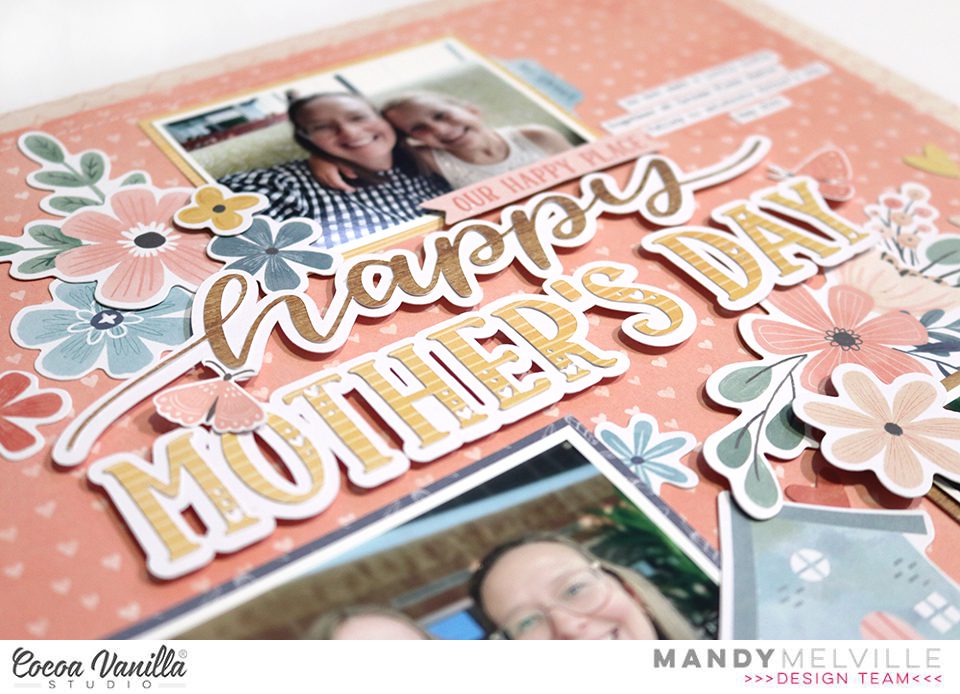
Next I cut my title using my new little Cricut Joy (which my hubby surprised me with for Mother’s Day!). I chose one of the phrases available to download within the Cricut Design Space and cut the word ‘happy’ from the Over the Rainbow paper and ‘Mother’s Day’ from the Sun Shower paper. I then created an offset and cut this from white cardstock, which helped the title to really pop and stand out from the background. I also adhered my title using foam tape to give it some nice dimension and shadows.
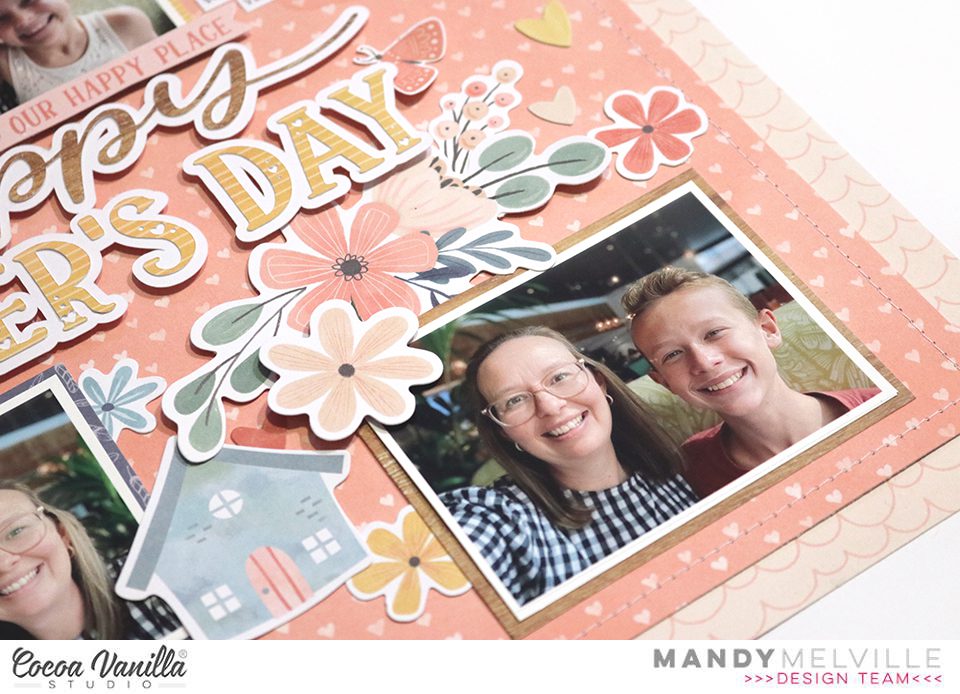
I matted my 3×4 inch photos with various patterned papers from the 6×8 Inch Paper Stack, and then arranged them around the title, creating a visual triangle.
Next I created two floral clusters, one in the top left and the other above the photo in the bottom right. This helps to give a diagonal flow to the layout, drawing the viewer’s eye down the page and through the title and photos. I used various floral and leaf die cuts in the clusters, layering them up and adhering some with foam tape for extra dimension and interest.
I finished the page off with a couple of little moths/butterflies that I fussy cut out of one of the 6×8 papers, as well as a few little heart stickers. I also added my typed journaling next to the photo at the top of the page.
Thanks so much for joining me here on the blog today. I’ve hope that you’ve been inspired by how I’ve included multiple photos on my layout.
Hey y’all! Laura Alberts back again with a challenge for this space themed collection, No Limits! I really enjoy seeing how far I can stretch a theme and this one worked beautifully for an Easter layout! Due to the bold colors in my sons’ outfits, these photos didn’t tie in terribly well with the typically pastel Easter themed collections, but were perfect for No Limits! I especially wanted pops of the blue and black in the background.
To draw plenty of attention to my photos, I highlighted them with bright yellow pocket page cards that really stand out on the darker background. By cutting them in half, I can stretch the pocket cards to mat my 3×4 photos! In addition, I fussy cut an entire 12×12 and A5 size page of the Nebula patterned paper, so that I could use these stars to scatter along the border of my photos. This detail adds such whimsy and movement to the page!
My favorite part of this layout is the fab word phrases I found in the cut apart sheet and the 6×12 sticker set! Love adding lots of words in addition to my title to capture the excitement of both my photos and my mood while scrapping these fun photos! The little chipboard and puffy stars were just the perfect finishing touches to add a little dimension and fun to the star border too!
I hope this layout inspires you to break the theme and try to find ways to use themed collections for your everyday or an opposite themed layout! If you’d like to see how ‘Love This’ came together, check out the process video below!
Hello papermaniacs! It’s Anna here with another layout made with new “No limits” collection. It’s also another page with pet photos. I know it’s becoming boring but nature blessed me with two human daughters and two good beagle boys and those guys need their layouts too, right? This time I made layout with photos of Pirat, who passed almost two years ago. I found those pictures in my photo box and title just pop up to my head. I decided to make it big and bold as a main decorative element of the page. I was on a scrappy weekend away with friends and I didn’t take much of my tools with me, including alpha dies and digital die cutting machine. That’s why I needed to be creative!
I started with picking few solid pattern papers in various colors, including the ones from A5 Paper Stack. 12*12 I used are named “Latitude” and “Spark”. Background of my page is amazing wooden paper called “Big bang”. You can never have too many wooden papers, right? As I mentioned before, I didn’t have any tools to cut letters for my title so I used simple pencils and scissors and sketched my own letters. They are wonky and uneven but they match the whimsy mood of the page. All you need to remember is to sketch letters in mirror reflection if you are doing it on the back of the paper (this way you don’t have to erase the pencil marks). You can also use existing letters as a stencil for more letters of the same kind.
I didn’t have my sewing machine with me so I added false stitching around the letters with white gel pen. It’s a simple and easy way to make elements pop more. The other thing missing on my layout is word “eyes”. I added simple, comic eyes instead. They are lurking at the doggo. Each letter is glued with a layer of foam tape to add dimension to the page.
I scattered some ephemera pieces between the letters, like stars, lightning and banners. I also added some around my two pictures. This is my “go to” move with every page. Photos look more “comfy” surrounded by various elements. I like mixing textures so I also added few wooden buttons and some cardboard stickers. Aren’t they the best element of each collection?
This page is a little bit less decorated than my usual layouts, but it often happens when you scrapbook on the go. You have to use what you packed and be more creative with creating embellishments. However, it’s colorful and has cute puppy photos so I still love it.
How about you? Do you like to scrapbook on the cropps? Or you feel lost without all your precious supplies next to your hand? Do you notice any difference in your style with limited elements?
That is all for today! Thank you so much for stopping by and see you in May!
Hey y’all! Laura Alberts back again with an Easter layout using the gorgeous Unforgettable collection! These sweet pictures of my daughters opening their Easter baskets were just perfect for this colour scheme. I split my photos into two clusters along the horizontal line of my background. I used a the frame from the ephemera pack and backed it with paper from the A5 paper stack, then tucked it behind one of the photos. Adding florals and a camera to finish off this cluster, then a few butterflies for movement.
On the right side, I added a cut-apart piece and clustered floral and ephemera circle behind that photo. Along the side, I added a tab, camera, and butterfly, as well as clear stickers to create a base layer under the other pieces. I love the mixed media style clear stickers for just this kind of accent.
I love these foam titles and just had to use ‘Bloom & Grow’ for this layout. It was the perfect sentiment for my darling girls who are growing like weeds! Layering the clear stickers gives the appearance of depth behind the title and photos.
I hope this layout inspires you to play with clear stickers in your layering, they can provide excellent bases for clusters! If you’d like to see how Bloom & Grow came together, check out the process video below:
Hello Friends! Welcome on Throwback Thursday kind of a post. This time I get a pleasure to rediscover one of the older Cocoa Vanilla collections. You know I love them all and I love coming back to them, combining bits and pieces and pattern papers. This time however I focused on one line only and I pulled out “Sunkissed”. It was hidden for the period of winter but it’s time for the big comeback of vivid colors and summer motifs! I pulled out two most expensive photos in my mamarazzi career and scrapbook them with little mixed media vibe. If you wonder why they are the most expensive, let me only tell you that I was convinced my new smartphone is waterproof… It wasn’t. At least I got those photos, right? :D
I started with sheet of watercolor paper as my background. I knew I wanted to use water so I had to be sure to use the proper base paper. Next step was to apply some clear gel medium through stencil with circles in different sizes. They are going to mimic the air bubbles in water. Gel medium is transparent and shiny when it’s dry and it’s also color resistant. Just make sure you dried it well before moving to next step.
I picked three Distress Oxide inks in “Mermaid lagoon”, “Broken china” and “Peacock feathers” colors and tap them all over the background and sprayed everything with clear water. Colors mixed with water well and started floating on the surface. I dried the background with the heat gun removing excess of water with paper towel. When everything was dry, I took a blending brush and applied some ink through the stencil in random spots. The background was done!
I was ready to start building my composition. My pictures didn’t have any white outline so I back them with some pattern papers to make them pop from the background. I used “Bright side” and “Sunny days” for this purpose. Idea for this page was to create an underwater scene so I kept it very monochromatic, in all shades of blue. I also cut out circles in various sizes using the same pattern papers adding few scraps from A5 Paper Stack.
Few bits and pieces from Ephemera Pack serve as an embellishments scattered around the photos. I also added my beloved Wooden Buttons and Puffy Stickers here and there. They are the best finishing elements. I was almost done with my page, when I noticed I also got some transparent stickers left so I added few of them in the background using mostly blue ones. They work best on light backgrounds, like the one I have in my page.
And that’s it! Simple, right? My favorite type of layout. That is all for today. Thank you so much for stopping by and I we will see each other in two weeks! I already created fun page with “No limits” collection for you!
Hello everyone. It’s Anna here with my next project made with amazing “No limits” collection. Super talented CVS Team has been playing with this line for a while and girls created all sorts of inspirational and fantastic layouts. Their ideas blow my mind! That’s why I though I will surprise you with something a little bit different this time. I made cards! Yep, not a common thing in my scrappy portfolio but I like to make a card or two from time to time. Especially when the idea comes to my mind for a specific products. That was the case this time. When I saw all those space related items like planets, stars and rockets, I though it would be fun to use them in an interactive design. I made three quite simple and easy to recreate cards.
First card has a slider, that moves the rocket up and down. It was the easiest and fastest to make and didn’t required any special tools. I started with cutting the background from A5 Paper Stack twice, in the same size. Then I took a craft knife and a ruler and cut out the strip of paper from one of the backgrounds. To estimate how wide the strip has to be, check what size of foam dots will you be using and add 1mm of each side. You will also need something small and heavy, like a coin. I used 1 cent, which was just perfect.
Next step was to add pieces of foam tape under the first layer of background leaving the tunnel for the coin to move up and down. Put the coin on the first layer of background, add second layer with the foam and glue them together. You should be able to see the coin under the strip. Next, add a foam dot on top of the coin and place the rocket. I used the one from Die Cuts pack, but I trimmed off the white outline to better fit the dark background. Slider is ready! Now you can finish the card by adding the planet on the bottom and some stars and smaller planets. My “Earth” was fussy cut from “Universal” paper. Stars come from Chipboard Stickers sheet and Puffy Stickers.
Second card also has a slider, but in a round shape. This time I had to reach out for dies and die cutting machine. I used to sizes of circles, one slightly smaller than another, to make a round tunnel for the rocket. Rest of the process was pretty much the same – foam layer, coin, foam dot. Decorating the card was also simple as I wanted the rocket to shine. You also need to remember to let the tunnel open so the slider can work smoothly.
This time my planet was fussy cut from the globe from Die Cuts pack. It was just a perfect size. Title for the card was created by cutting one of the stickers from 6*12 Sticker Sheet into pieces. I wanted it to match the “space” theme. Super cute Puffy Stickers stars are a perfect match for any project.
Last card doesn’t have any movable element. It has a shaker instead. I used one of the stars from Die Cut pack to make it. I actually used two of them (from the secon pack) becasue I wanted my star to hang of the side of the card, thus the other side of it would be visible too. If you are planing to place the shaker in the middle of the card, one star will be enough. I started making my shaker by adding a layer of think double sided tape on the left side of the star. I then added a piece of transparency and cut it into the proper shape. I did it twice, with both stars. Next step was to add a layer of foam tape cut into narrow strips on the edges of the star. It was ready to be filled with sequins and glitter. After that, I sealed the shaker with second star. This way, you can use either side of it.
Decorating the card as simple and easy, as with the previous cards. Rocket and few stars make the whole composition. “Reach for the stars” sticker was a perfect finishing touch.
That is all for today! I hope you liked my ideas for simple yet entertaining cards using amazing “No limits” collection.
Thank you so much for stopping by and see you in two weeks <3
Hey y’all! Laura Alberts back again with another layout using the stunning new No Limits collection from Cocoa Vanilla Studio! I absolutely love the versatility of this collection. I’ve used it for boy layouts, this is a teen layout, and I have plans for a baby layout! One of the many reasons I love Cocoa Vanilla designs is that they are so easy to use. This star explosion design was a lot of fun and uses the Big Bang patterned paper as a background with the Orbit patterned paper as a border. Loving this space theme!
Bursting out from behind my photo of my teenagers are a plethora of stars fussy cut from the 12×12 and A5 paper stack versions of the Nebula patterned paper. Having both sizes gives me a wide variety of stars to use as I scattered them out from the photos. Largely, I followed the lines on the Big Bang paper, but for some of the small stars, I just placed them randomly. To get a little pop of red on the page, I punched some tiny stars from the multi-colored stripe paper and added a word phrase from the cut-apart sheet.
For an extra pop, I used alpha dies on the A5 bright green patterned paper, then matted my photo with the same paper. Loved going a bit silly with this title as I point out the distinctly different styles my two oldest kids have. One has gone for super short with a shaved undercut and the other is growing super long hair! Love that! This title is an homage to their amazingly unique senses of style. To finish off this layout, like I always do, I added gold Nuvo and splattered with gold ink spray.
I hope this layout inspires you to give an explosion layout style a go! To see how the ‘Hair-mazing’ layout came together, check out the process video below:
Hello everyone! Today I have another layout made with brand new “No limits” collection. I once again reached out for the photo of my dog son and sent hit to the outer space. Idea for this page was maturing in my head since the day I got the collection. It’s filled with stars and fun cosmos related patterns so I though this kind of page is a “must do”. I didn’t have any specific picture so I had to improvise. This is the kind of page you make just for fun and to turn the idea into a project. Best part is everyone can recreate it becasue there are no special tools required like digital die cutting machine. I am a big fan of my Silhouette Cameo but I know not everyone has one and can be frustrated that some designes require this expensive equipment. That’s why I decided to make this page with handmade rocket. You can of course use cut file to recreate it but you don’t need to.
I cut every element of this page by hand with just a scissors and without any precise measuring and drawing skills. I started with printing my photo and cutting it into circle to establish the size of the rocket. Then I mixed several patterns from A5 Paper Stack and “Spark” paper to create a rocket. I was using one of the rockets from Die Cut Pack as a reference. It’s made out if basic geometrical figures cut by hand. They are not even, lines are wonky, but this is exactly what I was aiming at. After the rocket was finished I took my sewing machine and added some stitching of the edges for even more texture. You can replace them by fals stitches made with white gel pen.
I ended up cutting my dog out of the background and placing him in the round frame backed with piece of acetate creating a rocket window. I decided that the background in the photo was just too distracting. Word “epic” from Chipboard Stickers Pad became the name of the spaceship.
“Eclipse” paper is a perfect background for the outer space adventure! I places my rocket over it and added few wonky planets cut by hand here and there. Next step was to add title. It’s made with a set of Thickers in matching colors. My doggo is for sure out of this world! You can also add some other “space” related titles like “Take me to the moon”, “You are my moon, my sun and all of the stars” and probably few more. I finished my composition by adding few stars from Die Cut pack along and super cute puffy stars and planets from Puffy Stickers pack. Three wooden buttons add great texture. White splatters create make it all look even more like a space.
If you want to learn how this page was made, I recorded a process video for you!
I hope you will enjoy watching my Laika in the rocket.
That is all for today. Thank you so much for staying with me and see in again in two weeks!