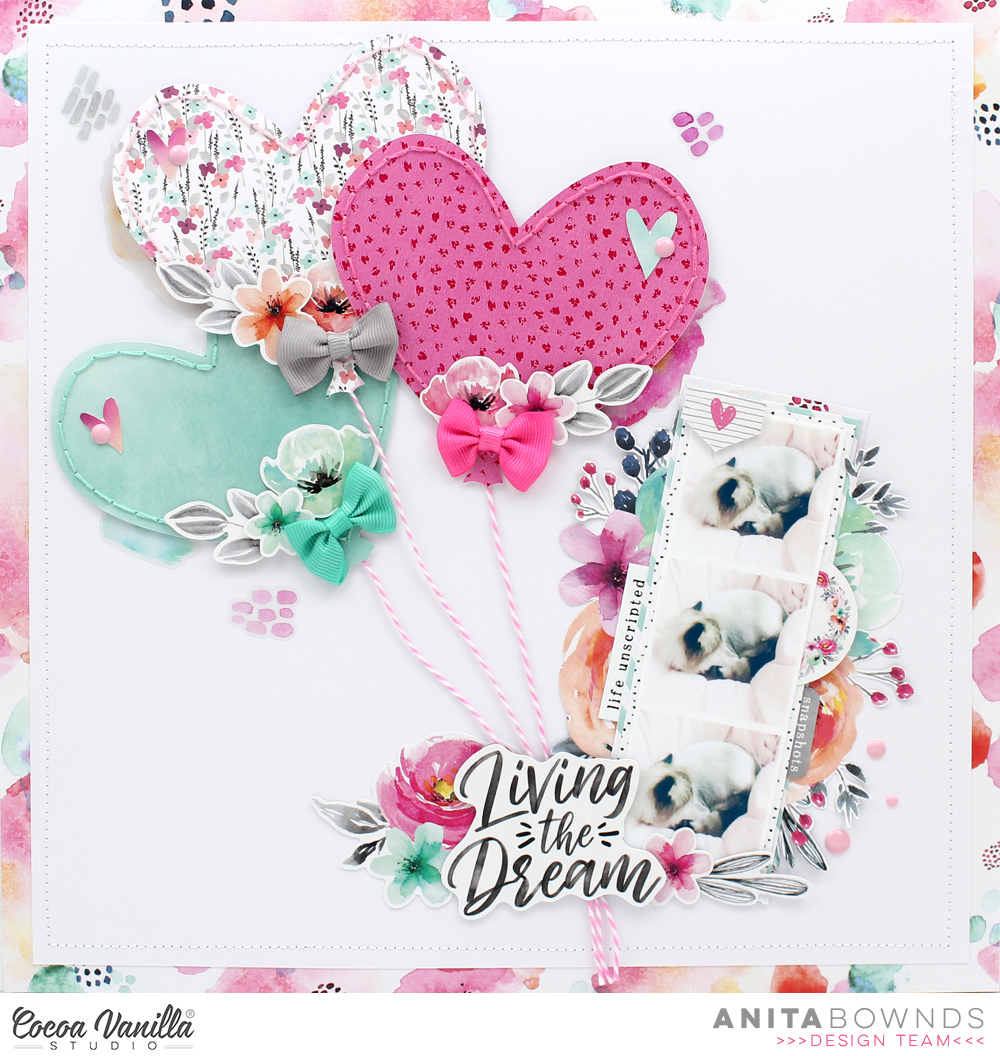
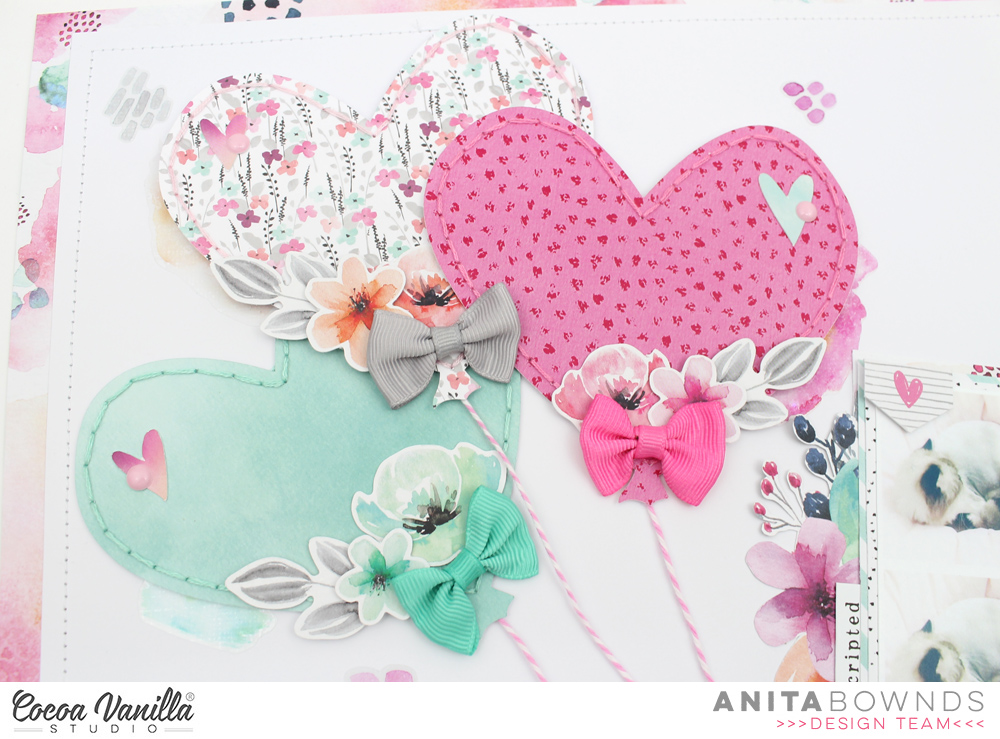
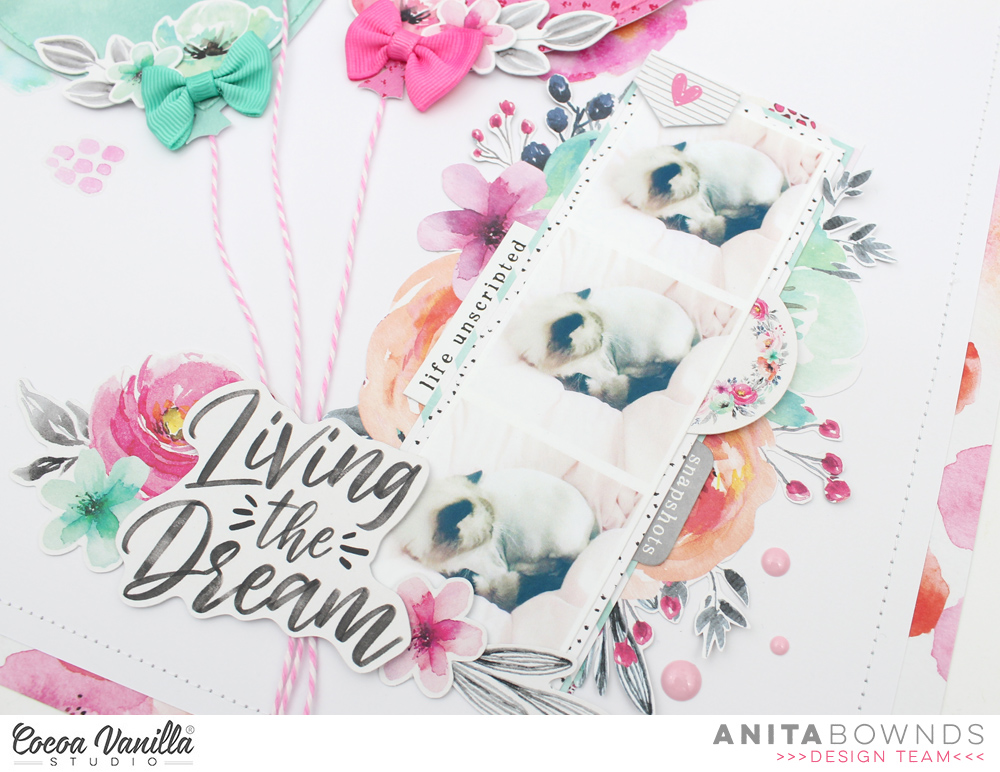
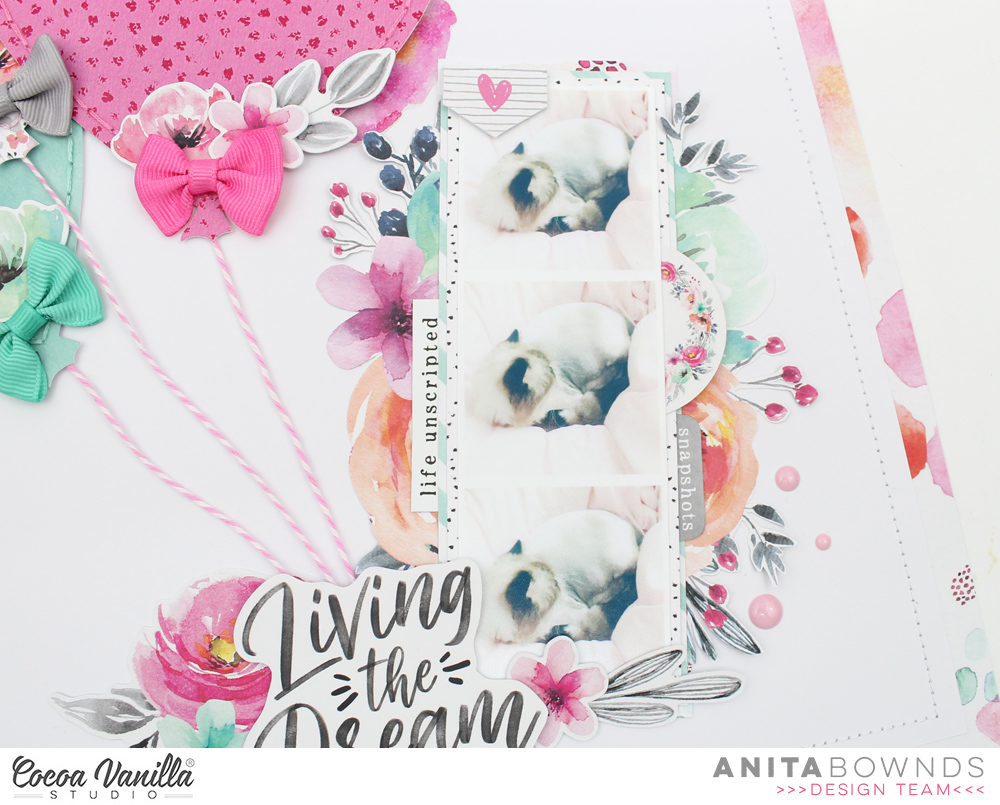
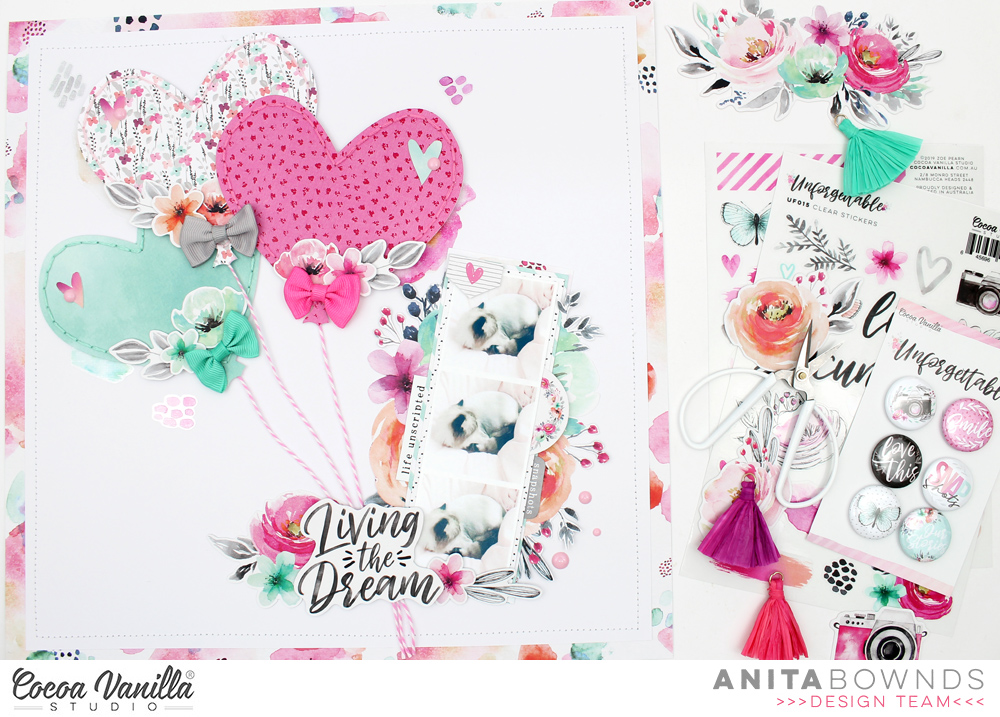
Hi crafty friends, Anita here with you today sharing a sweet layout using the beautiful unforgettable collection
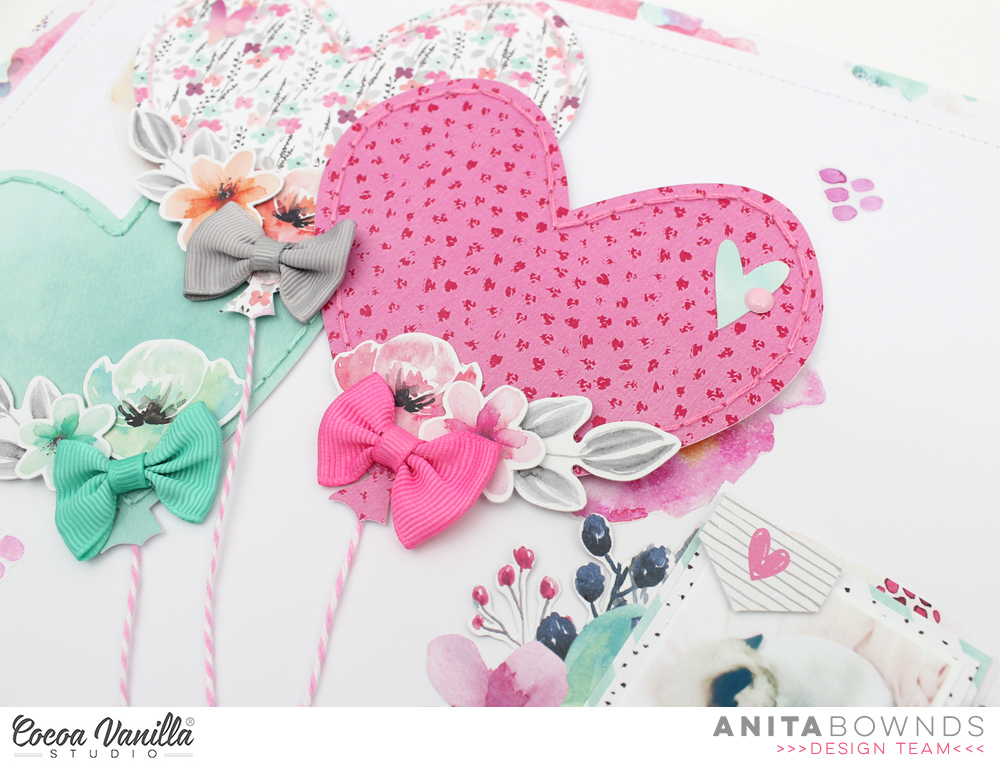
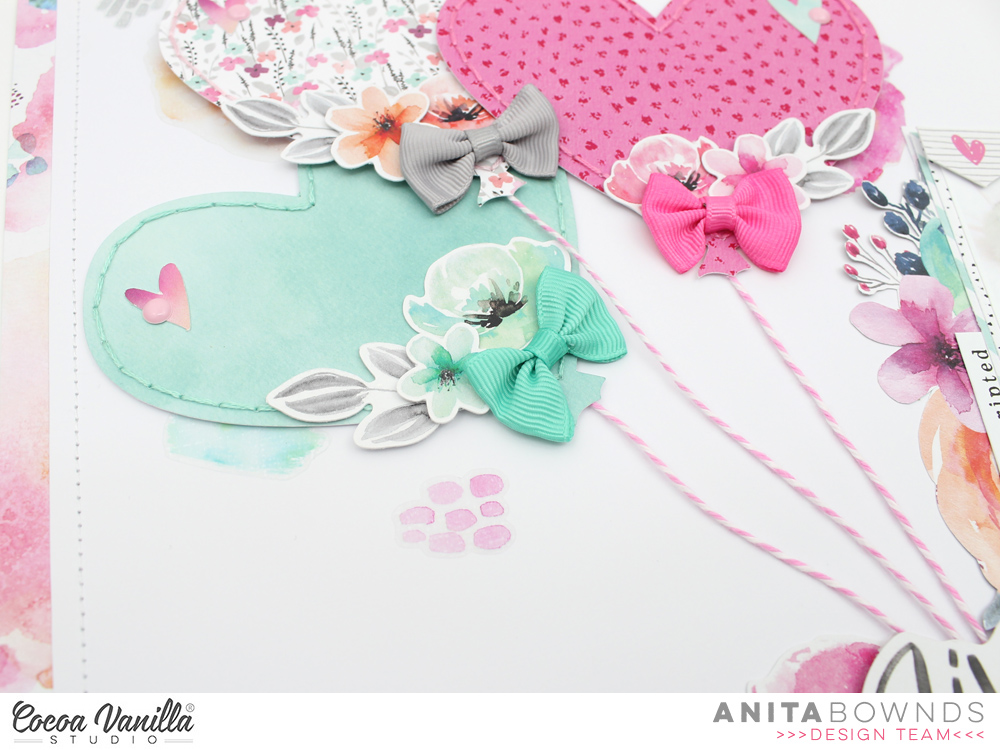
The layout is all about my kitty Kushan who thinks Eve’s beanbag is one of his beds…I’m sure he probably thinks he’s on a big pink cloud. So Today I had to include the bows and tassels on my layout I decided on the bows As I had a idea of floating heart balloons in the air.
I started by selecting 3 pattern papers from the 6×8 paper pad and using a cut file from the silhouette design store and cut 3 heart balloons out then I hand stitched around each balloon using a matching colour thread then I added some twine to the back and double sided foam tape to pop it of the page then I layered them onto my trimmed white cardstock on a angle.
Then I matted my white on pattered paper sprightly and machine stitched around the border of the white cardstock then using more patterned paper from the 6×8 paper pad I matted my photo on 2 different papers .
Then I added fussy cut flowers from paper glorious on each side of my photo
Then I pulled the twine down straight to the bottom of my photo and adhered my title from the ephemera pieces then I added accessory stickers and ephemera around the photo
Then I use 3 of the bows from the bows and tassels to add on each of my balloons then tucking flowers from the ephemera pack around the bows to add a extra pop of colour and to finish of the layout I added clear stickers and enamel dots
Hi lovelies! It’s Danni here today sharing another guest designer layout with you. This time I was very keen to get playing with the freebie cutfiles that match the new Unforgettable collection.
I first cut a large section of the heart wreath cutfile on my Silhouette machine using white cardstock – I just love the way white pops on the gorgeous papers in the collection. I went ahead and backed some of the cutfile with different papers from the 6×8 paper stack, making sure to leave some open spaces to keep it light and airy.
For my background paper I chose Lacewing for that gorgeous peach floral B side, then I tore strips from Natural Beauty and Story Teller (my two favourite papers from this collection so far, I can’t stop using them!).
I layered the strips to the left side of the page and added a crepe paper ruffle underneath for extra texture. I made sure to curl the edges of the torn paper strips up a little, then slipped the cutfile under the edge of the ruffle, creating a half-wreath peeking out from beneath the layers. This created the perfect spot for my pics to go.
I added some layers behind my pics with the 6×8 paper stack and tissue paper, added a little dimensional foam and placed my photos overlapping each other slightly. I then embellished my photos using some ephemera, a flair button, tiny word stickers and one of the adorable bow embellies.
At the top right of my page I created a small cluster with a label sticker for the date. I also added some floral embellishments peeking out from between the paper layers to the left of the page.
My title fits perfectly in the space between, with the foam title words again making the most perfect addition to the page. I can’t get enough of these gorgeous script titles! For finishing touches I sprinkled some enamel dots around the page in groups of three, splattered some white ink and added my journaling inside the circle of the wreath cutfile using a white gel pen.
I love how perfectly this layout represents my photos of my husband and I enjoying the sunshine in the garden, and how perfectly the colours match the peachy coral dress I wore.
I hope you like this layout as much as I do! Thank you so much for joining me today. Happy scrapping!
Hello CVS fans. It’s Anna here with my newest layout featuring new product in Cocoa Vanilla family. “Unforgettable” collection – the newest line designed by Zoe – features two new products. One of them is a set of foam words and second it a pretty package of bows and tassels. And this is what I will be focusing on today.
My favorite way of using any tassels is to add them to the mini albums covers creating dimensional embellishments hanging freely on the side. I also like to create garlands with paper elements and real tassels on the pages. I decided to use this second idea on my layout.
I cut out two big tags from papers with wooden pattern (did I mentioned how much I love wooden patterns?) and added stitching around them. Next step was to put a colorful string through the holes of the tags adding all four tassels from the packaging. I created kind of a lose loops and glues the string to the base paper. I wanted to use this pretty white paper with black words for a while and it was a perfect occasion.
To make the garland more complex I added two smaller tags – one from ephemera pack and one from sticker sheet. I finished the composition by adding pretty flowers here and there plus some smaller elements from ephemera pack. I also fussy cut a lot of butterflies from one of the pattern papers.
Two bows closing the composition from top and the bottom were added at the end as my final touch. I am so in love with this new “Unforgettable” line. I feel so inspired by the patterns, flowers and cute embellishments.
Thank you for stopping by and see you in two weeks with some other projects. I have in mind something different than a layout.
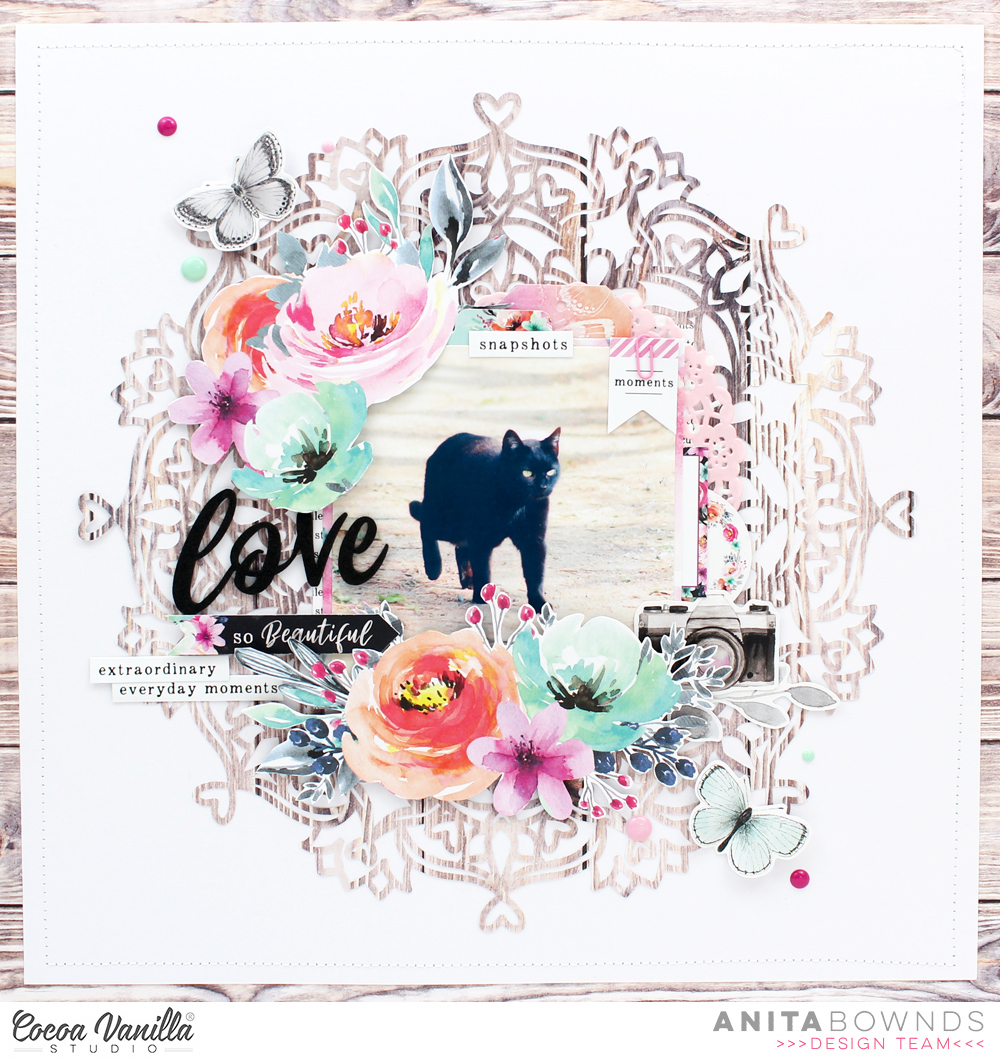
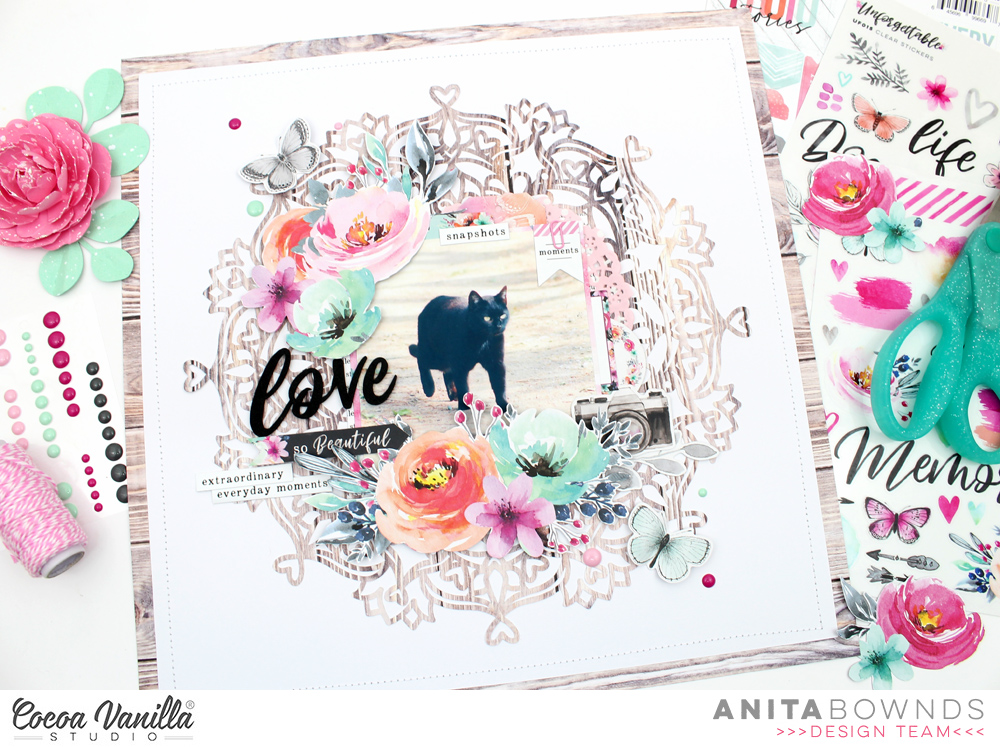
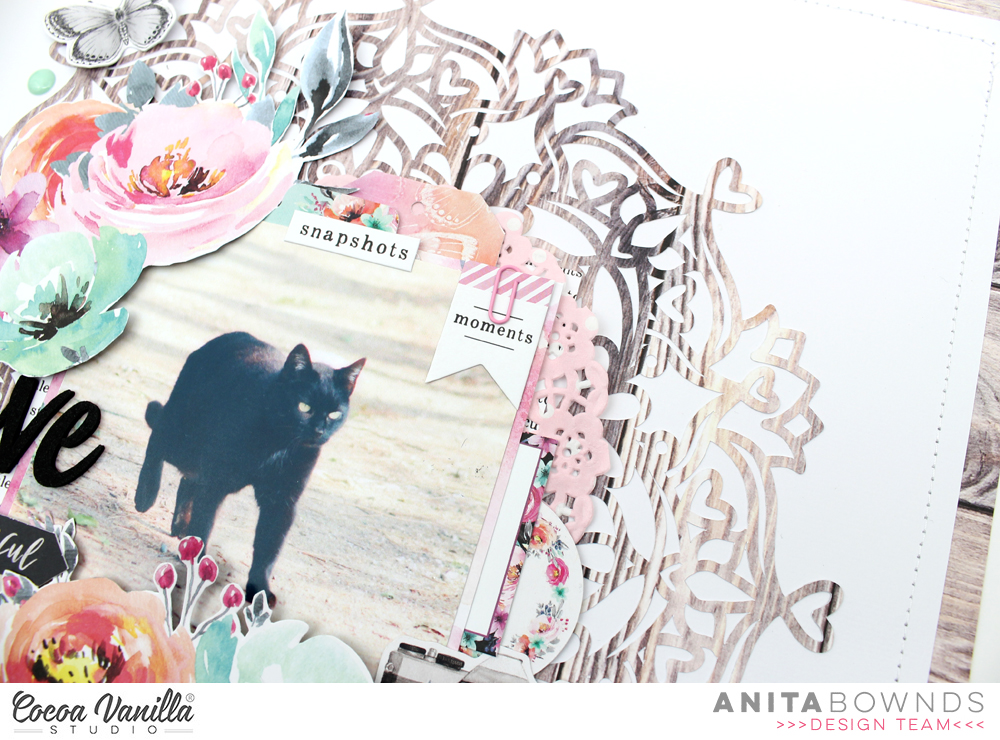
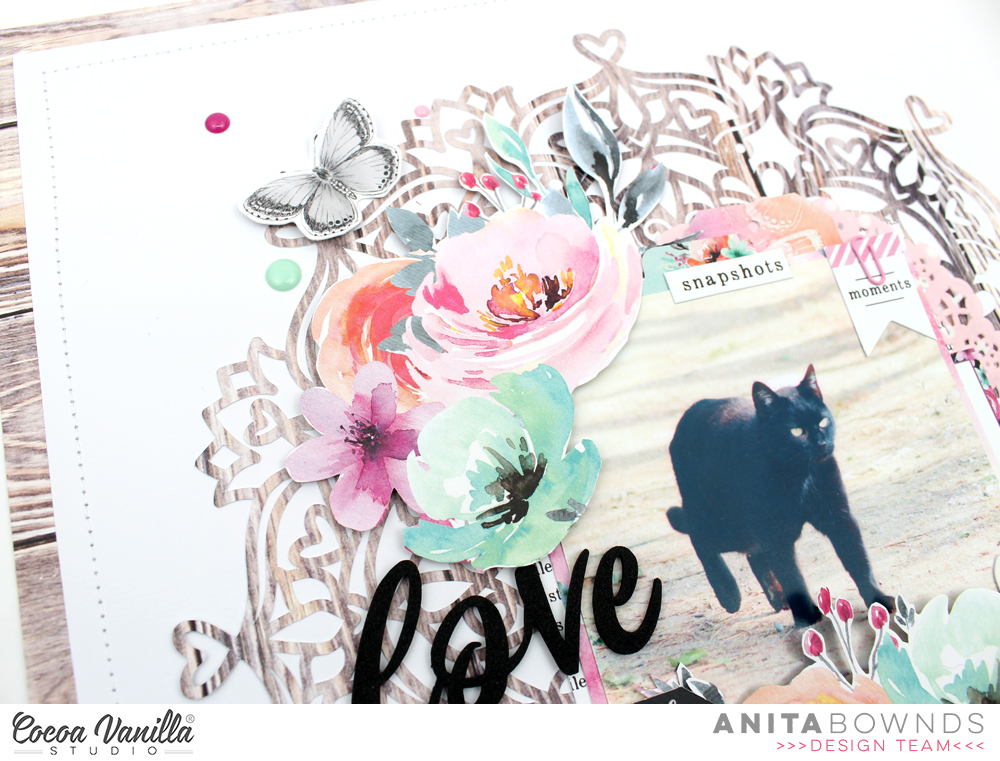
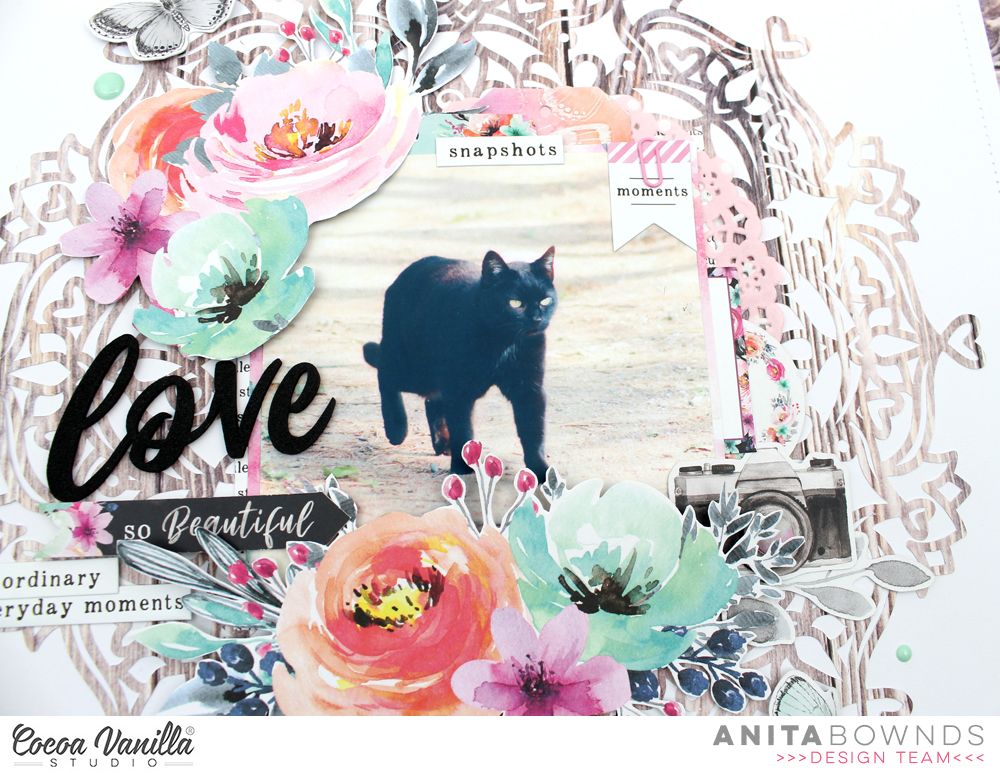
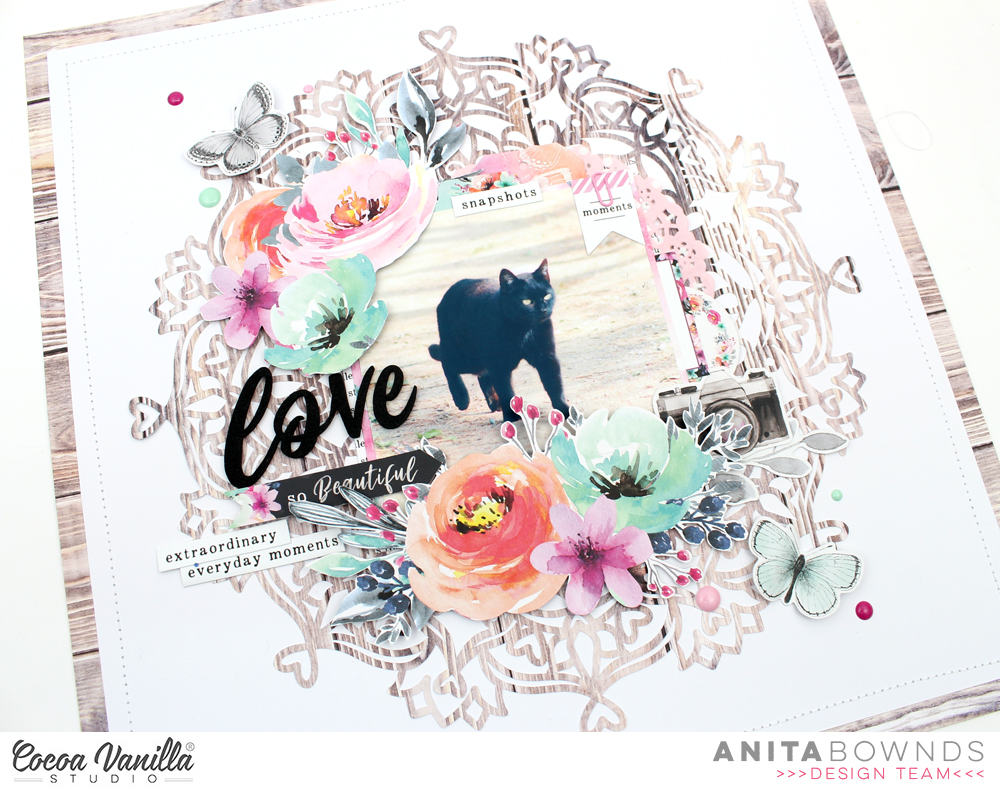
Hi crafty friends, Anita here with you today and I’m using the very beautiful unforgettable collection and my layout is all about our kitty Luna who loves following me around the garden to take photos I’m sure she’s thinks she’s part dog…..
so with my layout I started off by choosing a beautiful mandala cut file from Paige Evans
And natural beauty pattern paper and adhered it in the middle of my trimmed white cardstock and with the leftover of the natural beauty pattern paper I backed my white cardstock and then machine stitched around the border
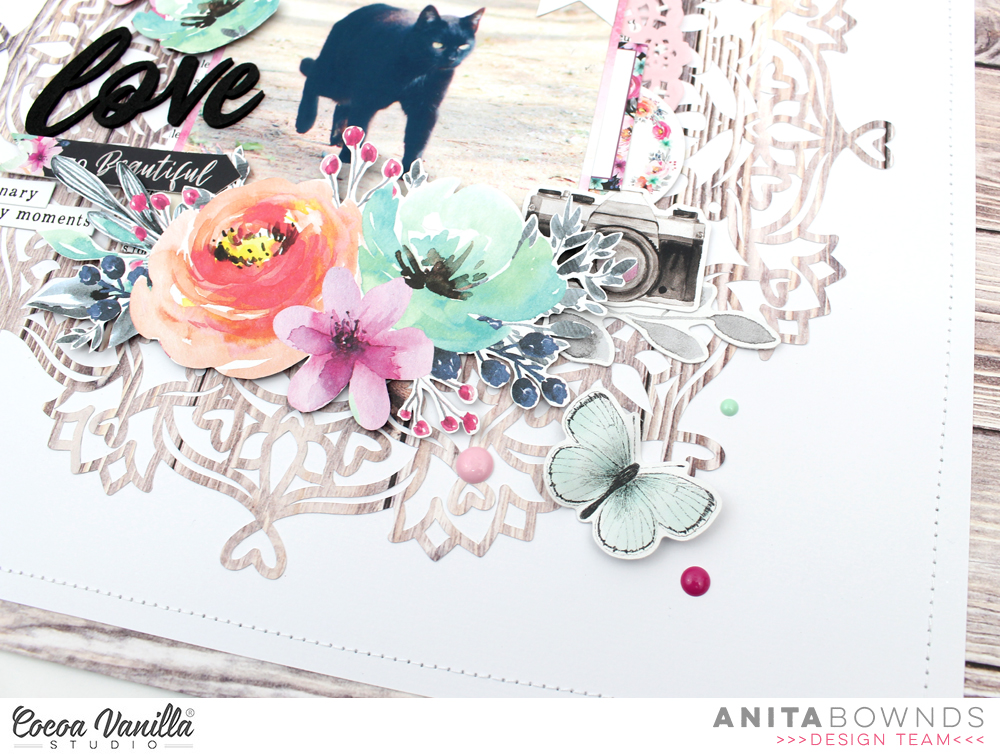
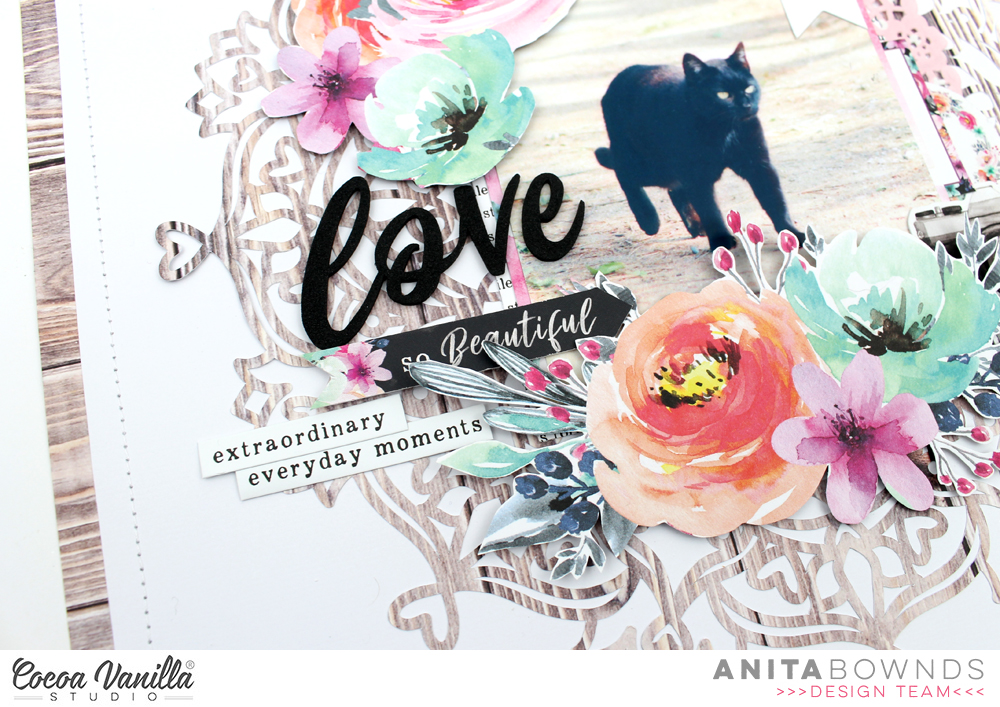
I chose papers from the 6×8 paper pad to back and add layers to my photo , then using a pink doily and a few ephemera pieces and sticker from the accessory stickers sheet then I added them to the top of my photo and using pattern paper glorious I fussy cut out some flowers to add around my photo and popped them up with double sided foam tape to add dimension
Using the foam title stickers I added my title in between the fussy cut flowers then I added a few more die cut ephemera bits around the photo and phrase stickers from the accessory sticker sheet and to finish off I add some enamel dots.
Mandy here today to share another layout using the GORGEOUS new Unforgettablecollection! I’m totally loving the beautiful butterflies and the florals in this collection, and I knew that I wanted to feature them on this page! I documented a photo of my eldest daughter Abigail taken earlier this year, and I used this layout as an opportunity to journal about how proud I am of her.
I started by trimming down my white cardstock background and matting it firstly with the Natural Beauty patterned paper (reverse side), then with the Unscripted paper (reverse side). I also added some machine stitching around the white cardstock to give the layout some texture.
Next I matted my photo with one of the papers from the 6×8 Paper Stack, and then I created a pretty floral cluster to the right of the photo. I used one of the larger floral die cuts as the base for the cluster, and then I tucked some extra leaves and smaller flowers into it. I finished it off with some more leaves which I cut out of white cardstock using the beautiful new Unforgettable Cut Files. These are designed by our very own design team member Gwen Wruck, and they’re available to download for FREE here.
As I said, I knew that I wanted to feature those gorgeous butterflies from the collection on this layout. I cut the larger ones out of the Pretty Bits patterned paper and the smaller ones were from the Lacewing paper. I arranged them so that they look like they’re floating from the bottom right up to the top left, giving the layout a diagonal flow. I adhered them with glue just in the middle, so that their wings would lift off the page, giving them lots of dimension.
I also created another smaller floral cluster in the bottom right hand corner of the page. Once again I used a combination of die cuts, along with leaves from the Unforgettable cut file set.
I’m LOVING the addition of the Foam Title Stickers in this collection! They make it so easy to add a title to your layout, and the scripty font is really pretty! Plus I love the contrast that the black adds against the bright colours!
I finished the layout off by adding some typed journaling strips, a few little word stickers, and a couple of the little hearts included in the Foam Title Stickers pack.
Thanks so much for joining me here on the blog today! I hope that you’ve been inspired by my layout! I’ll be back later in the month to share some more inspiration with you!
Hi scrappy friends! Guest designer Danni here, sharing another layout featuring the gorgeous Unforgettable collection. I have been having so much fun creating with this collection, and this time I decided I had to dive into those delicious florals and make a beautiful romantic layout.
I used Natural Beauty and Sprightly patterned papers to create a diamond-shaped background, including some torn vellum for texture.
I had this lovely roses cutfile sitting in my stash, so I decided to incorporate that, backing it with several patterned papers from the 6×8 paper stack and some more vellum. I popped it up off the page by adding some dimensional foam behind the patterned paper.
My photo was matted using the lovely turquoise and black & white spotty papers from the 6×8 paper stack, and I distressed the edges to add texture. For my title I cut this beautiful quote card from the Story Teller cut-apart paper and backed it with the peach paper from the 6×8 paper stack to make it pop against the black & white photo.
To embellish the page, I went to town with the florals from the ephemera pack. I adore florals and this ephemera set is packed full of the most stunning floral die cuts. I used the two largest clusters at the top-right and bottom-left of the diamond to emphasise the diagonal flow of the page, drawing the eye across my photo and title. I added some smaller florals either side of my photo with some of the beautiful leafy springs from the ephemera pack.
To finish off the layout I scattered three tiny word stickers from the accessory sticker sheet, added some delicate white ink splatters and sprinkled some of the white enamel dots from the collection around my large floral clusters.
This layout turned out so dreamy and romantic, I’m absolutely thrilled to be able to add this layout to my wedding album. I really hope you enjoyed this layout today, thank you for joining me!
Hello crafty Friends. It’s Anna here with another project made with brand new “Unforgettable” collection. I made another layout but it’s not surprise for you :) Once again I combined white background and a lot of layers of papers. I also used flowers as they are so pretty and tempting. Luckily I have two girls at home so I can use florals with almost all of my projects.
Pink paper called “Unscripted” was perfect to cut few roses and mix them with ephemera flowers. I set my machine to cut them and worked with my background in the meantime. I used blue Distress Oxide ink and applied it through stencil. Next step was to add some water to make it look more dreamy.
I used a strip of fun pictures of me and my daughter using filters. I love those mini photo sessions of us two. I backed my picture with a lot of paper layers. Using 6*8 paper stack helped me save my 12*12 papers :) I also fussy cut three big butterflies from paper called “Pretty bits”.
My title is a combination of amazing foam titles and some older black alpha stickers. I also added few transparent stickers here and there on the background. It’s a good way to add some special touch to white layout base.
I finished my page by splashing everything with pink and black inks. This kind of little mess is my signature style :) That is all for today. Thank you for stopping by <3 If you need more inspiration, check our FB group – Cocoa Vanilla Studio Community. You can spot a lot of amazing projects there to feed up your mojo.
Hello Scrappy friends! It’s Michelle back here today with a new layout share featuring the stunning UNFORGETTABLE collection. I’ve stepped back in time with a couple of super cute photos of Leila that I wanted to re-document and reminisce over. That cute little face really loved posing for the camera back then, not so much these days unless bribery is used HAHA
I challenged myself to use only pattern papers from the 6×8 paper stack fore this layout and I think I did well creating a simple stack of layered patterns as the base for the layout. I really love the smaller designs as you can cram more of them onto a page together.
I distressed the edges of the papers, roughly tore the text pattern rather than cutting and adhered them all flat to the page before folding up the edged slightly to add some slight dimension. I also added a piece of foam sheet to the back of the framed photo to raise it slightly higher than all the rest and layered it together with one of my favourite doilies.
I felt like this layout didn’t need a large title to take the focus away from the sweet photos. Instead I’ve created a large ‘cluster’ of florals and ephemera pieces and used a black banner tag for the title name.
To the top right of the photos I’ve added in a smaller cluster using similar items to the larger group. I follow this design technique on most of my layouts to create balance and direct flow of the layout (if thats even a thing as honestly I just go with the flow and slap things here and there HAHA). Lastly I added a few splatters of gold ink and called it done. Super quick and easy this layout was to create, which I love! I hope you enjoy it just as much as I do.
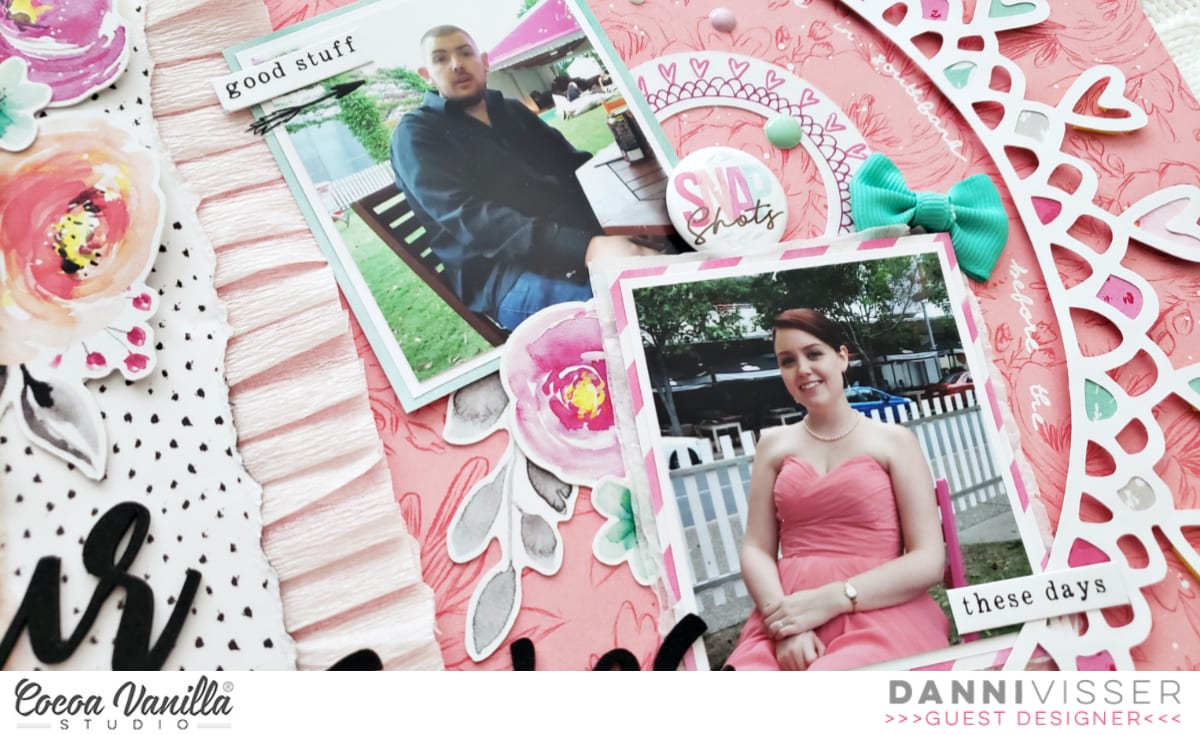
Hi everyone! It’s Sue Plumb here to share my latest layout featuring the gorgeous ‘Unforgettable’ collection. For this page I wanted to document some sweet photos of my hubby and our cat that were taken when he was just a kitten. (And yes, I think a pop of purple is perfectly acceptable for a masculine page!)
Starting with a white cardstock background, the first paper I was drawn to was the gorgeous wood grain print of the Natural Beauty paper. I am a huge fan of wood grain papers, and I have to say, I think this one is my favourite so far! The tones, the pattern of the grain – it’s just perfect. I cut a large piece and placed it vertically on the left side of my page.
I overlaid the wood grain print with a piece of the minty green watercolour print paper from the 6×8″ Paper Stack (in the 12×12″ papers this is the reverse print of the Garland paper). I used a notebook style paper punch to punch the edge of it for extra interest.
Then it was time to add some horizontal structure to my page. I used an extra piece of the same mint paper again; along with a piece of the black & white leafy print from the reverse side of the Natural Beauty paper; the grey stripe from the reverse of the Glorious paper; and the mint diagonal stripe from the Sprightly paper.
I decided to frame each of my photos using frames from the Die Cut Ephemera pack – one a gorgeous polaroid style wood grain and the other a black and white wreath. I positioned each of them over the patterned papers layers, using some cardboard behind them to pop them up from the page.
Now it was time to add some fun embellishments to bring all the elements of my page together.
I started with the Foam Title Stickers, choosing the word hello and adding it alongside my top photo. I then reached for the Die Cut Ephemera pack again – choosing the Living the Dream phrase piece to go alongside the lower photo. Between the two, I added the purple ticket from the ephemera pack.
I then took another frame from the ephemera pack, this time a sweet circular frame with a doodled heart border. I cut it into two pieces, tucking the larger piece around the corner of my top photo, and the second smaller piece in behind the hello sticker. I also added a label for my journalling that was fussy cut from the Story Teller paper.
After writing my journalling on the label, I added the super cute retro style camera and a small heart (both from the ephemera pack) to create a small cluster. Then, to balance it out, I added a small strip of the reverse side of the Natural Beauty paper at the top of my page, and the true story sticker from the Accessory Sticker sheet over the top.
Almost done – time for a few finishing touches! I added two small hearts from the Clear Sticker sheet; the purple butterfly from the Die Cut Ephemera pack; and the Life is Good sticker from the Accessory Sticker sheet.
I then stamped the oh happy life phrase using a stamp from my stash and added a few tiny splatters of berry ink.
That’s all from me today, thanks for stopping by so I could share this with you. The ‘Unforgettable’ collection is now hitting the shelves of retailers around the world. If you have a chance to get your hands on it, just do it! It’s really a stunning collection and I know you will enjoy creating with it as much as I am.
Hi everyone! My name is Danni, and I’m so excited to be here today sharing my first layout as guest designer using the exquisite new Unforgettable collection. For those of you that don’t know me, I have both a son and a daughter that I love to scrap, and while I was immediately drawn to the feminine floral elements, for my first layout I really wanted to highlight the versatility of this collection by creating a layout for my boy.
I’m using a beach photo for this layout, so I began by tearing large sections of the 12×12 papers to create a bit of a beachy scene, using Natural Beauty, Garland and Story Teller for the sky. I tore Garland in small sections to create a ‘wavy’ effect. For some more waves I cut some wavy shapes on my Silhouette, inked the edges with blue ink and machine-stitched them down using some wavy and squiggly lines. I wanted this to feel natural and organic, so I wasn’t trying to make the stitching perfect.
Next, I mixed some coarse texture gel with gold acrylic paint to create a really fun sandy texture and scraped that onto the page in different places along my ‘boardwalk’. I really love the fun texture this provides! To finish off my background I used some turquoise, gold and white liquid inks to splatter all around the page.
I broke into the 6×8 paper stack next, using the black and white type paper and a thin border of the peach floral to add a bit of colour. I popped my photo up on foam to create some dimension, then added my title using the gorgeous foam title stickers.
I went to town with embellishing, using a combination of the embellishment pack, accessory stickers, clear stickers and a flair button, plus a couple of the adorable hearts from the foam titles stickers to create three clusters around my page. I popped a few of the embellishments up on foam to create some visual interest. I wanted another pop of the peach colour, so I hand cut some starfish from the peach paper and added some dots with a white gel pen, then added one to each embellishment cluster.
To finish of the layout, I added my date on a label sticker below the title, journaled below the title with my black gel pen and added a sprinkle of the enamel dots to each embellishment cluster.
I’m in love with this finished page! I really hope you enjoyed joining me today, I can’t wait to create some more beautiful pages using this incredible collection.