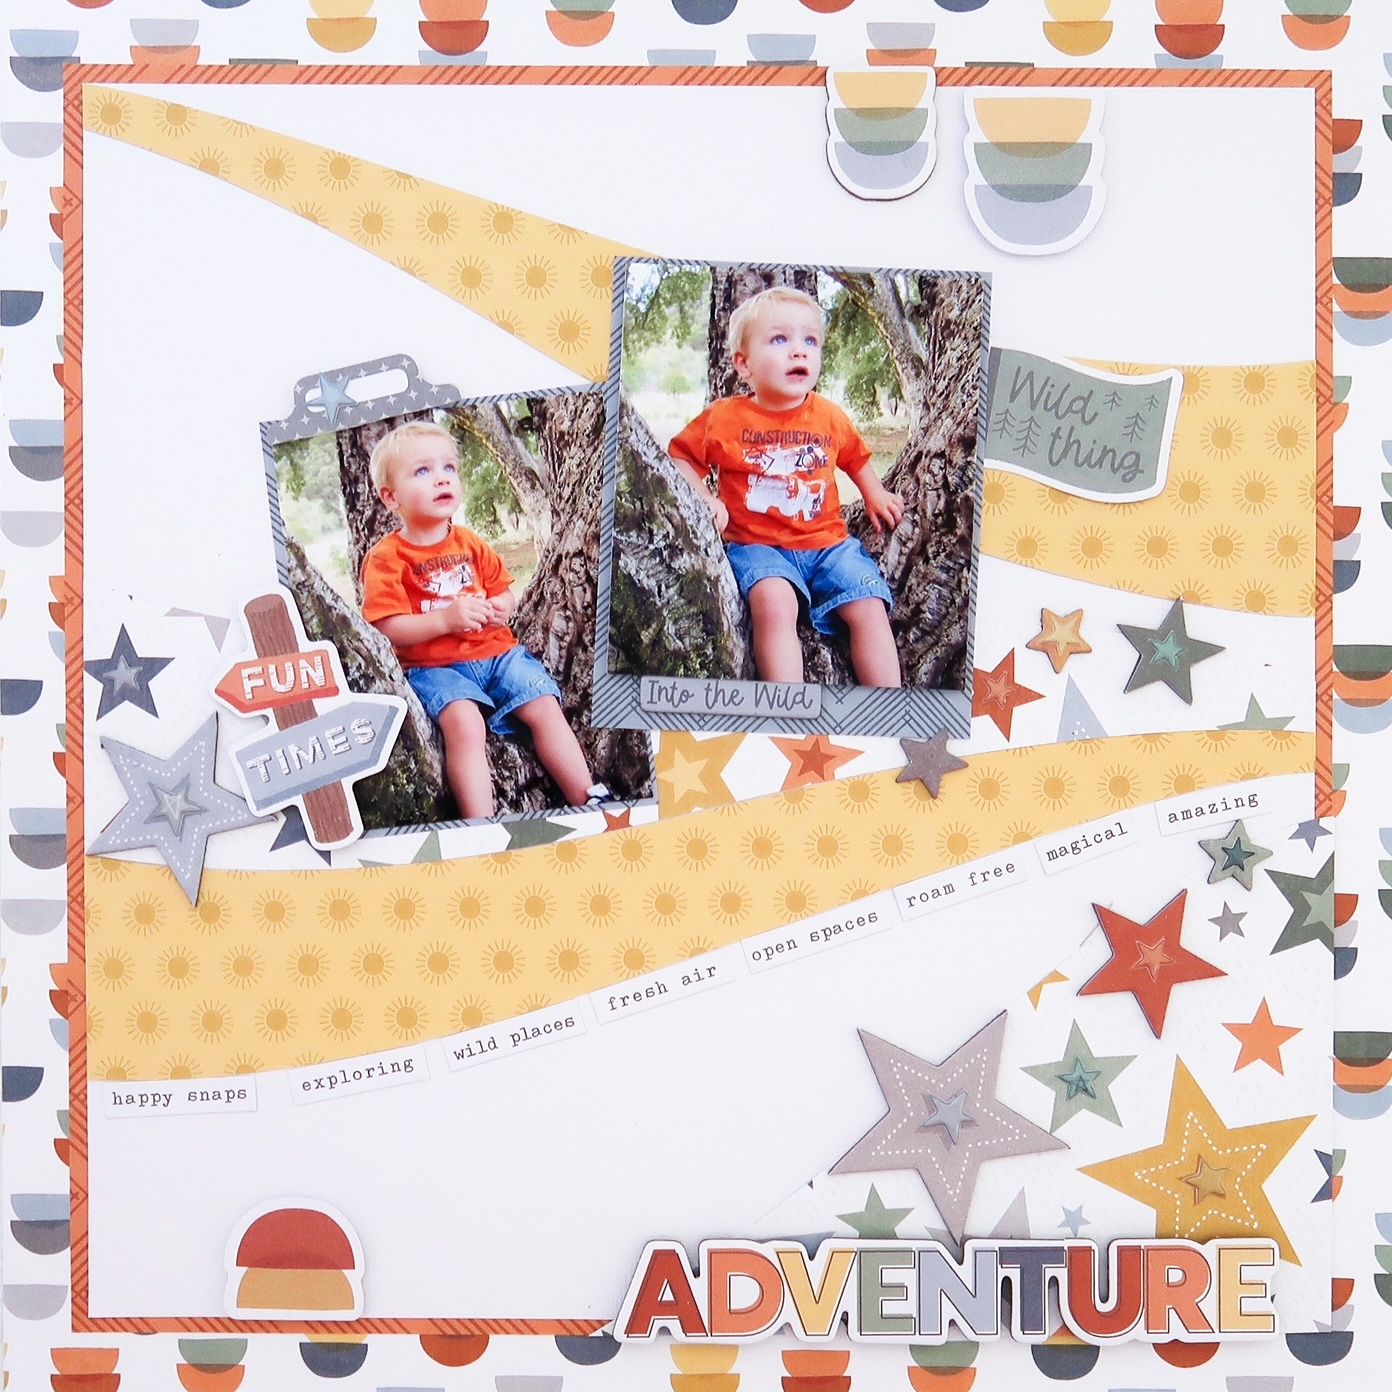
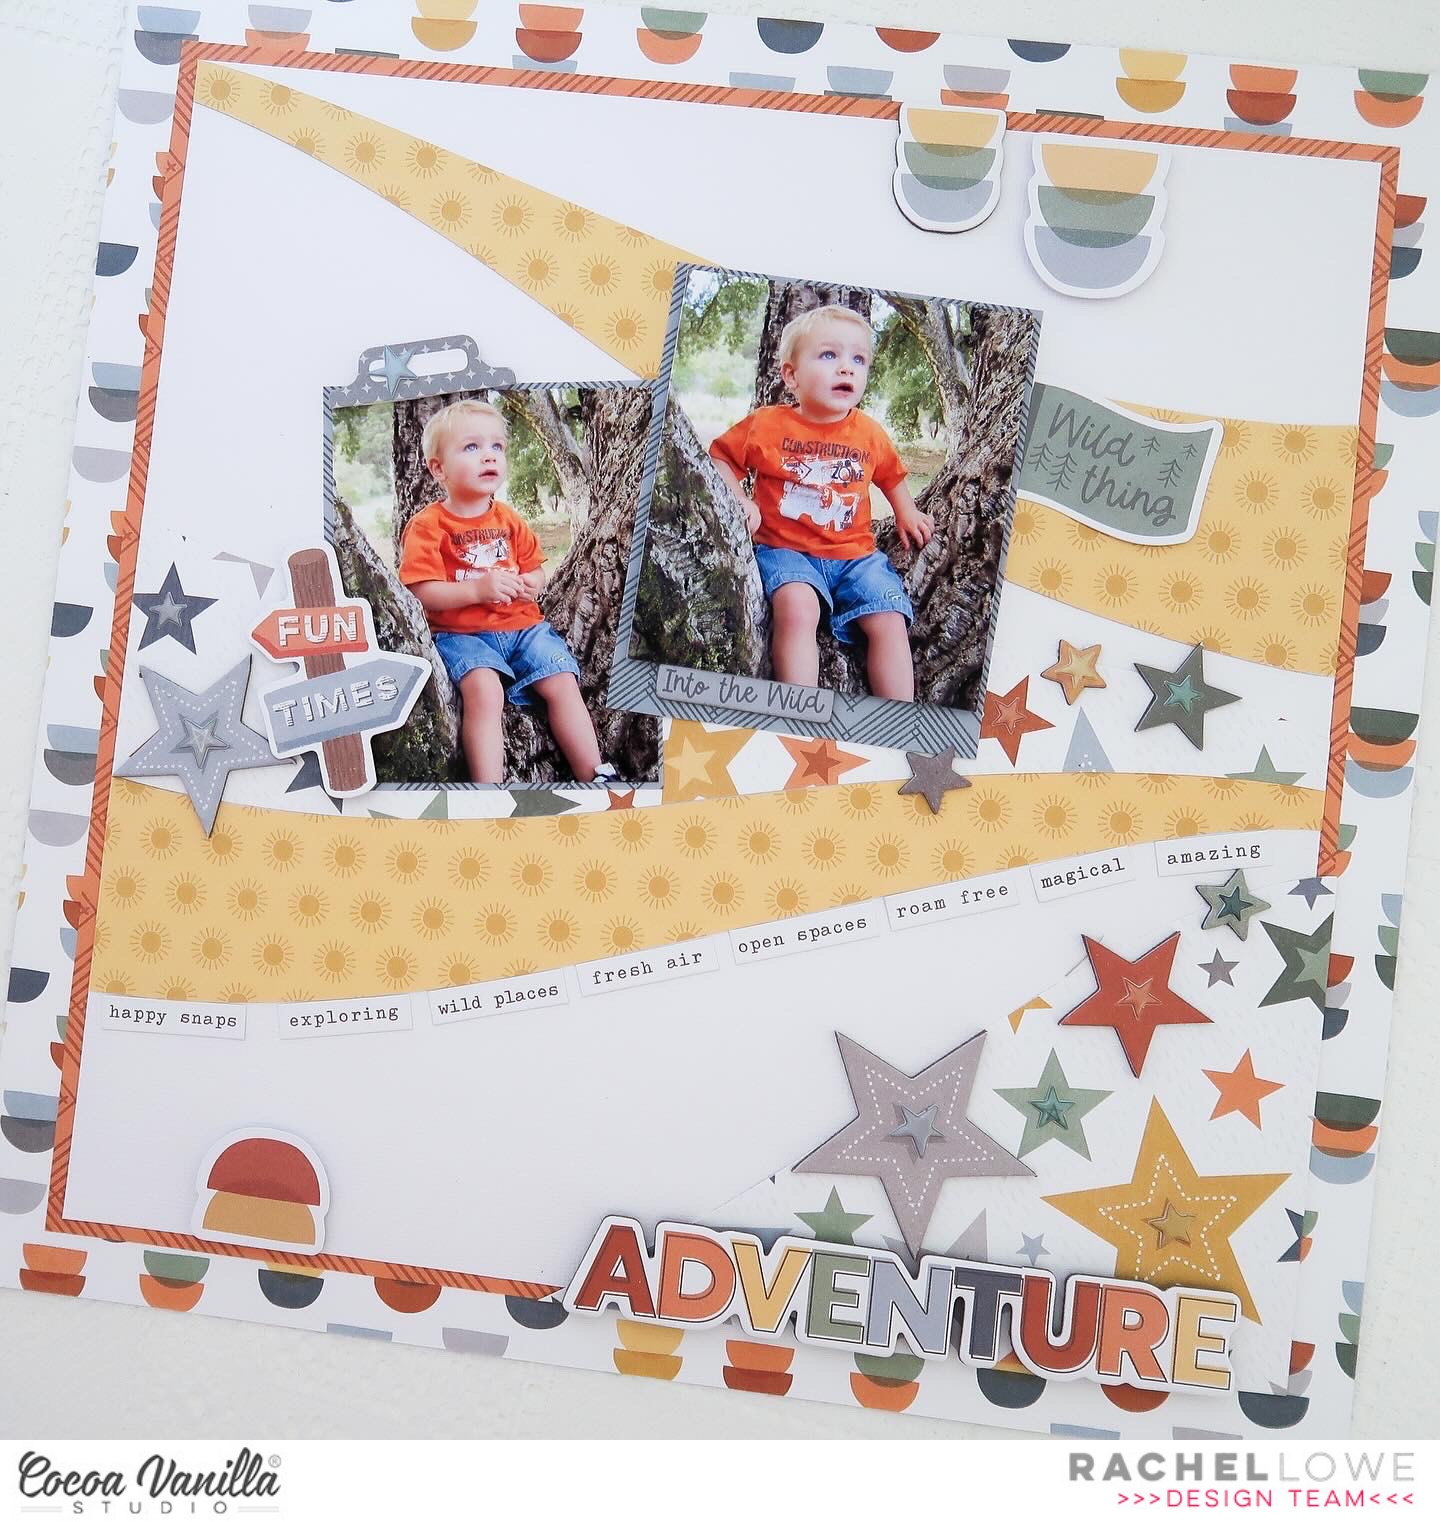
Hello crafty friends! Today I am sharing a layout using the fab Great Escape collection. I just love these photos of my youngest when he was a little one. The orange T shirt and ‘nature’ background are perfect colours for this collection.
I love white as my base but adding bright and patterned borders really make it stand out. I used Adventure paper and Happy Camper paper to border the white.
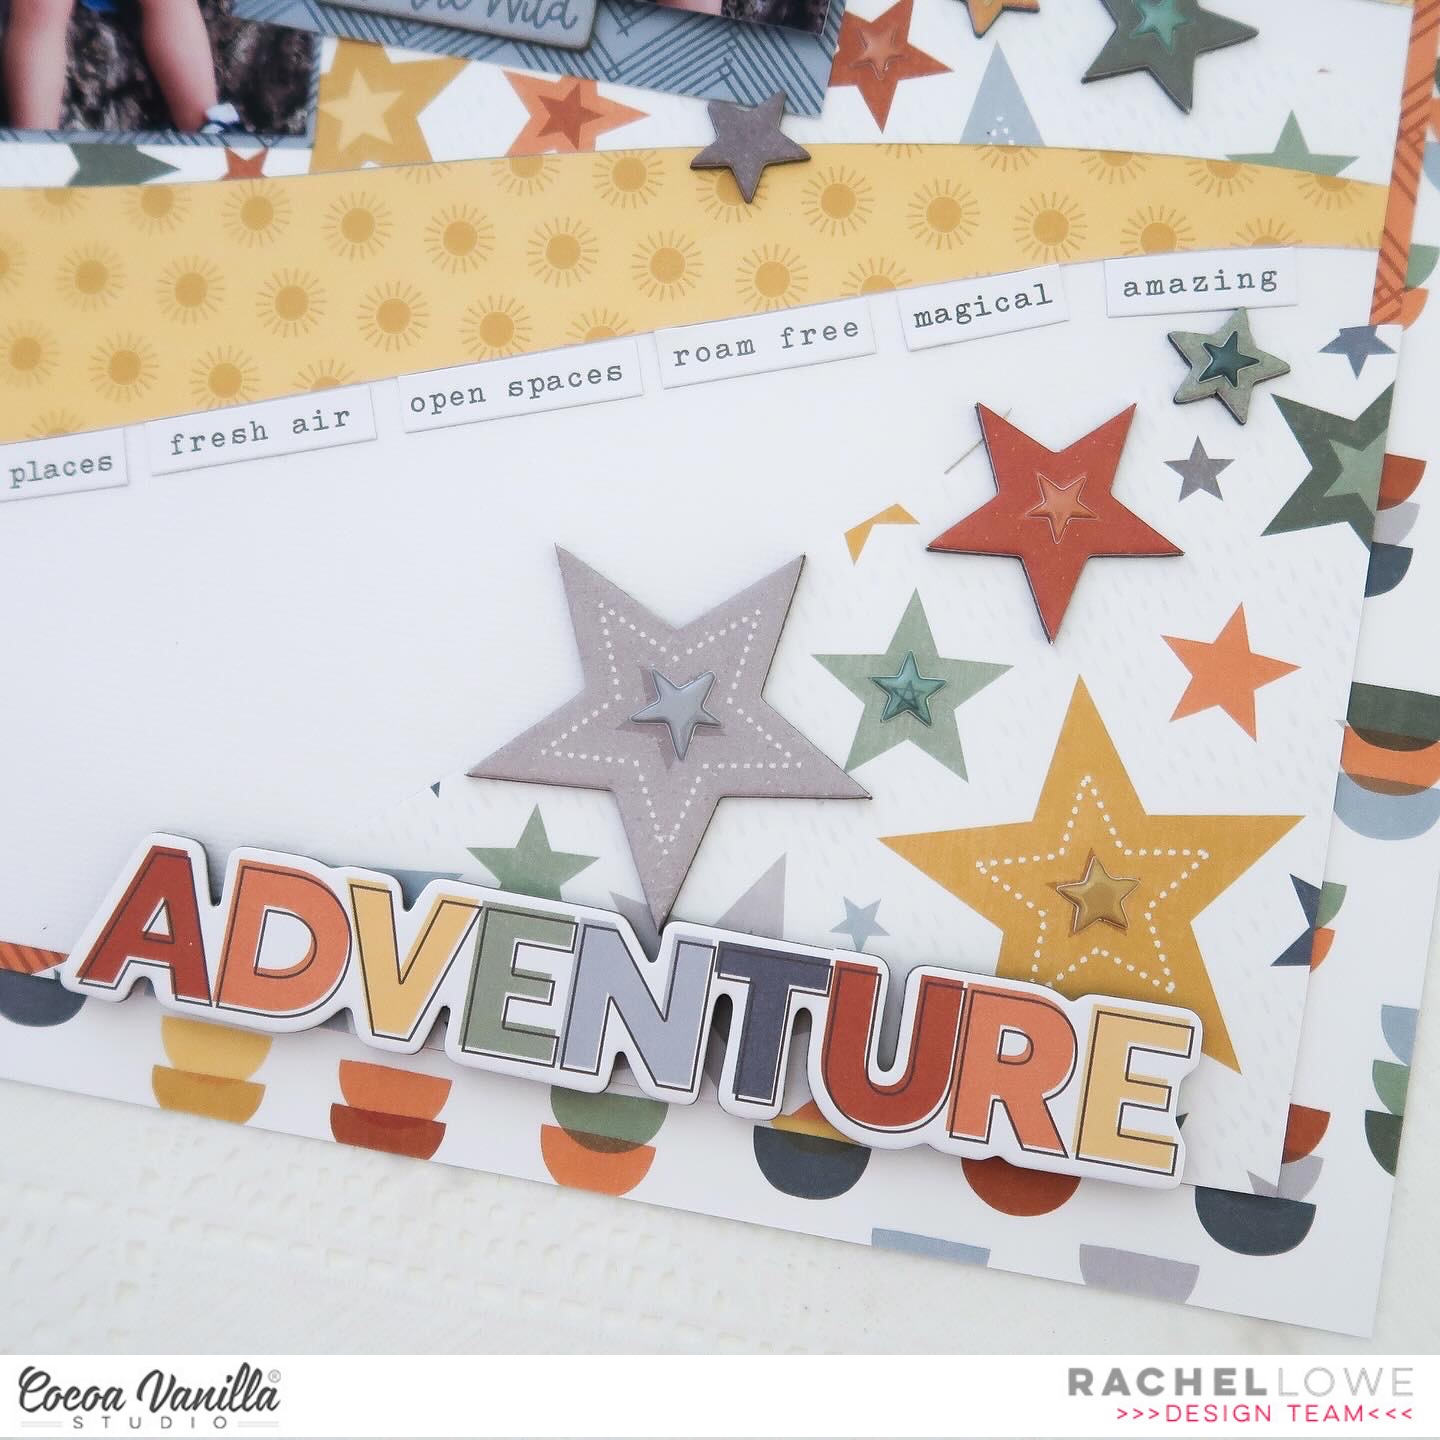
I used a cut file from the Silhouette Design Store to create the paper strips on the white cardstock. I used Horizon and Star Gazing paper.
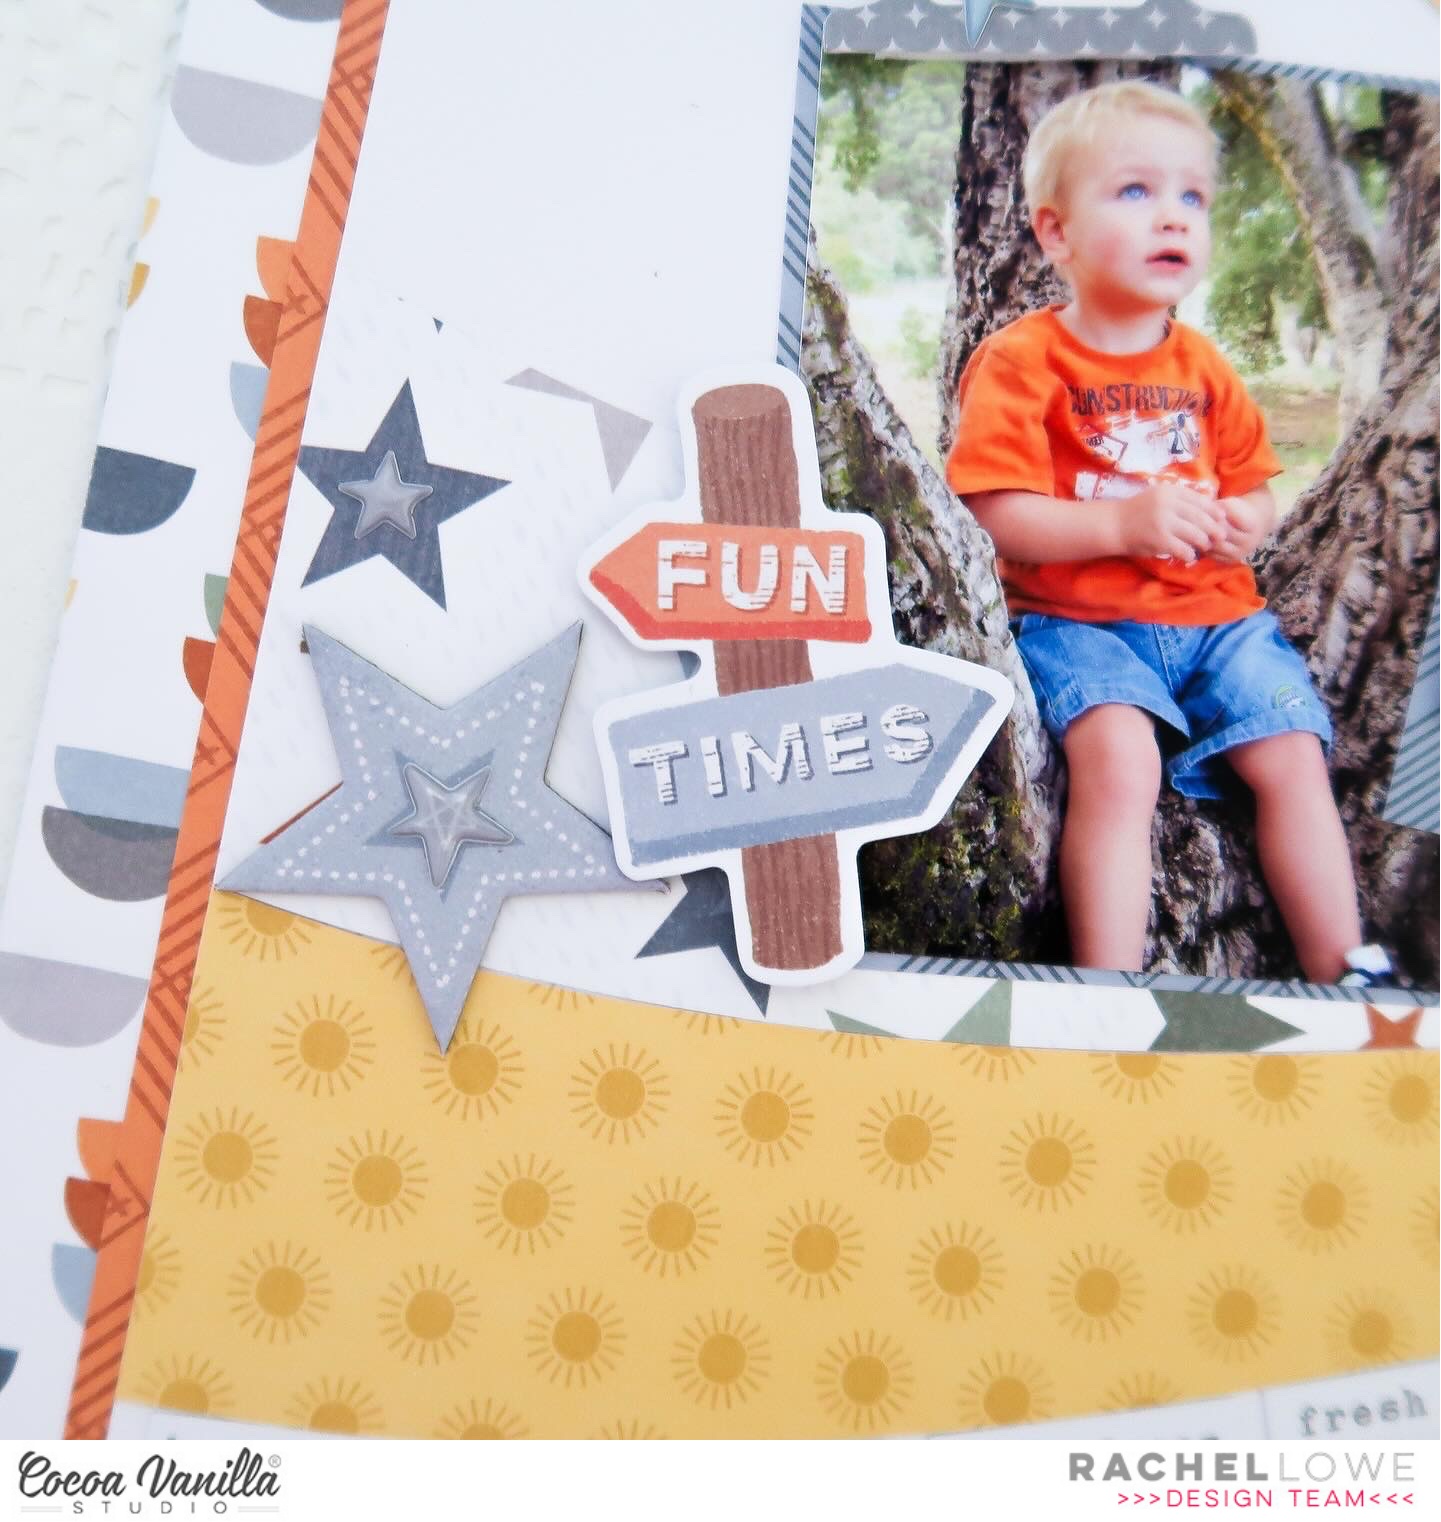
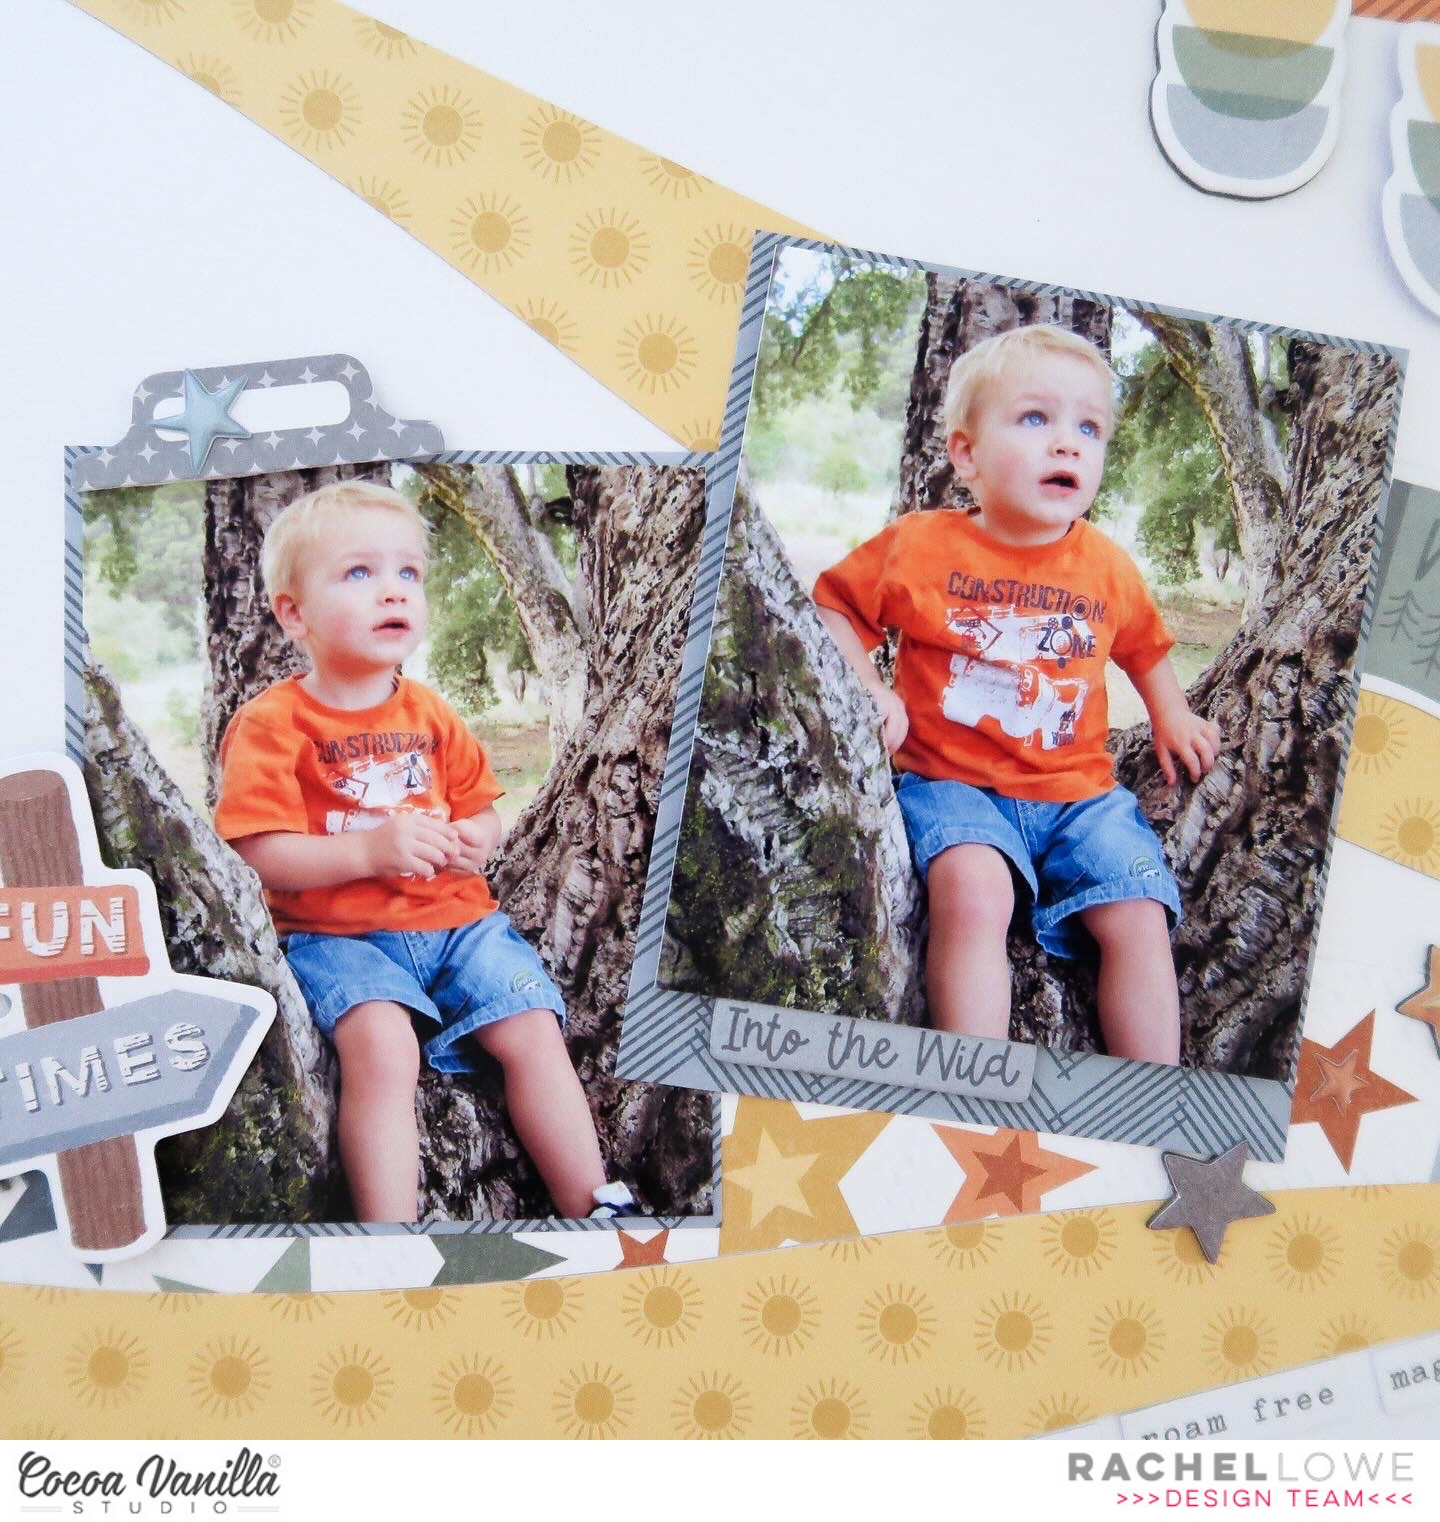
I next added my 3×4 inch photos matting them using a paper from the A5 paper stack.I created embellishments clusters around my photos using the Ephemera Die Cuts adding them with foam top over and under my photos.
To add dimension to my layout I used the Chipboard and die cut stars to layer over the stars on the star paper strips. I also added stars from the Puffy Star Stickers to the centres of those stars.
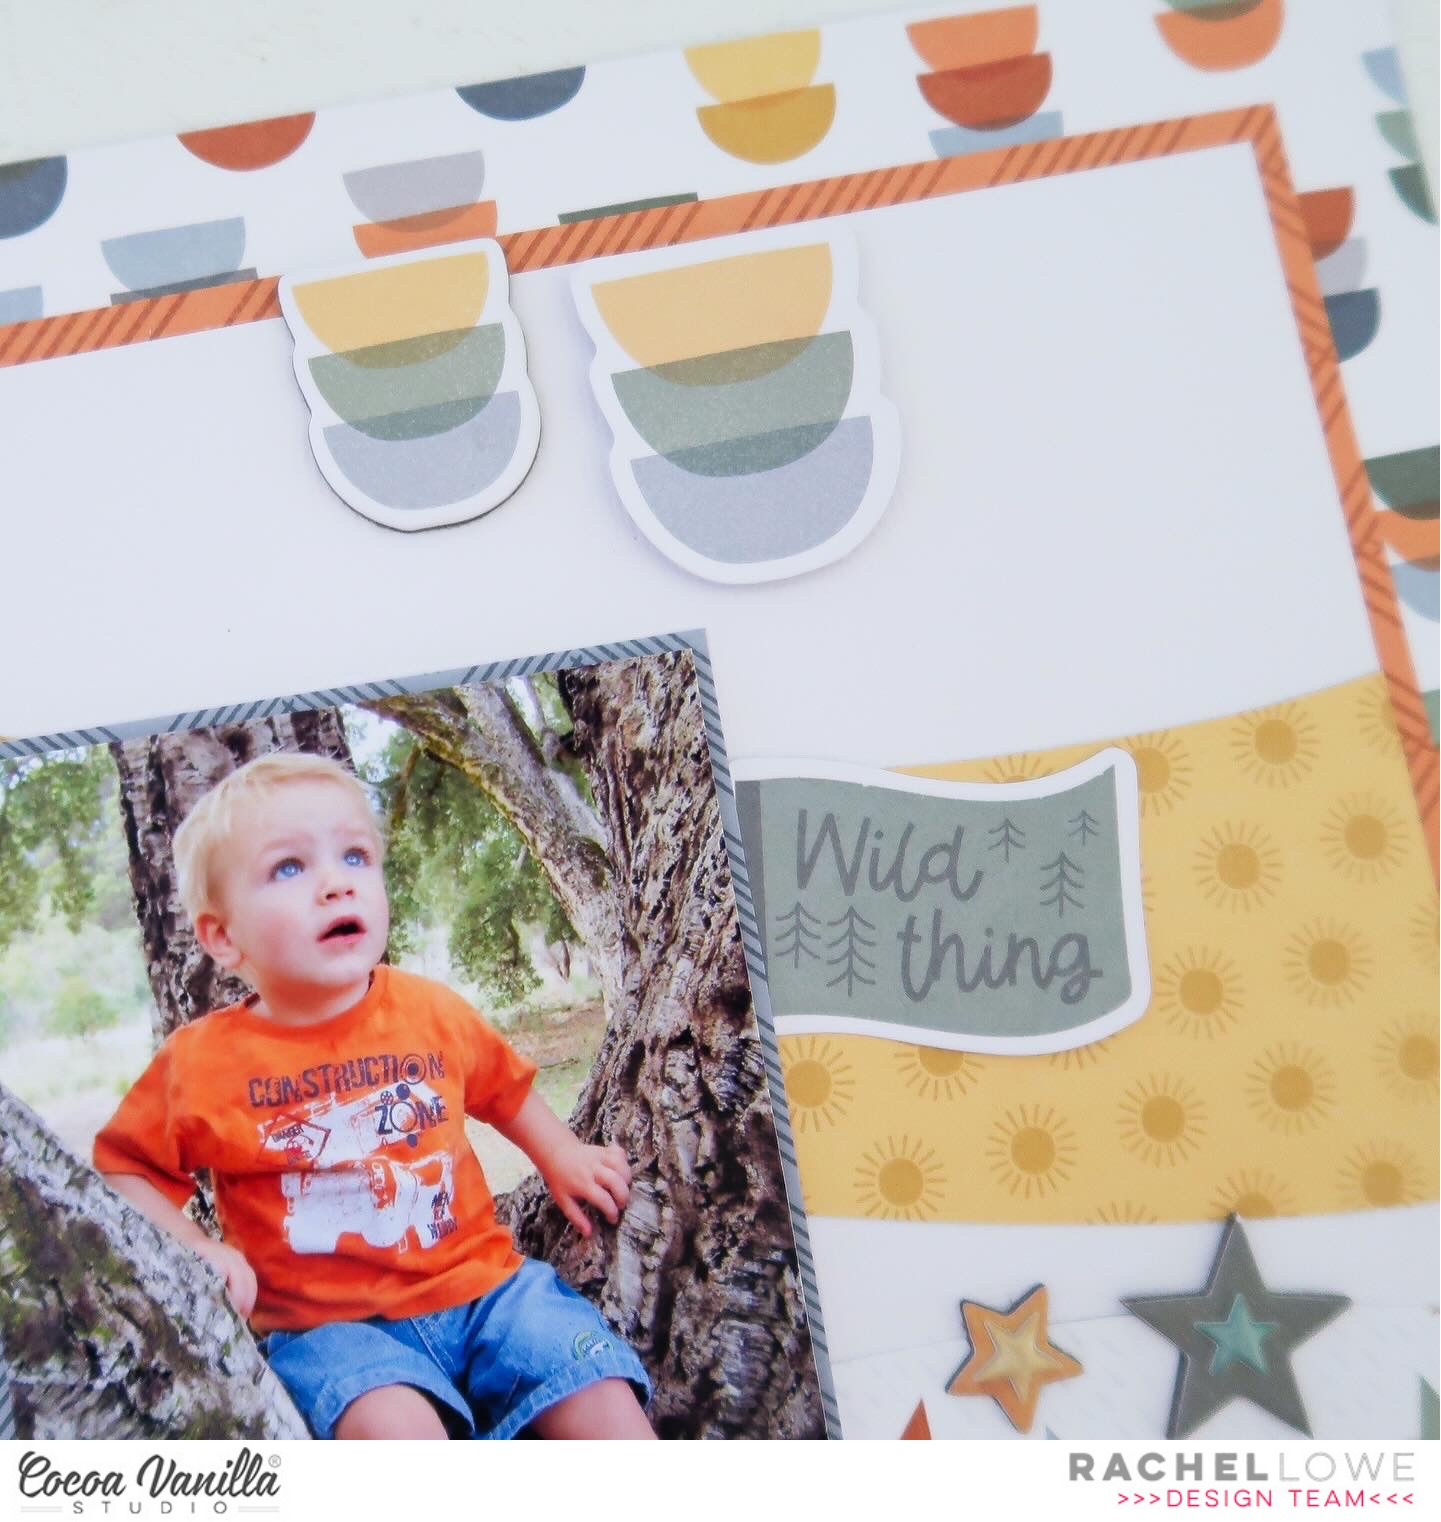
I used the Accessory Stickers to create my sub journalling using the phrase sentiments and added them by following the curve of the yellow paper.
I used the Chipboard word ADVENTURE as my title in amongst the star paper with foam tape.
I added more chipboard, using the repeat method to tie the outer border paper into the actual layout.
This was a fun layout to create and I am happy that I finally scrapped these photos. Thank you for stopping by and see you again soon.
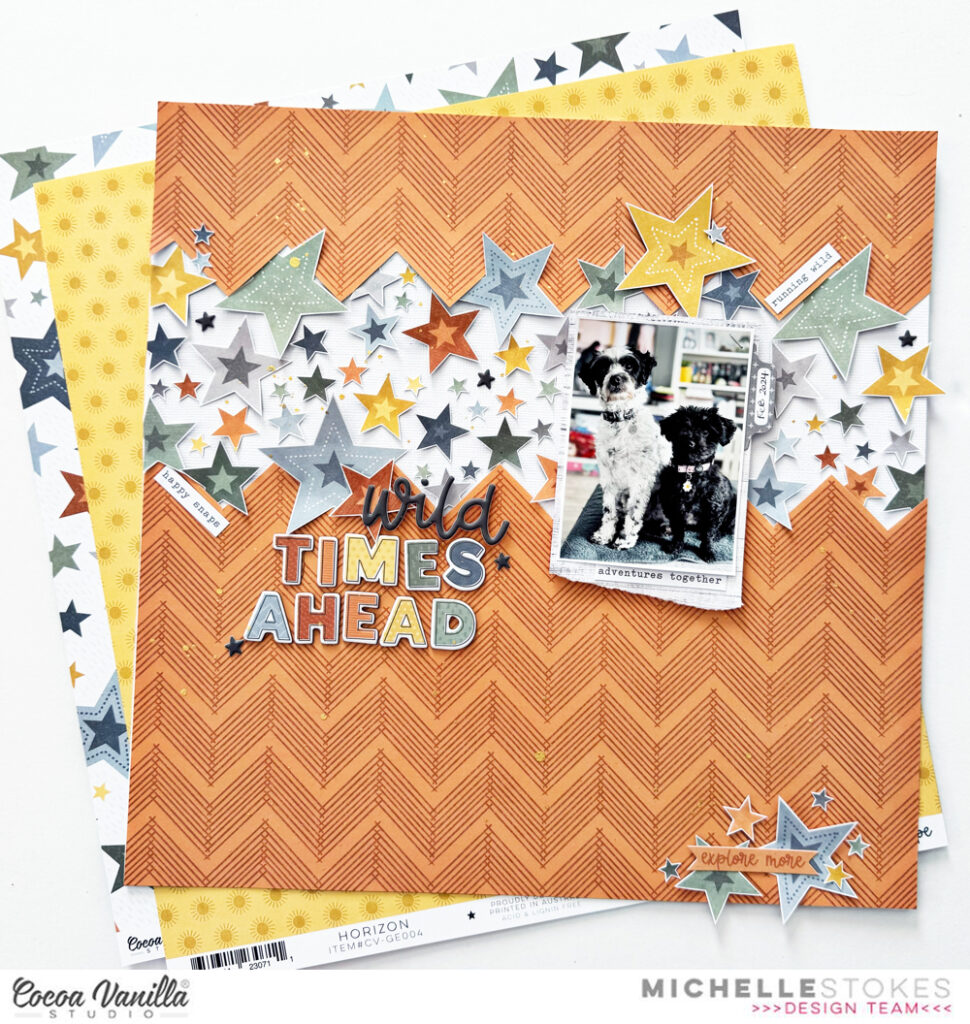
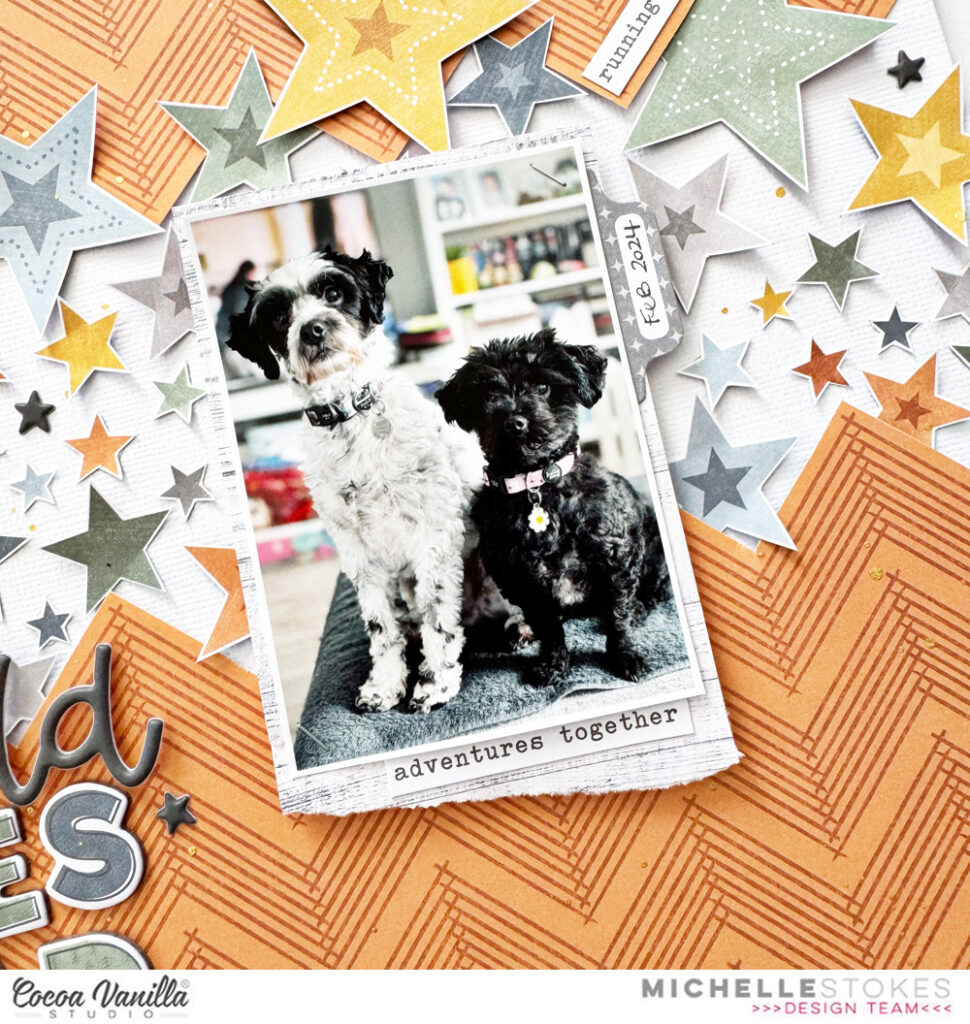
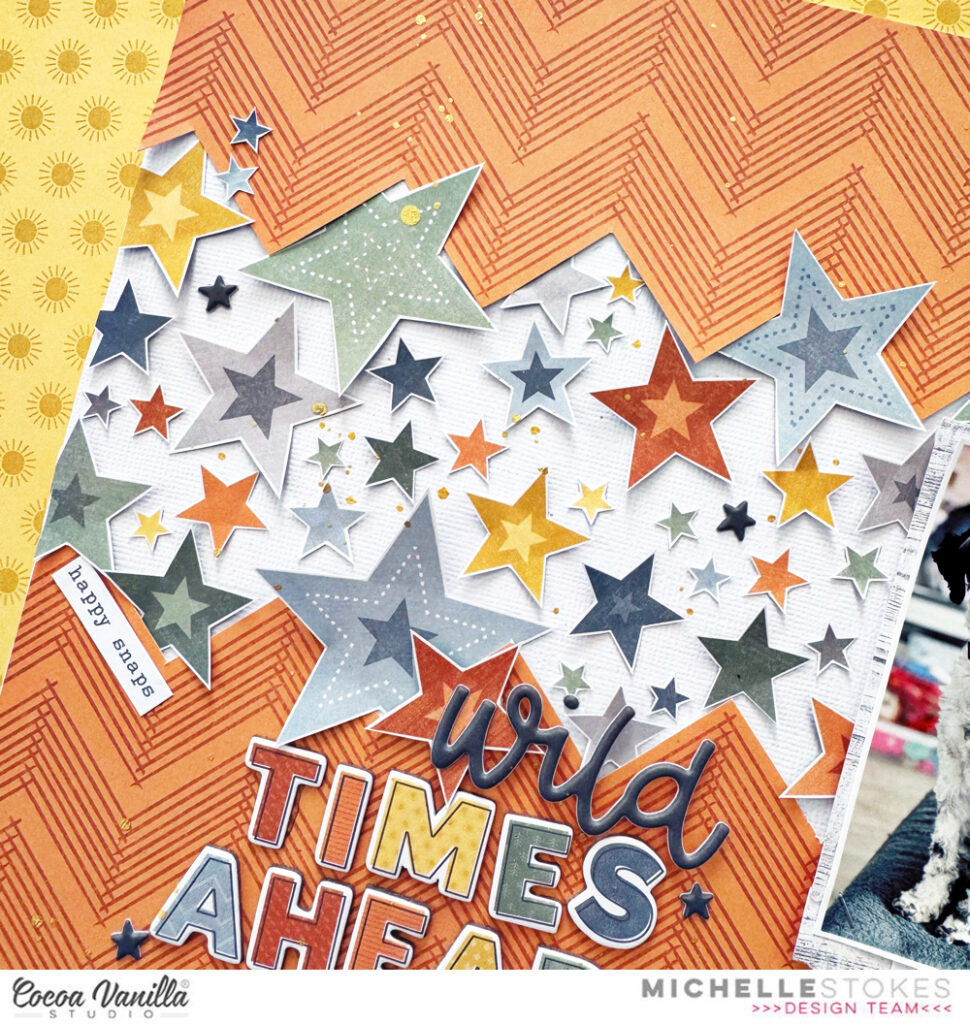
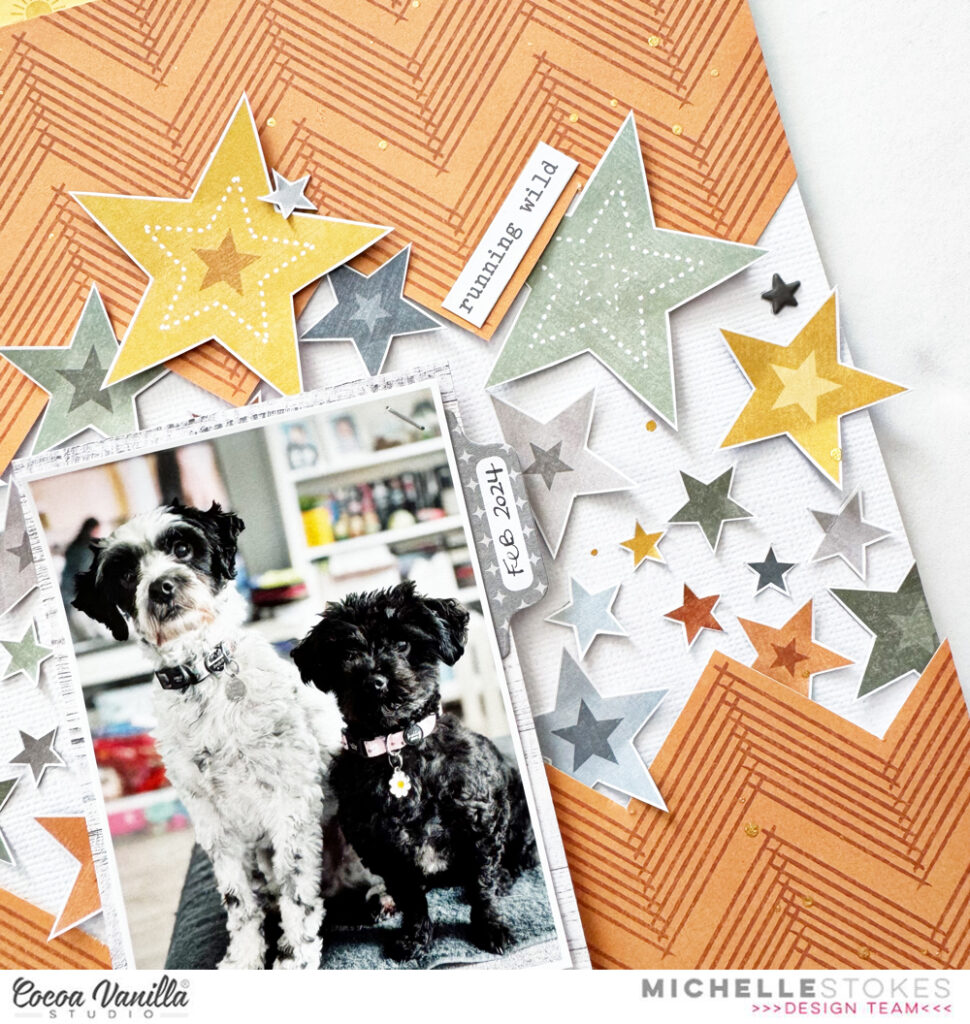
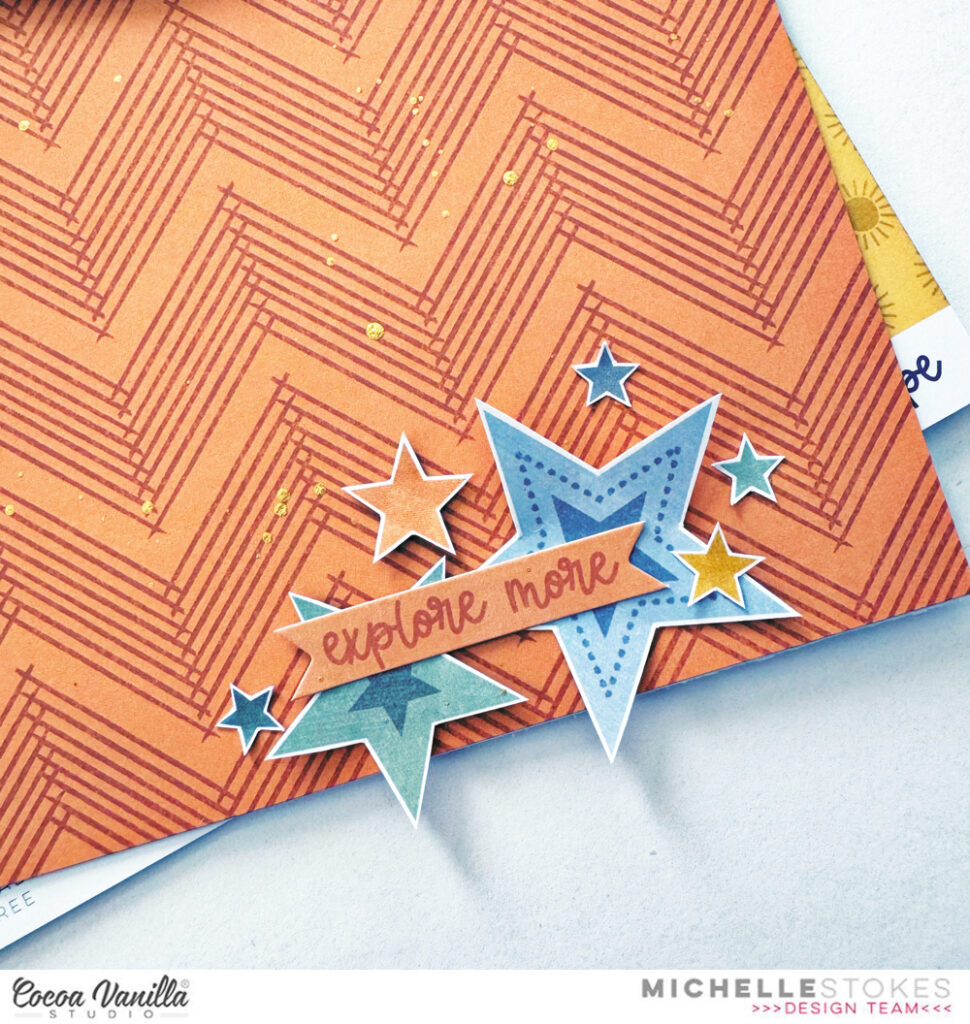
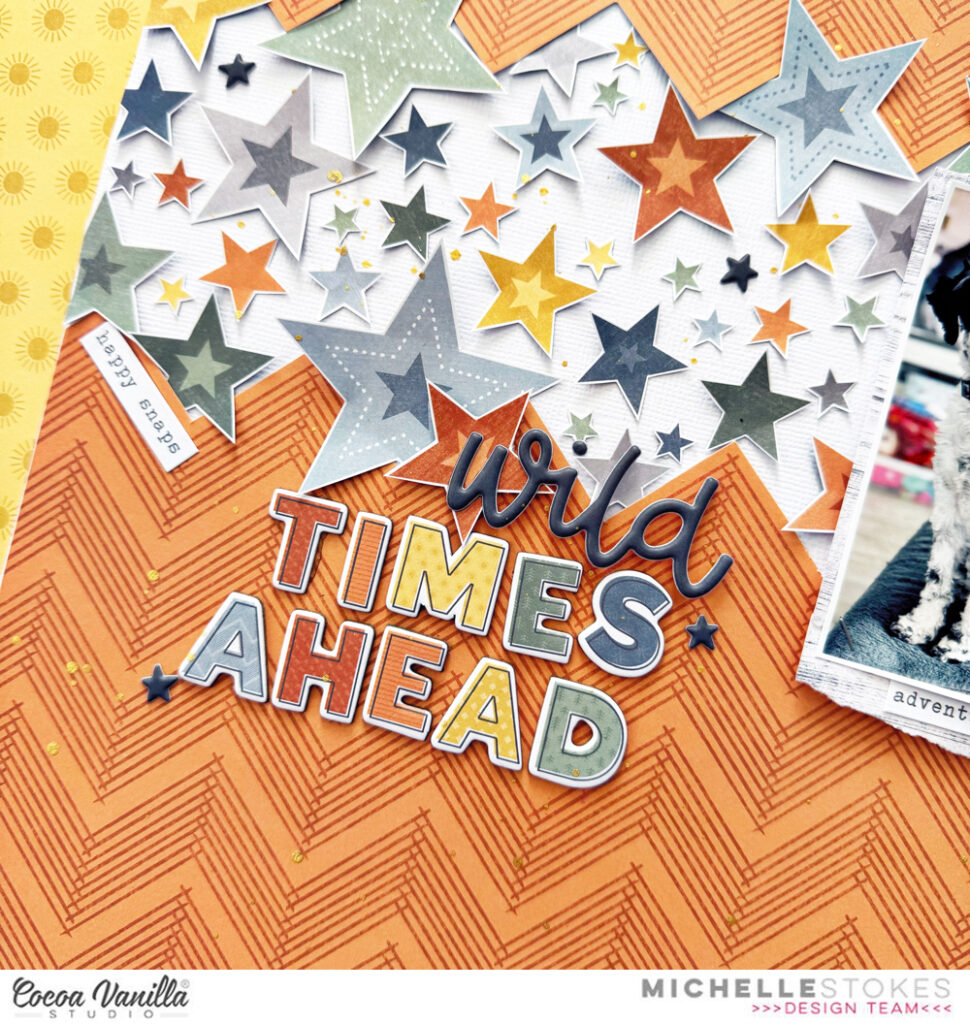
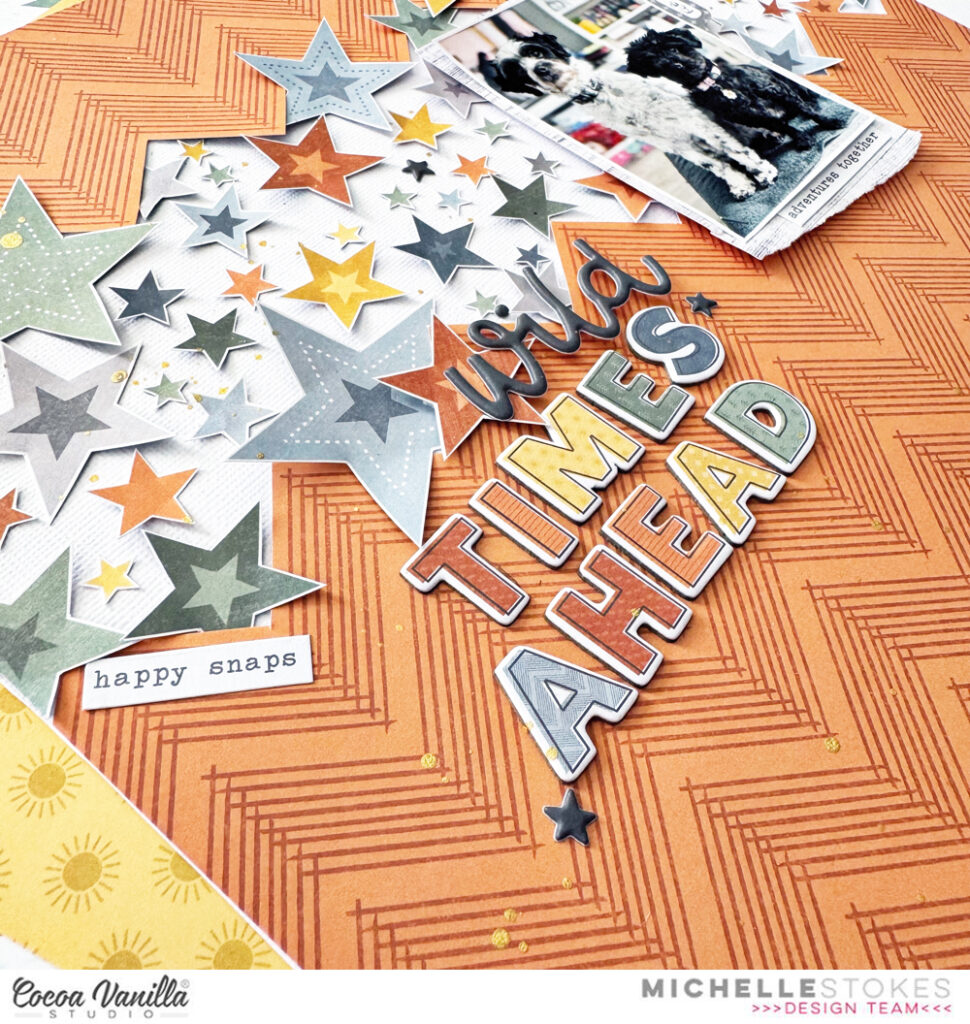
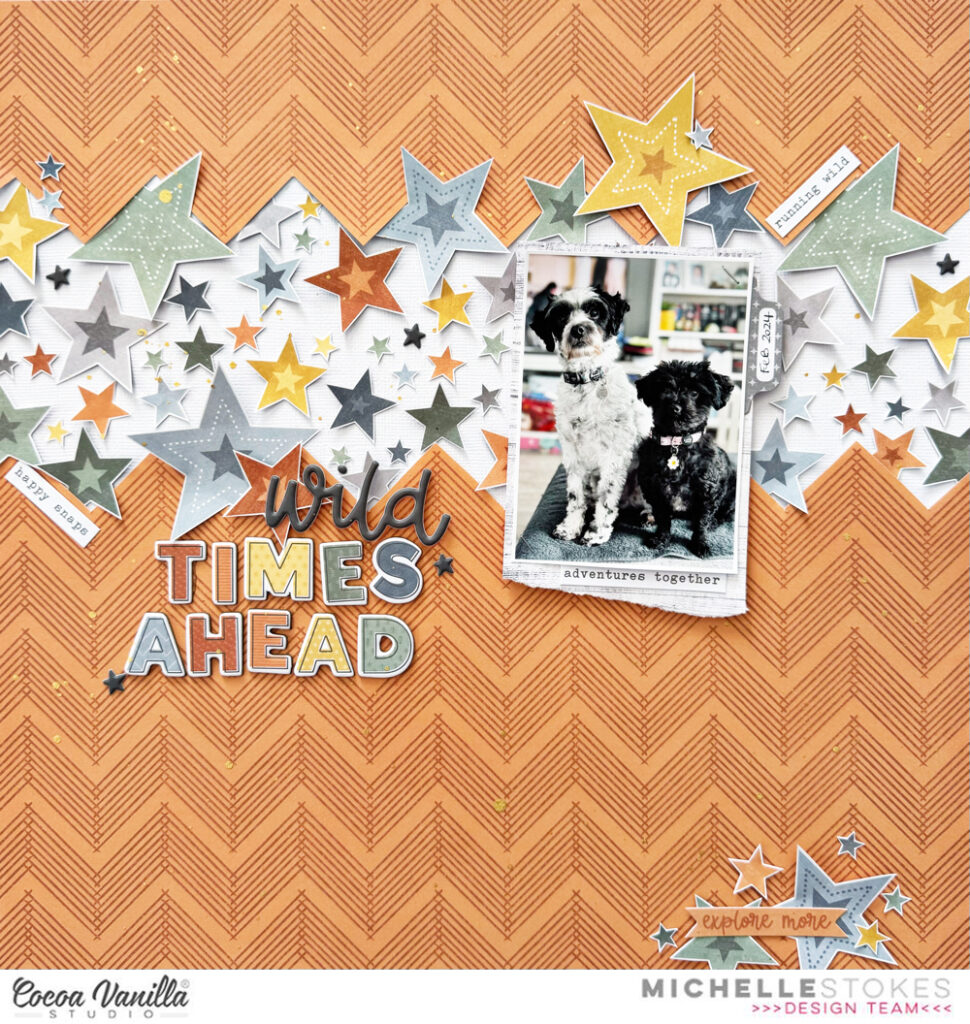
Hey Hey, It’s Michelle back here to kick off another week of creative shares from the Cocoa Vanilla Studio Design Team. This week I’ve used the awesome GreatEscapeCollection to create this star filled explosion of colour to document our sweet little furry kids after a fresh haircut.
To begin I cut into the HappyCamper paper between two of the zigzag lines and adhered them to some white cardstock with a gap between to add all the stars. I cut up an entire sheet of the StarGazing paper to get the right mix of colours and shapes to fill all that white space. I used both tacky glue and glue dots to adhere them to the layout for different heights of texture.
These 2 little fuzz balls are so hilarious when they have a haircut, its so much fun to look back each time.
I used a piece of the cool woodgrain paper from the A5paperstack to pop the photo off the layout amongst all the colour.
Love Love Love me some stars, just about as much as I love fussy cut florals, and even though cutting up all that one sheet took so very long, I really love the texture it gives the layout
Theres a couple of accessorywordstickers placed around the layout, and a mini cluster of beautiful stars at the bottom of the layout to balance it all out.
I created a mixed font title on the layout using the Foamtitlestickers along with chipboardsticker words. Perfect mix of textures to bring it all together.
I did add the usual splatter of gold ink to finish it all off.
Here’s a final look for you all…
Well friends, thats all from me today. Super short and sweet, just the way I like it.
Hello and welcome to my first layout created with the fabulous new collection Great Escape!
I love this photo of my eldest boy and his puppy (which of course when he moved out we ended having lol!!!) and knew it would fit perfectly with this collection.
I found this great cut file in the Silhouette design store and went from there. I used the Starry Night paper as the background piece to create the illusion of the sky and then Journey paper for the trees. I added the tree paper piece with foam tape to add dimension. Before adding this to my white cardstock which is cut at 10×10 inches I added a paint wash background.
And now for the fun part, embellishing! I added my photo which is a 6×4 inch landscape photo. I did my title at this point using the Foam Title Stickers. I then set about creating three embellishment clusters around my photo.
I added black stars from the Foam Title Stickers sheet, ephemera die cut pack and puffy sticker sheet. This adds varying textures to your layout and prevents it from look ‘flat’.
I layered die cuts both under and over the green tree cut file. Here you can see I added a phrase sentiment over the combi van and how I added the Out and About flag behind the tree cut file.
Don’t be afraid to add elements on your photo, it is a great way to tie everything together and as you can see here it does not distract from my actual photo.
Lastly I covered my photo with a scrap piece of paper to protect it and splattered the blue paint wash over my layout. I used another phrase sentiment as my sub journalling from the Accessory Sticker sheet.
I love how this turned out. The colours of this collection are perfect for any outdoor themed layout you want to create!
Thank you for stopping by and happy creating with Great Escape, you are going to love it!
My layout, using the beautiful Heart & Home collection is about documenting some goals for 2024 (I will add some handwriting to the journal card).
I found this book cut file in the Silhouette Design store and cut it in black for impact. I cut the white cardstock down to 9 inches square and added to the beautiful BountifulPaper. I added black machine stitching to add definition between the floral and white papers. I next added splatters of black paint to the white cardstock to break up the white.
I used the puffy alpha stickers to create my title which I added to the book pages. I used Golden Fields paper to create my layered butterflies. I used foam tape to layer them and used the puffy stickers to add hearts to them. I arranged them so they appear to be flying off the page.
I created a small embellishment cluster at the top left of my page using the die cut ephemera.
I matted my photo on a paper piece from the A5 paper pad and machine stitched a border in black. I added to my page with foam tape and before securing I tucked to the left the journal card ‘the story’ from the die cut ephemera pack. Lastly I added a floral bunch using the flowers from the floral die cut ephemera at the top of my photo and journal card. My photo size is 3×4 inches but you could certainly add a larger photo. I used thee puffy sticker dots for the centre of these flowers.
I created another small embellishment cluster to the bottom right of my photo to balance my layout.
You could add more photos and more journalling using the puffy alpha stickers. You could also paper piece the book if you wanted to add another colour to the layout.
As always thank you for stopping by and happy 2024 to you all!
Hello Hello, Michelle here with you today to share a super quick layout featuring the Heart& Home Collection. This Christmas creation came together using elements from the Collection that are just the right shades and patterns to pass as a Christmas Collection.
I’ve documented a photo of our House Elf Twinkle as I am running low on festive photos. I generally live in the moment at Christmas time and forget to pick up the camera.
I kept the background super simple and just layered some pattern paper strips together to create a base for the photo, with the addition of some string wrapped around them to hang a cluster of embellishments from. As there were no pattern/ colour clashes with the photo and collection used I was able to print it in colour at roughly 3.5×4.5 size. I adhered it straight to the paper stack using foam for slight dimension.
I added cut apart pieces to the photo and the large cluster to the left of photo, then created bunches of floral pieces in 3 separate clusters around the top half of the photo/ paper layer stack.
The florals and leaf stems are perfect colours for Christmas Scrapping, without using the traditional style of christmas products. These colours together represent a soft Christmas themed palette compared to the brighter more traditional colours.
Once I added the tag to the twine I tied it up in a bow and added tiny glue spots to keep the strings in formation
I created the title using some of my beloved white alpha stickers from years ago, altering them with some glitter glue for a touch of sparkle, plus some mini alpha stickers and handwriting for a more personal touch
Lastly I splattered the entire layout with gold ink and called it done. Heres a final look at the entire layout…
Well friends thats all from me today, thanks so much for stopping by.
I hope you all have a magical festive season with your loved ones, and that you can squeeze in a little crafty time here and there.
Hello Hello, Its Michelle back here today with a new layout share featuring our Beautiful Heart & Home Collection. For todays layout I thought I’d create something with our furry family members Daisy & Sonny, so a mixed pattern/colour combination it was.
I began by cutting into the magical A5 Paper stack that just keeps on giving to create squares in 2.5, 3 & 3.5 inch sizes to create a mixed “grid” effect on the background. I distressed the edges and adhered to the cardstock using foam for a little dimension and texture. As someone who doesn’t use much mixed media, I use other techniques to give layouts character as I just can’t handle the flatness without it.
I printed the photos of our sweet furry family members in colour and adhered them to some of the woodgrain pattern paper from the A5 paper stack. I added a little more texture by tearing along the bottom edge. These sweet little pups are so very loved in this house, but that sticker bottom right sums them up well. They’re both completely nuts lol
Before I added any of the embellishments I created the title using a word from the Gold Foil Title pack, handwriting and a mini cut apart piece from the A5 version of the Gather paper.
And then created a fussy cut florals cluster using the A5 version of the BOUNTIFUL paper. I layered the different pieces with my usual adhesives – double sided foam tape and tacky glue. I created mini clusters all over the page using similar elements in each as seen in the next couple of close ups…
Once I felt all the clusters were complete I added in tiny florals, mini puffy hearts, gold ink platters and dots
Here’s a final look at the whole layout
Well Scrappy friends, thats all from me today. Thanks so much for stopping by.
Hello Hello! It’s Michelle back today with another fun layout share using out beautiful Heart& Home Collection. I went with a rainbow assortment of pattern paper strips and some sweet family snaps. Kinda running low on photos to share these days, but I’m hoping the next few months of family celebrations will bring some fresh new snaps.
Now I’ll warn you, this post is very heavy in the photos, just not so much in the words. But sit back, relax with a drink and check out my newest creation..
I used almost all of the full colour pattern papers from the collection with a mix of multi colour papers and the typewriter text. I cut 2 strips from each piece that are roughly 1 inch wide, and left them all at different lengths to overlap at random heights in a blended colour order across the white background. I had intentions of sewing through the strips, but when creating late at night I tend to go off track from where I start.
Next up I gathered a few recent family snaps and printed them out in 2×2 and 2×2.5 inch size to back the cute frames from the ephemera pack and the cut apart frame from the GATHER paper. I used pieces of foam between the frame and the photo to make them look a little more realistic then adhered across the layout using more foam for dimension.
I layered in different forms of embellishments around the frames to add extra pops of interest, using a good mix of ephemera, fussy cut pieces, enamel shapes and accessorystickers
I added the Happy List from the GATHER paper which is perfect for adding our family list of loves at this present time. We certainly love our share of naughty foods, long car rides around our greater region of beaches and lots and lots of laughter
I added a loose string across the tops of the frames to make them look like they are strung across the layout. Mixing fibres like these is a good way to add a little texture to the layout.
Super cute photo of Leila and the doggo’s. No way they would sit this still ever again lol this must have been a fluke
I added the title to the bottom of the layout using the word FAMILY from the Ephemera pack along with the banner strip underneath. I used foam under these to pop them off the page giving more dimension to the bottom of the layout. Then I added the word sentiments from the accessory sticker sheet that work perfectly together in the area above the title.
Lastly I added a splattering of gold ink, some gold glittery splotches that dry like enamel dots, some tiny little fussy cut florals and then called it complete.
So many layers with all these strips gives so much texture to the layout which is a tick in my book.
Here’s a final look at the entire layout
Well thats all from me today, thanks so much for stopping by. Short and sweet with the words along with a total photo overload. I hope you’ve enjoyed seeing this creation today, just as much as I enjoyed creating it.
It may be spring here in Australia but Heart and Home collection is bring out all my fall feels! I love rainbows and couldn’t resist creating a fall layout with a rainbow.
The fall feel rainbow can be found in the Silhouette Design Store but note I added the row of small fall leaves for more visual interest.
I was able to use papers from the A5 paper pad except the outer rainbow arch which I used the 12×12 inch paper Fall Beauty. The other advantage of using the A5 paper pad papers is that the prints are smaller, so my title is full of leaves whereas if I had used the 12×12 paper you wouldn’t get the smaller detail. I used Framed paper woodgrain side as my border (white cardstock cut at 11 x 11 inches).
I added two square photos at 3.5 x 3.5 and 2.5 x 2.5 inches. I matted them and added with foam tape to create dimension.
I used gold glitter card to create the outline of the large leaf as gold always adds a warmth to a layout.
I used the hearts from the Puffy Stickers to decorate the two smaller rainbow arches.
As the cut file is large I was careful not to over do it with embellishments so it didn’t end up looking too ‘busy’. I added a small floral cluster to the top right of the rainbow slightly behind my photo. I added several of the die cut ephemera leaves and phrase sentiments.
I loved that I could use colour photos of my daughter which catches the colours of fall and adds to the warmth of this layout.
Thanks for stopping by today and I hope this inspired you in some way!
I love this photo, its not a visually stunning photo, no amazing scenery or backdrop but it is me with all my children after having a great day today. I have used the Happy Days collection!
I decided to go with a white background as I knew I was going to used Flutterby paper which is a dark contrast. I cut a seven inch circle in the Flutterby paper. I then cut three hearts in three different sizes and lastly a double bow.
I then used the butterfly side of Flutterby and Little Blossom paper to create the top and bottom paper angled design.
I created an embellishment cluster in the bottom paper pieces using die cuts from the ephemera pack. As you can see I tucked them in and under.
I machine stitched the hearts down the middle to create a 3D heart. I next added my photo which I double matted and used the chipboard title stickers to create my title. I followed the flow of the circle paper and left enough space in between to add chipboard hearts.
I added small floral cluster using the floral die cuts and finished this area off with a phrase sentiment from the accessory sticker sheet.
Lastly I added my paper bow (I used a cut file from the Silhouette Design store) and added a puffy heart to the centre.
This is a great design for multi photos if you wanted and you get to use many pattern pieces on one layout. My photo is double matted on paper from the A5 paper pad, which means you do not have to cut into 12×12 papers!
Thank you for stopping by and I hope this layout has inspired you in some way!
Hey Everyone, It’s Michelle here today with a little scrappy inspiration featuring the These Days Collection. I made both a layout and a couple of cards that can be shown off in a frame as part of your home decor so I think thats a win for today. Lets take a walk through how it all came together..
First up we will start with the layout. I fell in love with the little village of houses on the Neighbourhood paper the minute I saw it, but could never think of the right way to show them off. That was until recently when I had an idea to fussy cut them all out and line them up with some ‘grass’ and other bits to make one of the cutest layouts I think I’ve ever made.
I chopped my white cardstock into 3 even strips that I could line the houses up on, then sewed strips of the green and white spotted paper ‘Family Ties‘ to create the grass. I used a pair of herb shredder scissors that are pretty much the same as a pair of fringing scissors, I just felt these scissors would be better suited to my craft room than left in the trusty kitchen gadget draw haha.
I added machine stitching to each green strip then fluffed up the grass and added all the tiny houses to the rows.
I even added in a couple of trees, some mini potted plants, happy dogs and rabbits, some of the little people and a bike. Sweet tiny details that really made the layout come together.
Once I had the rows of houses sorted out and adhered with foam, I glued the 3 white cardstock strips onto a second piece of white cardstock, spacing them out evenly down the page, then I moved on to creating a mixed title
I used both the foam title stickers and mini alphabet stickers to combine together in a mixed font title. I sewed through all the pieces to keep them in place as I’d moved them around that many times to find the right place that they had lost their stickiness.
Next up I added my photos to the layout. I chose 2 family photos that worked with the title that I had created and printed them out in black and white so they didn’t clash with all the pretty house colours. I tucked the photos in the gaps I created between a few of the houses in 2 of the rows and popped them up slightly using foam behind them.
It may have taken many tries to get this recent family photo, with plenty of giggles in between.
I used some of the sweet little puffy heart stickers from the puffy stickers pack to create little puffs of smoke from a couple of the chimneys
Then splattered the white space with gold ink to create a star like sky, even though I haven’t used a dark background.
I really enjoyed creating this little village, so much so that I don’t think its going to be added to an album any time soon, I think it deserves to be out on show in a shadowbox frame for all to enjoy.
Speaking of enjoying crafty things, I had a couple of little houses left over that I thought I would make a couple of cards that can be interchanged in a frame and kept out on display in our living room.
I used all the same elements for these that I did in the layout, just in a 4x6inch size. Going to have a hard time switching them around that I might need a second frame to add to a different area of the house and make use of both cards at the same time.
Well friends, Thank you so much for stopping by to check out my creations using the These Days Collection. Be sure to check out the shop for the epic sale on this very collection, then we can all have little villages on layouts! If you do recreate this layout for your own family, please share it with us in the Facebook Community Group so that I can see how yours came together. I love seeing layouts that have been inspired by my own.