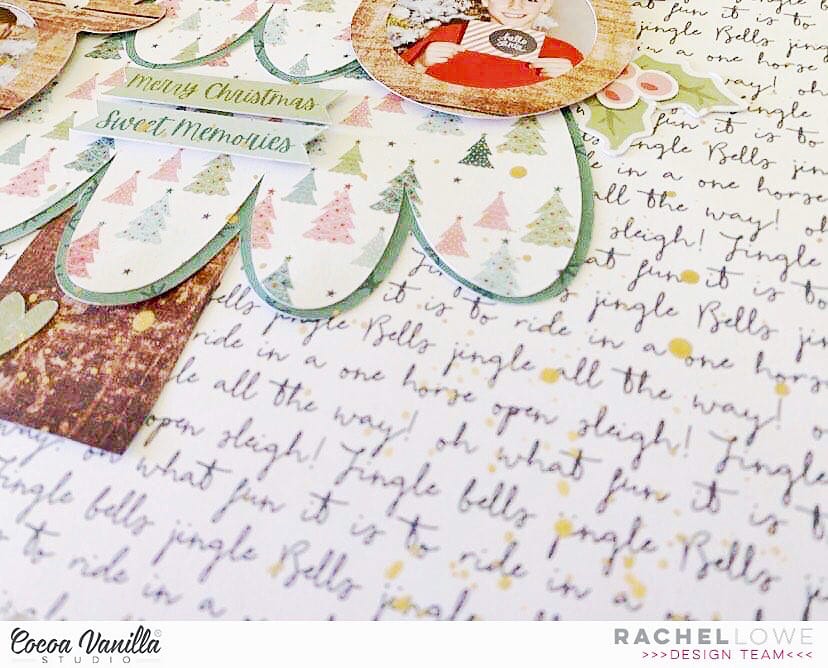
Hey CVS friends, I just had to create one more Christmas layout with the Merry and Bright collection before I finish up with Christmas projects!
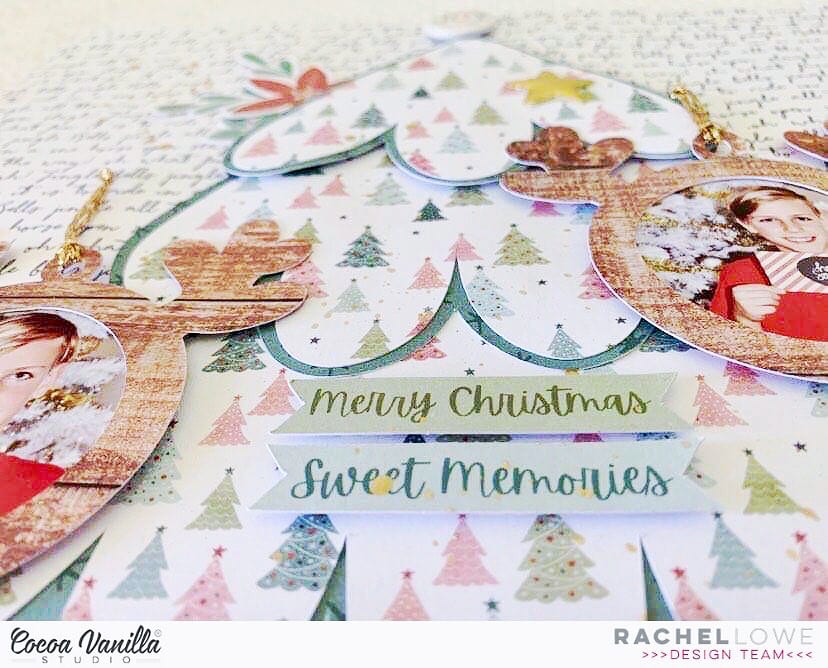
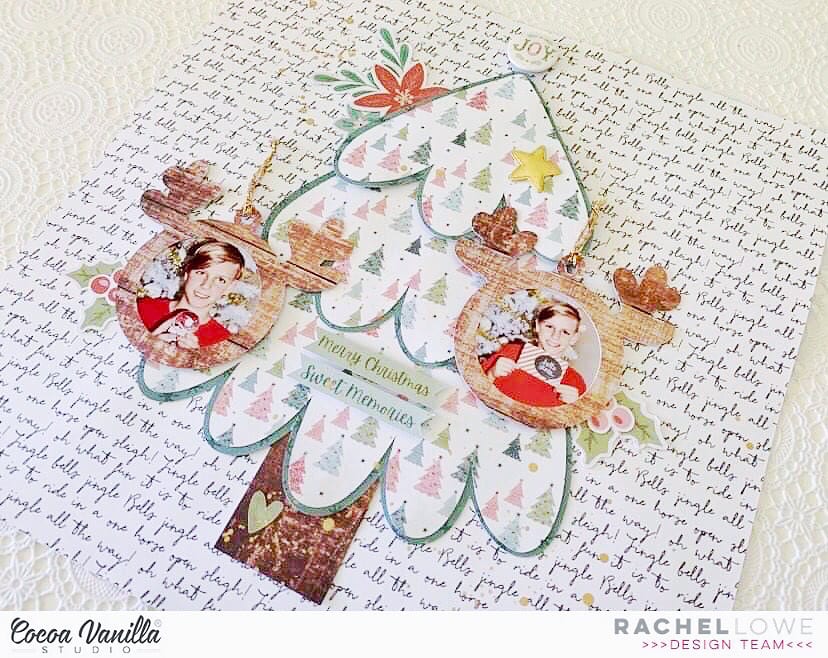
I firstly cut a Christmas tree, cut file from the Silhouette design store, I used the off set function to create two different sizes and then layered them. I used the Christmas Tree paper to create my tree. I used Oh What Fun paper as my base paper and splattered gold paint over it.
I found another cute cut file I had to use, reindeer frame which I cut in Seasons Greetings paper and added to my tree with foam tape to add height. I added some holly die cuts and tucked them under the reindeer frames. I added gold thread so the appear to be hanging off the tree like baubles.
I next set about decorating my tree. I tucked some flower die cuts under my tree which I also added with foam tape. I added a flair instead of a Christmas star but added a puffy gold star on the actual tree. I chose two sentiment die cuts and added to the bottom of my tree.
I lastly added another light splatter of gold paint over my whole layout to give it that Christmas sparkle feel! This collection is so beautiful to work with and the colour combinations just gorgeous, it is refreshing to work with a Christmas collection with a twist.
Thank you for stopping by today and see you again soon!
It’s Sophie on the blog today with another layout created with the beautiful Merry & Bright collection.
I highlighted a beautiful everyday moment of Sabrina playing with a new app on her Ipad.
I decided to use my label punch to create a design.
I punched several labels out of different patterned papers from the collection and aligned them in two vertical rows on the left side of the page. I machine stitched on them with white thread for more interest.
I emphasised my photo, the focal point of my page, by putting a big rectangle of the wood grain “Season’s Greetings” patterned paper behind it. I also added framed from the Ephemera pack behind the photo, as well as tissue paper and adhesive foam.
I put my title, created with alphabet dies, on top of the photo, and created a big floral cluster on the right lower corner of the page.
Finally, I embellished with scattered flowers and stickers some of the labels, and wrote down my journaling on one of the Pocket Cards from the same collection.
Here are some close-ups:
I hope you like this page ! It’s another example of a layout not Christmas related created with a gorgeous Christmas collection. And using a punch with a repetitive image is a great way to use many different patterned papers on a page without making it too busy..!
Hi crafters! Danni here with a double pocket page layout featuring the gorgeous Merry and Bright collection. I have so many of the stunning pocket cards left that I just had to get some of them used up, and what better way than a couple of pocket pages?
I like to use pocket pages as a way to include lots of photos in my yearly albums, especially photos that aren’t the best quality, are of less interesting everyday moments, or when I have several similar photos that I can’t choose between. These pages are everyday Christmas season snapshots and some extras from our Christmas parade.
For my first page I chose the “Merry & Bright” pocket card and backed it on the candy stripe 12×12 patterned paper for a title card. I chose two pretty pocket cards – one to embellish with Santa from the die cut ephemera, the other as a perfect spot for my journaling. I like to cover ugly or distracting background details in my photos with pretty embellishments, so I also fussy cut the two hearts from one the pocket cards and used them to decorate a photo.
I added some clusters of florals fussy cut from floral 12×12 patterned paper to the corners of two of my photos, then used a combination of die cut ephemera and accessory stickers to fill in any empty spaces. The tiny heart die cuts came in handy for this project – I used lots of them to embellish my photos, outlining them in white gel pen to really make them ‘pop’.
For my second pocket page I decided to make a couple of decorative feature cards. First, I used the multicoloured polka spot paper from the A5 paper stack, some die cut baubles and some strip rhinestones to make a hanging bauble card, filling in the corners with layered fussy cut florals. For the second decorative card I layered tag and phrase stickers together on a green starry pocket card, adding baker’s twine to the tag and another heart die cut.
Many of these photos have not-so-nice things in the background (a rubbish bin for example) so the accessory stickers and smaller die cut ephemera worked perfectly to cover these up and add detail to the photos. I also used a combination of fussy cut and sticker labels to add small areas of journaling to highlight the important memories from these photos.
I inked the edges of many of the cards in a Christmassy green ink to help define the edges and added lots of tiny words from the accessory stickers to help tell my stories. Do you like to use pocket pages to record your stories? I hope this inspired you to try some new things! There is a process video on YouTube linked below. Happy scrapping!
Hello Friends. Welcome in New Year. Today I want to share with you my first page created in 2021. I was assigned to my favorite “Throwback Thursday” theme, where we revisit older CVS collections. You know I love doing that. It feels so good to put older stuff into good use (and make some room for the new one :) ). This time I was inspired by the photo of my daughter taking bath. She reminded me of little mermaid (minus ginger hair) so my thoughts wandered in this direction. Happy memories deserve happy colors so I added some rainbow too. It resulted in colorful project with mixed media background.
I started with white sheet of paper and scales stencil. I picked 6 colors of Distress Oxide Inks and blended them through the stencil in rainbow order using brushes. They help you create very soft look. Next step was to add photo and composition around it. There is one collection that matches such a colorful background perfectly. It’s called “Happiness” and I already made many rainbow projects using it.
I reached into my ephemera leftovers (I managed to use up almost 3!!! packages) and picked few flowers and tabs and placed them around the photo. I also found this cardboard frame from much older “Wild at heart” line and decorated picture with it. Using my dies and die cutting machine I cut out three rows of “waves” from paper called “Good vibes“. I also cut out two sizes of circles from the same paper. They were meant to look like air bubbles under the water.
I love using white cardstock as a base and alter it with some mixed media. Applying inks over the stencil is so easy and fun and final results are just stunning. For more “underwater” effect I could only focus on shades of blue but I couldn’t help myself to add magical rainbow. Scales pattern was inspired by the mermaid tale but you can also use circles that will “pretend” air bubbles. If you don’t have matching stencil, but you are a proud owner of digital die cutting machine, you can cut temporary stencil using the machine.
My title is a mix of foiled alpha stickers and white stickers from CVS “Colour me happy” line. It’s white with matte finish so you can color it any way you want. I also have a die of mermaid tale and I cut it using silver cardstock to add it to design. My daughter Maja loves all things shiny and fairytale so she will for sure approve it. Adding small hearts fussy cut from “Little things” paper was my final touch to this page.
I hope this rainbow page will be first one of many happy designs this year. Thank you so much for stopping by and see you in two weeks.
Welcome back to the blog, Anna here with you today! Christmas is over, but for me, it’s hard to stop using the gorgeous Merry & Bright collection. So, I decided to use it in a wintry way. And including flowers, of course. I love the result!
First, I took the Sweet Serenity paper from the Daydream Collection and ripped it in half. I glued it on top of a watercolor sheet, where I did a mixed media background with pigment powders matching the colors. Then, I diluted white chalk paint with water and made splatters.
I used one of the frames from the Merry & Bright Die Cut Ephemera to frame my picture. And placed it in the middle of the page. Behind it, I put one of the Pocket Cards, which I turned into a tag.
To embellish the layout, I made a visual triangle creating three flower clusters. Some flowers were from the Die Cut Ephemera, and some others I fussy cut them from the Joy to the world paper. These flowers are so pretty, and it’s really easy to make beautiful clusters with them.
To built my title, I fussy cut the letters from the Season’s Greetings paper to spell the word “cold”, and then I complete the sentence with a little gold foil alphabet thicker that I had in my stash. So, my title is “Baby it’s cold outside” because we were on the street and my girls are wearing jackets with fur hats.
Finally, I scattered some snowflakes all over the page to add a snowy touch. I made them with a very old punch die that I have had for years.
And that’s all for today. I really love how it turned out. Thank you so much for stopping by today!
Happy New Year CVS friends! At the beginning of each new year I choose one little word to try and guide what I am striving to achieve (a different version of a New Years resolution started by Ali Edwards). This year I chose the word Progression (not perfection), the anxiety and stress that perfection can cause is now replaced with progression. So here is my layout which is all about my new OLW.
I went back to the beautiful Daydream collection after a month of Christmas scrapping! I have used GardenVariety paper as my background paper because I really can’t get enough of these florals. I add a 10×10 inch white cardstock to the centre and then added some messy machine stitching using a blue thread to help frame it.
I used a cut file to layer on top of the white cardstock, I chose another piece of cardstock which coordinated with the pink hues in the florals. I created a polaroid frame using Sweet Serenity paper, before adhering to my page I created a floral cluster cascading out of the right side of frame using the florals from the die cut ephemera pack.
To finish off this embellishment cluster I added an accessory sticker to my frame, flair and lastly a puffy heart. Next I focused on my title. I cut my word progress using the blue side of Garden Variety paper (Word from Silhouette Design store). I typed ‘not perfection’.
To tie it to the rest of the elements I added a rainbow and flower from the die cut ephemera pack which I added with foam tape and then added the first of the moth die cuts which flows to the circle on my page.
I added moth die cuts around the circle to finish off my page. I also went back and added drops of NUVO jewel drops to the petals and leaves.
Well thats it from me today, thank you for stopping by and have a wonderful week!
It’s Sophie with you today with a non-christmassy layout created with the lovely Merry & Bright collection.
My assignment for today was to create a page about something new…
Well, the last months haven’t brought anything new for me… aside from a new -completely different- way to practice medicine. As a doctor working in the hospital during this Covid era, all I had in mind was all the new protocols and guidelines to which we had to adapt when seeing our patients. Seriously, what a tough year….!
I first hand drew it on white paper, and when I was satisfied with the result, I copied it on the beautiful “Star Bright” paper. I machine stitched on it with matching thread and painted with green watercolor the edges to create depth.
I cut a strip of the “Jingle All The Way” patterned paper for the upper edge of the mask, added two pieces of twine, and dimensional foam before adhering it to my page.
My title is a cut out of the “Season’s Greetings” patterned paper (NEW) and an alphabet cut file from JustNick Studio (Reality) that I backed with the beautiful “Oh Christmas Tree” patterned paper. I also added adhesive foam under my title.
I cut two large strips of the “Jingle All The Way” paper that I put on the two sides of the layout, with a tiny scalloped punched border from the “Star Bright” paper.
I created a beautiful floral cluster beneath my title and on the top of my photo, that are fussy cut out of paper and from the Die Cut Ephemera pack.
Finally, I handwrote my journaling on a Pocket Card that I hid behind my photo, documenting my adaptation to this new reality.
Here are some close-ups:
I really hope that I could inspire you today. Why not use this gorgeous Merry & Bright collection for non Christmassy layouts ? See how versatile it is ?
I wish you all a splendid beginning of 2021 with lots of joyful crafting time !
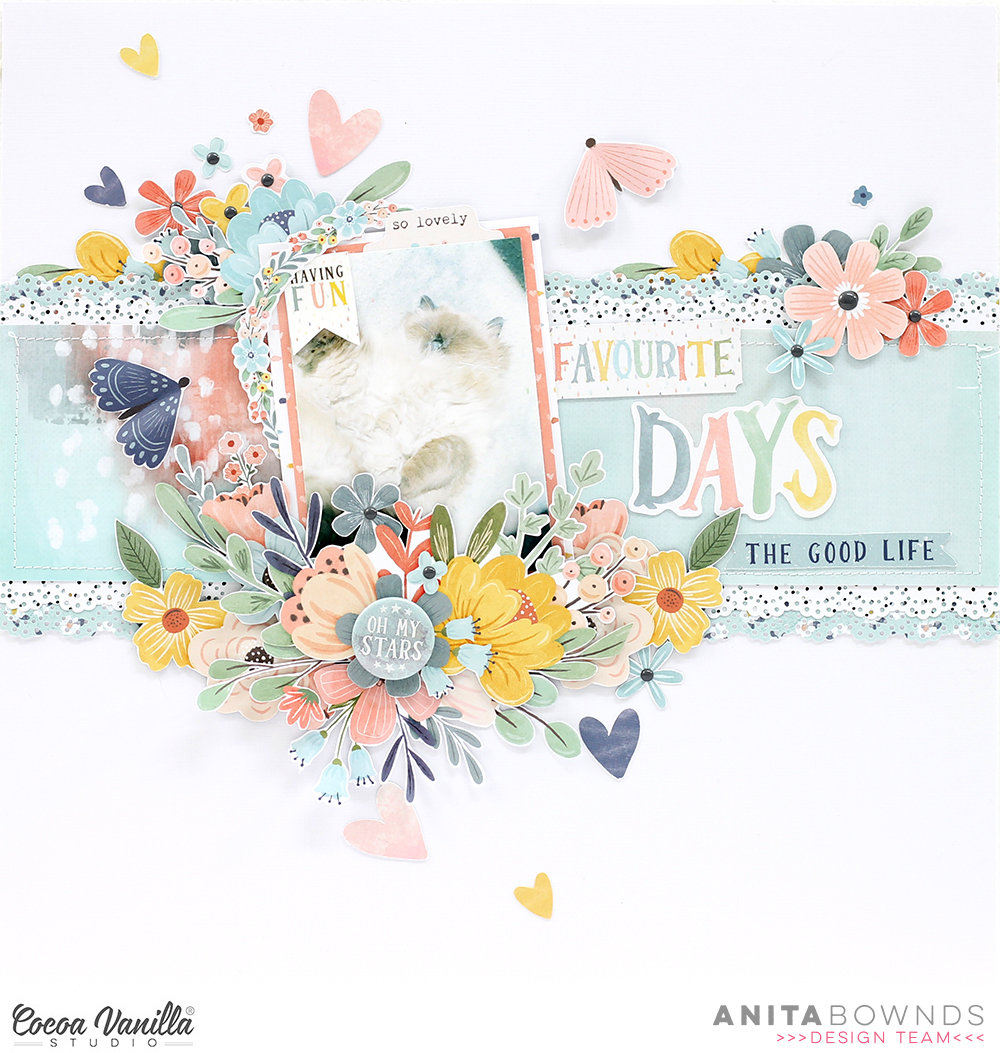
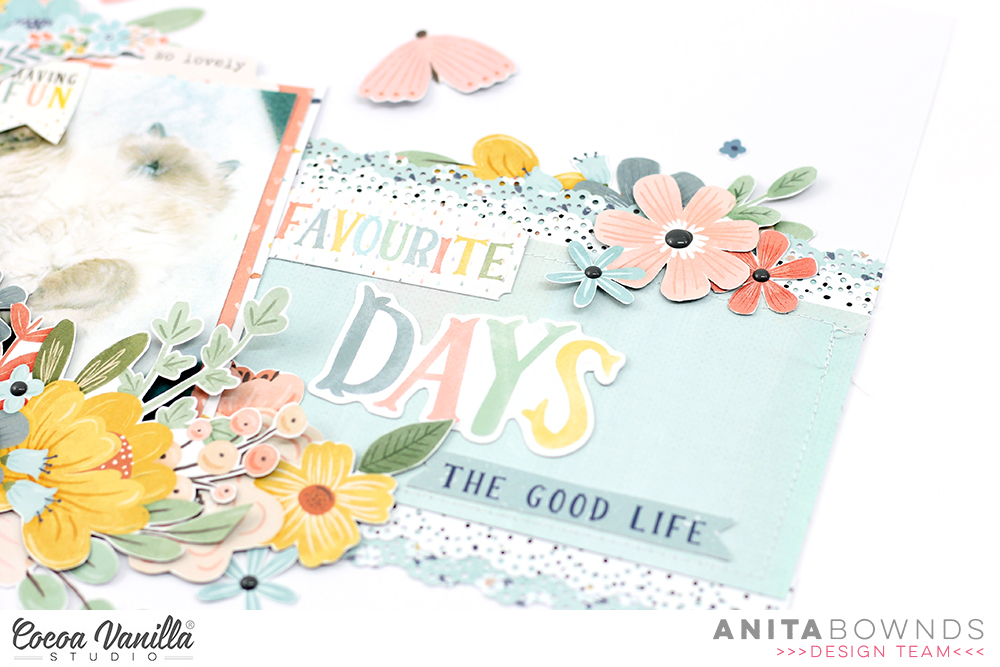
Anita here with you today sharing my first layout of the new year using day dream collection
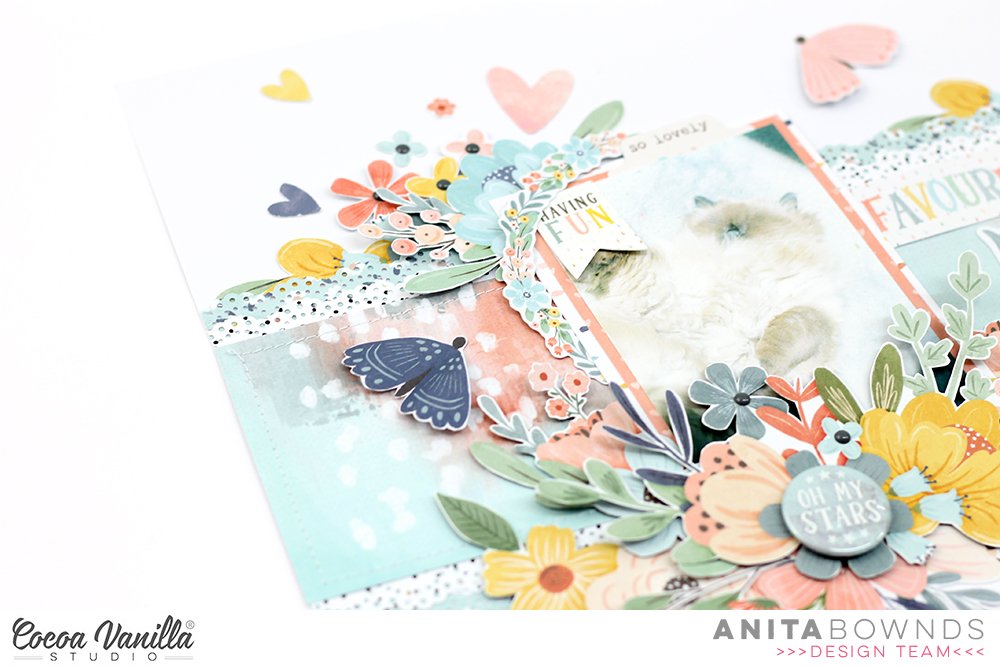
My photo is of my kitty enjoying the morning sun in front of the window this was before we decided that all that fluff needed to be shaved off … and yep he wasn’t happy about losing his fluff!!
I started off by trimming a 12×12 by 5 inch strip from sweet serenity and machine stitching around the edges then I cut 2 more little strips 1 inch by 12×12 from sweet serenity then using daisy days I cut 2 more strips 12×12 by inch and then with all the little strips I punched a border on each of them
Then I matted my photo on papers from the 6×8 paper pad ( you can substitute the 6×8 for the 12×12 using all aflutter and sun shower ) I then tucked a the circle ephemera piece behind the photo that I fussy cut around the edges.
Using garden variety pattern paper I fussy cut out a bunch of flowers and started adding flowers around the bottom of my photo along with flowers from the ephemera pack that I fussy cut around to match the rest of the fussy cut flowers
I added ephemera around my photo and more clusters of flowers around the photo and to the right side of the layout I also added some other bits from the ephemera, butterflies and my title then finished off with hearts around the flower clusters and enamel dots in the center’s of the fussy cut flowers..
Hello Cocoa Vanilla Studio fans. It’s time to wrap up this year with my final project for 2020. December in our family is full of reasons to celebrate as 4 of us have birthday in this month. Add Christmas to this and we basically party all the December weekends. The youngest of us, born in December, is my older daughter Gabrysia. She is teenager already and few weeks ago she turned 12. We had modest party with no guests due to Covid, but we decorated the living room as always (mama needs those cute photos to scrapbook!). I took one of her pictures to make this colorful, yet simple page.
I decided to dig in my CVS stash and pull some random, party related items, like very old wood veneers, elements from bits and pieces bags, buttons and fabric bows. I just love creating this way, with no limitation of what I can use and with whole rainbow of possibilities.
I started with printing my photo on A4 size paper (the biggest my printer can print) and cut it into a circle. Such a colorful photo doesn’t need much of embellishing so I only picked a paper for the background with soft, pink stripes. It’s from this old collection called “Love always“. I also used a piece of wooden paper from “Hello lovely” to make a frame around the photo.
I found some wood veneers from birthday themed line “Make a wish”. It was a perfect opportunity to finally use them. I also added few stickers and ephemera pieces from the same line. I almost managed to use every bit of this collection. Puffy flamingo comes with “Endless summer” collection and paper tassels are from “Unforgettable“. My title is quite simple as I only added number 12 cut out from a silver mirror cardstock. I used small star punch to make smaller, silver stars and scaterred them around the photo.
I love how simple yet eye-catching this page is. Sometimes less is more! And I am always so happy when i have a chance to use up older things from my stash. I feel I gave them second chance and nothing goes to waste.
With this party page I wanted to wish you all Happy New Year. Let’s hope for better one as this girl really craves for some travelling and teaching classed! See you in 2021 Friends.
Hello Hello and Happy Christmas Eve to you all! It’s Michelle here today with a new layout share for “Throwback Thursday, our regular fortnightly throwback to beloved Cocoa Vanilla Studio collections from the past. This week I’m sharing a super fun layout using the awesome Legendary Collection which is perfect for documenting all kinds of funny moments, especially funny photo’s of my sweet Leila who just recently turned 10!
The layout was based on a fun title idea to use with a funny photo of Leila on a toddle ride at a local shopping centre. She’s way too big to fit in the actual seat so she was perched on top for her Epic Adventure to ‘Toy Land’.
I started the layout by making the title then worked around that to create the whole layout. I’ve used the woodgrain paper ‘Outdoors Type‘ as the backing and layered in a couple of other pattern papers ‘Offbeat‘, ‘Epic Tales‘ and ‘Wild one‘ to make the photo stack pop.
There’s some hidden journalling tucked into the top of the photo too, using a tag from the Ephemera Pack and shared up close further down this post.
I like creating titles with mixed fonts and this collection has plenty. I’ve fussy cut the EPIC letters found on the cut apart paper ‘Epic Tales‘ to give them a more 3D look when adhered to the layout with foam tape. Under this I’ve added a Die Cut Title word plus another strip piece from the cut apart paper. The alphabet stickers I used for Leila’s name are an older CVS product thats currently not available. To the right of the title I added the hot air balloon from the Ephemera Pack.
I added the giant stars from the Ephemera Pack to the top and bottom of the layout on a diagonal across from each other, then layered more Ephemera pieces and Accessory Stickers to create open clusters. I certainly love a cluster of stars, almost as much as I love a cluster of florals!
I used a range of adhesives to keep some pieces flat and give some slight dimension. More often than not I use my tiny attacher, foam tape and tiny glue dots. Oh and sometimes I sneak in a little machine stitching
To finish the layout I’ve splattered gold ink everywhere, added a sprinkling of Enamel Dots within the clusters and added the journalling to the hidden tag. It certainly was hilarious watching her try to squeeze into the seat that day!
Well crafty friends thats all from me today, here’s one last peek at the layout I’ve shared with you today..
I hope you’ve enjoyed seeing what I created for this weeks Throwback Thursday post. If you don’t already have the Legendary Collection in your stash you really should add it. There’s plenty of ways you can use it, even if you don’t have boys to scrap!
Thank you all so much for stopping by today. I hope you all have a safe and wonderful Christmas with your friends and family. Stay safe and be Merry! I’ll be back in a couple of days to share the remainder of my Christmas Album using the Merry & Bright collection.
Until then, Happy Scrapping.. if you get the time to that is.


 First, I took the