I had the idea of using one of my favorite papers of the collection, ”Just Chillin” on the wood grain side and create a frame on my layout. I cut four strips of this beautiful paper with 45 degre angles on each end to create that frame. I added adhesive foam in the middle of each strip and adhered them together in a square shape. It gives the effect that each strip is curled a little bit, mimicking a wooden frame. I added a few hand stitches with yellow embroidery thread to each corner of the frame, and centered it on the gorgeous “Good Vibrations” paper.
My photo is from a typical summer day at home where my dog Fiona likes to jump in the pool endlessly !
I used a thick white cardstock inside the frame and added numerous multicolor watercolor splatters on it.
I backed my photo with tissue paper and adhesive foam. I teared a portion of a pocket card to write down my journaling.
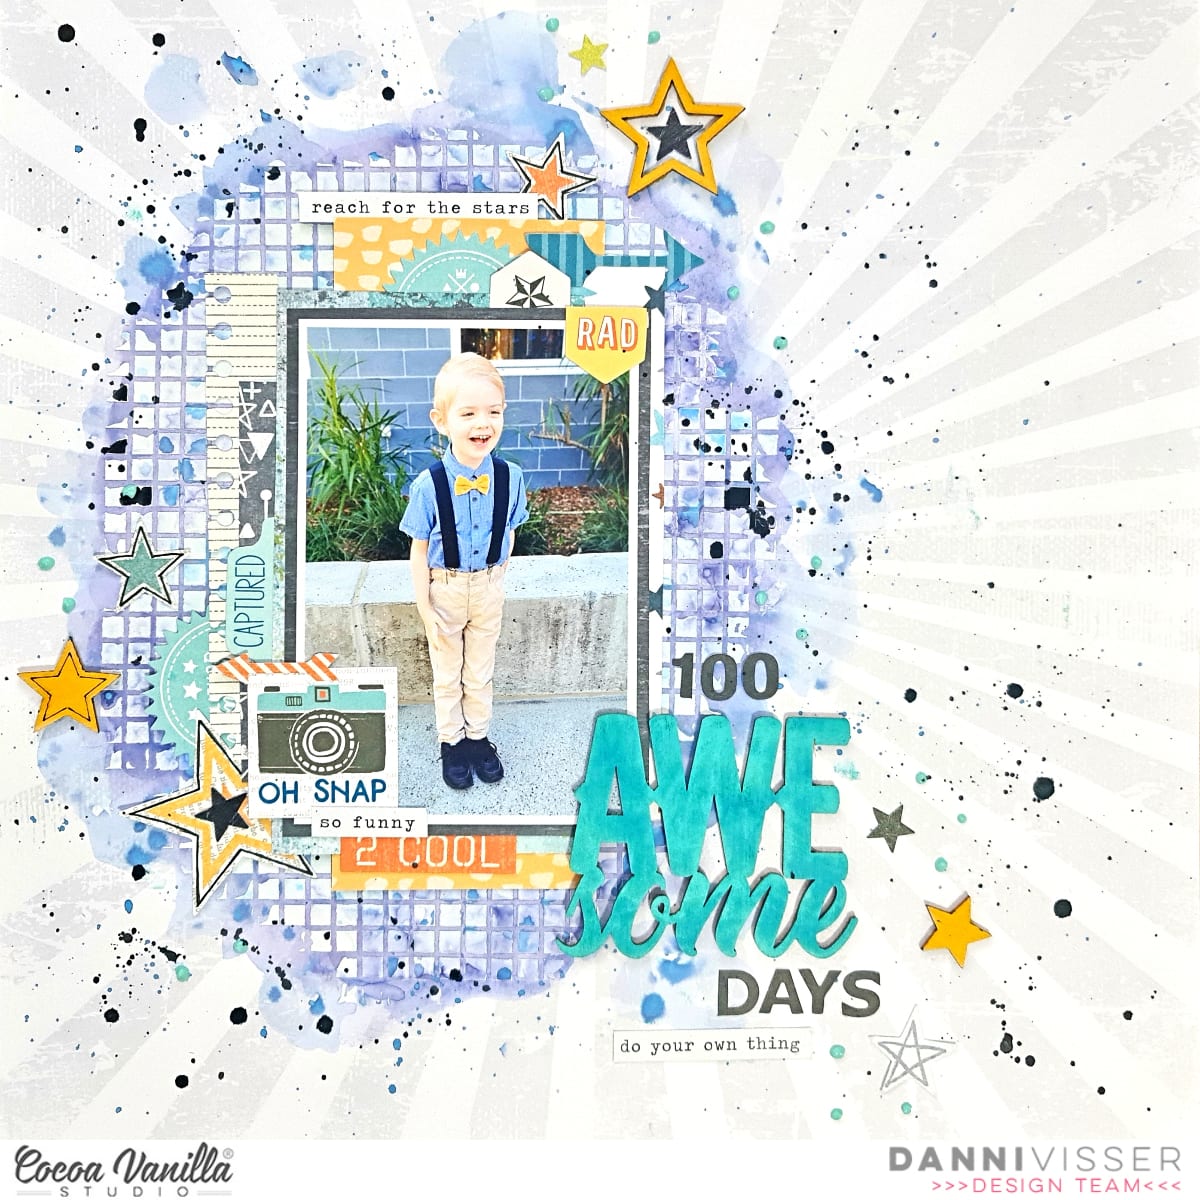
Hi Cocoa Vanilla fans! Danni here with a Throwback Thursday layout featuring some messy mixed media and the Boys Rule collection, plus a little You Rock and Totally Rad mixed in. These boyish collections all work so well together that I keep them together in the same plastic sleeve and use them as one big kit – so versatile!
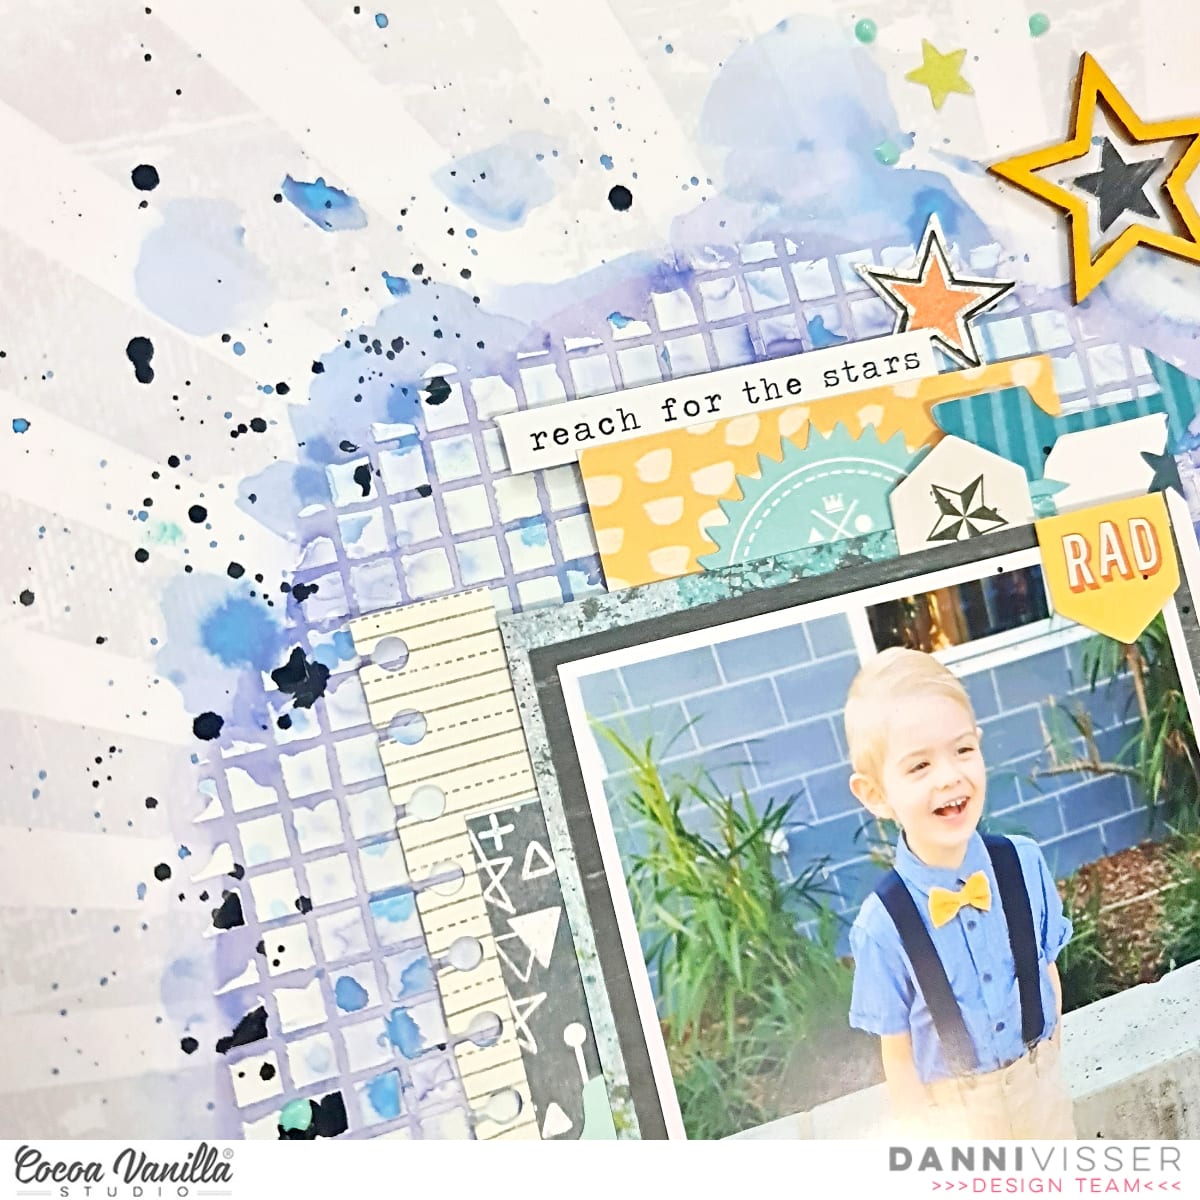
I knew I wanted to do some mixed media today so I chose a lightly patterned background paper from Boys Rule called Good Times 12×12 patterned paper. Once I had decided where my photo would go I used a waffle stencil with white modeling paste to create texture in the space surrounding my photo. I added some colour with a distress oxide ink pad in navy blue and used a paintbrush and some water to soften and blend it. I also used a midtone blue ink spray to add variation in tone and lots of ink splatters.
I layered up my photo with a variety of patterned paper scraps in varying shades of grey, blue and yellow. In my photo my son is wearing a bright yellow bow tie, so I really wanted to add pops of that bright colour around the entire layout. With this in mind, I chose some wood veneer stars from the You Rock collection and coloured them with yellow ink. I also decided to use the “Awesome” wood veneer piece as part of my title, so I inked that in a bright teal.
I build two large embellishment clusters around my photo and a smaller one around my title. I mainly used the accessory stickers from all three collections to do this, plus the inked wood veneer stars. I chose a variety of shapes including arrows, tabs, flags and stars, mostly using blues but also making sure to add some pops of bright yellow and orange to brighten up the layout.
As a final touch I added three tiny word stickers from the Boys Rule accessory stickers, some aqua dimensional drops and some bold ink splatters in black for an extra dramatic touch. This is definitely a ‘messy’ layout, and I feel that the black splatters really help to bring it all together.
I adore how this fun layout turned out! I hope you enjoyed joining me today. You can watch the process video below on the Cocoa Vanilla Studio YouTube channel to see how I struggled with the mixed media initially, and how I managed to make it work for me in the end. Happy scrapping!
Hey y’all! Laura here and I decided for these wild and crazy photos of my oldest son, I wanted to dig deep into my Cocoa Vanilla stash and play with the You Rock collection from 2017. I’ve almost finished it off and am determined to use it up this year. For this layout, I grouped my three photos across the center and layered scraps behind them to create a foundation for my photos. The title is cut from the paper pack packaging that I cut into a banner shape, with a small washi banner behind it.
In each of the four corners, I placed a piece of washi from the washi tape booklet that accompanied You Rock and then layered random embellishments together to create L-shaped clusters. These are a combination of fussy cut stars, ephemera, chipboard, wood veneer, and stickers. Loved seeing how I could puzzle together a variety of sizes and textures into each cluster!
The bottom right corner is my absolute favorite! I had just a few pieces left from the Totally Rad collection (as in about five pieces of ephemera!), so I created a hilariously cute little globe with a mustache that I fully admit sends me into giggles every time I see it. I think it perfectly captures the goofy personality of my oldest son! Finishing off the layout with my typical Nuvo Drops, but in black this time, and gold ink splatters.
I hope this layout inspires you to dig into your older Cocoa Vanilla Studio stash for your next layout! To see how “You Rock” came together, check out the process video below!
Hello scrappy Friends. Today I want to share with you project created for the “One product – three ways” theme. Our Sue chose paper from “Sunkissed” collection called “Feelin fine“. I must admit I had a hard time deciding which side I should use. I like both of them – more artsy and colorful brush strokes or dark pink, cute hearts. After few attemps and sitting over the empty paper for a while I finally decided to go with hearts. As it’s quite a solid patter, it works great with cut files. I chose hearts background pattern with a photo of me and my hubby in mind. It can be used in two ways – as an outline or a group of hearts. This is where I was stuck again… Too many choices :) In the end I decided I will use both ideas and divided the pattern in two parts, filling one side of background with an outline and second with the hearts.
I started with coloring my white cardstock base with a light pink mist. Then I glued down the cut file, rotating some of the hearts so the B side of the “Feelin fine” paper would be visible too. Some of the hearts are raised above the surface thanks to the 3D foam squares. I like adding this kind of texture to my projects.
I placed my photo and embellishments on the vertical line where my outline pattern ends and scaterred hearts begin. Area around the picture is embellished with a lot of elements from ephemera pack and flower pack, like palm trees and flowers. I also fussy cut two little rainbows from “Sunny days” paper.
The line between cut file and hearts is completely coveder with varoius elements and runs smoothly from one end to another. I added few small word stickers from sticker sheet turning them into small fishtail tags. Photo I used, even though is “romantic”, was taken during one of our summer travels, hence using “Sunkissed” collection, that matches the story perfectly.
Gold glitter foam title stickers are perfect for… titles, so I used one on my page. I also added few woodies here and there (with quite a heavy heart as it means I will run our ot them soon). Last step was splashing everything with yellow mist, adding this sunny touch to my page.
Other girls from our Team will share with you more ideas on how you can use this pretty paper and I am sure each one will be totally different.
Thank you so much to stopping by and see you in July.
Hey crafty friends, it maybe cold and gloomy outside but it is summer in my craft room! I love the colours of Sunkissed collection so much and so before These Days arrived (which I can’t wait for) I am happily creating away remembering summer!
The folded heart (rosette heart) is a cut file from the Silhouette Design store. I oversized mine as I wanted it to be the feature on my layout. I used the Growing Wild paper to create the hear. I used the left over paper strip (using the floral side) of the Growing Wild paper, tearing at the top and bottom of the strip. Before adhering my white cardstock I tore another paper strip from the Summer Lights paper using the pink part of the ombre paper and tucking it under my floral strip. Finally to soften I add a 7x 5 inch strip of Vellum paper tearing at the bottom only.
I next added my folded heart, I used a wet glue to ensure it wasn’t going to move or lift. I have used a 4×4 inch square photo which I matted onto a square of Feelin Fine paper.
I have created embellishment clusters in a triangle configuration with my photo at the centre. This is important to do when you are using ‘busy’ patterns and ‘bright’ colours. I added a small cluster of flowers (using the Floral Ephemera pack), adding some gold thread and finishing off with one of the gorgeous Wood Epoxy Buttons.
Under this embellishment cluster I added another, using the fruits from the Die Cut Ephemera pack and finishing off again using another, but smaller wood epoxy button.
I created a large and cascading cluster of the gorgeous tropical flowers from the photo flowing onto the vellum and white cardstock. Again I added gold thread under the outer flowers. To create dimension some were added over others with foam tape. I also added clear NUVO jewel drops on some of the centres and leaves. I added two phrase sentiments from the die cut ephemera pack.
I used one of the words from the Glitter Foam Titles and curved it gently around the top of the heart.
And there you have it one super fun summer layout and of course you could use a larger photo and add two smaller ones over the heart. Thank you for stopping by and happy creating!
Hello CVS friends, it may be winter here in Australia but in my craft room it is summer! I am still using my sun kissed collection and loving it!
I was set the challenge to scrap lift Tarrah, it took me ages to decide on a layout as she has created so many gorgeous layouts. Finally I settled on this one.
And here is my take on her sketch (I may have taken a little creative license!).
I used a palm leaf cut file from the Silhouette design store. So I could lift it somewhat (so it didn’t appear ‘flat’, I cut one in white and then another (using the off set function) using the Sunny Days paper. As in Tarrah’s layout I used a project life card from the collection, I just repositioned mine.
Once I had added my photo I created an embellishment cluster tucking die cuts under my photo, adding wooden epoxy button and finishing off adding a clear sticker paint brush stroke.
I next created a tropical floral cluster, the larger one being a cut file and the others from the floral ephemera pack adding some of the flowers and leaves from the Puffy Stickers pack.
To finish off I added some puffy stickers on my photo, added a die cut ticket and then lightly splashed my layout with some white paint. If you like multiple photos you could replace the project life card and add another photo! Isn’t it mazing how different a sketch can look just by changing the collection!
Thank you for stopping by today and see you again soon!
I started by creating a mixed media background. I used thick white cardstock, added a lot of water and sprayed a few different Shimmerz paints (mostly Mustard Seed and Sweet Heart Vibez). I let the colors run and blend on the cardstock and also added a few splatters with a brush. I let it dry completely.
Gwen back on the blog today with a new share featuring the ‘Sunkissed‘ collection. For this layout, I asked everyone in the Cocoa Vanilla Studio Community on Facebook if I should add in some Mixed Media to my page… and the resounding answer was YES, so I’m adding it Gwen style which is a ‘clean mixed media’ look. I’ve gone with a bright pink colour as it really works well for this bright and happy collection. This layout documents this fun photo of my daughter and I on a recent family vacation.
To begin the page, I mapped out a plan for the layout design getting a clear idea of where my title and photo would go. From there, I added some mist through a 6×6 star-bust design stencil from my stash to my background. While my mist was drying, I backed my cut file (from CUT to YOU) using papers from the A5 paper stack and backed with 3D foam for dimension.
Next, I’ve used my sewing machine to add stitching to my background and photo and then positioned my cut file title and photo onto my layout base.
For the embellishments, I’m working with the larger pieces first such as the cute palm tree and clouds. The are from the ‘Die Cut Ephemera pack‘ and then I’m moving to the smaller embellishments like the ‘Puffy Stickers‘ and ‘Wood Epoxy Buttons‘. I’m working on three main embellishment clusters for this page, one above the right top corner of my photo, the second on the right hand side of my photo and the third one towards the bottom left hand side of my photo.
You can also see above my mixed media sun-burst from the stencil. I love how it’s a small detail but it adds a really fun element to the page. The Sun icon you see in the picture below is from the ‘Puffy Sticker pack’ and works so well with the clouds, the sun burst and palm tree on my page.
To finish up the page, I’ve added some typed sentiments from the ‘Accessory Sticker Sheet‘ which I have mounted onto foam tape for dimension as well as some small die cut hearts from the ‘Die Cut Ephemera Pack‘.
I’ve also made a YouTube video which you can watch here:
I hope you enjoyed seeing my creative process for this layout and it inspires you to pull out your supplies of the ‘Sunkissed’ collection and document a fun Summer holiday photo or two! If you are not already part of the Cocoa Vanilla Studio Community on Facebook, I encourage you to pop over and join us.
It’s Mandy Melville, and I’m so thrilled to be back here on the CVS blog for the first time in over a year to share some inspiration with you all! Unfortunately I had to take a break from my design team commitments over the past little while due to increased work commitments, but when I was invited to re-join the amazing CVS Design Team recently, of course I couldn’t say no! I love being able to share these gorgeous products with you all!
For my first layout share, I chose to use the absolutely stunning Daydream collection! If I had to pick a favourite scrapbook collection of all-time, it wouldn’t be an easy choice, but I think this collection might just be it! The gorgeous colours and the beautiful florals make it such an enjoyable and easy collection to create with! It was so perfect for documenting this lovely photo that I took of my eldest daughter Abi recently.
I’ve been hoarding the lovely Daisy Dayspatterned paper since I first got this collection, but I decided that it was time to finally use it! If you’re familiar with my scrapbooking style, you’ll know that I LOVE fussy cutting, especially floral elements! So of course I couldn’t resist fussy cutting that beautiful floral wreath to use as the main element on my layout.
I started my layout layout off with a sheet of American Crafts white textured cardstock as my background, which you can now purchase from the Cocoa Vanilla Studio store! I then cut a 10 inch square out of the heart print All Aflutter patterned paper, and I cut a circle out of the middle of the paper about 8 3/4 inches in diameter. I adhered this patterned paper to my white cardstock, and added some machine stitching around the outside of it to give the page some additional texture. I also smudged some white gesso onto it to fade out the colour just a little bit, as well as a few white splatters. I then layered the fussy cut wreath on top, just adding glue randomly to allow some of the leaves and flowers to lift freely off the page.
For my title, I combined some alphabet stickers from my stash with the word ‘beautiful’ from the Die Cut Titlespack. I love these beautiful scripty die cut words, and they make adding a title to your layouts so easy! I adhered it using foam tape for extra dimension, (which you might know is another thing that I love to add on my pages!)
I double matted my photo using one of the papers from the A5 Paper Stack, as well as the woodgrain polaroid frame from the Die Cut Ephemera pack. I also included a doily from my stash in my photo layers which adds some extra detail and texture. Under the right hand side of the photo I tucked a tab from the Accessory Sticker Sheet.
Next I added a couple of little butterflies that I fussy cut out of the All Aflutter paper from the A5 Paper Stack, as well as some tiny flowers that I cut out of the Garden Variety paper. I finished the layout off with a few little phrase stickers from the Accessory Sticker Sheet, which added the perfect sentiments to my layout about my beautiful girl.
Thanks so much for stopping by today! I hope that you enjoyed taking a look at my layout, and that you’ve found some inspiration. I look forward to sharing with you again here later in month. Until then, happy scrapping!
Hi everyone, its Melissa here and I’m back today sharing a new layout I created with the gorgeous Sunkissed Collection. I used one of the two free exclusive cut files that were available during International Scrapbooking Day called ‘Floral Wreath’. You can find this cut file in the Cocoa Vanilla Studio Community Group on Facebook. My photo is of my youngest daughter Ava (aged 4) in the bush at the beach house we stayed at in January on our summer holiday.
I created my layout using the B side of ‘Brightside’ for my background. Its a beautiful shade of blue and during my Facebook Live scrapbooking session during the weekend of International Scrapbooking Day I nearly used this paper. I told everyone watching that I would use this paper for another background, hence this layout!! I added splatters of watered down white acrylic paint before I adhered my cut file.
I predominantly used papers from the A5 Paper Stack to back my cut file, and I focused on solid patterns or small repeating patterns. I embellished around my photo by adding Floral Ephemera and Puffy Stickers.
I also fussy cut a floral cluster from Growing Wild and used it to embellish the top of the wreath. I even got two of the Wood Epoxy Buttons onto my layout!
I used a phrase from the Die Cut Ephemera pack for my title. It was perfect against the blue background, and I popped it and lots of the flowers up on dimensional adhesive. I wrote my journaling with a silver pen.