It’s Sophie with you today and I have a beautiful layout to share !
This week’s theme is “Outdoor Adventures” and I thought right away that I wanted to create a layout highlighting the amazing trip to Italy that we did last year. We went to the Dolomites, and literally fell in love with this part of the Country. The mountains, lakes, the hikes, the beauty of nature, Ahhh… I can’t wait to go back…!!
The Legendary collection, with its color scheme and embellishments was the perfect collection to document my page.
I started with the Legendary Offbeat Paper as my background. I applied only a thinny bit of dry yellow-orangy ink to the center of the page where I planned to put my photo.
I backed my photo with tissue paper, adhesive foam and the back side of that same patterned paper (yes, thankfully I had two sheets !).
I used a JustNick digital Cut file that I cut on white cardstock and backed with many patterned papers from the collection (Outdoors Type, Total Legend, Wild One and One Way papers). I used adhesive foam on the back of the cut files to make them stand out a bit more and arranged them around my photo.
Finally, I wrote down my journaling directly on the background, added a few more embellishments and some enamel dots, and stamped the date on a colorful Legendary Accessory Sticker.
Here are a few more close-ups !
I truly hope that my page has inspired you in some way. The Legendary collection is so versatile, I am sure it will suit your next design !
Thank you for passing by, and I will see you again soon !
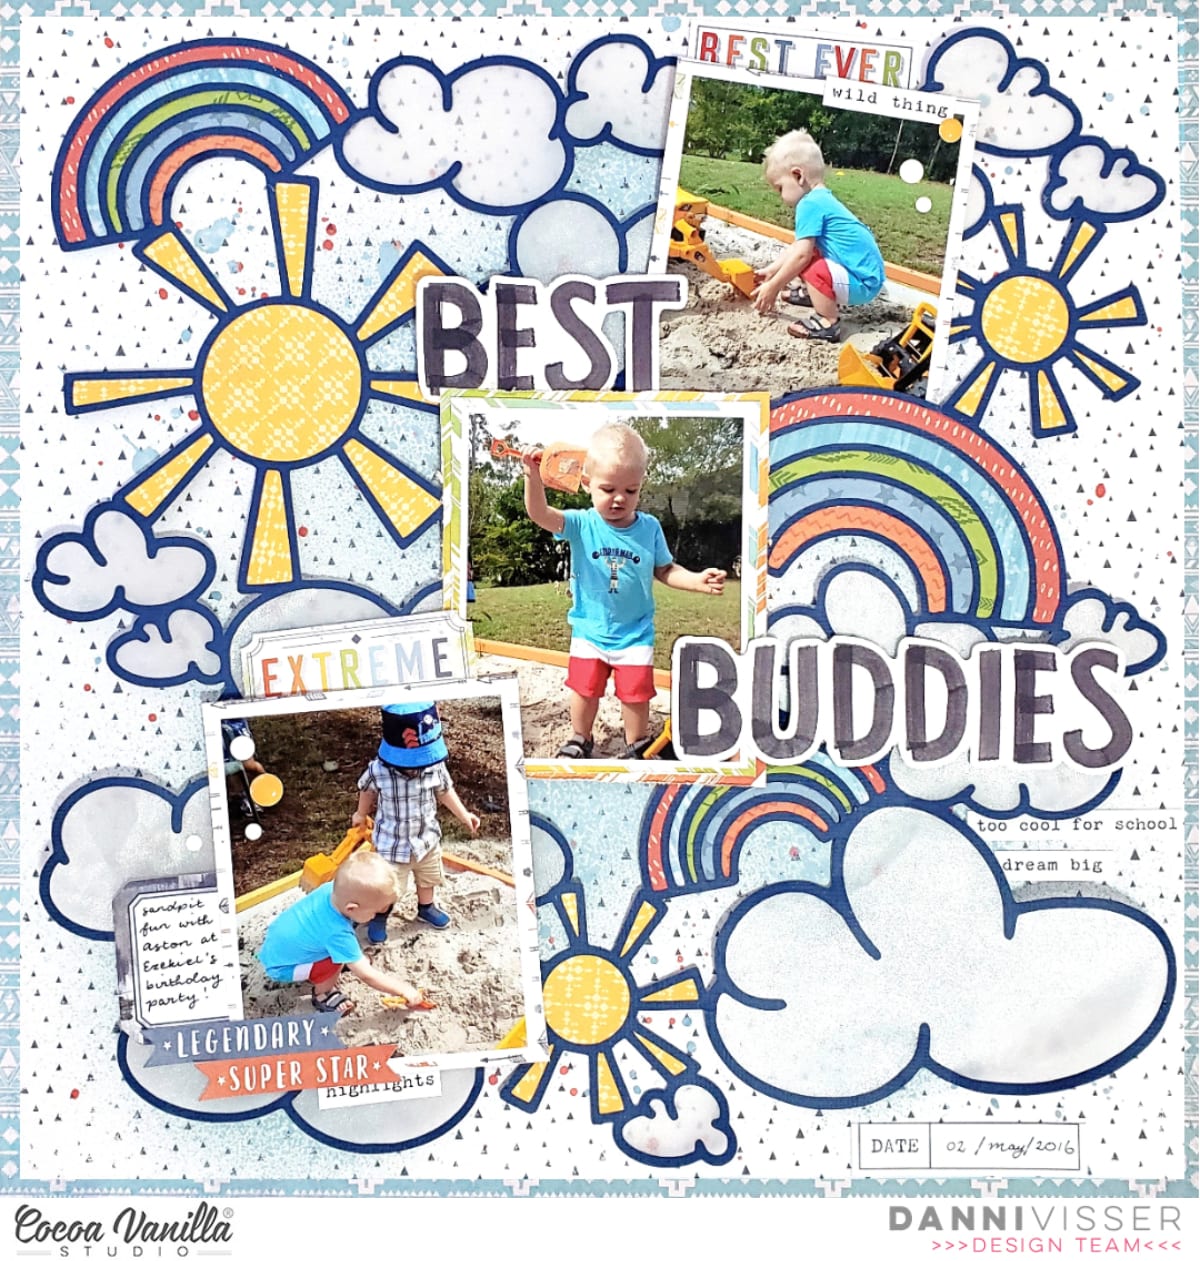
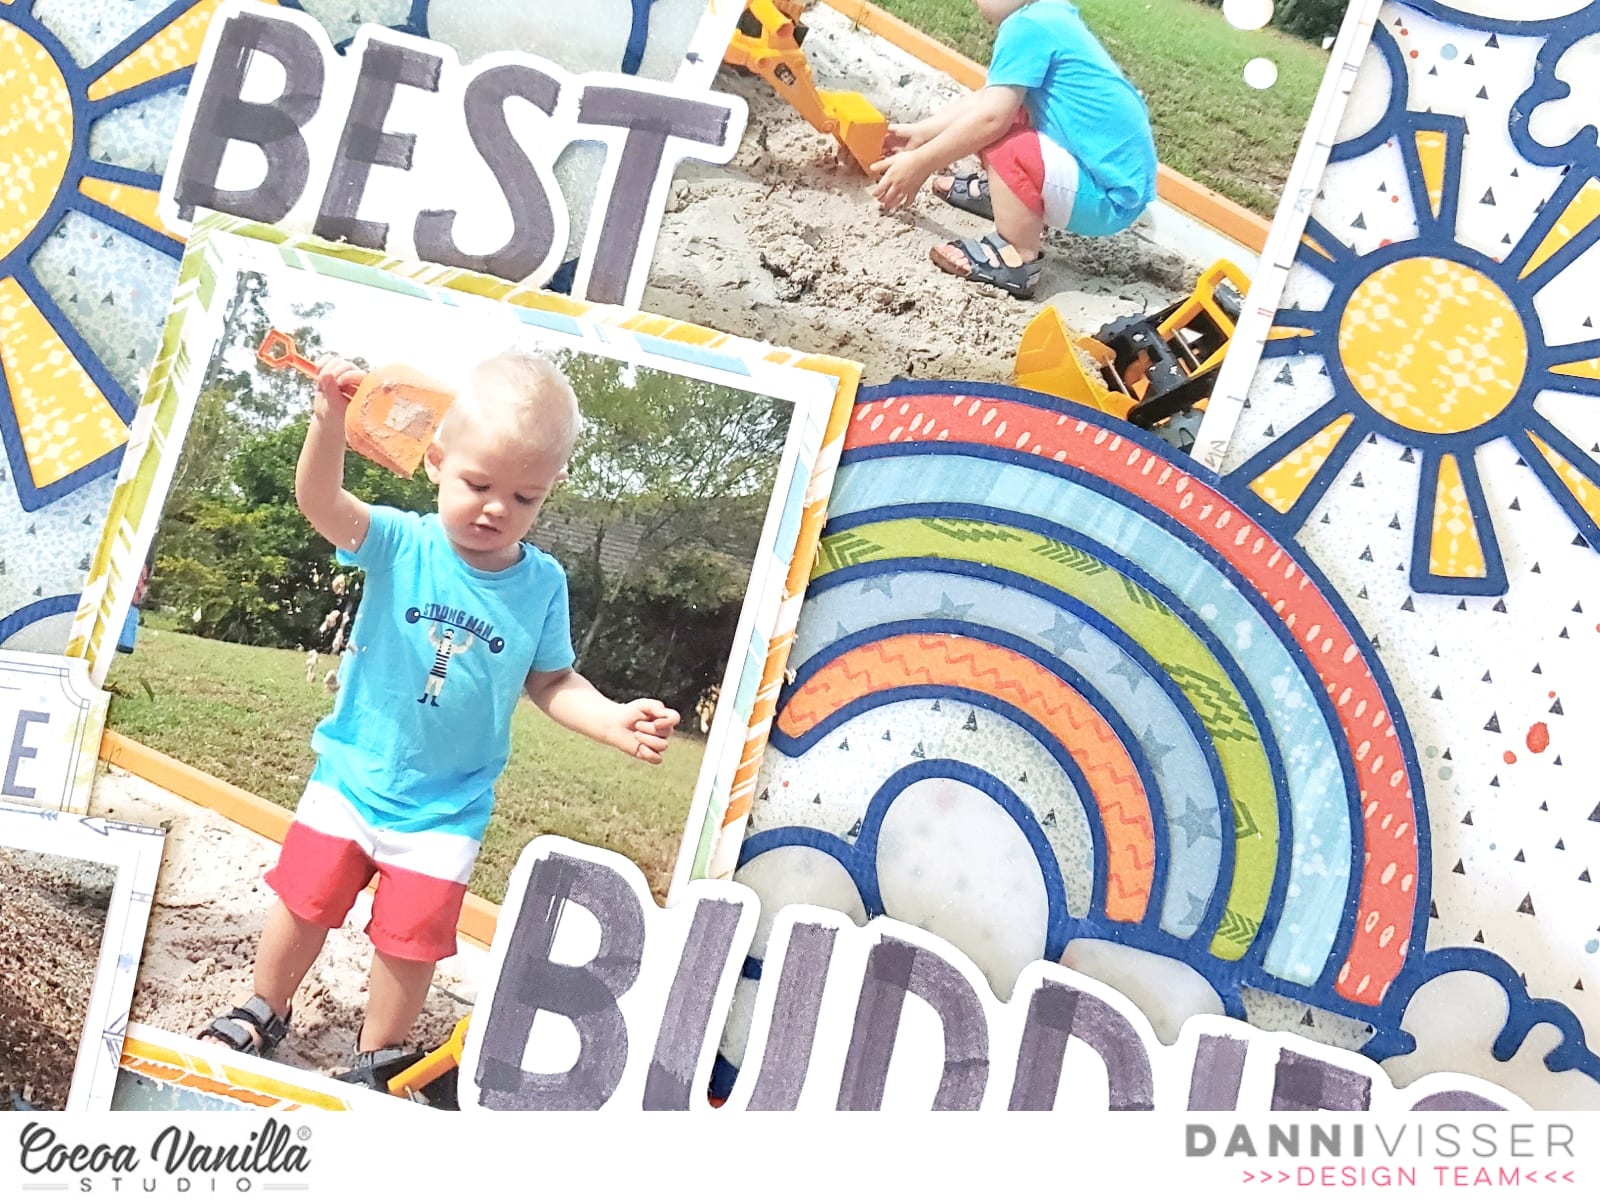
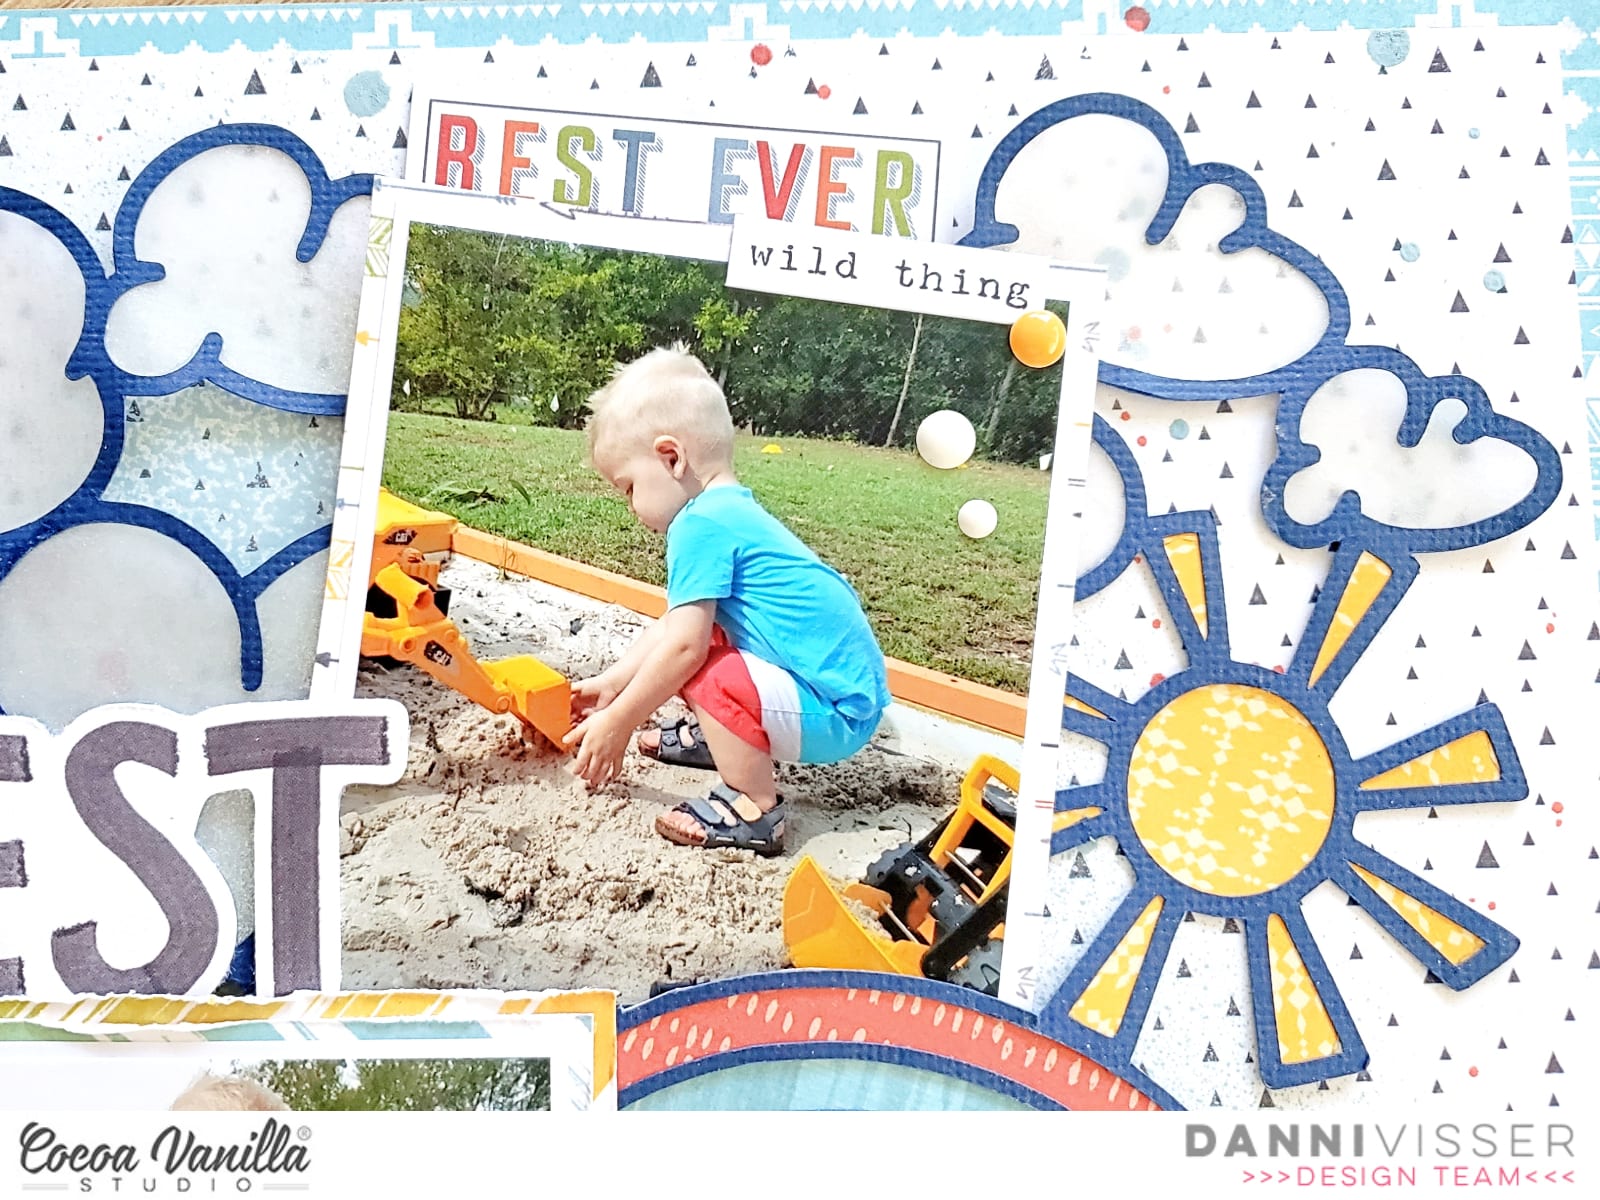
Hi there Cocoa Vanilla fans! Danni here with a bright and happy outdoors themed layout to share with you, using none other than the Legendary collection. This collection has just been absolutely perfect to get all those outdoor adventures documented! This time I have created a multi-photo layout to document my son and his little friend’s sandpit adventures.
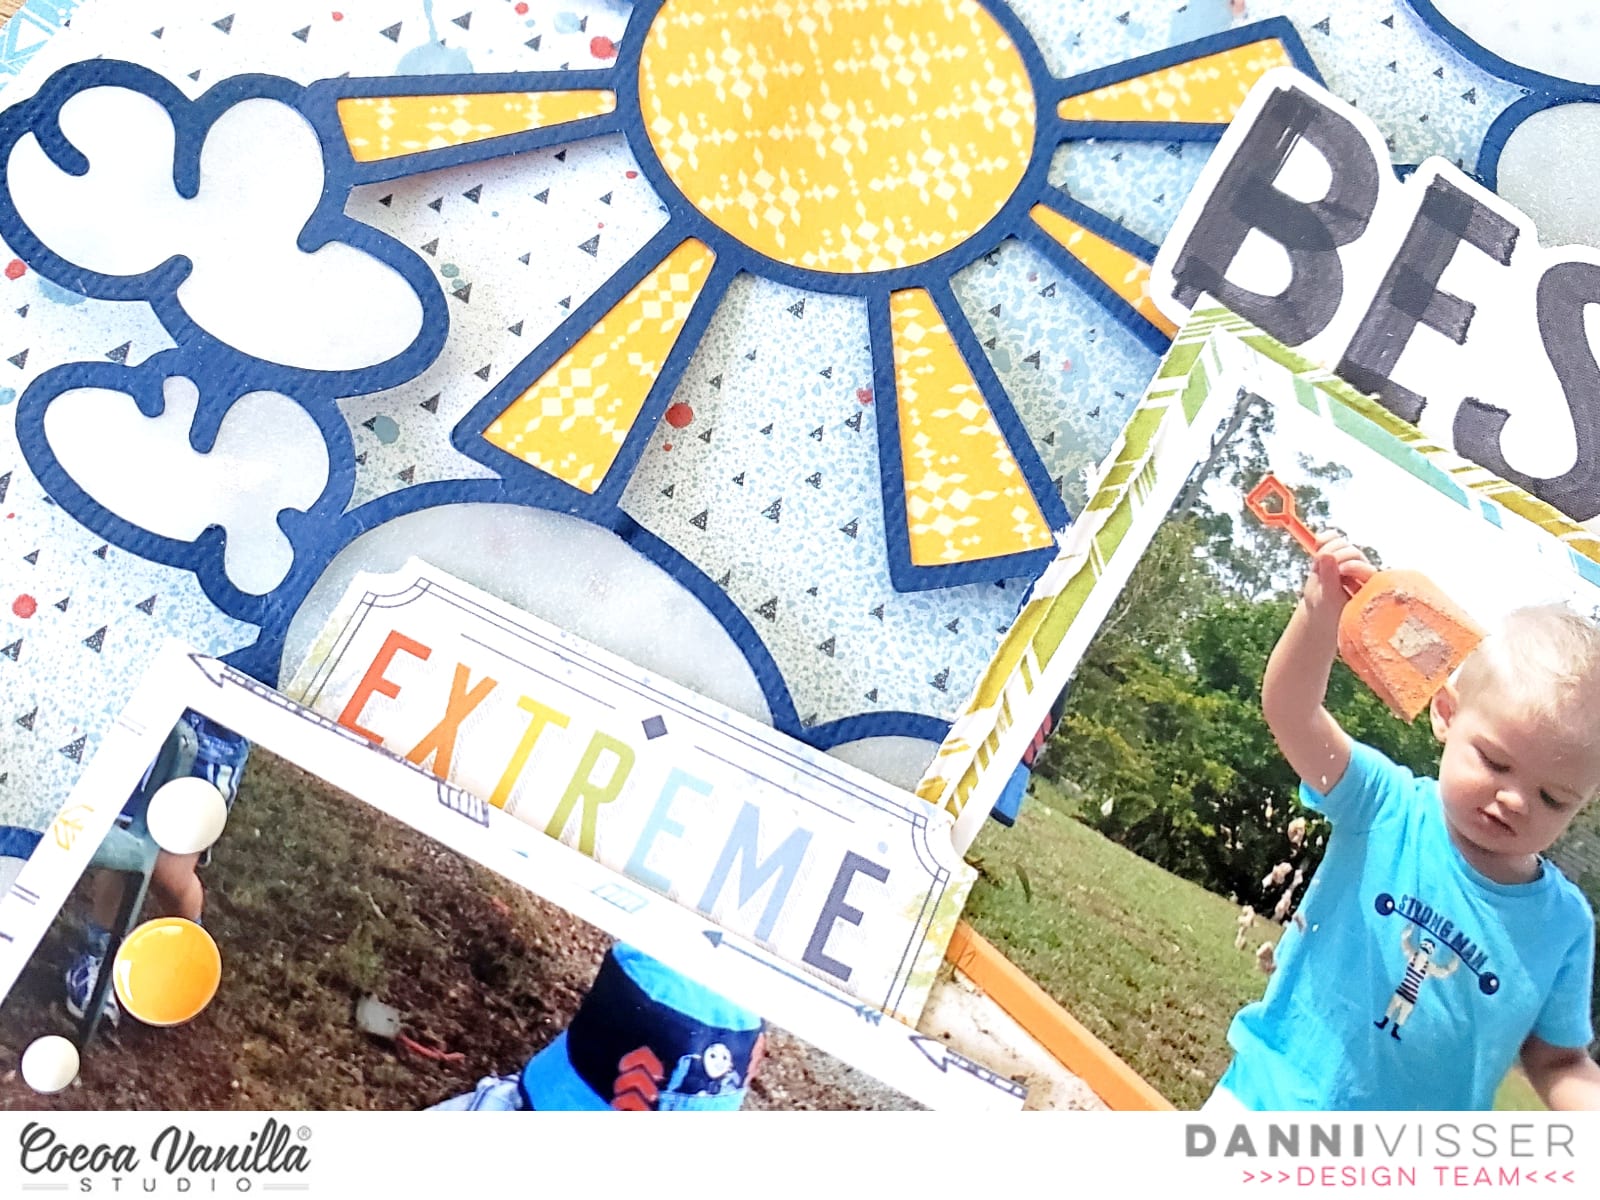
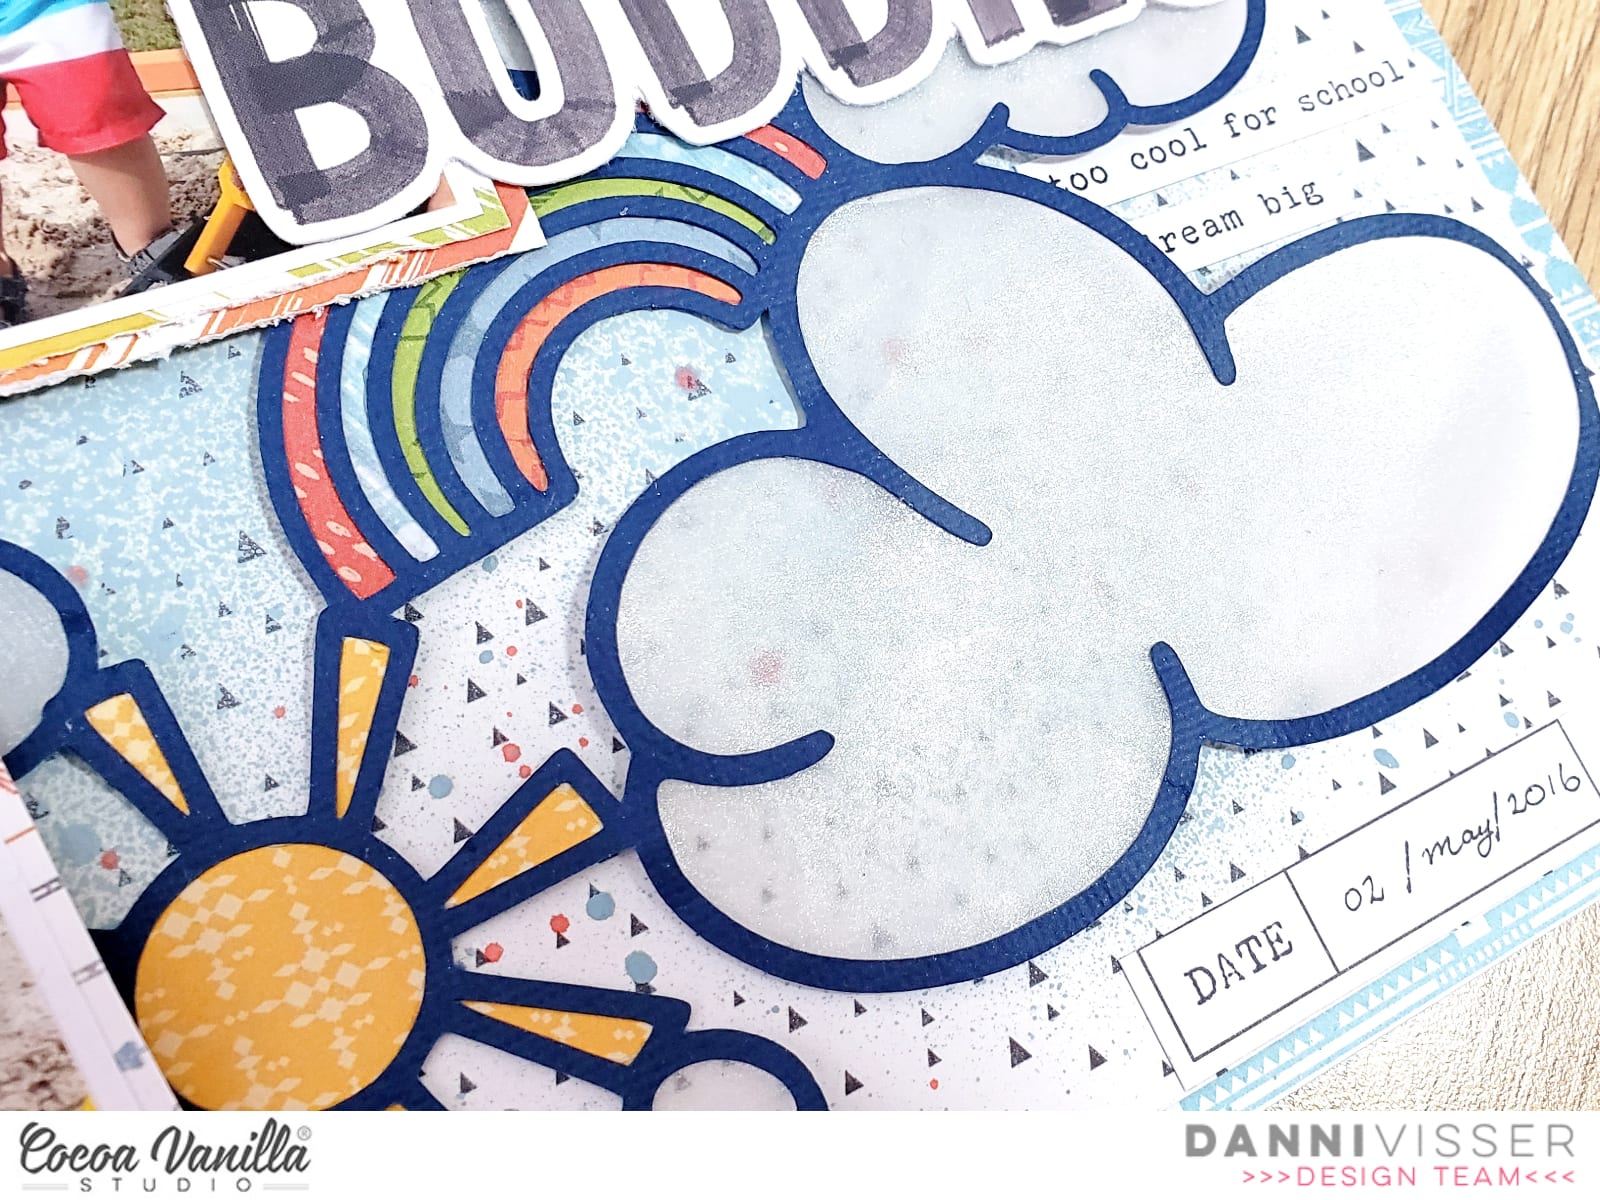
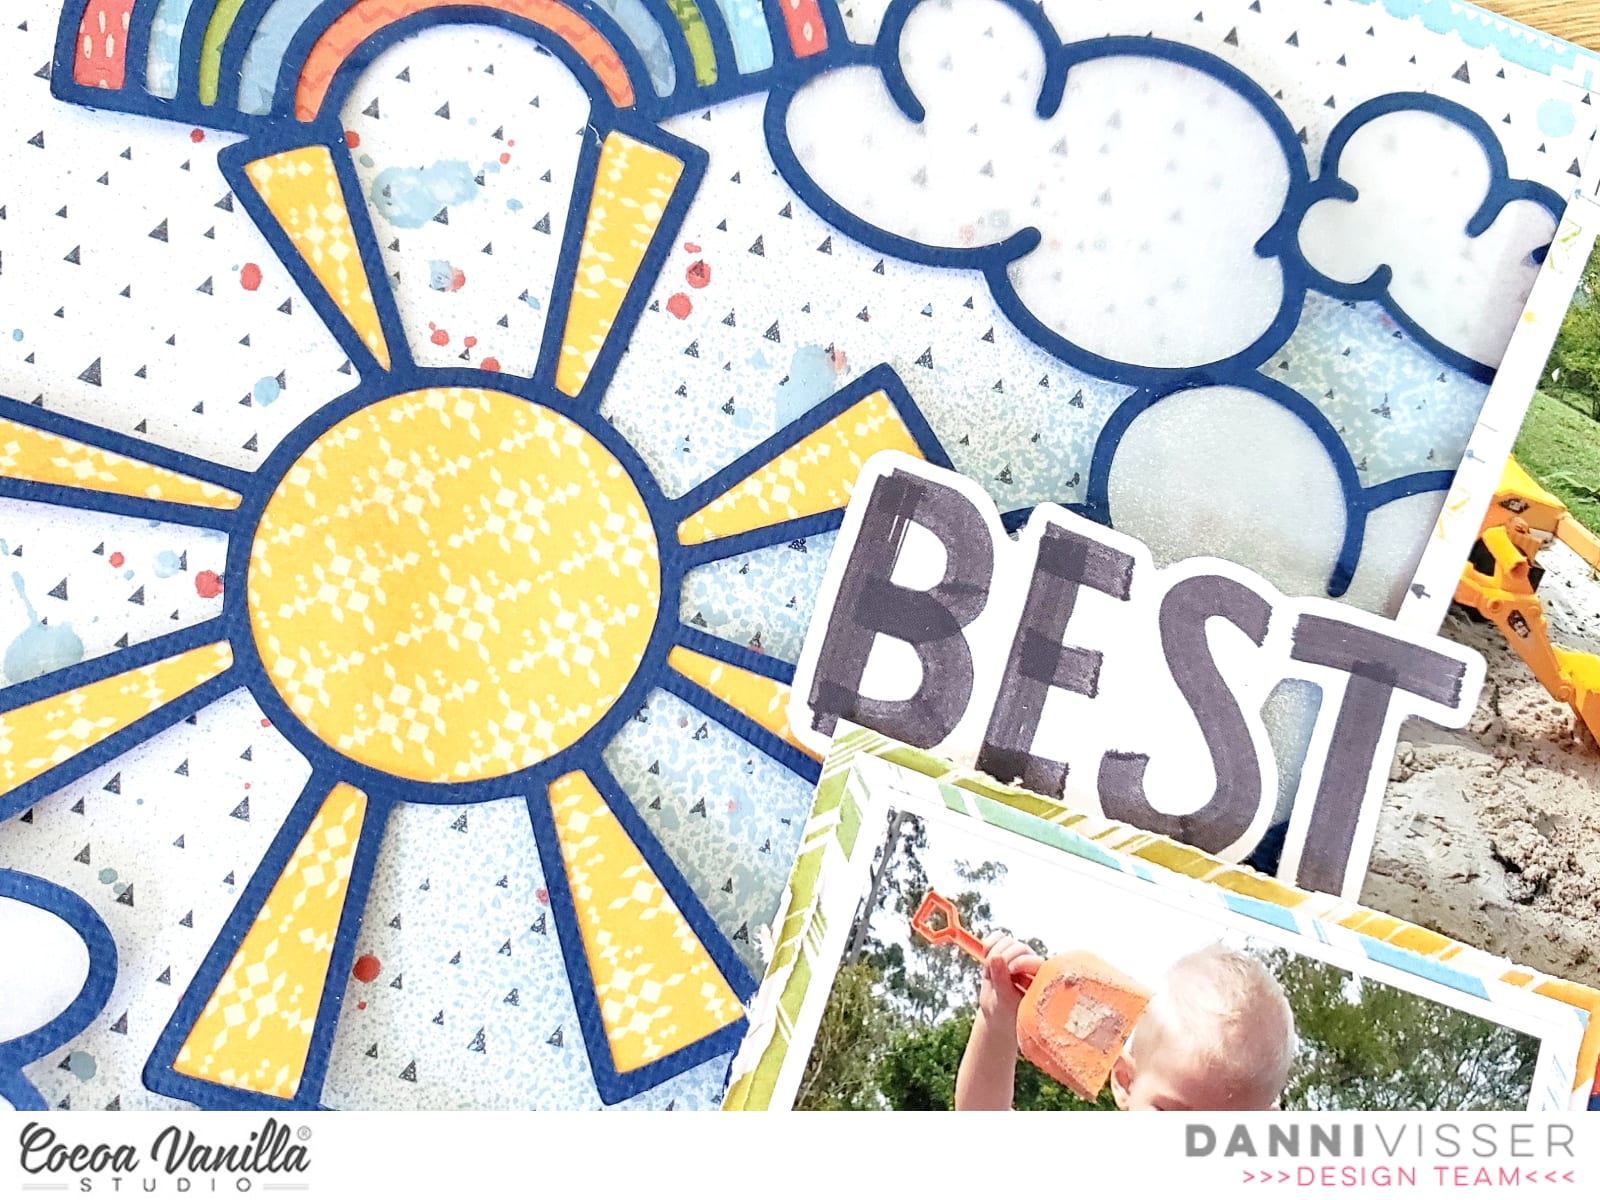
I based my layout around this fab sunny sky background cut file, which I cut on a dark blue cardstock on my electronic cutting machine. I knew I wanted to use a light background and I knew the blue would really pop, plus I just love using coloured cardstock! I backed the suns and rainbows in the cut file using patterned papers Total Legend cut apart side and Wild One.
I then decided I wanted to play with some vellum and art media for the clouds. I took some plain vellum, then an iridescent gel medium which I applied first with a paintbrush, then a sponge (I did not find much difference either way) to turn my vellum into a shimmery metallic translucent finish. I love this effect! It was so easy and looks so pretty. Once the vellum dried, I used it to back all the clouds in the cut file.
Next my background. I chose Epic Tales patterned paper for a lovely light bright base, then added a border of Total Legend patterned paper to pull in some of the bright blue from the photos. To avoid the vellum looking invisible on the white background, I spritzed some light blue mist onto the paper roughly in the places the clouds would go. I also added some burnt orange ink splatters for a contrasting colour.
I added some simple photo mats using Wild One and One Way patterned papers and arranged my photos in a diagonal line across the page. My title was easy thanks to the die cut titles – I simply chose ‘Best Buddies’ and added the titles either side of my photo line. So simple!
I chose some of the tags, tickets and banners from the die cut ephemera and theaccessory stickers to embellish around the top and bottom photos, keeping to that diagonal layout. I added my journaling and date on label stickers, then used my very last enamel dots to add some detail to the corners of the photos. I don’t know about you, but it feels so good to use up the last few bits of a scrappy supply – luckily, I have a backup packet!
Thank you so much for joining me today. I hope you enjoyed following the process as much as I enjoyed making it! I have a video linked below if you would like to watch as well. Happy scrapping!
Hey y’all! Laura here with a really fun take on this amazing mandala design on the Explorer paper from the Legendary Collection. I wanted to see if I could use both the inside and outside of this gorgeous design on two separate layouts! This idea has been floating around in my head for ages, so I decided to dive in and give it a go!
Once I finished fussy cutting out the mandala pattern inside, I pulled together two different sets of photos, one for a busy layout and one for a simple layout. I figured the contrast between the two designs would be a fun juxtaposition! For the first layout, I layered in plenty of scraps and even used the part of the orange One Way paper that wouldn’t show to mat my photos! Love when I can get the absolute most use out of my papers, especially the gorgeousness from Cocoa Vanilla.
I had quite a bit of journaling to add to these photos, so I ended up using three label stickers from the 6×12 accessory sticker sheetto create spots for the details around the page. Anime is a huge interest for two of my kids at the moment, so the opportunity to see people dressed as their favorite characters was a thrill! And this wild, layered background was the perfect backdrop for these photos, pulling the bright orange and blues in together. Adding in the very appropriate “So Epic” title and the little stream of stars around each of my two clusters was a fun way to finish it off!
For my second layout, I backed the frame of the mandala with the Epic Tales paper, then adding a border of the bright orange One Way paper to give that blue a pop of excitement! Using many of the circle elements in the ephemera pack, I backed a few with scraps and layered them in with my photos of a Scouts fishing trip. My goofy son’s silly antics are some of my favorite pictures to scrap and these were no different! I did have to take the design all the way to the edge on the right to cover up where I cut through to the mandala, but overall, I think it turned out pretty cool!
I hope this double layout from one pattern inspired you to look at your patterned papers a little differently! It’s fun to see how you can use every little piece up in a new way. If you’d like to see the So Epic layout come together, I have the entire process in the video below!
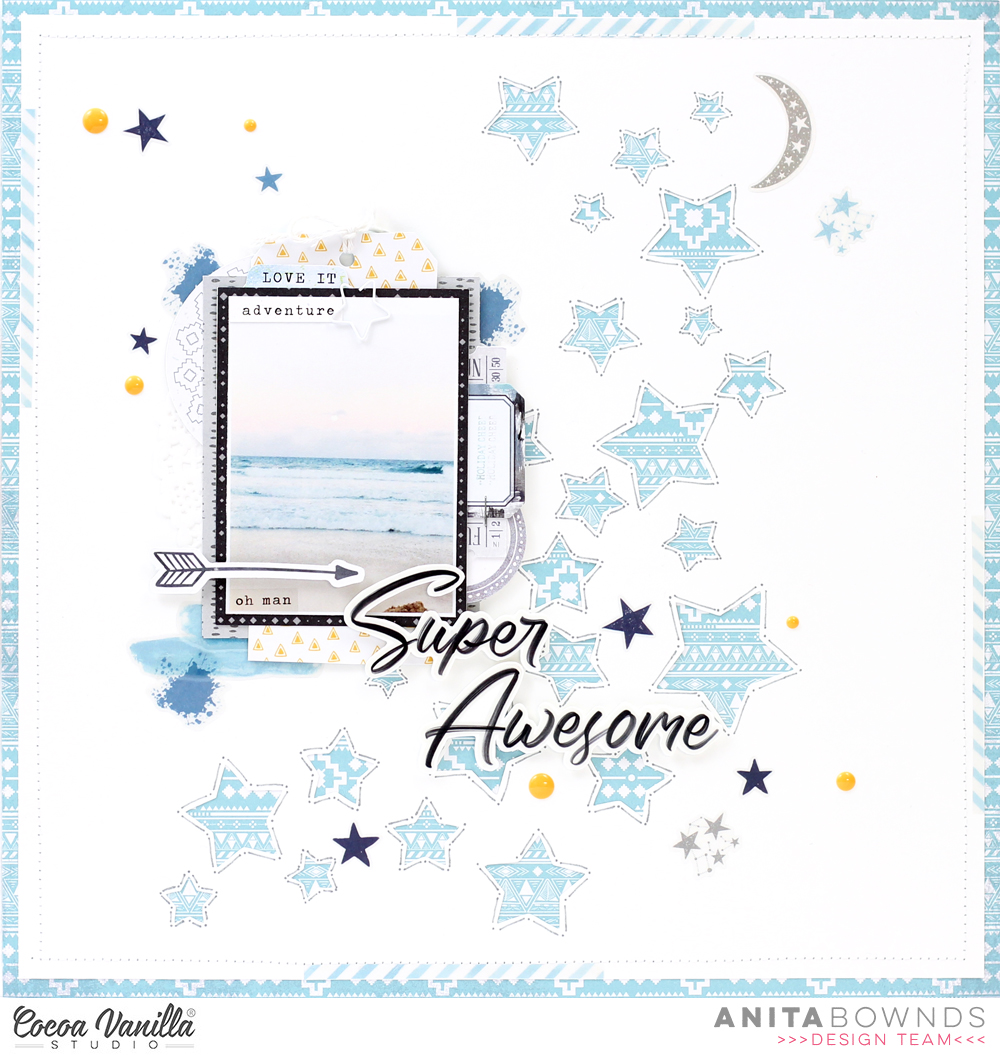
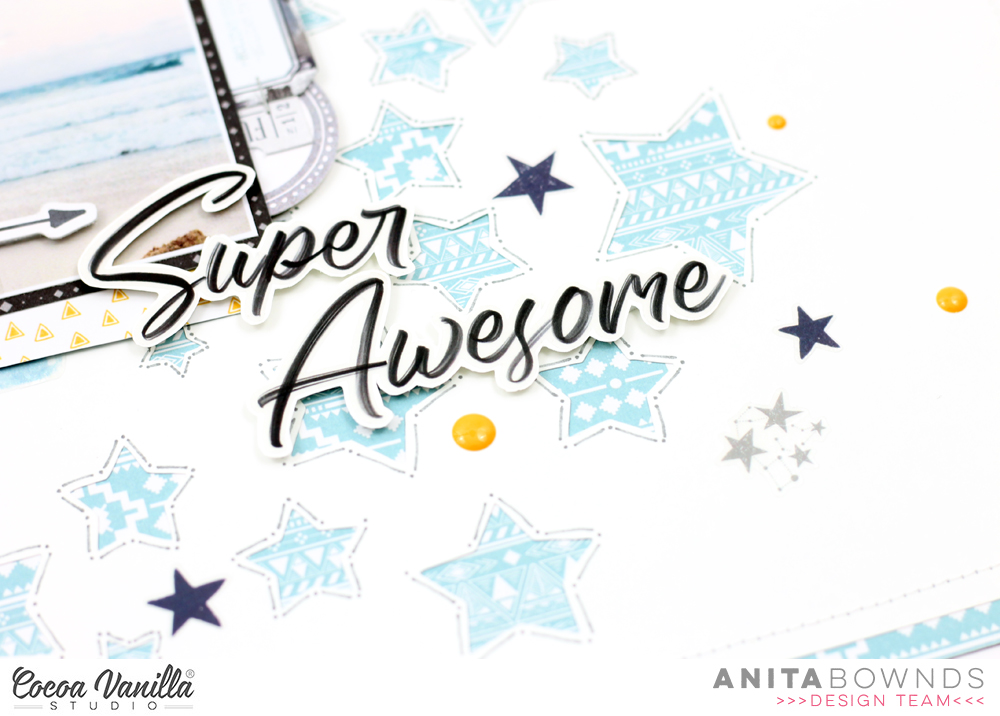
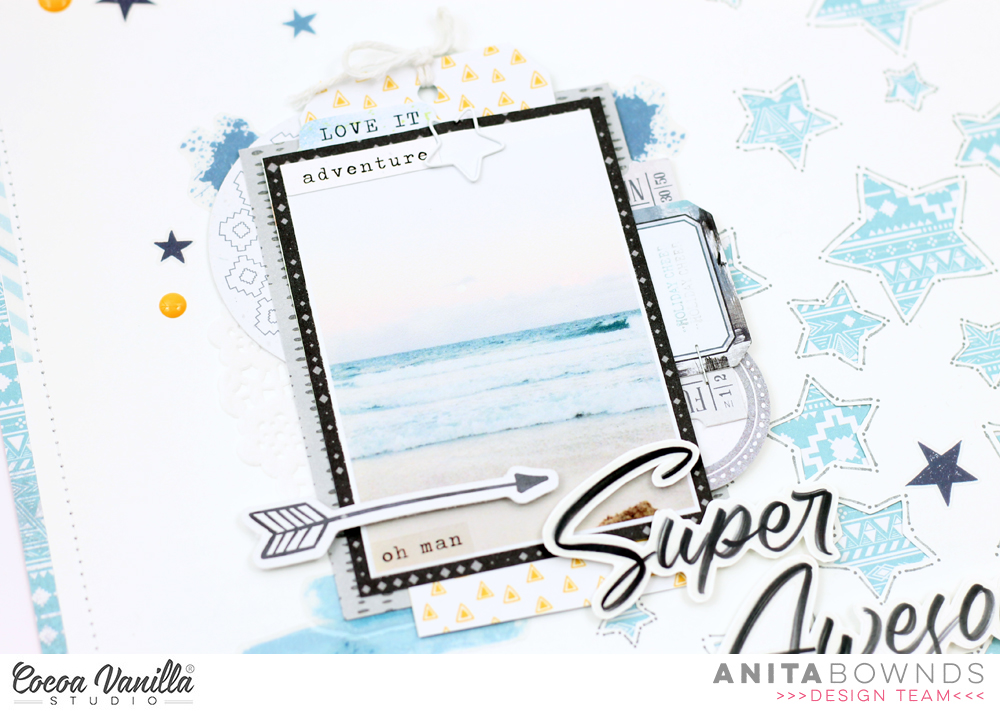
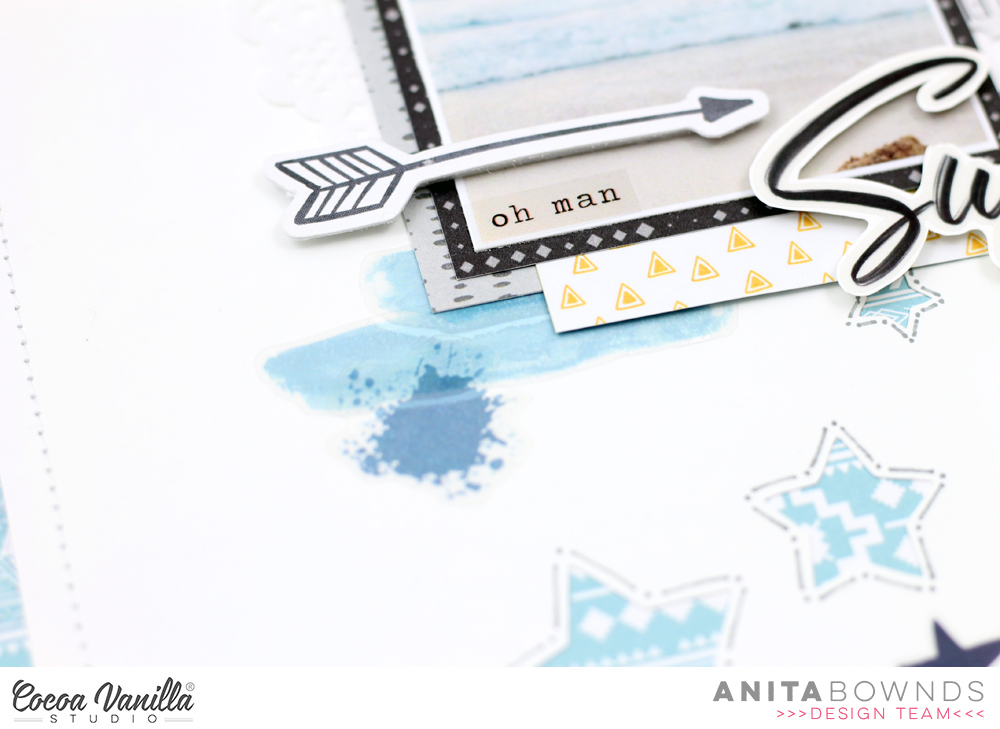
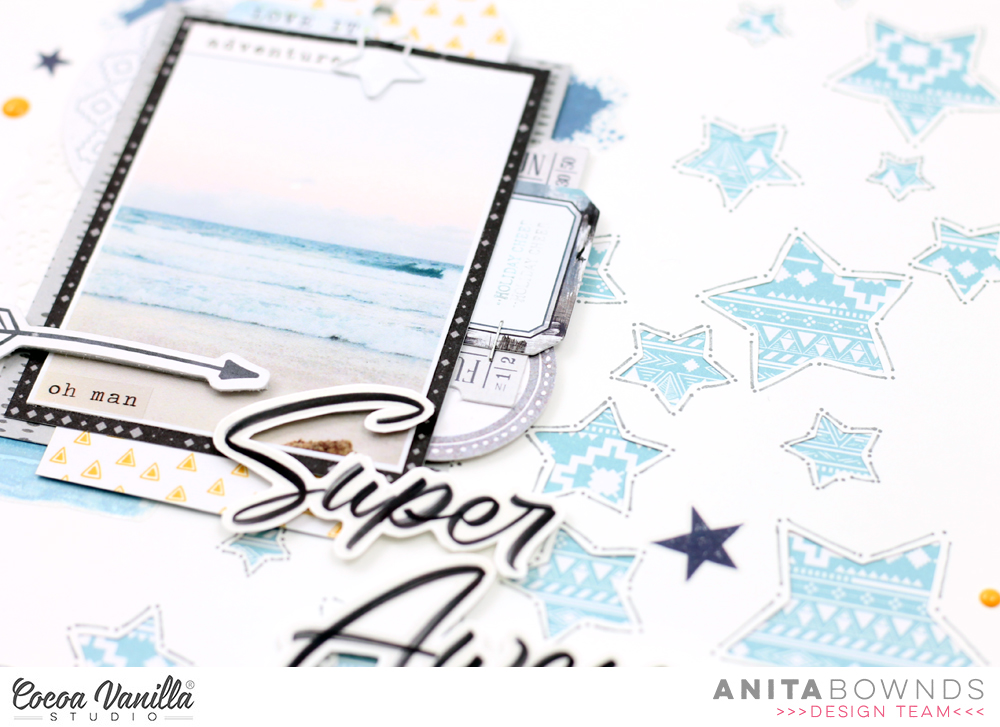
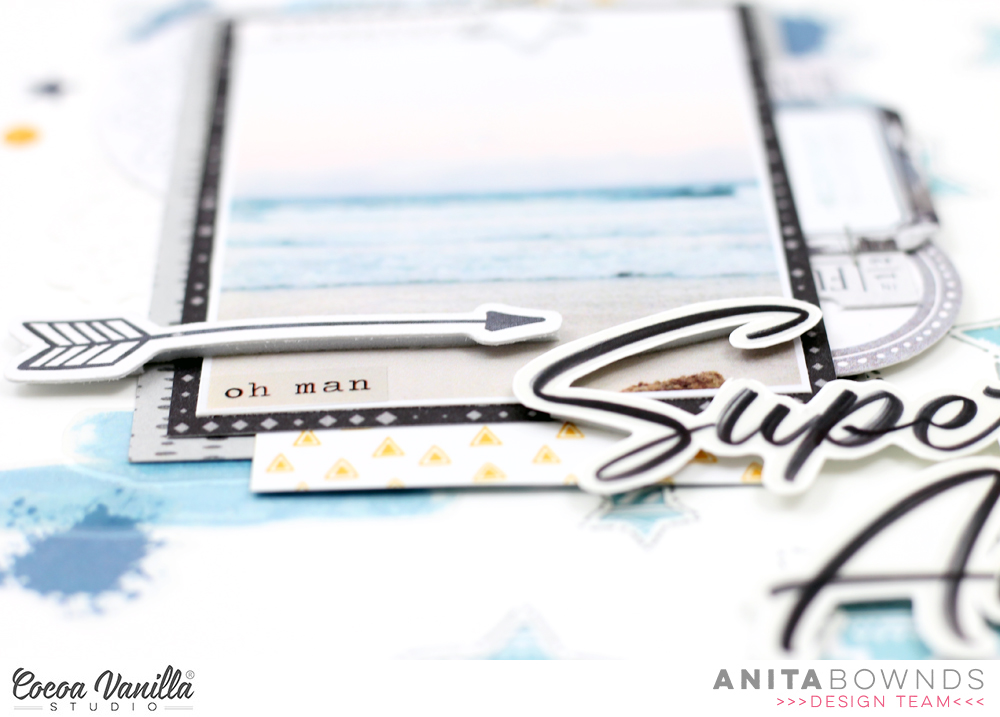
For my layout I decided to do one with stars , I know it doesn’t really go with a beach theme but this photo was taken late in the afternoon and the moon was out already totally weird I know but it was a beautiful afternoon just sitting on the beach enjoying the view…
I started off by cutting out a star background cut file from @neatndcraftycutz
And adhering it down on total legend patterned paper then I machine stitched around the border and using a fine tip grey pen I added dots and lines around the stars to add more texture
I then layered a doily and patterned paper behind my photo using total legend and all star
And to add more texture and dimension I tucked accessory stickers and ephemera in the layers of the photo. I add a hand made take using patterned paper and tucked into my photo layers.
Using double sided foam tape I popped up my title using the clear stickers adhered on cardstock
I then added more of the clear stickers around my photo just underneath
I scattered the stars stickers around the layout and title along with a few enamel dots to add more texture and dimension are the cut file stars
I also used a few stickers from boys ruleaccessory stickers and clear stickers.
Hi Cocoa Vanilla fans! Danni here, back with another layout using the incredible Legendary collection. This one is a super simple dimensional rainbow layout that doesn’t require any fancy equipment, just a pair of scissors! I added some machine stitching for extra interest, but that step is definitely optional.
I started with a white cardstock background and added a border with Wild One 12×12 paper to echo the rainbow theme. Next, I cut curved sections of paper in the shape of rainbow arches with scissors, using a dinner plate as a template guide. I used One Way, Offbeat, Wild One, Explorer and Total Legend 12×12 patterned papers to get a good mix of mostly solid colours and spaced them evenly on the page so the white background showed through between each stripe. I distressed all the edges to hide any imperfections in my cutting and added some machine stitching along the edges of each stripe.
My photo is a very special one to me, of my husband and I walking with our son and holding hands. You can’t see any of our faces, but the love and feeling is still so clear. I kept the photo mats simple with a layer of plain vellum followed by Epic Tales 12×12 paper. I used a combination of accessory stickers, clear stickers and die cut ephemera to embellish around my photo. I especially love how the clear stickers really pop on a white background, so I took the opportunity to add several of them, including the watercolour brushstrokes.
I added a small cluster at the bottom of the rainbow to help balance out the heavy embellishment near the top of the page. I popped the die cut title “Adventure” up on dimensional foam and added some black alphas to complete my title, positioned underneath my photo.
I wanted to add some of the amazing stars from this collection to echo the star pattern on my son’s jumper, so I used a combination of die cut ephemera and fussy cut All Star 12×12 paper and added them around my embellishment clusters and title. I used a sprinkling of enamel dots to help fill in any gaps between the stars.
For a finishing touch I used some diluted black acrylic paint to add some splatters around my embellishment clusters. I find black splatters add the perfect bold accompaniment to the bright colours in this collection! Thank you for joining me today, there is a process video linked below if you would like to watch. Take care and happy scrapping!
Hi everyone its Melissa here and today I’m going to be sharing something a little bit different. Did you know that you can make your own Traveler’s Notebook inserts? I started doing this because I couldn’t purchase them here in New Zealand, and I found it a perfect way to feature beautiful patterned papers. I also love having control over the weight of paper inside the notebook. This is by no means my own idea, and there are lots of videos on YouTube for how to do this in lots of different ways. Anyway this way is definitely the lazy girls technique because no measuring is required, just an existing notebook to use as a guide. In terms of the actual making, I suggest you watch my process video (at the end of this post) where I demonstrate what you need and exactly how to create them.
I let each of my 4 children choose a patterned paper from limited selection from the Legendary and Unforgettable Collections to make each of the notebook covers. I was pleasantly surprised that two of my girls selected a paper from Legendary which tells me its definitely not just for boys!
Sam (age 13) ended up with the arrow paper by default, but I knew it would be perfect for a teen boy. I embellished with two cut aparts from Epic Tales, one that I tore in half and distressed the edges of, and the second that I fussy cut the word “EPIC” which was perfect for his cover. I did some subtle mixed media splatters and splatters on the background with some shiny mist. I finished his cover with a couple of Accessory Stickers, and I also used some of the Clear Stickers.
Here is a close up of Sam’s notebook.
Next up was Azaria (who has just turned 11), who completely surprised me by choosing the Brave Heart paper for her cover. She loves neutrals, so I decided to mix in some of the gorgeous Unforgettable, and based the embellishment of her cover off the cut apart from the Story Teller paper. I altered the cut apart by cutting off the floral pieces, distressing all edges and then glueing them back together. I love doing this!! I minimally embellished with some Clear Stickers and a Die Cut Ephemera piece. Edgy and girly all at once!
Here is a close up of Azaria’s notebook.
Next up was my girly-girl Brielle (6) who I knew had to have her entire notebook made from Unforgettable! She immediately fell in love with the Glorious paper! For her cover, I started with layering the wreath cut apart from Storyteller over a piece of paper from the 6×8 Paper Stack, and added a Clear Sticker arrow with a heart layered over the top. I distressed all of my edges of course! I needed something to break up the busy floral from the embellishment, so I used white acrylic paint applied with a dry brush, and I applied it very thickly. Once it was dry I added one of the Clear Stickers (cut in half), punched a tab and stapled it on, and my final touch was to add a clear sticker heart on the tab.
Here is a close up of Brielle’s notebook.
Onto the final notebook which was for Ava (3.5) who is my rough and tumble little girl. As soon as she saw the selection of papers in my hand she said “I want the stars” so the Legendary All Star paper was hers! I wanted to challenge myself to use more of Legendary on Ava’s notebook so I used a cut apart from Epic Tales. I distressed all of the edges like I did with the other three notebook cover papers, and for a subtle girly touch I added a Clear Sticker flower from Unforgettable and I totally love the resulting mix of grey and pink!
Here is a close up of Ava’s notebook.
I bound my notebooks by hand stitching with 3-hole pamphlet stitch, and the centre of the notebook looks like this.
And here’s a lovely photo of all the notebooks stacked up. Now to convince my children that they’re not actually getting the notebooks, but they’re for me to document their stories that don’t require a full 12×12 layout!!
You can watch my process in the following video, and I also show the embellishing of the notebook covers.
I hope I’ve inspired you to make your own Traveler’s Notebooks!
Anna here today with you sharing a new layout featuring the amazing Legendary Collection. I don’t usually use photos of me in layouts, but this week my husband and I have celebrated our ninth wedding anniversary, so this is like a little commemoration. We have been together for 21 years, and we have grown together and formed a family.
For my page, I used the Offbeat paper as my background, and I added some mix media. I took a 12×12 stencil and applied white stencil paste. Before I removed the stencil, I spread some pigment powders and water. So this way, the color is only deposited on top of the stencil paste. I used the same colors on the paper.
I matted my picture with the Outdoors Type paper and used some circular die cuts from the Die Cut Ephemera pack to layer it. I also stacked some stars, because there’s a star in my husband’s cap. With foam dots, I raised all the elements to give more volume to the composition.
The title consist of two different words, one from the Die Cut Titles and another one from the Clear Stickers. On top of the photo, I also added a tab and the word love from the Accessory Stickers to complete the title: “Love this adventure”.
Finally, I embellished my page with more clear stickers and two enamel dots. I didn’t want to overload the layout, to give prominence to the photo and the wonderful distressed pattern paper. As I always say, less is more.
Thank you so much for stopping by today. I hope you like this layout and inspired you to create something special with your memories. Have a great week!
Hey friends its Michelle back here today with a new layout share featuring the awesome Legendary Collection. I was so inspired by our recent Stars and Stripes theme that I couldn’t help but use that as the base for this layout. Stars are the perfect embellishment for scrapping a layout of Leila’s ‘Star of the Week’ photo from last year.
I chose a fun new cut-file design from CUT to YOU that features 3 different star designs and resized them to create different focus points for the layout. I cut all 3 designs out on white cardstock and backed the larger design using a mix of different patterns and colours to compliment the stars within the collection. Papers used – ALL STAR, EPIC TALES, EXPLORER, OFF BEAT, TOTAL LEGEND and WILD ONE.
I adhered the star to the left side of the layout using foam sheeting to raise it off the background paper (OUTDOORS TYPE) and added the super cute photo of Leila to the left backed with a piece of BRAVE HEART and a sticker tab from the Accessory Sticker sheet.
I created the title using a cardstock title piece and alpha stickers from previous collections. LOVE LOVE LOVE those white alphas! There’s a sprinkling of stars, both fussy cut and ephemera, on top of the big star also.
I kept the other 2 star designs open and adhered half of each design to the edges of the layout, creating open clusters and tying all the elements of the layout together. In the top cluster I added the ‘Hey You’ banner sticker from the sticker sheet and a mix of fussy cut and ephemera stars.
In the bottom cluster I added pieces from the ephemera pack, fussy cut and ephemera stars plus a word sticker from the Accessory Sticker sheet. Lastly a splattering of gold colour shine to finish it off.
Well friends that’s all from me today. Thanks so much for stopping by.
Hey everyone, I’m here today capping off the Stars and Stripes theme this week on the CVS blog. Of course, I chose to use the amazing Legendary collection which compliments this theme beautifully.
Here is the layout that I created:
This layout is documenting a photo of my little man taken at the start of March – pre-covid restrictions here in Australia. We had taken a family drive to a small town about an hour from our house to visit the market and township. Jack decided to pose on the townships post office doorstep. I adore this photo but it does project such an innocence in this little man. Jack has such a beautiful and sensitive little heart, but certainly as I have documented many times keeps us on our toes. I chose to feature a stripe through the diagonal stripe ‘Explorer’ pattern paper that has backed my photo. If there is one paper that I would love multiples of in this collection it is this lime stripe paper (or the Woodgrain, who can pass up a nice woodgrain). Instead of using my own typewritten journaling I used the tiny word stickers in the accessory sticker sheet. I was able to make a little phrase by adapting some of the stickers available.
The main design element of this photo was a cut file tag which is called Geometric Tags and is available in the Cut To You online store. In my cutting machine software I manipulated the tag so it was bigger and wider – so I could have a giant tag on my layout. The tag features stars – which I was able to highlight by backing the cut file with different patterned papers. I used the yellow in the Wild One paper and the orange in the One Way paper.
The title of the page ‘you rock’ was created using the clear stickers. I adhere the stickers onto a white card and fussy cut around them creating my own die cut titles. I love how these turned out! I also added a flair featuring a star to this title area.
I created an embellishment cluster in the bottom left corner of the page featuring ephemera and fussy cut stars. I used the stars from the All Star paper to trace onto the woodgrain paper. This helped balance the darker elements of woodgrain in the embellishments.
To finish the page I scattered multiple fussy cut stars. These make a nice design element but also can be used to help balance out any colours that are featured on the layout. The entire layout was then bordered on a patterned paper featuring stars called Offbeat.
Thanks so much for stopping by the CVS blog today. I hope my layout has given you some stars and stripe inspiration!
Hey y’all! Laura Alberts here again with a fun way to use up those scraps at the end of a project! I find cut files are brilliant for finishing off those little scraps you might otherwise throw away and with a giant title like this one from COAPA, those scraps can really shine! I have really enjoyed scrapping tons of photos with the new Legendary collection, but this mixed media style background paper has to be my absolute favorite in the entire collection. It’s called “Offbeat” and I think it framed this cut file beautifully!
I kept the embellishing pretty simple on this layout, so as not to compete with the photo or title design, but I did squeeze in a few stars (and stripes!) anyway. Stars are a great shape for boy layouts and one that has become my go-to for masculine pages. Clustering them is super simple, they tuck into each other at the corner of a label or word phrase sticker (or both!) as well as peeking out from behind larger design elements.
The best part of any layout for me is always those tiny details that finish it off. In this case, I used a combination of enamel dots and Nuvo drops to add a bit of interest to my clusters and then added to the splattered background with even more splatters in gold! I hope you find inspiration to use your scraps too, whether it’s backing a cut file or layering behind your photo. To see this layout come together, check out the process video below!