Hey everyone, it’s Raquel here with you sharing my latest layout created for the ‘circles or squares’ theme on the blog this week. For today’s layout I decided to go for the not obvious choice of circles and went for the squares instead.
Here is the layout that I created:
The subject of my layout today is my little man. This year he has begun learning basketball one night after school. He is having a ball and I was excited to be able to document this for him.
The theme is ‘circles or squares’ so I decided to create a square grid design to document two small photos. To create the grid design I used multiple scraps I had in this collection and a square die from Sizzix. I love that I was able to create a visually appealing layout with minimal papers.
To embellish the page I used a variety of ephemera pieces – in stars mainly, making sure to find pieces that are a perfect to match this sport theme. I delved into my stash and also found old enamel dots for the layout.
The title for the layout was created using a combination of CVS collections. The banner was cut from one of the cut apart papers. So cute!
I did not journal in detail on this page today. However I did add some tiny word stickers from the accessory sheet and add the ‘what’ and ‘when’ detail in typewritten journaling.
Thanks so much for stopping by the CVS blog today I hope you have been inspired by my layout.
Hey y’all! Laura Alberts back again with another boy layout featuring the Legendary collection. I absolutely loved this Brave Heart mixed media style patterned paper, but didn’t want it to over power my photos. So, by layering white cardstock between the mixed media paper and the gray dot paper, the two work better together! I love the little photo corners I cut out of some scraps to give the center area a bit of dimension.
The title is from the clear sticker sheet, thought it has the look of handwriting or stamping! A small cluster of stars in several places on the layout were the minimal embellishing I added to this page. Most of the stars are fussy cut from the All Star patterned paper, but some are punched from scraps. Small dots of gold Nuvo Drops and gold ink splatter, along with hand-drawn stars add tiny details to each cluster.
I puzzled these photos together with the intention of creating the look of a modified grid, balanced, but yet off-kilter. I think this design works beautifully with these photos because it illustrates the nature of the castle featured there. My favorite part of this layout is the clear sticker “Epic” on my photo with word phrases underneath. That small detail is just awesome!
I hope this layout inspires you to have some fun with the bold colors and patterns in the Legendary collection! To see how the “Super Awesome Adventure” layout came together, check out the process video below!
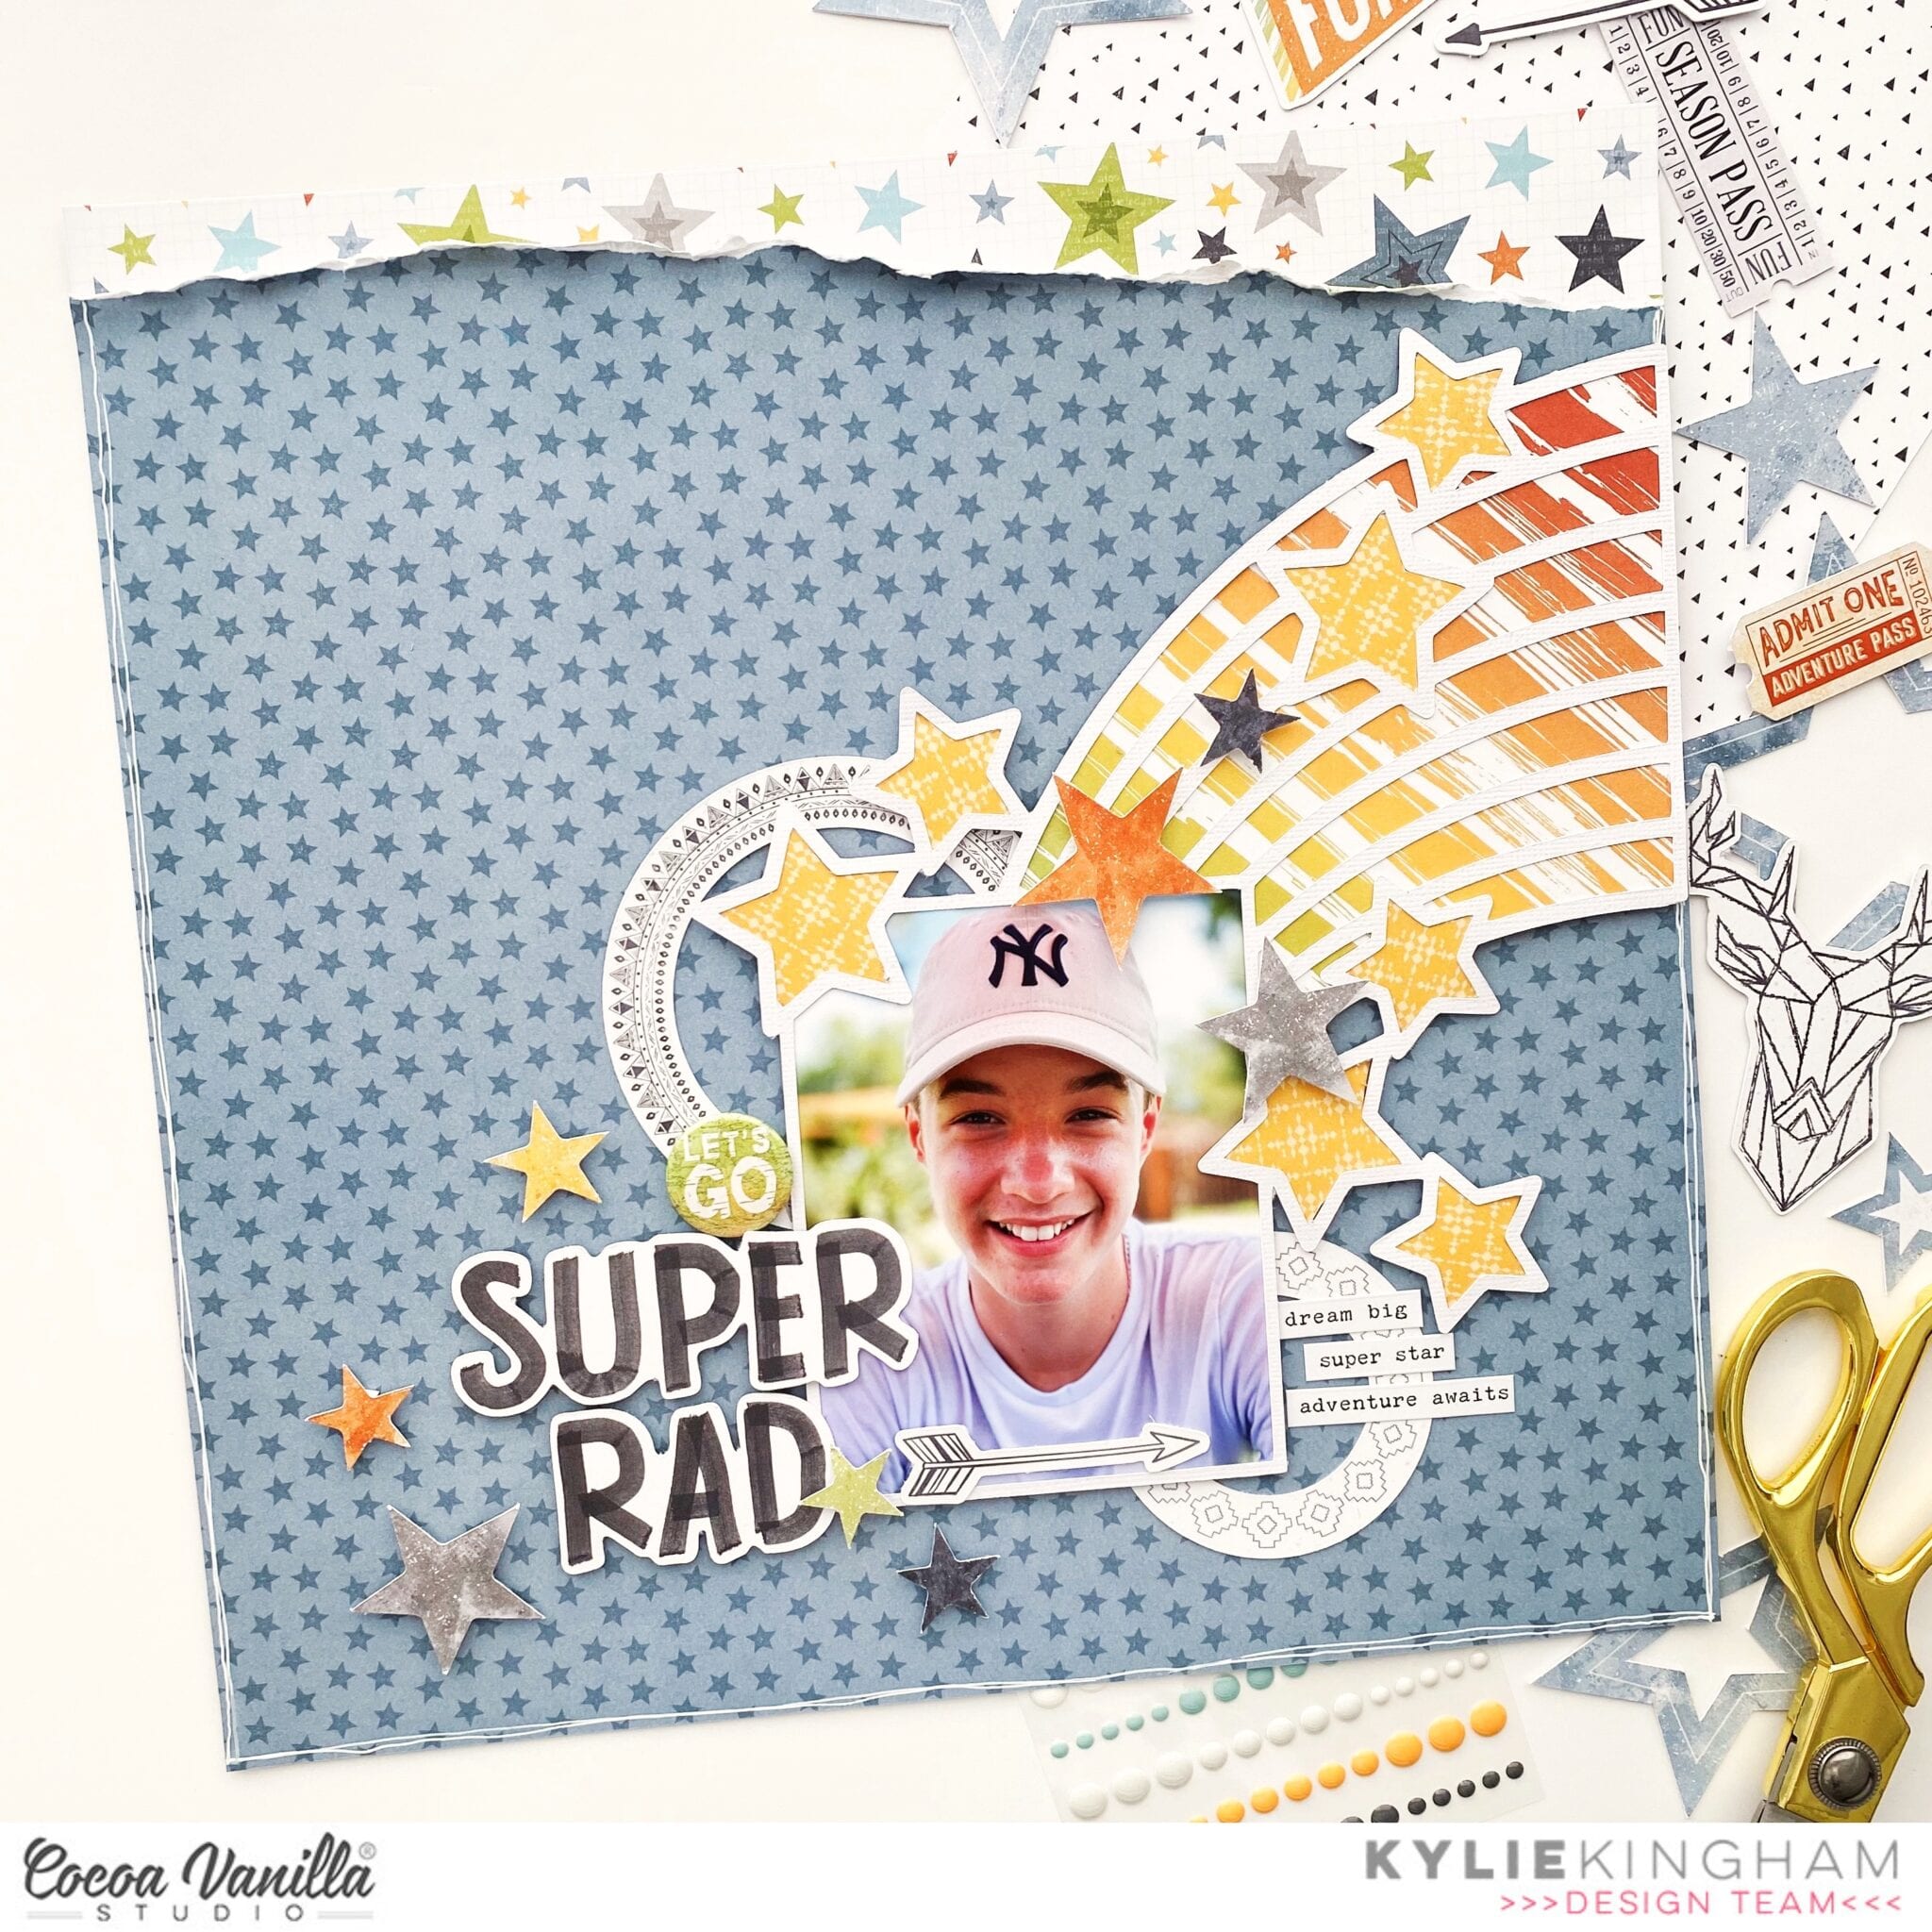
Hello Cocoa Vanilla fans. It’s Kylie back with you today with a new layout I have created with the Legendary collection. I have so many photos of my son to scrapbook and knew that the Legendary collection, combined with a fun cut file which has been designed by Cut To You, would be perfect together.
I have always loved the colour palette of the ‘Legendary’ collection and have used the beautiful ‘OFFBEAT’ paper as my background. I tore a 1.5 inch strip off the top of my page and added a piece of ‘ALL STAR’ paper as a contrast. My cut file was backed using both sides of the ‘WILD ONE’ paper.
I love that this particular cut file has a frame for positioning your photo. I cut down my 4″x 6″ photo to fit within the frame before adhering the cut file to the background with some foam adhesive squares. From the die cut pack I added a few extra stars surrounding my photo for balance.
Because I loves me a BIG title, the die cut title pack was perfect for constructing something well suited to the theme of my layout. These were also added, overlapping my photo a little with foam adhesive squares.
To complete my page I used a white marker pen to freehand draw a border around my page. This detail may only seem faint but it frames my completed page perfectly.
I have also filmed a short process video where you can watch exactly how my page came together-
Thanks so much for stopping by the blog today. I hope you have a little inspiration from my layout for your own scrapbooking.
Hey y’all! Laura Alberts back again with a bold and beautiful boy layout featuring the stickers in the Legendary collection. On the right side of the layout, I’ve created a trail of clear arrow stickers to add a border along that side and anchor the layered block to the side of the page. Then, alongside the right side of the bottom photo, I added a column of phrase stickers from the cardstock sticker sheet. The enamel dots give a little pop of dimension next to each phrase.
To the left of the photos, I layered clear star stickers around the die cuts to give a “stamped” effect. Love how clear stickers look on a white background! Then, I layered punched scraps and fussy cut stars all around the large die cut star (which I backed like a cut file with patterned paper). Enamel dots, Nuvo Drops, and ink splatter added the perfect detail finishers to this large star explosion!
The title may be my favorite part of this layout, it’s fussy cut from the Epic Tales cut apart and fit perfectly in that spot at the bottom! I popped each letter up on foam to give it a bit of dimension and put them on a jaunty angle for a bit of fun. Love the way the colors of the letters tie the layout together. I added my journaling around the perimeter of the layout for an extra border.
I hope this layout inspires you to have some fun with the bold colors and patterns in the Legendary collection! To see how the “Epic” layout came together, check out the process video below!
It’s Tarrah back with you and today I am sharing a new layout for our ‘My Signature Style’ theme. When I think of my signature style I think of my sons and boy layouts! So I chose to create with the awesome Legendary collection
Also my signature style would have to include, colour, clean lines and a cut file – I chose a star and rainbow one from CUT to YOU.
I cut out a rainbow and stars cut file design from white cardstock and backed the majority of the design with the gorgeous Wild One paper Where there are stars in the design, I backed these with various scraps of the 12′ x 12′ papers from a previous project, making sure not to have the same pattern too close together. Once the entire cut file was backed, I added craft foam to the back of the cut file. I then adhered it to another piece of white cardstock. I love the shadows this creates.
I placed the photo of my sons on the lower section of the cut file, I layered a patterned paper underneath it and popped it up with craft foam also. I added the ‘Yeah Boy’ sticker to the right hand side of the photo and the Noteworthy tab to the left of the photo. My title is one of the awesome cardstock die-cut titles I love these so much! The font is so cool and very ‘boy’! I adhered the title flat however I added the Extreme die-cut and popped this up above the title. I also added a clear sticker to white cardstock and then fussy cut it out, adhering it just under the Brothers title.
Some other embellishments I added were the star diecuts from the ephemera pack, some phrase and word stickers from the Accessory sticker sheet and some more clear stickers too. I printed my journaling onto cardstock and then cut it into strips, I also stamped the date stamp, lastly I trimmed down the white cardstock and matted the whole page onto the star paper. I love how my layout has turned out, it is definitely a ‘me’ page!
Thank you so much for stopping by Cocoa Vanilla blog today, I hope you enjoyed my layout and that I have inspired you in some way?
Hi everyone, it’s Sue here today to share my latest design team project with you. Do you know what day it is today? It’s Throwback Thursday! And that means I am sharing a brand new layout using up some of my older Cocoa Vanilla stash. The purpose of this regular feature is to help inspire everyone to continue using up what they already have (so we can make room for all the new pretties, like the ‘Sunkissed’ collection).
For today’s project I decided to create a boy-themed layout, as I get lots of requests for boy pages, so I dug into my stash of both the ‘Legendary’ and ‘Boys Rule’ collections for an epic mash-up of the two. I love the way they combined for this layout, and I hope you do too!
I started my layout with the mandala-style print of the Explorer paper from the ‘Legendary’ collection as my page base. I then added a small amount of dark grey acrylic paint using a wide brush to help define the focal area of my page. My aim for this layout was to stick with a largely monochromatic palette of black / white / grey, with a pop of one colour, and I chose yellow. I love this colour combination for boys, as it’s a great change away from the traditional blues & greens that are often used for masculine pages.
I added a large piece of the Wild One patterned paper with the gorgeous yellow print in the centre of my page, which provided me with the big pop of colour I was looking for. I used a torn edge to add texture to the page and tucked a smaller piece of the Straight & Narrow striped paper from ‘Boys Rule’ under it. I double matted my photo using the Happy Go Lucky and Messed Up papers (also from ‘Boys Rule’) and added some scrap cardboard under it to pop it up from the page.
My title was the next element I tackled, as I knew I wanted it to fill the space beside my photo. I used a combination of the ‘Boys Rule’ Clear Stickers and ‘Legendary’ Die Cut Titles – because I love a good mixed font title!
For my embellishments, I created three clusters to form a visual triangle. The main cluster was at the bottom right corner of my photo, and consisted of a handmade star embellishment which I topped with one of the ‘Boys Rule’ Flair Buttons. I also added a die cut banner along the bottom edge of my photo and some gold twisted wire which I stapled to the page.
For my remaining embellishments I used a mix of ‘Legendary’ Die Cut Ephemera pieces; a few ‘Boys Rule’ Accessory Stickers and some of the ‘Legendary’ Enamel Dots. Then I finished off my page with some black ink splatters.
If you would like to see exactly how this layout came together, you can watch my process video here:
Thanks for stopping by today. Until next time, happy scrapping!
Hi Cocoa Vanilla Studio fans! I hope you are all ready for some tropical, summer-inspired projects coming your way because the new Sunkissed collection hit my doorstep just a few days ago! I live in the subtropics, so this collection is absolutely perfect to scrap my family memories most of the year round. Today is extra special because myself and the amazingly talented Anita Bownds are doing a scraplift swap and I get to go first (you will see her scraplift a layout of mine soon!).
It was pretty tough choosing a layout to lift because I love so many of Anita’s projects. I decided on a cutfile layout because this is an element that we both tend to use quite often, and it also makes a page come together very easily. There were several I loved but, in the end, I decided on this lovely bicycle page because I knew I had pics of my son’s first ever public bike ride that I had yet to document.
The beauty of scraplifting another artist is that the decision-making and design is already taken care of for you. I chose a similar cutfile by COAPA Cutfiles and cut it on white cardstock, then went ahead and backed it with patterned papers from the A5 Paper Stack and Summer Lights 12×12 patterned paper.
I chose the Just Chillin’ 12×12 patterned paper for the background, as I liked the cloud pattern and the pale blue colour. I matted the photo with some of the A5 paper stack papers I had already used to back the cutfile, to create a nice separation between the photo and the background paper.
For my title I continued with the ‘Summer’ theme of the original layout with the Foam Title Stickers¸ however I changed the second half of the title from ‘Fun’ to ‘Days’ so that I could use one of the Clear Stickers that fit just perfectly in the space.
I went ahead and used the Floral Ephemera to build floral clusters in the top left and bottom right of the layout as in the original layout. I tried to get a good balance of the colours and include some bits of foliage to finish out the clusters. I also added some tiny floral sprigs to the basket of the bike from the floral ephemera – so sweet!
Anita’s layout featured lots of sweet tiny flowers scattered around the page, and this is where I deviated slightly – I couldn’t resist the sweet tiny hearts in the Clear Stickers so I added a sprinkling of those where the tiny flowers were placed. I also completely adore the Puffy Stickers though, so quite a few of the tiny puffy flowers made it onto the page as well!
Some more personal touches I included were adding a bunting die cut from the die cut ephemera to the bike, plus a scattering of tiny word phrases from the accessory stickers in three places around the layout (I can never resist these!).
I really hope I did this scraplift justice. I am super happy with how it turned out and I had so much fun creating with the amazing new Sunkissed collection. I hope you enjoyed joining me today, there is a process video linked below if you would like to watch too. Happy scrapping!
Hi everyone!! It’s Melissa here and I’m so happy to be back sharing another layout with you. This time it’s a much requested boy themed layout, and of course I had to use the amazing Legendarycollection!! At the beginning of every year I create a page for each of my four children as an introduction to the year, setting the scene and telling them what I hope for them in the preceeding year. I used a stunning cut file from Cut To You which was so perfect for the theme of my layout for Sam (who is aged 13).
I created my background with a water activated ink pad. I stamped on my craft mat, sprayed it with water and then did the reverse packaging technique where you place the cardstock onto the mat several times. The key is to not add too much water, especially if you’re not using gesso. I also used a stencil and foam pad to blend the same ink. My final mixed media touch was to splatter with some sparkly water activated powder and white iridescent ink spray. The reuse tis a very subtle layered background behind the cut file.
I backed the cut file with patterned paper that was not overly blue, so that I could use blue in my background to make the colours pop! I used Wild One, Total Legend, Brave Heart and All Star. For the stars I cut them in One Way and popped them up with dimensional adhesive. I love the interest that it provides, especially as everything else on the cut file is glued flat to the background paper.
Its not often that I incorporate my photo into the backing of a cut file, but for this one the open “A” was perfect, especially as my photo of Sam was taken at our favourite beach. One of my daughters was also in the photo, and my placing him in the cut file I was able to cut her out. I love that I’m still able to see the rocks, beach and sea.
I embellished very simply withAccessory Stickers, Die Cut Ephemera, and Enamel Dots. I didn’t want to take away from the cut file and especially the photo, and I think the small clusters work well to achieve this.
Today I want to share with you this baby boy-themed layout. I usually do more girly layouts, but once in a while, I like to get out of my comfort zone. Also, I know that many of you will be happy with some masculine inspiration with the Legendary collection.
On this page, I’m documenting a photo of my sweet nephew Roger. He’s so smart and happy, always with a smile on his face. Isn’t he cute? My sister sends me a lot of pictures of him, and I love making layouts with those pictures. For this page, I started with the Offbeat paper as my background.
Then, I cut out triangles in different sizes from Outdoors Type, Total Legend, and Wild One papers. I’m not going to lie, I struggled with the arrangement of all these triangles until I found a design that I liked, placing them on the left side of the page.
I also cut my picture into a triangle shape to fit it in the design, framing it with a white border. I used foam dots to raise some triangles and give more dimension to the layout. The reason to put the photo on the left side, it’s because the baby is looking to the right, so it looks like he’s looking across the page.
For my title, I combined the Die Cut Titles with the Clear Stickers to write “Super cool kid”. I raised the die cut titles with foam too. I love to combine different fonts to build my title.
Under the title, I placed another clear sticker as a subtitle and my journaling. Finally, I spread some enamel dots and a couple of stickers from the Accessory Stickers. I couldn’t help to put this cut geometric bear too.
And that’s all for today. Thank you so much for stopping by. I hope you like this page, and it gives you some inspiration for documenting your boys’ pictures. I think Cocoa Vanilla Studio has the best masculine collections ever!
Have a great weekend and save a little time for crafting!
It’s Tarrah back with you today to share a new boy themed scrapbook layout featuring my youngest son and the awesome Legendary collection. The inspiration for this layout definitely came from the awesome circle die cuts in the ephemera pack and the journal card from the Epic Tales paper that says My Sun, My Moon and All of My Stars. I knew that I had the perfect photo to go on this layout. It is of my youngest son sitting in front of a moon and star background at Luna Park.
I chose to pull similar colours from the journal card and use these throughout my layout, the orange, blue and grey colours really spoke to me for this page. I added some subtle grey mixed media to a sheet of plain white cardstock and then began to arrange the elements how I felt they looked best. The ephemera pack is amazing value with so many awesome pieces to help tell your story and enhance your design at the same time!
I fussy cut the journal card into a round shape to fit in with all the other elements on the layout. I also cut my photo into a circle and adhered one of the circle frames on top. Of course there had to be stars on this layout too so I pulled out a few large and small ones from the ephemera pack and arranged them amongst the circles.
Once I had most of the larger elements adhered to my page it was time to add some smaller embellishments like some accessory stickers, clear stickers and enamel dots! All of these smaller details were added in and around some of the larger elements on my layout to help draw your eye in.
Lastly I added some sprinkles of black mist and stamped the date. I then trimmed down the white cardstock and framed it using one of the grey patterned papers from the Legendary collection.
Thank you so much for stopping by today, I hope you enjoyed my layout and that you were inspired in some way? Make sure to check out the amazing Cocoa Vanilla Studio online store for the Legendary collection and so many more amazing collections.


 I chose to pull similar colours from the journal card and use these throughout my layout, the orange, blue and grey colours really spoke to me for this page. I added some subtle grey mixed media to a sheet of plain white cardstock and then began to arrange the elements how I felt they looked best. The
 Once I had most of the larger elements adhered to my page it was time to add some smaller embellishments like some