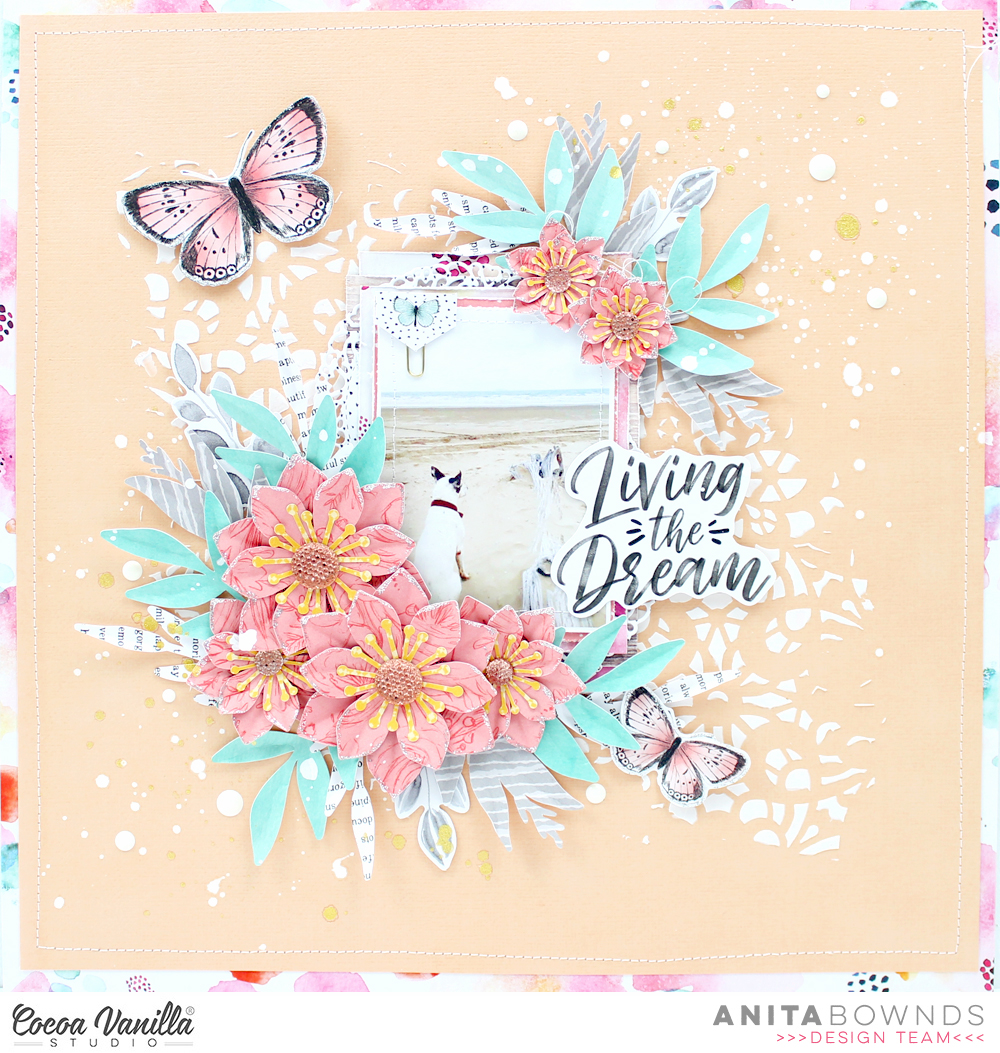
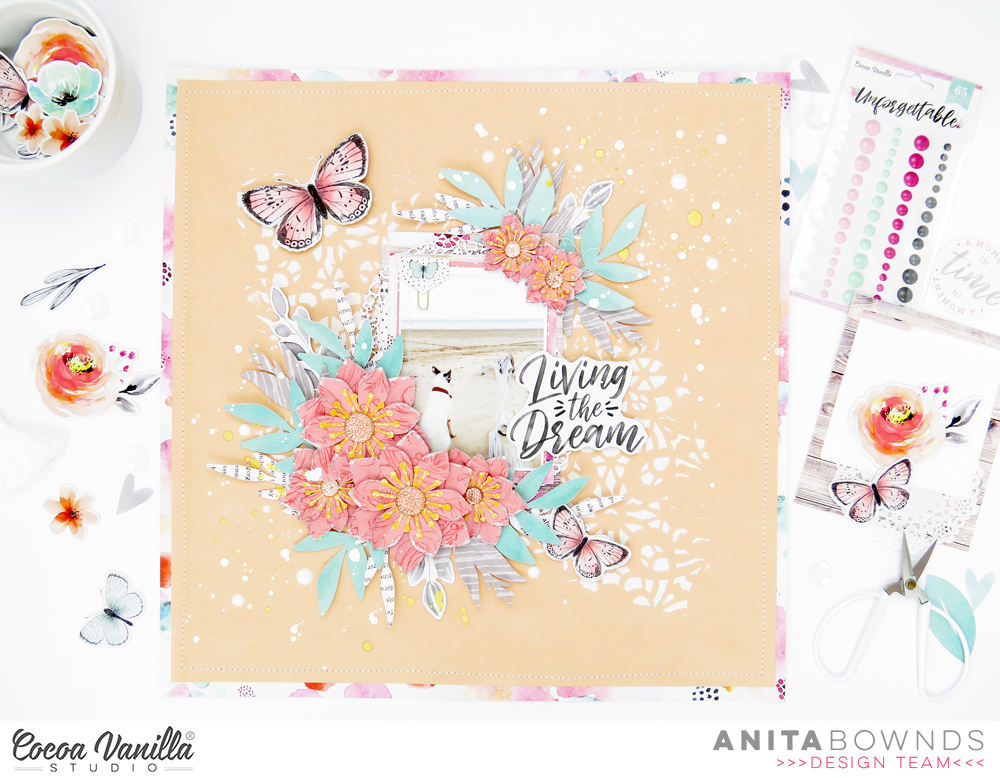
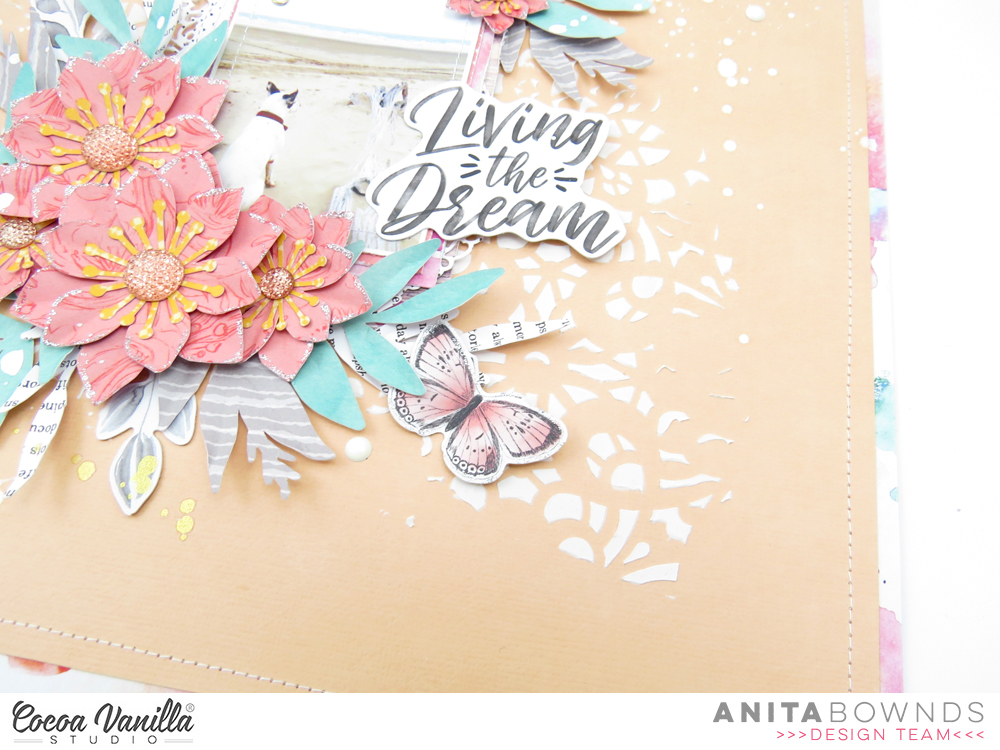
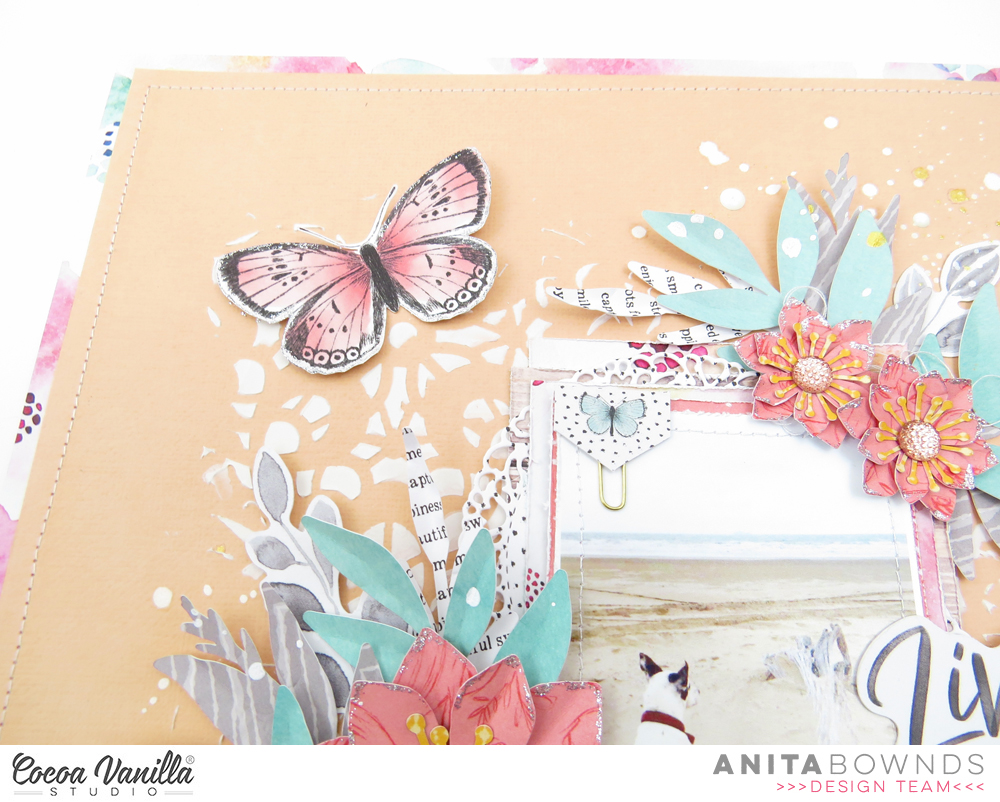
Anita here with you today sharing a layout using unforgettable collection to create this beach themed layout
This photo always reminds me of when I was young going camping, fishing and just having fun swimming with the puppies… so I was inspired to get out of my comfort zone and use a peach coloured cardstock instead of my normal white…
So I started off by applying some modeling paste through a stencil and having it digitally across my cardstock
Then I trimmed it down and matted it on sprightly pattered paper to add a little pink around the border then using my sewing machine I stitched a boarder.
To add some texture to my photo I add a stitched border.i then started layering pattern papers behind my photo I used pretty bits , sprightly and natural beauty Next I used my cameo to cut out a layered flower I designed using papers glorious, garland, lacewing and patterned paper from the 6×8 paper pad
And started layering them around the photo putting then into a cluster and tucking the leaves in randomly to spread the colours out.
Then using some of the butterflies, leaves and other bits from the ephemera I added them around my photo and in some of the layers.. I also used one for my title to add right beside my photo.
Next I I add some flicks of white paint and some of gold and to finish it off with some scattered enamel dots.
check out my process video on YouTube
I hope I’ve given you some inspiration using a different colour combination
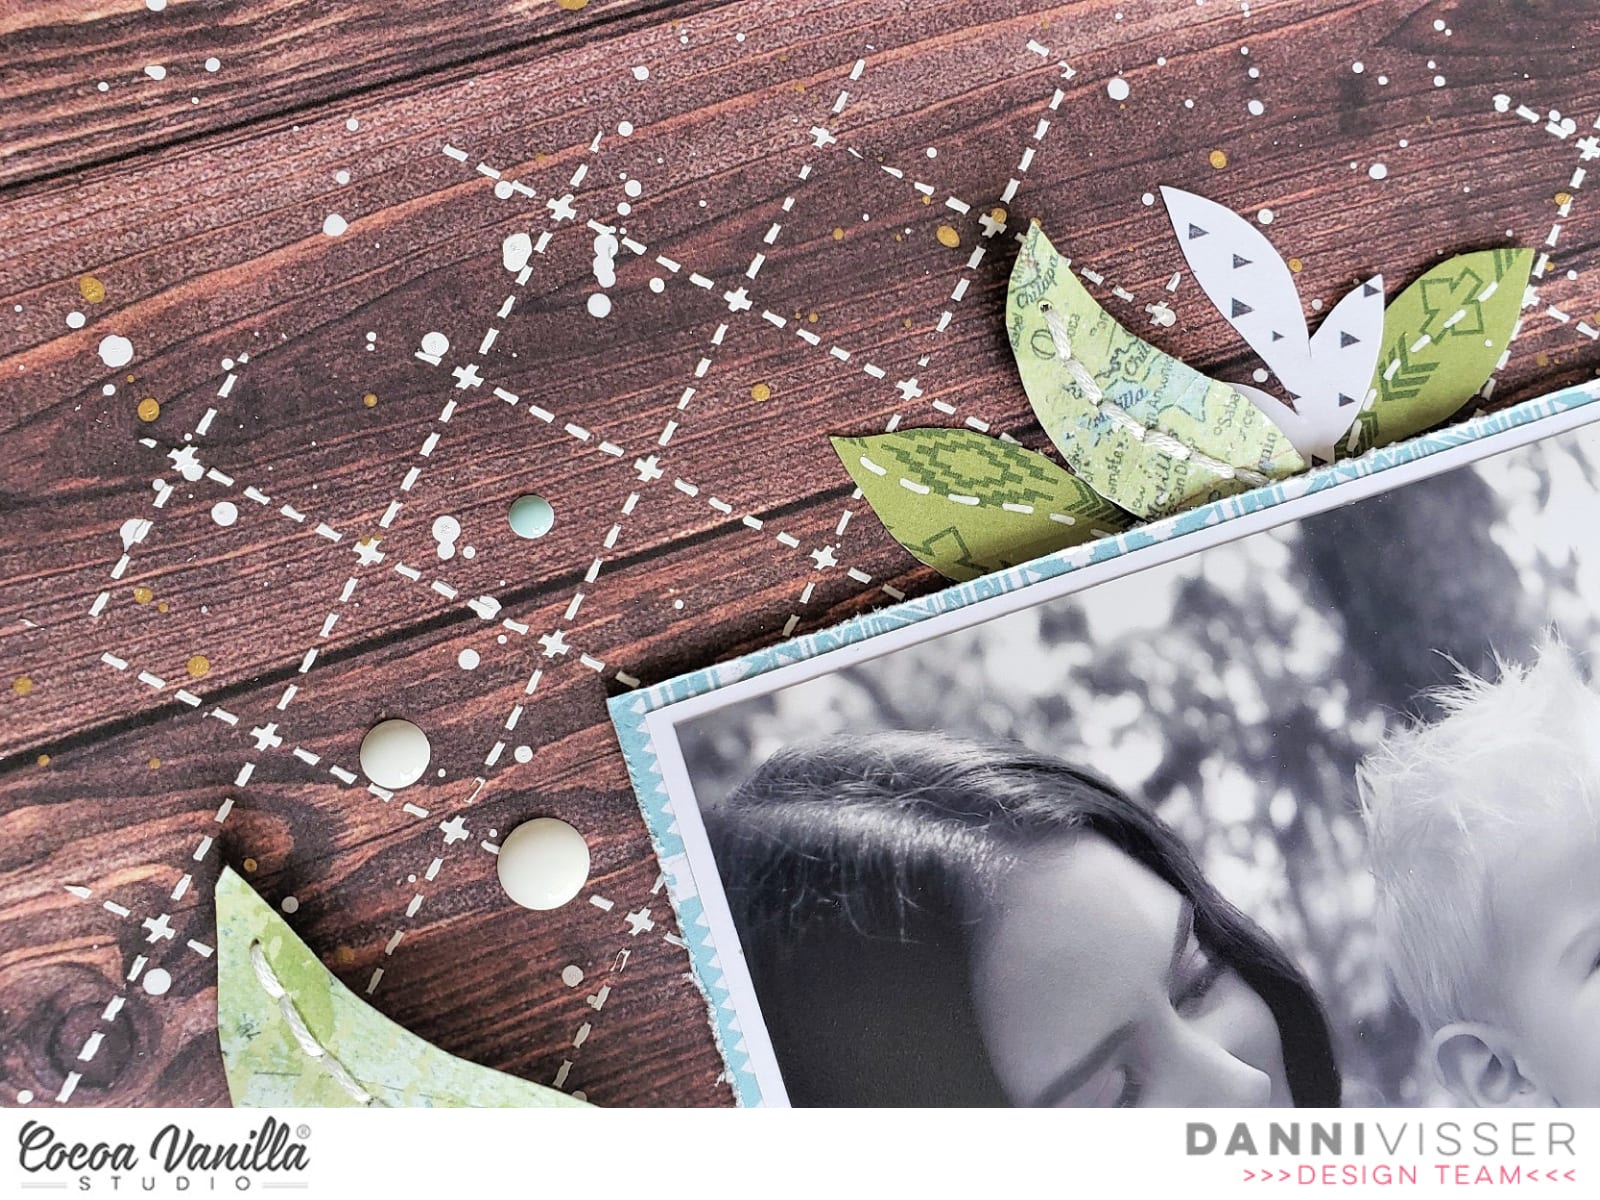
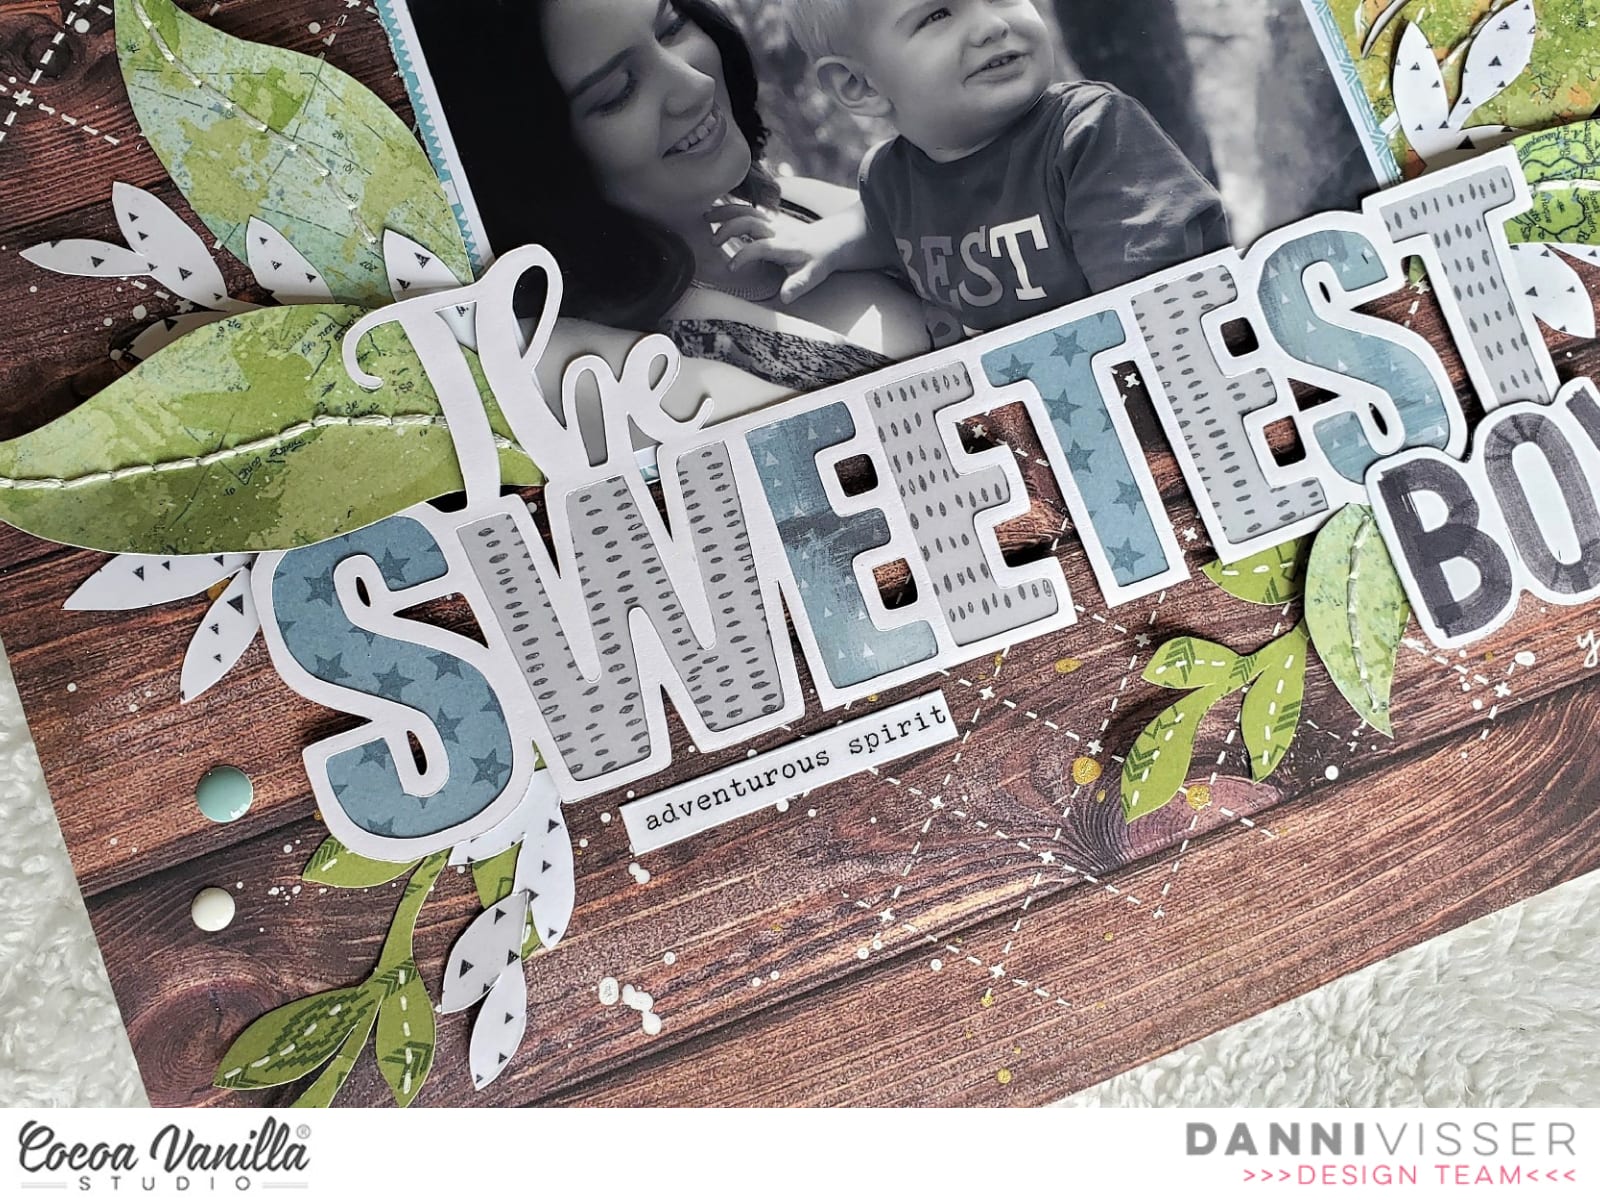
Hi Cocoa Vanilla fans! Today I am sharing a simple layout with a big impact featuring lots of patterned papers from the stunning Legendary collection! I was inspired to make a very organic nature-themed layout because this photo of my son and I was taken in the Australian bush, and you can see the trees in the background.
I began by freehand cutting some leaf shapes from Outdoors Type and Epic Tales patterned papers, making sure to vary the size and shape. I wasn’t too careful about making these neat; people really don’t notice any flaws in the finished layout. I wanted to add some interesting details to the leaves, so I hand stitched some veins on the larger ones with white thread and used white gel pen for faux stitching on others.
I decided to use this sweet cutfile as the main part of my title, so I went ahead and backed the letters with blue and grey from Epic Tales, Offbeat and All Star papers. To finish off my title I took the word ‘BOYS’ from the Die Cut Titles and trimmed off the ‘S’ with my scissors. Remember if the words aren’t quite what you need, it is so easy to alter them slightly! I kept my photo mats simple with a plain white followed by the light blue from Total Legend paper.
I absolutely adore the woodgrain in Outdoors Type paper, so I decide to use that as a background. Because it is a dark tone, white accents look very striking in contrast, so I added some white modelling paste thought a quilted stencil and plenty of splatters with my white and gold inks. This kind of mixed media is simple to do but makes a huge impact!
I added some dimensional foam to my photo and title then arranged my leaves in clusters around them. I made sure to vary the placement of the green and white leaves to break up the colour and add more dimension. For a finishing touch I added three clusters of light blue, grey and white Enamel Dots and three tiny words stickers from the Accessory Stickers. I can’t help but put enamel dots and tiny word stickers on almost all my layouts; it just doesn’t feel finished without them!
I included a couple of simple lines of journaling and the date in white pen below my title. I just adore this layout – it was really quite simple and didn’t take too long at all, but it looks so lovely all finished. I’m so happy with it! There is a process video linked below if you would like to watch it all come together. Happy scrapping!
Hi everyone and welcome back to the Cocoa Vanilla Blog! Today’s topic is sewing, so for this layout, I used my sewing machine and also did some hand stitching. Today I’m featuring the wonderful and colorful Bohemian Dream collection.
I chose the B side of the Flower Child paper for my background. Then I ripped a wide strip from the Dreamer paper and a thinner one from the Gypsy Heart paper and stacked them together at the center of my page. In this layout I showcased two pictures of my younger daughter on the beach. These days I’m missing open spaces so much. Behind these two photos, I placed 4 of the 3″x4 “cards from the Beautiful Mess paper and I sewed all the edges with different types of stitches.
For my title, I used my Silhouette Cameo. I cut out the word happy from the Abundant paper and hand stitched it with white thread. I also cut a bigger outline of the word from vellum. I adhered the word to the vellum with foam dots and placed it under the photos.
I embellished the page with some flowers and a butterfly from the die cut shapes and also a flower from the vellum flowers. The rest of the embellishments are from the sicker sheet.
And finally some enamels dots… almost a must-have for me. I think they add such a nice touch to any project, don’t you agree?
I really love to add some kind of stitched to my projects, because it gives interest and texture. Do you usually do that? I hope you like this layout and inspires you to create something beautiful today!
Hello sweet friends! It’s Kylie back with you today to share another new layout I have been working on, featuring the super awesome “LEGENDARY” collection. I knew I wanted to work with some mixed media for this design and to keep it fairly monochromatic.
To create my framed background, I layered OFFBEAT, ONE WAY and BRAVE HEART papers. (I had carefully removed the centres of the papers first, just leaving a frame, to avoid wastage.) Each piece had been trimmed down slightly smaller than the previous to achieve a stacked appearance. I added a white card stock to the top layer, ready for some mixed media. Using a black fine tip marker, I drew a free-hand border around the edges.
Some Aqua toned watercolour was added to my large acrylic stamp block and I proceeded to stamp colour in the centre of my background. I kept adding until I was happy with the result.By using a ‘stamping’ technique allows me to control where I want the colour to be more effectively.Once dry, I took some stamps from my stash which I thought matched well with the Legendary collection and added them throughout my background. One in navy ink, the other in black.
I had three photos of my son I wanted to use in sequence. The ‘sure take my photo, hey whats over there?’ shot, the ‘here’s your nice one Mum’ shot and the ‘OK, I’m so done now’ shot. When you keep clicking your camera, I love the photos you end up with! I printed them in black and white, the larger measuring 4″ x 4″ and the two smaller are 2″x 2″. I adhered them in place with foam tape and was then able to add some die cuts and a title surrounding my cluster.
To finish my layout, I added a very large date stamp to the lower left corner.
Thanks so much for stopping by today and seeing my layout. I hope it gives you a little inspiration for your own scrapbooking.
Hello Hello! It’s Michelle back today with a new layout to share with you all. I’ve chosen to feature the wonderful Legendary Collection for this layout and share how it can be used to document the moments in our girls lives that don’t necessarily need all the pretty feminine florals or hearts. I’ve based this layout on a running theme I have for Leila that documents all her favourite things each year. I started this back in 2016 and have created a layout each year focusing on the same topic and keeping to the same basic grid design.
This year I changed up the type of collection and used the fun Legendary collection rather than the feminine styles from the past, the layout on the right covered in florals is last years creation. I find that keeping a similar design for this theme had helped to get the topic documented quickly, but also will be easy to find each individual layout to reminisce in years to come.
I started the layout by writing out the list of favourites and adhering the notepaper to the dark woodgrain paper OUTDOORS TYPE . I chose to use a photo of Leila in her finest PJ attire playing the switch and adhered this to the map paper which is the reverse of the OUTDOORS TYPE paper . Next I chose an assortment of complimentary patterns to create the grid design in the background. A mix of WILD ONE, OFF BEAT, BRAVE HEART, TOTAL LEGEND, EXPLORER and EPIC TALES which are all adhered with double sided tape and machine stitched for a little extra detail.
Once the grid of pattern papers were adhered and stitched I added the photo and list to the centre of the layout. These are raised slightly off the background using foam sheeting for that slight pop of dimension.
I added a cardstock title piece and stickers to the top of the notepaper list to create the title, with the addition of some ephemera stars and flair button to fill the blank space.
I added some random banner and tab stickers to the top and right of the photo.
I kept the embellishment clusters pretty simple in the top left and bottom right of the layout. The pieces used can be found in the ephemera pack.
and lastly some accessory word stickers to the top right and bottom left pattern papers and a good splattering of gold colour shine to the entire layout.
Well friends thats all from me today. Thanks so much for stopping by. Be sure to check in with us regularly over in the Cocoa Vanilla Studio facebook group to talk and share all things CVS!
Hi everyone! It’s Sue Plumb here to share my latest design team project with you. For this layout I was tasked with incorporating the theme of “sewing”, which gave me a great excuse to dust off my sewing machine and put it to good use. I decided to use the ‘Legendary’ collection for my page and pair it with a series of photos of my boys and hubby having some fun with a swing at the park.
I started with a sheet of white cardstock that I cut down to measure 11×11″, and then mounted it against the fabulous rainbow stripe of the Wild One paper. I chose this paper as my base as I really wanted to coordinate with all the colours that were present in my photos. It also opened up a broad colour scheme for the papers I was going to use on my page.
For my design I knew I wanted something fun with lots of colour and a feeling of movement to echo the action in the photos, so I decided to create a large banner. Once I had decided where my photos were going to sit on the page, it was simply a matter of cutting an assortment of different sized paper pieces for the sections of the banner. (The papers I used included All Star; Total Legend; Wild One; Offbeat; and Explorer.) I then used a small amount of glue to tack the pieces lightly in place before I used my sewing machine to stitch down the middle of a few of them.
I then tacked the photos lightly in place before adding several lines of stitching back and forth across the top to represent the string of the banner and hold them firmly in place. (I deliberately left all the loose threads hanging intact, as they added to the texture of the page.) I then went back and bent up the tails of the banner pieces, as well as the bottom edges of my photos so they would look as though they were blowing in the breeze. Now it was time for some embellishments!
I started by tucking the large circular frame / mandala piece from the Die Cut Ephemera pack in underneath the middle photo, then added a large star over the top (which I also bent up from the page). I chose the words super and silly from the Die Cut Titles pack and tacked them along the top of my photos. I then took to it with my sewing machine again, and added some lines of stitching over the top, before I added the word fun from the Clear Stickers pack underneath.
In amongst the banner pieces, I tucked in a couple of tickets and a small flag from the Die Cut Ephemera pack; then I added a couple of phrases stickers from the Accessory Sticker sheet along the bottom of the left photo. From the Clear Sticker set, I added two chevrons on either side of my photos to indicate a “swinging” motion and to help draw the viewer’s eye through.
At the top of my page I added some crazy, silly stitching in each of the top corners, then added a date label from the Accessory Sticker sheet to the right hand side. I finished off by adding a few paint splat Clear Stickers, and then a few splatters of black ink and I was done!
This was a really fun page to put together, (especially doing all that random wild sewing!) and I am really happy with the result. If you have a sewing machine but you aren’t confident sewing on a layout, then this type of project might be right for you because perfection is not necessary.
Thanks so much for stopping by today so I could share this with you. Until next time, happy scrapping!
It’s Tarrah back with you and today I am sharing a new layout for the stitching theme we are featuring here on the CVS blog this week using the awesome new Legendary collection. The photo I am documenting is a recent one of myself and my boys getting out for some exercise and fresh air during Covid-19 isolation!
I have wanted to try doing an 8.5′ x 11′ sized layout for some time now, I have created a few in my time but not many that I have shared before. I loved the smaller space to work with! I decided to incorporate machine stitching right around the entire perimeter of the blue star background paper, bending up the edges to create some texture.
I decided to cut out an arrow design cut file (free from Paper Issues) from white cardstock and backed all the arrows with different patterned papers. I love how it looks with all the colours. I added craft foam underneath to give it dimension and placed it to the centre of the page.
Once the cut file was adhered, I placed my photo towards the top right corner, adding craft foam and 2 of the stickers from the accessory sticker sheet underneath the photo. My title is made up of the cardstock titles, I added craft foam underneath the title also and placed that opposite the photo at the top.
Some of the embellishments I included on my page are all from the Legendary collection, including the clear stickers, die-cuts, enamel dots, a flair button and some of the small phrase and word stickers from the accessory sheet. Lastly I added the date stamp to the ‘Best Ever’ sticker at the bottom.
The Legendary collection is perfect for documenting both the boys and girls in your life! Make sure you get your hands on some!
Thank you so much for taking the time to stop by the Cocoa Vanilla blog during these uncertain and crazy times. I hope you all stay safe and healthy.
Hey Creative friends, Gwen here today with some more scrapbook inspiration using the new ‘Legendary’ collection by Cocoa Vanilla Studio. For this layout, I was challenged to feature some stitching, which, if you know me, really isn’t a challenge at all because I like to add stitching to every layout I do! I’ve got another photo of my hubby for this one, taken last year when we were out enjoying a refreshment after a bushwalk.
With my photos chosen, I got to thinking about my challenge and the stitched elements. I decided on adding some stitched details to a large cut file element. This one is from CUT to YOU and is called ‘Camera Oh Snap’ and I’ve cut it out super large with the idea to place it centred on my page.
This photo was taken at an Irish pub; you can see the bright green walls in the background. I thought this might be a hard colour to work with, but the ‘Legendary’ collection works perfectly. I began with the ‘Outdoors Type’ paper, because of the bright green. I used it to back the largest areas of my cut file. For the smaller parts of the file, I’ve used the ‘OffBeat’, ‘One Way’, and ‘Total Legend’ papers. If you get one pattern paper from this collection it needs to be ‘Total Legend’, it has so many bold colours and the prints are in a smaller format to the other 12 x 12 sheets, this makes them so good for backing files like this.
With my cut file now backed and looking good, it was time to add some stitched details. I’ve added stitching along the out edges of the file, including the camera buttons and then more along the main horizontal elements of the camera as well. I’ve done this to help draw the eye across the page, this design is going to run horizontally, left to right.
Next, I’ve mounted my photos on some leftover of the ‘Offbeat’ pattern paper and stitched around the edges of those as well. I’ve used this same pattern paper as my layout border and added stitching here too. I’ve added foam to the photos and then positioned them in the bottom left side of the page. I’m going to balance them out with my title and embellishments towards the top right-hand side.
As always, I’ve looked at adding the larger embellishments first. I’ve started with my title, adding the word ‘Happy’ from the ‘Die Cut Titles’ pack and then the large element that says ‘Hey Good Lookin’ from the ‘Die Cut Ephemera’ pack. The cute little bear element in the top right-hand corner is also from this embellishment pack. I’m adding 3D foam tape to some of the elements for added dimension.
Next, I’ve added in the medium-sized elements such as the ‘Limited Edition’ tag piece (also from the Ephemera pack) and the flair button from the ‘Flairs’ pack. The stars were also added here, all of these are from the ‘Die Cut Ephemera’ pack.
The smallest elements I’ve added last, these being the cute typed sentiments from the ‘Accessory Stickers’ Sheet and the ‘Enamel Dots’, always a must-have for me from any collection.
I’m super happy with how this one turned out, I love the bold colours and the large feature title and that I have another fun layout created of my husband. If you haven’t seen the new ‘Legendary’ collection, I hope this page has inspired you to go and check it out!
Hey y’all! Laura Alberts back with a Wild & Free layout featuring my youngest son and his stockpile of sister-annoying weapons. He is ready to take on all three of his sisters with this setup! I couldn’t stop giggling while scrapping this one, he’s so serious in his games and he was ready to rock and roll. This cut file from Paper Issues was absolutely perfect for this “target practice” style layout! I used the front and back of the Wild One patterned paper from the Legendary collection to build my background and then fussy cut tons of stars from the All Stars patterned paper to create a cascade that follows the color pattern of the background!
By tucking this larger ephemera star behind my photo, it helps to draw your attention to the photo as well as give the impression of the smaller stars shooting off from the larger one, a cool effect and perfect for this layout! I added a scattering of enamel dots and gold ink splatter to add detail to this cascade of stars.
I used a cut apart piece for my title and an arrow to draw your eye back to the photo again! On a one photo layout, it’s important to reinforce that this is the focal point in more than one way. And finally, I added these word phrase strips below the photo to create a pre-made journaling spot! I love how this layout came out and I think it really captures the feeling of that moment for my son.
I hope you’ve found some inspiration in this design and I would love to see how you capture your photo’s moment in time with your design! And don’t be afraid to fussy cut these brilliant stars that inspired this layout for me! They make for fantastic embellishments that already perfectly match the collection! A little bit of extra time can make a huge difference in your creations, those details can take your creativity even higher!
Thank you so much for joining me on the sister-blasting adventure and enjoy the process video for this fun layout below! Until next time, my friends!
Hi there crafty friends, Anita here with you today sharing a sweet layout using the midnight collection there are lots of soft colours in this collection perfect for those girly shabby chic projects..you know me I love adding some flowers and what better way then to make them yourself from the paper in the collection…
I had a basic design idea in mind for my layout, but wanted to make flowers for my layout using moonlight patterned paper and I used papers from the 6×8 paper pad for the leaves. Then i started off using white cardstock
I then cut a few strips of paper from sophisticated and inky depths to lay on the left side of my cardstock just overlapping then to add a cluster of embellishments and to have it going diagonal up the page
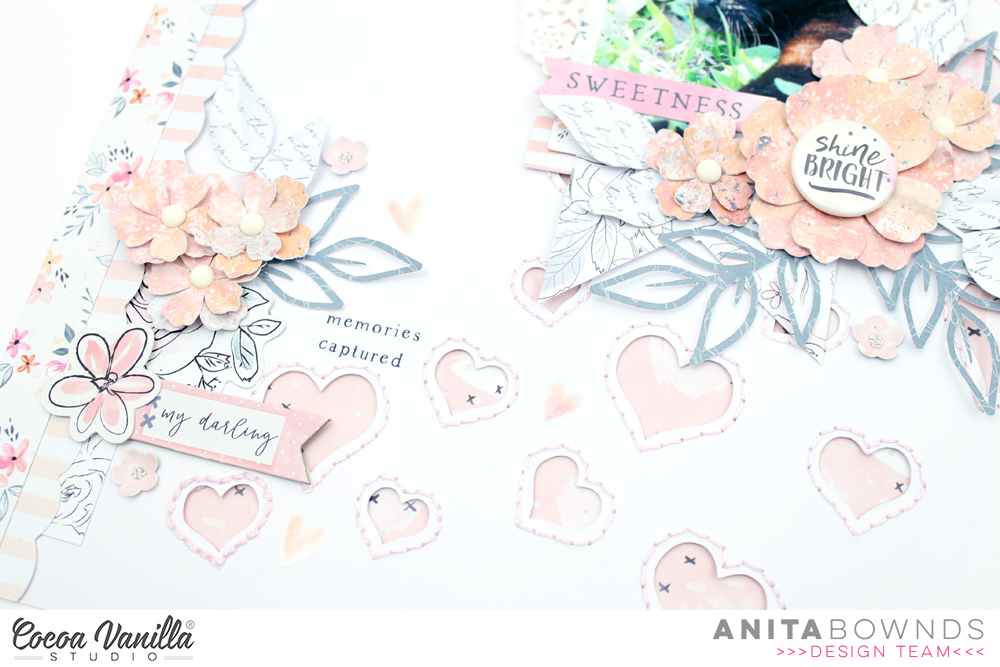
I decided on adding more texture and dimension using a @neatncraftycutz scattered hearts background cut file
Adding some hand stitching and backing it with all the things pattered paper so to bring more of that light pink in the layout and draw the eye to the photo..
Then I layered patterned paper behind my photo with papers from the 6×8 paper pad and tucking a few little doilies in the layers then I started clustering the flowers and leaves around the photo along a few accessory stickers . I also add a few more embellishments chipboard pieces and ephemera to the clusters
Add the flair button in the center of my big flower adds a touch of dimension and texture
And to finish of the layout I add a few clear stickers around the layout..


 At the top of my page I added some crazy, silly stitching in each of the top corners, then added a date label from the Accessory Sticker sheet to the right hand side. I finished off by adding a few paint splat Clear Stickers, and then a few splatters of black ink and I was done!