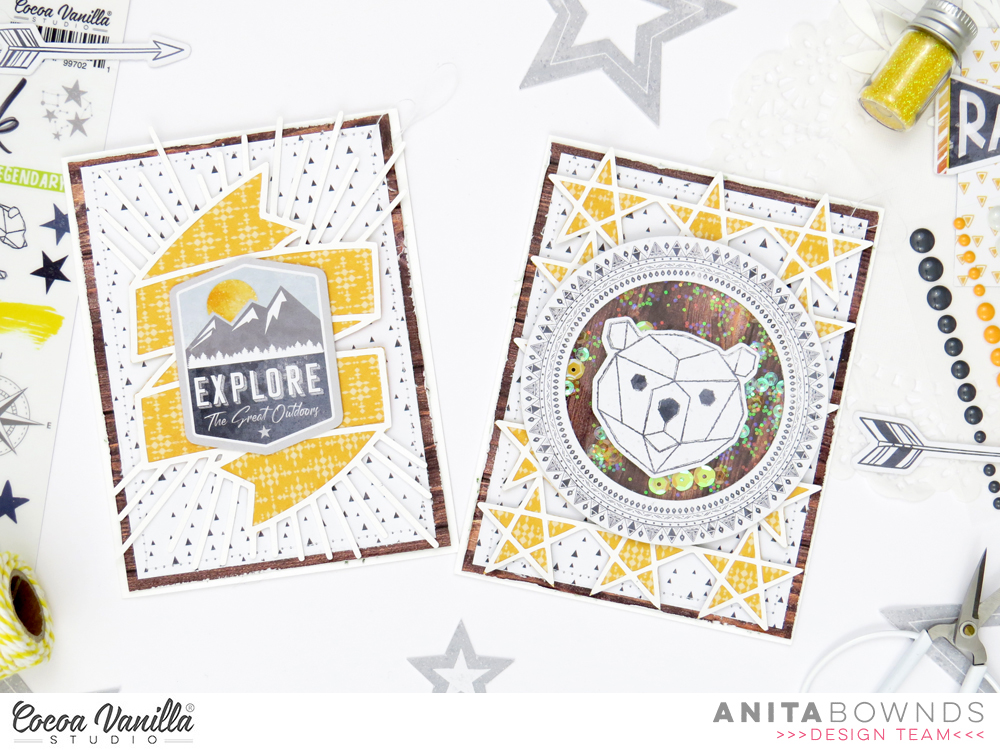
Hi there crafty friends, Anita here today sharing a couple fun cards using the new fabulous legendary cut file available for free in the cocoa vanilla studio store and the awesomeness legendary collection …
these are super easy fun cards to make only using white cardstock , 3 papers ,ephemera and 2 of the cut files sized to fit my cards.
I started with 2 white card bases and chose 3 patterned papers outdoors type, epic tales and wild one
And cut out the legendary cut files on white cardstock
Then I cut and layered outdoors type on both card bases then next I cut a piece of epic tales for each of the cards a added a machine stitched border around the edge then adhered them down.
I backed both cut files with wild one and adhered then down with double sided foam tape to add dimension then added ephemera on more double sided foam tape to add more texture and dimension
And using ephemera, plastic and a few sequins I created a shaker for the front of one of the cards.
I hope you have enjoyed my legendary card inspiration today…
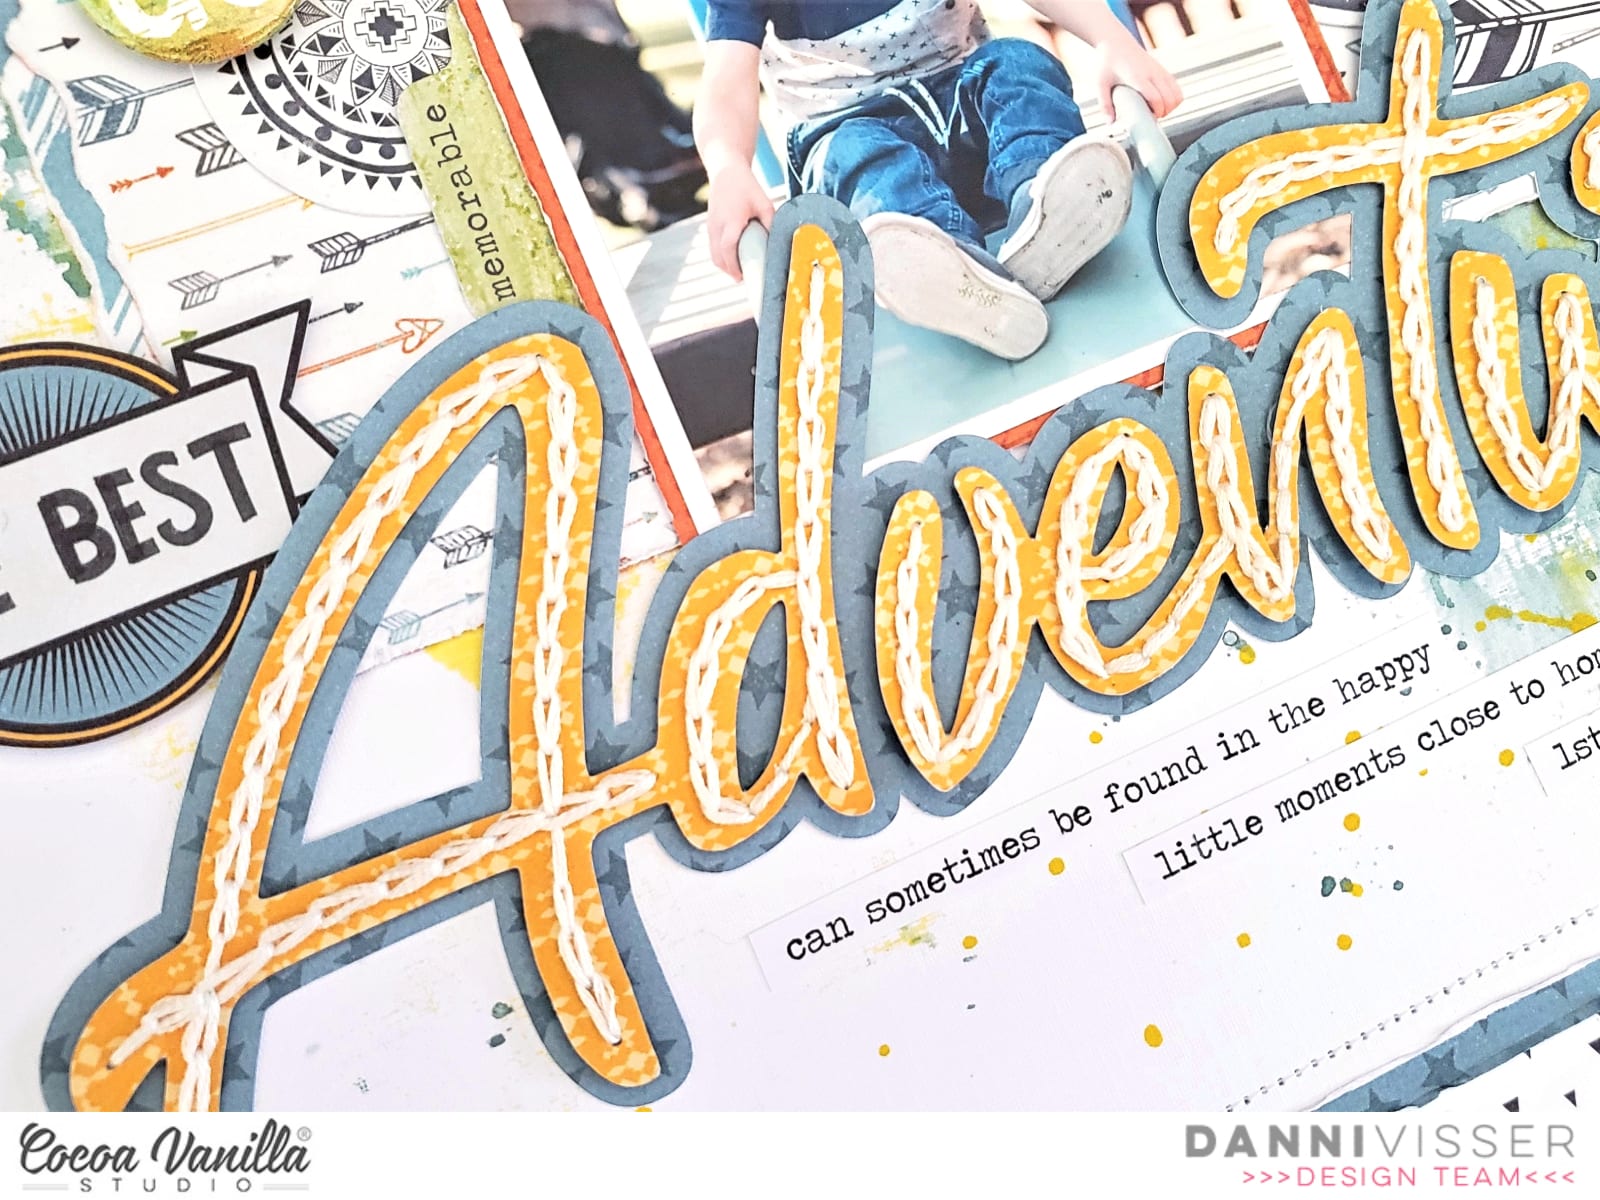
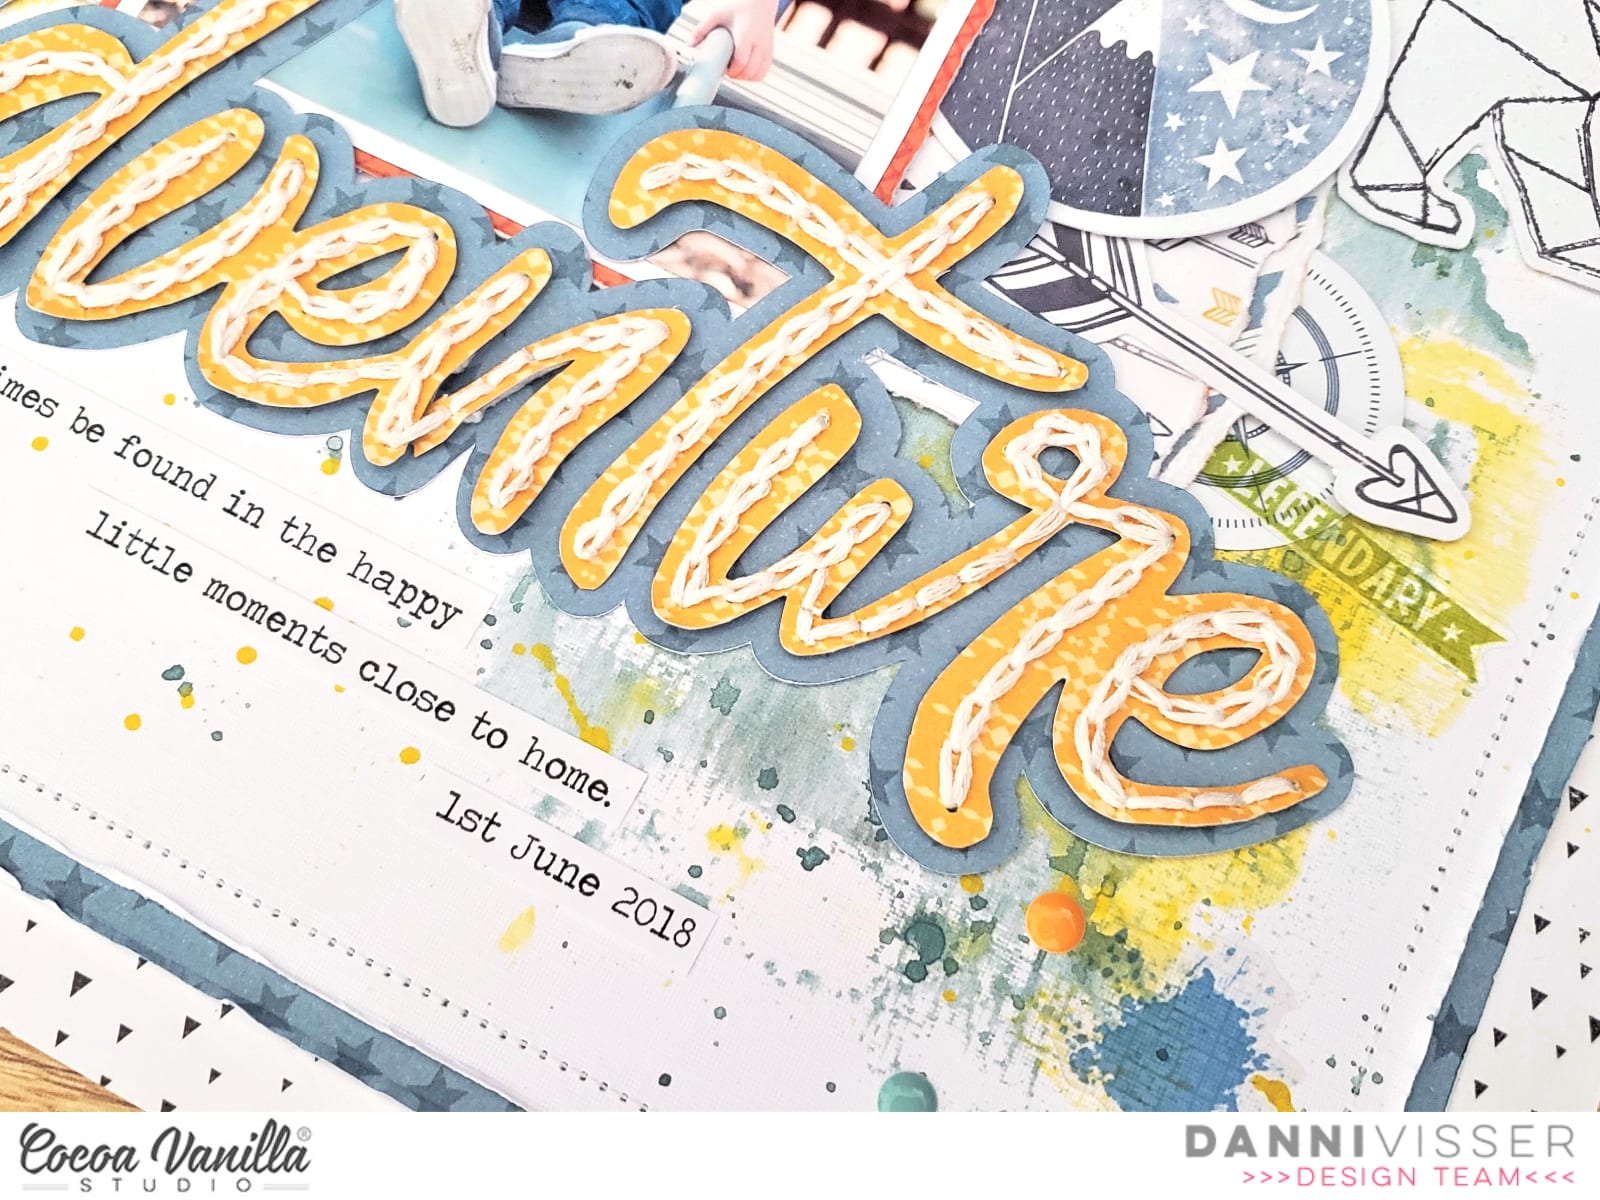
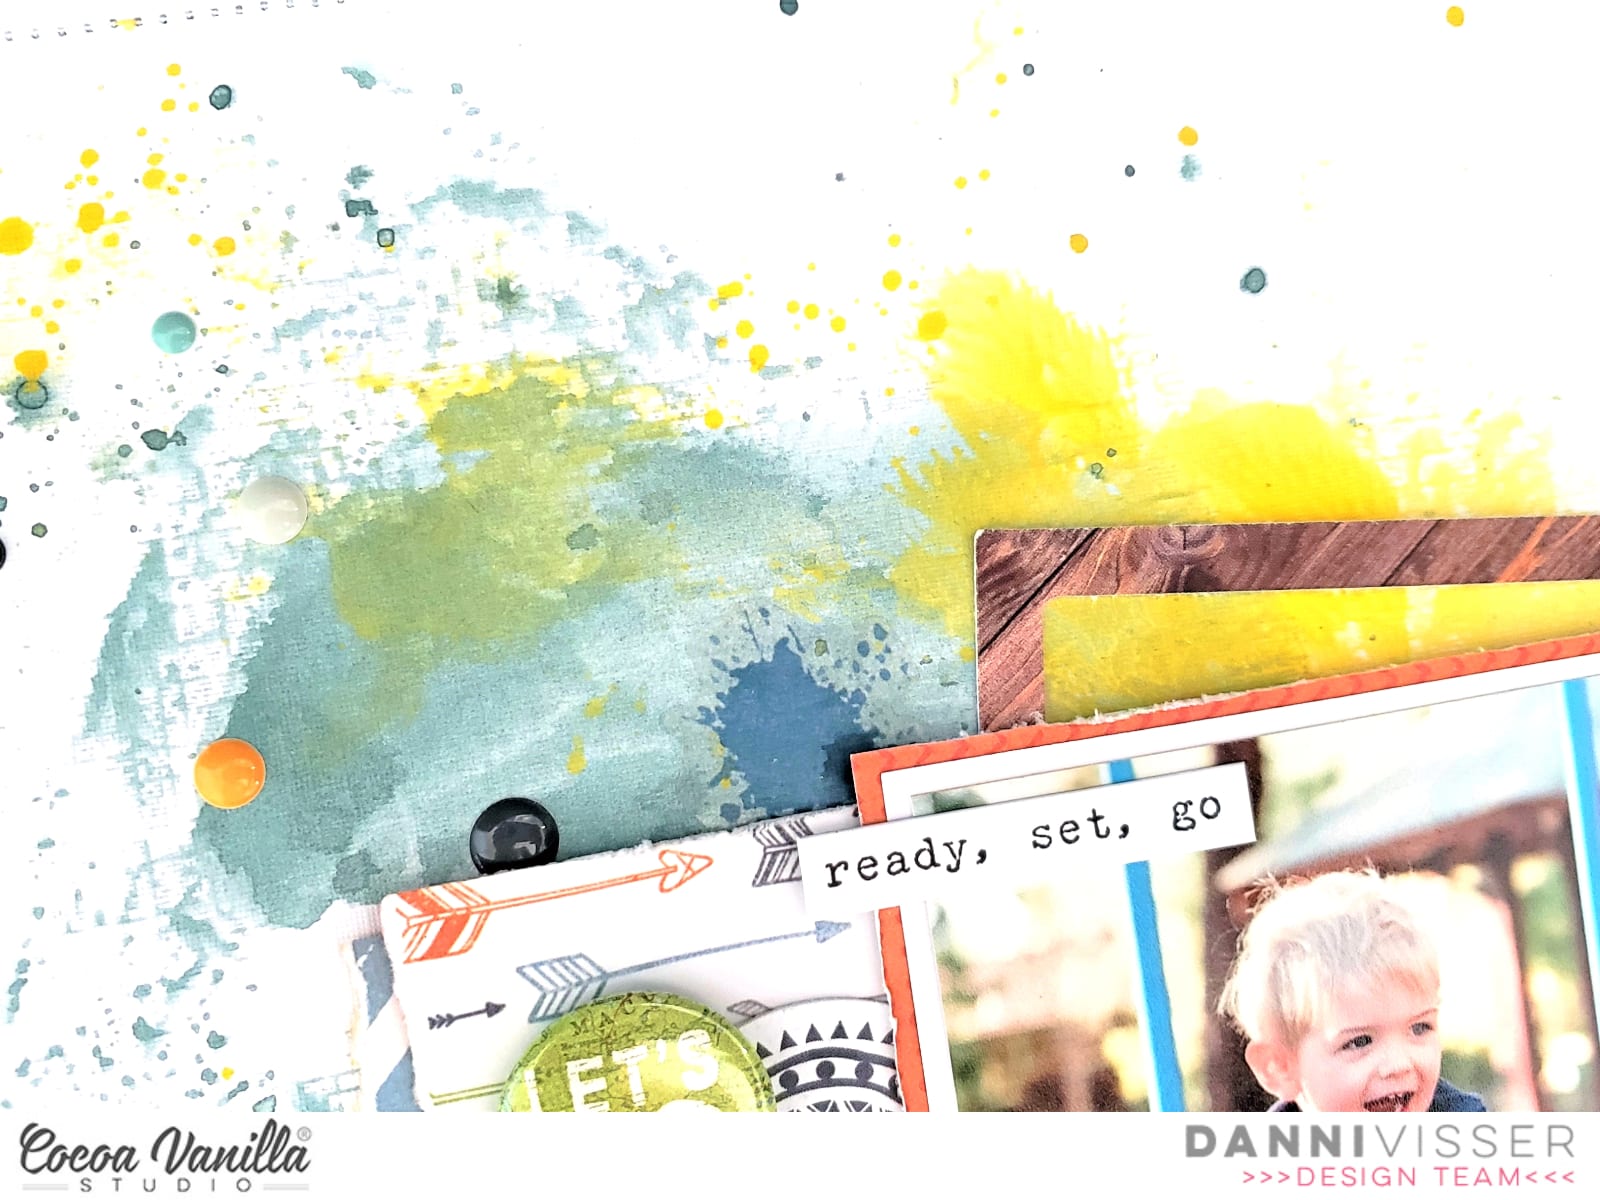
Hi everyone! Danni here, back again playing with the beautiful Legendary collection. Once again, I am scrapping an outdoors photo and I chose this adorable photo of my son playing at a local park. This week we were challenged to feature the incredible Legendary free cutfiles that are available for download, and I decided to use the Adventure word as my title. I cut it once from the yellow side of Wild One patterned paper, then used the offset tool in Silhouette studio to cut a slightly larger backing piece from Offbeat patterned paper. I then went ahead and hand-stitched a single line of chain stitch following each of the letters. I am on a big hand-stitching kick lately, I just love the texture it provides, and I find the process very relaxing! Once I finished the stitching, I adhered the title to the backing piece using tacky glue.
Next I got to work on creating my background by using Offbeat and Epic Tales patterned papers to frame a piece of white mixed equipoise.online media cardstock and machine stitching around the edge using a combination of straight and zig zag stitch for added interest. I went through and distressed all the edges with my fingers to really emphasise the layers. Too jazz up the white background I added some colour in blue and yellow using watered-down artist acrylics and the packaging technique, followed by lots of splatters. I added some of the paint splatters from the Clear Stickers too, these are perfect for adding that mixed media effect.
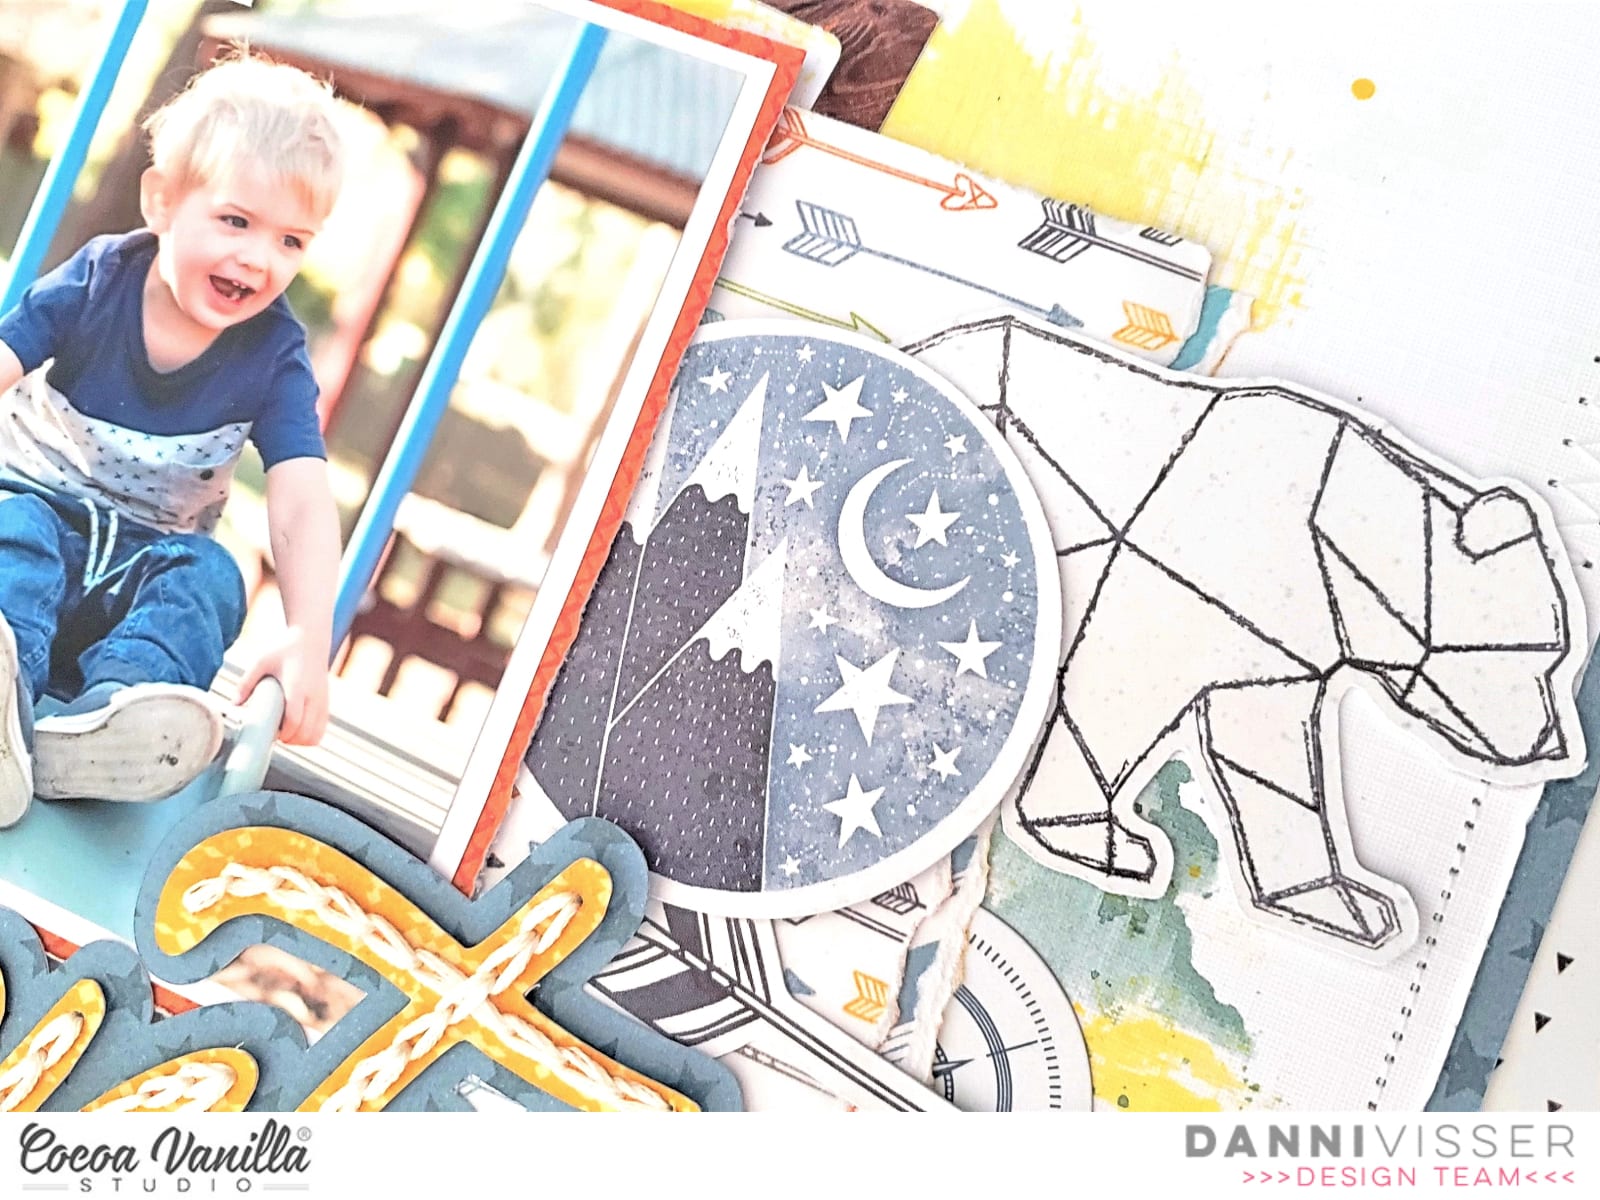
I matted my photo in white followed by the orange One Way patterned paper to really draw the eye to the photo. I flipped One Way over and used the reverse side as a larger layering piece behind my photo, creating a space for embellishments to sit. I added some torn strips of Wild One paper as well for some extra colour.
To complete my title, I fussy-cut the ‘The Best’ banner from Epic Tales cut-apart patterned paper and layered it behind my main ‘Adventure’ title. I embellished either side of my photo using a combination of Accessory Stickers and Die Cut Ephemera, using several circular elements to tie in with the ‘The Best’ banner. The green ‘Let’s Go’ Flair Button was the perfect addition to this theme.
My few lines of journaling I added in strips of typeface font in that perfect little space below my title. I added in one of the tiny word stickers from the Accessory Stickers at the top of my photo to help frame it and finished the layout with a sprinkling of the Enamel Dots in all the colours. I’m really pleased with this one! It wasn’t planned out and definitely came together during the creative process, and those are definitely some of my favourite layouts.
There is a process video linked below if you would like to watch this one come together.
Anna here today with you sharing a new layout. Have you ever used a digital kit? I must say that it’s my first time, and I’m so happy with the result. On this page, I’m featuring the Hello Lovely collection that you can find on the Digital Products section from the shop.
I have a standard A4 printer, so for my background, I decided to use two 12×12 patterned papers from the More than words collection. I used the Precious paper and backed it with the Gossamer paper. I think both go very well with the Hello Lovely collection.
The focal point of my layout is this cut file from Paige Taylor Evans. I think it describes perfectly the look of my youngest daughter in the pictures. I cut it from white cardstock and placed the photos behind the letters “O”.
Instead of backing all the letters, what I did methenolone enanthate primobolan depot was use the inner part of the letters as a template. I draw them on the patterned paper that I printed and fussy cut them. I raised the cut file with foam dots, but I glued the inner part of the letters to the background.
In the digital collection bundle, you can find printable element sheets. They’re so easy to cut, and I used them to embellish my page. I also die cut a couple of white bows with my Big Shot.
Thank you so much for stopping by today! I hope you like how I used this digital collection and encourage you to try it!
Hi Everyone it’s Michelle here with you today to share a new layout I made to round out our Mothers Day Celebrations. I hope all the mummas out there had a wonderful day yesterday with those near and dear to them. I’ve used the sweet Happiness Collection for my layout today that documents a sweet moment of Leila and I snuggling, and a cut file design from CUT to YOU.
I chose this photo from a few years back so the quality isn’t perfect, but it totally sums up one of the many things I love about being a mum. The endless snuggles while they’re still little. Snuggles these days are very few and far between, so I Cherish the ones we do have.
I cut out the cut file design from CUT to YOU (Hearts on Strings) using the EXPRESSIVE paper and used the outer edge remnants to back frame the white cardstock background paper. I used tiny raised glue dots to adhere the cut file to the cardstock to give a slight lift off the paper.
Next I gathered some complimentary pattern papers to layer under the photo, 2 of my most used colours from this collection I think, the reverse of both GOOD VIBES and EXPRESSIVE with a tiny strip of hearts from the SO FRESH paper.
To the left of the photo I added a couple of pieces from the cut apart paper LITTLE THINGS to create a title for the layout. I also included a word sticker from the ACCESSORY Sticker sheet and some handwriting on a tag.
I fussy cut florals from the wreath pattern paper SO FRESH to create clusters both left and right of the photo/title piece and added some stickers from the Accessory sticker sheet and glitter enamels from the Make a Wish collection to finish them off.
Theres also a good splattering of gold colour shine around the page and some machine stitching of the edges to add a little extra fun to the layout.
Well thats all from me today. Thanks so much for stopping by and seeing my layout that celebrates a special moment in this mummas life. I hope you can share your precious moments with us too in the CVS Facebook group. We do love to see what you all create using CVS products.
Hello dear friends! It’s Kylie with you all again today, sharing a new layout I have just completed. Since it’s Mother’s Day here in Australia today, I thought it would be fitting to share a layout of that theme. I decided to use some of my Bohemian Dream stash and have combined it with a beautiful cut file which has been designed by lovely design team member Gwen, of Cut to You.
The cut file had two frames amongst leaves which were backed with the Wild and Free paper. For one frame I have fussy cut the gorgeous dream catcher 3 x 4 card from the Boho Bits paper and I have added my photo to the lower frame.Once it was all backed I adhered it to the Kaleidoscope paper with foam tape.I like the dimension and effect it gives to my layout, having it sit up from the background.For some extra colour I added two 1.5cm strips of Flower Child paper to each vertical side.
I really love to layer together different embellishments for texture and dimension. I have used the chipboard stickers, vellum accents and die cuts to support and balance my layout.Some have had foam tape added to raise them, giving a lovely natural flow.
Large titles can make such a beautiful impact to a layout. I selected the ‘Dream Big’ phrase chipboard stickers and added them to the lower side of my page. Once completed, I went back and added some of the chipboard hearts as well as a vellum butterfly to finish off my page.
Thanks so much for stopping by today. I hope you have enjoyed seeing my latest design and it gives you a little inspiration for your own scrapbooking.
It’s Tarrah back with you and today I am sharing a new layout for our Mother’s Day theme we have going on this week on the blog! I decided to document a special photo of my beautiful Mum and myself on Sydney Harbour when we went to the ballet a year ago. I pulled out the gorgeous Midnight collection to help me document this special memory.
I found a really lovely cut file designed by fellow team member Gwen from Cut To You, I cut it out from white cardstock and then backed the hearts at the top of the cut file with the pink side of the Shine Bright paper the Special word in the cut file, I backed with the ‘B’ side of the Inky Depths paper, I love that small soft floral side. Once it was all backed, I placed craft foam underneath both the hearts and the ‘Special’ word.
I chose the ‘B’ side of the Mixed Blessing paper for my background and also matted that piece with another sheet of the Inky Depths paper. I machine stitched around the entire edge to add some texture and interest. I placed the cut file title in the centre of the page and I cut a strip of the Bloom and Grow paper and placed it underneath the bottom of the cut file before I adhered it all down. I matted my photo in the orange part of the Shine Bright paper and added craft foam underneath the photo and mat, it fit perfectly just above the word ‘Special’ with one of the hearts from the cut file overlapping onto the photo also.
I tucked in one of the cute die-cut frames from the die-cut ephemera pack into the top of my photo, I then took one of the paint strip clear stickers and added it to white cardstock, I then fussy cut it out and tucked it into the right side of my photo. I also added one of the cute flair buttons here. The jar and flower chipboard piece fit perfectly there just above the ‘You’ in the cut file, I love how this looks here. I also tucked in one of the floral die-cuts to the left of the jar to bring in some more of the florals to the page. I also added a few chipboard hearts and also a clear sticker heart too. Lastly I added some of the accessory word and phrase stickers and the date stamp to finish off!
Thank you so much for stopping by the Cocoa Vanilla blog today! I hope you have plenty of Mother’s Day memories you can document!
Hey CVS friend, today I have some boy love to share! I have used the fab new Legendary collection.I have used a fun cut file from Silhouette Design store, I chose it so I could use more of the designs on one layout.
I cut my white card stock down to 10×10 inches and adhered it to the Wild One paper. Keeping to the rule of thirds, I chose three papers to paper piece the cut file, Wild One – yellow side, All Star paper and One Way paper. I used foam tape to adhere the finished cut file to create a 3D effect.I then added my photo and again with foam to create more height. I chose to create an embellishment cluster around my photo, using the die cut ephemera and accessory stickers. How gorgeous is the geometric bear I tucked behind my photo!I used the accessory stickers to add my subtitle/journalling.
I have used more foam tape to add die cuts to create more height and added some enamel dots under some of the die cuts.I love all these colours together but because I didn’t want my layout to look ‘too’ busy I was careful when it came to my embellishing.
And there you have it one super colourful and super fun boy layout! Thank you for stopping by today and have a wonderful week!
Hi everyone! It’s Sue Plumb here to share my latest project with you. Today I am sharing a layout I created last weekend as part of the Cocoa Vanilla International Scrapbook Day celebration event. It was such an amazing weekend – full of fun, friendship, and of course, inspiration! I am so proud of our team and all the work they put into the event, and to hear how much everyone who took part enjoyed it, really made it all worthwhile.
So the layout I am sharing here was designed for Gwen’s “Grab 5” challenge where we had to include – a chipboard element; a die cut title; a flair button; enamel dots; and something fussy cut. I decided to document this fabulous photo of my daughter being hit with holi powder that was taken by a friend of mine who is a photographer. And what better to pair a splash of colour with, than the beautiful ‘Bohemian Dream’ collection?
Given the “arty” theme of this photograph, I decided the best approach would be to have some arty fun whilst I created it. I started with a sheet of white cardstock that I cut down to measure 11×11″ with the intention of mounting it on patterned paper later on. I pulled out my gelatos (if you don’t have gelatos you can substitute any sort of water soluble pastel or art crayon). I chose some colours that would match with the palette of the collection, and used them to create a very simple “scribbled” background in a rough square shape. I then used my fingertip and a baby wipe to blend the colours out.
With my background work complete, I then turned my attention to creating some layers for behind my photo. I gathered some scraps of the Gypsy Heart and Dreamer papers and added them behind my photo, tucking in a yellow paper doily from my stash as well. I also added a tag that I cut and the you brighten my world tag sticker from the Accessory Sticker sheet, both tied with twine.
For the fussy cut element of my page, I couldn’t go past using the stunning floral print from the collection – Abundant. I cut three pieces from the paper, tucking each of them under the edges of my photo to form a triangle around it. I also added the live a colourful life sticker along the bottom edge of the photo.
By now I needed to tick off a few other items from my criteria list, as I only had one in place so far. I grabbed a flair button from the Flair Button pack, adding it on top of the floral cluster to the left of photo. The next element I wanted to add was the chipboard element, so I chose a few pieces from the coordinating Chipboard Accent Sticker sheet – a couple of small hearts and the beautiful pink moth.
For my title, I knew exactly what I wanted it to say, so I grabbed the ‘Happiness’ Die Cut Titles pack and chose the words life is beautiful. To complete my title I fussy cut a mess from one of the cards on the cut apart Boho Bitspaper, then mounted all the words down along the right side of my photo.
I finished off my page with a scattering of sweet enamel shapes (hearts) and a splattering of some navy mist. I was so happy with how this pretty page turned out!
If you haven’t joined the INSD group yet, you can find it on Facebook HERE. There are still a few days left to enter the challenges, plus there is also a free online class from Zoe you can access (including a printable digital kit); process, live scrap and instructional videos from different members of the team; and plenty of inspiration as well, of course.
Thanks so much for stopping by today so I cold share this with you. Until next time, happy scrapping!
Hey everyone, its Raquel here with you today sharing a layout that I created using the free printable INSD kit and free live online class that Zoe did last Friday night. Zoe’s class was created in a 12×12 size and inspired by these home days in isolation. I was so motivated to create a page using the page design and kit as a base for an 8.5×11″ size layout.
Here is the layout that I created:
I created a process video to show how this layout came together, you can see it here:
The layout features two photos of my kiddies taken recently during our home learning. We are going onto our 7th week of isolation here in our household and are currently home learning. Our school has an amazingly supportive program for these two kiddies, but being 5 and 7 they of course need constant support to complete set tasks. Getting used to this new normal and Mummy as the teacher has been new for us all. While supporting my kiddies to learn, I am also a Foundation school teacher so as well as supporting my own kiddies I have a class of 19 to work with as well. To say its been a juggle is speaking lightly. I am very much looking forward to life resuming to normal and everyone being safe and healthy as I am sure we all are.
The photos are printed on my home printer (an Epson picture mate) and in black and white. Printing in black and white allows any colour palette to use. I will often print my photos in black and white if my photo is very busy with a lot of competing colours. The page kit itself had four approx 3×4″ cards in the printables. These cards were designed to act as photo mats. I used them for the same reason and was able to double mat my photos with what was included.
What I loved about the page kit was the paper strips were already designed to a length and width. Being a smaller layout, I was able to trim these narrower and shorter and still get the desired effect. I machine stitched the strips to the page and was able to curve the ends inwards to create dimension.
The page kit also came with a page of ephemera pieces. I am sure if you are tech savvy there would be a way of print and cutting these with a die cut machine. However, I simply took mine to the couch while I was with my family and fussy cut them out with some precision tip scissors.
I adhered the clusters with a combination of clear glue dots, liquid adhesive and adhesive foam squares. I love the multidimensional look the varying adhesives brings to a page.
I did add a couple of products from my stash to this page, but they were minimal. One thing I added was a piece of pink patterned paper from the ‘Make a wish’ collection to frame the whole layout in. I felt that the layout needed a border to ground it. I also machine stitched around the border. The other thing I added from my stash apart from white cardstock was the wood veneer pieces, they were from both the older collection Free Spirit and Colour me Happy. I had forgotten that I had them in my stash and were a surprising and welcomed addition to help complete this page. They added that finishing touch that I was after.
The digital kits intended title was ‘home life’ however because I work in a smaller size I felt like it was too overpowering. I was happy to find the memories wood veneer piece to finish my title area. I used the tag in the kit to layer my typewritten journaling onto. I didn’t go into too much detail of the whole home learning experience but plan to on future layouts to document this unprecedented time in our lives. The little bow with the crochet thread added that nice finishing touch to the tag and element of journaling.
I hope that you got to join us, the CVS team in the INSD weekend celebrations. It was so much fun with lots of challenges and inspiration shared.
Hey Creative friends, Gwen on the blog today with some more scrapbook inspiration. I have a special share for this one using the new ‘Legendary’ collection. It’s my sisters birthday today, so for this page, I really wanted to create a page for her and her fur-baby. I won’t be able to visit her for her birthday this year, so I thought this would be a nice way to help her feel special today.
For this page, I started with the ‘Wild One’ pattern paper as I really wanted to add some colour for this page. I’ve used it as a frame for my layout and also to back the cut file banner here. This cut file is part of the set that was designed by CUT to YOU for the Legendary collection and is available for FREE download here. If you don’t have a cutting machine, CUT to YOU offers a cutting service and ships worldwide. I’ve resized the banner piece as large I could to make it a background feature and used it as an anchor for the other elements in my page.
I’ve also used the ‘Off Beat’ B-Side pattern paper on the banner for contrast. For my photo, I’ve gone with a double mat, using the A-Side of the ‘Off Beat’ pattern paper and the pop of yellow from the B -Side of the ‘Wild One’ pattern paper. **Design Tip – I’ve only used 2 pattern papers for this page, but it looks like more because I’ve made sure to include and A and B sides of both.
With my large banner cut file centred on my page, I decided to offset my photo, pushing it slightly to the right. To balance out the page, I’m going to add my embellishing to the left. For this, I’ve gone with elements from the Die Cut Ephemera pack, starting with the largest elements first.
I’ve decided to go with the ‘Adventure Awaits’ Banner piece which mirrors the cut file shape and also doubles as my title. I’ve also added in some of the round elements from the die-cut pack for interest. I’ve added these into my layers. It was at this point that I wanted to add some more warmth to the page. To do this, I’ve dug deep into my stash and found some vintage ‘Life is Beautiful’ pieces of wood veneer. These are long gone from the store, but you could use any wood veneer you have in your stash to replicate this look.
With the larger embellishment pieces locked into place, I’ve gone back and added in some smaller details such as the die-cut stars and some typed sentiments from the ‘Accessory Sticker sheet’. I’ve also added some enamel dots from the collection as well as a sprinkling of sequins from my stash and called the layout complete.
I had a lot of fun making this page for my sister, I hope she likes it! I hope it has inspired you in some way. If you haven’t seen the new ‘Legendary’ collection, it’s shipping now from a store near you so be sure to check it out.


 I found a really lovely cut file designed by fellow team member Gwen from Cut To You, I cut it out from white cardstock and then backed the hearts at the top of the cut file with the pink side of the
  I chose the ‘B’ side of the
 I tucked in one of the cute die-cut frames from the die-cut ephemera pack into the top of my photo, I then took one of the paint strip clear stickers and added it to white cardstock, I then fussy cut it out and tucked it into the right side of my photo. I also added one of the cute flair buttons here. The jar and flower chipboard piece fit perfectly there just above the ‘You’ in the cut file, I love how this looks here. I also tucked in one of the floral die-cuts to the left of the jar to bring in some more of the florals to the page. I also added a few chipboard hearts and also a clear sticker heart too. Lastly I added some of the accessory word and phrase stickers and the date stamp to finish off!
 I have used a fun cut file from Silhouette Design store, I chose it so I could use more of the designs on one layout.
 I then added my photo and again with foam to create more height. I chose to create an embellishment cluster around my photo, using the
  I used the accessory stickers to add my subtitle/journalling.
 I have used more foam tape to add die cuts to create more height and added some
  I love all these colours together but because I didn’t want my layout to look ‘too’ busy I was careful when it came to my embellishing.


 What I loved about the page kit was the paper strips were already designed to a length and width. Being a smaller layout, I was able to trim these narrower and shorter and still get the desired effect. I machine stitched the strips to the page and was able to curve the ends inwards to create dimension.
 I did add a couple of products from my stash to this page, but they were minimal. One thing I added was a piece of pink patterned paper from the ‘Make a wish’ collection to frame the whole layout in. I felt that the layout needed a border to ground it. I also machine stitched around the border. The other thing I added from my stash apart from white cardstock was the wood veneer pieces, they were from both the older collection Free Spirit and Colour me Happy. I had forgotten that I had them in my stash and were a surprising and welcomed addition to help complete this page. They added that finishing touch that I was after.


