Hello crafty Paperlovers, Welcome to the Cocoa Vanilla Studio Blog today! It’s Josefine here showing you a new scrapbook layout that I created with the beautiful collection Sunkissed. I am completely in love with this beautiful summer collection. Definitely one of my favorite collections ever!
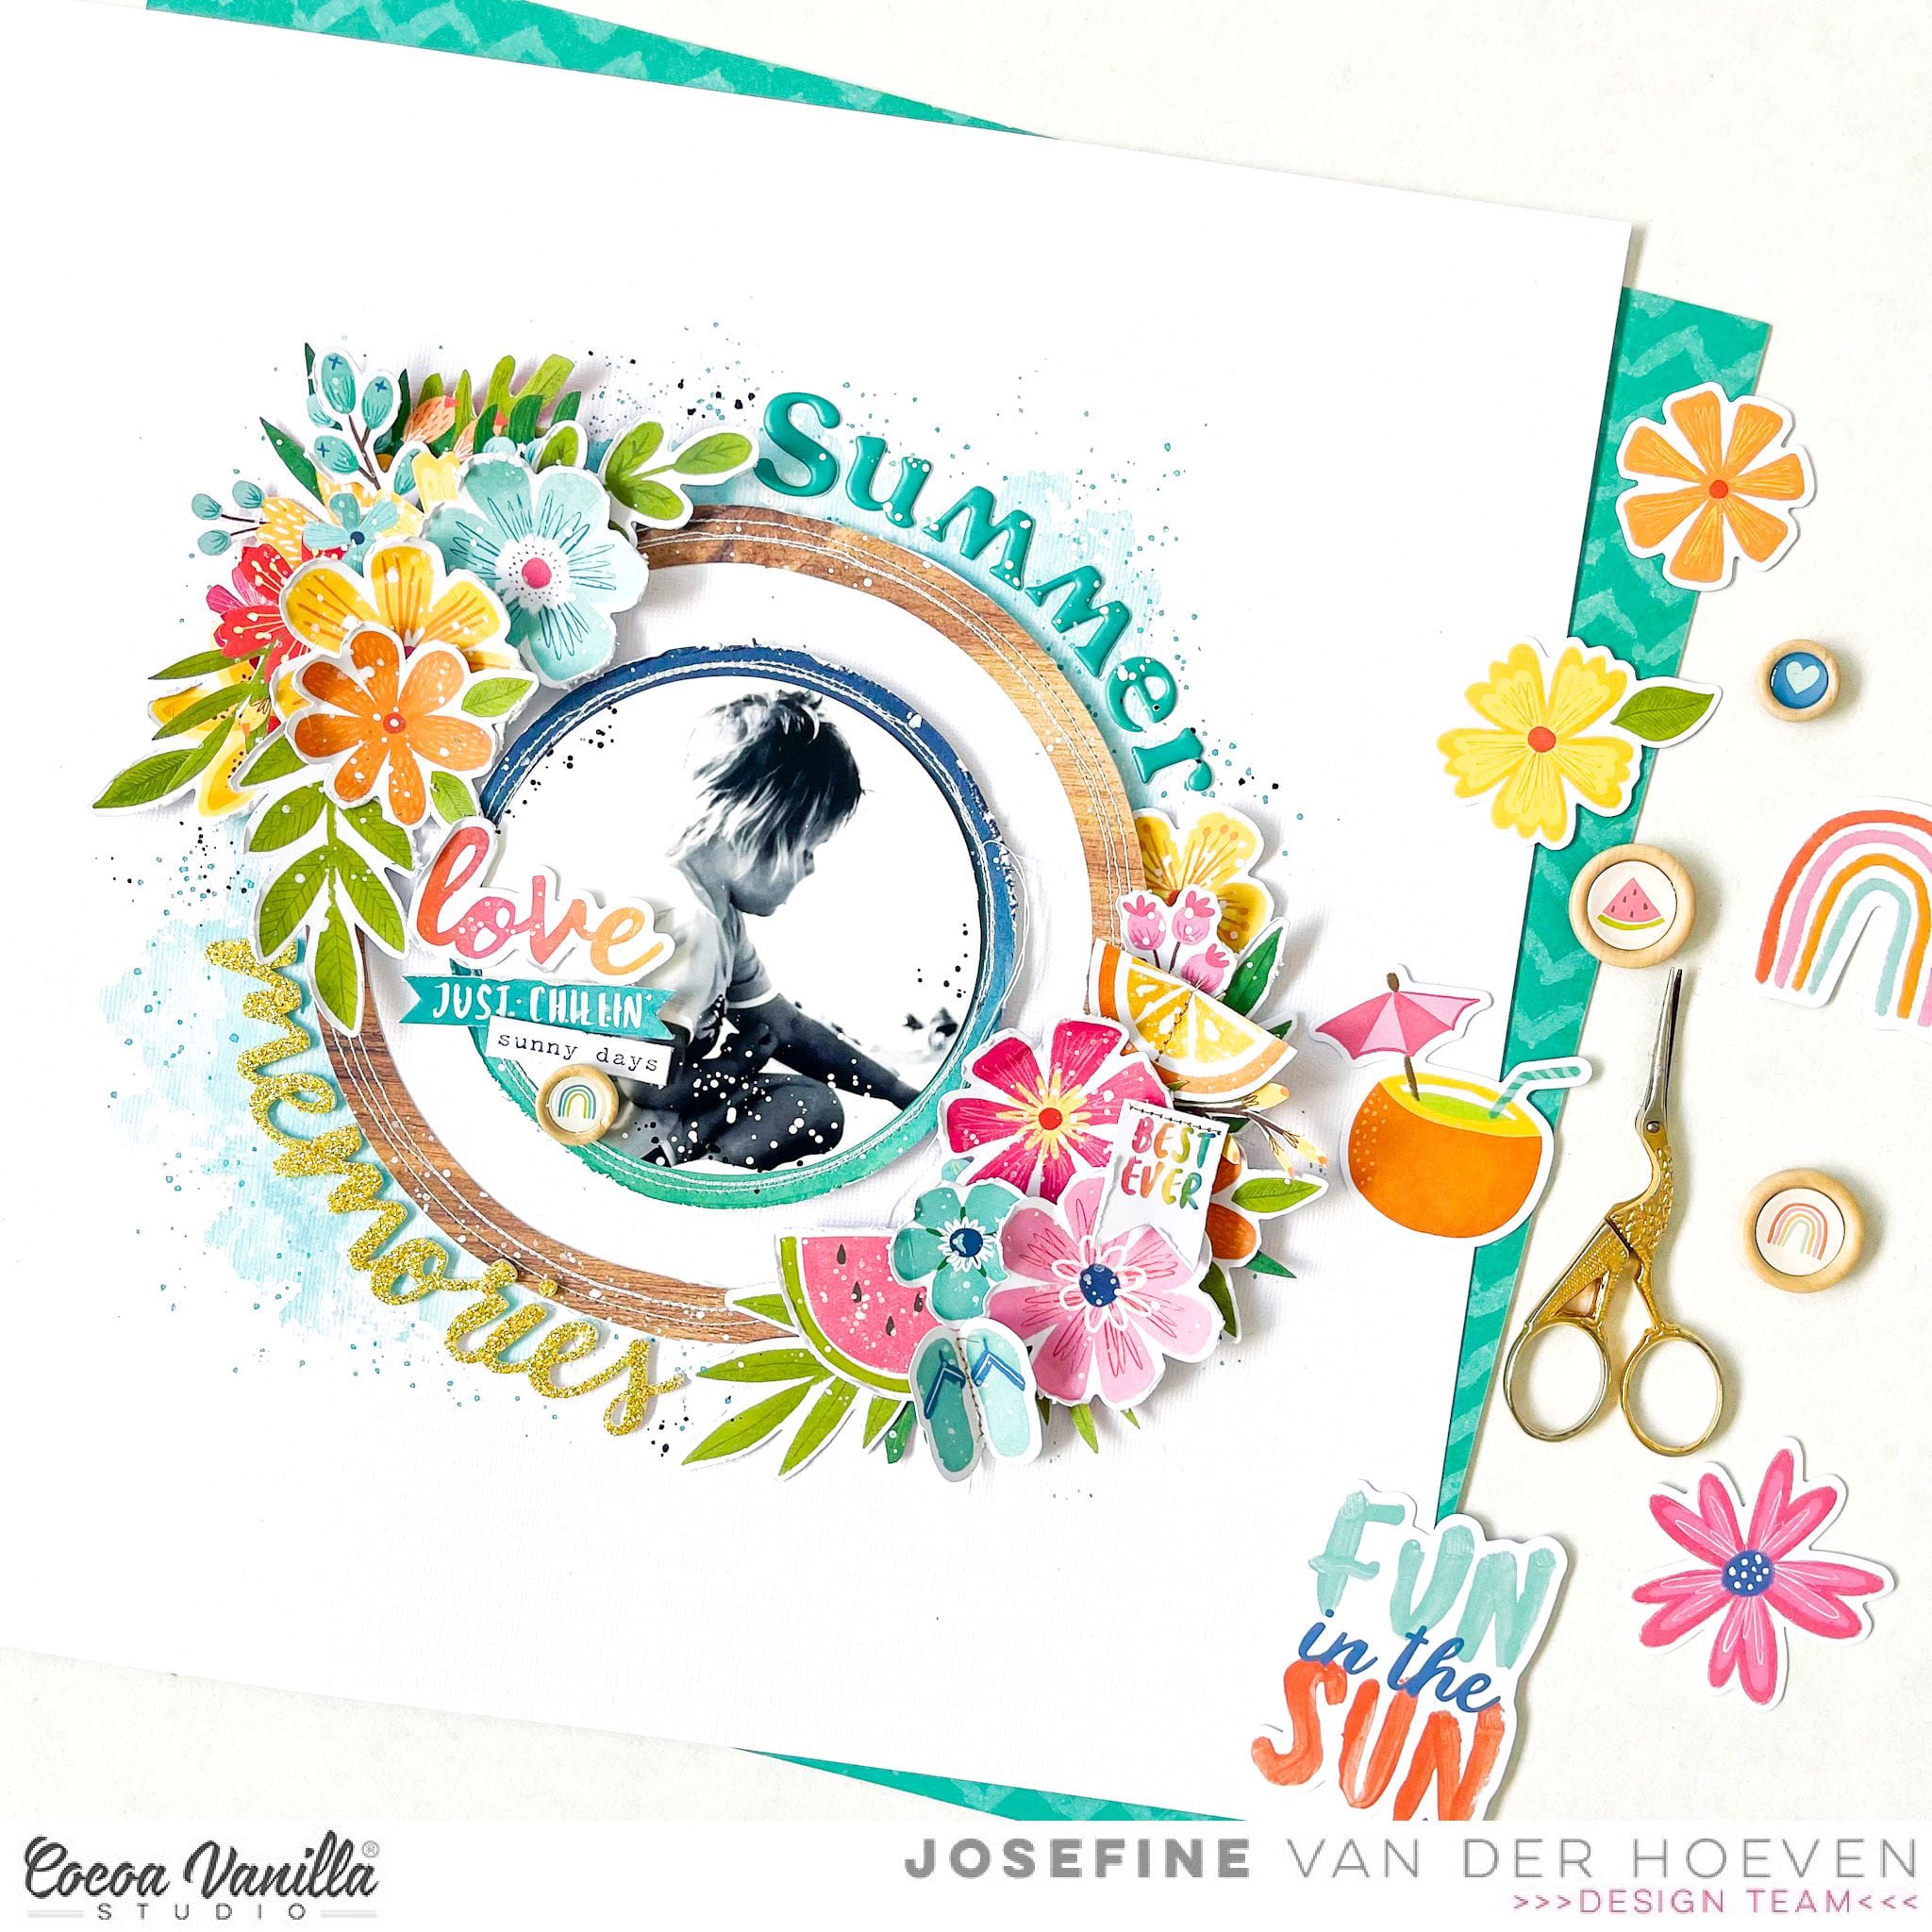
I love circles layouts and wanted to create a circle layout with this beautiful summer collection. I cut out a circle border from the wood grain design paper of the Sunkissed collection and I cut out a circle from the blue/green colored design paper. Both circles I stitched with white sewing thread. I place these circles in the center of this page. I placed my photo on top of the circles in the middle. Around the edges of the circle I stamp several times with the distress oxide and make some mixed media splatters. The color I used is “broken china”.
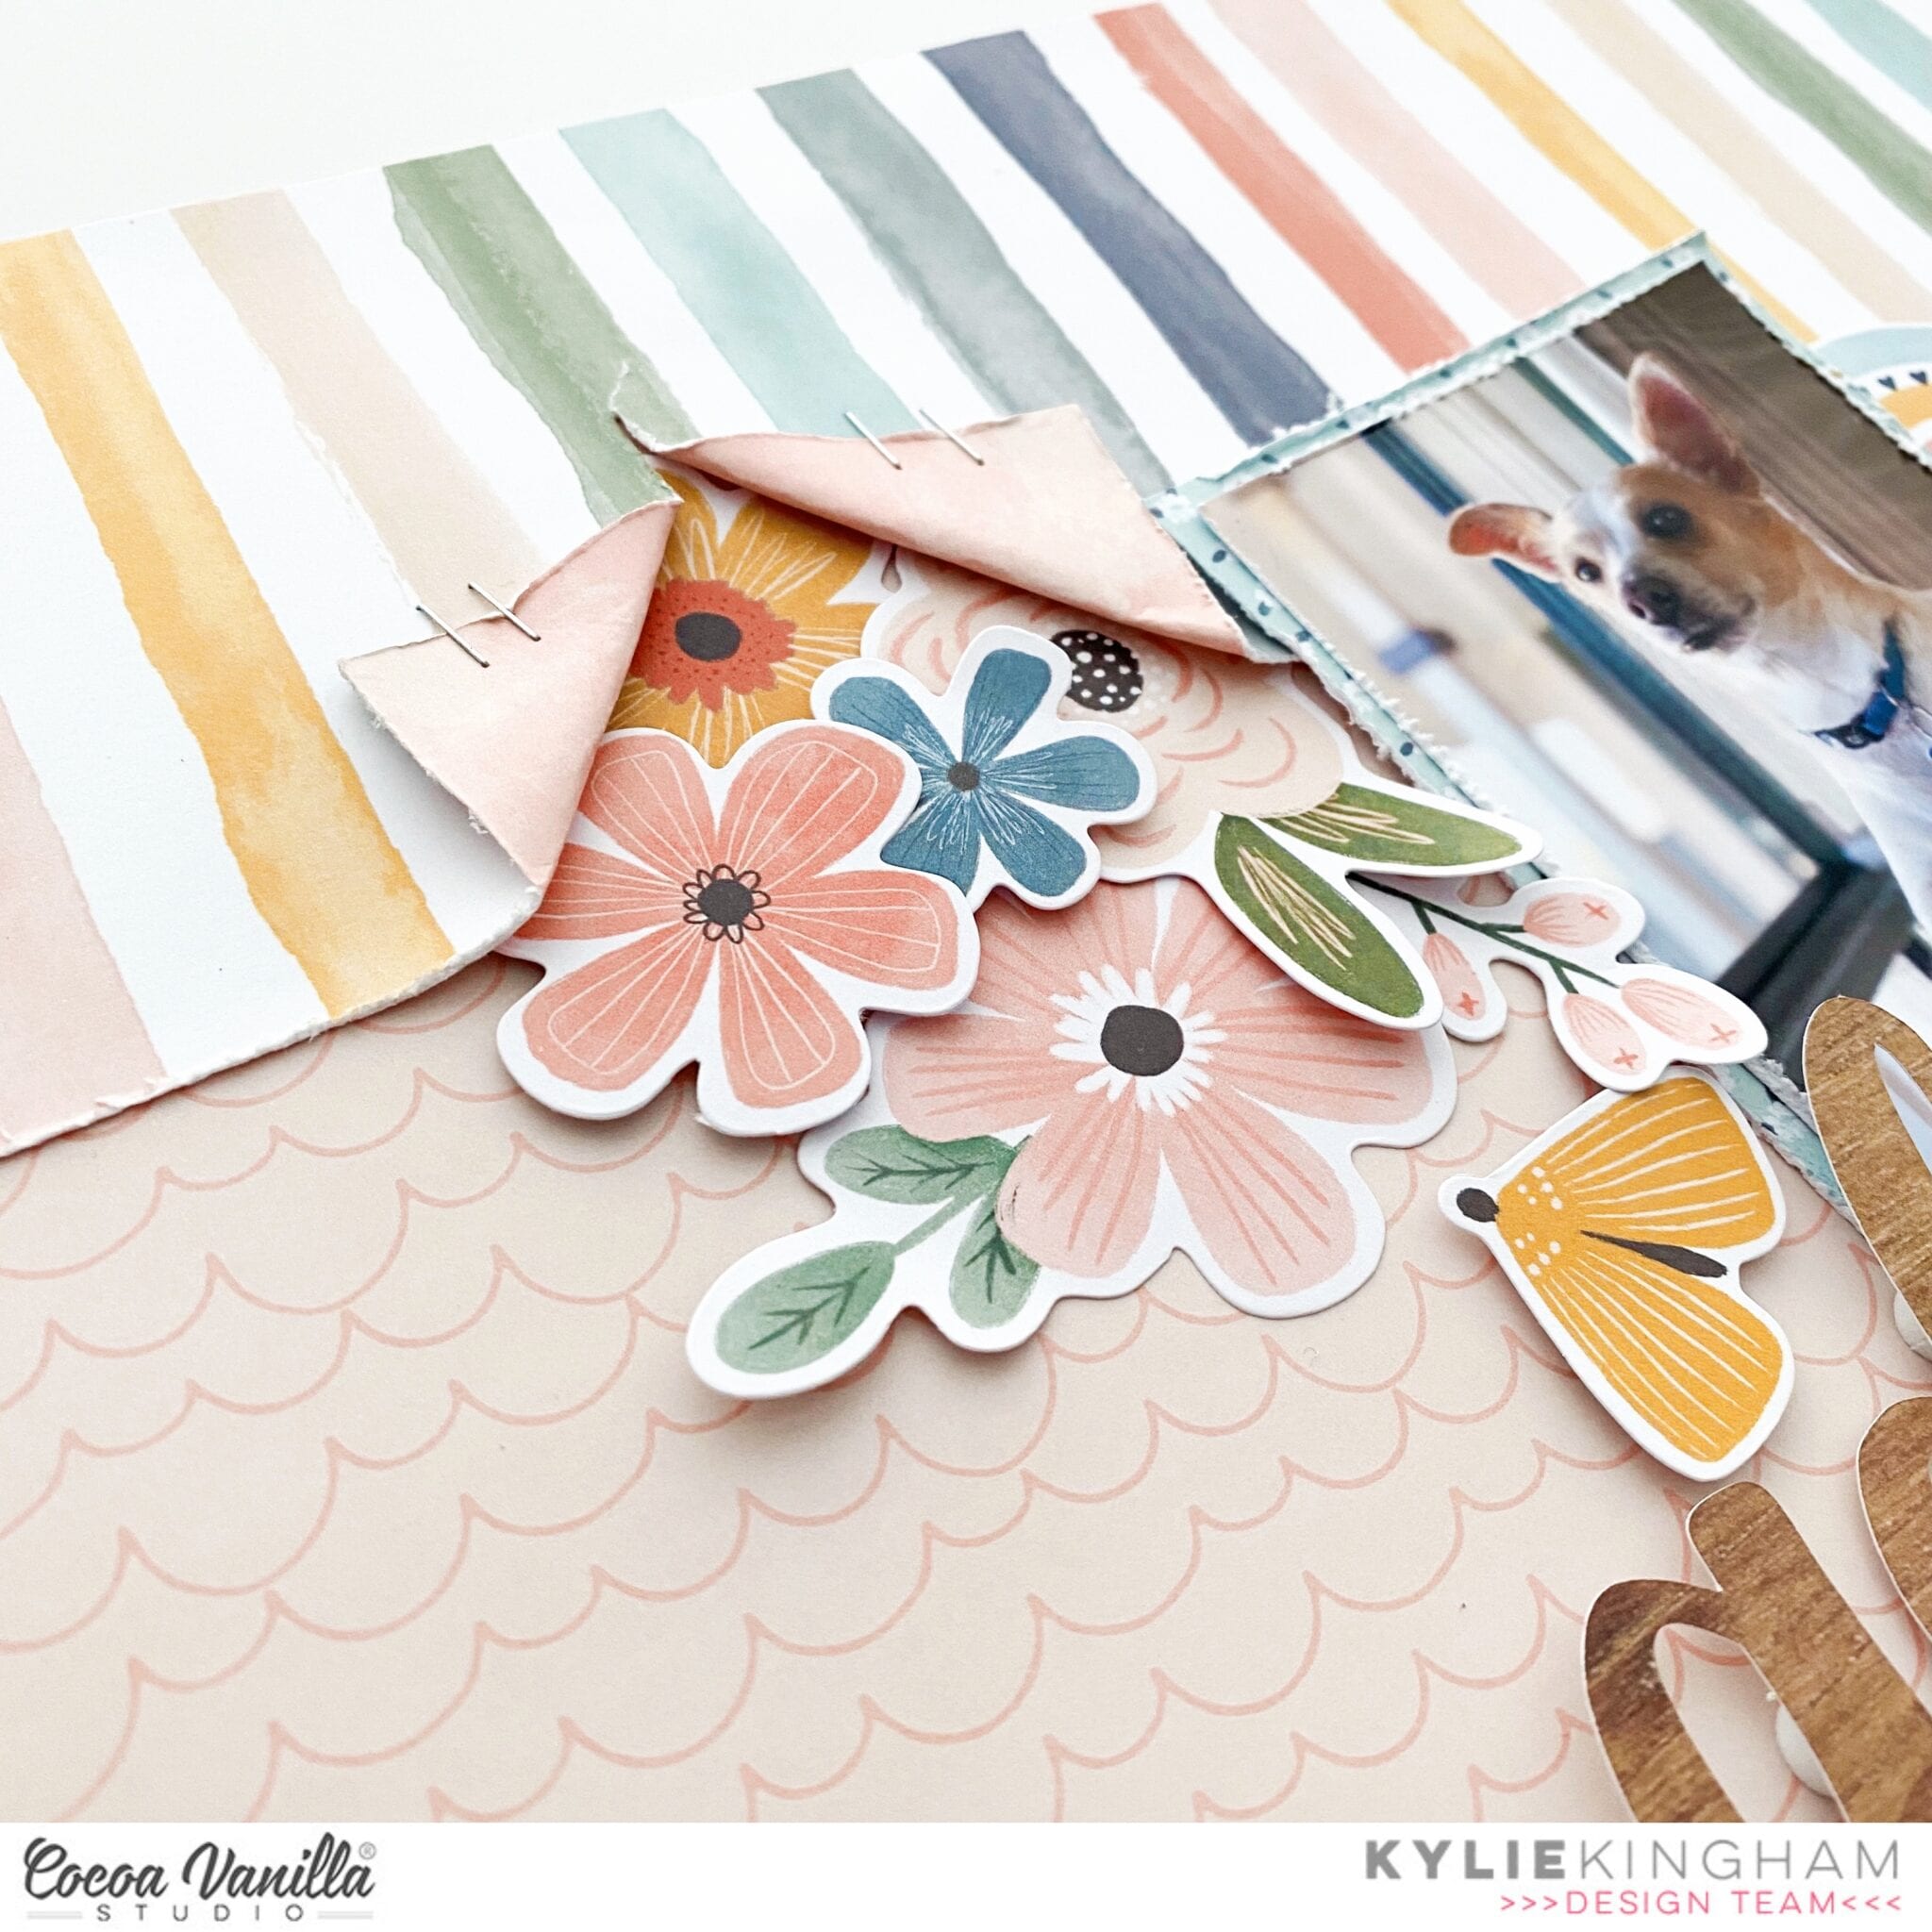
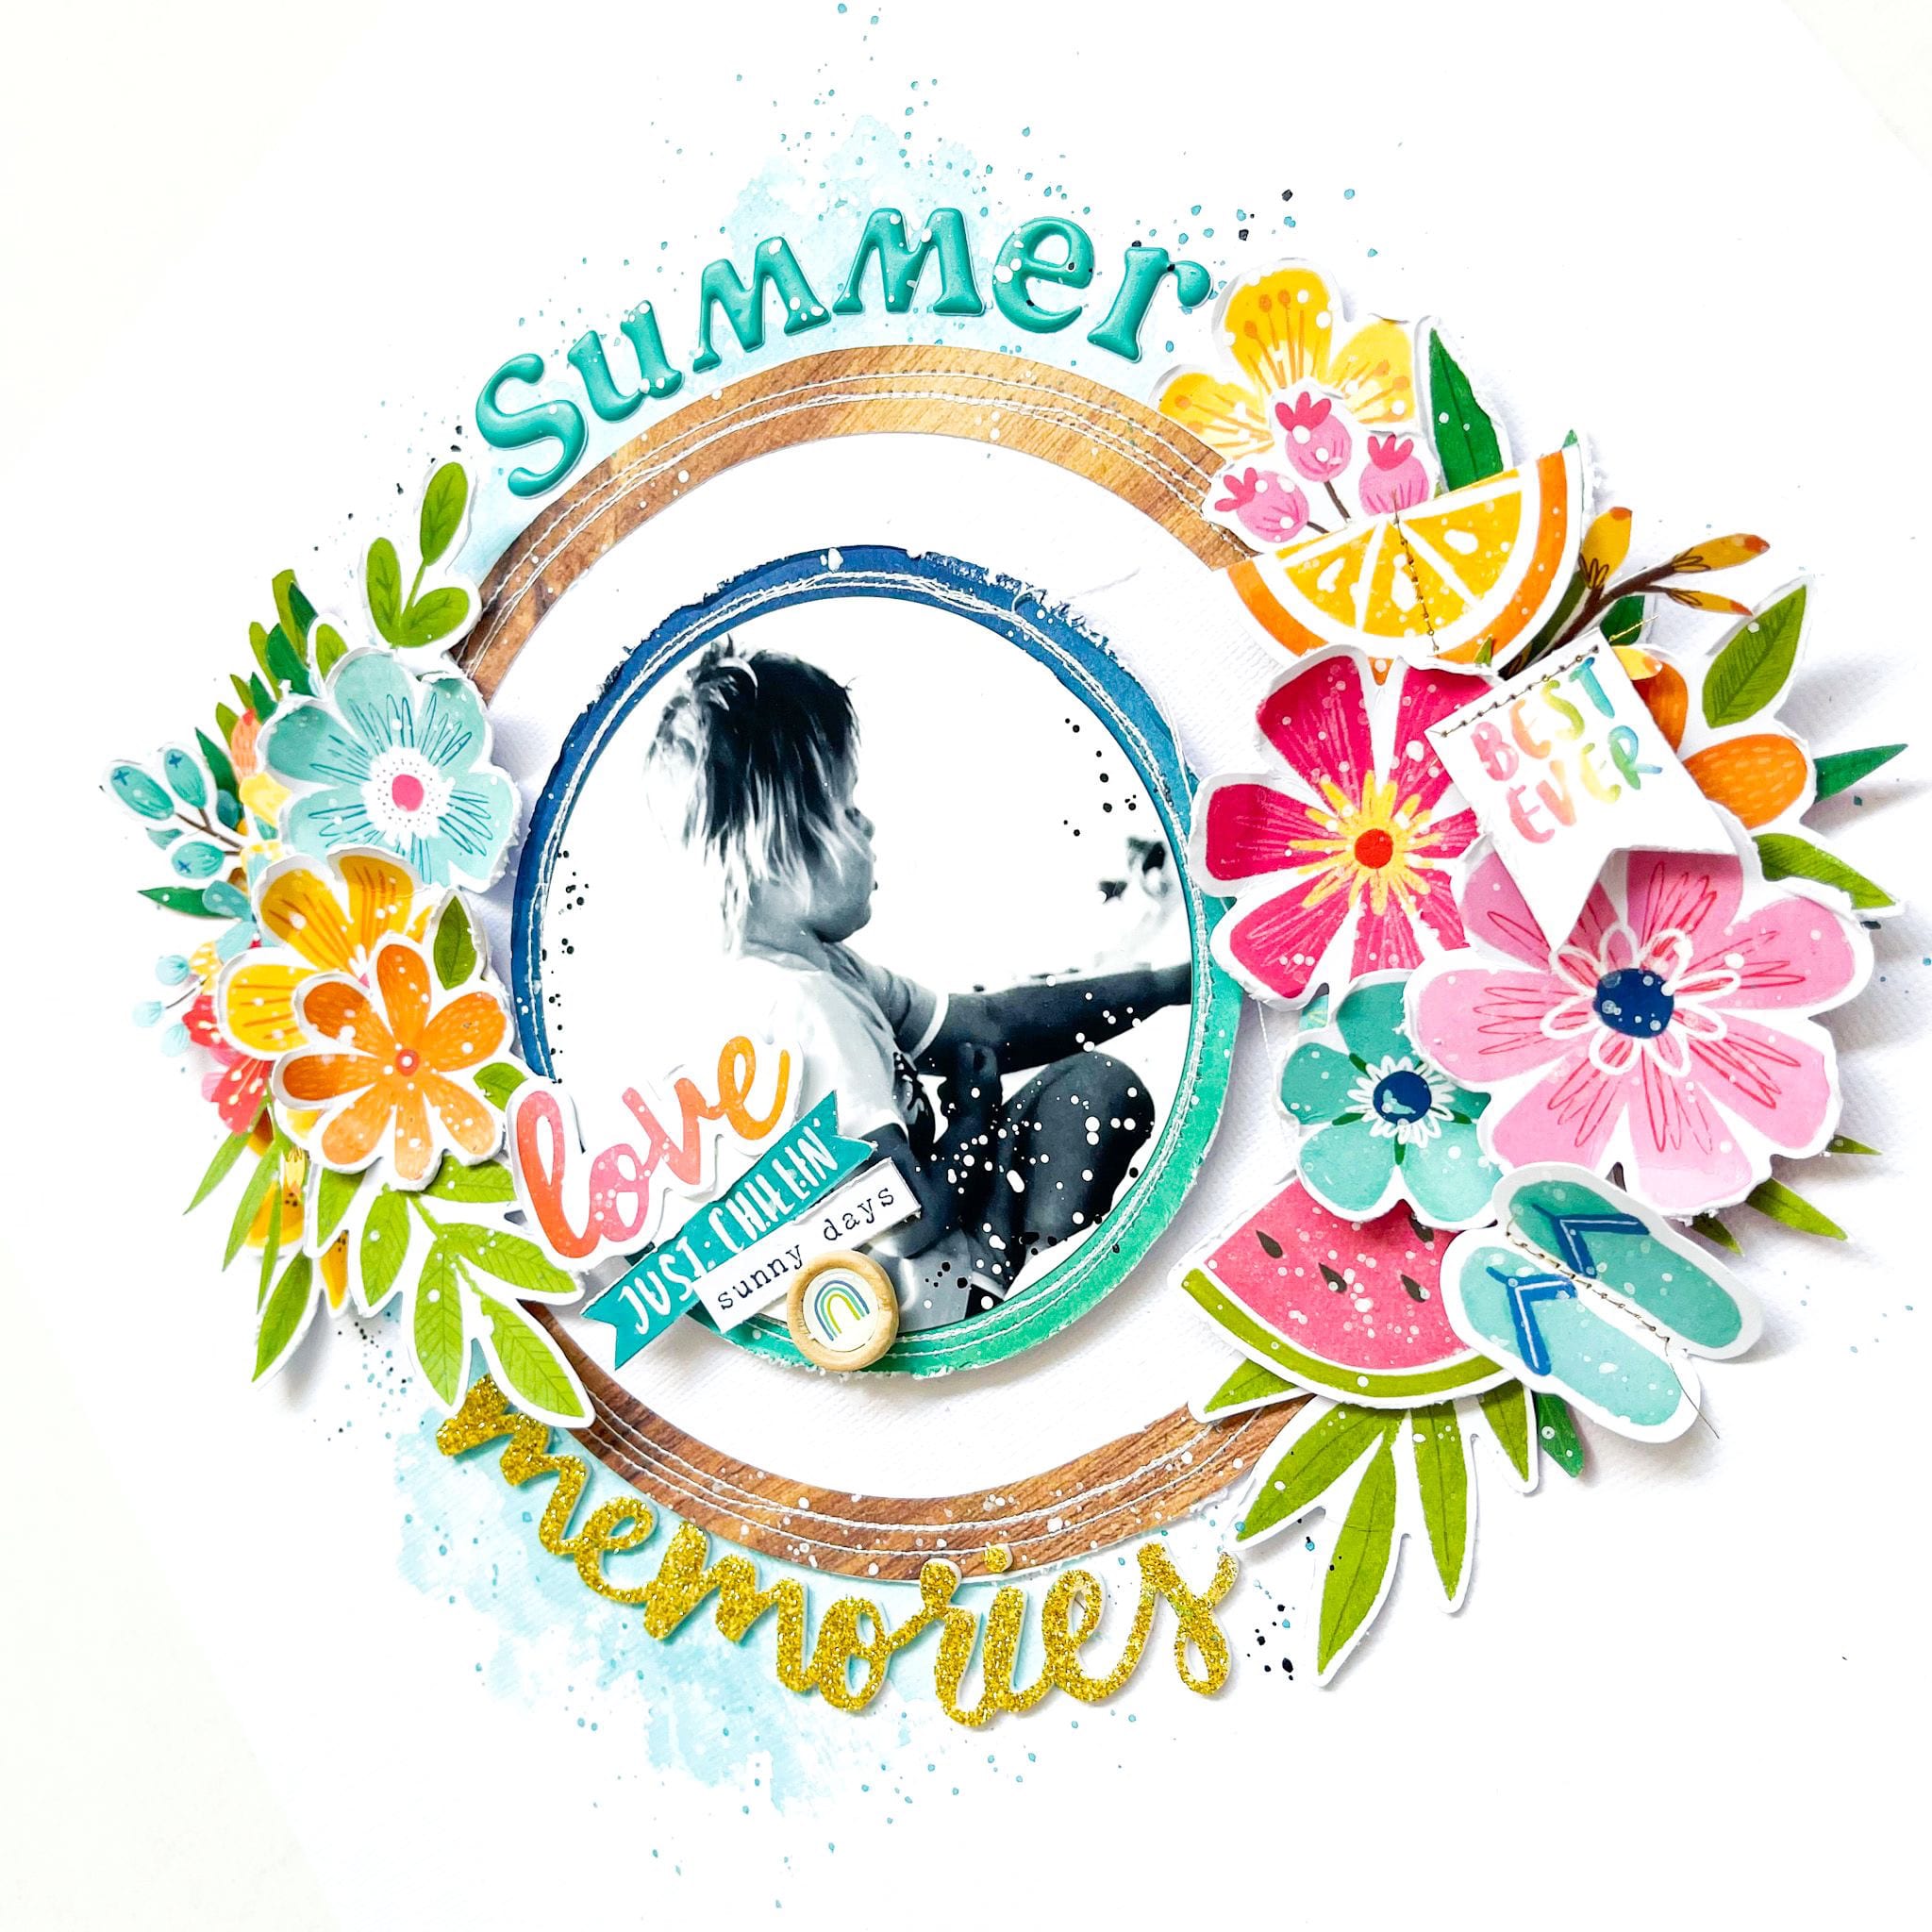
I selected some flowers, die-cuts and stickers and make a cluster on both sides of the circle. I used the gold glitter puffy word ” Memories” and placed it under the circle. I also choose an aqua colored Alpha set for the word “Summer”. My title for this layout will be ” Summer memories”.
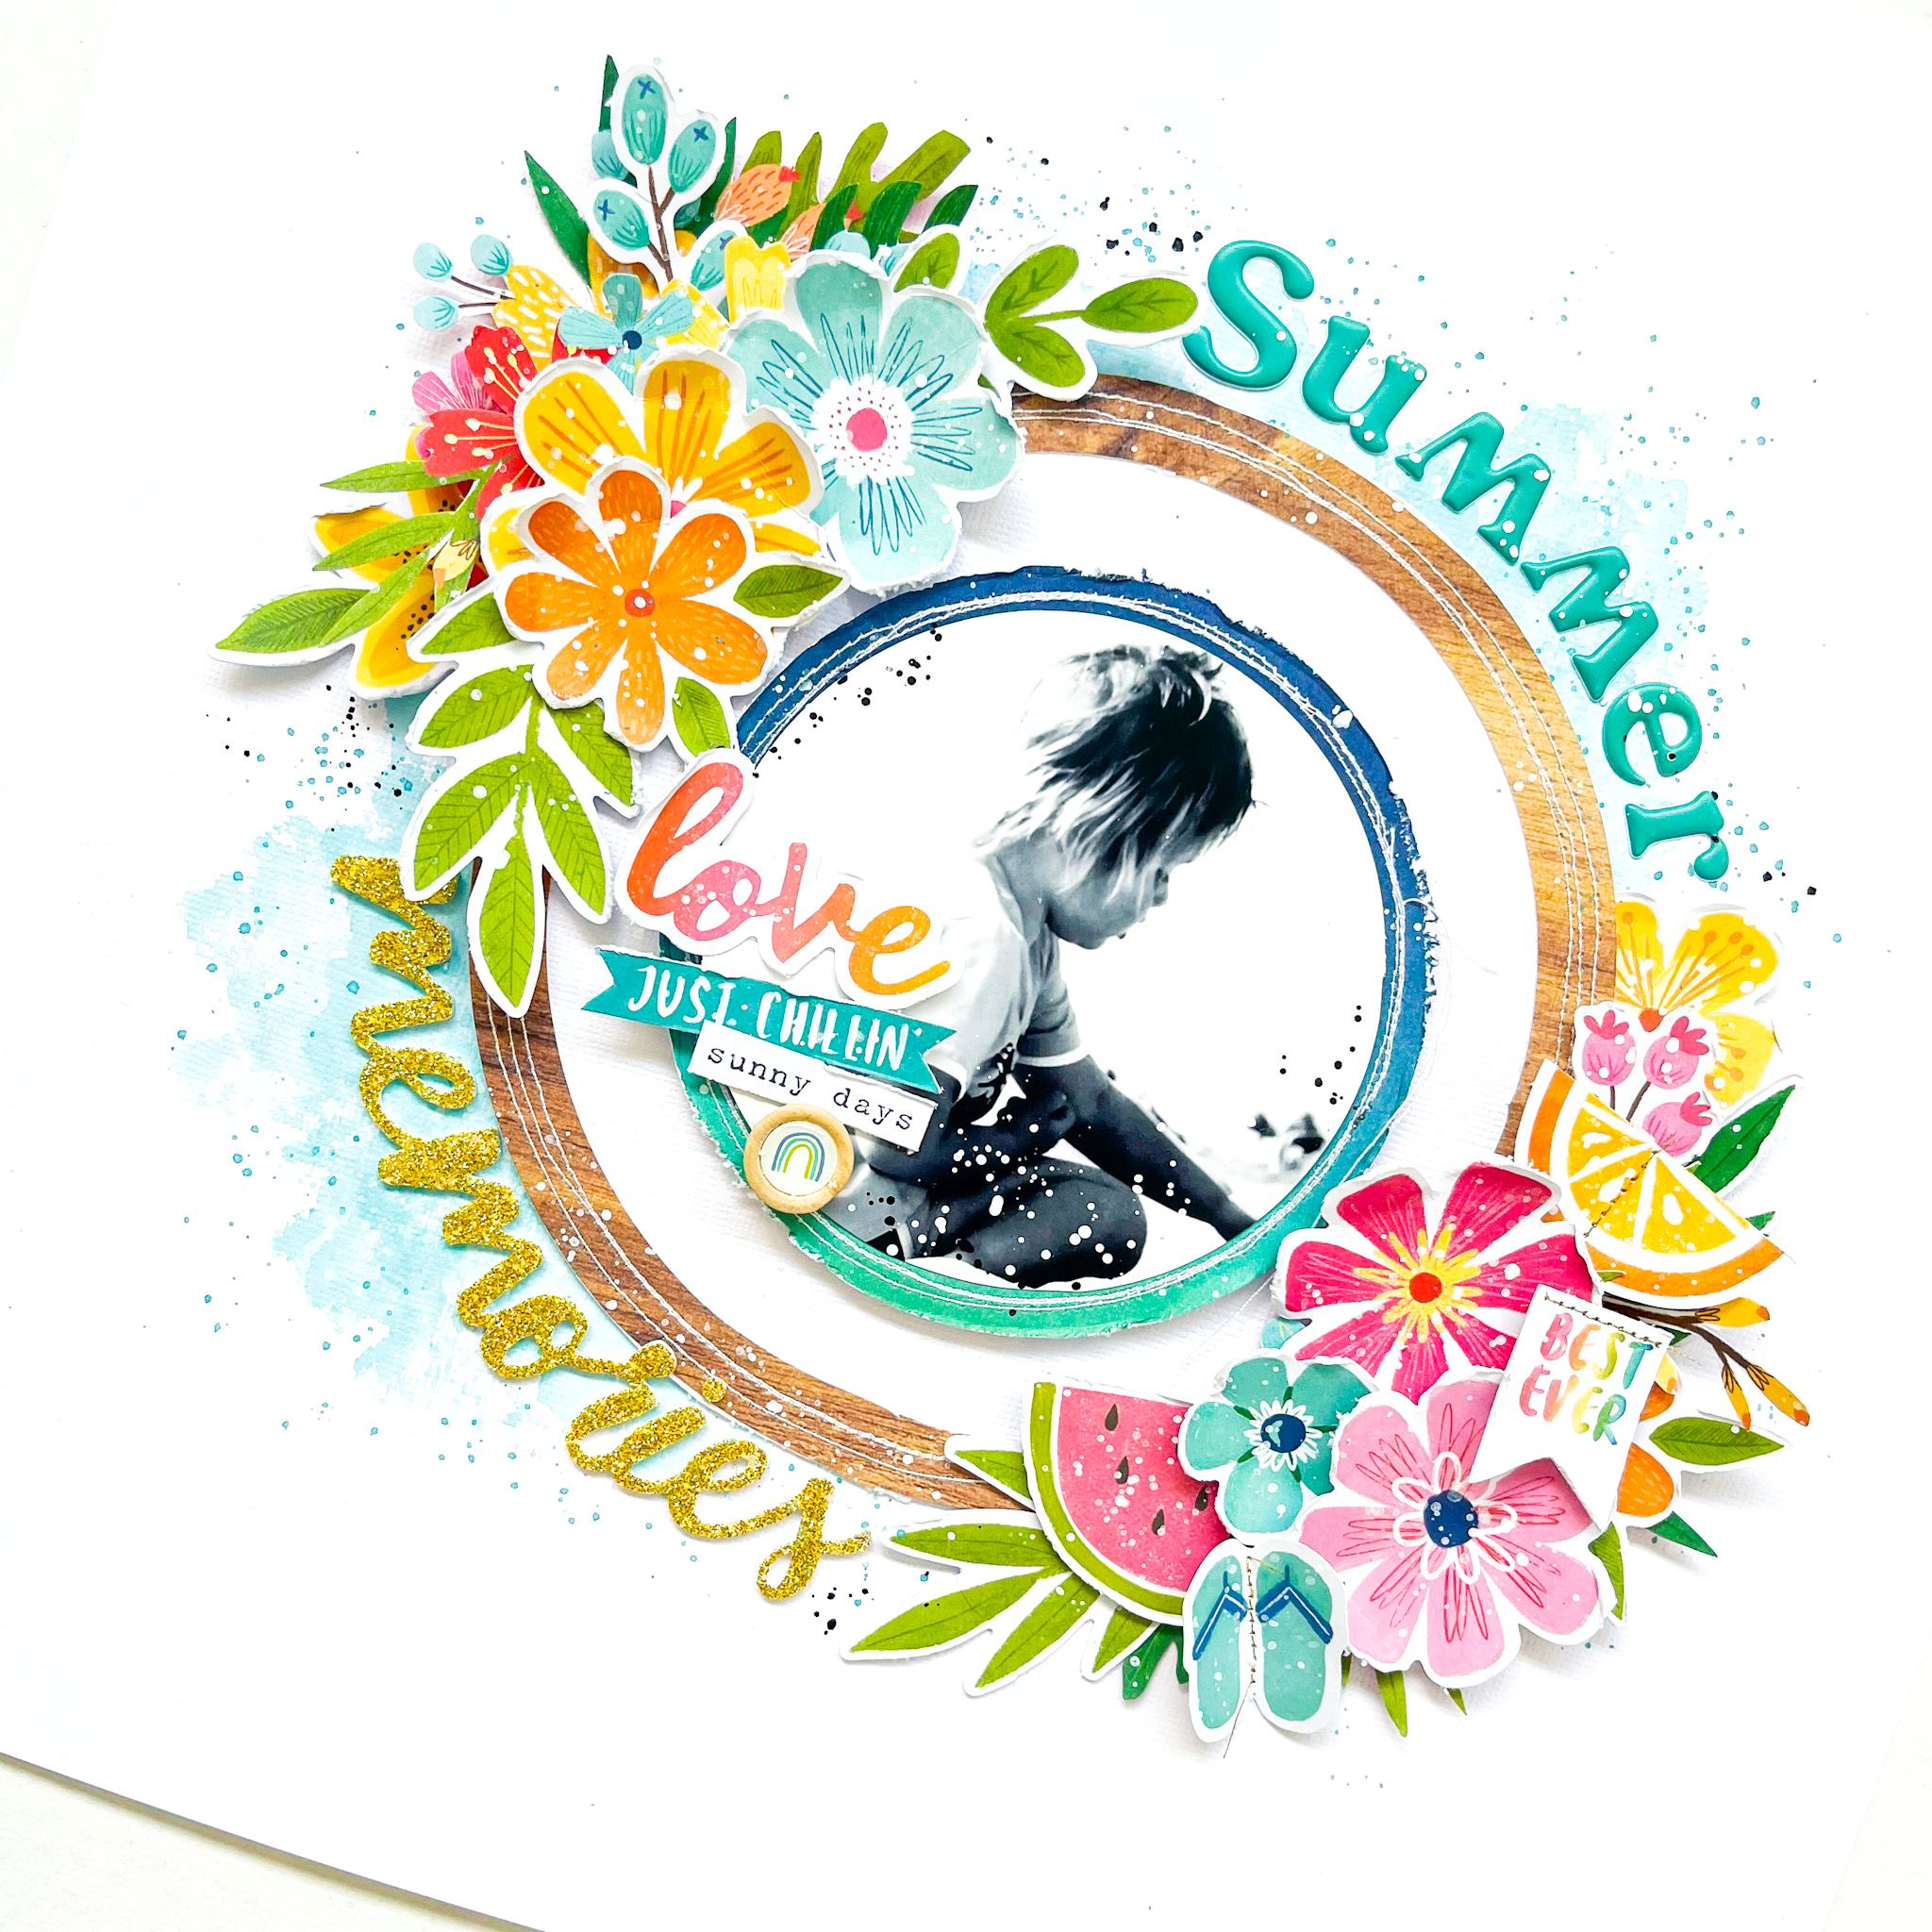
I have decorated different die-cuts with gold sewing thread. On top of the picture I placed some die-cuts and word strips. Of course, I also used a wooden button on this layout. I choose to keep this page clean and simple. Now t’s time to add some white and black acrylic paint splatters and use my brush for this. These splashes make it so festive.
I am very happy how this scrapbook layout turned out. I hope I was able to inspire you with this summer layout. I looking forward to seeing your beautiful creations with this awesome summer collection! Wish you a beautiful and crafty day! XoXo, Jo
Hello Hello! It’s Michelle here on the blog today with a brand spankin new layout share that features our amazing NEW collection – These Days. Love Love LOVING the soft colour palette and all the pretty patterns within this collection. Its perfect to mix together within a grid style layout like I have done, which some of you might say is very similar to one I’ve made in the past. You’d all be correct as its the newest addition to my yearly themed layout of ALL things Leila.
For those who aren’t quite familiar with what I’m talking about, heres a look at the previous 2 layouts I created in past years using the same layout design, same design techniques and recording the same details as years past. I’ve done this so in years to come we can look back on all the fun things that Leila loved each year, and its an easy way to simplify scrapbooking when you just want to document memories quickly.
You can find last years post HERE , the previous 3 years were not shared on this blog.
The main focus of this layout is to share Leilas current favourites at the same time each year, along with a current photo. However, this year has been a little hectic and It skipped my mind to get it done scrapped so its a couple months later than usual.
To start off the layout I grabbed the a5 paper stack and flipped through to fins 6 complimentary pattern papers to create the grid background. I sewed around each piece using machine stitching adding a couple of extra detailed stitches in random places. Next up I worked on creating the list on a ‘clip board’ using some scrap notepaper and adhered to the woodgrain pattern paper from the a5 paper stack. I’ve used the fancy new black foam title stickers as a title and added mini puffy number stickers from the new mini puffy alphabet set for her age plus a cute little puffy house sticker and gold heart to bring the B&W photo and list together. I used the rainbow watercolour stripea5 paper as a base for the photo, tucked in a label tab from the ephemera pack, created a mini floral cluster of both ephemera and fussy cut florals (Home Grown paper) and added a few accessory word stickers to finish off this area of the layout.
At the top left of the layout I created one magical cluster of ephemera pieces, wood button, puffy heart sticker, wreath from the Good Life cut apart paper and foam leaf from the foam title stickers pack.
I replicated a similar cluster at the bottom right using more ephemera, wood button, florals and foam leaf strand.
At the top I added a couple of banner flag pieces from the Good Life cut apart paper.
Lastly a close up of some of the messy stitching, oh so slightly distressed paper edges and a sprinkling of gold colour shine to finish it all off.
Well friends thats all from me today. Thank you so much for stopping by and seeing my super quick simple hack to document the things you don’t want to forget. It doesn’t always have to be all the pretty/cute photos that get scrapped, sometimes all you need is a simple photo of them doing what they love, and adding a list of all the other things they love.
Hello everyone! It’s Kylie with you all today and I have another new layout design to share with you all. The theme this week on the blog is ‘An Everyday Moment’. So to document and scrapbook something that happens from your every day. I’ve decided to scrapbook a photo of my sweet little pup- Maximus Decimus Meridius…..or Max for short. (We adopted him as a baby and named him after the Gladiator. He may be small but he is mighty!) Do you like to scrapbook your pets too?? I really need to start creating more pages of little Max. I had this photo of him that I took recently, doing his favourite thing! Laying on his blanky on the top of the lounge, under the heater and watching the world go by outside. He loves to do this for hours on end each and every day!
For my layout I have used the beautiful DAYDREAM collection as well as a gorgeous title cut file by Cut To You. The HAPPY PLACE paper was used for the background and I used the OVER THE RAINBOW paper to cut out the cut file. Once the cut file had been cut out and backed, I adhered it to the background using foam adhesive tape.
I added a 3-4 inch strip of the STEPPING STONES paper to the top of the background page and tore into the base line just a little. For a rustic effect I folded the tear back and stapled each side. I was then able to begin tucking and layering some of the floral die cuts from this point.
My photo was printed to a 3″x4″ size and back with the DAISY DAYS paper. It was added to the top of the title cut file with more foam adhesive tape. Once in place I worked really hard to ensure my page kept a nice balance of accents. More die cuts were added behind my photo as well as below my title. To finish, I added a short sub-title phrase to suit my photo from the cardstock sticker sheet.
I hope you have enjoyed seeing my latest page design today! Until next time,
It’s Tarrah back with you today to share a new layout focusing on an ‘Everyday’ theme and featuring the gorgeous Unforgettable collection!
When I think of ‘Everyday’ I think of myself with my immediate family – my husband and our 2 sons. It’s not often we get photos together so I take the opportunity when I can! I took a piece of the teal and white stripe paper and trimmed it to measure 8′ x 12′ I then cut it to measure 4′ x 12′ and then cut this into 3 pieces to measure 3′ x 4′ rectangles.
I bent the edges of each piece and adhered them in the centre of the small text patterned paper. I trimmed the small text paper down so that I could mat a pink piece of 12′ x 12′ paper behind the entire layout. I adhered my photo slightly to the left of the layout and in the centre.
On the right of the photo, I added the Everyday sticker from the accessory sticker sheetpopping it up using foam dots for dimension. The sticker formed the first part of my page title, the second part of my title is the word ‘Stories’ from the Foam Title Stickersthat I placed under my photo. Also on the right I tucked in some floral ephemera, a foam black heart and a die-cut heart and an enamel dot.
On the left I tucked in more ephemera including the camera, some tickets and some more enamel dots. I also added one of the gorgeous flair buttons here too. Lastly I added a few small things including some phrase stickers, dropped a few sprinkles of mist and stamped the date stamp.
Thank you so much for stopping by the Cocoa Vanilla Studio blog today! I hope you enjoyed my layout as much as I enjoyed creating it?! The design of this layout is easy to recreate yourself using any of the amazing Cocoa Vanilla collections!
I had the idea of using one of my favorite papers of the collection, ”Just Chillin” on the wood grain side and create a frame on my layout. I cut four strips of this beautiful paper with 45 degre angles on each end to create that frame. I added adhesive foam in the middle of each strip and adhered them together in a square shape. It gives the effect that each strip is curled a little bit, mimicking a wooden frame. I added a few hand stitches with yellow embroidery thread to each corner of the frame, and centered it on the gorgeous “Good Vibrations” paper.
My photo is from a typical summer day at home where my dog Fiona likes to jump in the pool endlessly !
I used a thick white cardstock inside the frame and added numerous multicolor watercolor splatters on it.
I backed my photo with tissue paper and adhesive foam. I teared a portion of a pocket card to write down my journaling.
Hey Creative Friends, Gwen back on the blog today with another share for Cocoa Vanilla Studio. I’m using more of their new ‘Sunkissed‘ collection to document a sweet photo of Miss C from a few years back.
To start the page, I’ve backed a cut file, this one from CUT to YOU with pattern papers from the A5 Paper Stack. The smaller prints in the A5 papers are ideal for this and I love how there are a couple of exclusive prints in the pack.
I’ve backed my photo with the ‘Sunny Days‘ pattern paper and used it to create a border around the base of my page. For the background of my layout, I’ve used a piece of pale blue card stock from my stash. I’ve also added here my signature stitching, I just love this detail.
Next, I’ve added my backed cut file onto the layout centred and a little towards the bottom of the page. Then, I’ve placed my photo at the centre bottom. I’ve raised on foam for dimension so it’s now time to embellish.
For the embellishments, I’ve gone with three clusters to create a visual triangle on my page. The main cluster features a sweet rainbow from the ‘Die Cut Ephemera‘ pack and a Sunshine element from the ‘Puffy Sticker pack‘ as well as some floral die cuts from the ‘Floral Ephemera pack‘.
For even more interest on my page, I’ve added in some of the ‘Wooden Buttons‘. I love the texture of these. As I build out the clusters, I’m making sure to have at least one of each of these in each one. I find that when I replicate elements in each of my clusters, it really helps pull the page together.
Here you can see the die cut pieces, a wooden button, puffy sticker and a typed sentiment from the ‘Accessory Sticker Sheet‘. I like to add these stickers with foam tape for added dimension. They really are a great way to round out a page and the sentiments really help to tell the story in the photos.
I’ve also made a YouTube process video for this layout which you can watch here:
Mandy here with you today to share a new layout featuring the beautiful Sunkissed collection. I’m loving using this collection to scrapbook all of our holidays snaps! With overseas travel being off the cards at the moment, we decided last year to spend the money that we’d put aside for an overseas trip on a caravan instead. It’s been so nice to be able to getaway on little trips a lot more often now, and of course you know what that means… LOTS of holiday photos to scrapbook! The photos that I’m documenting today were from our trip at Easter time. My youngest just loved spending time at the beach jumping in the waves, and as always the bright colours and gorgeous florals from the Sunkissed collection were perfect for this scrapbooking these photos!
I started my layout off by trimming down my white cardstock background and mounting it on the yellow floral Fun in the Sunpatterned paper. I then trimmed the gorgeous woodgrain Just Chillin paper down to 10 inches square, and adhered it to the middle of the page. I added a doodled white border around the woodgrain paper, and I also added some machine stitching around the outside of it to give the layout some extra detail and texture.
I printed my two photos at about 3 1/2 inches square and matted them with papers from the A5 Paper Stack.
I adhered the top photo using craft foam for added dimension, and I adhered a little banner from the Die Cut Ephemera pack on the top right hand corner. I also tucked a colourful bunting die cut under the top left hand corner of the photo. I love the way all of the bright and colourful embellishments pop against the woodgrain background!
I wanted to create a rough grid style design on this page using elements of different shapes and sizes. So once I’d placed my photos on the layout, I decided to cut a couple of the 3×4 inch cards out of the Fun in the Sunpatterned paper. I used the one with the blue border as a journaling spot and adhered it in the top right hand corner of the grid. I added my typed journaling to the card, as well as the ‘Happy Days’ die cut banner across the top.
Underneath the journaling card, I added the #Vacation banner which I also cut out of the Fun in the Sun patterned paper. I made another banner out of one of the papers from the A5 Paper Stack to layer underneath the blue one, and then I fussy cut a bunch of florals from the beautiful Growing Wild patterned paper to tuck around the banners.
For the final spot in the grid, I used the ‘Fun in the Sun’ card, which made the perfect title for my layout! This was also cut out of the Fun in the Sun patterned paper. Again I tucked lots of fussy cut florals around the card, as well as one or two from the Floral Ephemera pack. I adhered some with foam tape for added dimension and interest.
I finished the layout off by adding a few of the cute little flowers from the Puffy Sticker pack.
Thanks so much for stopping by the blog today. I hope that you enjoyed taking a look at my layout! I’ll be back later in the month to share some more inspiration with you.
Hi Cocoa Vanilla fans! Danni here with a Throwback Thursday layout featuring some messy mixed media and the Boys Rule collection, plus a little You Rock and Totally Rad mixed in. These boyish collections all work so well together that I keep them together in the same plastic sleeve and use them as one big kit – so versatile!
I knew I wanted to do some mixed media today so I chose a lightly patterned background paper from Boys Rule called Good Times 12×12 patterned paper. Once I had decided where my photo would go I used a waffle stencil with white modeling paste to create texture in the space surrounding my photo. I added some colour with a distress oxide ink pad in navy blue and used a paintbrush and some water to soften and blend it. I also used a midtone blue ink spray to add variation in tone and lots of ink splatters.
I layered up my photo with a variety of patterned paper scraps in varying shades of grey, blue and yellow. In my photo my son is wearing a bright yellow bow tie, so I really wanted to add pops of that bright colour around the entire layout. With this in mind, I chose some wood veneer stars from the You Rock collection and coloured them with yellow ink. I also decided to use the “Awesome” wood veneer piece as part of my title, so I inked that in a bright teal.
I build two large embellishment clusters around my photo and a smaller one around my title. I mainly used the accessory stickers from all three collections to do this, plus the inked wood veneer stars. I chose a variety of shapes including arrows, tabs, flags and stars, mostly using blues but also making sure to add some pops of bright yellow and orange to brighten up the layout.
As a final touch I added three tiny word stickers from the Boys Rule accessory stickers, some aqua dimensional drops and some bold ink splatters in black for an extra dramatic touch. This is definitely a ‘messy’ layout, and I feel that the black splatters really help to bring it all together.
I adore how this fun layout turned out! I hope you enjoyed joining me today. You can watch the process video below on the Cocoa Vanilla Studio YouTube channel to see how I struggled with the mixed media initially, and how I managed to make it work for me in the end. Happy scrapping!
Hey y’all! Laura here and I decided for these wild and crazy photos of my oldest son, I wanted to dig deep into my Cocoa Vanilla stash and play with the You Rock collection from 2017. I’ve almost finished it off and am determined to use it up this year. For this layout, I grouped my three photos across the center and layered scraps behind them to create a foundation for my photos. The title is cut from the paper pack packaging that I cut into a banner shape, with a small washi banner behind it.
In each of the four corners, I placed a piece of washi from the washi tape booklet that accompanied You Rock and then layered random embellishments together to create L-shaped clusters. These are a combination of fussy cut stars, ephemera, chipboard, wood veneer, and stickers. Loved seeing how I could puzzle together a variety of sizes and textures into each cluster!
The bottom right corner is my absolute favorite! I had just a few pieces left from the Totally Rad collection (as in about five pieces of ephemera!), so I created a hilariously cute little globe with a mustache that I fully admit sends me into giggles every time I see it. I think it perfectly captures the goofy personality of my oldest son! Finishing off the layout with my typical Nuvo Drops, but in black this time, and gold ink splatters.
I hope this layout inspires you to dig into your older Cocoa Vanilla Studio stash for your next layout! To see how “You Rock” came together, check out the process video below!
Welcome to the Cocoa Vanilla Studio blog! A new day and a new share! It’s Josefine here with a new scrapbook layout for you using the beautiful “Sunkissed Collection” do you like pool parties too?!
For this layout, I start with a white sheet of cardstock. I stamped with a background stamp that already looks like a stain several times with the Distress oxide on the white background. The color I’m using is ” Broken China” when I’m done stamping I make splatters with the distress oxide on my mixed media background. The challenge is; use one paper, three ways with the beautiful design paper “Feelin’ Fine” from the beautiful Sunkissed collection.
I cut the title “Pool Party” with my Cricut Maker and backfilled it with the design paper “Feelin Fine” Check these cute butterflies! I cut the butterflies with my Cricut maker from the design paper ” Feelin Fine” and placed them around the title “Pool party” I cut the design paper to size and placed it behind the photos. I used two photos and placed the small size on top. Between the photos I used vellum.
I placed my photo in the center of the page. I picked out different die-cuts and layered them on the side of the photo. I also used clear stickers on my layout. I placed the clear stickers on acetate and cut them out. I slide them between the design paper and the photo. This gives a great look-through effect. Check this cute clear sticker “days” on this page.
If you placed these clear stickers on acetate you can used them as a charm. You make a hole with your “crop a dile” and with a metal ring you can make a charm. Just perfect for a mini album!
I colored the alphas from the cut file with distress oxide. The color I used is “Picked Raspberry” I used my blending tool for this. I attached the alphas with gold sewing thread.I punched stars out from the design paper with a punch and I randomly placed them on my layout.I created splatters with white acrylic paint and used my brush for it.
I hope I was able to give you some great ideas how you can used the clear stickers. I had a lot of fun creating this layout! I want to thank you for stopping by on the blog today! Wishing you a beautiful and crafty day! XoXo, Jo