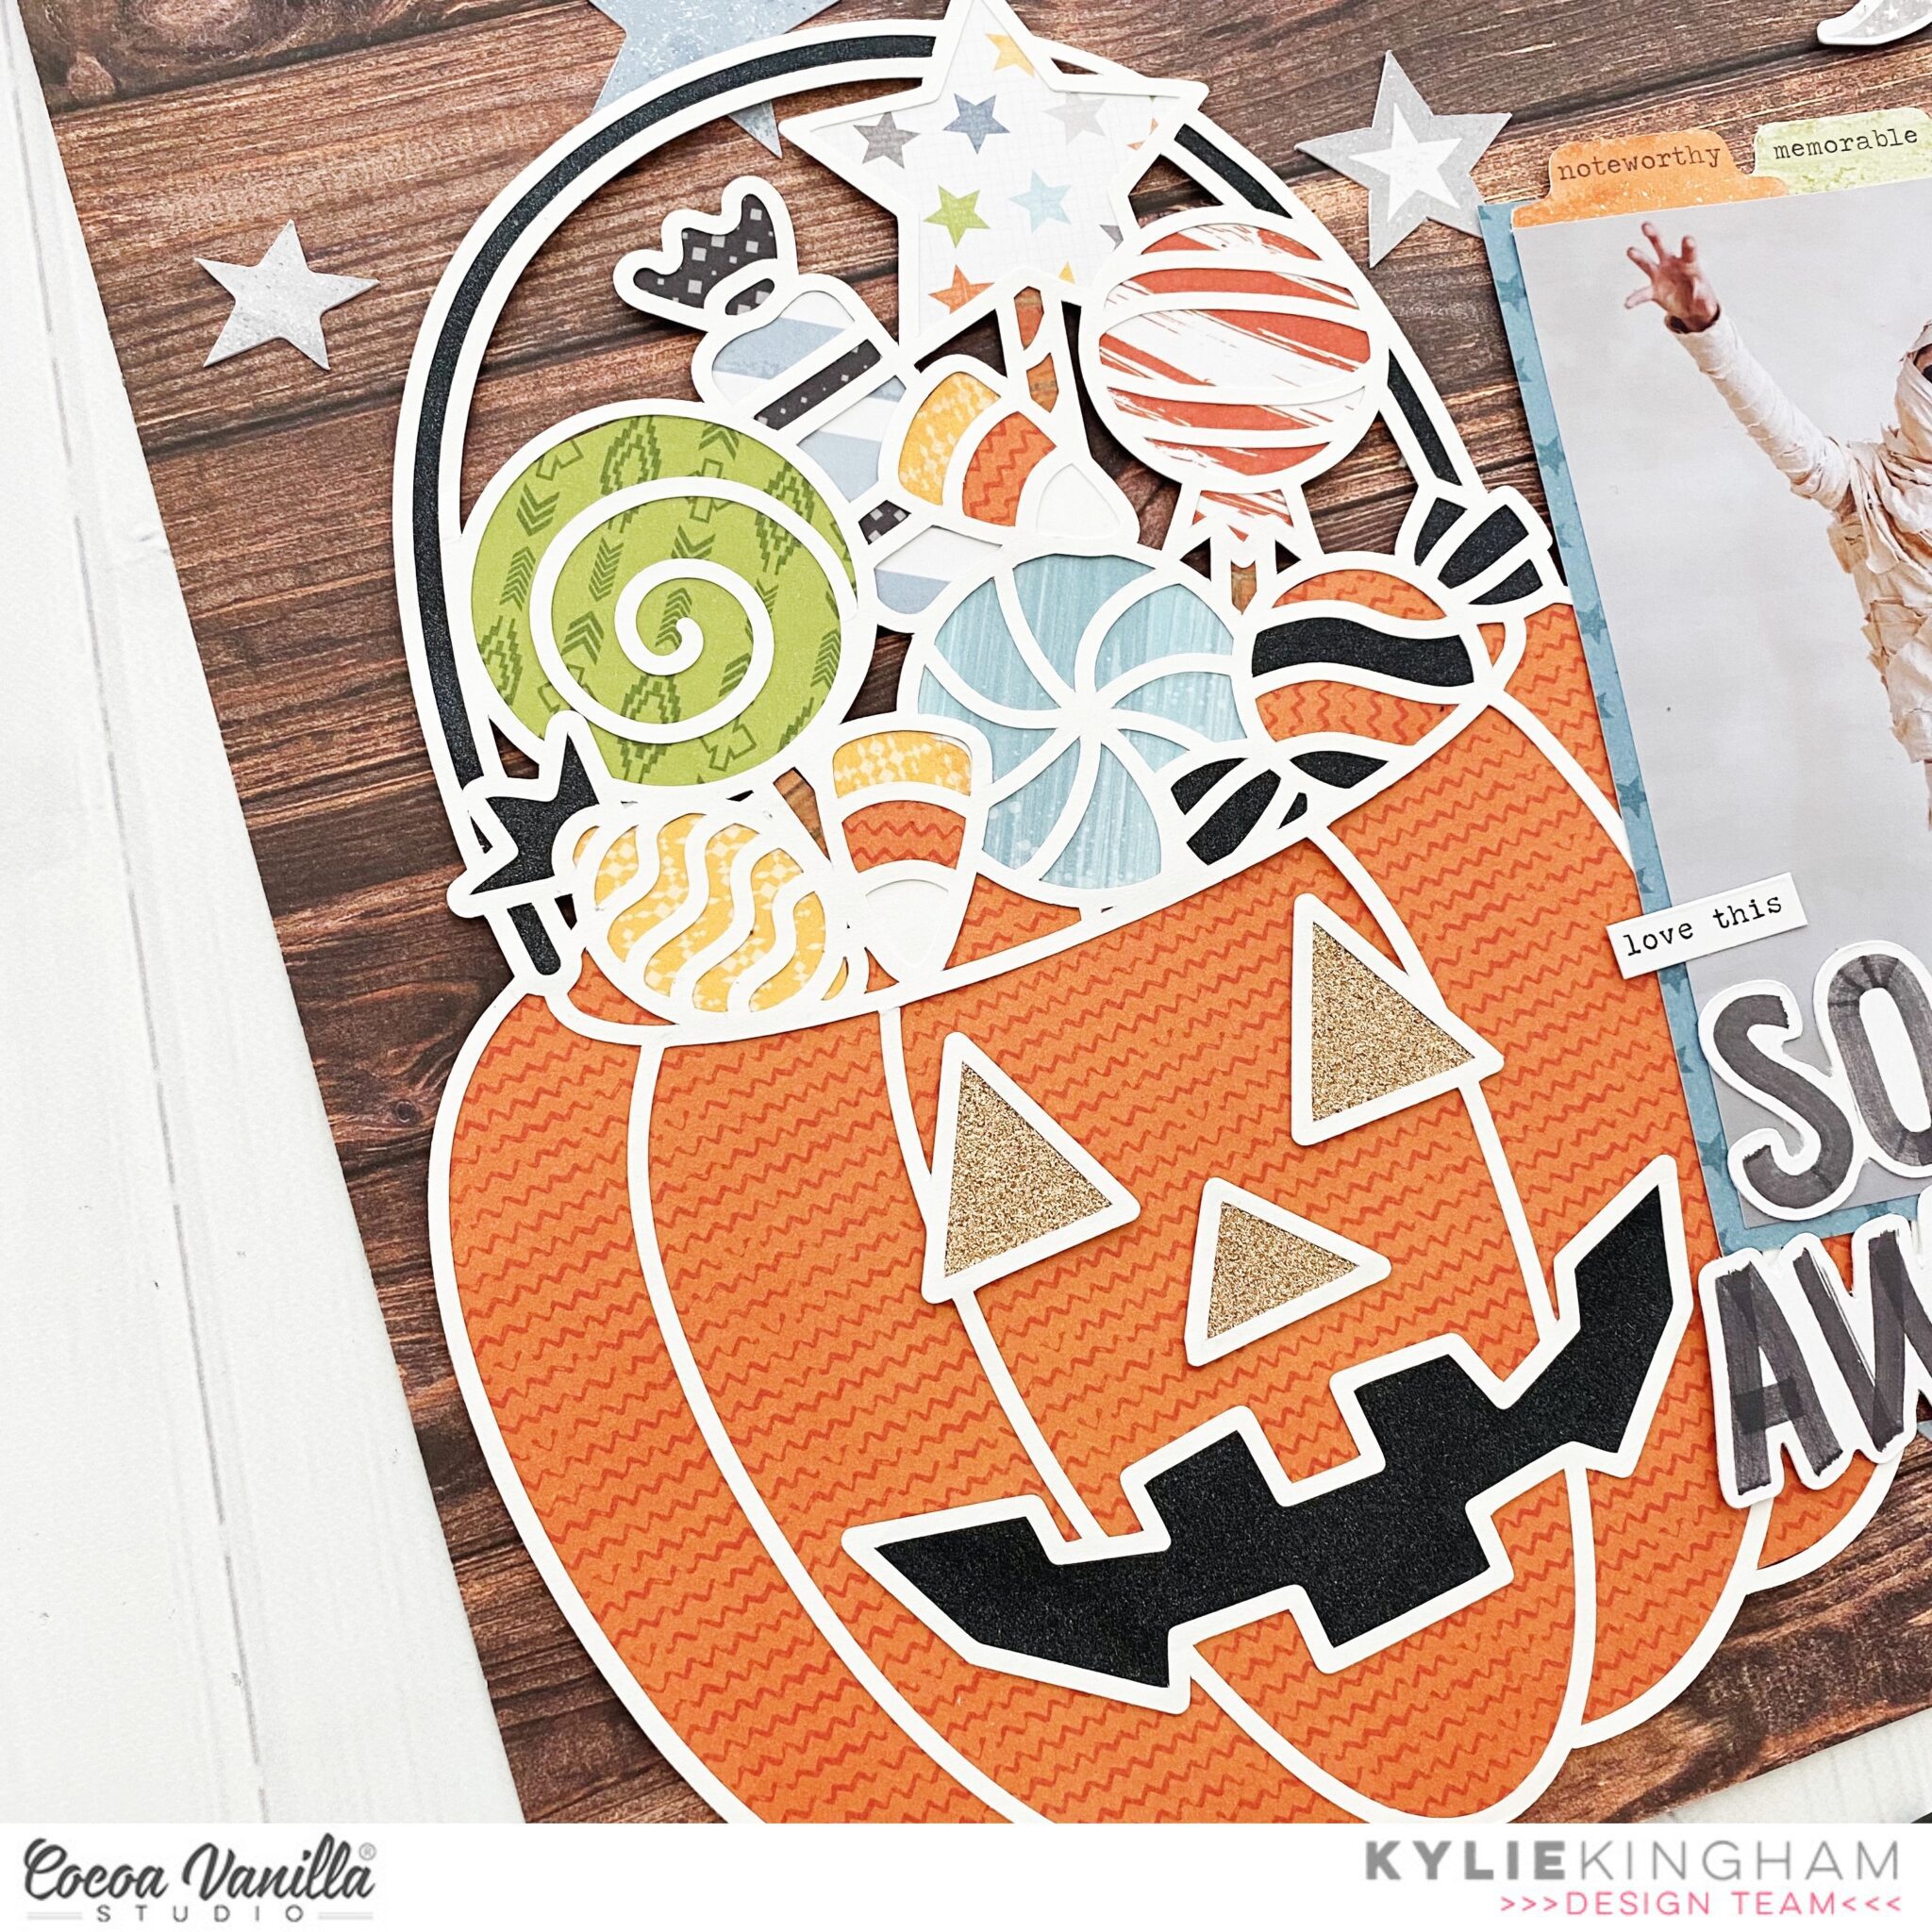
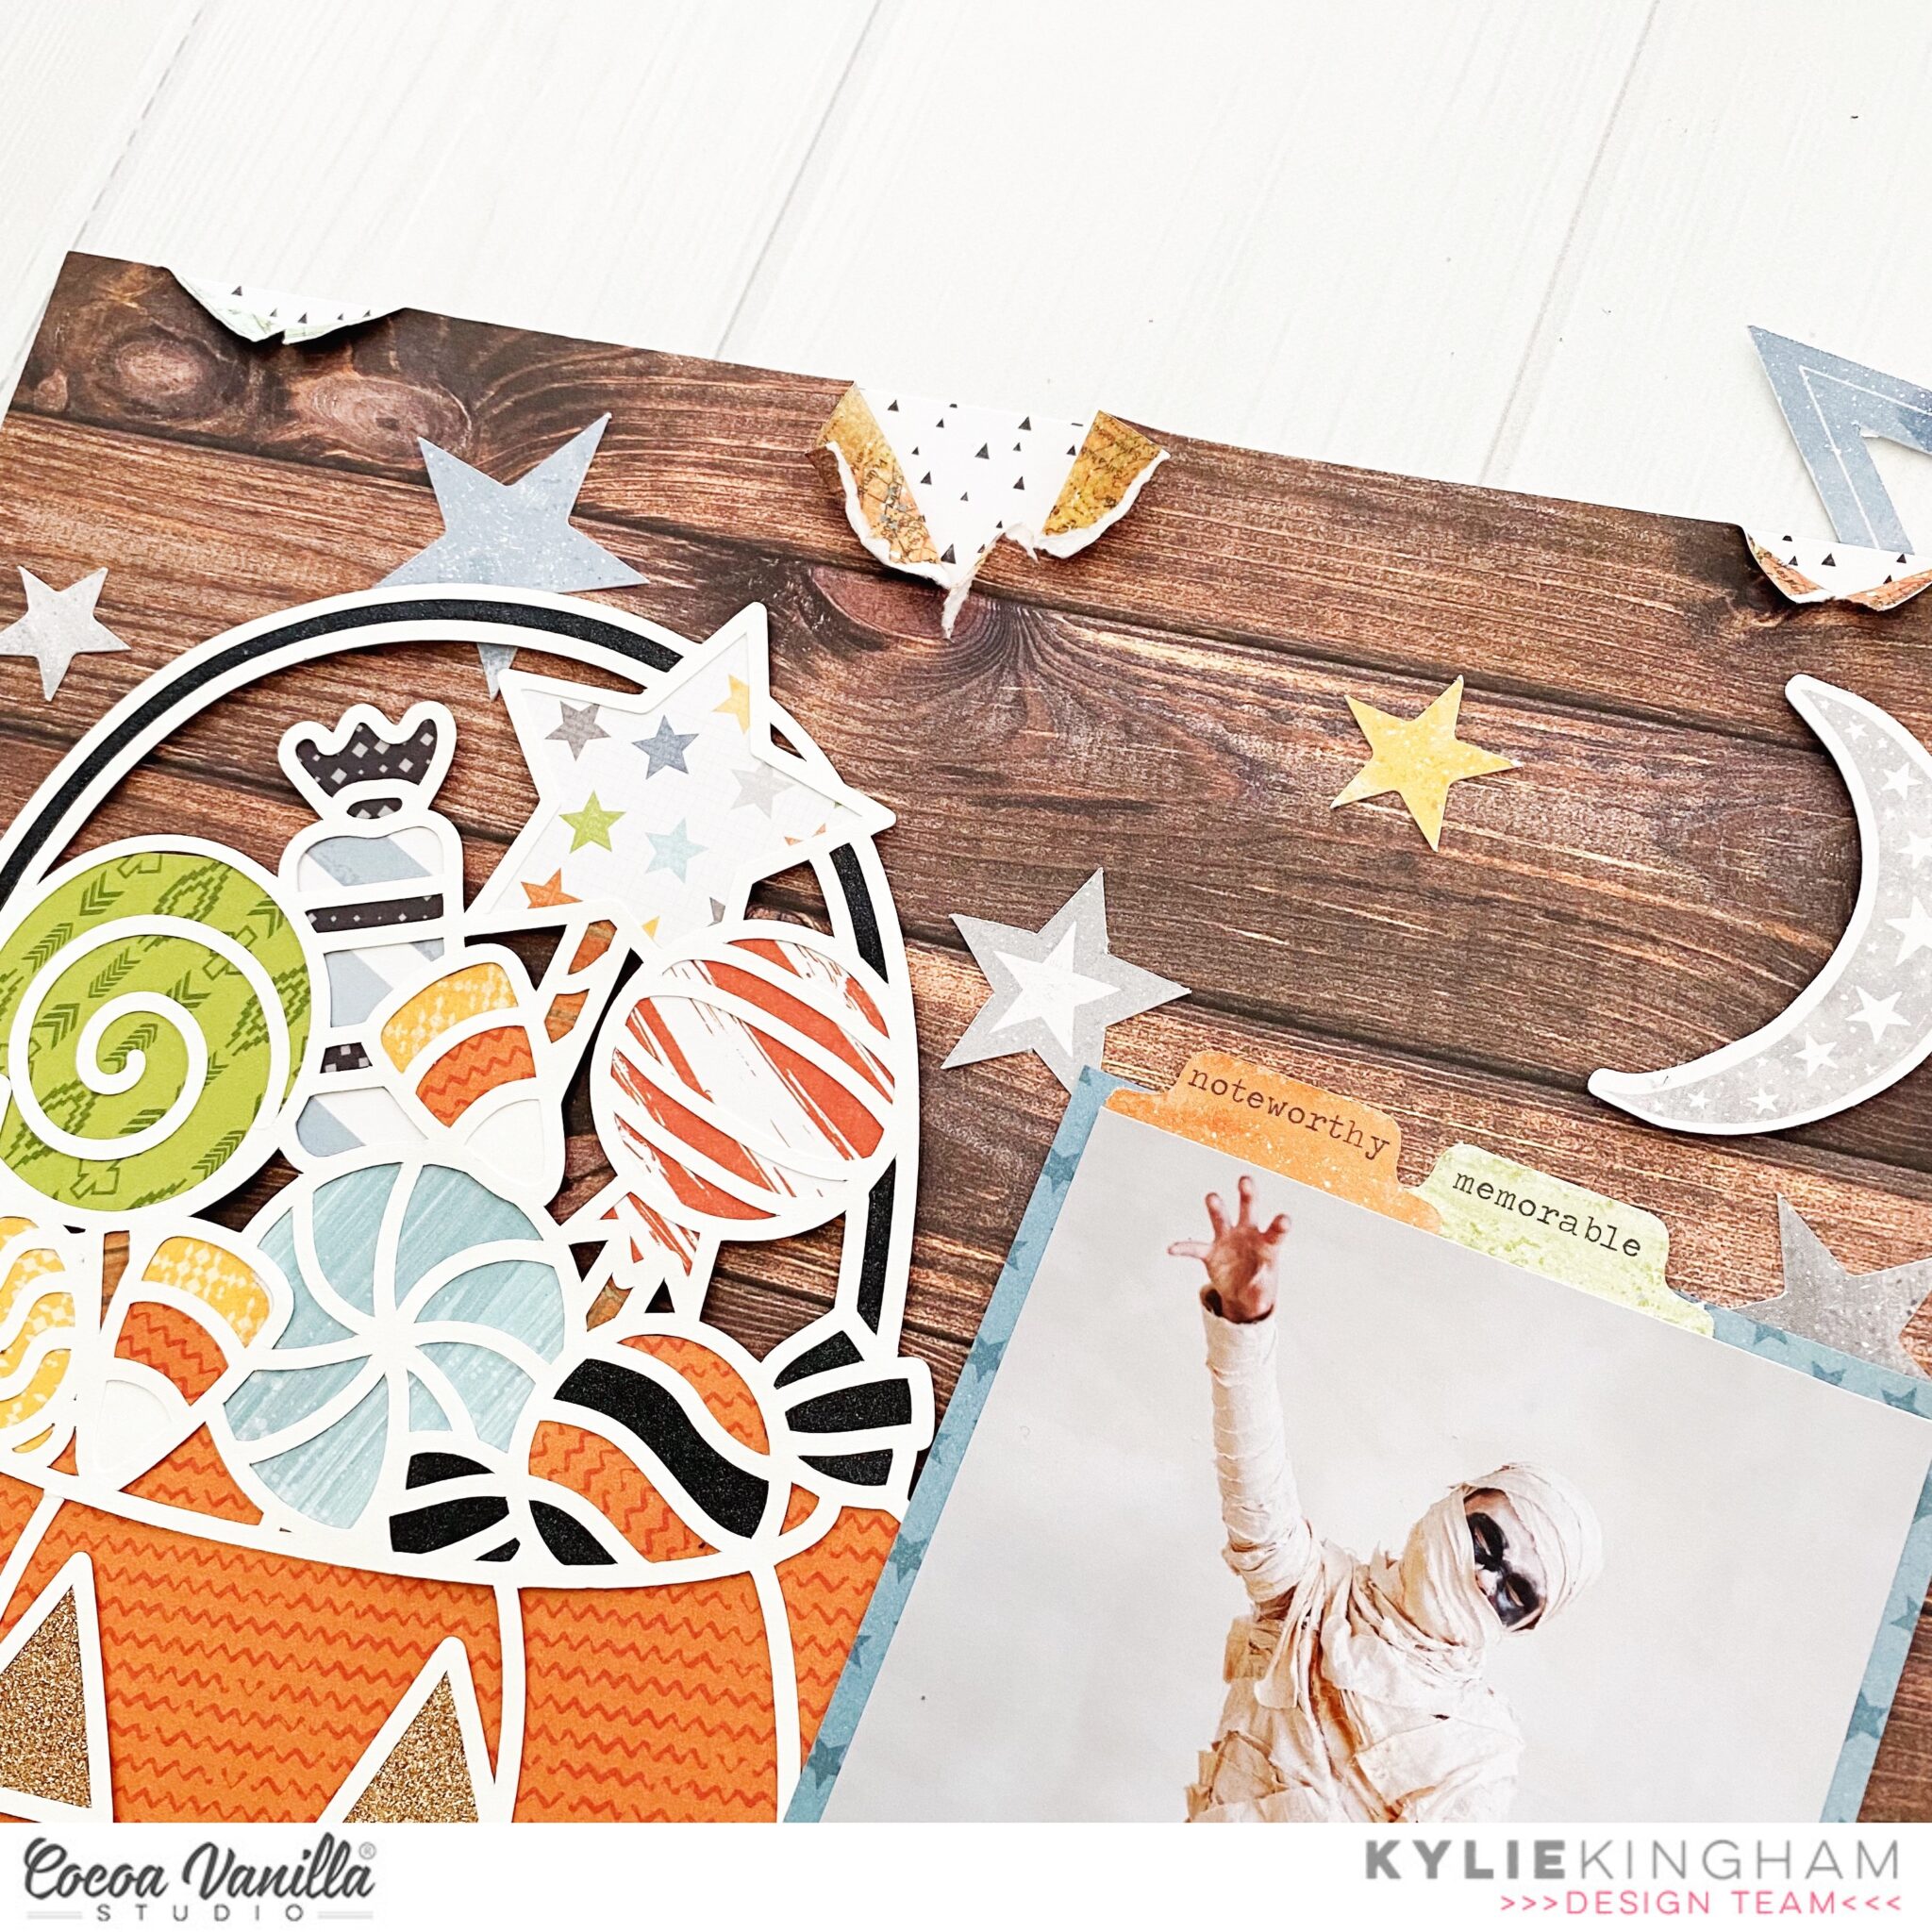
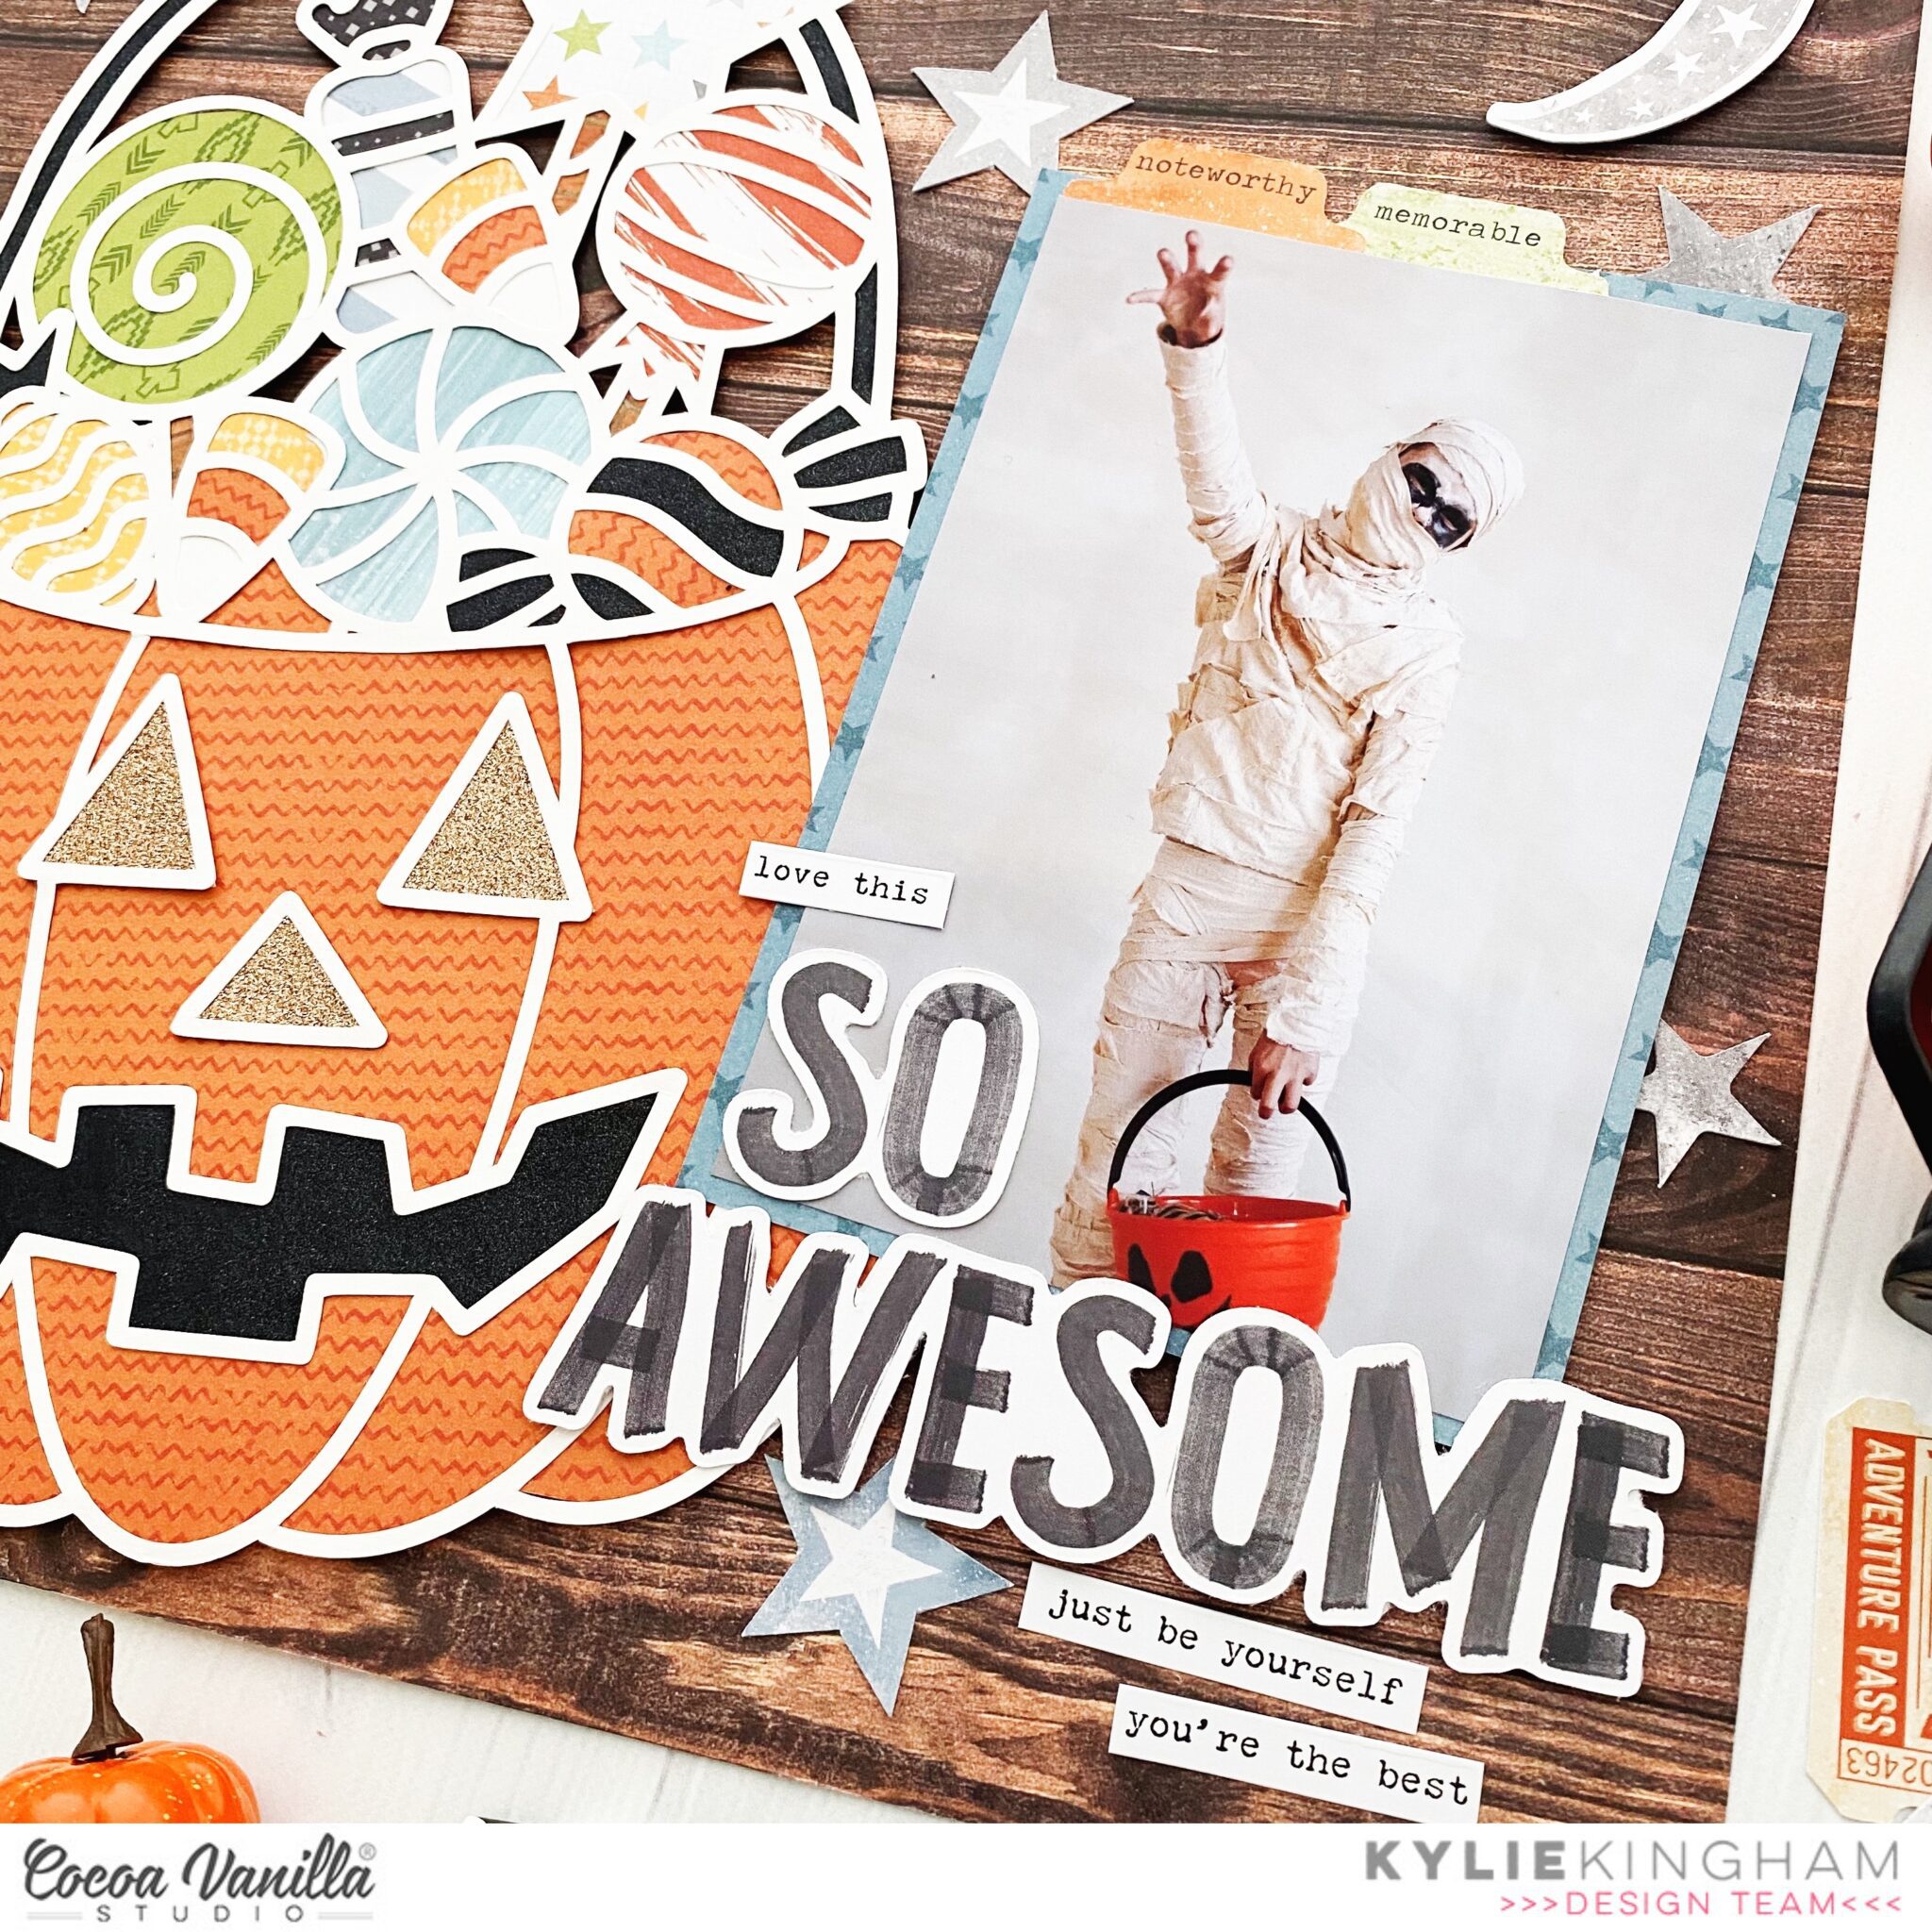
Hello friends! It’s Kylie with you today and I have a fun new layout I have created to share. Even though we don’t really recognise Halloween here at home, I had some photos of some Halloween fun at school I wanted to scrapbook. The main focus of my page is a cute cut file which has been designed by Paige Evans. The “LEGENDARY’ collection was my choice for this page as the colour scheme was perfect for what I had in mind.
The ‘OUTDOORS TYPE’ paper was chosen for my background. I love the depth of colour and the woodgrain look it has. Once I had cut out my cut file, I began the process of backing each section piece by piece. Rose Gold and Black glitter cardstock from my stash were used on the facial features.For dimension I adhered the cut file to my page using foam adhesive squares.
For a little added texture on my background I tore into the top of my page and added some of the ‘EPIC TALES’ paper in behind.
My photo was trimmed to 5.75″x 3.75″ and backed with a 6″x 4″ piece of paper. It too was adhered with foam adhesive squares. This also allowed me to tuck some of the star die cuts in underneath both the photo and the cut file. I created a title to correspond with the pages theme from the large title die cut pack and also added some of the typed phrase stickers below.
I really hope you have enjoyed seeing my ‘SPOOK-TACULAR’ themed page today on the blog.I have also filmed a short process video for you to watch.
Perhaps it gives you inspiration for your own scrapbooking layouts. Until next time,
It’s Tarrah back with you today to share a Summer themed scrapbook layout using one of the older Cocoa Vanilla Studio collections called Endless Summer. I chose this collection because of the gorgeous teal colour of the water in my photo, a selfie of myself kayaking earlier this year. The teal in the Endless Summer collection was a perfect match! Don’t you love it when that happens?!
I chose my background patterned paper first – opting for the pretty tropical floral outline paper. I did trim it down so that I could add a double mat of cardstock behind the patterned paper. I pulled out a pink and a teal cardstock to mat the page with. I added the wood grain die-cut frame from the Ephemera pack over my photo and stapled an arrow die-cut to the top right of the frame, I then adhered it using craft foam in the centre of my page. I like the look of various layers of dimension on my layouts so I added foam tapes and regular tape under the floral die-cuts and tucked these into both sides of my photo. I also added some leaves here and bent the edges up on both the florals and the leaves.
On the right of the photo I included the super cute flamingo die-cut and the Summer Holiday ticket from the ephemera pack. I also tucked one of the flair buttons and adhered a wood veneer arrow. Below my photo I adhered the Memories Are Made of This die-cut piece on top of the frame, I also tucked in the banner die-cut underneath the photo. My title is made up of the letters that spelt ‘Summer’ and the ‘Fun’ word in the ephemera pack. I also added the cute anchor wood veneer piece to the bottom left corner of the photo. Near the anchor I placed a wood epoxy bead and also placed another wood veneer piece across the Summer title.
To the left of my photo I added the round ‘Smile’ die-cut piece and a heart die-cut. Above the photo I added some cloud die-cuts with craft foam and layered the ‘Summer Days’ banner die-cut across the clouds. I also scattered some of the gorgeous enamel shapes in the hearts around the page. Lastly I stamped the date stamp and checked that everything was adhered down sufficiently.
Do you still have the Endless Summer collection in your stash? Why not pull it out and get creating with it? You can use my layout here as inspiration. If you don’t have the physical collection you can now purchase the Endless Summer digital collection and print your own papers and embellishments as many times as you like!
Thanks so much for stopping by the Cocoa Vanilla blog today! I hope you enjoyed my layout as much as I enjoyed creating it?!
Today I am sharing a school themed layout with the gorgeous These Days collection!
I used a cut file from Paige Evans named “Open Book” and I thought this was a beautiful starting point for my page.
I used a thick white cardstock for my background, on which I added a little bit of watercolor paint starting from the open book and up, adding also lots of little splatters of paint.
I let it dry completely, and in the meantime, backed my cut file with different patterned papers from the collection.
I applied white gesso on some parts of the book to fade away the colors a little bit for a very soft look.
I mounted the open book on adhesive foam before adhering it to the page.
I used a photo of my sweet daughter on her first day of school a few weeks ago. I couldn’t be happier that she still wants to collaborate for that!
I added tissue paper and adhesive foam behind it and placed it a little bit crooked on the right side of the open book.
I fussy cut 3 frames out of one of the A5 patterned papers, scattered them around and added a few embellishments on them.
My title is a mix of Die Cut Ephemera, Clear Sticker and letters created with a die from my stash.
Finally, I created a floral cluster with the Floral Ephemera pack, I added two butterflies and stamped the date on a label from the Accessory Stickers Pack.
Here are more close-ups.
I am so happy with the result!
I hope you can find inspiration with my page today in using this beautiful collection in a versatile way!
Thank you for stopping by, have a great crafty day !
Hi everyone, it’s Raquel here and today I am kicking off a school theme this week on the blog. And what better way to kick off school week than with a post celebrating World Teachers Day which is today, October 5th. So to celebrate this day I decided to create a layout all about the 2021 school year….and what an interesting year as a teacher and Mumma it has been here in Victoria.
Here is the layout that I created:
As I mentioned, my goal for this layout was to document the 2021 school year. And boy…what a year it has been. The continual shift and change from onsite to remote learning has been tough as a teacher of 5 year olds and a mum of two primary school age children. I had a few photos taken at random times throughout the year that I wanted to include on this page. This free ‘notes’ cut file from Paper Issues was perfect and allowed me to add multiple photos. I used the ‘Family Ties’ paper for the cut file and love this colour against the white background.
I took advantage of the theme of ‘teacher’ and included all of the woman and child ephemera pieces on this layout. They were the perfect addition to this page I thought.
Due to the framed design of this page my journaling is scattered from the to left square to the bottom of the page. As always I used my typewriter and cut it in a strip design.
To back the spaces in the cut file that were not filled with photos I used a combination of the 3×4″ pocket cards and the a5 paper pad. The designs were perfect and I was able to incorporate a variety of both busy and more subtle patterns to balance out the layout.
It is so lovely to be able to spend my days in my profession in the same school as my kiddies. Don’t get me wrong, it’s not a perfect situation as my little man may attest, but I love being able to see those special school moments like awards and assemblies that I had previously missed as a Mumma.
The whole cut file was adhered to the page using a foam adhesive. I also used a variety of dimensional adhesives to adhere any of the ephemera pieces to the page.
The clear sticker hearts and mini heart puffy stickers were that perfect small embellishment to finish off my clustered areas of embellishments.
I also ran a two strips of patterned paper along the left side of the layout. I used my binding edge punch for one of the layers to coincide with the ‘school’ theme.
I am absolutely in love with the mini alpha puffy stickers,…..wow, such perfection! I love the impact they make without overtaking a layouts design.
It was hard to know what to title this page with, so the simple ‘teach’ seemed to fit the purpose. The ‘for the record’ sentiment was on a 3×4″ card. Worked well for this layout to lay journaling.
What a year, I’m crossing fingers and toes that 2022 is a much calmer year for us all xxx
Above all the challenges of the role that has been 2020 and 2021 as a teacher I honestly would not change my job for anything. The absolute joy I get from my profession as a teacher is the ultimate reward…the relationships, the growth I see and the professional learning that I make daily…..just the best!
On this day I think we also need to take our ‘hats off’ to the families and carers who have helped to facilitate their child’s learning alongside their child’s classroom teacher. What a team we have all made and what a journey this last two years has been! Thank you!
Mandy here today to share a new layout featuring the amazing Daydream collection! This is still one of my absolute favourite collections to work with! The colours are so pretty, the florals are stunning, and everything just works together so beautifully. It’s one of those collections that’s so easy to work with, and I’m always so happy with the projects that I create with it.
The layout that I’m sharing today features the beautiful Over the Rainbow patterned paper, and a sweet photo of my son Isaac and youngest daughter, Eleanor.
To start this layout off, I decided to fussy cut that beautiful rainbow out of the Over the Rainbowpatterned paper. I wanted to add some craft foam behind it so that I could raise it up and give it some nice dimension. I had originally intended to use a sheet of white cardstock for my background, but when I laid the rainbow over the woodgrain patterned paper (which is the reverse side of the Over the Rainbow paper), I immediately fell in love with how that looked. The hoarder in me was a little sad to use up two sheets of this gorgeous patterned paper on the one layout, but it looked so pretty that I couldn’t resist!
I matted my photo with two papers from the A5 Paper Stack and then adhered it over the top right hand side of the rainbow. I embellished around the photo using lots of the beautiful floral die cuts from the Die Cut Ephemera pack, as well as a cute little house. I added a large floral cluster above the photo, and created another smaller embellishment cluster on the bottom right hand corner of the photo.
In order to complete the visual triangle, and to balance out the photo and embellishments in the top right, I created another embellishment cluster in the bottom left hand corner of the page. This one includes more floral die cuts, as well as a banner that says ‘The Good Life’, and a little word sticker from the Accessory Sticker Sheet. I also added a Puffy Gold Glitter Heart from the These Dayscollection to each of the embellishment clusters. I love the sparkle and texture that this adds!
For my title, I decided on using the ‘Happy Days’ die cuts from the Die Cut Ephemerapack. I wanted to curve the title around the rainbow, so rather than using each word as a single die cut, I fussy cut each letter so that I could adhere the letters individually and curve the words around. I was really happy with how that turned out!
To add some extra detail to the page, I fussy cut a few little butterflies out of the All Aflutter paper in the A5 Paper Stack, and adhered them on top of the rainbow. I also added some white ink splatters around the embellishment clusters, and I doodled a white border around the top and right hand edges of the layout. To finish the page off, I added my typed journaling strips underneath the photo.
Thanks so much for stopping by today! I hope that you’ve been inspired by my layout!
Hi Cocoa Vanilla Studio fans! Danni here with a sweet baby layout featuring the adorable These Days collection. My inspiration for this one came from the stripes on Family Ties 12×12 patterned paper. I wanted to play with some textured paper layers, and I had a large cardstock heart left over from a cutfile, so that decided the direction of my page today.
I started by cutting Family Ties 12×12 patterned paper into strips, then distressing the bottom edge of each strip with a paper distressing tool and rolling the edge up a little more with my fingers. I then took my cardstock heart and glued the layers on top, starting from the bottom and working my way up to the top, overlapping each strip. I used the cutfile out of pure convenience, but you can easily do this just by hand-cutting a large heart shape.
Once I had all the strips glued, I trimmed off the excess with scissors by flipping the heart over and using the back of the cardstock heart as a guide. I chose a white cardstock background because I really wanted the gorgeous colours on the heart to stand out. I added some ink splatters to the background in shades of soft blue, pink and yellow to match the beautiful These Days collection colours.
I added two black and white photos of myself and my son when he was a baby. I love the way he is looking up at me in these photos! I backed the one where you can see his face more with paper from the A5 paper stack and popped it up on dimensional foam.
Next, I created three clusters using the floral ephemera around the heart and my photos. I added two of the tiny wood epoxy buttons to the centre of a flower in two of the clusters, then a large wood epoxy button to the middle floral cluster. Right in the middle of the heart I added a framed sentiment piece from the die cut ephemera. This phrase perfectly summed up how I felt about my sweet baby boy in this moment.
For a title I added ‘Together’ from the foam title stickers across the bottom of the heart, overlapping my photo and the bottom floral cluster. Finally, I added some adorable floral puffy stickers to the clusters and some teeny tiny puffy sticker hearts at the top and bottom of the page. A few sentiment stickers from the accessory stickers finished off the layout perfectly.
I love how sweet and light this layout turned out. I hope you enjoyed joining me for this project today. See you next time and happy scrapping!
Hey y’all! Laura Alberts here with a blast from the past! This layout features Hello Sunshine and a bit of Endless Summer, some of the oldest Cocoa Vanilla collections in my stash! To start this layout, I backed the stunning denim style patterned paper with this Happy Days pattern paper to give it a bright, cheerful border. Then, I used Vicki Boutin’s Iridescent Glaze to add some lovely hearts around the perimeter of my photo clusters. These little hearts help to define the shape of the center clusters.
In the top left corner, I layered an ephemera frame and florals from Endless Summer with a sticker banner from Hello Sunshine. I love the way some pieces are tucked underneath, while others are on top. The mix of the two makes this area of the layout feel more dimensional even though it’s quite flat.
On the top right side of the layout, I repeated that process, layering Endless Summer florals underneath of the photo and stickers from Hello Sunshine on top. To give these hearts a bit more interest, I added Endless Summer enamel shaped hearts and tiny punched gold foil hearts into the background. I love the mix of colors and textures in these clusters as a result!
The photos featured in this layout are of my husband and I’s favorite treat restaurant for date nights. It’s a special place for the two of us and makes special occasions feel even more special! Adding the ‘Just Perfect’ banner underneath the restaurant’s sign seemed fitting!
This title is actually a cut apart, but it blends in really well with the background, giving it the appearance of a stamp! After I finished the embellishing, I added gold Nuvo drops and splatter around the clusters for a bit of sparkle. My journaling is written around the entire perimeter of the layout, giving it a handwritten border, and talking about how much we enjoy this restaurant and why we we love it!
I hope this layout inspires you to reach deep into your stash and pull out some old Cocoa Vanilla Studio favourites! I love finding new ways to use older product!
Hey Hey! It’s Michelle here today with a new layout share featuring the These Days Collection, and boy was it a fun one to create! I had the joy this week of Scrap-lifting one of my fellow DT Members Kylie, and yes a challenge it was. I had the hardest time deciding which beautiful layout of hers to recreate as they’re all so stunning! I chose something wonderful that was created a couple of years back, heres my version…
Fussy cut florals eat your heart out! If you cant tell by what I’ve created, I chose the absolutely stunning layout Kylie created with the Unforgettable collection and all those beautiful hand made flowers. Now my layout doesn’t stack up to the amazing creation below, but I’m still pretty happy with the outcome.
To create my version of Kylies layout I turned the orientation of the layout around in a couple of different ways. I used the design of the layout as a sketch and both rotated and mirror flipped it to create the design of my own layout. I used similar elements and pattern ideas that Kylie has used, just in a slightly different way.
I started with a pattern paper background using a mix of dotted paper, wood grain paper and a multicolour pattern to peek out between the 2. (Family Ties & Pretty Posies paper)
I scrapped a cute photo of Leila from many many moons ago, almost 10 years ago to be exact. I printed the photo in black and white as I knew I’d be adding A LOT of colour within the clusters of florals and didn’t want them to clash. I added a couple of layers of A5 papers behind and adhered it over the background using foam for a hint of dimension amongst all the other layers.
I added the title to the photo using a foam word title from the Unforgettable collection along with 2 cut apart pieces from the Good Life paper that I adhered with a little foam tape.
Next up was the fun part of creating clusters of florals in a diagonal line across the layout. I had pre-cut tonnes of flowers from the Home Grown paper in both 12×12 and A5 sizes while sitting on the couch one night a few weeks back so there was plenty to play with. I layered the florals using both foam tape and glue dots and added a touch of silver thread for added texture. The cute gold glitter heart adds another form of texture and dimension to the cluster along with the cute mini puffy hearts
I used more of the same elements in the top cluster too. Just love these colours together
On the right side of the photo I’ve added more florals in a mini cluster along with a frame from the Wall of Frame paper, cut apart pieces from the Good Life paper, more puffystickers and thread
I really enjoyed creating this layout, especially making floral clusters with all those gorgeous flowers and I certainly never grow tired of creating with them.
Well friends that’s all from me today. Thank you so much for stopping by!
Until next time, Happy Scrapping
Hello sweet friends. It’s Kylie back with you on the blog today! For todays blog post it’s all about scrap-lifting one of our fellow teamies and I have been assigned the lovely Michelle! I have had a tough time choosing a layout of Michelle’s to scrap-lift as ALL of her work is simply beautiful. You can see for yourself HERE! Such beautiful inspiration am I right??
After much deliberation, I decided to scrap-lift the following, beautiful page from Michelle. I loved the clever placement of all those paper strips and the opportunity to use lots of different paper prints. I had a very small amount of my ‘BOHEMIAN DREAM’ collection left and felt this design would be perfect for using up those last few bits and pieces.
Here is Michelle’s design, followed by my take on her design…
As you can see I have rotated my layout so the strips sit vertically on the background. Each strip of paper measures between 1cm up to 3cm wide and the lengths were cut randomly as I was placing them. For balance I also layered some strips over the top of others to create a layered, dimensional effect similar to Michelle’s page.
The frame from the die cut pack was perfect for adhering over the top of my photo. Once in place I cut off the excess of the photo for a snug looking fit. I then backed it with some white tissue paper from my craft stash, just to soften the look of the edges once adhered to the background. Next, I layered more die cuts to surround the frame for balance.
To complete my page I added a large title below my photo. The gold alpha stickers were from my craft stash but gave a nice pop of colour against the background and fitted well with the chipboard sticker ‘Happy’ title.
Thanks so much for stopping by the blog today! I hope you have enjoyed seeing my latest project.
Hello crafty friends, today is throwback Thursday! I knew I wanted to use this gorgeous paint brush cut file from Confessions of a Paper Addict and my layout flowed from there. I dug deep into my CVS stash and realised that although I do not have much of collections left I had enough using a large cut file.
I used a wood grain paper to cut the handles of the brushes and to add visual interest I used a rose gold glitter paper which contrasted wonderfully against the black. Instead of using the cut file paint brush strokes I used the clear stickers paint strokes from various older collections. I love how they turned out!
I then embellished each paint brush by adding floral clusters tucked behind the wood part of the paint brush. I added butterfly flairs, and clear stickers in a way they look like they are flying into and away on my page.
I next added my photo with foam tape which is a 3.5 x 3.5 inches.I added it off centre to the middle paintbrush. To frame may photo I found two large die cut butterflies at tucked under my photo each side. I found some black phrase sentiments and chose a relevant one to my theme and added directly under my photo.
I found a die cut title and added with foam tape, just above it a added another phrase die cut as my sub title and to finish off I added a clear sticker camera.
Since I had every clear sticker sheet out that I owned I went back and added some more clear stickers, the mixed media strokes. I found another flair with Life is Good which was in a orange tone so blended perfectly with the colours of my layout.
I do love how this turned out and enjoyed the challenge of using my stash and older CVS collections/embellishments. Clear stickers have always been a favourite embellishment for me and they really added beautiful colour and texture to my layout.
Thank you for stopping by today and have a wonderful week!
 The ‘OUTDOORS TYPE’ paper was chosen for my background. I love the depth of colour and the woodgrain look it has. Once I had cut out my cut file, I began the process of backing each section piece by piece. Rose Gold and Black glitter cardstock from my stash were used on the facial features.For dimension I adhered the cut file to my page using foam adhesive squares.