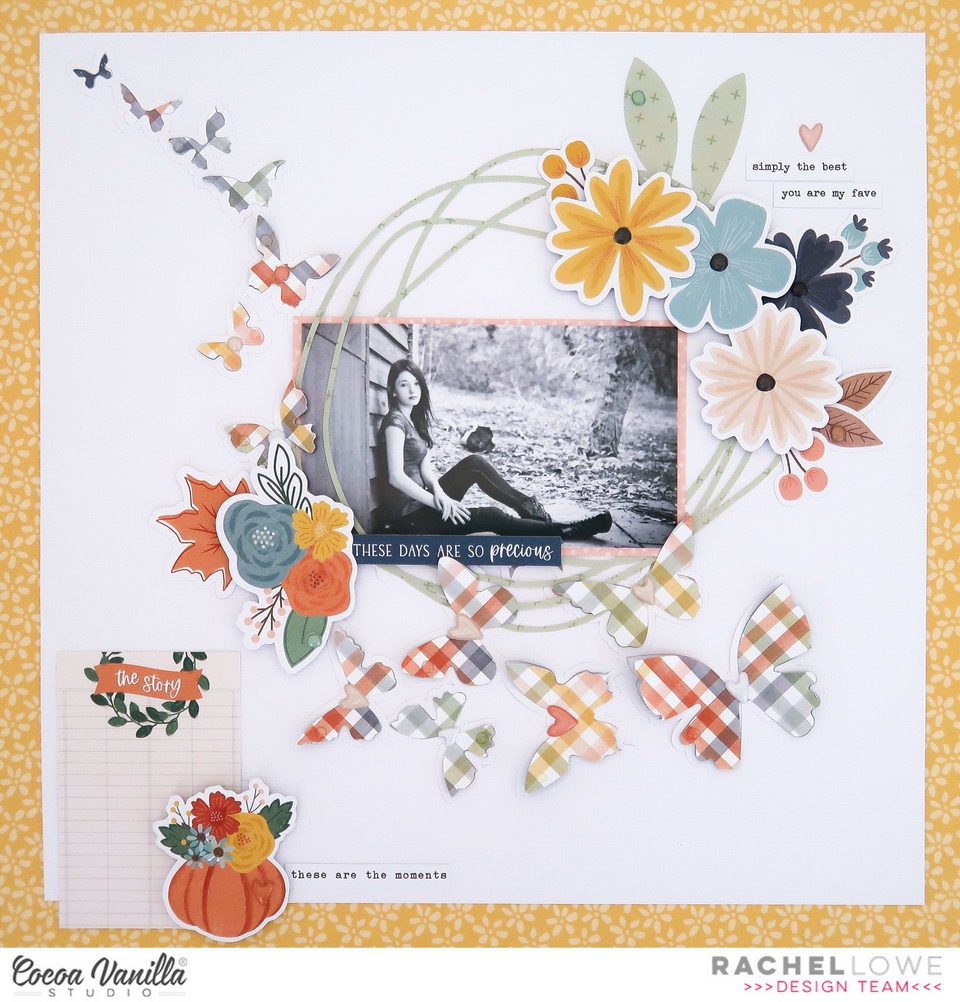
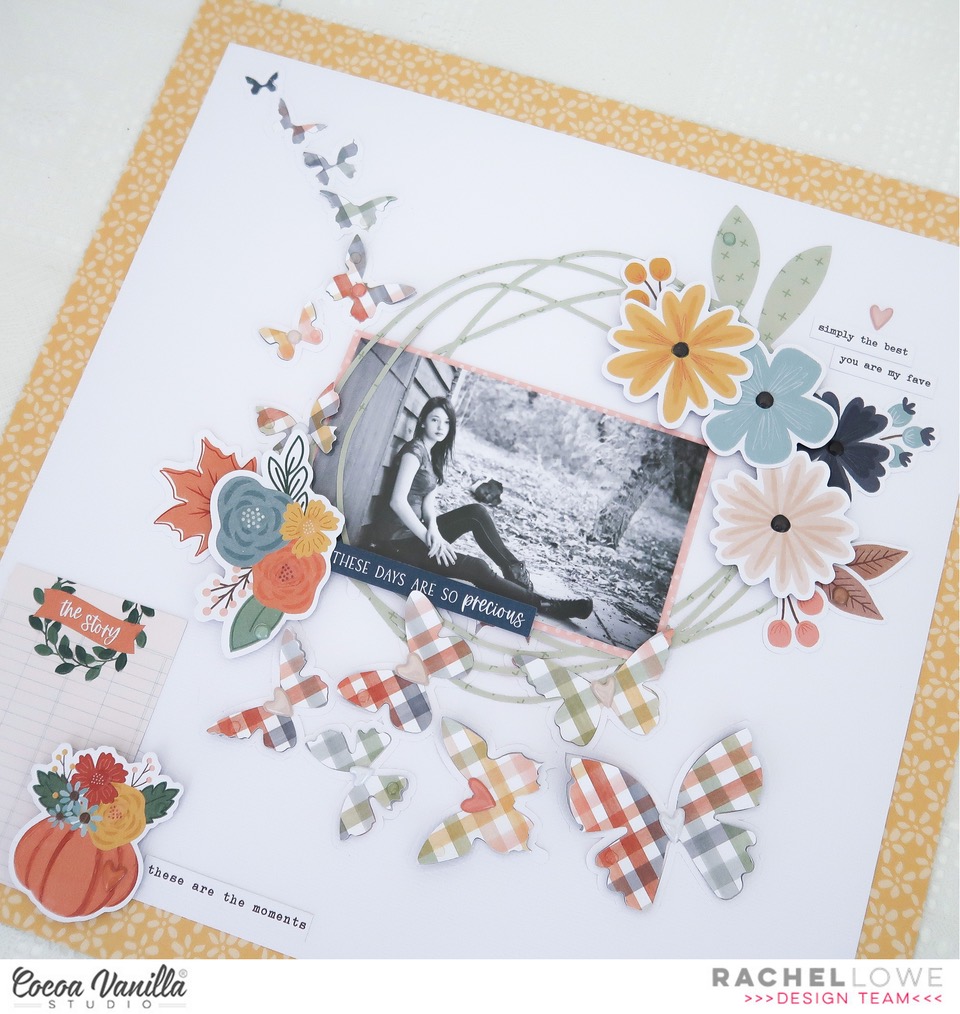
Hello Rachel here and today I sharing another Fall themed layout featuring my daughter using the beautiful Heart and Home collection.
I have used several cut files from the Silhouette Design store, butterflies and a fall wreath. You can see the I have covered the flowers and most of the leaves so I could add the Floral Ephemera and add my own layering where needed.
Once I had adhered the wreath cut file I then added the ‘flying butterflies’. I used the A5paper pad to cut the butterflies and the larger ones I cut two so I could layer them up with foam tape. I added the heart Puffy Stickers to create the butterfly body.
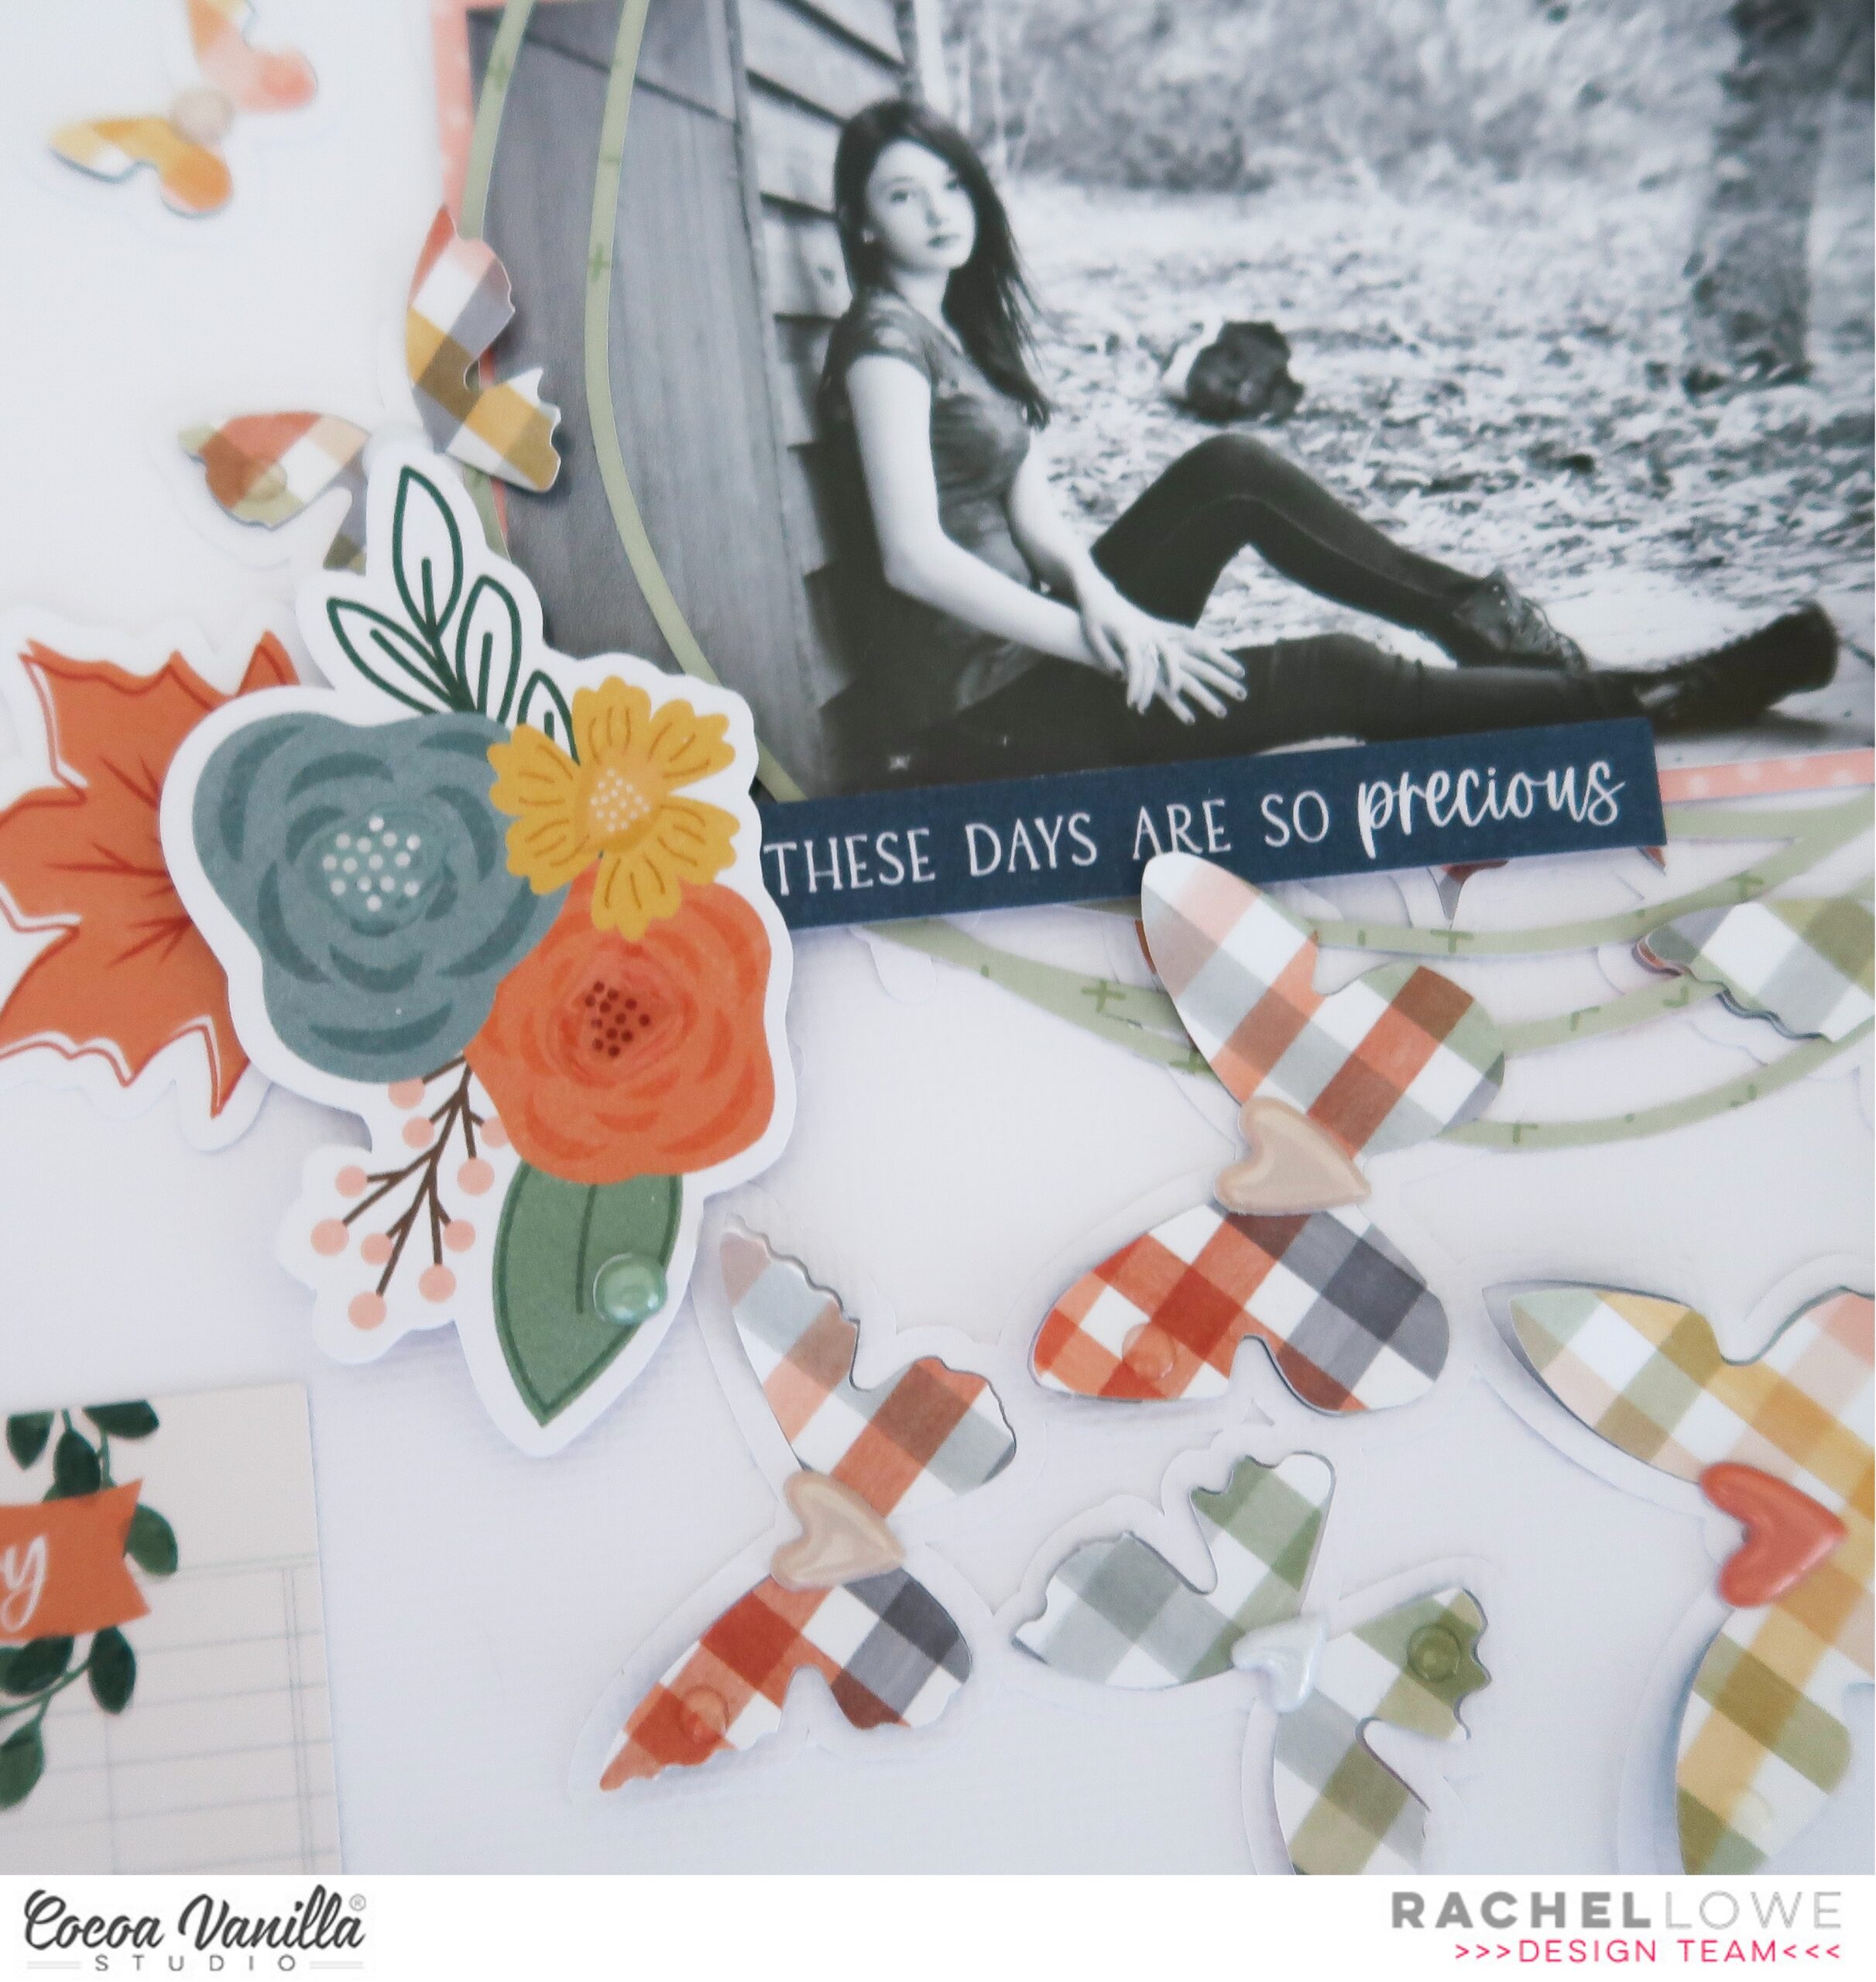
I used a 6×4 inch landscape photo, I sadly had to convert it to black and white as my daughters top was purple! I added a thin mat and tucked it under some of the wreath so it looked a part of it. I next added two floral clusters using a mix of the Floral Ephemera and Die Cut pack. I added a sticker from the Accessory Sticker sheet tucking it slightly under the flowers and leaves.
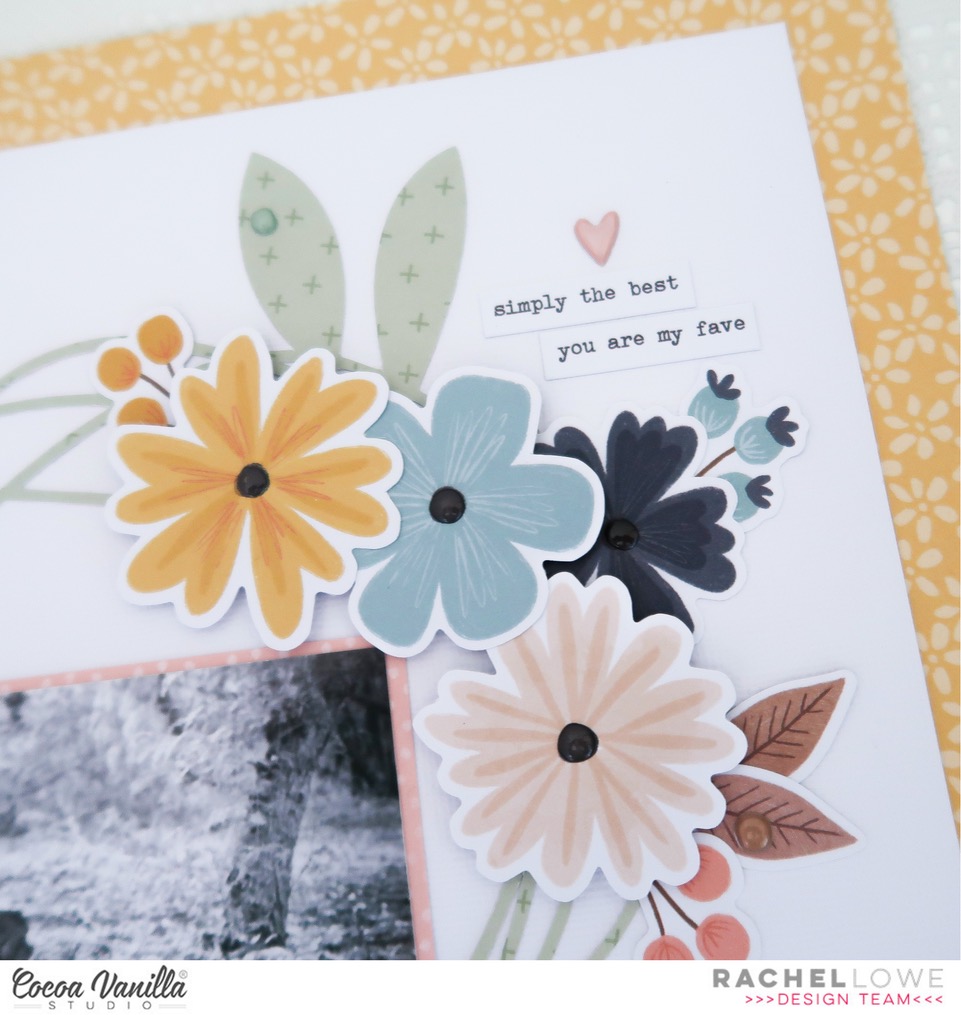
I used larger blooms to cover the cut file flowers at the top of the wreath and layering the flowers, leaves and sprigs with foam tape. I used phrase sentiments to create sub journalling.
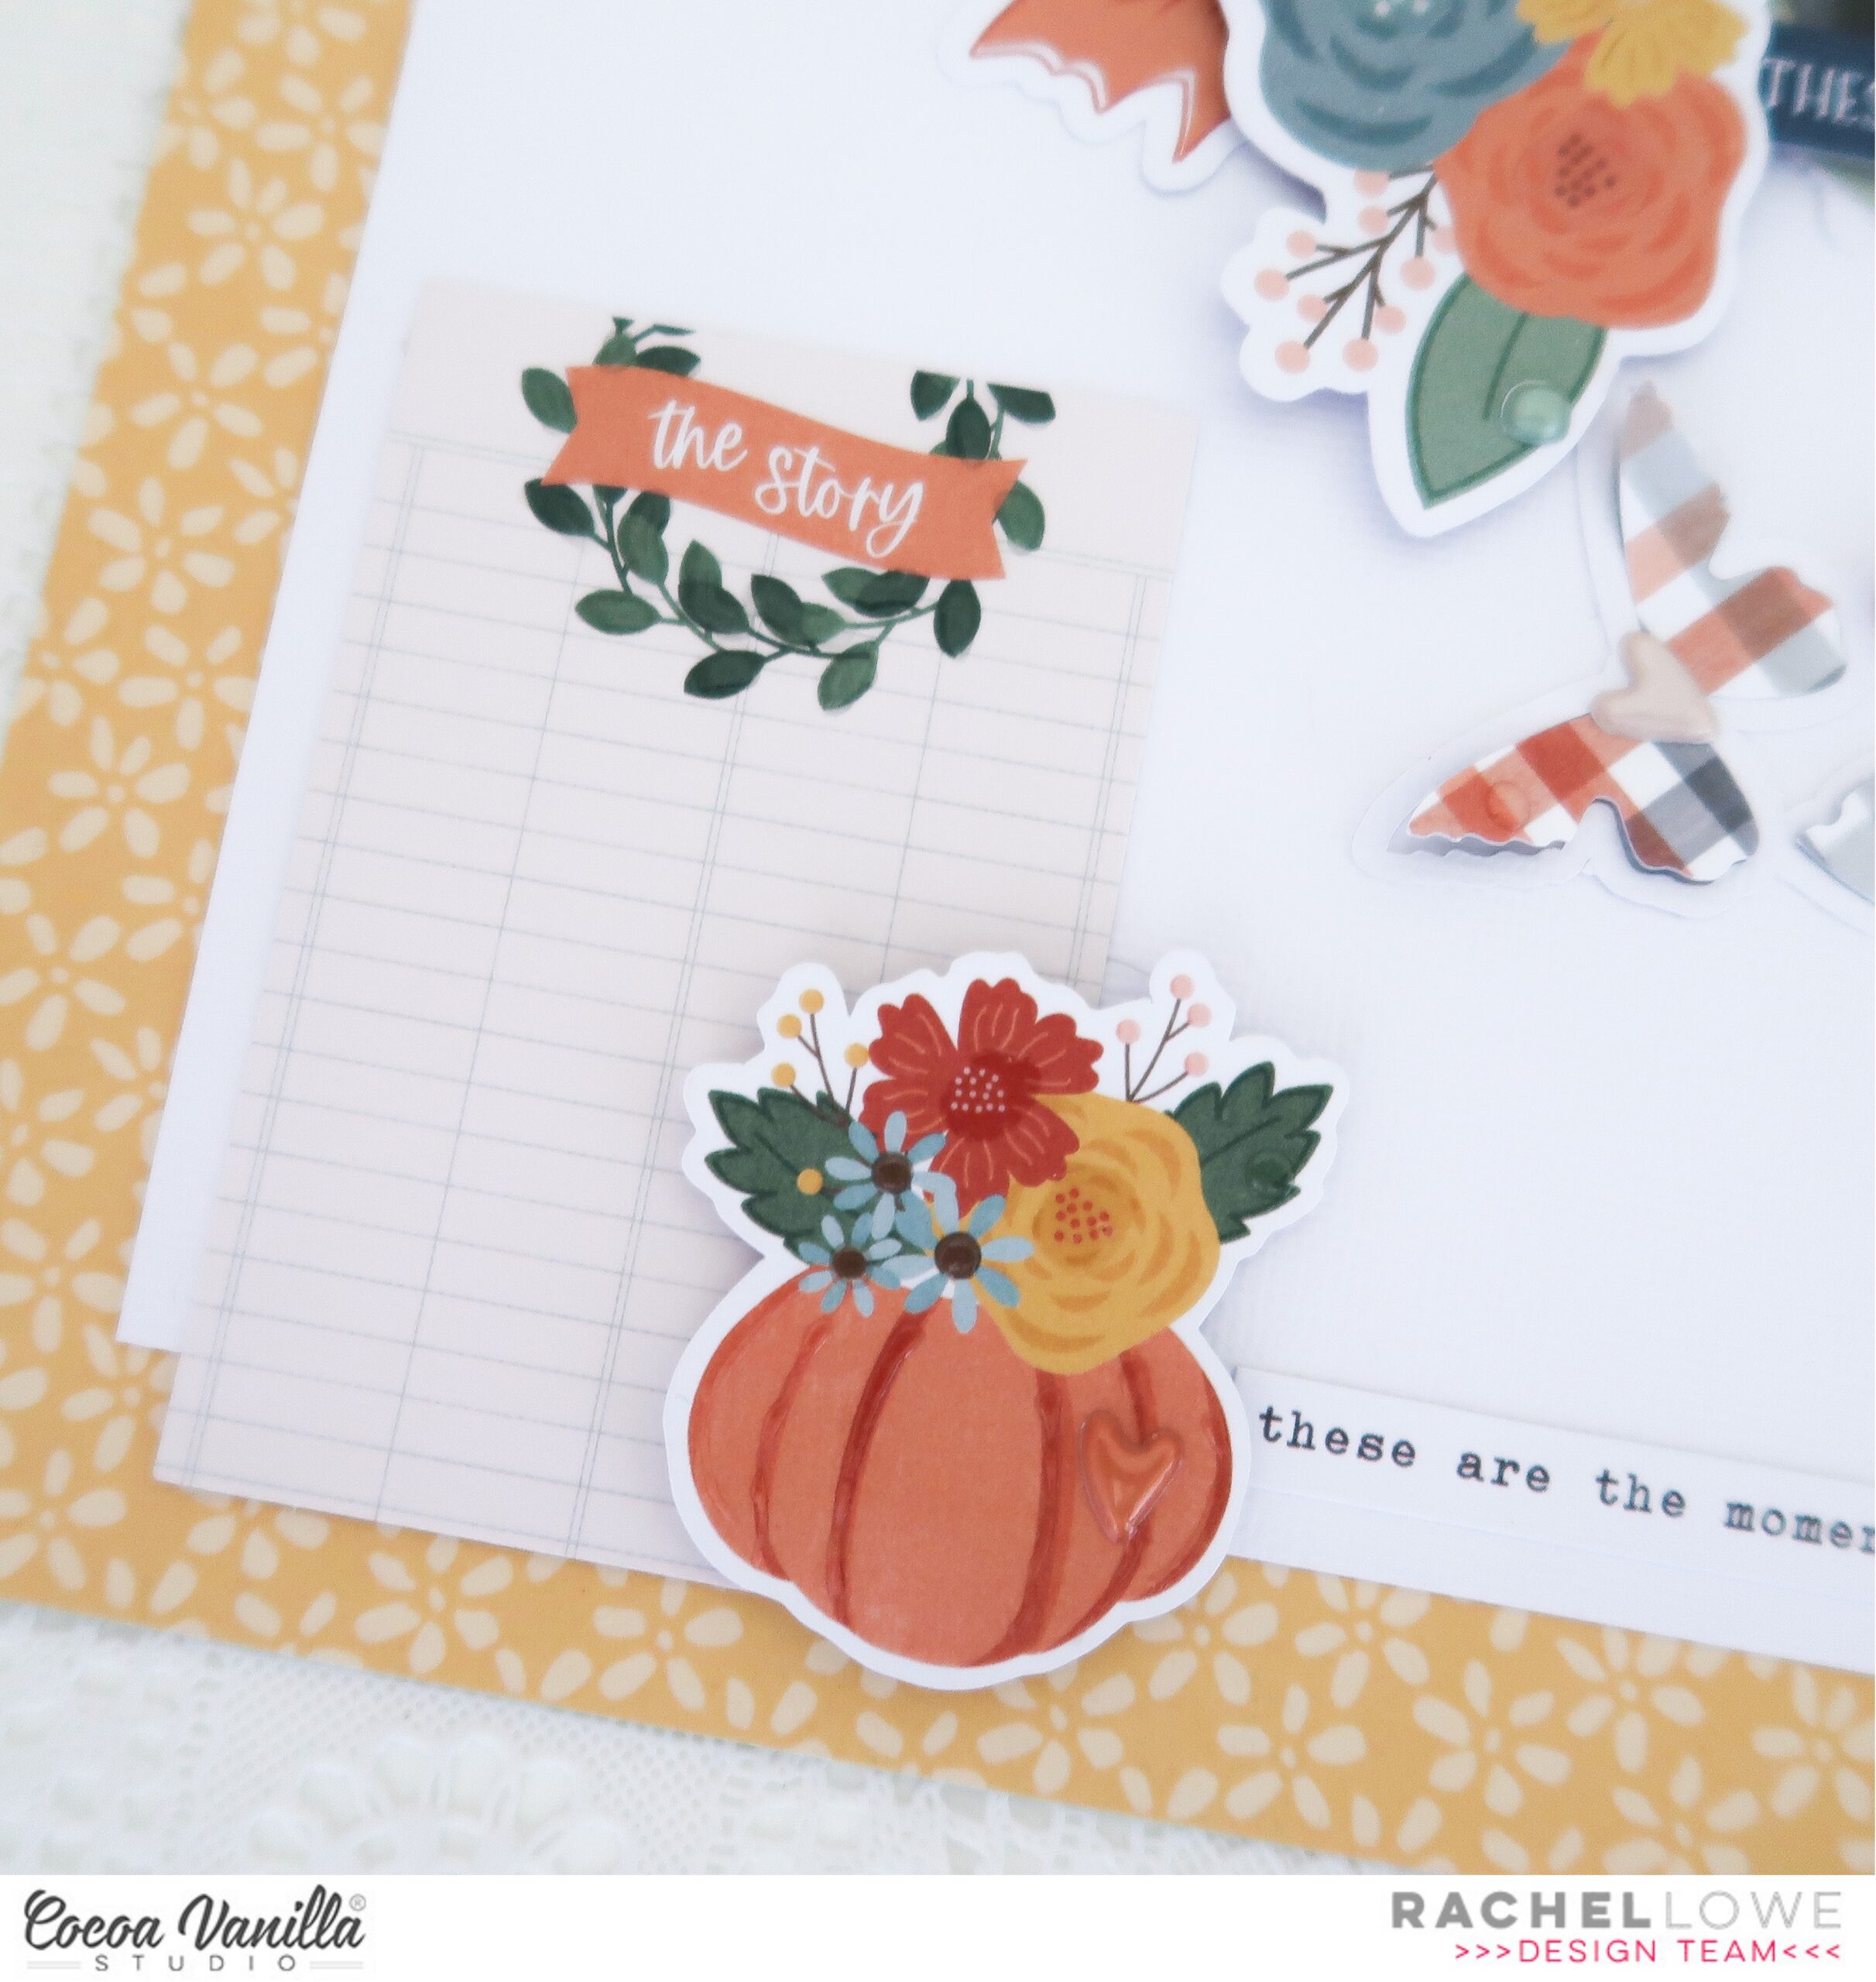
You can find this journal block in the die cut ephemera pack, I will go back and add some handwriting later. I finished this off by adding the super cute pumpkin with flowers die cut and another phrase sentiment sticker. The only 12×12 inch papers I used for this layout was Gather and Leaf Litter.
I really wish my daughter had worn a different colour top so I could have added a colour photo, showing the beauty of autumn leaves and colours which I think would give this layout another layer of colour, warmer I think. Anyway next time I will do better with clothing choices and colours!!!!
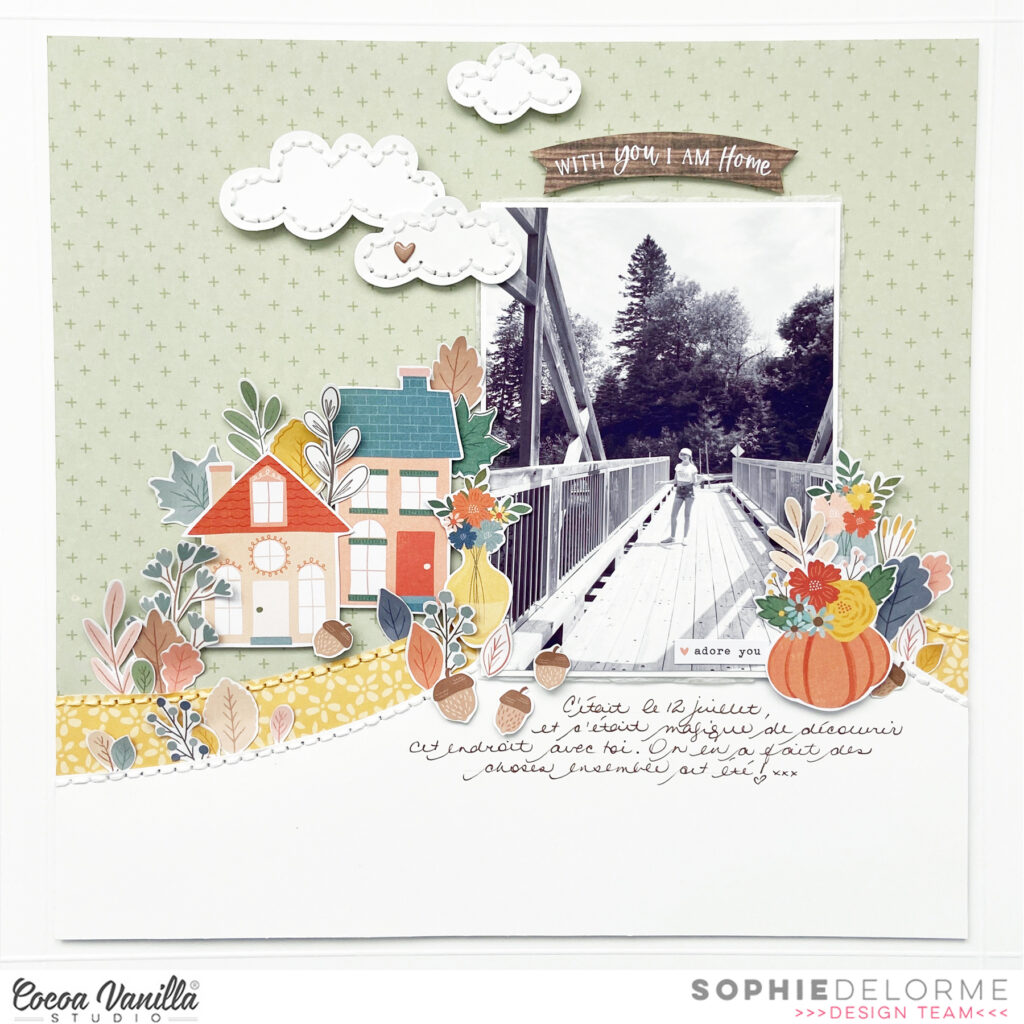
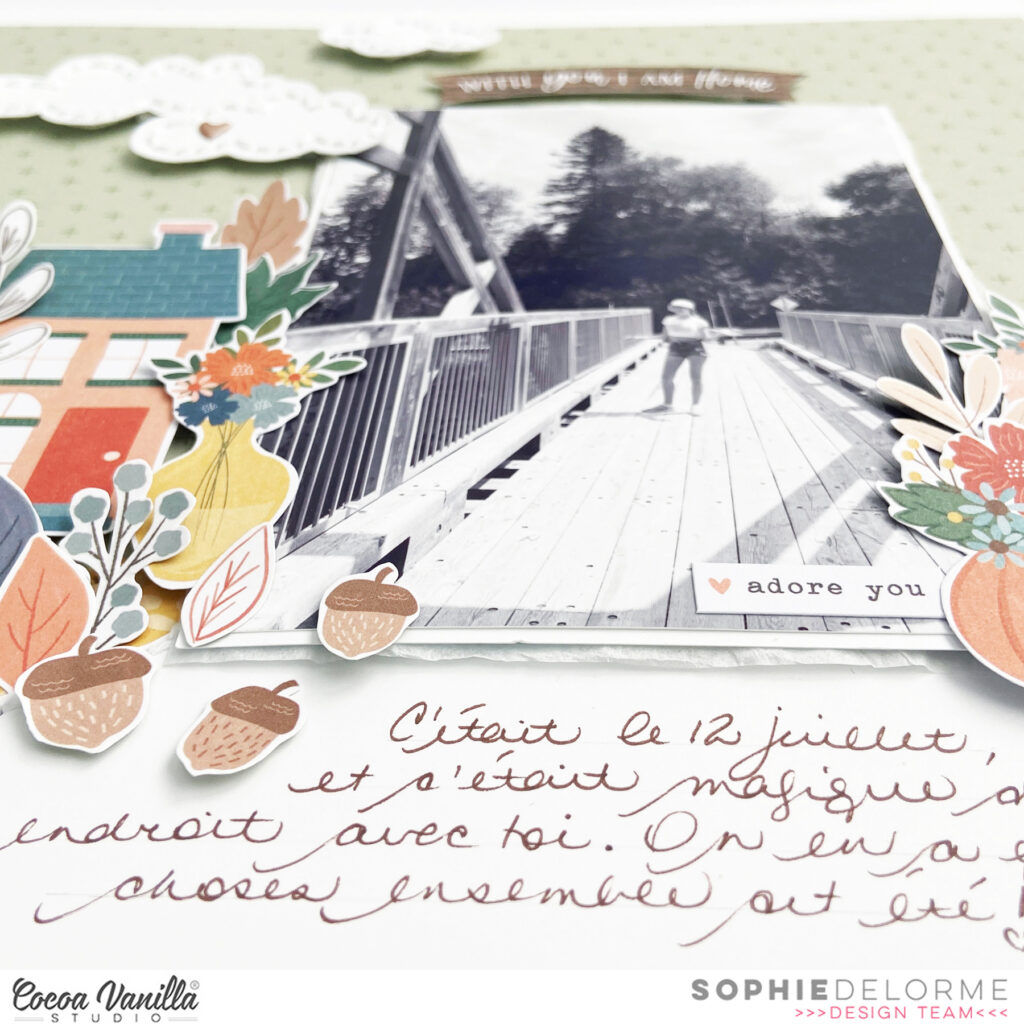
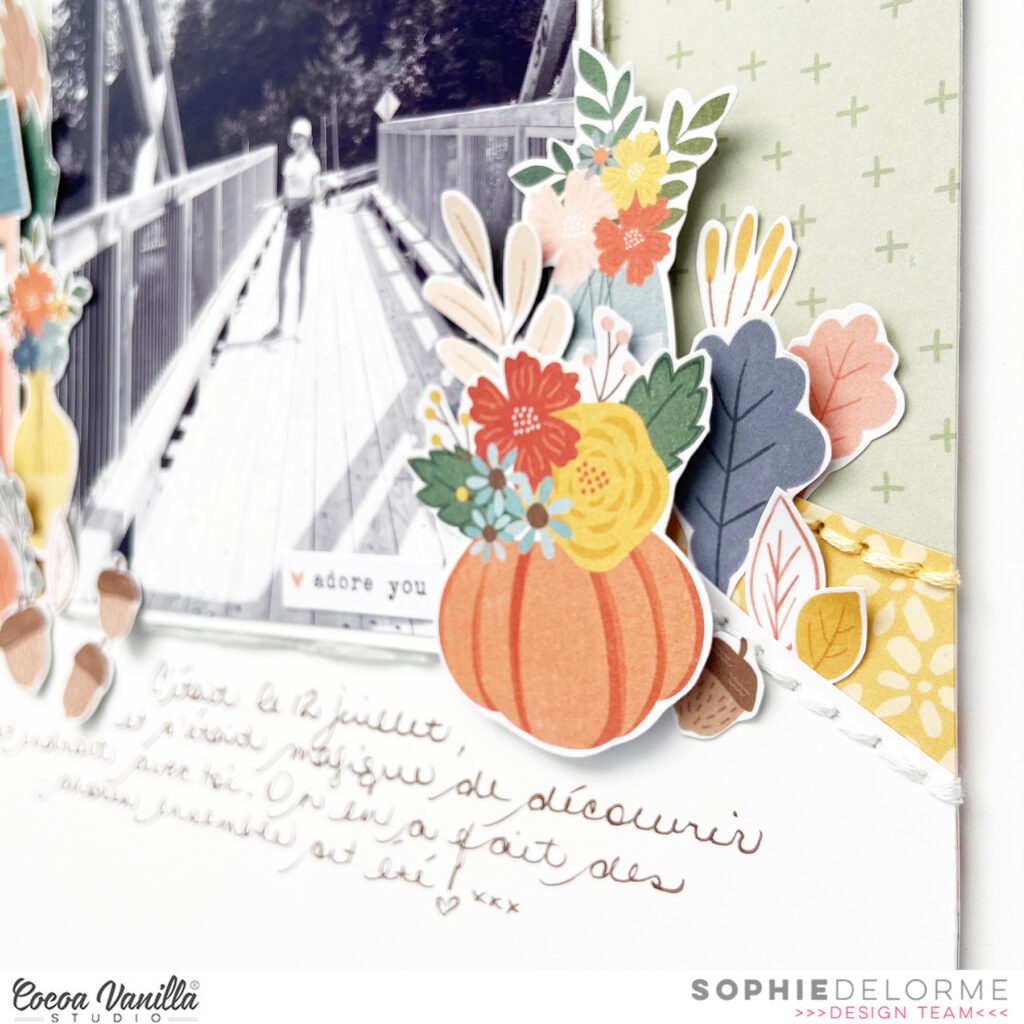
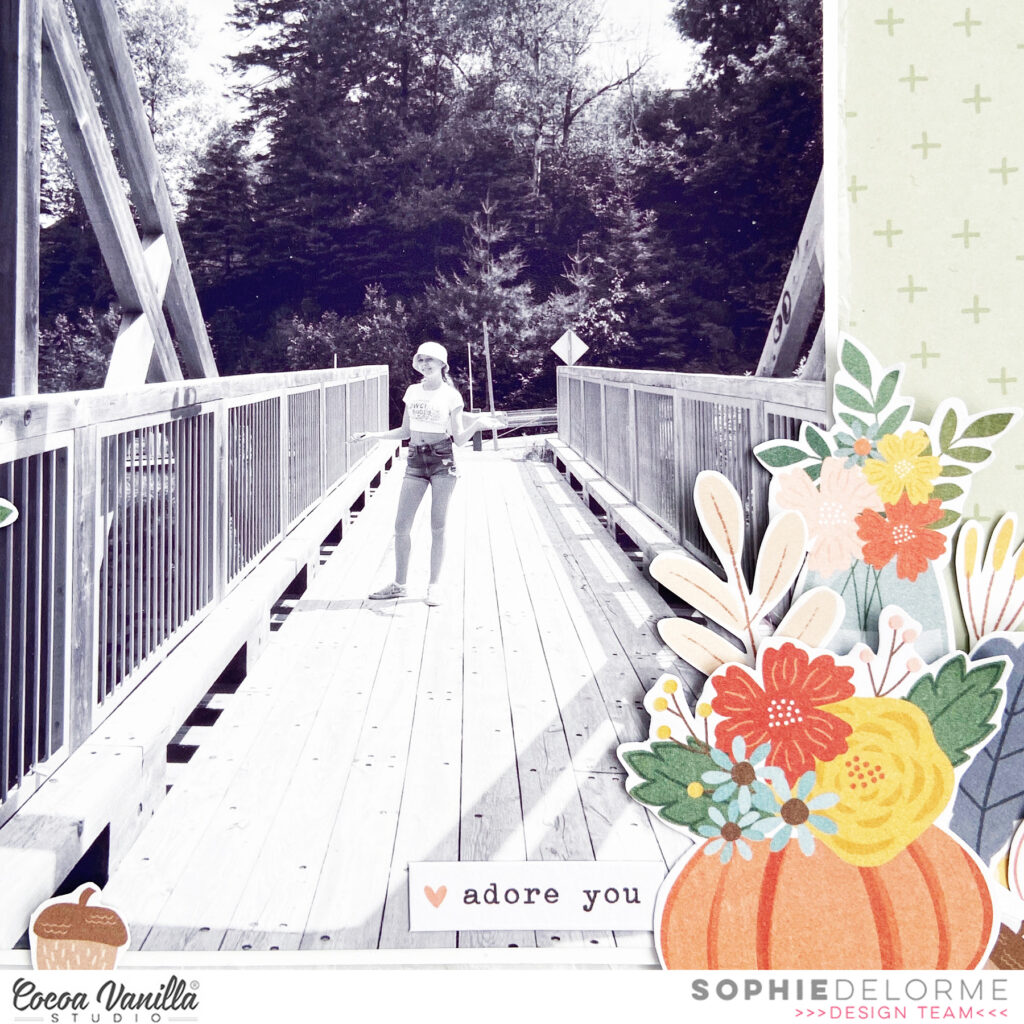
I have a new layout to share today created with the lovely Heart & Home collection !
I based my design on a black and white photo of my daughter Sabrina walking on a bridge this summer. I “continued” the road with white Cardstock and added a yellow border with the “Gather” patterned paper. I hand stitched on the papers with matching thread, and placed everything on the beautiful “Leaf Litter” green paper.
I cut the page into a 11 inches square and mounted it with adhesive foam on a 12×12 white cardstock on which I scored a few lines, as shown in a close-up here:
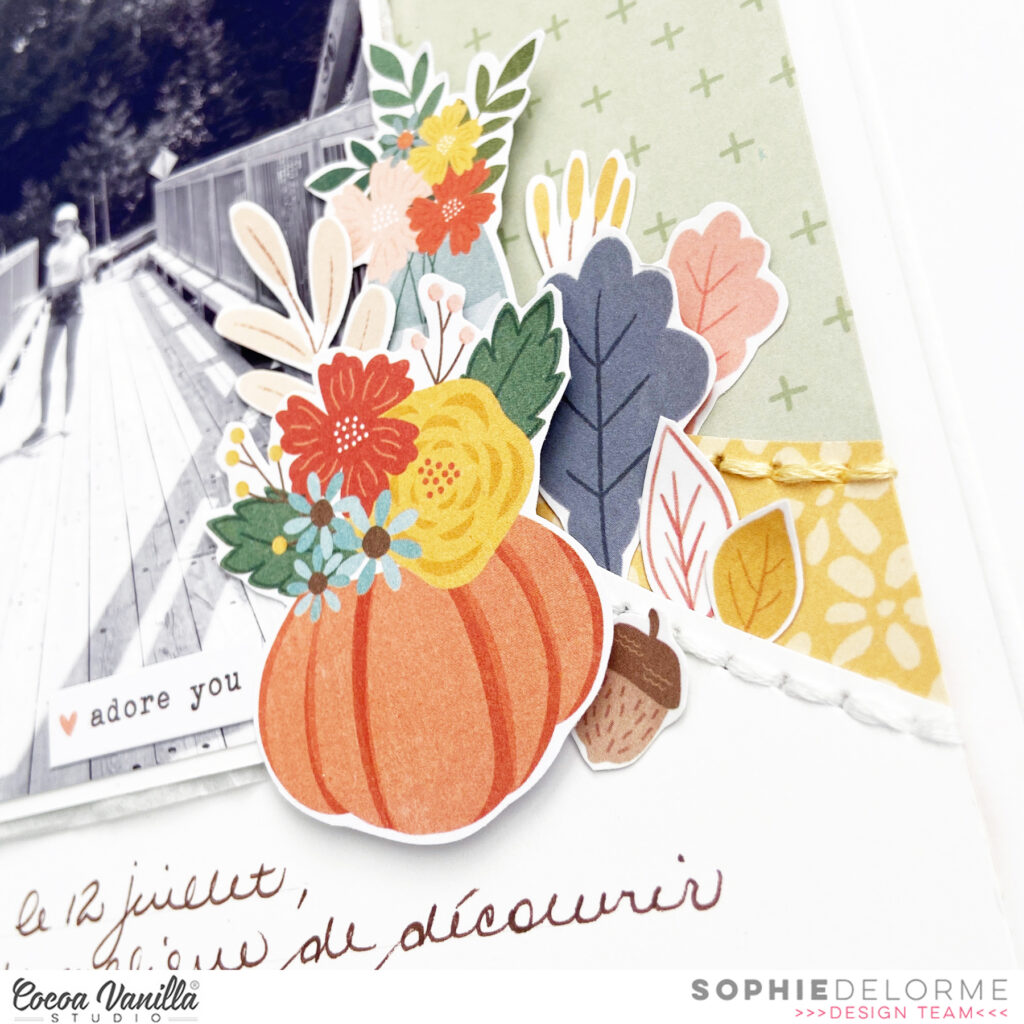
I decorated around the photo along the road with Die Cuts from the Die Cut Ephemera pack and fussy cut flowers and leaves out of patterned papers.
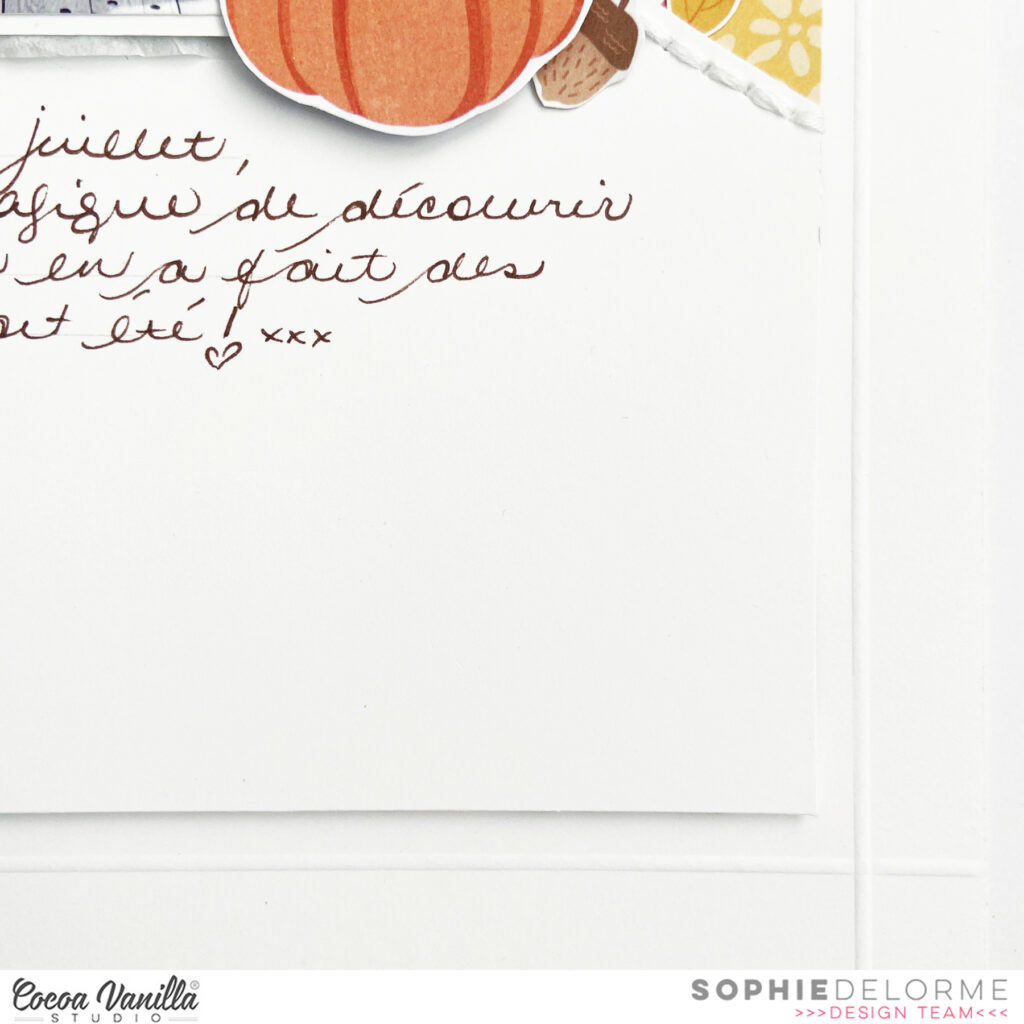
My title is a little banner from the Die Cut Ephemera pack. I drew, cut and stitched little clouds around the photo as the finishing touch, and handwrote my journaling with a brown pen.
Here are more close-ups:
This is a very different design for me but I am so happy of how it turned out !
I hope you like what you see and are being inspired by this gorgeous collection !
Hello and welcome back everyone. It’s Kellie here today sharing another page using the new Heart and Home collection.
Today I am documenting some silly family pics …here is my page…
I recently saw a cut file from Kelly Made It on her blog which reminded me of some of the stitched icons found in this collection and I thought it would work perfectly with this range so I chose matching embroidery threads and made them a feature on my page… love how this worked out.
I used the paper called ‘Harvest’with the stripes to add to the top of my page and another smaller strip to the bottom… I love how this brings in all the colours of this collection. I then bought in a strip of the woodgrain paper called ‘Framed‘ to separate the stripes from the stitching.
I placed my 3 photos vertically down the right side of my page and popped them on the ‘Gather’ paper, distressing the edges to give some dimension. I also added some of the cut aparts also from the ‘Gather’ paper to add to my photos.
Next I worked on my title. I cut out a frame from the ‘Framed’paper and used the ‘Mini Puffy Alphabet Stickers’ to add my title. I popped the frame up on foam pads to add dimension then added some florals which were cut from the ‘Bountiful’ paper to tuck in behind the frame.
I hope you found some inspiration today and pop back regularly to see what the Design Team has been working on.
Hey y’all! Laura Alberts back again with a sweet shelf design to scrap these photos of a curious little squirrel that I saw fairly often while wandering the campus in college last year. It was a mascot of sorts for one of the English buildings and I looked for him every time I walked past. For this layout, I used the stunning new Heart & Home collection and went wild with fussy cutting!
Using the diagonal stripe from the cut apart sheet as a base and adding a branding strip on top, I created two shelves for my photos and title to sit on. Starting from this base, I built up clusters of fussy cut florals from both the patterned paper and vellum, as well as sticker sheet and ephemera icons. I even fussy cut the tiny little flowers to use as scattering bits around my clusters.
On the right side, I added a label for journaling and an adorable little house. On the bottom, I used the line for a large title from the gold foiled titles pack. The falling florals and leaves seemed fitting for photos from autumn here in the United States. I adore these sweet little moments with nature!
I hope this layout inspires you to take photos of unexpected moments or animals that you encounter and record those too! You never know what these memories will mean to you in the future. To see how “Good Life” came together, check out the process video below:
Mandy here with you today and I’m so excited to be sharing my first layout using the stunning new Heart and Homecollection! I absolutely adore the soft muted colours and lovely ‘homely’ feel of this collection. For my first layout, I decided to document a recent photo of my hubby and kids taken on Fathers Day.
As this layout is focused on my hubby on Fathers Day, I decided to give it a bit more of a masculine feel by narrowing the colour palette down to the blues, greens and browns in the collection. I chose four of the patterned papers – Harvest, Golden Fields, Leaf Litter and Fall Beauty – and cut each into a large triangle before piecing them together to create my background. I matted my photo with the woodgrain patterned paper from the A5 Paper Stack and adhered it in the middle of the page using craft foam to help it ‘pop’ off the page.
To embellish the layout I created three floral clusters which create a visual triangle and help to draw the viewer’s eye to the photo. The first cluster underneath the photo includes some flowers and sprigs from the Floral Ephemera pack, as well as a label sticker that I added the date to, and a die cut phrase. I also fussy cut an acorn and leaf from the Leaf Litter paper to add to the cluster. Underneath the photo I added a sub-title using the sweet Mini Puffy Alpha Stickers.
Next I created a cluster to the left of the photo. Again I used Floral and Die Cut Ephemera, and the same colours that I used in the first cluster. To create some dimension in the cluster, I tucked some elements underneath the photo and adhered some overlapping the edge of the photo.
I created a third and final cluster at the top of the page using similar pieces that I’d used in the first two clusters. By repeating colours and elements throughout each of the embellishment clusters it helps to make the layout feel cohesive and balanced. I also finished off each cluster with a Puffy heart Sticker. Above the photo I added my title using one of the stunning words from the Gold Titles pack and underneath the title I added a final finishing touch with a tiny word sticker that says ‘family is everything’.
Thanks so much for joining me here on the blog today. I hope that you enjoyed taking a look at my layout featuring the beautiful new Heart and Home collection!
Hello, hello! It’s Anna here with my first ever project made with brand new “Heart & Home” collection. Fall is slowly coming to the northern hemisphere and this line will be just perfect for all of my pictures taken in September and October. However, before trees will hange their colors and I will decorate my home with pumpkins, I decided to scrapbook photo of my beautiful daughter, taken during our summer travels. This collection is versatile enough to be able to scrapbook with it almost any theme.
I just love the new floral Specialty Printed Vellum and I knew I need to use it right away! As it’s a semi transparent material, it looks best on light or white background. Pattern papers may alter colors of the print, creating new and unwanted shades on your project. I grabbed my small scissors and spend some time fussy cutting flowers and leaves out of it.
I chose white 12*12 paper sheet and applied a little bit of color using brick stencil and Spun Sugar Distress Oxide ink. I wanted to create very subtle background in the area where my composition will be. After it was done, I was ready to start adding flowers.
I combined them with another amazing product – Titles With Gold Foil! They are so pretty so I turned them into the part of my composition, picking the ones that match the photo. They all describe my daughter. Each one is glued with a layer of foam adhesive to add more dimension to my project. In between the words, I added my vellum flowers. You need to remember to use a proper adhesive to mount them as wet glue will make vellum curl and it will not look good. I used a glue dots.
I didn’t use any pattern paper while making this page. Titles and vellum florals are the main decoration here. I also reached for some Die Cut Ephemeras to add more defined splashes of colors. Everything is finished with cute and tiny Puffy Stickers.
First layout of new collection is always a “test project” for me and I need to discover my favorite patterns and elements. I already have few more ideas for “Heart & Home” collection and I can’t wait to share them with you! It’s all for today. Thank you so much for spending your precious time with me and see you in two weeks!
Hello Paperlovers, Welcome to today’s Cocoa Vanilla Studio blog for some fresh Scrapbook inspiration! I’ve chosen the latest collection called “Heart and Home.” What a delightful collection, perfect for cozy autumn moments and family nature adventures. I wanted to document this photo of my daughter and me high up in the mountains in Austria, and the “Heart and Home” collection is a perfect fit. When we’re in the mountains, it truly feels like coming home. Every year, we climb to the eternal snow. We had so much fun. It’s essential to me to capture these unique moments like this one.
I’m starting with a white cardstock paper as the base of my layout. I’m using a dark blue distress oxide called “faded jeans.” I apply the ink with a damp sponge, dabbing it onto the white cardstock paper until I’m happy with the mixed media background. I also splatter some extra blue ink with a brush for a playful effect. I choose two sheets of design paper, cut them to size, and place them behind the photo. I try to match the colors of the design paper with the photo, opting for a blue and brown shade and I position the photo in the center of the layout.
Now it’s time to create clusters, and I carefully select various flower die-cuts for the clusters. I use 3D foam for the clusters to make the flowers stand out beautifully on the blue mixed media background. For the title, “Beautiful Place,” I use gold foil word die-cuts. These match perfectly with the stunning colors in the collection. I place the title partially over the photo and between the two flower clusters. I complement the title with a lovely word die-cut, “with you I am home,” and playfully position two fallen leaves. I embellish my layout with adorable blue puffy hearts. I fussy cut a few butterflies from the patterned paper and give them a place between the flowers. From the vellum, I cut out some additional flowers and place them between the flower clusters. I’m already a fan of these beautiful vellum flowers!
I splatter a bit of white gesso, and my layout is ready. I hope I’ve been able to inspire you with this mixed media layout and look forward to seeing you next time on the Cocoa Vanilla Studio blog. Wishing you a creative and wonderful day!
Hi everyone, this is Niki (@nikiclairecreates) and on this scrapbook layout I have used the new beautiful Heart & Home collection to create a design with circles, stencilling and a cute little sequin shaker pocket out of a piece of ephemera. There is a process video for this layout which can be found lower down.
I started with the beautiful Flurry paper which is dark blue with multicoloured leaves on one side, and has a multicoloured check on the other side. Of course I loved both sides! I cut some circles and positioned these onto a white background together with some patterned paper stripes too.
I made a sequin shaker pocket out of the wreath from the Die Cut Ephemera. I cut a piece of white card to back the wreath with, and cut a piece of acetate the same size. I then machine stitched the two pieces together trapping some sequins inside. I then added the wreath ephemera on top of the sequin pocket – it looks so cute!
I embellished the layout with Floral Ephemera and also added a small amount of stencilling around my circles and photos using a sun beam style stencil.
For my title I used one of the gorgeous Gold Titles ‘gather’ and then added the word ‘together’ using the Mini Puffy Alphabet Stickers.
I finished off with puffy heart stickers and splatters of white paint!
Thank you so much for joining me today and happy scrapping
It’s Tarrah back with you to share a new scrapbook layout featuring the gorgeous new Heart & Home collection! This collection is so gorgeous and perfect for documenting outdoor themed projects as well as thankful, home and Autumn/Fall themed projects! Heck its suitable for any type of project really!
I am documenting a recent photo taken on an adventure with my love. I take photos of us every chance I get!
I started by choosing an Autumn Leaf cut file from CUT to YOU and cut this out from plain white cardstock. I did resize it down slightly and then cut it out. I then adhered the cut file to the yellow/mustard coloured paper from the A5 paper stack. I fussy cut around the edges and then placed it to the side while I created the rest of the layout. I took a plain sheet of white cardstock, as I mostly start with, I took the ‘Flurry paper’ ( I love this paper!!) and tore it in half horizontally. I then adhered this to the top half of the white cardstock, I did leave the adhesive off the bottom in case I decided to tuck anything at the bottom, which I did decide to do. I cut the bottom strip of rainbow diagonal stripes off the bottom of the ‘Gather paper’ and adhered this piece down.
Once the strip was adhered, you can see in the close up photo above that I rolled the edges of the tear part of the ‘Flurry paper’ to add some texture to my page and to reveal the paper on the other side, I love how this paper blends in with the diagonal stripes perfectly. I took the cut file that I finished earlier and using craft foam underneath for dimension, I adhered it overlapping the papers on the page and slightly over to the right hand side to leave some room on the left side for a title and some embellishments. I then placed my photo right on top of the cut file, I love how this adds an extra layer between the background and the photo. On top of the photo I adhered a phrase die-cut piece from the Ephemera pack and tucked in at the top the heart speech bubble die-cut. I cut some of the banner pieces from the ‘Gather paper’ and adhered one on the right hand side, tucked in behind the cut file and the other on the left hand side, underneath the sticker that says, ‘Another Perfect Moment Captured’ from the Accessory Sticker Sheet.
I also adhered the Simple Joys circle die-cut from the Ephemera Pack using craft foam on the right hand side and took a small phrase sticker and placed this above the circle die-cut. My title is one of the gorgeous gold foiled cardstock titles, I chose the word ‘Happy’ and adhered this to the left of my photo using craft foam to add some more dimension. I also added a few more of the small black and white word and phrase stickers from the Accessory Sticker Sheet around my page. I love to add these to my layouts as I do not journal all that much on my pages, adding these helps to tell the story of the photo and capture the moment a bit more. Next I took some of the leaves from the Floral Ephemera pack and tucked in a few of these around the cut file to extend on the cut file and bring the Autumn leaves from the paper above down to the bottom of the layout. I love how these look tucked in all around the cut file.
The Puffy Stickers are just SOOO beautiful so they definitely had to be added to my layout too! I placed most of these down amongst the Autumn Leaf die-cuts, placing some of the circle ones tucked under leaves and the heart ones out for all to see! Lastly stamped the date stamp as I always do and then I added some sprinkles of Gold Heidi Swapp Colour Shine.
I love the detail, the design, the dimension and the collection! It is SO easy to work with and you too can create pretty projects!
Thanks so much for stopping by the Cocoa Vanilla blog today! Make sure to get your hands on the gorgeous Heart & Home collection!
Here is second layout using the beautiful Heart and Home collection. The theme of the collection inspired me to create a family layout, hubby must have been working as its me with my children!
I found this gorgeous flower cut file from the Silhouette design store. For large petals I used Golden Fields and Harvest 12×12 papers, for the smaller petals and smaller flower I used papers from the A5 paper pad.
Once I positioned my flowers on the white base paper I set about adding my photos. I chose a 4×4 and 3×3 inch photos. I used Golden Fields Paper typed words side to mat my photos. I added black stitching to the larger one to add definition and draw your eye.
I added it with foam tape as I wanted to add my title slightly under my photo. I chose the word GATHER from the titles with gold foil pack. I added my sub title under my photo using stickers from the accessory sticker sheet, to finish off I added a tiny floral bunch, which was actually the vase with flowers die cut ephemera which I discarded the vase.
Again with my second smaller photo I added with foam tape and then added more sub titling using stickers from the accessory sticker sheet. I tucked one of the cute houses from the die cut ephemera pack and finished off adding another small flower bunch coming out of the roof and a heart puffy sticker to the door.
Despite this layout looking ‘busy’, you can easily fit two or three photos or one larger photo.


 As this layout is focused on my hubby on Fathers Day, I decided to give it a bit more of a masculine feel by narrowing the colour palette down to the blues, greens and browns in the collection. I chose four of the patterned papers – Harvest, Golden Fields, Leaf Litter and Fall Beauty – and cut each into a large triangle before piecing them together to create my background. I matted my photo with the woodgrain patterned paper from the A5 Paper Stack and adhered it in the middle of the page using craft foam to help it ‘pop’ off the page.
 Next I created a cluster to the left of the photo. Again I used Floral and Die Cut Ephemera, and the same colours that I used in the first cluster. To create some dimension in the cluster, I tucked some elements underneath the photo and adhered some overlapping the edge of the photo.
 I created a third and final cluster at the top of the page using similar pieces that I’d used in the first two clusters. By repeating colours and elements throughout each of the embellishment clusters it helps to make the layout feel cohesive and balanced. I also finished off each cluster with a Puffy heart Sticker. Above the photo I added my title using one of the stunning words from the Gold Titles pack and underneath the title I added a final finishing touch with a tiny word sticker that says ‘family is everything’.
 Thanks so much for joining me here on the blog today. I hope that you enjoyed taking a look at my layout featuring the beautiful new Heart and Home collection!


