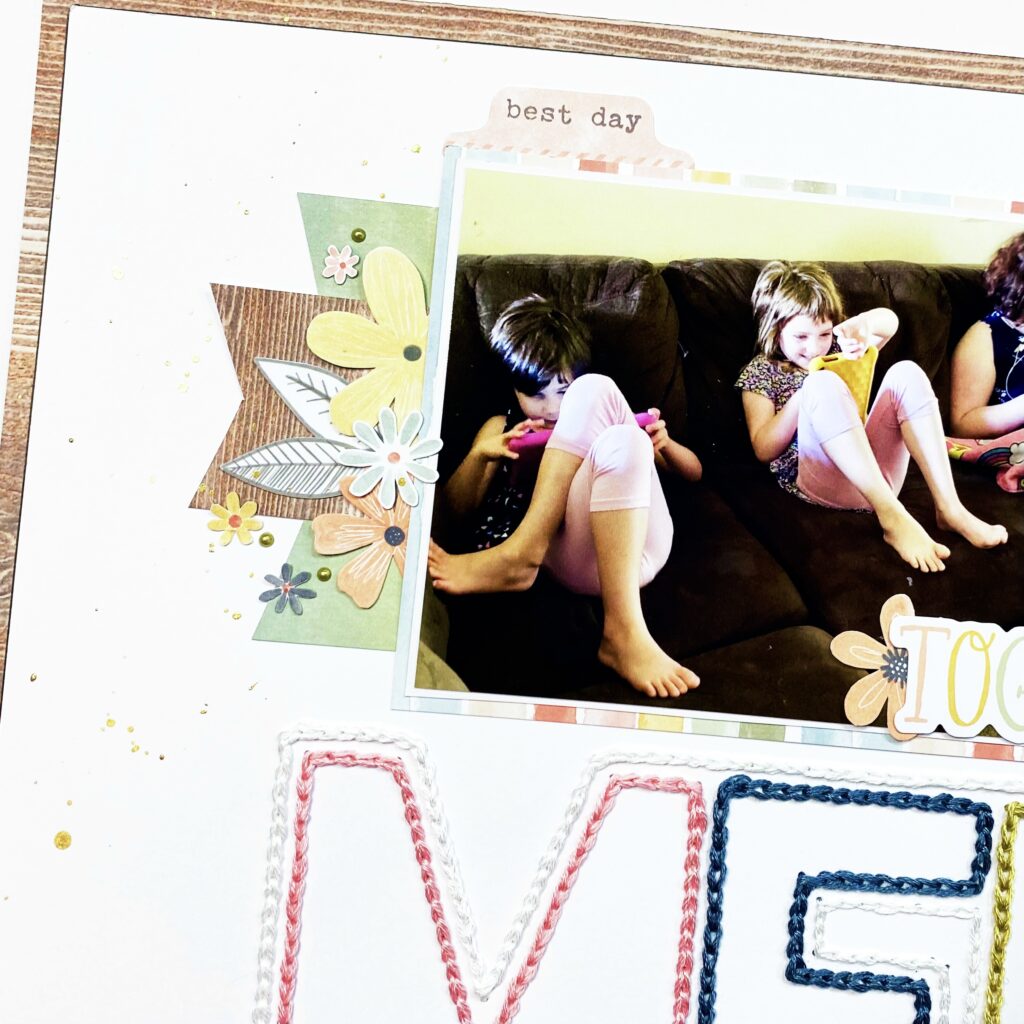
Hey y’all! Laura Alberts back again with a hand-stitched layout featuring the stunning These Days collection! For this beautiful title, I used a stitching cut file from Paige Evans. Instead of using an electronic cutting machine, however, I printed out the image and used a paper piercer to poke the holes by hand. Then, using a variety of coordinating colored floss, I chain-stitched the title. While three days of stitching was certainly a time commitment, I think the end results were worth it!
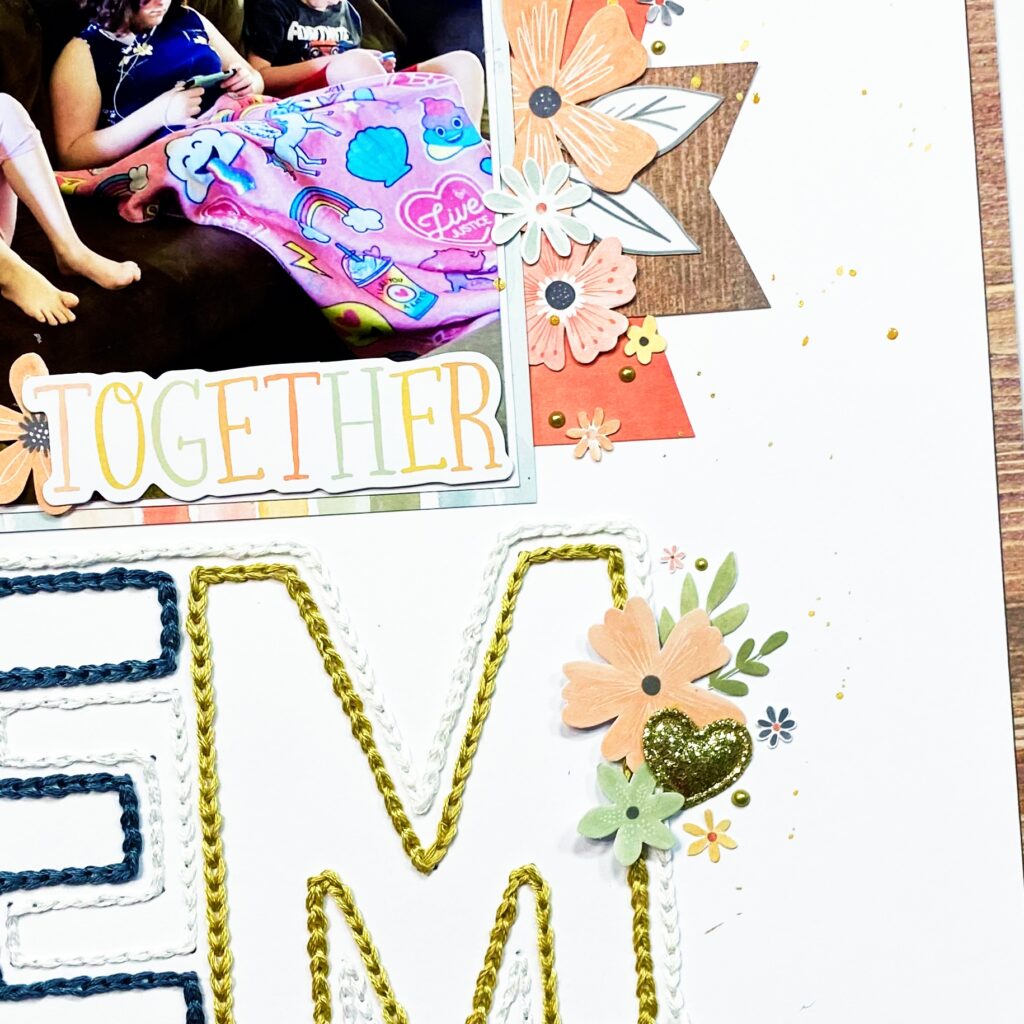
I backed the entire layout with a stunning wood grain paper called Pretty Posies and then reached into the A5 paper stack for these beautiful banners and mat behind my photo. The florals I’ve clustered on either side of the photo are fussy cut from the Home Grown patterned paper as well as the floral ephemera pack. Even those tiny little scattered florals are fussy cut! I do enjoy prepping new collections by fussy cutting all the florals first!
On opposite sides of my stitched title I added florals from the ephemera pack that I fussy cut the white border off of, with little fabric hearts for a bit of added texture. That is the name of the game with this layout! Stitching is a brilliant way to add texture and dimension to a layout without adding a lot of bulk to your albums! I finished off the layout with gold Nuvo drops around the clusters for extra detail and a bit of gold ink splatter. My favourite part was adding my journaling to the ‘O’, such a fun and unexpected place for journaling!
If you’d like to see how ‘Memories’ was created, be sure to check out the process video below! I hope you will give hand-stitching a try and see how you can elevate your scrapping with added texture!
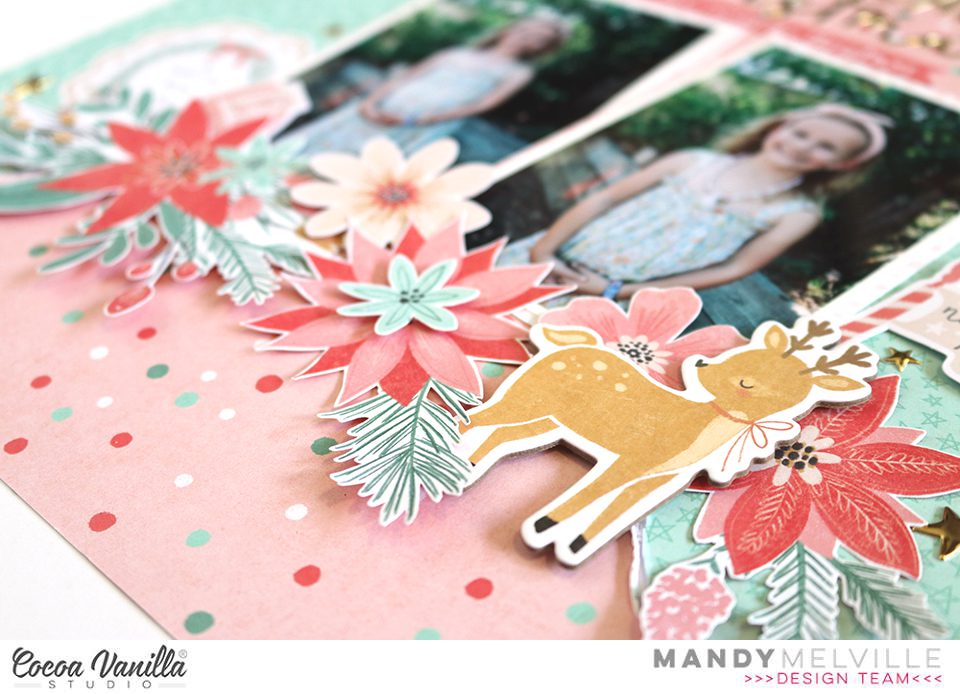
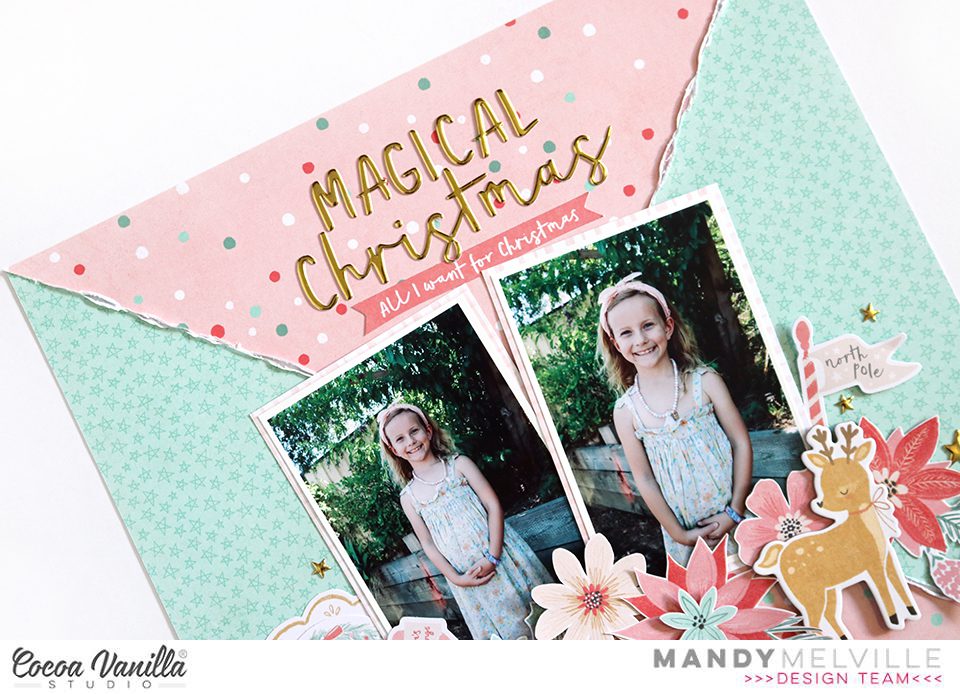
Mandy here today to share some more inspiration using the gorgeous Joyful collection. I can’t get enough of this collection, and I’m having so much fun using it to document our Christmas memories! For my layout today, I decided to scrapbook a couple of super sweet photos of my youngest daughter Eleanor, taken on Christmas Day, and I love the way the beautiful colours in this collection really complement these photos.
I started the layout off by dividing the page into quarters to create four triangular segments. I cut two triangles from the pink Feeling Festivepaper, and another two from the aqua Deck the Hallspaper to fill in the four sections of the background. I distressed the edges of each of the papers to give them lots of texture. I then matted my photos with the reverse side of the Adventpaper and adhered them in the middle of the page.
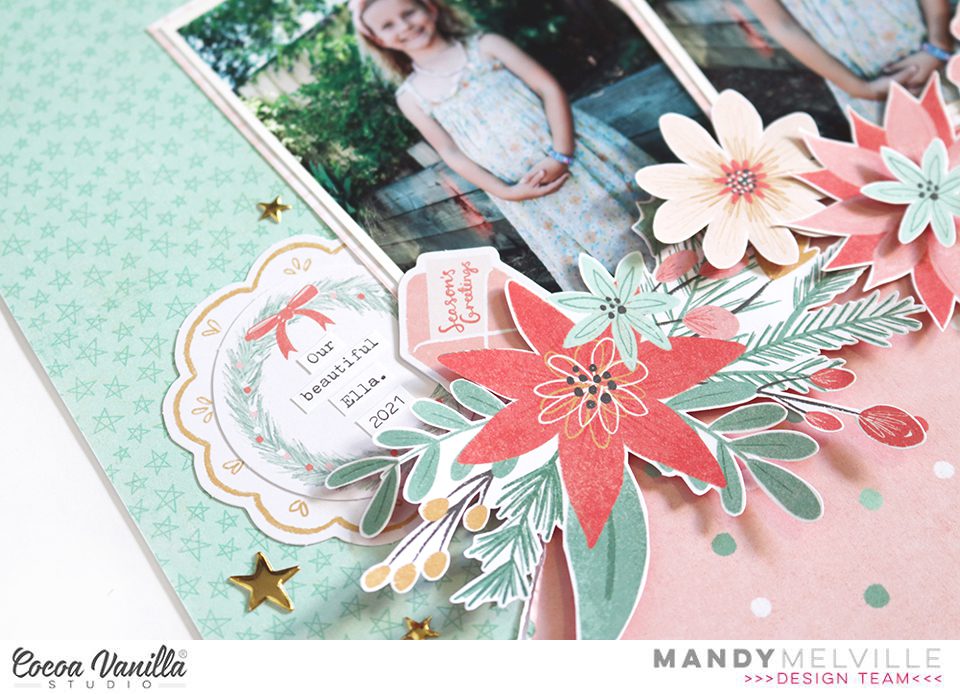
Of course I couldn’t resist fussy cutting some of the beautiful floral clusters from the Tis the Seasonpaper! Once I’d cut them out, I arranged them around the bottom edges of the photos to provide a ‘ledge’ for the photos to sit on. I adhered some of the flowers with foam tape to give the cluster some nice dimension and interest. I also tucked that sweet little chipboard deer in amongst the flowers and I think he looks super cute there!
I also added a few die cuts into the floral cluster, including the cute envelope and the ‘north pole’ flag. To the left of the photos I added a die cut label, layered on top of a frame, which I used to add the details of the photos to.
For my title I couldn’t go past using one of the Puffy Gold Title Stickers, and I decided on the phrase ‘Magical Christmas’. I added this above the photos, and then to finish the layout off I added a sprinkling of gold stars, which are also from the Puffy Gold Title Stickers. I think the gold elements add the perfect touch to a festive layout!
Thanks so much for joining me here on the blog today. I hope that you’ve been inspired by my layout. I’ll be back to share some more inspiration next month. Until then, happy scrapping!
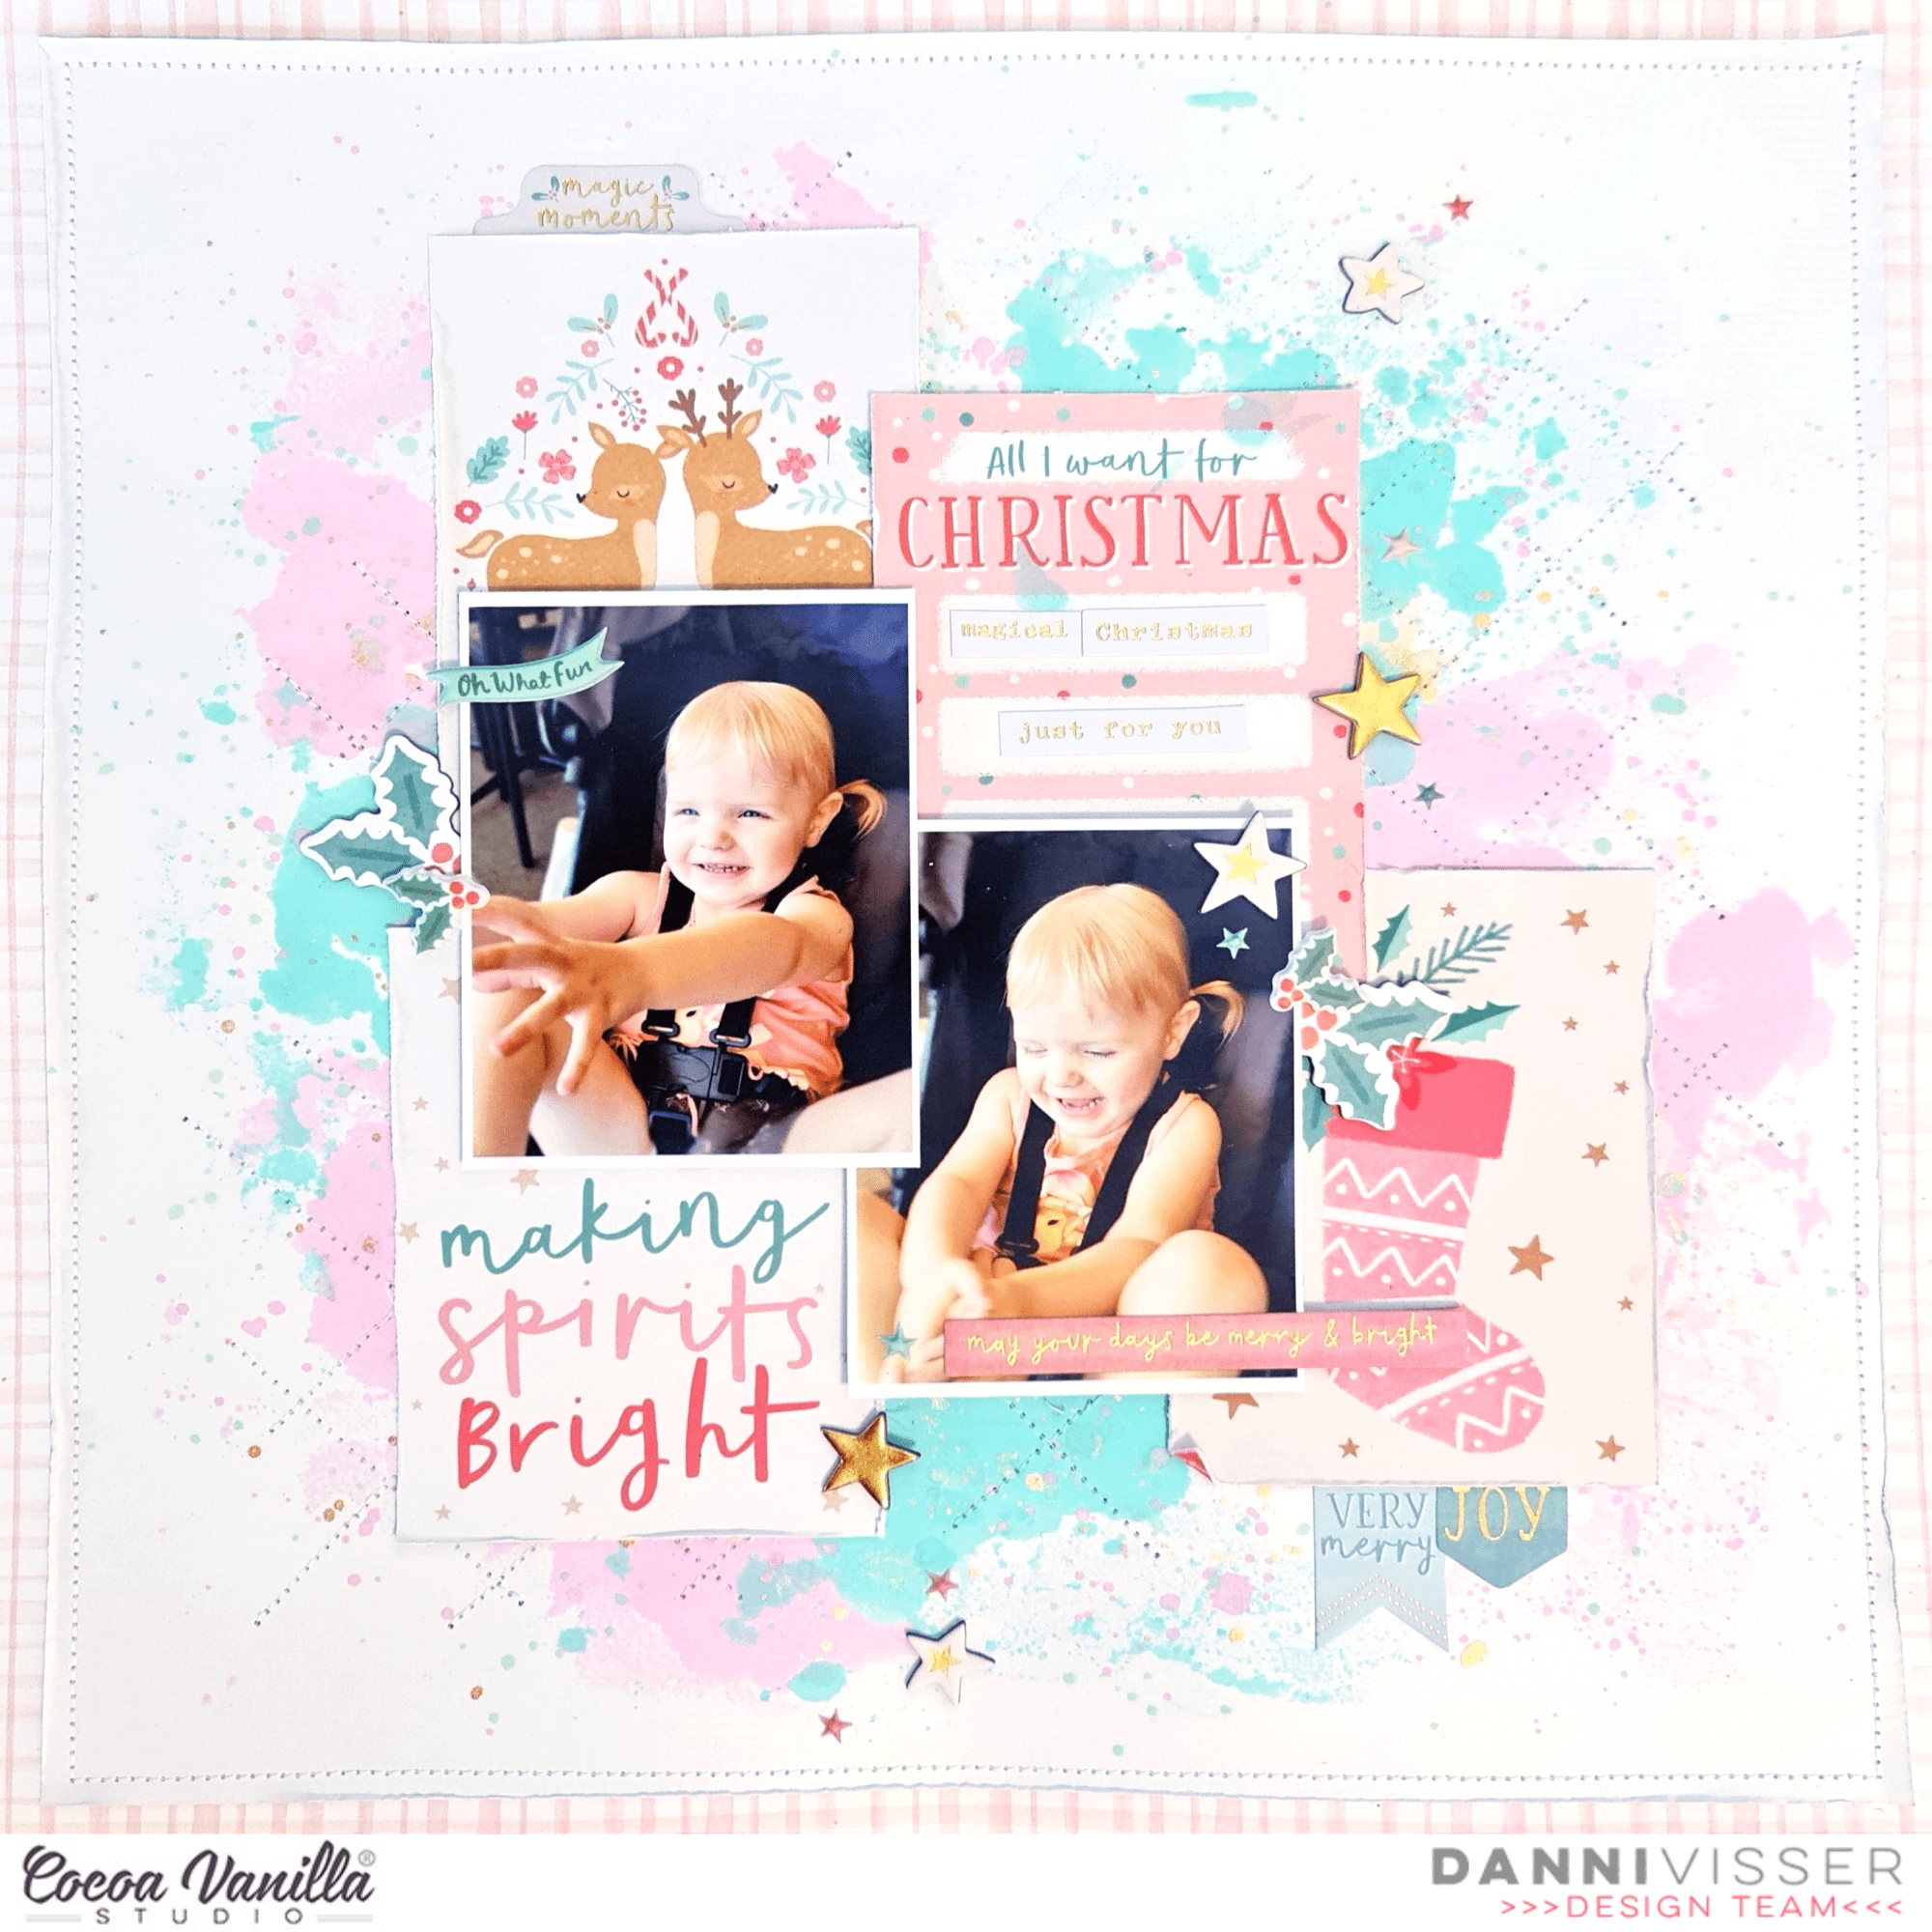
Hi Cocoa Vanilla Studio friends! Danni here with a fun mixed media layout featuring the absolutely beautiful Joyful collection, because I still can’t get enough of it! I have a couple of sweet photos of my little girl to document, so I decided to keep everything bright and add lots of texture using machine stitching.
I started the layout with a white cardstock base and added a border with the soft pink gingham side of Advent 12×12 patterned paper. I added a line of machine stitching around the edge to add extra security and added detail. This gave me an idea to add a quilt-inspired design to the page – I’ll explain more about that later.
I have been eyeing off the gorgeous double sided 3×4 cards for a while, and this is one of my favourite ways to use a bunch of them on a layout. I overlapped my two 3×4 photos slightly, then chose four of the cards to build a large cluster to go in the centre of the page. I distressed all the edges of the cards then layered them around and behind my photos at different heights and widths to create variety. I adhered all these together then set them aside while I worked on my background.
I wanted to add some mixed media to the plain white background, so I took some distress oxide ink pads and diluted the colour using water and some white acrylic ink. White acrylic ink is great because it mutes bright colours while also making inks more opaque. My colours ended up still being brighter than I wanted, but I’m totally ok with that. I used the packaging technique to add messy splotches of the ink to the white cardstock.
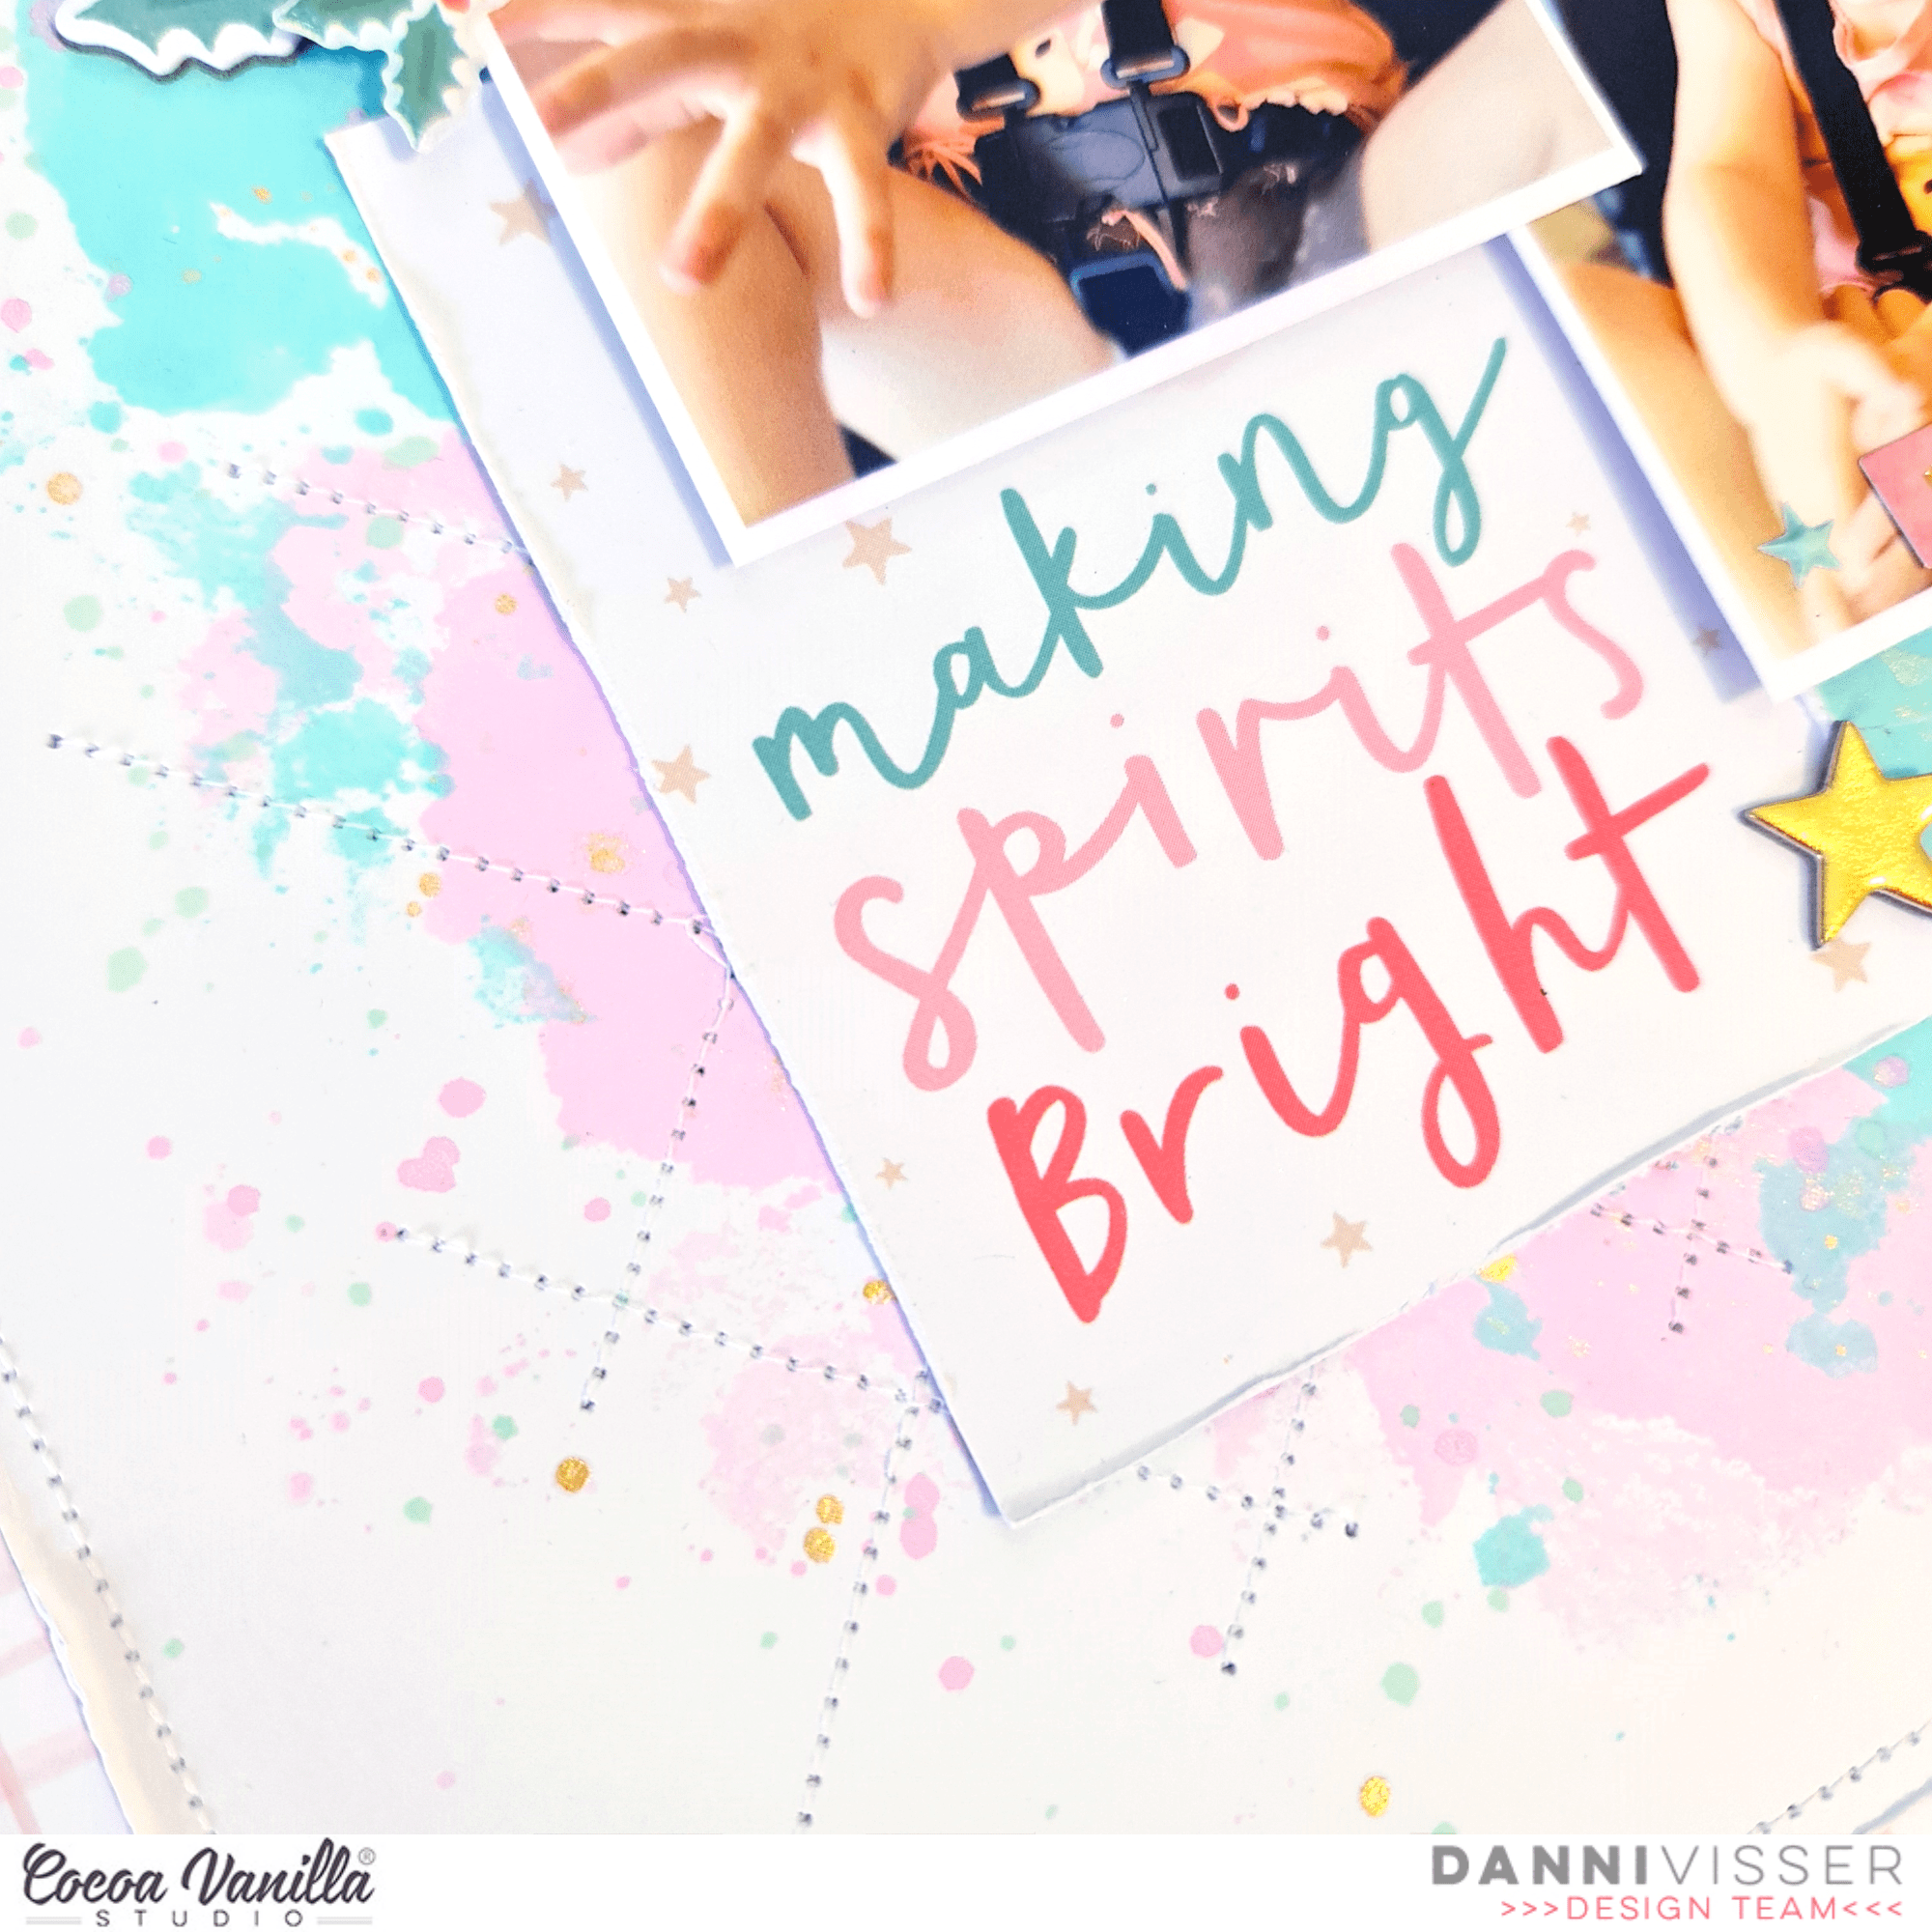
Once the paper was completely dry, I went in with my sewing machine and added lots of cross hatching lines of stitching in a quilted-style pattern. I made sure to add the stitching where it would be visible around my central cluster. Because my photo and card cluster was already adhered together, I could just go ahead and glue it down to the centre of the page in one piece. I ended loving the quilted stitching effect peeking out from behind everything!
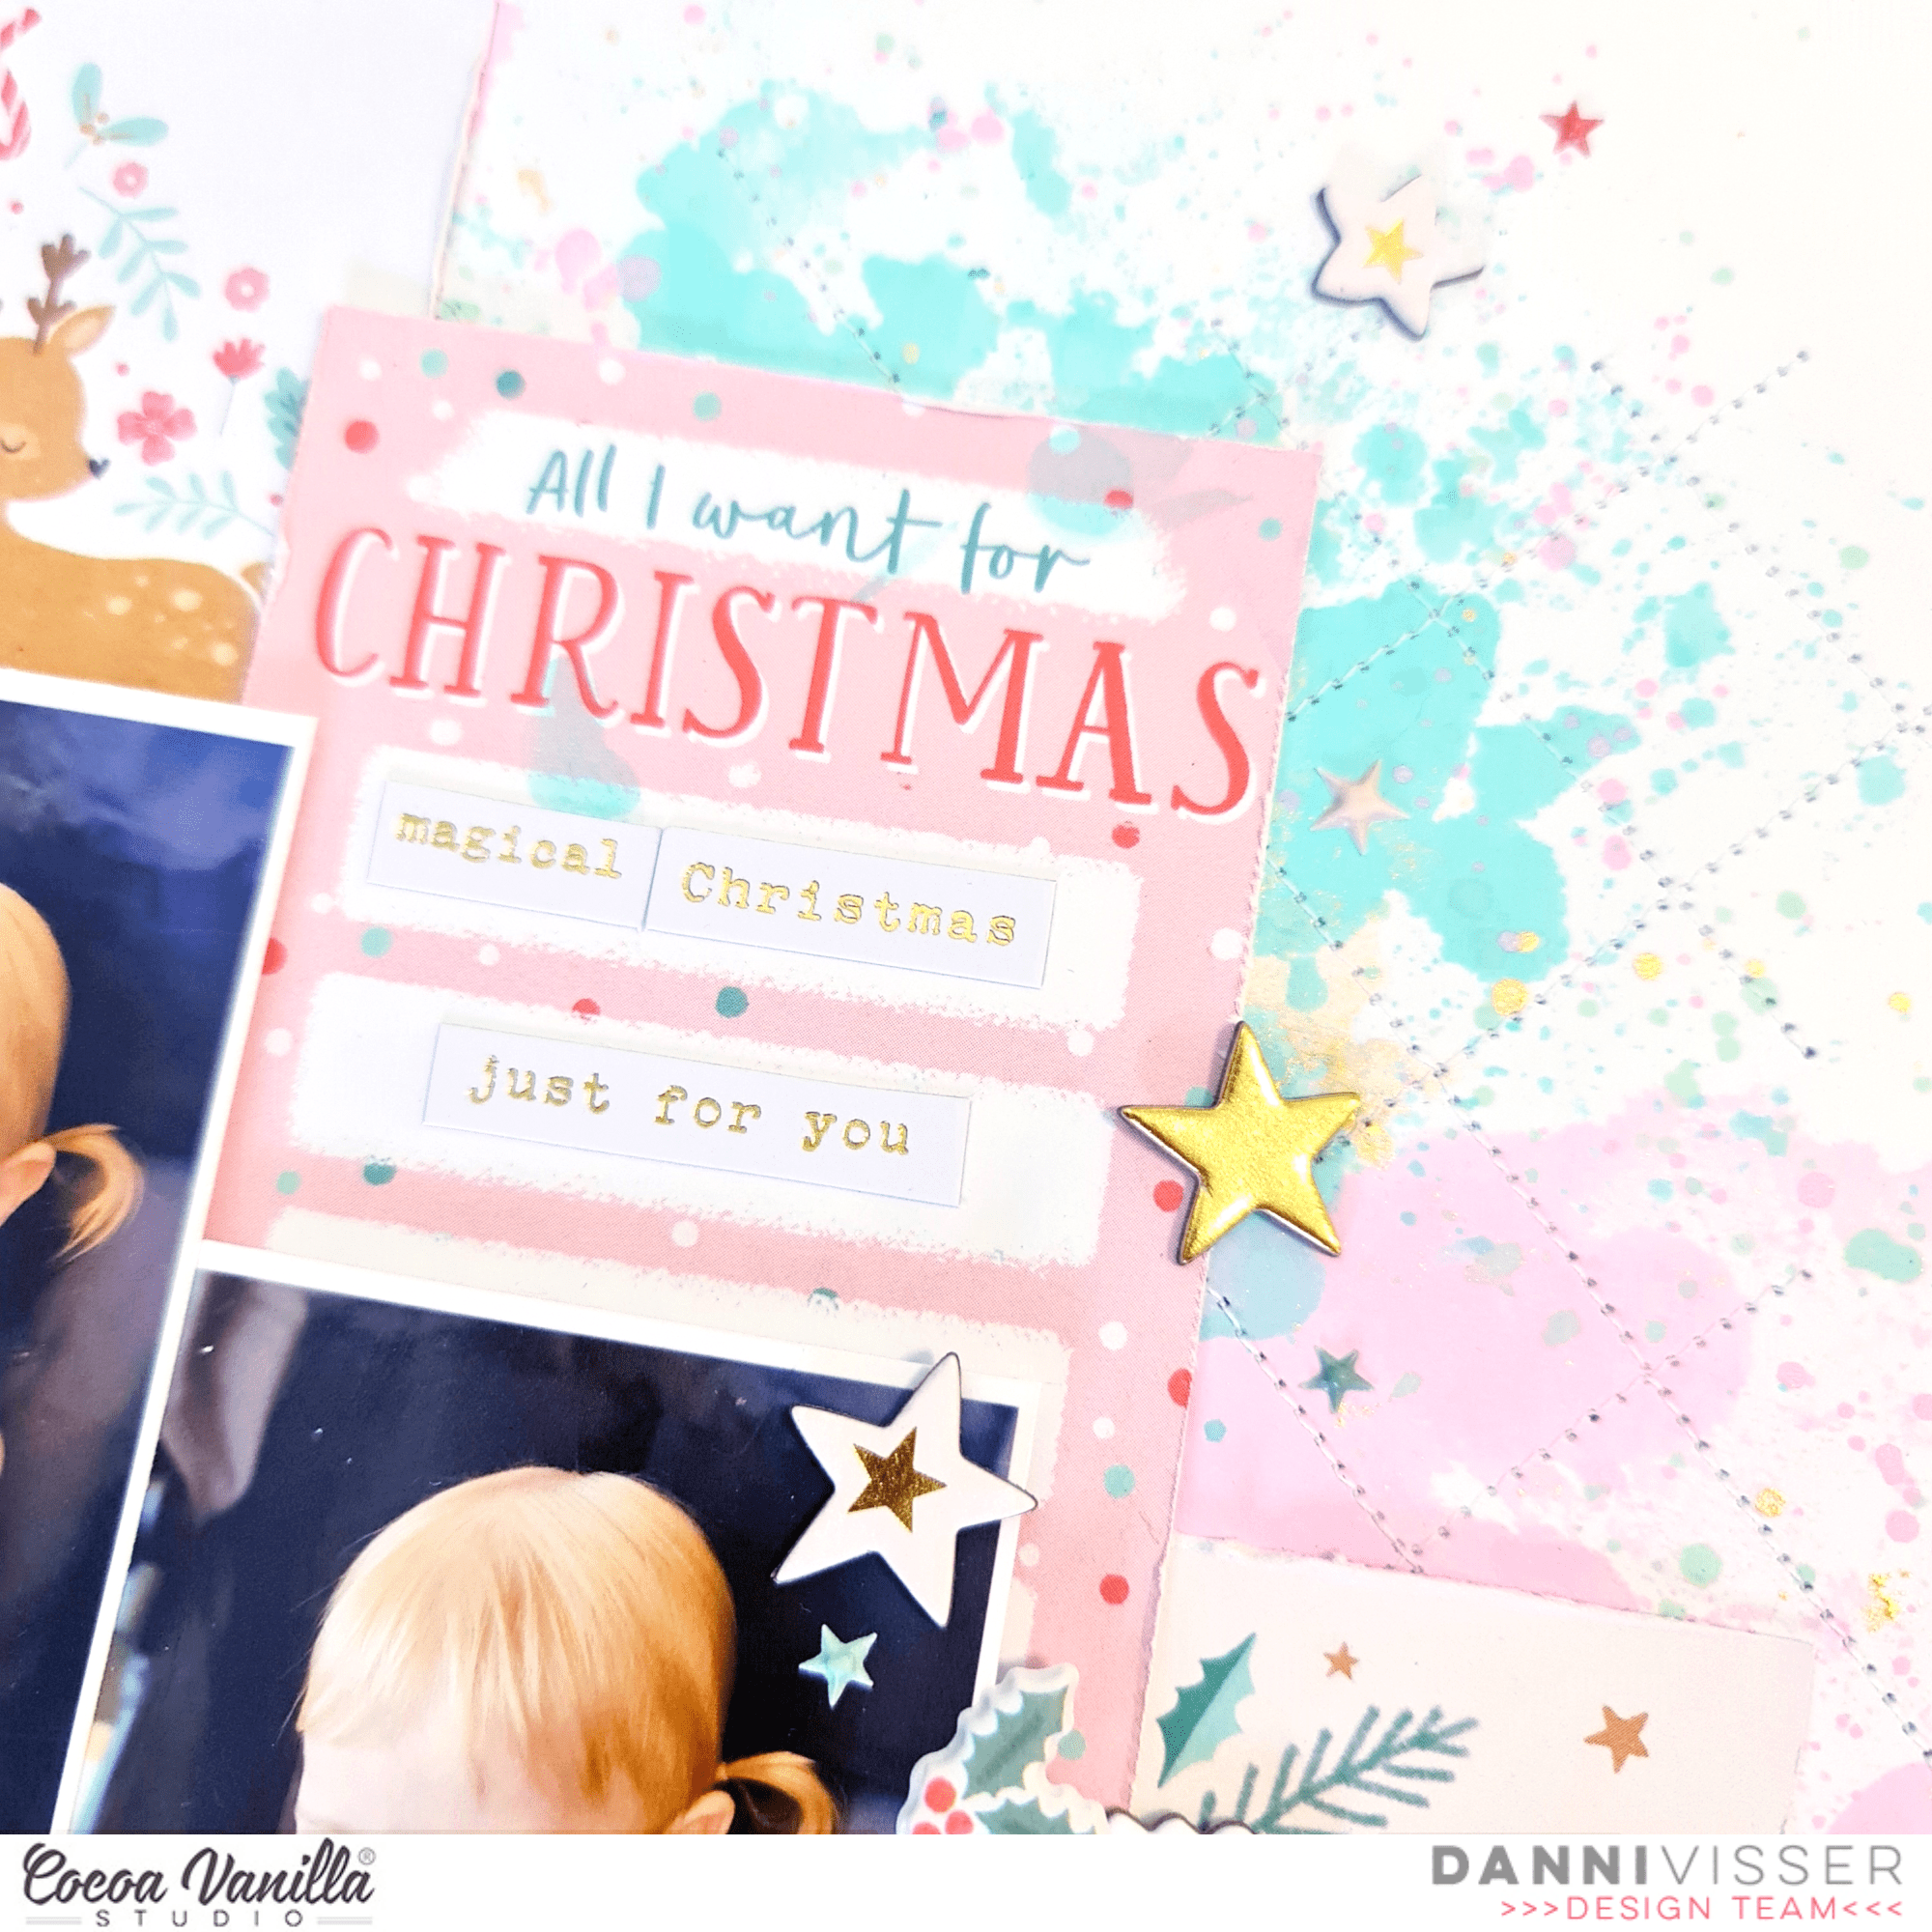
I finished off the ‘All I want for Christmas’ card with some small phrase stickers from the accessory stickers – I just love that shiny gold typeface font. I also took a couple of flag accessory stickers and layered them below the lower 3×4 card, plus a tab accessory sticker at the top. I embellished lightly with some chipboard sticker holly leaves either side of my photo, and some shiny chipboard sticker stars cascading down my layout.
Finally I added some puffy sticker holly leaves layered with the chipboard sticker ones, then some tiny puffy sticker stars. I love how this one turned out, I hope you did too. There is a process video linked below on the Cocoa Vanilla YouTube channel if you would like to watch this layout come together. Happy scrapping!
Hello scrappy Friends. It’s Anna here with my newest page. I still haven’t finished scrapbooking christmas photos so the bag with “Joyful” collection is still on my desk. I had this one, fun photo of my puppy spending time under the christmas tree that I wanted to use on the project. It was such a funny moment, when he found a perfect spot for the nap there, when all the presents were handled and christmas was done and dusted. All I could think of while looking at him was a Mariah Carey’s song “All I want for christmas is you”. He was like a self wrapped gift :) It have me an idea of a layout title.
I gathered all solid patterns from “Joyful” line, going through both 12*12 sheets and A5 paper stack. I decided to use “Deck the halls“, “Feeling festive“, “Making spirits bright” and “Tis the season” plus few small papers fromt the stack. Next step was to hand cut the letters for the title. I haven’t sketched anything so each letter if different. I tried to keep them around 5 cm tall. If you want to recreate my idea and you don’t feel confident enough to cut them by your own, you can reach for bigger alpha dies or digital die cutting machine. My desk is a total mess right now, swamped with few projects in progress so I didn’t have room for the Cameo to put up.
I tried few pattern papers for my background but they were mixing with the patterns I used for letters so I decided to use sheet of kraft cardstock instead. I arranged the letters and the photo and glued everything down. I only applied glue in the middle of each letter to be able to tuck something behind them if needed.
Next step was to decorate everything with ephemera pieces and stickers. I went through ephemera pack, chipboard stickers and puffy stickers to choose matching elements. I found a tall gift and I replaced one of the I letters with it! Am I brilliant or what? :D I also fussy cut some starts from “Making spirits bright” and added them to composition. You all know how I love papers with elements that can be easily cut out!
Here you can see my precious gift from up close. Isn’t he the cutest? My final step was to add few wooden buttons and golden splatters. To my surprise, this page came together really fast. Cutting the letters took me less than half an hour and placing all the elements another half making it an one hour page. I had a lot of fun with the big title and I will for sure revisit this idea for some other topic. It’s also a perfect opportunity to use up smaller paper scraps or make a page when you run our of full 12*12 papers and have only leftovers.
That’s all for today. Are you still creating christmas themed projects like me, or after the December is done, you no longer find it enjoyable? Let me know in the comments. Thank you so much for stopping by and see you in two weeks.
Hi everyone, Its Melissa here and I’m thrilled to be back with my first post of 2022! I was very tempted to create another spread for my December Daily Traveller’s Notebook, but instead I decided to create a layout with the beautiful Joyful collection. This layout is about my 7 year old daughter and her letter to Santa, which she showed him during a visit in our little town. I backed the cut file with predominantly papers from the A5 Paper Stack.
The lovely cut file is by Confessions of a Paper Addict and is not Christmas themed, however I made it work by adding fussy cut florals from this collection. I also used vellum for the paper in the typewriter. I printed out “Dear Santa” on my computer with a typewriter font.
For my background I did some ink blending with Distress Oxide inks and an older stencil. I also used several Chipboard Stickers which I adore!
A large floral cut from Tis the Season was perfect to place on the bottom of my photo to balance all the other florals. I used sparkly glitter paste on all of my fussy cut florals.
The woodgrain paper is from Sunkissed and is called Just Chillin. It was perfect to look like a desk for the typewritter to sit on.
Hello Paperlovers,
Welcome to my new post on the Cocoa Vanilla blog today! It’s Josefine here with a new scrapbook layout. For this layout, I chose a winter layout that I created with the amazing Joyful Collection and was inspired by the Cocoa Vanilla Moodboard.
One of the things that inspired me was the winter photos and the light blue color of course I added some extra colors to my design. With the velum and white gesso splatters, I tried to capture the winter vibe.
I start with a mixed media background that I created with the distress oxide ink. I chose the color “Victorian Velvet” I applied the ink with a stamp to my white cardstock background by stamping several times. This is how I created a stain of ink in the center of my layout. I punched out several butterflies from the design paper, vellum and light pink tissue paper.
I used gold sewing thread and stitched the butterflies together. I also punched out a photo in a butterfly shape. I placed the butterflies in the center of the mixed media background and start decorating using die-cuts, flowers, stars, stickers and wooden buttons.I placed die-cuts, flowers and stickers between the butterflies. I loved how that turned out. Look the gorgeous word strips on my layout and the gold title Memories under the butterflies. I splashed white gesso and gold acrylic paint splatters on top of the butterflies and embellishments.I punched some white twigs out of white cardstock and gave them a winter look with the Nuvo glacier. WoW, such a cool effect! I really love the shimmers. Curious to see more details and exactly how I made the layout! Just hop over to the Cocoa Vanilla Youtube channel for the process video! https://youtu.be/lkJee7SFoG8
I want to thank you for visiting the blog today and hope I was able to inspire you with this layout! I wish you a very happy and creative day today and enjoy watching the process video.
XoXo, Jo
Hey Hey! It’s Michelle here with a new layout share featuring the wonderful Joyful Collection. A brilliant Christmas themed collection that was just right for documenting our sweet Doggo’s first Christmas. We had such a magical day, and this little fur ball absolutely loved the insane amount of wrapping paper we had around.
I started the base of the layout first by getting messy with some inks, water and plastic packaging. The best way to smoosh the colour on without getting too messy, although it does make the paper warp a little but nothing I cant handle.
I’ve used a cutfile from CUTtoYOU that I used on a previous layout, this time I flipped it around a little and cut it up to fill the corners of the layout rather than the centre. I backed each star (including the main large star) with different pattern papers from both the A5 paper stack and 12×12 papers, then adhered them to the background using double sided tape for a little dimension.
The sweet little photo of human kid and fur kid has been backed with the candy cane print from the A5 paper stack and adhered using more of that fabulous doubled sided tape. I added the tags (ephemera pack and pattern paper) to the top right of the photo to cover some of the junk thats shown in the background of the photo lol
In the top left corner I added some extra ephemera pieces along with some fussy cut stars to created an open cluster of sorts
I repeated the same elements in the other star groups at the bottom and right side of the layout.
Next up I added a mixed font title using the awesome gold puffy title stickers, my beloved white alphas and an ephemera piece. I sewed through the white alphas to ensure they stay put for years to come.
Heck how cute! I couldn’t pass up the chance to use this sweet little rabbit from the ephemera pack in this tiny bottom cluster.
And as a last minute addition to the already adhered layout, I added in a little pocket to the back of the photo and tucked in a journalling card from the pocket page cards pack. I embellished this with some ephemera pieces and accessory stickers then added the note about Daisy Doggo’s first Christmas.
Well friends thats all from me today, thanks so much for stopping by to see my first creation of 2022. I can’t wait to get back into the craft room to make more mess with this wonderful Joyful Collection!
It’s Tarrah back with you and yes I am still creating Christmas layouts!! I just can’t get enough! The stunning Joyful collection makes it so super easy to create pretty Christmas pages! I documented a Snapchat selfie photo taken on Christmas Day.
I chose the Holly Days paper as my main background paper and trimmed it down so that I could back it with the woodgrain side of the Pretty Posies paper from the These Days collection. I like how the woodgrain paper helps to make the fox die-cut pop and the flowers in similar colours on the page. I machine stitched a border around the edge so that the 2 papers attached to each other.
I cut out a pretty cut file from CUT to YOU and used the A5 paper to back all of the open spaces. On the bow of the cut file, I added red and then added 2 different greens to the leaf parts of the cut file. I adhered it down using regular adhesive, I love how the wreath on the Holly Days paper peeks through and adds a layer and some extra detail between the cut file and paper.
I layered one of the cards from the Pocket cards pack under my photo and adhered the photo down using craft foam over to the right of the layout. For my title, I chose the Believe word from the Gold Puffy title stickers and placed it below my photo. I fussy cut out some of the Poinsettia flowers from the smaller paper in the A5 paper stack and adhered some around the page. In the centre of the bow at the top, I placed the round Making Spirits Bright chipboard sticker. A few of the smaller embellishments I added were wood epoxy buttons, Accessory stickers and some more die-cuts. I also added a few of the small stars from the Gold Puffy Title stickers. Lastly I stamped the date stamp and my layout was complete.
Thanks so much for stopping by the Cocoa Vanilla blog today! I absolutely love how my layout turned out and I hope you were inspired in some way?
I centered them in a horizontal line on a white cardstock and added a gold machine stitch on the Advent paper. I distressed and curled up the edges of each paper.
I used a black and white photo of our sweet dog Fiona in front of our Christmas tree. I mounted it on adhesive foam and added tissue paper behind it.
I used two pocket cards from the Joyful collection Pocket Cards pack on each side of the photo, printed my journaling on velum and added it to the right card.
My title comes from the Joyful Chipboard stickers. I stamped the word “my” with an alphabet stamp set from my stash.
I created two big floral clusters that are from the Joyful Die Cut Ephemera pack and some fussy cut out of the gorgeous Tis The Season patterned paper. I also created leaves with a leaf punch from my stash.
I added a gold ribbon bow and a few white leaves that are from a JustNick Studio cut file.
Finally, I added a few Joyful Puffy Stars, a Wood Button from the same collection and numerous gold crystals from my stash.
Here are more close-ups:
Although Joyful is a Christmas collection, It is so versatile and easy to use for other kind of projects !
I hope this was inspiring for you ! Thank you for stopping by, and happy crafting !
Hi everyone, happy new year! If you are anything like me (4 weeks deep into school holidays), you are having trouble remembering what day it is and are tired of hearing “muuuuuum” for the five hundred and twentieth time today. (Hang in there, we’re past the half way mark!) Fortunately, I do know today is Thursday, because it is actually “Throwback Thursday” and my turn to bring you some fresh inspiration using an older collection. I didn’t go too far back though, because today I am sharing a layout featuring the beautiful ‘Sunkissed’ collection which is still available in the Cocoa Vanilla Studio online store.
For this layout, I wanted to create a mixed media page and decided to use some of my stash of acrylic paint. I love using paint because it is quick, easy, economical, and available in a great range of colours. And even those of you who are not “mixed media people” will usually have access to paint if you want try a technique like this yourself. (I didn’t use any fancy paints – cheap student grade acrylics will do the job!)
The photos I documented on this page are of my two boys taken on the day of their colour run at school. This was not long after they had crossed the finish line and they were both so proud of how wet and coloured they were. (And no, I didn’t bother trying to wash the clothes, they were destined for the bin anyway.) It was the colours of the paint on their clothes that inspired my colour choices for this layout.
As I mentioned above, I used acrylic paint for my mixed media background on this page. I used three different colours which I applied with a small brayer. (This method is great if you are short on time as the thin application means it dries super fast!) I then mounted my painted cardstock on top of the beautiful Good Vibrations striped paper, which created a fun page border.
Next, I added my rainbow arches, which had been fussy cut from a piece of the Bright Side paper left over from a previous project. I cut only the pink, orange and yellow arches (or what I had of them anyway) and stuck them onto my background.
I then created a layered mat for my photos to sit on using a piece of the heart print Feelin’ Fine paper, topped with a piece of the smaller scale cloud print paper from the A5 Paper Stack and finally a scrap of the Summer Lights paper. I also added a small yellow paper doily and some frayed gauze for texture before adding my photos on top.
The next step was to add my title, which I ran along the horizontal strip in my paper stack. To the left of my photos I used some alphabet stickers I had left over from the Love Always collection for the word colour and then to the right, I used the word fun from the Glitter Foam Title Stickers. Look at that gorgeous golden sparkle!
With all the main components in place, it was time to add a few fun embellishments. I chose a number of pieces from the Die Cut Ephemera pack including a flag, umbrella, and a watermelon slice. These were chosen purely based on their colour, but I love that they add a touch of whimsy to the page. I also added several stickers from the Puffy Stickers pack.
I finished off with some phrases from the Accessory Sticker sheet and some tiny black ink splatters. I love how fun and colourful this layout turned out!
If you would like to see exactly how it came together, you can watch my process video here:
Thanks for stopping by so I could share this with you, I hope you are feeling inspired to bust out some of your older Cocoa Vanilla stash now too! Until next time, happy scrapping!


 I placed die-cuts, flowers and stickers between the butterflies. I loved how that turned out. Look the gorgeous word strips on my layout and the gold title Memories under the butterflies. I splashed white gesso and gold acrylic paint splatters on top of the butterflies and embellishments.I punched some white twigs out of white cardstock and gave them a winter look with the Nuvo glacier. WoW, such a cool effect! I really love the shimmers. Curious to see more details and exactly how I made the layout! Just hop over to the Cocoa Vanilla Youtube channel for the process video!


