Hi crafty friends, Anita here sharing my first project of the month…
with the awesome Legendary collection
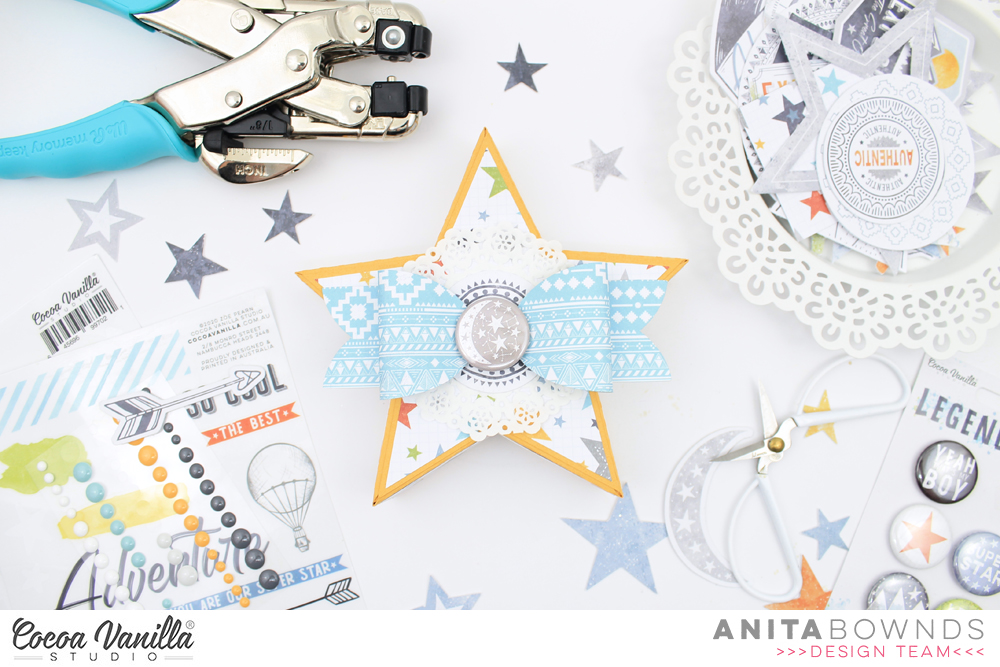
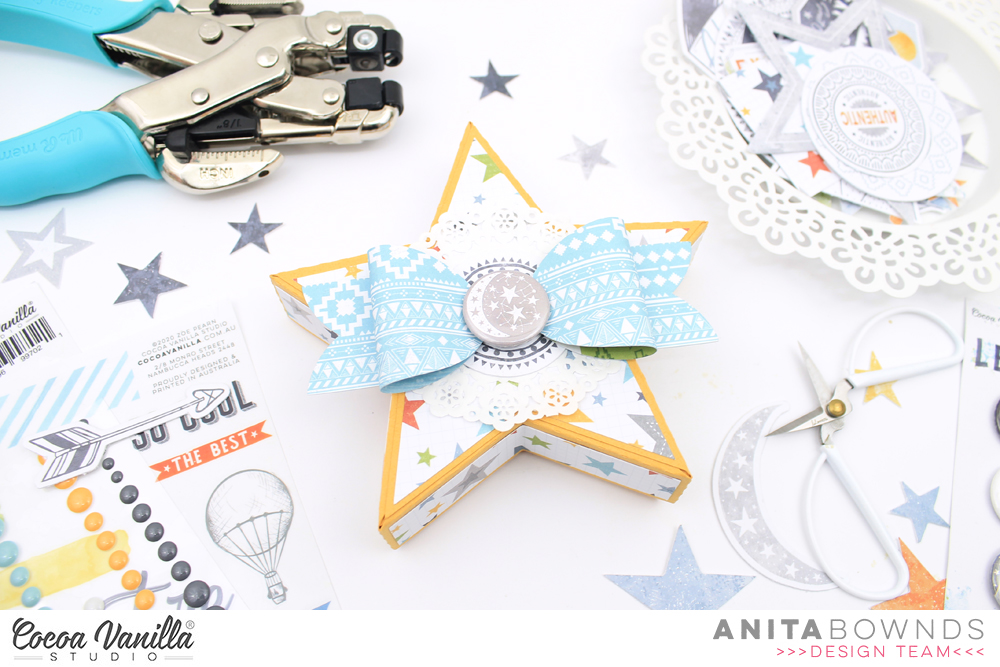
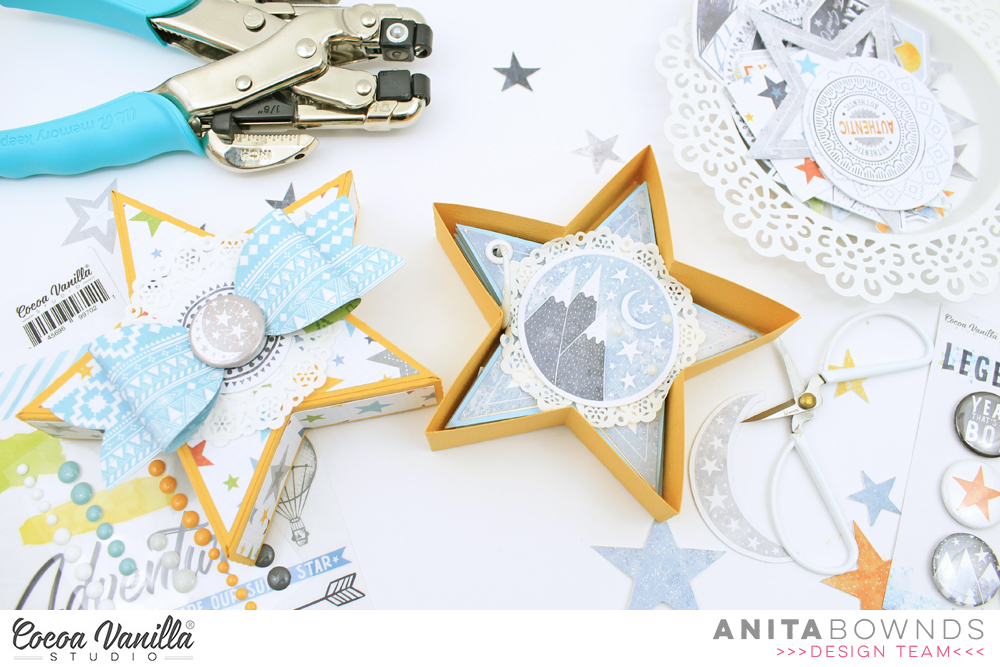
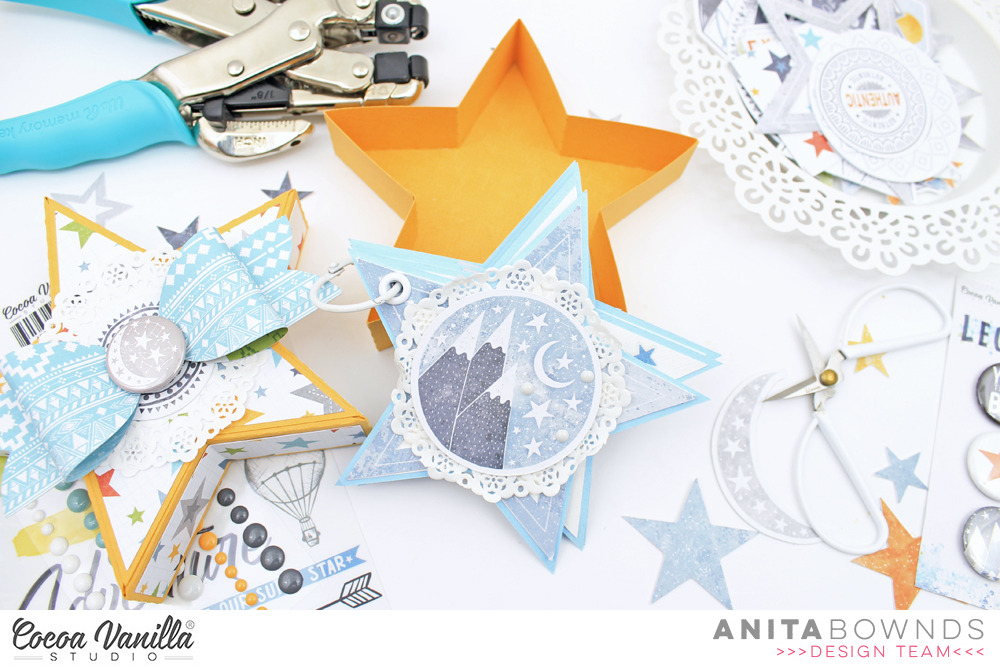
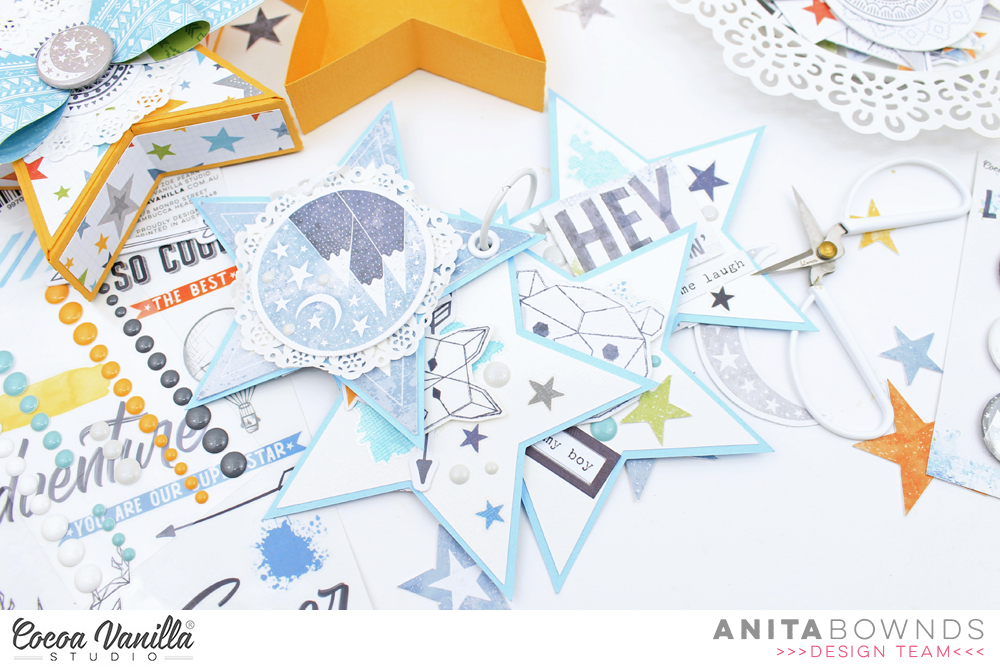
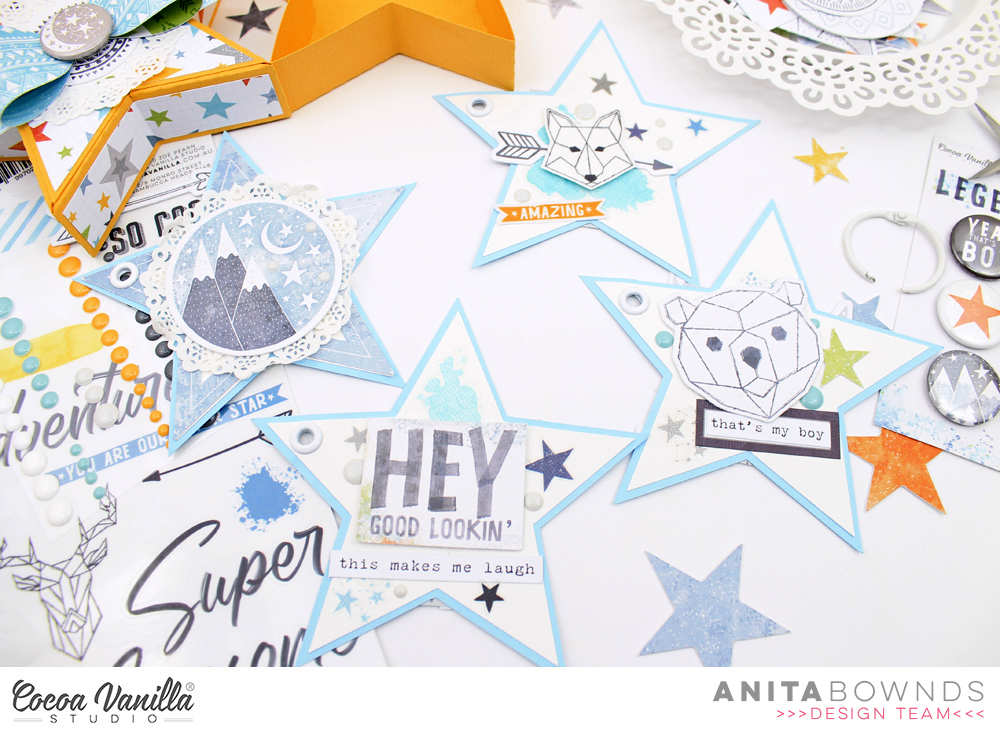
I decided to step out of my comfort zone and create a star gift box with a mini album inside .
I started off by using my cameo and a star gift box with slip lid cut file from the silhouette design store. And cutting it out on yellow cardstock and the other parts to cover the lid and lid sides with the all star paper
Then using a bow cut file from the silhouette design I used paper total legend to create the bow
Then I simply add a little doily ephemera and a flair to the top of the box to embellish
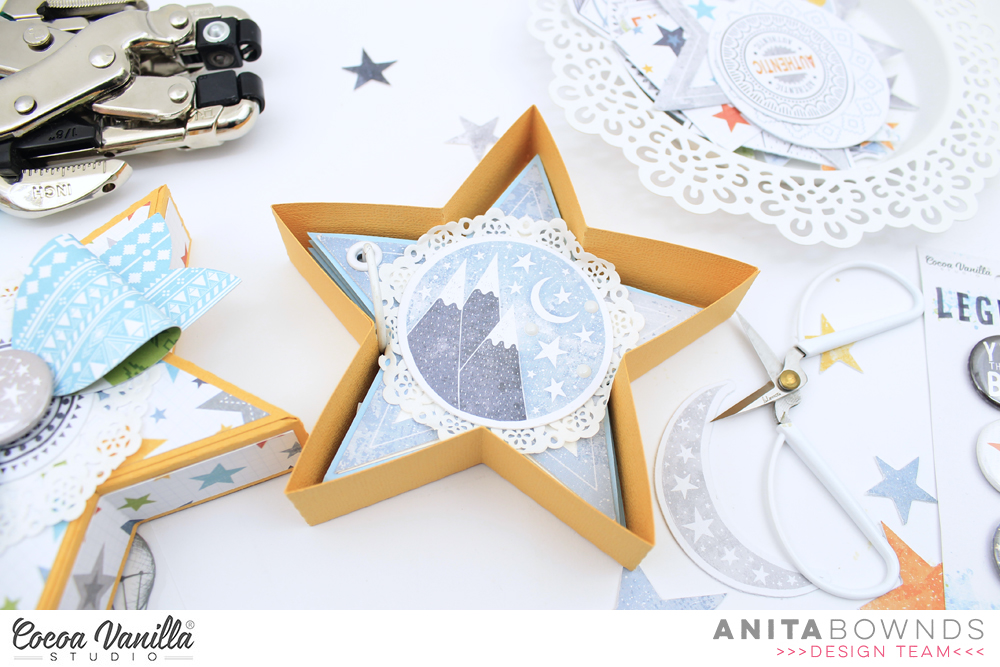
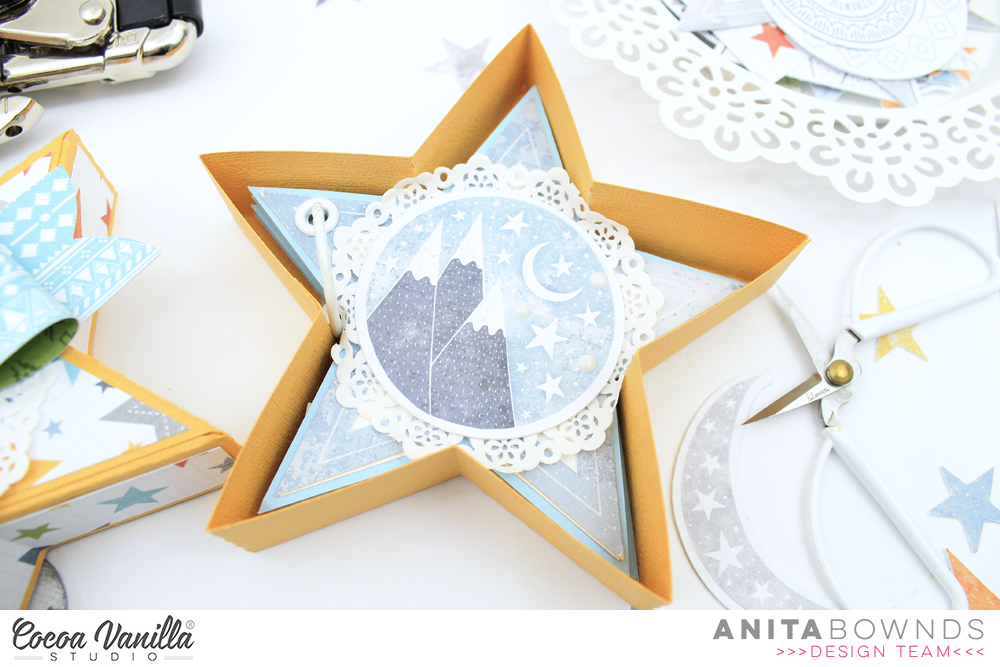
Then using the same cut file star I measured it to fit inside the box and cut it out 4 times on light blue cardstock to create my pages then I cut them out again just a little smaller with white cardstock to Matt on top of my star pages
Then I added them together and added a while eyelet in each on to add the binding ring
Then I started embellishing the cover with ephemera , doily and enamel dots.
For the pages I added a mix of clear stickers, stickers , ephemera and enamel dots.
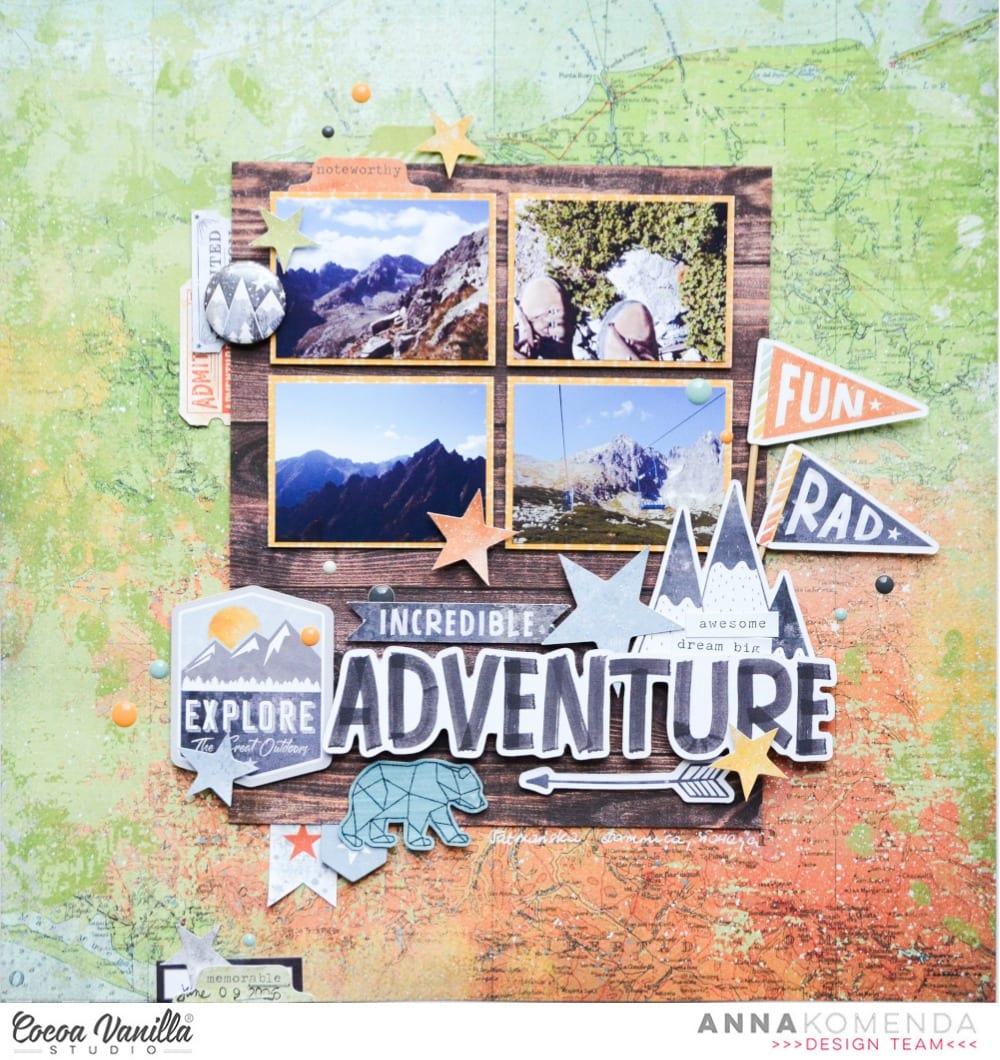
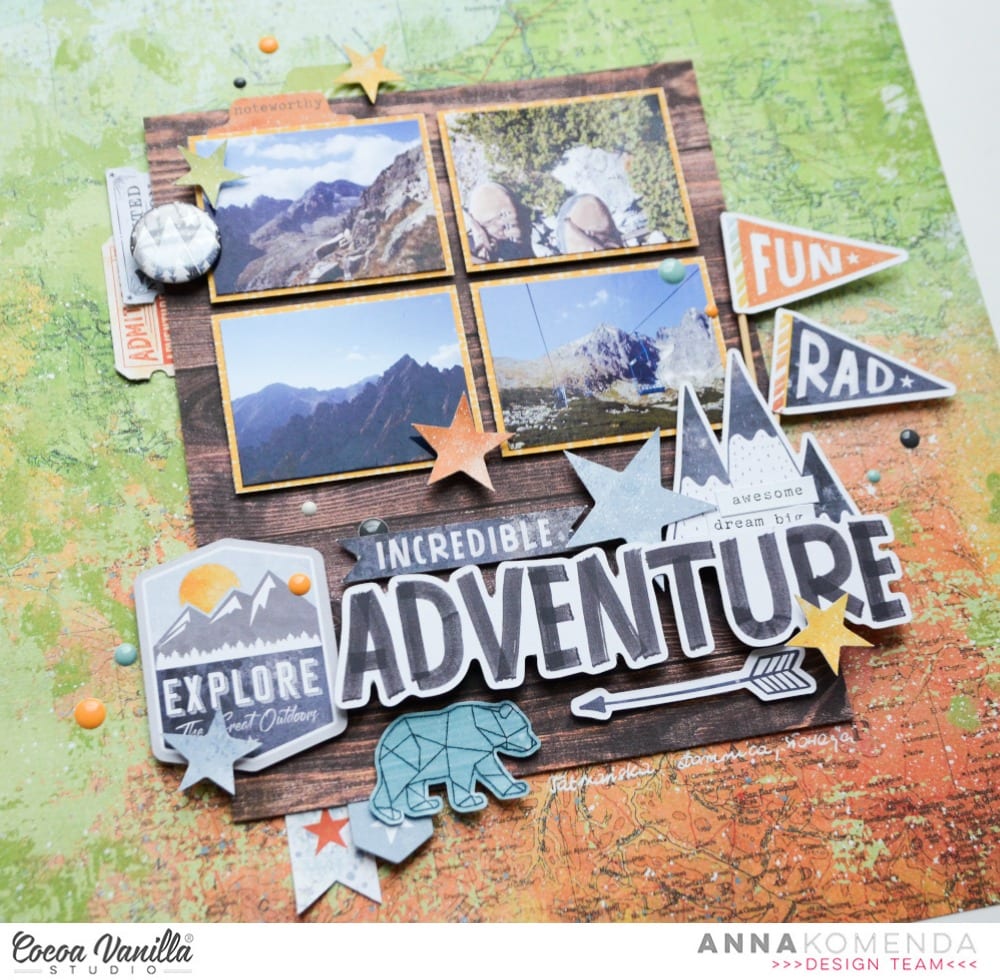
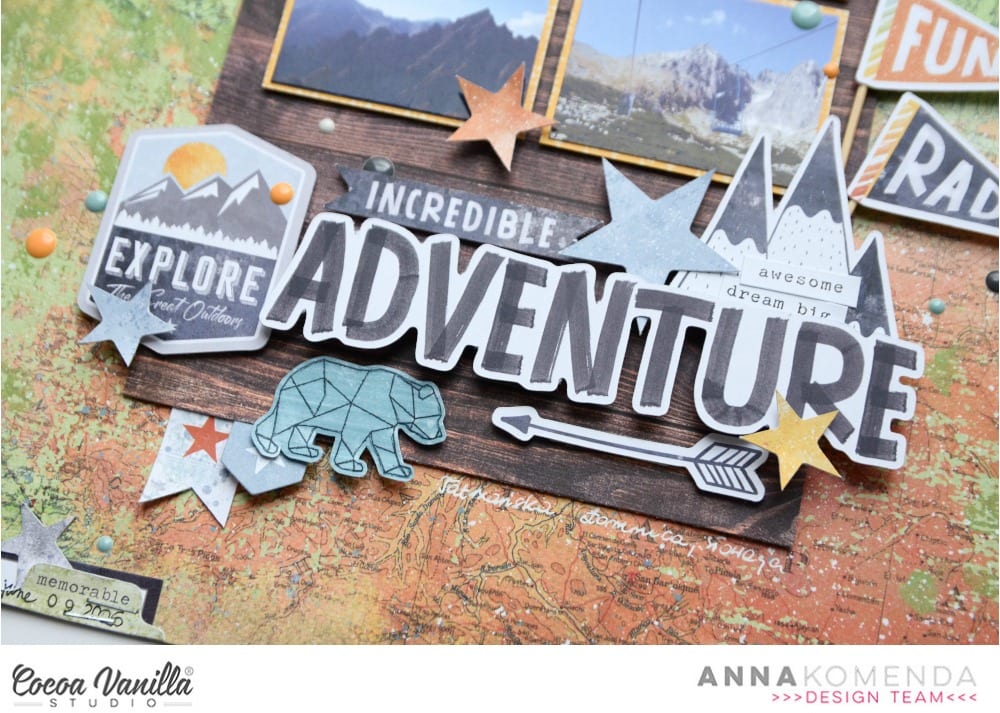
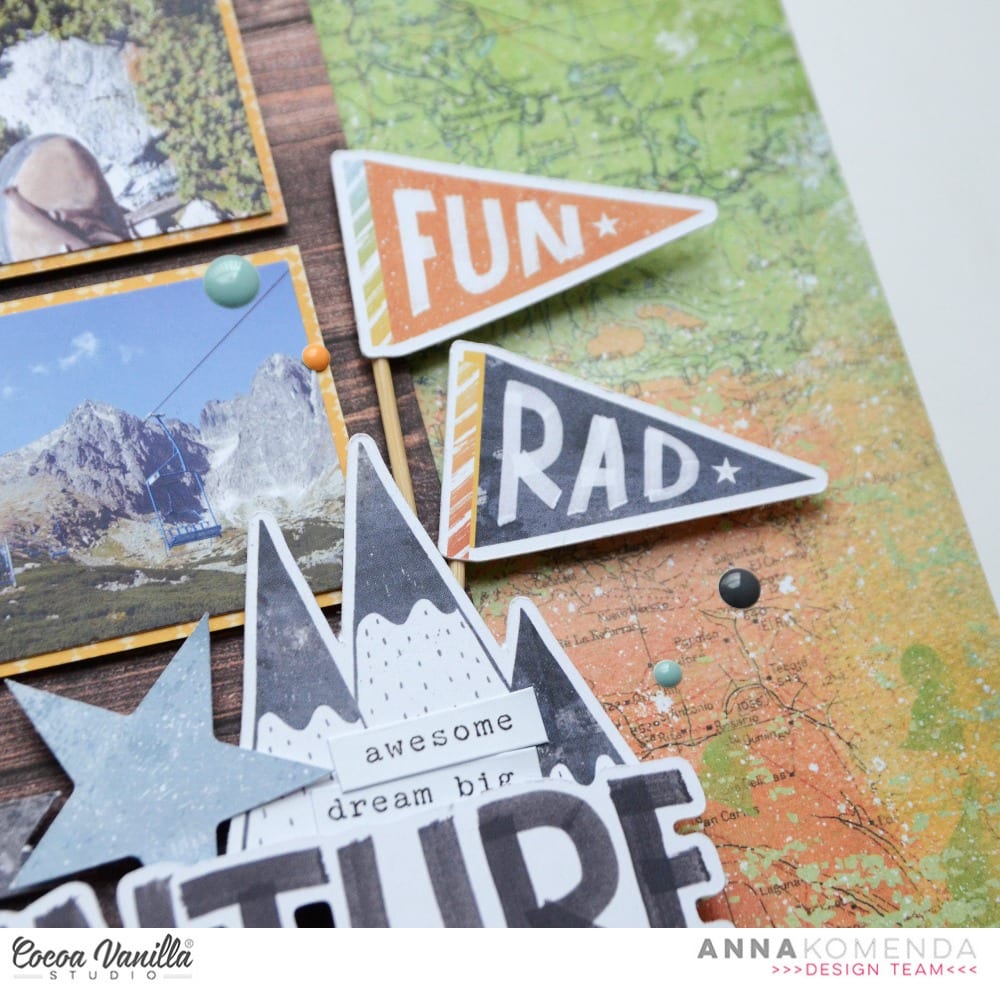
Hello Cocoa Vanilla fans. It’s Anna here with fresh from the oven page. I got my stash of brand new “Legendary” collection and I knew I had to use it right away. You know I am a mom of two girls, big fan of flowers and pink, but Cocoa Vanilla masculine lines are always so colorful that I would want them anyway. “Legendary” line is also perfect for all your outdoor adventures and this it the way I decided to use it first. I am planning some mini album with my oldest, furry child, who is a good boy but I needed a warm up first.
I was very inspired by the paper with a map pattern “Outdoors type”. Because let’s be honest – what can be better as a background for travel page? The problem is that I love the B side too… Such a pretty wooden pattern. So I combined them both :) They look amazing with my photos taken in Tatry mountains during our first (me and hubby) trip as a couple. It was time before fancy cameras and I do not have many decent photos from that time. I managed to pick few when we were reaching a high peak using a cable car. Landscape from above looked amazing that day.
I picked some ephemera pieces that may fit the travel theme and gathered then under the photos. I also added a title using a word from “Die cut titles”. This is such an amazing product and it makes adding titles so easy. You can use words separately or build longer sentences.
I also have an idea for a very simple embellishment – add little wooden sticks to the flags included into ephemera pack and you will have some dimensional element to add to your projects. I placed my flags over the mountains silhouettes.
I finished my page adding date stamp, few stars and enamel dots. Did you noticed that they are back to the CVS products range? “Unforgettable” collection had them and this line also has matching ones. I love this product and I am so happy to see it back.
That is all for today. I hope you love “Legendary” line as much as I do. It’s appearing in the shops around the world already if you feel you need to have it right away (BTW – I know you do :D). Thank you for stopping by and see you in March.
Hello Friends it’s Michelle back today with my final share for this wonderful month of LOVE. I stepped back in time and used the beautiful More than Words for this lovey dovey share along with a family photo from a few years back. Love the sweet pastel colours within this collection that give a soft feminine feel to the layout.
I chose a fun cut file from CUT to YOU (designed by DT Member Gwen) to use as the main focal point on the layout and backed it with multiple pattern papers from the 6×6 paper pad within this collection. I used a loose rule of 3’s for this to ensure I had a good balance of colours and patterns = 3 of each pattern or colour tone spaced out amongst the letters, words and hearts. I backed the entire layout on a 12×12 piece of the COLLAGE paper (reverse side) plus a little pop of the same pattern used as a layer within the photo stack.
I used foam tape to adhere the entire file to the backing cardstock – this gave it a slight pop of dimension off the page.
I adore this photo of us, Leila was so little compared to how giant she feels now. I layered some scrap pieces from previous layouts under the photo stack – nothing goes to waste here! Theres a cluster of sorts formed to the right of the photo using pieces from the ephemera pack. Love the tiny floral bits in this collection.
Another little cluster using similar elements over on the left of the page, incorporating a couple of stickers – one of which was fussy cut from a larger sticker.
Another mini cluster at the top of the layout to finish off the visual triangle I was hoping to achieve with such a ‘large and in charge’ type of cut file in the background. I really love how it all turned out, and felt it was complete after a sprinkling of my trusty gold colour shine.
Well thats all from me today, short and sweet but straight to the point! I hope you’ve enjoyed taking a look at my step back in time. I cant wait to see what next month brings – we’ll all be creating with the newly released collection – LEGENDARY. Be sure to keep an eye here on the blog and on our other socials – Instagram and Facebook for more creative goodness!
It’s Tarrah back with you and today I am excited to be sharing my first layout using the AWESOME Legendary collection!
As the mother of 2 boys and hubby, I am slightly outvoted in my house and love all the boy collections to document their antics with! The Legendary collection is absolutely perfect for their pages, on this page I have documented a photo of my handsome youngest son hanging out at the shops one day!One of my favourite papers from the collection is the rainbow one called ‘Wild One’, I love how it is in a diagonal design! I trimmed it down slightly and added it to the ‘Explorer’ paper, I like the navy as a mat for the page. I then cut out a diagonal triangle cut file design from The Cut Shoppe from white cardstock and placed it over the top of the paper. I love how the white breaks up some of the rainbow paper. I machine stitched around the outside edge of the layout.
The large stars in the ephemera pack have a line drawn on them so they were perfect to machine stitch, see the detail on 2 of the larger stars in the photo below. I matted my photo using the wood grain frame die-cut and one of the small cut out papers from the ‘Total Legend’ paper, I also stapled one of banner die-cuts to the top left corner of my photo. I adhered the largest star in the top left corner and the smaller one in the bottom right corner and then adhered my photo over the top.
The Die-Cut title pack are awesome and I love the font of these! I chose the words ‘Cool Dude’ for my title and popped it up with pop dots underneath and placed to the right of my photo. I took lots of the coloured stars from the die-cut pack and popped them up in rainbow fashion like the paper. I love the height and shadows this creates! I also added one of the awesome flair buttons with the star on it to the right of the ‘Cool’ word in my title. Lastly I added a few of the clear stickers, accessory stickers and enamel dots to finish my layout.
Make sure you keep an eye out for this amazing new boy collection, it is now in your favourite retailer stores and will be coming to the Cocoa Vanilla Studio online store really soon!
Hello CVS friends I hope you are having a fab week! My photo is of me in Croatia (because a pretty bike like this has to be scrapped!), I made my husband take about 50 shots as historically he takes terrible photos, out of the 50 odd shots I got one where the actual bike and me ended up in the photo lol!!!!!
I have used Unforgettable collection and the bike with flower baskets cut file is by Paige Evans/Silhouette Design store.I cut a piece of white cardstock at 10×10 inches matting it on Unscripted paper. I then set about create tiny flowers to fill the baskets. I used Forget-Me-Not paper to create them and a flower punch that I had in three sizes. I used white NUVO crystal drops in the centres.I then paper pieced the bike and hearts, I used Garland paper turquoise side, for the baskets I used Glorious paper the grey side and finally I used Class Act paper from Love Always collection.I used the Clear Stickers from Unforgettable collection, butterflies and the paint brush stroke which I added under my photo (as I chose not to matt it). I added some Accessory Stickers under my photo. My photo is 5×4 inches.I chose a Flair from the collection which is also my title, choosing it over a traditional title as I didn’t want my layout to become cluttered.
This layout is all about pretty! Well that’s it from me today, thank you for taking the time to stop by. See you again soon!
Hi everyone! Sue Plumb here to share my latest design team project with you. Today I am sharing a baby girl mini album I created using the super pretty ‘Midnight’ collection. (You may recall that I made one of these a few months ago for one of my sons using the ‘Boys Rule’ collection – you can see that post HERE) As it usually goes when you have more than one child, you can’t do something for one without doing it for another, hence I am back today with this album created for my daughter.
I began this mini album with an unbranded 6 ring pink planner I purchased from eBay. This planner came completely empty, and unlike the last planner I used (which was from Kmart), this one features a magnetic clasp to close it, rather than the elastic band. I also used an adjustable 6 hole punch (also purchased from eBay) that I set up to fit the rings in the planner.
I used pieces from most of the patterned papers from the collection, cutting a variety of sizes and shapes to use for the pages. I then punched each one with the hole punch, ensuring they were not all aligned the same so that they would sit at varying heights within the album. I also added some additional decorative detail to some of the pages using an assortment of border punches.
I created “tip-ins” for some of the pages using patterned paper adhered with washi tape. This allows you to extend on the amount of space you have on a page to add extra photos or journalling, or even hide journalling underneath, just like I did with my daughter’s birth story above.
Remember you don’t always need a photo on each page – it adds extra interest to an album to intersperse purely decorative pages, or pages that simply feature a sentiment throughout, such as the page featuring fussy cut flowers from the Bloom & Grow paper and a Die Cut Title word above.
Another way to help anchor photos into an album and ensure they appear as a cohesive part of the page design, rather than just stuck over the top, is to add embellishments that overlap part of the photos. Alternatively, don’t be afraid to use an entire photo as a page in itself and punch directly through the photo. (Matte photos tend to work better for this, rather than glossy.)
To continue to provide variety throughout the album, try turning some of the elements vertically on the page; or have a horizontal page opposite a vertical one. (It also adds an extra level of interactivity to have people rotate the album to look at them.)
A great way to include a series of photos is to print them as a photo strip and fold them accordion style with a tab sticker to pull it out with…
The photos fold out and then fold neatly back into the album, only taking up the same amount of space as one photo.
Create small pockets from scrap pieces of paper to hold journal tags. For a final interactive element, I uploaded a video taken during the drive home from the hospital with my daughter to my YouTube channel (set as private) and then created a QR code for it. This allows it to be scanned by a QR code reader on a phone that links to the video and plays it. (My children LOVE these!)
There is much more to this album than I could show here. If you would like a look at the entire album, I have a flip through below:
Thanks so much for stopping by today. Until next time, happy scrapping!
Gwen back on the blog today and I have a page I’ve been wanting to make for the longest time. I’m a big fan of scrapbooking the ‘everyday’ and the little things in my world AND, I’m pretty sure most of you with tweens or teens are going to relate to this one.
This photo was taken out at a restaurant for lunch, and yes, Miss 12 was sitting on her phone… it has become a little bit of a family joke, we like to tease her a little about it. She is always chatting with her friends or checking out Instagram, it’s a big part of her world right now and I really wanted to document it, because I know it won’t always be like that. Look at that concentration on her face, oh so serious!
Along with my photo, I also had the idea to use this cut file to help me tell the story. It is by CUT to YOU. I cut the phone element out really large and then a couple of the speech bubble elements. I’ve then gone about backing these. For the large phone piece, I couldn’t go past the beautiful ombre of the ‘Shine Bright‘ paper. For the speech bubbles, I’ve gone with the dark floral in the ‘Mixed Blessings‘ pattern paper and the floral from the ‘Inky Depths‘ pattern paper. The smaller print of these florals was perfect for this.
With my cut files backed, I went about the base design for the page. I’ve positioned the phone element down the left-hand side and the two speech bubbles coming out from it towards the right. I’ve mat my photo here with more of the ‘Shine Bright‘ pattern paper and stitched around the edge for added detail. You can see I’ve also used this paper for my outside edge border.
Now that my large elements are in place and the design for the layout has structure and a plan, I can now add in my smaller elements. This is the fun bit for me! I knew I wanted to add in a title for this page using the ‘Die Cut Titles‘. There are so many great titles in this pack but nothing was quite right for the space I had to work with or the moment I was trying to document, so… I got creative! I used the word ‘this’ and then the word ‘things’ but trimmed off the ‘s’ on the end, making my title ‘this thing’. **Design Tip – Don’t be afraid to cut or trim die-cut elements to make them unique and help them work on your page.
Now, it was just a matter of adding in some pretty elements. I pulled from the ‘Die Cut Ephemera‘ pack as well as a flair from the ‘Flair Buttons‘ pack. I’ve also used this sweet sticker with a heart on it from the Accessory Sticker sheet. The flower and bow are what I like to call ‘Vintage’ Cocoa, from the depths of my stash, so it was great to get them onto a page!
Thanks for popping by today to see my latest project, I hope it inspires you to get creating with this collection and maybe document a small part of your everyday! As always, be sure to pop into the Cocoa Vanilla Studio and CUT to YOU Facebook groups to share your pages, I love seeing what you make.
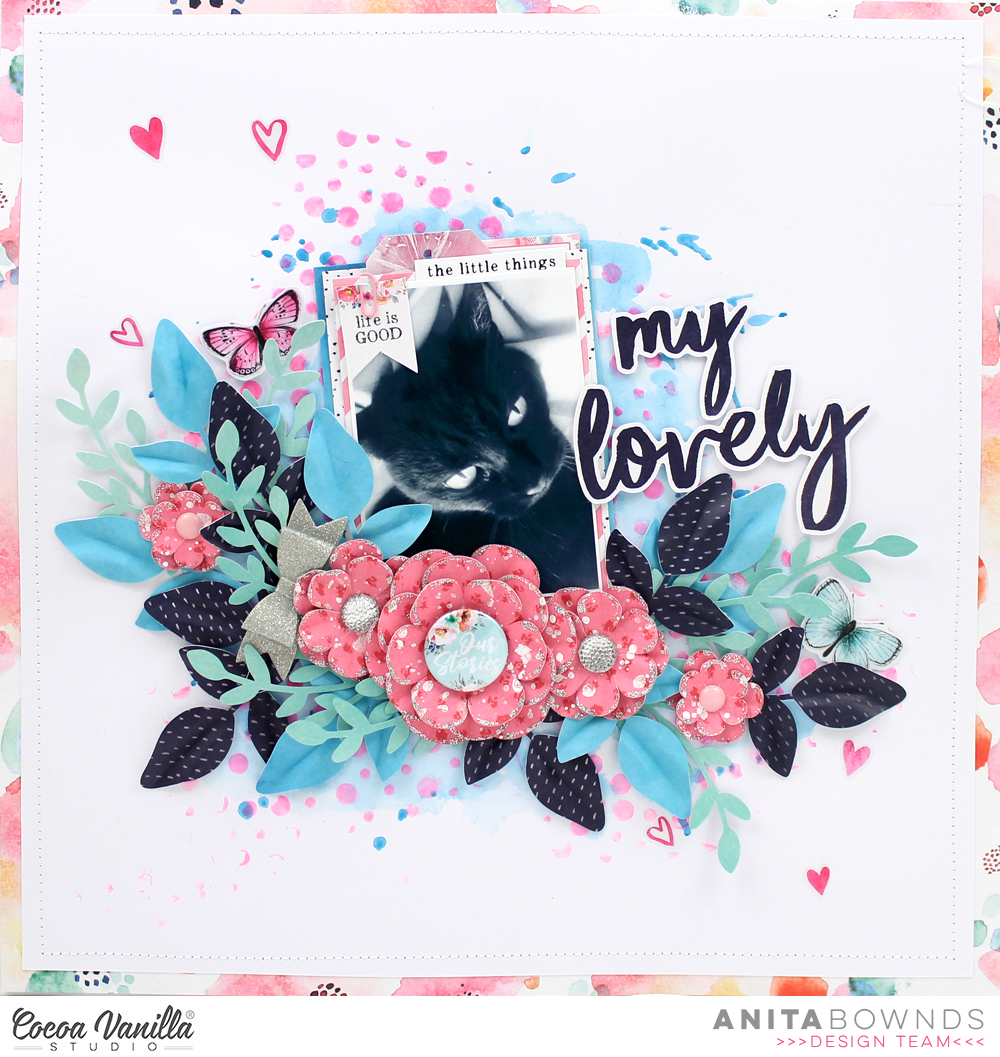
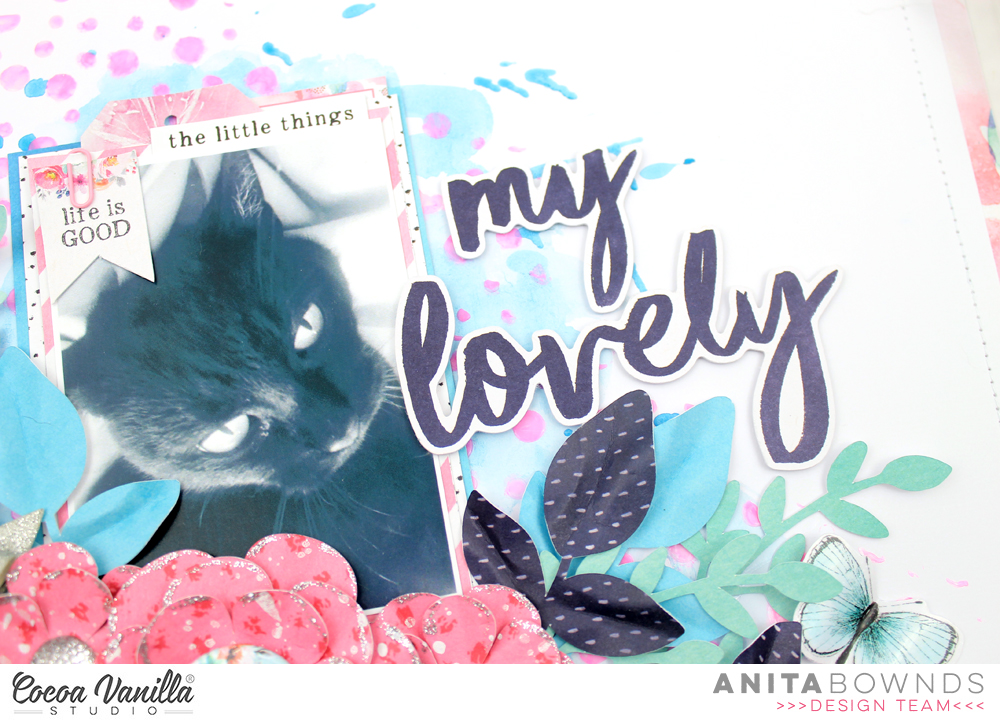
Anita here sharing a fun mixed media layout with lot’s of flowers and leaves using unforgettable and happiness collections I really love how all the cocoa vanilla studio collections always work so well together and I absolutely love the bright and beautiful colours…
I started off with white cardstock and adhered it on sprightly pattered paper to add colour to my border around my white cardstock then stitched around the edges using my sewing machine
Then I added watercolour to the cardstock and then mixing pink paint with heavy body gel
Through a dots stencil to add more texture to the background
Then I started adding flowers and leaves from a cut file from Paige Evans that I cut from unscripted ,garland papers and the 6×8 happiness paper pad using my silhouette cameo I added a flair and enamel dots and a few rhinestones from my stash
Then I matted my photo on papers From the 6×8 unforgettable paper pad and the blue pattern paper from the happiness paper pad and tucking it in the flower clusters and i used a title from the happiness cardstock titles
And I finish off the layout by adding some ephemera and stickers around my photo
And clear stickers around my floral cluster.
I hope I’ve given you some fun mixed media and floral inspiration
Hello friends. It’s Anna here with my newest page made with CVS goodies. You all have seen the brand new line that will be appearing in the stores any time called “Legendary”. It’s another amazing, boy themed line, that came out from Zoe’s wonderful mind. I am still waiting for it, so I decided to dive into older collections. This time my creative process started with a picture, that I printed long ago but didn’t have mojo on how to scrapbook it. The important thing for this page is mentioning that my printer was dead for few days so I had to use photos that I already had on hand, so I was kind of “forced” to use this one. Don’t get me wrong – the picture is so cute and darling to me but the colors were hard to scrapbook as I always prefer more pastel shades and this one was edited with weird filter. it was a perfect opportunity to challenge myslef. I knew I am going to use some CVS collections, so I went through my stash and picked papers that may work for those colors and “baby bedtime” theme.
“Endless summer” line turned out to be just perfect when it comes to colors, especially the paper with cute clouds. It’s no longer available in the shop but you can purchase the digtal version of it and print your own paper. Stary paper “Star fall” from “Boys rule” collection was just perfect for a bedtime themed page. Thta it how thw whole idea came out.
After I fussy cut some clouds, I placed them around the background and added photo. I knew, I didn’t want to add too much to make a picture a main star of the project. I have a little box filled with elements from older CVS collections, all mixed up so I searched through it looking for matching elements. I didn’t care the line, I just wanted them to fit the theme. I picked many wooden stars from various collections including the very first boy themed line “Flying high”. I also added a cardboard frame and rubber tag that were a part of “Wild at heart” collection. My title was made with leftover alpha stickers.
It’s a very simple page and because the photo carries so many good memories, i wanted to add journaling too. however, I hate seeing my hadwriting on the pages, so I hid it. I cut out two tags in the same size from paper scraps and tided them with a string. The bottom tag has a little journaling on it, but it’s cover by the second one. This way I still get my memories recorded and a clean page :)
That is all for today. CVS collections are perfect used separatelly and together and working with them is a pure joy. I am a member of this team for 5!!! years and I still can’t get enough of them. thank you for stopping by and see you in two weeks.
Hey Friends its Michelle back here today with my first layout share for the month of LOVE.. I went with a heart theme for my layout using the colourful HAPPINESS Collectionand a new cut file from CUT to YOU.
This sweet girl LOVES a selfie here and there, and the perfect time to capture just happens to be night time snuggles. However I’ve just realised upon writing this post that the photo was in fact taken early December, the night before her birthday. The journalling for the photo could have been completely different, but much the same as the direction I took when creating.
OK, lets talk through the process of how this all came together shall we?
I resized the cut file design to around 10 inches and cut it out twice for this layout – once using white cardstock for the outline, then again for the backing piece using the MEADOW paper. I adhered the 2 pieces together where each heart joins the next and left the tops of the hearts open for a little added dimension. Then I stuck the entire piece to the backing paper SPRINKLES
I added the photo to the bottom left of the hearts wreath, layered with some vellum and GOOD VIBES paper and adhered using foam tape to lift it up off the layout. I added a cluster of EPHEMERA pieces to the right of this using different forms of adhesive for varying depth of layers.
Heres a closer look at all that pretty goodness
Top left of the layout I replicated the ephemera cluster and added a title using cardstock words. To the lower right I added my handwritten journalling, a couple of accessory stickers and of course the wrong stamped date HAHA
Well thats all from me today. Thank you so much for stopping by.


 One of my favourite papers from the collection is the rainbow one called ‘Wild One’, I love how it is in a diagonal design! I trimmed it down slightly and added it to the ‘Explorer’ paper, I like the navy as a mat for the page. I then cut out a diagonal triangle cut file design from The Cut Shoppe from white cardstock and placed it over the top of the paper. I love how the white breaks up some of the rainbow paper. I machine stitched around the outside edge of the layout.
 The large stars in the ephemera pack have a line drawn on them so they were perfect to machine stitch, see the detail on 2 of the larger stars in the photo below. I matted my photo using the wood grain frame die-cut and one of the small cut out papers from the ‘Total Legend’ paper, I also stapled one of banner die-cuts to the top left corner of my photo. I adhered the largest star in the top left corner and the smaller one in the bottom right corner and then adhered my photo over the top.
 The Die-Cut title pack are awesome and I love the font of these! I chose the words ‘Cool Dude’ for my title and popped it up with pop dots underneath and placed to the right of my photo. I took lots of the coloured stars from the die-cut pack and popped them up in rainbow fashion like the paper. I love the height and shadows this creates! I also added one of the awesome flair buttons with the star on it to the right of the ‘Cool’ word in my title. Lastly I added a few of the clear stickers, accessory stickers and enamel dots to finish my layout.
 I cut a piece of white cardstock at 10×10 inches matting it on
  I then paper pieced the bike and hearts, I used
  I used the
  I chose a
 This layout is all about pretty! Well that’s it from me today, thank you for taking the time to stop by. See you again soon!