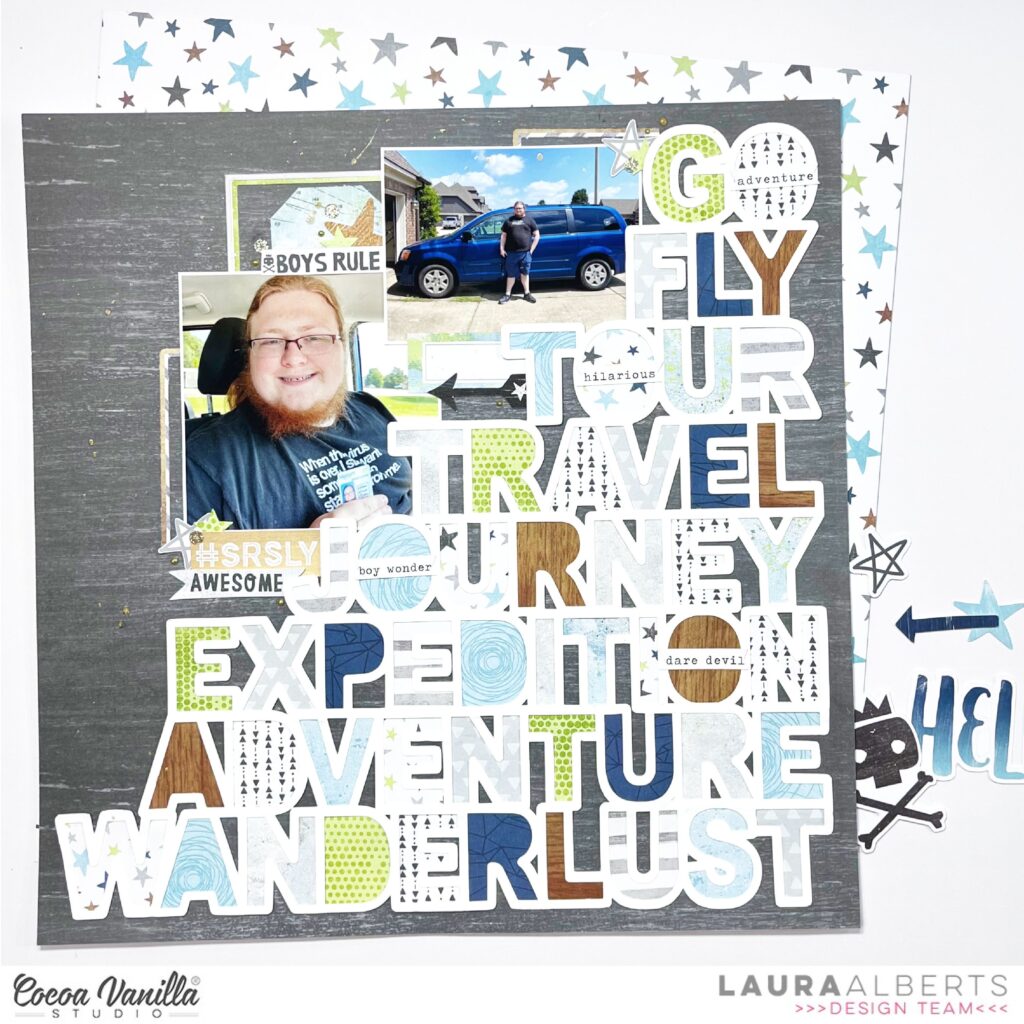
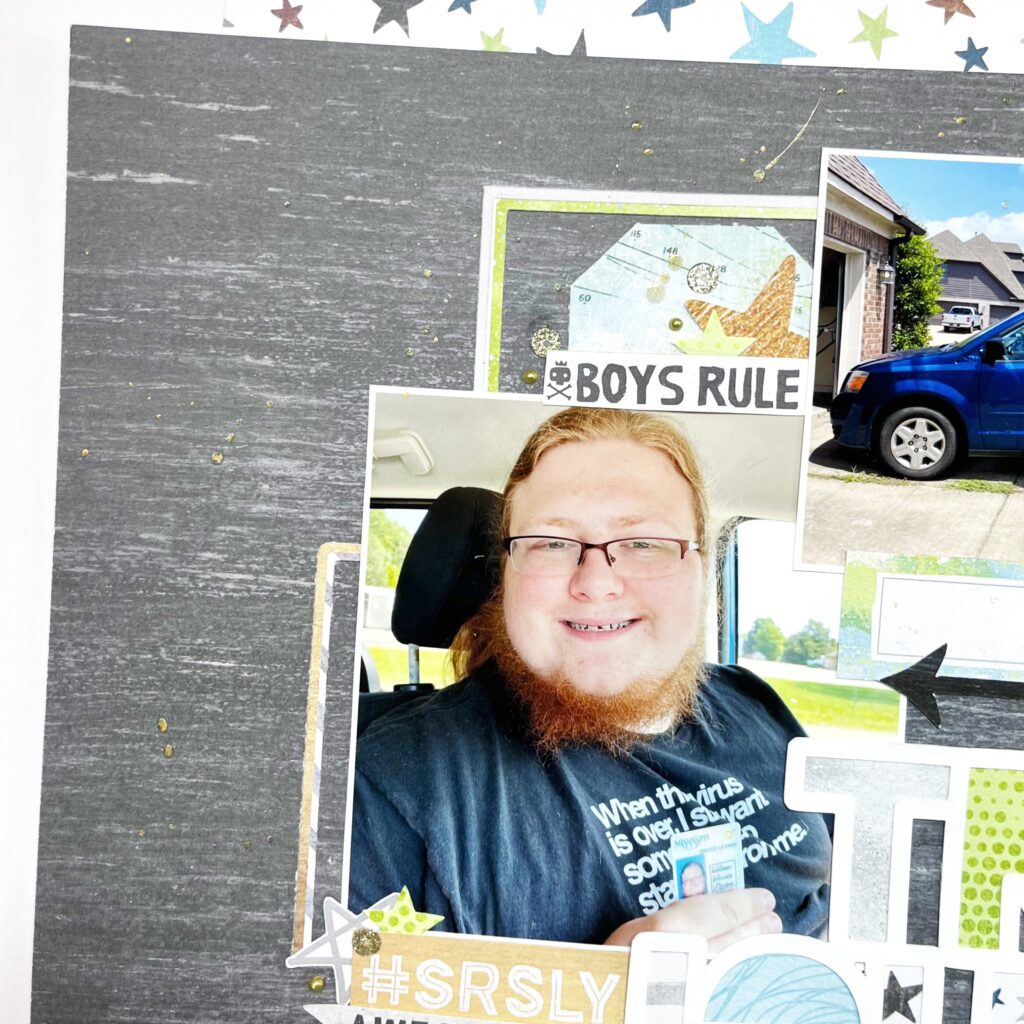
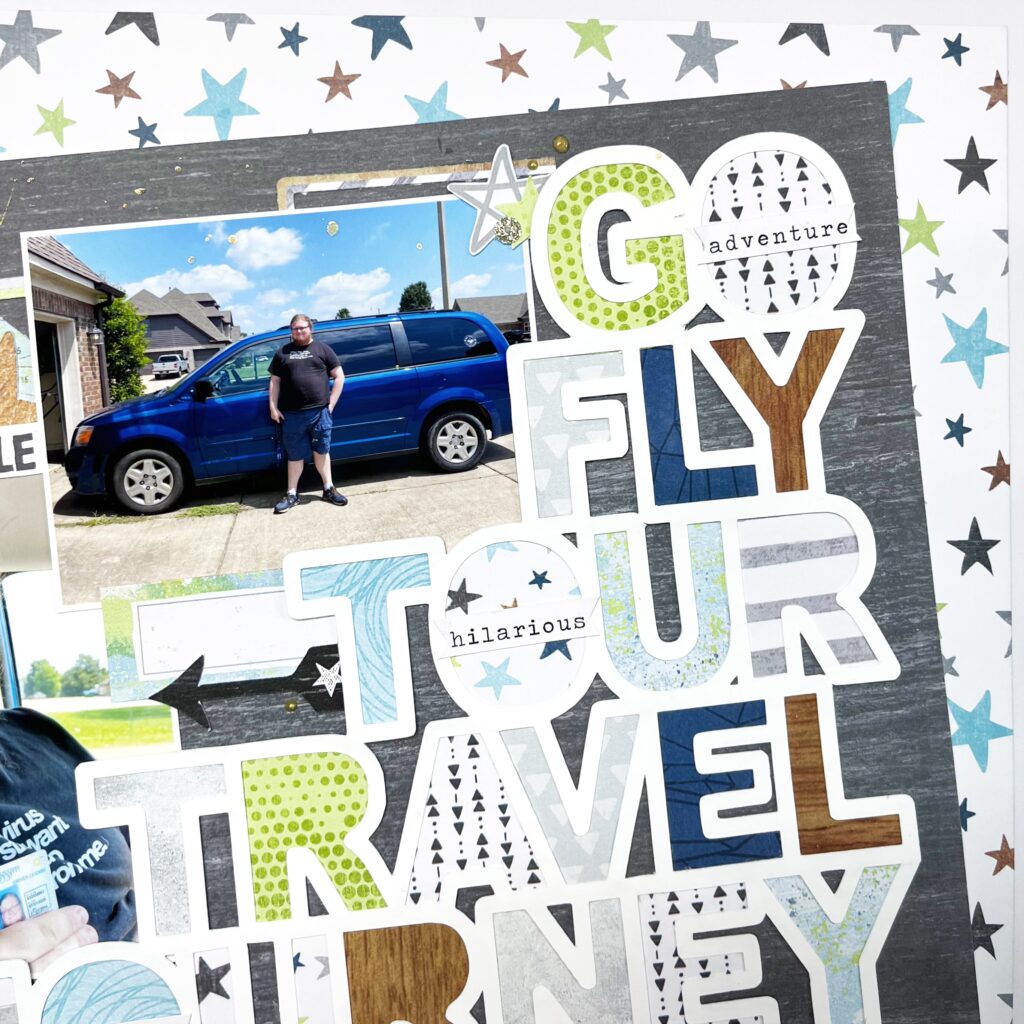
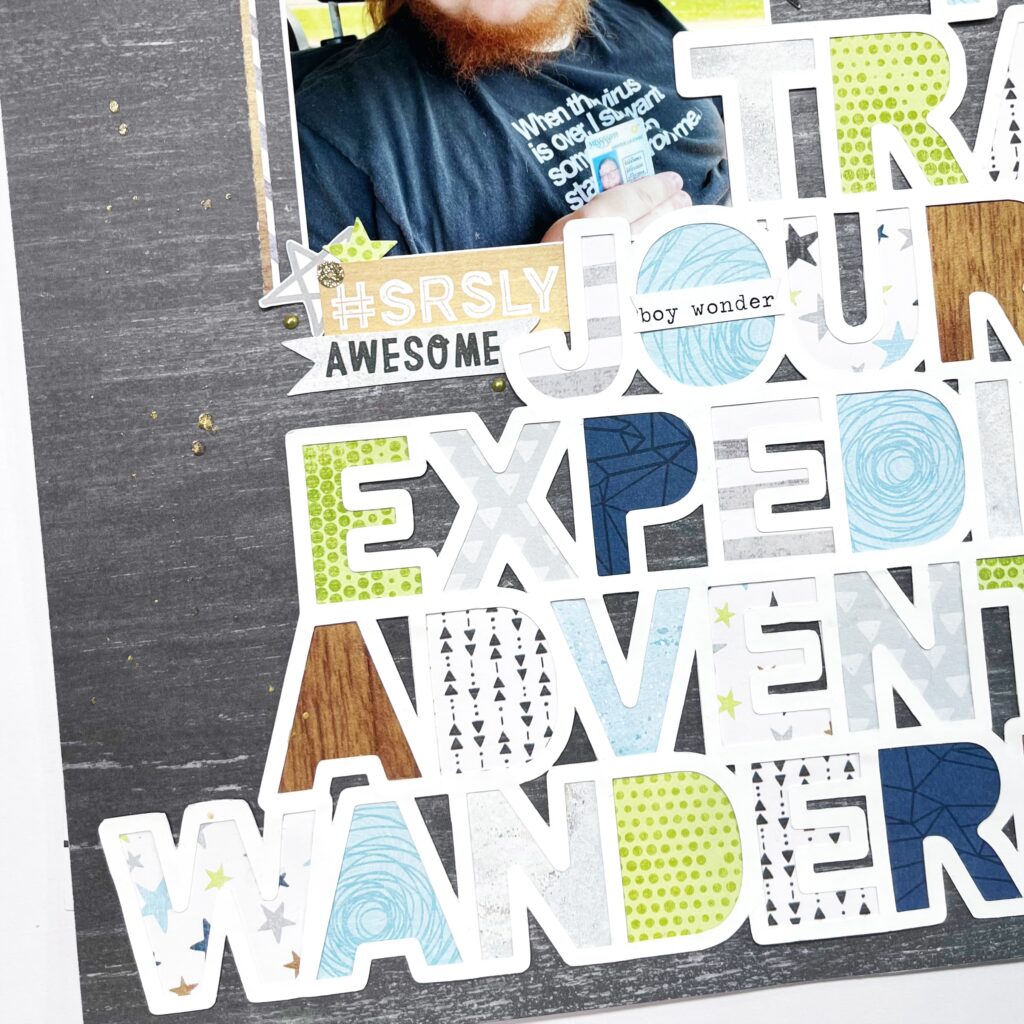
Hey y’all! Laura Alberts here again with a fun boy layout using a Throwback Thursday collection…Boys Rule! I adore this collection and the mix of colors and patterns that make it so versatile to use! Scrapping these photos of my oldest getting his driver’s license was so much fun! I paired a Paige Evans’ cut file called ‘Travel Words’ with the bright bold colors in the A5 paper pad.
To give the cut file a bit of pop, I layered it on top of the gorgeous gray background in this collection. I added a word phrase in front of each of the O’s in the long title. My photos on the other hand are the star of the show! I made sure to layer a few frames around the perimeter of my layout. Love this look!
I kept my embellishing fairly simple on this one because the large title doesn’t need it! A few small clusters around my photos that utilize ephemera pieces.
I hope this layout inspires you to give cut files a go, if you haven’t already, and then break out your paper frames! Be sure to check out the video below to see how Go Fly came together!
Hello scrappy friends! Today I have a 8.5×11 inch layout using the beautiful Storyteller collection with a focus on the floral die cut ephemera.
I found this lovely hanging basket cut file by Paige Evans (Silhouette design store) and knew it would be perfect to fill with the floral die cuts. I firstly cut it as a whole using the Cross it off paper (wood grain side). I then cut it whole again in white cardstock. I then cut off the hanging leaves in the wood grain and added the white cardstock ones. I paper backed the basket with a blue paper piece from the A5 paper pad.
I used Spring Fling paper to add a border to my white cardstock (floral side). I next used wet glue to adhere the hanging basket cut file. I decided on a 3×3 inch photo and as a guide placed where I wanted it and started adding floral die cuts over the cut file florals. I arranged them until I was happy and ensuring they also gave the effect of hanging over the basket.
I added some centres to flowers using the Puffy stickers to add dimension. Lastly I added some green leaves in amongst the white leaves for contrast.
I added my photo with foam tape and then set about to embellish using the die cut ephemera, accessory stickers and chipboard embellishments. And lastly I added a butterfly wood epoxy button.
This turned out so pretty and would suite a variety of scrapbooking themes.
Thank you for stopping by today and have a fab week!
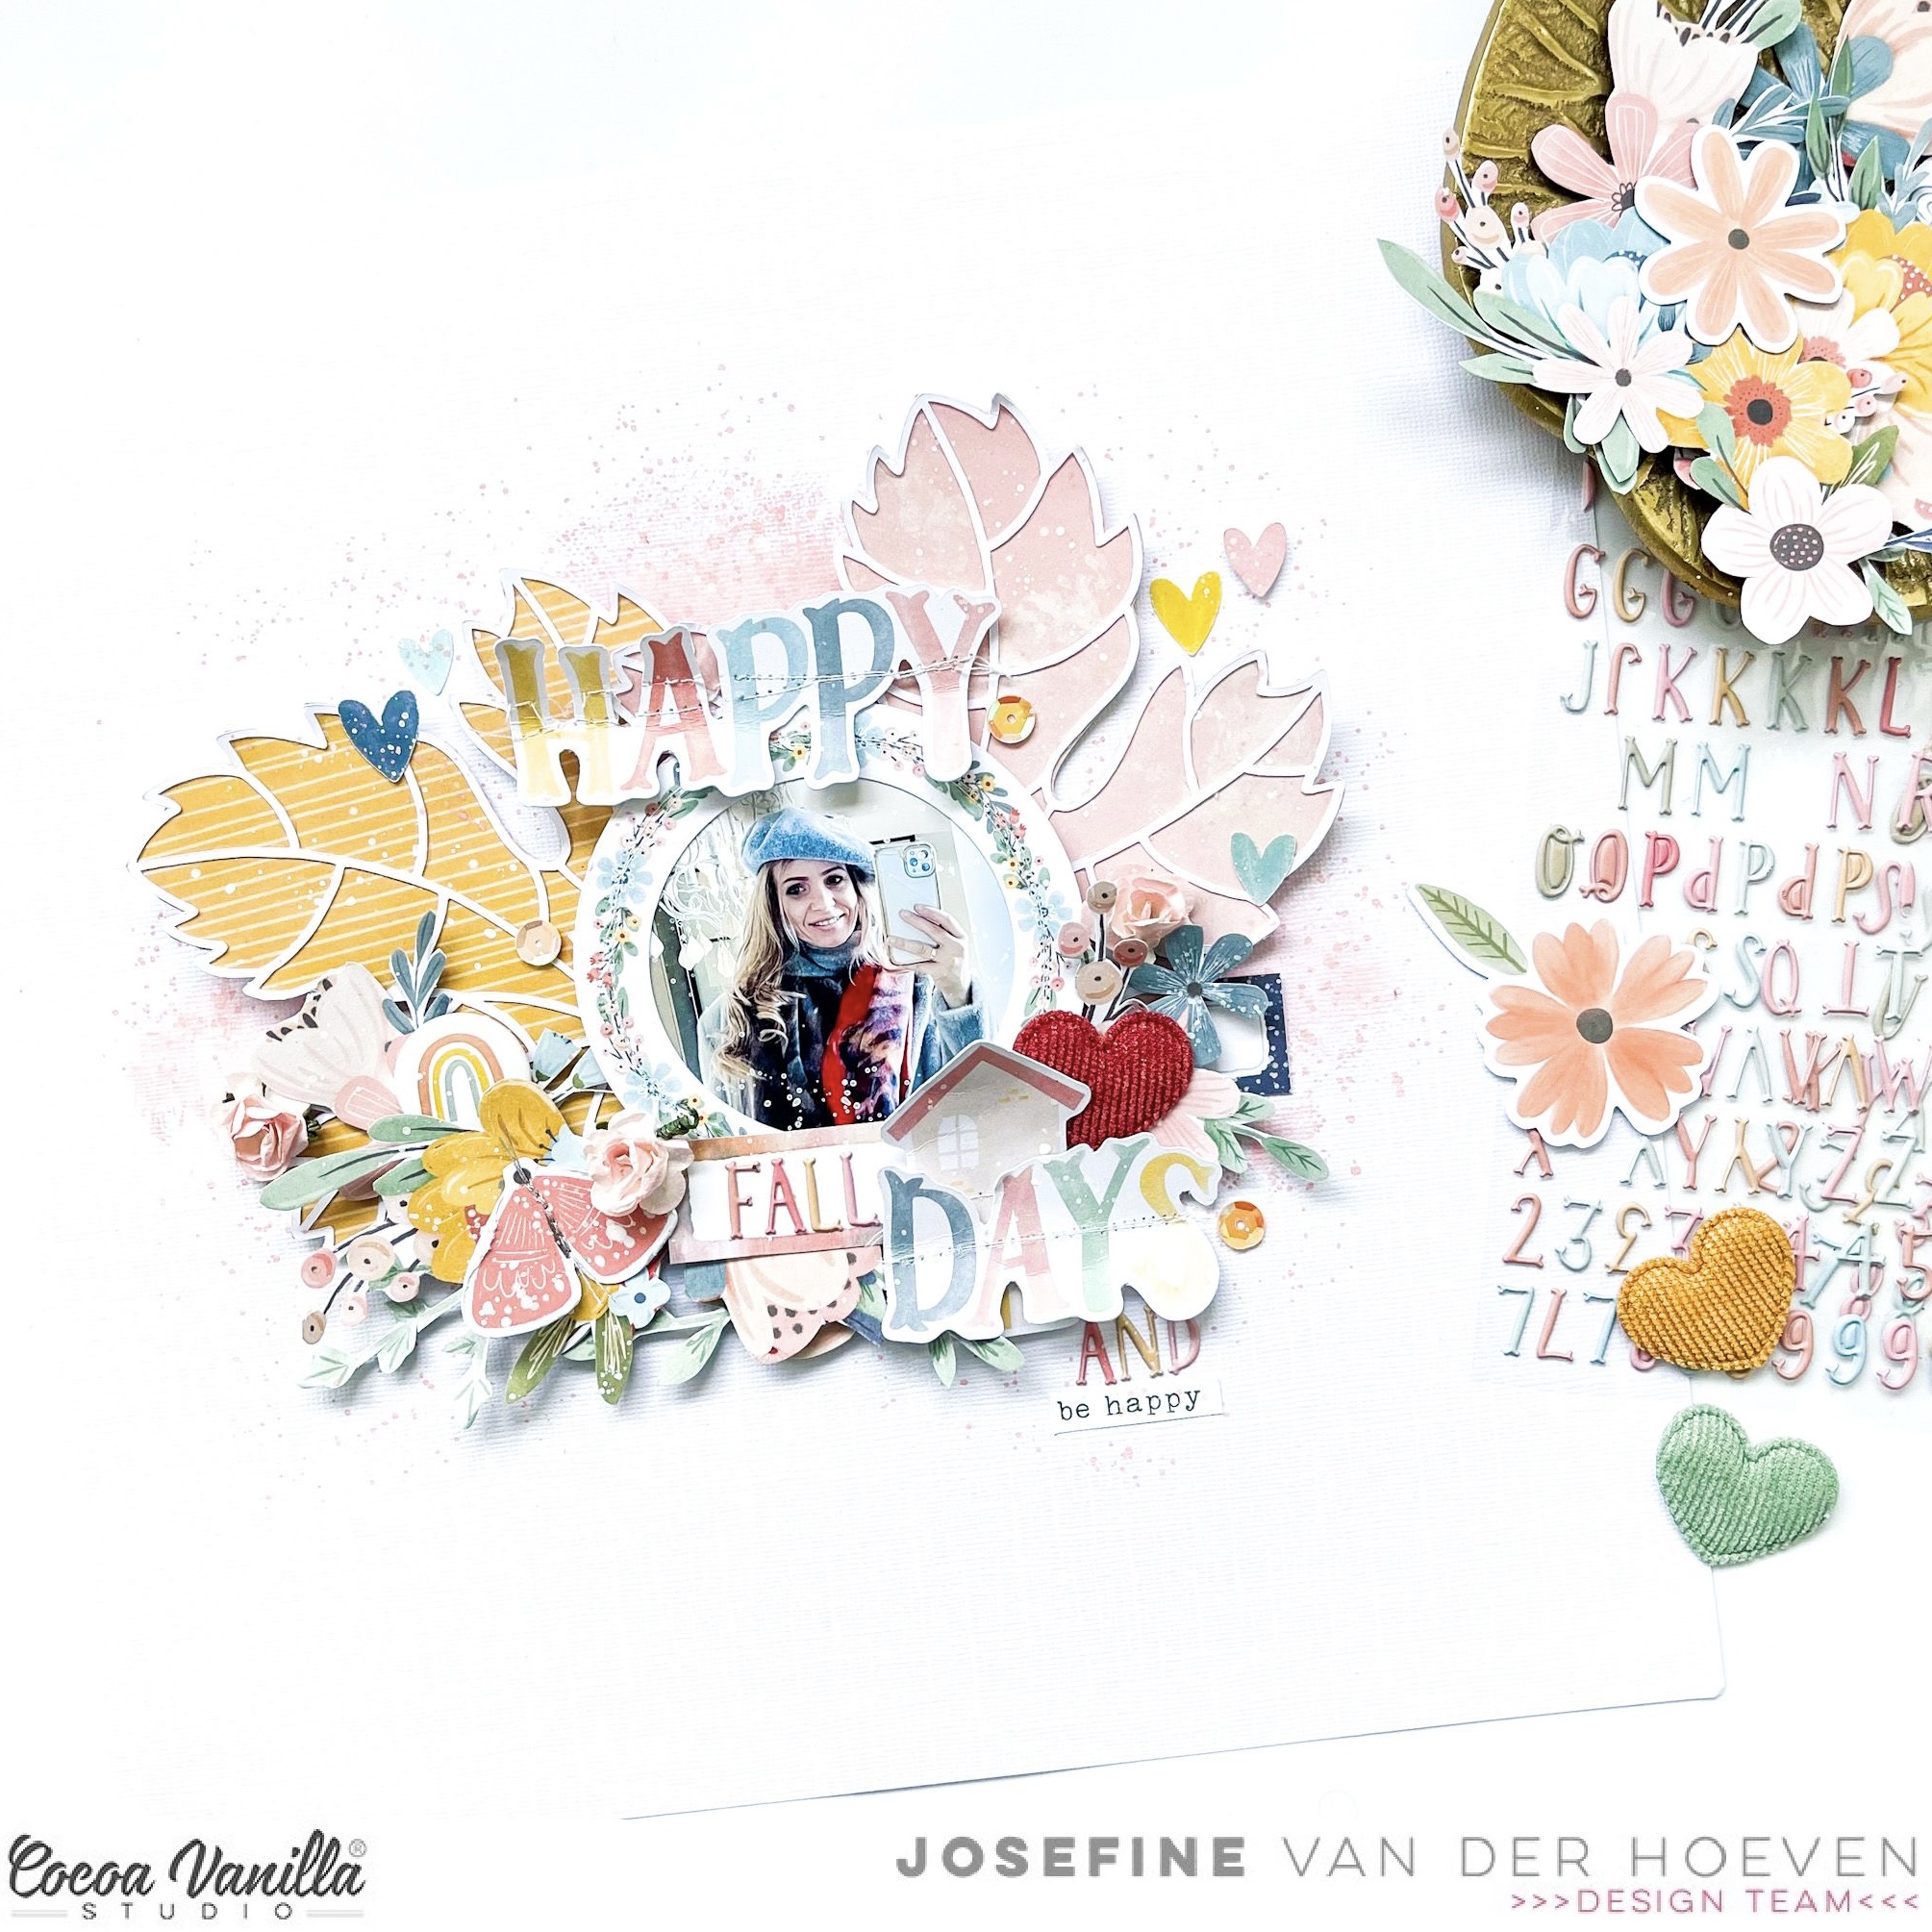
It’s Jo here on the Cocoa Vanilla Studio blog today sharing a new scrapbook layout with you. For this layout, I was inspired by two seasons. I chose to create a fall layout in spring colors. I had some leftovers from the Daydream and These Days collections and chose to combine them both for this layout.
I grab a 12×12 white watercolor paper and choose one of my fave color distress oxide called “saltwater taffy” I create three stains on the white background by using a kitchen sponge. I make a stamping motion on the watercolor paper with the sponge and the Distress oxide color. Don’t forget to wet the sponge a little bit so the ink flows out nicely on your paper. I take a watercolor brush and splash some ink. I love the effect of ink splatters on my layouts. These splatters give my mixed media background more demension and a festive look.
I use a beautiful cutfile designed by Cut to You called “Autumn leaf” I cut out the cutfile twice by using my Cricut Maker and backed it with yellow and pink colored design paper from the gorgeous Daydream collection from Cocoa Vanilla Studio.
I placed both cutfiles on top of my light coral pink mixed media background.
I fussy cut a few flowers from the pattern papers and placed these under my Happy Autumn selfie picture. I made a cluster on both sides of the photo with the gorgeous Die-cuts elements, stickers and figures from the Daydream and the These days collection.
I placed a few extra embellishments like butterflies, sequins, labels and stickers to decorate my Autumn layout with spring vibes. Some of the embellishments I added white sewing thread with my sewing machine. Finally I give my layout some extra white gesso splatters.
I hope I’ve given you some fun ideas for combining different collections and themes like spring and fall with each other. I love to see you next time on the Cocoa Vanilla Studio blog and social with a new crafty scrapbook project! Can’t wait to see your gorgeous inspiration on the Cocoa Vanilla FB groep! Happy creating and I wish you a fun and crafty day friends!
Hey Hey! It’s Michelle here today with a new layout to share with you all using the StorytellerCollection. This layout was inspired by our current MonthlyChallengeboard and I have to admit, of all the layouts I’ve ever made in the past, this would have to be the most random subject I’ve documented lol
Inspired by the pumpkins on the board, I went down a soup making rabbit hole and came up with this creation using a pumpkin design cut file from CUT to YOU.
There are so many different ideas that come from this board, it was quick tricky to figure out what would work for me and the random photos we take as a family each year.
The piles of pumpkins had me, and I got to work in silhouette studio resizing the CUT to YOU pumpkin file to create 1 large pumpkin to sit in the background of the layout and a second smaller pumpkin to act as the base for the title I was adding to the layout.
I used the Oh My Heart paper to cut out the pumpkins and backed the larger size with some vellum and the smaller with a pink paper from the A5 paper stack. Both pumpkins were adhered to the layout over the torn woodgrain strip (Cross if Off) using both double sided foam tape and thicker foam sheeting to add a slight hint of dimension.
I used multiple photos of my soup and sanga making time, printed out in a 3.7inch grid then cut into strips to overlay each other. I used the cute little rainbow hearts paper from the A5 paper stack for layering underneath then embellished with an accessory word sticker and label from the Story Time cut apart paper.
Next up I added the title using my beloved whitealphas adding machine stitching to hold them in place, whilst adding a little pop of texture to the layout.
On both pumpkins I created a cluster on top of the leaf area, using multiple fussy cut florals in all sizes from the A5 paper stack version of Spring Fling. Slowly but surely I am making my way through all those tiny sweet flowers
I also strung a tag from the ephemerapack to the top of the larger pumpkin and adhered it to the cardstock using foam tape
Here’s a closer look at the florals cluster on the smaller pumpkin, using a mix of adhesives for varying layers of dimension. Tacky glue, glue dots and foam tape would have to be the most used items in my stash.
1 final cluster added to create the visual triangle of embellishments on the layout, then the usual splattering of gold ink to finish it all off..
Super quick and easy layout to recreate if the need be, other than all the fussy cutting of florals that is.
Here’s one final look at the end result..
Thanks so much for stopping by, I hope you’ve enjoyed seeing where my inspiration of our current Monthly Challenge board took me, I certainly enjoyed creating it.
Please be sure to check out the Cocoa Vanilla Studio Community Group on Facebook to see all the other entries, and enter your own for a chance to win. We really to love to see what you all create, and where your inspiration takes you each month.
Hello CVS crafty friends! I have another spring themed layout to share this month. This time it is all about Paris in Spring featuring a photo of my daughter strolling in Paris. I have use the beautiful Storyteller collection.
I found a pretty floral frame cut file from the Silhouette Design store. I cut the floral piece using Little Love paper and paper backed them using Ditsy Daisy paper. I next added a bright blue water colour wash to my white card stock base. I then added the floral frame. I added some floral sprigs and leaves from the Floral diecut ephemera pack.
I next added my title. I used a mix of the Foam Title stickers and Accessory Sticker sheet. I then added a die cut camera and die cut butterflies, which I added with foam tape.
I added my 6×4 inch landscape photo which I matted on a blue paper piece from the A5 paper pad. I love the quote ‘the story behind the photo’ and the size perfect to fit under my photo with foam tape. I added one of the phrase sentiment die cuts to the top of my photo ‘love this’.
I went back and added centres to the floral die cut, some I cut from paper and others I added Wood EpoxyButtons which adds dimension.
I love the mix of blue and yellow and with small pops of other colours and use of a small floral print finished of with a black title, so eye catching. Definitely Spring vibes here!
Thank you for stopping by today and I hope you all have a wonderful week with lots of time to create!
Welcome and so happy to see you again on the Cocoa Vanilla blog today! It’s Josefine here and I’m sharing a new layout with you. For this girls pink layout I choose to work with the beautiful collection “Sunkissed. I really love the pink vibe on this happy page from me and my daughter.
I took a 12×12 watercolor paper and choose three pink colors of distress oxide to work with. The colors I used are, picked raspberry, kitch flamingo and spun sugar. I placed an ink pad on my white background and make a horizontal line. I do this with all the three different ink pads. Then I take a medium watercolor brush and blend the colors with each other by using a little bit of water. I splash some more with the colors by using my watercolor brush and then let the background dry by air. By splashing with water on your distress oxide and dabbing it dry with a piece of kitchen paper you create a super cool watercolor effect.
I used a cutfile by Paige Evans called “Beautiful” as part of my title. The title I choose for this layout calls “We look beautiful together on vacation” I really love the moments that I spend with my teenage daughter. These moments are very special and precious to me. I cut the cutfile with my Cricut Maker and backed it with yellow colored design paper. I color the alphas with the distress oxide “mustard seed” and then I stitch the alpha’s with light yellow sewing thread on my cutfile. The stitching details give my alpha’s more detail and dimensions.
I cut different pattern papers to size and placed it behind the photo from me and my daughter. I made a cluster on the right side of the photo with the gorgeous Die-cuts elements, stickers and figures from the Sunkissed collection. I select some more embellishments for extra decoration between the alpha’s.
I punched out a few butterflies from the lovely Sunkissed design papers and placed them in different places on my layout. Also I give my layout some white splatter with white gesso for a festive look.
I hope I was able to inspire you with this happy pink girls layout with the fresh and colorful Sunkissed collection and give you a creative idea for an easy mixed media background. Of course, I hope to see you next time on the blog with a new project! Can’t wait to see your beautiful projects on the Cocoa Vanilla FB groep! I wish you a very happy and crafty day friends!
Hello crafty friends today I am celebrating all things Spring (well if you live in the Southern Hemisphere anyway!), flowers, sun, bare feet and yellow!!! Storyteller is a perfect collection for spring themed layouts.
I firstly created a water colour background effect on my white card stock, using yellow as it reminds me of spring, I then found a cute vase cut file from the silhouette design store. I used Oh My Heart paper to create my vase.
Now for the fun part, I created flowers for my vase using the Floral die cut ephemera pack. I added them with foam tape to add dimension and then tucked in extra leaves and sprigs.
I add a phrase sentiment banner from the die cut ephemera pack on the vase. I chose a wood grain paper from the A5 paper pad to mat my photo.
Next I created my title using a cut file which I cut using Ditsy Daisy paper. I added a camera die cut and added a wood epoxy button to the lens of the camera.
To finish my layout off I went back and added some die cut butterflies and puffy stickers in amongst the flowers and under the butterfly wings.
A simple layout technique wise but visually beautiful with the colour choices and lots of flowers!
Thank you for stopping by today and I will be back later in the month with some more inspiration.
Good Day Friends,
Lina here on the blog today with an Autumnal layout I created using the fun Sunkissed collection and a photo of my eldest daughter, from this past weekend. I know Sunkissed is a summer themed collection, but I couldn’t resist it’s rich tones of yellow, orange, and pink. I think by looking at my layout, you’d never guess that the collection was geared towards summer. And, that’s the beauty of CVS collections, they’re just so full of fun and colour and that makes them versatile.
I began with a white piece of 12×12 cardstock and created a blended ink background in yellow, coral, and pink. I used water to then add droplets which then I dabbed off to create a reverse splatter as the water removes the ink where it’s placed.
I created the cutfile in Silhouette Studio using two different fonts, layering them and then cutting the background from white cardstock and the rest from papers from the A5 Paper Stack. The Paper stack is perfect for smaller tasks such as cut files or even matting of a photo. I popped up the cut file with dimensional foam and then placed it on my now dry background.
The photo is printed in colour and I feel like the shades and tones in the photo play nicely with the colour scheme I’ve used and do not “get lost” amongst all the colour I have already laid down. I matted my photo with papers form the A5 Paper Stack adding in the same pink, yellow and green.
Time for my favourite part…. the embellishing of the layout. I created a few clusters, one main, large one within the cutfile, a second cluster, mid sized to the left of the photo and lastly a smaller third one, to the right of the photo. I used florals from the Floral Ephemera and a few banners from the Die Cut Ephemera packages. Because I wanted this layout to have more of an autumnal vibe to it, I stayed away from the teal and blue that is included in this collection using soley the shades of orange, yellow, and pink with a pop of green. I also used some gold thread to create a nest for a small Wood Button to sit within. In doing this, I feel like I give the button a home. :P
Lastly, I used some gold ink spray and splattered paint in and around my layout. As always, this finishes off my layout and ties it all together. in my eyes, it similar to adding sprinkles on a cupcake… it’s just that little bit extra that completes your layout.
Thank you for joining me today on the blog and I hope you have a wonderful rest of your day!
xoLina
Hello Hello! It’s Michelle here today with another instalment of our current story telling feature. I’ve used our beautiful Storyteller Collectionfor this layout that documents a big step in Leila’s school life – School Camp. Even though she might have been super anxious in the lead up to going away, Leila and her mates certainly enjoyed themselves while there.
I started off by cutting out some large clip boards from CUT to YOU to use as a place to ‘clip’ my photos. I used both sides of the DITSYDAISY paper to cut both the outline and the background of the boards and adhered the pieces together, leaving the ‘clip’ piece free to tuck in all the pieces they’re holding.
I added all 3 clipboards to a piece of the CROSS IT OFF paper, using pieces of foam sheets to give them a little pop off the page before adding all the other elements that I’ll share below.
I used 2 photos from the campers send off, both featuring friends that Leila’s had since Prep and even Kinder.
On the left side clip board I’ve layered the photo with a pocket page card, pieces cut from the cut apart sheet STORY TIME plus some fussy cut florals from the SPRING FLING paper in both 12×12 and A5 size
Over on the right I’ve added the 2nd photo layered on top of a folded card that’s hiding the written journalling. It’s not hidden for any other reason other than I wrote more than I expected and I couldn’t make it work tucked into the other clipboard. I added more of the same elements over this side as I did on the left clip board to keep things cohesive across the entire layout.
I used a simple piece of notepaper ripped from a book to write the journalling, adhered it between 2 pocket page cards then machine stitched top and bottom for a little extra detail.
On the middle clipboard I’ve added the title using another CUT to YOU cutfile cut out of the green A5 version of LITTLE LOVE, layered over the journalling spot from the cut apart paper STORY TIME with the addition of an accessory sticker from an older collection.
Along the tops of the clip boards I added some WOODEN BUTTONS to act as thought the boards are ‘pinned’ to the woodgrain background (CROSS IT OFF)
I added the twine along the tops and glued it into place using some tacky glue that dries clear. Theres also a sprinkling of both gold and white inks around the layout to finish it all off.
Here’s another look at the entire layout..
Well friends, thats all from me today. Thanks so much for stopping by! I hope you’ve enjoyed seeing my version of our story telling theme, it’s certainly been a fun one to create. Please be sure to share your own versions within our facebook community group HERE
Hello CVS friends! I wish I would journal more on my layouts, using my own handwriting but I struggle and therefore using other means to journal. Today I am sharing a rainbow fun layout when I have used Storyteller collection and the accessory stickers to add my journalling.
This double rainbow cut file is from the Silhouette Design store.
I have used the curve of the rainbow cut file to add my accessory stickers/journalling. I chose my phrases and then cut them as I needed to fit the curve. I know this is cheating but it does look good!!! I used Oh MyHeart paper, using both sides to create my rainbow. You will see that I have used foam tape on some of the rainbow pieces so it didn’t look ‘flat’. Once I had done this I added accessory stickers on thee top curve to create my journalling. I chose a patterned background paper using Little Love paper.
Here I added the Storyteller puffy sticker hearts adding them to the hearts on the paper pieces of the rainbow. On the top rainbow I added a butterfly Wood Epoxy Button. Adding these embellishments prevents your layout looking ‘flat’ and adds texture.
I used Ditsy Daisy paper for my title HAPPY. I also added some of the letters with foam tape. I used the smaller pattern of this paper from the A5 paper pad which is perfect when you are creating smaller elements.
I created a small floral embellishment cluster using the floral die cut ephemera pack, just because I like flowers really but keeping in mind this layout is ‘busy’ in patterns and colours so not wanting to over do it.
I matted my 4×4 inch photo and added to the lower right of my page with foam tape, tucking under a banner tab to the top and then a phrase sentiment from the die cut ephemera under my photo. A black and white photo against these colours/patterns really pops.
This is a simple but fun layout to create. I love the font of the accessory sticker words/phrases and they really do work well on this layout as my storytelling of my photo.
As always thank you for stopping by today and look forward to sharing my next layout with you in September.


 I took a 12×12 watercolor paper and choose three pink colors of distress oxide to work with. The colors I used are, picked raspberry, kitch flamingo and spun sugar. I placed an ink pad on my white background and make a horizontal line. I do this with all the three different ink pads. Then I take a medium watercolor brush and blend the colors with each other by using a little bit of water. I splash some more with the colors by using my watercolor brush and then let the background dry by air. By splashing with water on your distress oxide and dabbing it dry with a piece of kitchen paper you create a super cool watercolor effect.


