Super Star | Legendary Collection | Tarrah McLean
Hi Cocoa Vanilla friends!
It’s Tarrah back with you and today I am sharing another new layout featuring the awesome new Legendary collection!
Hi Cocoa Vanilla friends!
It’s Tarrah back with you and today I am sharing another new layout featuring the awesome new Legendary collection!
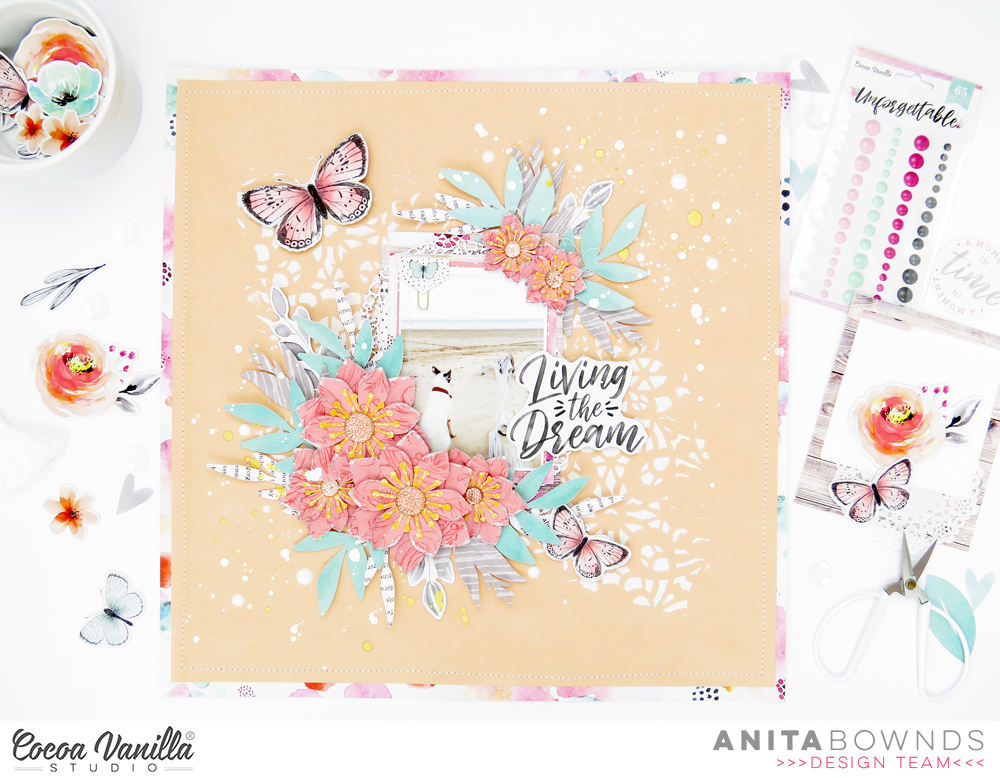
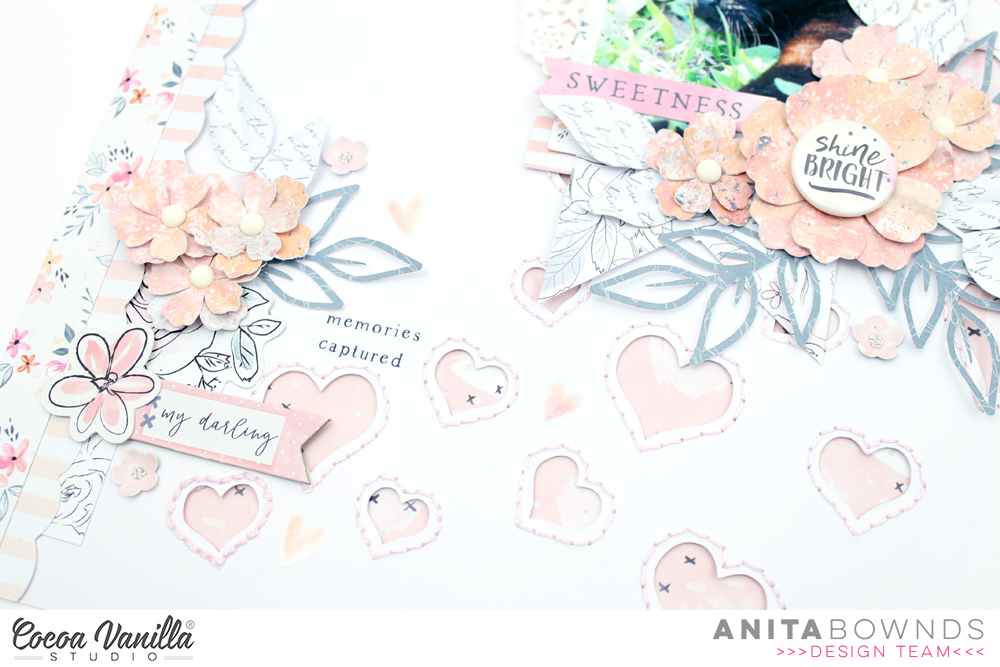
Hello CVS friends, today I have a layout to share using a mix of the older collections, Wild at Heart, Midnight , Unforgettable and Make a Wish collections. Instead of my go to white cardstock I used the beautiful and subtle grey white washed wood grain paper Artisan. I wanted a real pop of colour so used the bright pink paper Hooray. I have used a large scallop hand punch to create a border each side of the Wild at Heart Vellum sheet which is 4 x12 inches. I added machine stitching to each side of the pink border strips.
 I added my photo off centre with foam tape and finished off with a bow from Unforgettable collection.I have not matted my photo knowing I was going to be adding layered flowers which would draw the eye to the photo.
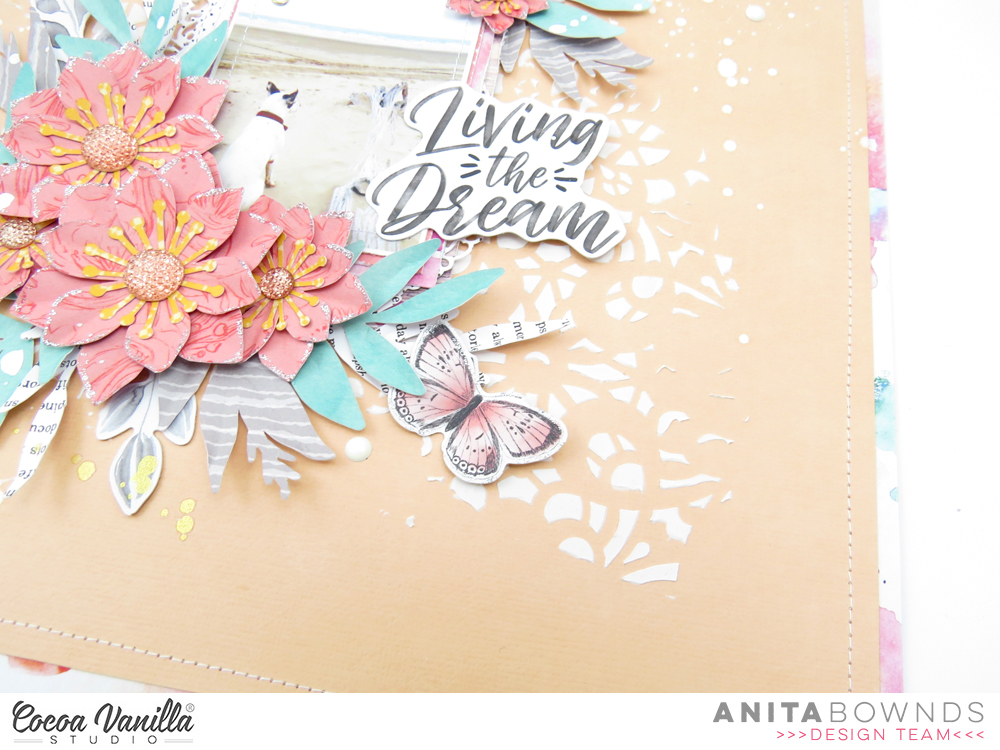
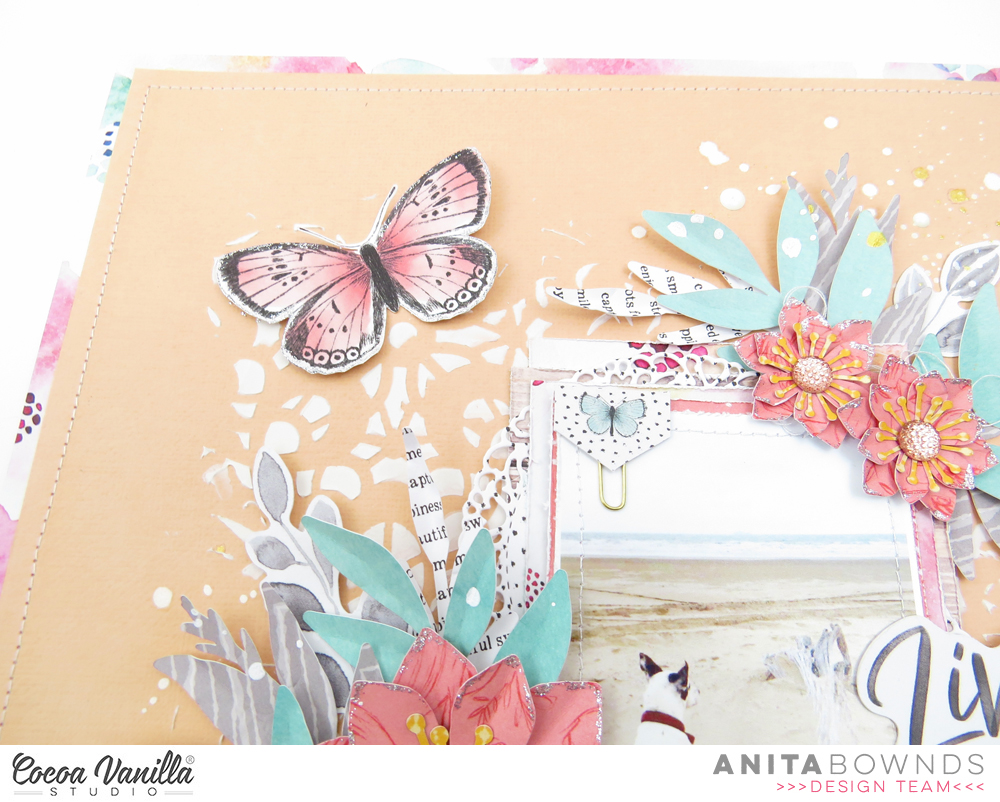
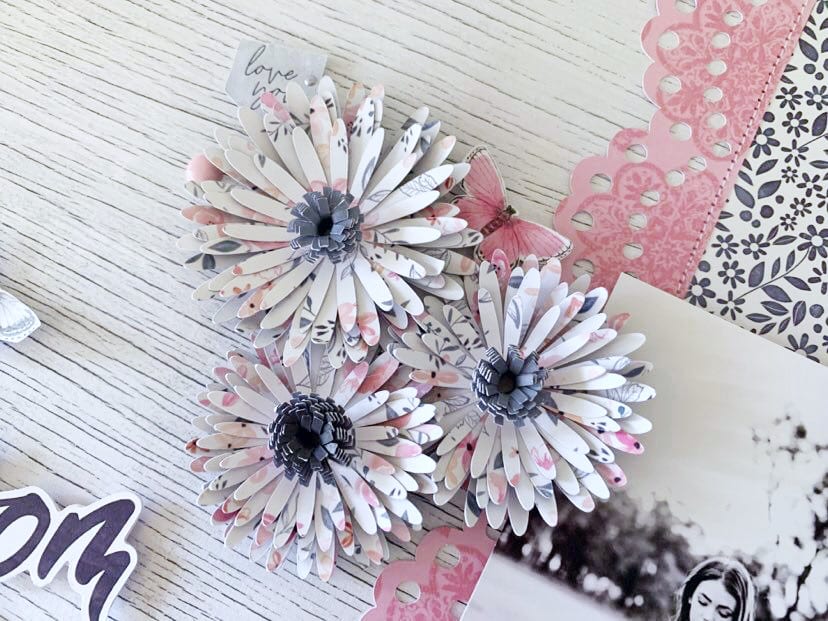 I have used two different cut files from the Silhouette Design store to create my layered flowers but for those who do not have a cutting machine use a hand punch, punching at least 3 and then layer with foam tape. If you want to recreate these centres, they are super easy! Cut a 12 inch strip at 1/2 an inch. fringe cut with a pair of scissors and then roll as you would any rolled flowers. Once the glue has dried then push outwards all the way around, then glue to the centre of your flowers. I have used Inky Depths paper from the Midnight collection to create my flowers.
 You will see that I then tucked in-between the flowers fussy cut butterflies, some die cut leaves and a sentiment from the accessory stickers.
 I then created my title using Happiness die cut titles. I added some more fussy cut butterflies around my title adding some Unforgettable enamel dots.
 I love using word and phrase sentiments from the Accessory Stickers sheets and you can see I added some more under my photo and under my large title.
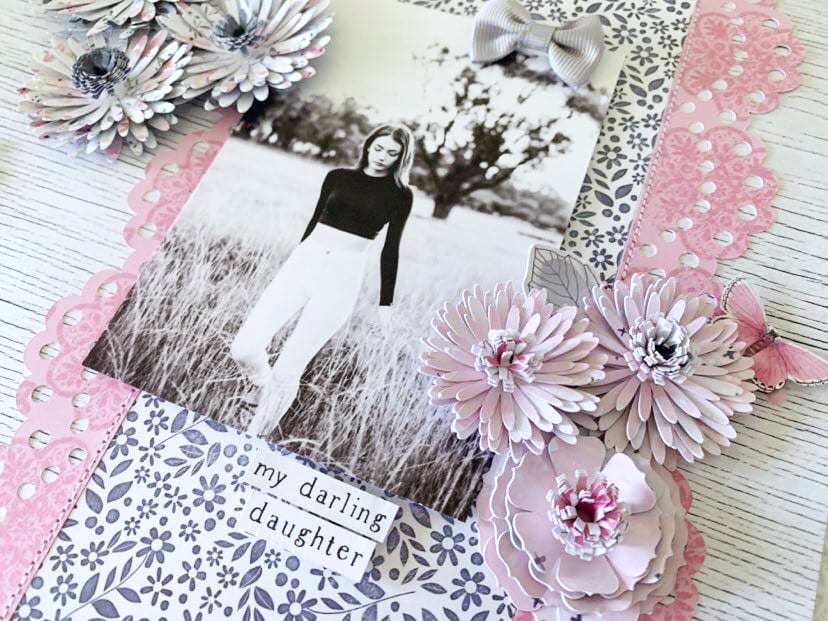 And there you have it, I love how this turned out! A great colour palette even though I have used several different collections. Don’t be put off because of the flowers on this layout, you can make. beautiful one’s too, time to blow the dust off those punches!
Thank you for stopping by today and feel free to leave any questions you may have on this layout in the comments. See you soon, stay safe and well!
Rachel X
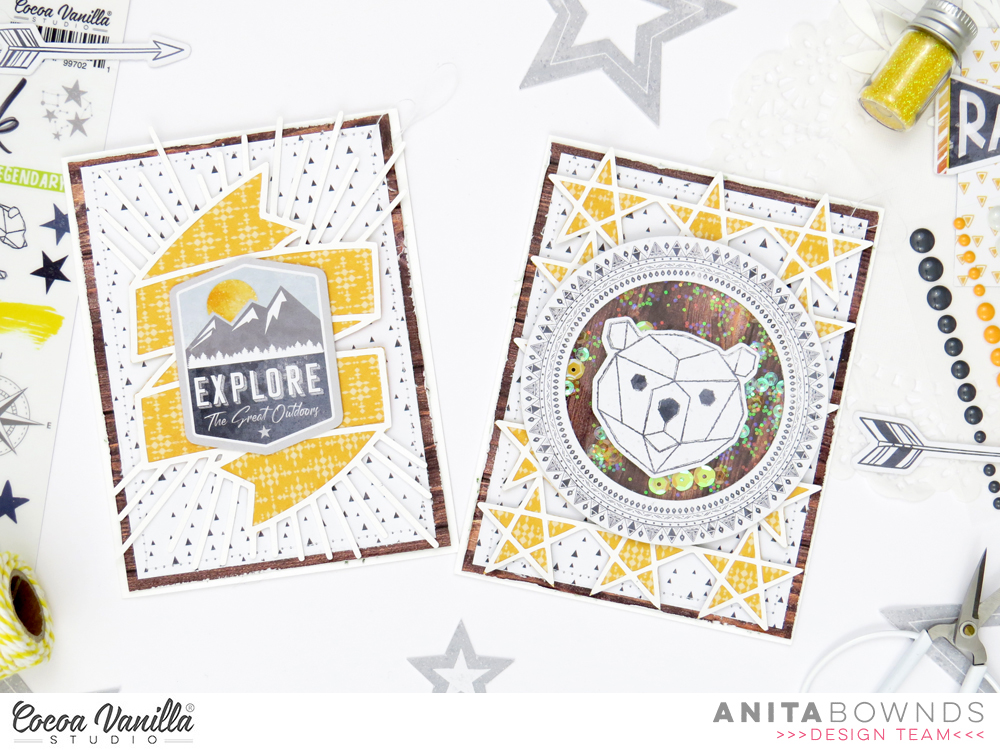
Hi everyone, it’s Raquel here today sharing a new layout featuring the amazing new Legendary collection and the freebie cut file designed by Gwen at Cut to You exclusive to CVS. This layout today features my little man, who is not so little anymore, and our gorgeous puppy Lola.
Here is the layout that I created:
Here is a process video for how this layout came together:
The main feature of this layout, along with the photo of course, is the banner cut file which I have cut on black textured card stock. I normally cut all my cut files on a white so choosing the black was a big change for me. I have to say though I love the masculinity that this adds to the layout and that striking pop of contrast. To back the cut file I used both sides of the ‘Total Legend‘ patterned paper. My colour palette for this layout was to stick to the woodgrain, green, blues and greys which I was able to do with the embellishments and papers within the collection. These colours really complimented the colours in the photo of Jack and Lola.

The photo was matted on the green of the ‘Outdoors Type‘ patterned paper. I then added a cute woodgrain tab and a compass ephemera piece to the top left of the photo. The green legendary embellishment that you can see is actually a clear sticker, adhered to a piece of white card stock and cut out. I tend to do this a lot with the clear stickers as that gives me the freedom to move them around. Plus adhering them on white allows them to really feature and pop as an embellishment. I used my tiny attacher to add a few staples to the embellishments – more for a design purpose than for the use of adhesion. 
Stars feature on this layout heavily and were mainly chosen from the ephemera pack. There is nothing better than a scattering of stars on a layout, wouldn’t you agree? Of course, I added them in a number of 3. I always tend to work in threes when I embellish.

The enamel dots in this collection have this beautiful shade of blue. I scattered a few on this layout too.

For the title today, it did take me a while to figure out what I wanted to add. When going through my Legendary stash I came across the phrase ‘Stay weird, stay wonderful” on the ‘Epic Tales‘ paper and I just knew this was perfect. I fussy cut the heading out and then added my typewritten journaling in strip form underneath. 
The line style stars scattered amongst the page are a fussy cut star from the ‘Epic Tales‘ paper. I love the look of these as an added embellishment. 
I framed this layout with the woodgrain from the ‘Outdoors Type‘ paper. I love the woodgrain in this collection. So so amazing. I added extra detain to the border using machine stitching and also some staples.

I hope you have been inspired by todays layout. Thanks so much for stopping by the CVS blog.
Stay safe,
Raquel xxx

Hey y’all! Laura Alberts back again with a sweet layout of my grandmother using the stunning Happiness Collection. I started with a cut file from Hip Kit and filled it with papers from the Happiness 6×8 paper pad, then added it to this gorgeous teal background on the Good Vibes patterned paper. Using floral swags from the ephemera pack on the left and bottom of the photo and adding a cut-a-part piece from the Little Things patterned paper to add my journaling.

The larger butterflies are fussy cut from a cut-a-part sheet and the smaller butterflies are all fussy cut from the Bright & Beautiful patterned paper. I love the simple elegance trenbolone these add to this layout, it’s amazing the mileage you can get from patterned paper if you’re willing to fussy cut out the beautiful icons! I thought these lovely butterflies were perfect for a memorial page honoring my grandmother’s amazing life.

To finish this layout off, I added clear heart stickers around the clusters and the arrows by the die-cut title. Then, a little flourish with Nuvo drops in gold and white, as well as gold splatter! I love the way the tiny details like butterfly trails give this layout such movement and interest.

I hope this layout inspires you to try adding some extra tiny details to your layouts! If you’d like to see this layout created, I have a process video below! Have a wonderful and creative day!


Hi everyone! Danni here, back again playing with the beautiful Legendary collection. Once again, I am scrapping an outdoors photo and I chose this adorable photo of my son playing at a local park. This week we were challenged to feature the incredible Legendary free cutfiles that are available for download, and I decided to use the Adventure word as my title. I cut it once from the yellow side of Wild One patterned paper, then used the offset tool in Silhouette studio to cut a slightly larger backing piece from Offbeat patterned paper. I then went ahead and hand-stitched a single line of chain stitch following each of the letters. I am on a big hand-stitching kick lately, I just love the texture it provides, and I find the process very relaxing! Once I finished the stitching, I adhered the title to the backing piece using tacky glue.

Next I got to work on creating my background by using Offbeat and Epic Tales patterned papers to frame a piece of white mixed equipoise.online media cardstock and machine stitching around the edge using a combination of straight and zig zag stitch for added interest. I went through and distressed all the edges with my fingers to really emphasise the layers. Too jazz up the white background I added some colour in blue and yellow using watered-down artist acrylics and the packaging technique, followed by lots of splatters. I added some of the paint splatters from the Clear Stickers too, these are perfect for adding that mixed media effect.

I matted my photo in white followed by the orange One Way patterned paper to really draw the eye to the photo. I flipped One Way over and used the reverse side as a larger layering piece behind my photo, creating a space for embellishments to sit. I added some torn strips of Wild One paper as well for some extra colour.

To complete my title, I fussy-cut the ‘The Best’ banner from Epic Tales cut-apart patterned paper and layered it behind my main ‘Adventure’ title. I embellished either side of my photo using a combination of Accessory Stickers and Die Cut Ephemera, using several circular elements to tie in with the ‘The Best’ banner. The green ‘Let’s Go’ Flair Button was the perfect addition to this theme.

My few lines of journaling I added in strips of typeface font in that perfect little space below my title. I added in one of the tiny word stickers from the Accessory Stickers at the top of my photo to help frame it and finished the layout with a sprinkling of the Enamel Dots in all the colours. I’m really pleased with this one! It wasn’t planned out and definitely came together during the creative process, and those are definitely some of my favourite layouts.

There is a process video linked below if you would like to watch this one come together.
Happy scrapping!
Danni x
To add some texture to my photo I add a stitched border.i then started layering pattern papers behind my photo I used pretty bits , sprightly and natural beauty Next I used my cameo to cut out a layered flower I designed using papers glorious, garland, lacewing and patterned paper from the 6×8 paper pad


Hey y’all! Laura Alberts back with a Wild & Free layout featuring my youngest son and his stockpile of sister-annoying weapons. He is ready to take on all three of his sisters with this setup! I couldn’t stop giggling while scrapping this one, he’s so serious in his games and he was ready to rock and roll. This cut file from Paper Issues was absolutely perfect for this “target practice” style layout! I used the front and back of the Wild One patterned paper from the Legendary collection to build my background and then fussy cut tons of stars from the All Stars patterned paper to create a cascade that follows the color pattern of the background!

By tucking this larger ephemera star behind my photo, it helps to draw your attention to the photo as well as give the impression of the smaller stars shooting off from the larger one, a cool effect and perfect for this layout! I added a scattering of enamel dots and gold ink splatter to add detail to this cascade of stars.

I used a cut apart piece for my title and an arrow to draw your eye back to the photo again! On a one photo layout, it’s important to reinforce that this is the focal point in more than one way. And finally, I added these word phrase strips below the photo to create a pre-made journaling spot! I love how this layout came out and I think it really captures the feeling of that moment for my son.

I hope you’ve found some inspiration in this design and I would love to see how you capture your photo’s moment in time with your design! And don’t be afraid to fussy cut these brilliant stars that inspired this layout for me! They make for fantastic embellishments that already perfectly match the collection! A little bit of extra time can make a huge difference in your creations, those details can take your creativity even higher!
Thank you so much for joining me on the sister-blasting adventure and enjoy the process video for this fun layout below! Until next time, my friends!


Hello and Happy Easter Monday. Its Melissa here! I hope you had a lovely Easter with your loved ones wherever you are in the world. I’m so excited to be working with the amazing Legendary collection, and there was a lot of excitement (from my kids and I) when the courier came to our door!
I decided to challenge myself to scrap an Easter photo with this rad collection, with an extra twist of using a floral cut file ,and to use it to document my son Sam. The cut file is from Confessions of a Paper Addict.

The first thing I did was to pull all of the papers that I thought would work for this cut file, bearing in mind that it has a lot of florals. Often I find that the B-sides are best for backing smaller details on cut files. Cut part sheets are also great for finding extra patterns and colours.

The title word said “Brothers”, but as I only have one son I altered it by cutting off the “s” to make it work for this photo of Sam. The story behind this photo is that although he was a big 12 year old last Easter, he still joined in the Easter hunt and even posed for this photo for the sake of his youngest sisters. If you have kids that are nearly teenagers you’ll know what I mean!!

I love using a patterned paper for a background, and this gorgeous small repeating triangle was perfect. I added some small blue and yellow splatters for some subtle detail. I really wanted the feature of may layout to be the photo and the cut file, so I kept embellishment to a minimum. I added some of the clear stickers to help draw the eye in, and my final touch was to use blue drops on the two flowers that were too small to back with patterned paper.

I hope you enjoyed my Easter layout. Thanks for looking, and I’ll be back later this month.
Take care
Melissa