Hi everyone!! It’s Melissa here and I’m so happy to be back sharing another layout with you. This time it’s a much requested boy themed layout, and of course I had to use the amazing Legendarycollection!! At the beginning of every year I create a page for each of my four children as an introduction to the year, setting the scene and telling them what I hope for them in the preceeding year. I used a stunning cut file from Cut To You which was so perfect for the theme of my layout for Sam (who is aged 13).
I created my background with a water activated ink pad. I stamped on my craft mat, sprayed it with water and then did the reverse packaging technique where you place the cardstock onto the mat several times. The key is to not add too much water, especially if you’re not using gesso. I also used a stencil and foam pad to blend the same ink. My final mixed media touch was to splatter with some sparkly water activated powder and white iridescent ink spray. The reuse tis a very subtle layered background behind the cut file.
I backed the cut file with patterned paper that was not overly blue, so that I could use blue in my background to make the colours pop! I used Wild One, Total Legend, Brave Heart and All Star. For the stars I cut them in One Way and popped them up with dimensional adhesive. I love the interest that it provides, especially as everything else on the cut file is glued flat to the background paper.
Its not often that I incorporate my photo into the backing of a cut file, but for this one the open “A” was perfect, especially as my photo of Sam was taken at our favourite beach. One of my daughters was also in the photo, and my placing him in the cut file I was able to cut her out. I love that I’m still able to see the rocks, beach and sea.
I embellished very simply withAccessory Stickers, Die Cut Ephemera, and Enamel Dots. I didn’t want to take away from the cut file and especially the photo, and I think the small clusters work well to achieve this.
For “Throwback Thursday,” I decided to use an old photo and an older collection! This photo of my matron of honor and the best man from my wedding is one that I knew More Than Words would be perfect for, the lovely mix of pinks, yellows, and pale blues are just lovely. I started with a long column of journaling on the left side because I knew I wanted to document why these two people are so special to my husband and I.
I wanted to use the chipboard words for my title because they added a bit of texture and dimension to the layout and nestled in the “remember this” ephemera piece just above them. As usual, I fussy cut the white borders off of all the flowers to get a nice cohesive look when they’re clustered together. I really enjoy fussy cutting and find it incredibly relaxing!
This larger cluster was a combination of an old cut file from the Silhouette store that I’ve had sitting on my desk for ages and the floral ephemera. I started by cutting off the smaller florals that would otherwise be hidden under the photo, backed the open areas with patterned paper, and layered in leaves and florals. Adding touches of gold Nuvo to the centers of the florals and as trails behind the butterflies gives a lovely bit of deal.
I also created a sketch based on this layout to show how all of the layers fit together and make it easier for your to recreate the design if you’d like to!
I hope this story-based layout inspires you to add a bit of extra journaling to your pages too! To see how the “Happy & Sweet” layout came together, check out the process video below!
Hello everyone, its Melissa here and I’m so happy to be back sharing with you, this time a Valentines Layout for our Love theme. Valentines Day isn’t a huge celebration or holiday here in New Zealand, but it is an opportunity to reflect on the love that I have for my husband. Its also the perfect excuse to scrapbook us instead of the kids!! I created this layout with the gorgeous Daydream Collection and a cut file by Confessions of a Paper Addict.
I stated by applying gesso to my white cardstock to prepare for mixed media. I chose some soft and pretty water soluble crayons in colours that would match the colours in Daydream and applied them with the packaging (smooshing, kissing etc) technique. I used my heat gun to dry off each layer. Once all my layers were complete I added some splatters of water activated splatters. I love the soft and pretty effect all my layers create!
I backed the cut file with predominantly papers from the 6 x 8 Paper Stack. I love the smaller scale of these patterns, and selected smaller repeating designs for the little envelopes and florals. I embellished the envelopes with fussy cut flowers, stickers from the Accessory Sticker Sheet, and even included Flair Button! The photo is of my husband and I (featuring our daughter photo-bombing!) on a day that we went boating at our largest local lake during January.
I used the 6 x 8 version of Stepping Stones to back the letter part of the cut file. This was perfect to contain my journalling! I embellished the letter with a Puffy Heart.
The word “Love” from the Die Cut Titles was perfect for my title, I needed a title that didn’t take up too much space, so that it would be of the right scale to not dominate the layout. My final step was to back the layout onto Happy Place.
I love how soft and pretty this layout turned out, a little different for me and perfect for my family scrapbook album!
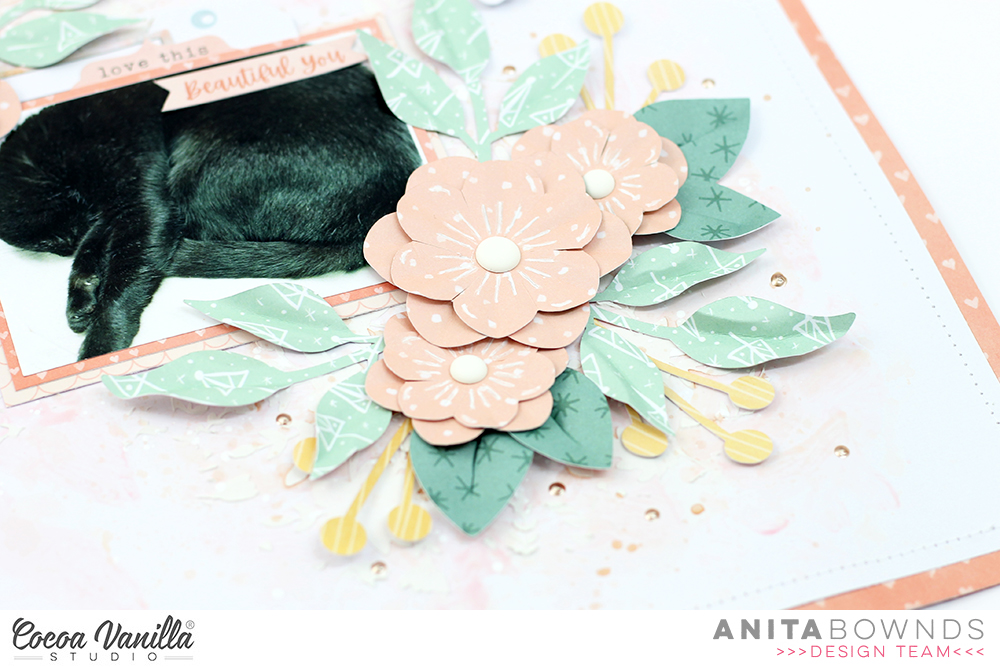
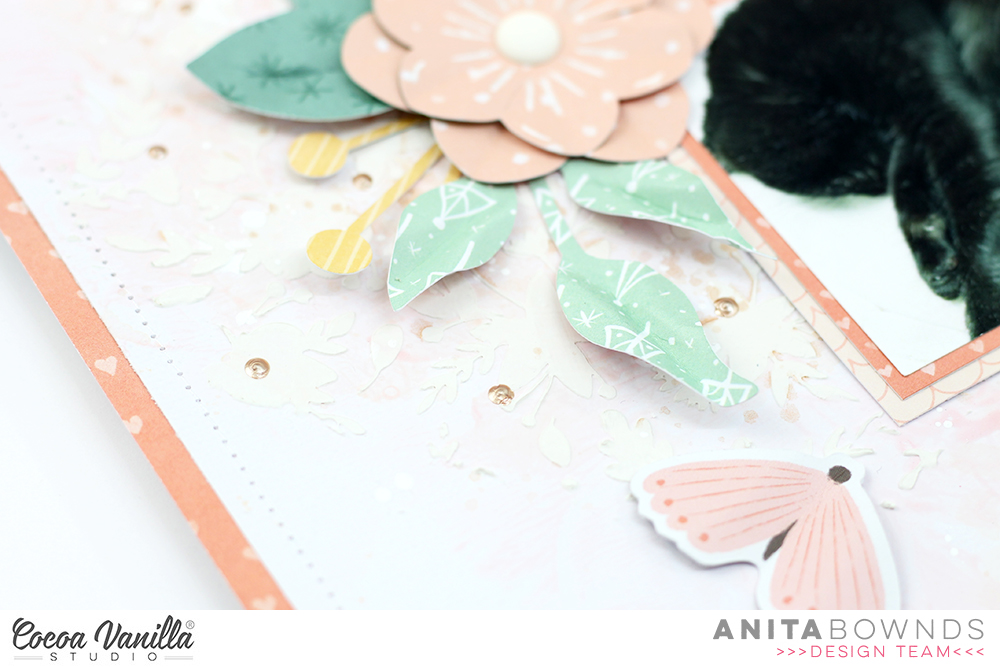
Hi lovely’s , Anita here with you today sharing a floral layout mixing 2 collections together day dream and merry and bright using a photo of our Luna sleeping on my chair in the craft room and I often find her asleep on my chair she likes the craft room as it’s quiet and a great place to just chill out..
You know me ..white cardstock first then I was thinking with this layout I wanted to add some mixed media
To the background so I used the plastic package technique and kissed light pink paint and peach watercolour to the background across the page and let it dry before adding a stenciled modelling paste across it
Then I flicked white watered down paint and did the same with rose gold to add a bit more colours in the background, I kept it light as I didn’t want the background to take away from the foreground I just wanted it to blend
Then I matted background on all aflutter and machine stitched around the boarder then I matted my photo on papers from day dream 6×8 and tucked in some stickers from the accessory stickers from day dream in the top of the photo layers and adhered my photo in the center of the layout..
Then I started cutting out my flowers using joy to the world pattern paper and for the leaves I used oh Christmas tree , count down and sun shower to make my clusters. Using a white pen I added so detail to the flowers and just bent them up a bit to add dimension and layered them with a enamel dots in the center’s to finish them off
And I bent up the leaves just to add more dimension to look more like flowers instead of them being flattened out
And then I clustered them on 2 sides of my photo and finish off the layout with a few ephemera butterflies from the day dream ephemera pack and a few drops of liquid pearls I rose gold.
I hope you have enjoyed my floral inspiration today
Happy New Year CVS friends! At the beginning of each new year I choose one little word to try and guide what I am striving to achieve (a different version of a New Years resolution started by Ali Edwards). This year I chose the word Progression (not perfection), the anxiety and stress that perfection can cause is now replaced with progression. So here is my layout which is all about my new OLW.
I went back to the beautiful Daydream collection after a month of Christmas scrapping! I have used GardenVariety paper as my background paper because I really can’t get enough of these florals. I add a 10×10 inch white cardstock to the centre and then added some messy machine stitching using a blue thread to help frame it.
I used a cut file to layer on top of the white cardstock, I chose another piece of cardstock which coordinated with the pink hues in the florals. I created a polaroid frame using Sweet Serenity paper, before adhering to my page I created a floral cluster cascading out of the right side of frame using the florals from the die cut ephemera pack.
To finish off this embellishment cluster I added an accessory sticker to my frame, flair and lastly a puffy heart. Next I focused on my title. I cut my word progress using the blue side of Garden Variety paper (Word from Silhouette Design store). I typed ‘not perfection’.
To tie it to the rest of the elements I added a rainbow and flower from the die cut ephemera pack which I added with foam tape and then added the first of the moth die cuts which flows to the circle on my page.
I added moth die cuts around the circle to finish off my page. I also went back and added drops of NUVO jewel drops to the petals and leaves.
Well thats it from me today, thank you for stopping by and have a wonderful week!
Hello Hello! Its Michelle here with you today. I hope you’ve all had a wonderful festive season and are all rested and ready to see this crazy year off and start a fresh new one in the next couple of days. I have another instalment of Christmas Memory sharing for you all – the second half of the 2019 album I shared with you last month featuring loads of bits n bobs from the very cheerful Merry & Bright Collection. Like the first post, this one is also very photo heavy so lets jump straight into it..
… starting with the middle of December. There was lego building, tree building and secret letters from Twinkle our Elf. I’ll leave links for all the products I’ve used at the very bottom of this post
This time of year is also when Leila or one of us in this house tends to fall ill. In 2019 for Leila sadly it was a stomach bug that had her wiped out next to the undecorated Christmas Tree’s for an entire day
I created a flip/ shaker pocket to conceal the photo and journalling from that day using a label from the cut apart sheet Oh What Fun and ’14’ from the Countdown paper. There’s some glitter and a couple of ephemera hearts sprinkled into the front of the pocket on top of the pocket page card. To keep them all in place I sewed the flap directly onto the pocket page below.
Over the page I’ve kept things pretty simple using more numbers from the Countdown paper. I’ve repeated this step through the entire album to keep things cohesive.
In between the pocket pages I’ve added a giant paper tag insert using 2 pieces of pattern paper from the A5 paper stack – Joy to the World and the text side of Oh What Fun. I’ve created the round glitter shaker over the top of the floral pattern using the large circular wreath ephemera piece, some left over clear packaging, a tonne of sliver glitter and machine stitched around the wreath to keep out closed. I added flowers and banner from the ephemera pack, then stapled a piece of coordinating ribbon to the top.
I kept the text side of the tag blank as the album is already quite bulky, plus theres a lot going on in the photos to the right. The 18th of December last year was quite the busy day – we treated ourselves to a new car and Twinkle got up to mischief in my craft room creating signs for the Christmas Tree. It was a sad time for Leila saying goodbye to our first family car, but we were all very excited with our new wheels!
Top right of the pockets is another see through glitter pocket using the numbers from the Countdown paper, a single puffy gold star and machine stitched along the top edge to stop the glitter going everywhere.
As we start to creep towards the last third of the month it gets a little busier. The end of school, long days at work, House Elf getting up to mischief and HOT HOT HOT weather.
Another flip pocket using pocket page cards, ephemera and some off cut strips of Jingle all the Way (candy cane stripe) conceal more photos of Leila’s last day at school. One a photo of the crazy mask she made and the other a photo with one of her favourite teachers ( not shared for privacy reasons)
This kid is a hoot! An accessory sticker was perfect to embellish the photo I took of a well needed coffee at work. What a crazy time of year working in Pharmacy can be, and not because its Christmas!
We made it to see Santa to share with him all the things Leila was hoping to receive for Christmas. I had Leila write on the Dear Santa card herself which was the perfect touch to this spread. If you’d like to do the same with your children you can find this card on the Oh What Fun cut apart sheet.
We didn’t get the chance to ‘trim the tree’ until quite late in the month. The lead up to and start of December is always chaotic for us with work, school and Leila’s Birthday so the poor tree always gets neglected until the last minute. We make sure to enjoy it for a few weeks into January before packing it all away.
I used some of the wonderful woodgrain found on the Seasons Greetings paper or in the A5 paper stack as a base for this mini layout. I cut a frame out of the Candy Cane stripe Jingle all the Way to frame the photo then layered 2 trees from the ephemera pack and some stickers to finish it off. On the right hand side I used the darker green print of Oh Christmas Tree to cut a tree design cut file from CUT to YOU. I backed it with some clear velum and sprinkled glitter within each circle to create twinkling lights. I’ve machine stitched the tree onto the Oh What Fun paper to keep it in place.
On the back I created a simple sequin shaker pocket using another ephemera frame and adhered it to some Countdown paper with ephemera pieces and a strip of ‘Christmas rainbow’ diagonal stripe that can be found along the bottom of the Oh What Fun paper.
Over the page I kept the pockets simple using cards from the pocket page card pack. I also documented a photo I screen shot from facebook when our beloved country was on fire.
Were on the home stretch now, just a few more to go…
Another simple insert between pages of photos using vellum, ephemera pieces and a puffy gold star
with a very similar cluster created on the reverse to coincide with the photos of family from Christmas Eve.
Another photo heavy spread with pocket page cards as fillers with the addition of a couple accessory stickers and a cute ephemera house
All the fun of Christmas Day contained in 1 spread. This is literally all the photos I took on this day minus a few extra blurry ones. I chose to live the moments in person rather than a face behind a phone camera, but I’m happy I took just these few.
Lastly we round out the month with a few crazy faces from New Years Eve. Every year so far this crazy kid has been awake and ‘celebrated’ it well and truly into the new year with us. Last year it was on the couch watching fireworks from around the country on tv with her beloved stuffed animals.. and a few crazy selfies with me. You’re welcome lol
Well friends thats a wrap on my 2019 Christmas Memories album, and my creative shares here with you for 2020. Its been a crazy year for us all, and I cant wait to see what the next year brings.. Lets hope its a little less chaotic than 2020 but a heck of a lot more happy!
Thank you all for your love and support throughout the year.
Hi all Rachel here! I still can’t believe it is only a few days until Christmas. I have to say I am always disappointed by my Christmas Day photos and never end up with any good enough to scrap and hence why I came up with this layout, a creative way to include lots of photos and journalling all nicely put in envelopes on a layout. I have loved working with the new Merry and Bright collection, it is so easy to create with!
Firstly I cut two envelopes, this scallop envelope from the Silhouette Design store.I used Joy To The World and Jingle All The Way papers for my envelopes. I used Countdown paper as my background paper. I placed the envelopes on a slight angle and over lapping one over the other.
I worked on one envelope at a time, with the left one I added a die cut tree and florals from the Die Cut Ephemera pack from the collection. I tucked under the envelope and added on the actual envelope. Of course I had to add a Gold Puffy Star to the top of my tree! I added a phrase sentiment from the Accessory Sticker Sheet.
On the opposite envelope I added more die cuts, phrase sentiment and one of the gorgeous Flairs. Tucking elements under and over in an embellishment cluster adds visual impact and adds layers to your layout.
The 3×4 inch pocket cards can be used various ways, some of the patterned cards I included as photo mats and others for journalling. You can embellish these of course like tiny layouts.
I added 3 of the die cut baubles hanging from the top of my page, adding machine stitching in the place of ribbon, I added them with foam tape to create dimension, finished off with a gold gem stone on the centres (from my stash).
Here I have added some older Christmas photos, in various sizes in each of the envelopes as an example.
I will use this layout to add some of my Christmas 2020 photos and some memory journalling and all before 2021!
Thank you for stopping by and I wish you all a safe and happy Christmas. See you again in 2021.
Hi CVS friends, with Christmas almost upon us and recently receiving the new Merry & Bright collection I just had to make a mini album in preparation of those Christmas photos.
I only made a 6 pages in this album because to be honest most of my Christmas photos are usually less than average, but I can add the best or highlights!
I used a cut file from the Silhouette Design Store. To protect my album cover I cut one in acetate and used an embossing file (stars) to add texture. I added a pop-pom tassel for that little something extra. I love the coloured O rings you can now get, I chose some teal ones to blend in with the colour schemes of Merry & Bright.
I used the 6×8 inch paper pad for this album, another reason I love 6×8 inch paper pads, the smaller prints are perfect for mini albums and mini albums. I used Season Greetings paper wood grain side to create a thin border and Oh Christmas Tree paper over top. I embellished with florals from the die cut ephemera, a phrase sticker from the Accessory Stickers and finished off adding a flair and puffy gold star.
Here I created a pocket and made a tag. I have used Jingle All the Way paper for the tree page and tag. I added the Santa card from the Oh What Fun paper.
So I could add multiple 2×2 inch photos I added a accordion flap to the page adding another paper element from the Oh What Fun paper.
I added two die cut baubles, a puffy star and finished off with a sprinkle gold paint across the page. I used the Oh Christmas Tree Paper as my base paper.
For my last page which I used Star Bright paper, added a frame die cut and created an embellishment cluster. You will notice I added a machine stitched border around each tree page to add texture and definition.
You could obviously add lots more pages or create double sided pages depending on how many photos you want to add, the good thing about mini albums like this you can make them bulky and they still look great.
Hi CVS friends today I am sharing my first layout using the gorgeous new Christmas collection Merry & Bright.
As most of you know I LOVE cut files and what’s better when one is already cut for you with a beautiful water colour mixed media effect! (large die cut and backing kit) All I did before starting my layout is splattering the page with gold paint.
I love the Christmas Krispy Kreme doughnuts and so I have used this photo to Create a fun layout. My photo size is 4×4 inches. Using the 6×8 inch paper pack I used Star Bright and Oh Christmas Tree papers and cut at 4.2 inches. I angled each mat behind the photo but attached the photo straight with foam tape over the right of the tree.
I tucked under my photo the double heart flair buttons and finished off using two die cut tabs from the ephemera pack.
I created a floral cluster on the left side of the tree, using foam tape of some of the florals to add dimension. I tucked a die cut ticket slightly under the larger flower.
Of course I had to add the happy Father Christmas die cut and created a small embellishment cluster in the lower left corner of my layout, again using foam tape on some of the die cut ephemera.
Lastly I added one of the gold puffy hearts to the top of the tree. I had considered adding some machine stitching but to be honest this cut file kit is just perfect the way it is.
Super quick and super easy layout that still looks fabulous!
Thank you for stopping by today and I will see you again soon with an off the page creation all about Christmas.
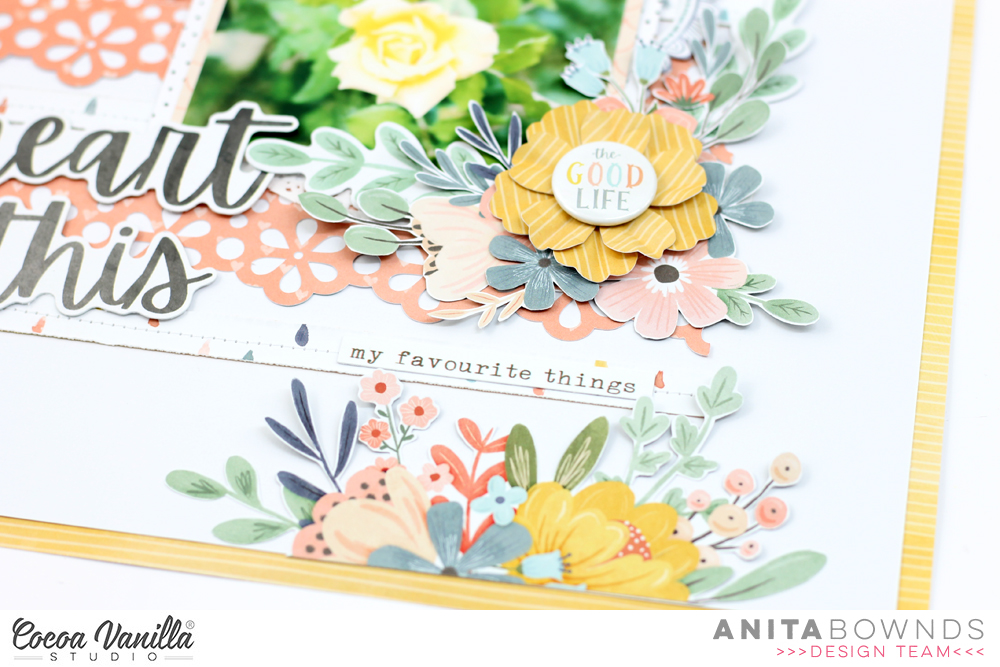
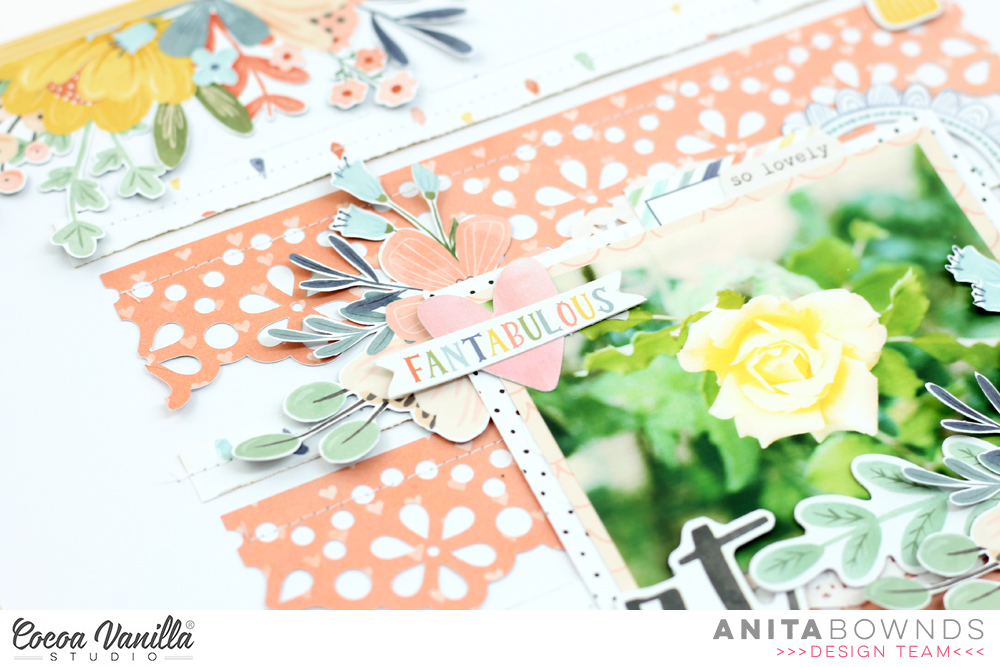
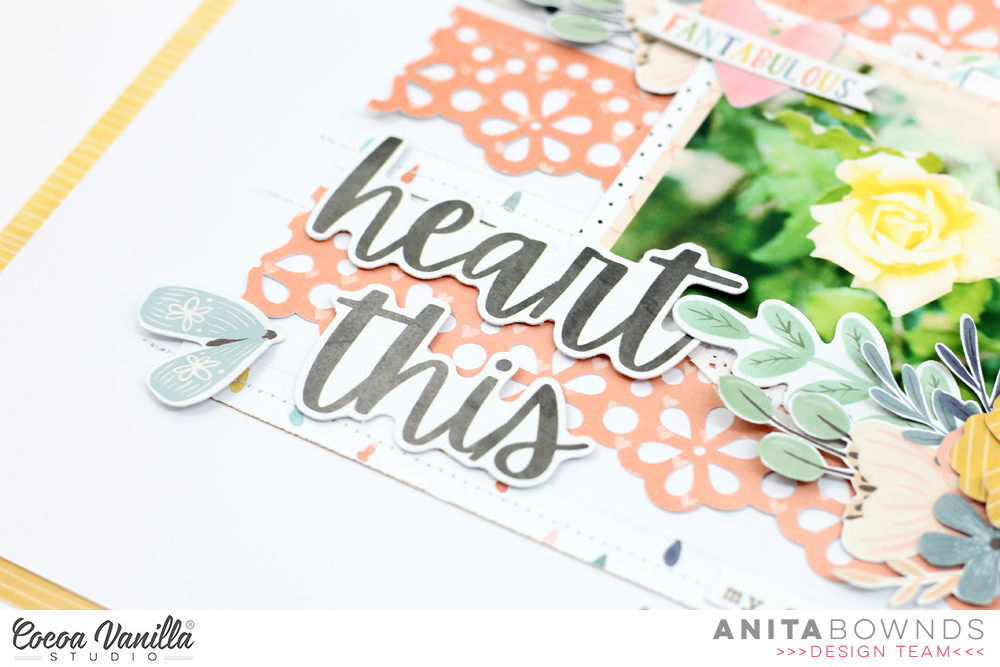
Hi crafty friends Anita here, sharing a layout using the beautiful Day Dream Collection
I really enjoy spring each year all the flowers are in bloom it’s all so pretty and probably my favourite time of year
I started of by trimming 2 sides of my cardstock and then I matted on sun shower pattern paper
Then using my cameo and a cut file from the silhouette store I cut out 3 border strips using all aflutter pattern paper and then I trimmed 4 strips of sun shower and adhered them down underneath each other, then using my sewing machine I added stitching on each of them.
Then I matted my photo on happy place and sweet serenity pattern paper and adhered it just off center of the strips then I started tucking ephemera and accessory stickers under and around my photo. Using pattern paper garden variety I fussy cut out a bunch of flowers and added them to the top and bottom of layout and around my photo
Then I added a flower I had previously made to one corner of my photo with fussy cut flowers around and a flair button. Then to finish off with my title from the cardstock titles and a couple of butterflies from the ephemera then I popped a sticker from the accessory stickers underneath the clusters of flowers..


 I only made a 6 pages in this album because to be honest most of my Christmas photos are usually less than average, but I can add the best or highlights!
 I used a cut file from the Silhouette Design Store. To protect my album cover I cut one in acetate and used an embossing file (stars) to add texture. I added a pop-pom tassel for that little something extra. I love the coloured O rings you can now get, I chose some teal ones to blend in with the colour schemes of Merry & Bright.